| Oracle Database 2日でPHP開発者ガイド 11g リリース2(11.2) B56267-01 |
|
 戻る |
 次へ |
この章では、従業員レコードを挿入、更新および削除できるフォームを使用してAnyco HRアプリケーションを拡張します。
この項では、基本的な「Employees」ページが含まれるようにアプリケーションを拡張します。
従業員レコードを表示するには、次の手順を実行します。
chap5ディレクトリを作成し、chap4からアプリケーション・ファイルをコピーし、新しく作成したディレクトリに移動します。
Windowsの場合:
mkdir c:\program files\Apache Group\Apache2\htdocs\chap5
cd c:\program files\Apache Group\Apache2\htdocs\chap5
copy ..\chap4\* .
Linuxの場合:
mkdir $HOME/public_html/chap5
cd $HOME/public_html/chap5
cp ../chap4/* .
anyco.phpファイルを編集します。construct_employees()関数を追加します。 この関数は、従業員問合せを作成し、db_do_query()関数をコールしてその問合せを実行し、ui_print_employees()関数を使用してその結果を出力します。
function construct_employees()
{
  $query =
  "SELECT employee_id,
    substr(first_name,1,1) || '.  '|| last_name as employee_name,
    hire_date,
    to_char(salary, '9999G999D99') as salary,
    nvl(commission_pct,0) as commission_pct
   FROM   employees
   ORDER BY employee_id asc";

  $conn = db_connect();
  $emp = db_do_query($conn, $query);

  ui_print_header('Employees');
  ui_print_employees($emp);
  ui_print_footer(date('Y-m-d H:i:s'));
}
この問合せではバインド変数を使用しないため、db_do_query()コールに$bindargsパラメータを渡す必要はありません。db_do_query()を宣言すると、デフォルト値(空配列)が自動的に指定されます。PHPでは、関数に様々な数のパラメータを含めることができます。
anyco.phpファイルを編集します。 construct_departments()へのコールをconstruct_employees()へのコールに置き換えます。
<?php // File: anyco.php

require('anyco_cn.inc');
require('anyco_db.inc');
require('anyco_ui.inc');

session_start();
construct_employees();
...
?>
anyco_ui.incファイルを編集します。 ui_print_employees()関数を追加して、HTML表の従業員データの表示を実装します。
function ui_print_employees($employeerecords)
{
  if (!$employeerecords) {
    echo '<p>No Employee found</p>';
  }
  else {
    echo <<<END
  <table>
  <tr>
    <th>Employee<br>ID</th>
    <th>Employee<br>Name</th>
    <th>Hiredate</th>
    <th>Salary</th>
    <th>Commission<br>(%)</th>
  </tr>
END;
    // Write one row per employee
    foreach ($employeerecords as $emp) {
      echo '<tr>';
      echo '<td align="right">'.
            htmlentities($emp['EMPLOYEE_ID']).'</td>';
      echo '<td>'.htmlentities($emp['EMPLOYEE_NAME']).'</td>';
      echo '<td>'.htmlentities($emp['HIRE_DATE']).'</td>';
      echo '<td align="right">'.
            htmlentities($emp['SALARY']).'</td>';
      echo '<td align="right">'.
            htmlentities($emp['COMMISSION_PCT']).'</td>';
      echo '</tr>';
    }
    echo <<<END
  </table>
END;
  }
}
anyco.phpファイルおよびanyco_ui.incファイルへの変更を保存します。 Webブラウザに次のURLを入力して、これらの変更の結果をテストします。
Windowsの場合:
http://localhost/chap5/anyco.php
Linuxの場合:
http://localhost/~<username>/chap5/anyco.php
結果ページを調べ、下へスクロールして、ページに表示されているすべての従業員レコードを参照します。
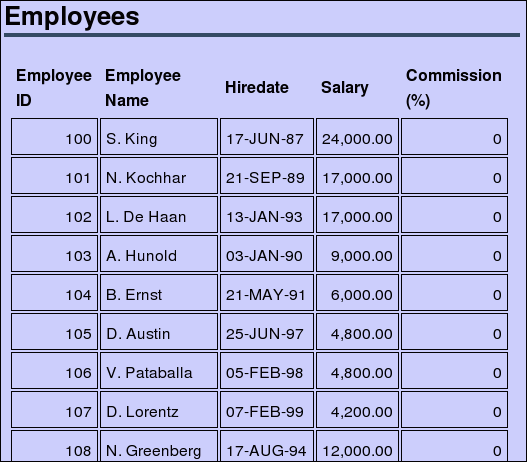
この項では、従業員レコードを操作できるように基本的な「Employees」ページを拡張します。
従業員レコードを操作できるようにするには、次の手順を実行します。
anyco.phpファイルを編集します。 construct_employees()コールを、従業員レコードの表示、挿入、更新および削除のリクエストを管理するフォーム・ハンドラ制御ロジックに置き換えます。
<?php // File: anyco.php

require('anyco_cn.inc');
require('anyco_db.inc');
require('anyco_ui.inc');

session_start();
// Start form handler code
if (isset($_POST['insertemp'])) {
  construct_insert_emp();
}
elseif (isset($_POST['saveinsertemp'])) {
  insert_new_emp();
}
elseif (isset($_POST['modifyemp'])) {
  construct_modify_emp();
}
elseif (isset($_POST['savemodifiedemp'])) {
  modify_emp();
}
elseif (isset($_POST['deleteemp'])) {
  delete_emp();
}
else {
  construct_employees();
}

...
anyco.phpファイルを編集します。 construct_insert_emp()関数を追加します。
function construct_insert_emp()
{
  $conn = db_connect();

  $query = "SELECT job_id, job_title
            FROM jobs
            ORDER BY job_title ASC";
  $jobs = db_do_query($conn, $query,
                      OCI_FETCHSTATEMENT_BY_COLUMN);

  $query = "SELECT sysdate FROM dual";
  $date = db_do_query($conn, $query,
                      OCI_FETCHSTATEMENT_BY_COLUMN);
  $emp = array(
    'DEPARTMENT_ID' => 10,      // Default to department 10
    'HIRE_DATE' => $date['SYSDATE'][0],
    'ALLJOBIDS' => $jobs['JOB_ID'],
    'ALLJOBTITLES' => $jobs['JOB_TITLE']
    );

  ui_print_header('Insert New Employee');
  ui_print_insert_employee($emp, $_SERVER['SCRIPT_NAME']);
  // Note: The two kinds of date used:
  // 1) SYSDATE for current date of the database system, and
  // 2) The PHP date for display in the footer of each page
  ui_print_footer(date('Y-m-d H:i:s'));
}
construct_insert_emp()関数は、2つの問合せを実行して、「Insert New Employee」フォームへの移入に使用するデフォルト・データを取得します。このフォームは、ui_print_insert_employee()関数によって表示されます。
JOBS表の$queryは、既存のすべてのジョブIDおよびその説明のリストを取得して、ui_print_insert_employee()関数によって生成されたHTMLフォームにジョブ・タイプ選択用のリストを作成します。
SYSDATEが使用されている$queryは、新しい従業員のデフォルトの雇用日を設定するために、現在のデータベース日時を取得します。
このアプリケーション・コードでは、2種類の日付が使用されています。PHPのdate()関数は、ページ・フッターに日時を出力します。OracleのSYSDATE関数は、「Employees」ページの雇用日フィールドに表示するデフォルトの日時を取得し、テキストが正しいデータベース形式で入力されるようにします。
2つのdb_do_query()関数コールには、問合せの戻り型が列値の配列になるように指定する追加のパラメータ値OCI_FETCHSTATEMENT_BY_COLUMNが含まれています。
anyco.phpファイルを編集します。 insert_new_emp()関数を追加して、EMPLOYEES表に従業員レコードを挿入します。
function insert_new_emp()
{
  $newemp = $_POST;
  $statement =
    "INSERT INTO employees
        (employee_id, first_name, last_name, email, hire_date,
         job_id, salary, commission_pct, department_id)
     VALUES (employees_seq.nextval, :fnm, :lnm, :eml, :hdt, :jid,
             :sal, :cpt, :did)";

  $conn = db_connect();
  $emailid = $newemp['firstname'].$newemp['lastname'];

  $bindargs = array();
  array_push($bindargs, array('FNM', $newemp['firstname'], -1));
  array_push($bindargs, array('LNM', $newemp['lastname'], -1));
  array_push($bindargs, array('EML', $emailid, -1));
  array_push($bindargs, array('HDT', $newemp['hiredate'], -1));
  array_push($bindargs, array('JID', $newemp['jobid'], -1));
  array_push($bindargs, array('SAL', $newemp['salary'], -1));
  array_push($bindargs, array('CPT', $newemp['commpct'], -1));
  array_push($bindargs, array('DID', $newemp['deptid'], -1));

  $r = db_execute_statement($conn, $statement, $bindargs);
  construct_employees();
}
db_execute_statement()関数の戻り値は無視され、変数にも割り当てられません。関数の結果に対してアクションが実行されないためです。
anyco.phpファイルを編集します。 construct_modify_emp()関数を追加して、従業員レコードを更新するためのHTMLフォームを構築します。
function construct_modify_emp()
{
  $empid = $_POST['emprec'];
  $query =
    "SELECT employee_id, first_name, last_name, email, hire_date,
            salary, nvl(commission_pct,0) as commission_pct
     FROM   employees
     WHERE  employee_id = :empid";

  $conn = db_connect();
  $bindargs = array();
  array_push($bindargs, array('EMPID', $empid, -1));

  $emp = db_do_query($conn, $query, OCI_FETCHSTATEMENT_BY_ROW,
                                      $bindargs);

  ui_print_header('Modify Employee ');
  ui_print_modify_employee($emp[0], $_SERVER['SCRIPT_NAME']);
  ui_print_footer(date('Y-m-d H:i:s'));
}
anyco.phpファイルを編集します。 modify_emp()関数を追加して、更新フォーム・フィールドの値でEMPLOYEES表の従業員レコードを更新します。
function modify_emp()
{
  $newemp = $_POST;
  $statement =
    "UPDATE employees
     SET   first_name = :fnm, last_name = :lnm, email = :eml,
           salary = :sal, commission_pct = :cpt
     WHERE employee_id = :eid";

  $conn = db_connect();
  $bindargs = array();
  array_push($bindargs, array('EID', $newemp['empid'], -1));
  array_push($bindargs, array('FNM', $newemp['firstname'], -1));
  array_push($bindargs, array('LNM', $newemp['lastname'], -1));
  array_push($bindargs, array('EML', $newemp['email'], -1));
  array_push($bindargs, array('SAL', $newemp['salary'], -1));
  array_push($bindargs, array('CPT', $newemp['commpct'], -1));

  $r = db_execute_statement($conn, $statement, $bindargs);
  construct_employees();
}
anyco.phpファイルを編集します。 delete_emp()関数を追加して、EMPLOYEES表から従業員レコードを削除します。
function delete_emp()
{
  $empid = $_POST['emprec'];
  $statement = "DELETE FROM employees
                WHERE employee_id = :empid";
    $conn = db_connect();
  $bindargs = array();
  array_push($bindargs, array('EMPID', $empid, 10));
  $r = db_execute_statement($conn, $statement, $bindargs);

  construct_employees();
}
anyco.phpファイルを編集します。 construct_employees()関数で、db_do_query()コールの最後のパラメータとしてOCI_FETCHSTATEMENT_BY_ROWを指定し、ui_print_employees()コールの2つ目のパラメータとして$_SERVER['SCRIPT_NAME']を指定します。ファイルは、次のようになります。
function construct_employees()
{
  $query =
  "SELECT employee_id,
    substr(first_name,1,1) || '.  '|| last_name as employee_name,
    hire_date,
    to_char(salary, '9999G999D99') as salary,
    nvl(commission_pct,0) as commission_pct
   FROM   employees
   ORDER BY employee_id asc";

  $conn = db_connect();
  $emp = db_do_query($conn, $query, OCI_FETCHSTATEMENT_BY_ROW);

  ui_print_header('Employees');
  ui_print_employees($emp, $_SERVER['SCRIPT_NAME']);
  ui_print_footer(date('Y-m-d H:i:s'));
}
anyco_db.incファイルを編集します。db_do_query()関数に3つ目のパラメータとして$resulttypeを追加します。コール元が出力タイプを選択できるように、oci_fetch_all()コールの最後のパラメータ値OCI_FETCHSTATEMENT_BY_ROWを変数に置き換えます。
function db_do_query($conn, $statement, $resulttype,
                     $bindvars = array())
{
  $stid = oci_parse($conn, $statement);

  ...

  $r = oci_fetch_all($stid, $results, null, null, $resulttype);
  return($results);
}
anyco_db.incファイルを編集します。 db_get_page_data()関数内で、db_do_query()コールの3つ目のパラメータ値としてOCI_FETCHSTATEMENT_BY_ROWを挿入します。
function db_get_page_data($conn, $q1, $current = 1,
                          $rowsperpage = 1, $bindvars = array())
{

  ...

  $r = db_do_query($conn, $query, OCI_FETCHSTATEMENT_BY_ROW, $bindvars);
  return($r);
}
anyco_db.incファイルを編集します。 db_execute_statement()関数を追加して、INSERT文などデータ操作文を実行します。
function db_execute_statement($conn, $statement, $bindvars = array())
{
  $stid = oci_parse($conn, $statement);
  if (!$stid) {
    db_error($conn, __FILE__, __LINE__);
  }
    // Bind parameters
  foreach ($bindvars as $b) {
    // create local variable with caller specified bind value
    $$b[0] = $b[1];
    $r = oci_bind_by_name($stid, ":$b[0]", $$b[0], $b[2]);
    if (!$r) {
      db_error($stid, __FILE__, __LINE__);
    }
  }

  $r = oci_execute($stid);
  if (!$r) {
    db_error($stid, __FILE__, __LINE__);
  }
  return($r);
}
anyco_ui.incファイルを編集します。従業員行を含むHTMLフォームが生成されるように、ui_print_employees()関数を変更します。ファイルは、次のようになります。
function ui_print_employees($employeerecords, $posturl) { if (!$employeerecords) { echo '<p>No Employee found</p>'; } else { echo <<<END <form method="post" action="$posturl"> <table> <tr> <th> </th> <th>Employee<br>ID</th> <th>Employee<br>Name</th> <th>Hiredate</th> <th>Salary</th> <th>Commission<br>(%)</th> </tr> END; // Write one row per employee foreach ($employeerecords as $emp) { echo '<tr>'; echo '<td><input type="radio" name="emprec" value="'. htmlentities($emp['EMPLOYEE_ID']).'"></td>'; echo '<td align="right">'. htmlentities($emp['EMPLOYEE_ID']).'</td>'; echo '<td>'.htmlentities($emp['EMPLOYEE_NAME']).'</td>'; echo '<td>'.htmlentities($emp['HIRE_DATE']).'</td>'; echo '<td align="right">'. htmlentities($emp['SALARY']).'</td>'; echo '<td align="right">'. htmlentities($emp['COMMISSION_PCT']).'</td>'; echo '</tr>'; } echo <<<END </table> <input type="submit" value="Modify" name="modifyemp"> <input type="submit" value="Delete" name="deleteemp"> <input type="submit" value="Insert new employee" name="insertemp"> </form> END; } }
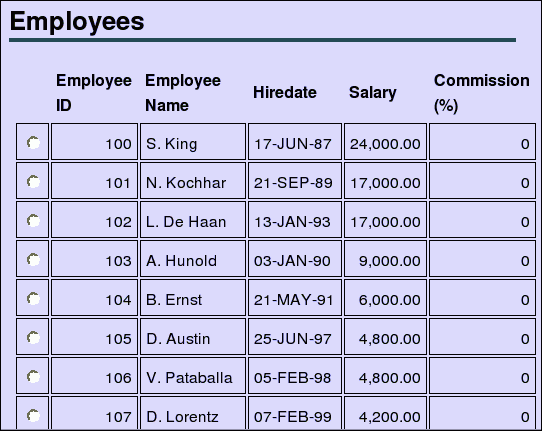
変更または削除するレコードを選択できるように、各行の最初の列にラジオ・ボタンが表示されています。
anyco_ui.incファイルを編集します。 ui_print_insert_employee()関数を追加して、新しい従業員データを入力するためのフォームを生成します。
function ui_print_insert_employee($emp, $posturl)
{
  if (!$emp) {
    echo "<p>No employee details found</p>";
  }
  else {
    $deptid = htmlentities($emp['DEPARTMENT_ID']);
    $hiredate = htmlentities($emp['HIRE_DATE']);

    echo <<<END
  <form method="post" action="$posturl">
  <table>
    <tr>
      <td>Department ID</td>
      <td><input type="text" name="deptid" value="$deptid"
                 size="20"></td>
    </tr>
    <tr>
      <td>First Name</td>
      <td><input type="text" name="firstname" size="20"></td>
    </tr>
    <tr>
      <td>Last Name</td>
      <td><input type="text" name="lastname" size="20"></td>
    </tr>
    <tr>
      <td>Hiredate</td>
      <td><input type="text" name="hiredate" value="$hiredate"
                 size="20"></td>
    </tr>
    <tr>
      <td>Job</td>
       <td><select name="jobid">
END;
    // Write the list of jobs
    for ($i = 0; $i < count($emp['ALLJOBIDS']); $i++)
    {
      echo '<option
             label="'.htmlentities($emp['ALLJOBTITLES'][$i]).'"'.
           ' value="'.htmlentities($emp['ALLJOBIDS'][$i]).'">'.
           htmlentities($emp['ALLJOBTITLES'][$i]).'</option>';
    }
    echo <<<END
      </select>
      </td>
    </tr>
    <tr>
      <td>Salary</td>
      <td><input type="text" name="salary" value="1"
                 size="20"></td>
    </tr>
    <tr>
      <td>Commission (%)</td>
      <td><input type="text" name="commpct" value="0"
                 size="20"></td>
    </tr>
  </table>
    <input type="submit" value="Save" name="saveinsertemp">
    <input type="submit" value="Cancel" name="cancel">
  </form>
END;
  }
}
anyco_ui.incファイルを編集します。 ui_print_modify_employee()関数を追加して、従業員レコードを更新するためのフォームを生成します。
function ui_print_modify_employee($empdetails, $posturl)
{
  if (!$empdetails) {
    echo '<p>No Employee record selected</p>';
  }
  else {
    $fnm = htmlentities($empdetails['FIRST_NAME']);
    $lnm = htmlentities($empdetails['LAST_NAME']);
    $eml = htmlentities($empdetails['EMAIL']);
    $sal = htmlentities($empdetails['SALARY']);
    $cpt = htmlentities($empdetails['COMMISSION_PCT']);
    $eid = htmlentities($empdetails['EMPLOYEE_ID']);

    echo <<<END
  <form method="post" action="$posturl">
  <table>
    <tr>
      <td>Employee ID</td>
      <td>$eid</td></tr>
    <tr>
      <td>First Name</td>
      <td><input type="text" name="firstname" value="$fnm"></td>
    </tr>
    <tr>
      <td>Last Name</td>
      <td><input type="text" name="lastname" value="$lnm"></td>
    </tr>
    <tr>
      <td>Email Address</td>
      <td><input type="text" name="email" value="$eml"></td>
    </tr>
    <tr>
      <td>Salary</td>
      <td><input type="text" name="salary" value="$sal"></td>
    </tr>
    <tr>
      <td>Commission (%)</td>
      <td><input type="text" name="commpct" value="$cpt"></td>
    </tr>
  </table>
  <input type="hidden" value="{$empdetails['EMPLOYEE_ID']}"
         name="empid">
  <input type="submit" value="Save" name="savemodifiedemp">
  <input type="submit" value="Cancel" name="cancel">
  </form>
END;
  }
}
Anycoアプリケーション・ファイルへの変更を保存し、Webブラウザに次のURLを入力して、変更をテストします。
Windowsの場合:
http://localhost/chap5/anyco.php
Linuxの場合:
http://localhost/~<username>/chap5/anyco.php
各行にラジオ・ボタンが付いたすべての従業員のリストが表示されます。
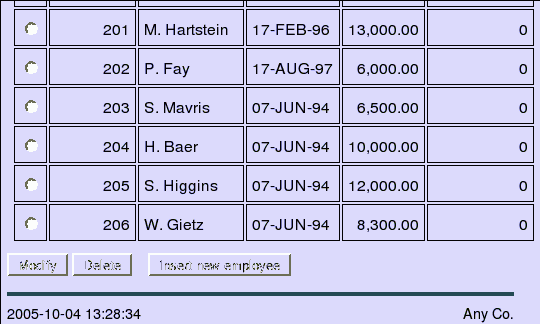
「Employees」ページの下部にスクロールして、「Modify」、「Delete」、「Insert new employee」の各ボタンを表示します。
新しい従業員レコードを挿入するには、「Insert new employee」をクリックします。

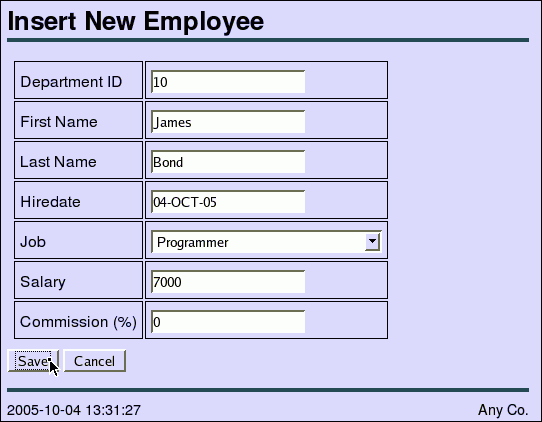
従業員レコードを作成または変更する場合は、データベース定義に従って、給与を0(ゼロ)より大きい値にし、コミッションを1より小さい値にする必要があります。コミッションは、小数点以下2桁に丸められます。 「Insert New Employee」ページでは、「Department ID」フィールドは10(デフォルト)、「Hiredate」は現在の日付(デフォルトのデータベース日付書式)、「Salary」は1、「Commission (%)」は0(ゼロ)になっています。次のフィールド値を入力します。
First Name: James
Last Name: Bond
Job: リストから「Programmer」を選択します。
Salary: 1を7000に置き換えます。
「Save」をクリックします。
新しい従業員レコードが正常に挿入されると、Webページがリフレッシュされ、フォームにすべての従業員が表示されます。 Webページを最後のレコードまでスクロールし、新しい従業員レコードが存在していることを確認します。システムの新しいレコードに割り当てられている従業員IDは、次の例に示す従業員IDとは異なる場合があります。

新しい従業員レコードを変更するには、そのレコードの横にあるラジオ・ボタンを選択し、「Modify」をクリックします。

「Modify Employee」ページで、「Email Address」フィールドをJBONDに変更し、「Salary」を7100に増やし、「Save」をクリックします。
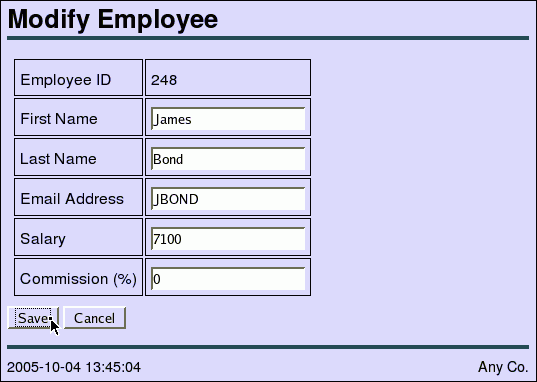
従業員レコードが正常に更新されると、「Employees」ページが再表示されます。最後の従業員レコードまでスクロールし、James Bondの給与が7,100になっていることを確認します。

新しい従業員レコードを削除するには、そのレコードの横にあるラジオ・ボタンを選択し、「Delete」をクリックします。

削除が正常に完了すると、削除した行は「Employees」ページに再表示された従業員レコードのリストに表示されません。

この項では、「Employees」と「Departments」の両方のページにアクセスできるようにアプリケーションを変更します。
「Departments」ページと「Employees」ページを結合するには、次の手順を実行します。
anyco.phpファイルを編集します。 construct_employees()関数の問合せに、department_idを:didというバインド変数の値と比較するWHERE句を含めます。これによって、一度に1つの部門の従業員がページに表示されます。 deptidセッション・パラメータ値を取得してバインド変数に移入します。
$query =
 "SELECT employee_id,
         substr(first_name,1,1) || '.  '|| last_name as employee_name,
         hire_date,
         to_char(salary, '9999G999D99') as salary,
         nvl(commission_pct,0) as commission_pct
  FROM   employees
  WHERE  department_id = :did
  ORDER BY employee_id asc";

$deptid = $_SESSION['deptid'];
anyco.phpファイルを編集します。construct_employees()関数で、バインド情報が渡されるようにdb_do_query()関数のコールを更新します。
$conn = db_connect();

$bindargs = array();
array_push($bindargs, array('DID', $deptid, -1));

$emp = db_do_query($conn, $query, OCI_FETCHSTATEMENT_BY_ROW, $bindargs);
anyco.phpファイルを編集します。construct_departments()関数で、部門IDをセッション・パラメータに保存します。
$_SESSION['currentdept'] = $current;
$_SESSION['deptid'] = $deptid;
「Departments」ページの現行の部門IDがセッション・パラメータとして保存され、「Employees」ページで使用されます。
anyco.phpファイルを編集します。 「Departments」ページおよび「Employees」ページのタイトルに出力する部門名を問い合せる関数get_dept_name()を作成します。
function get_dept_name($conn, $deptid)
{
  $query =
    'SELECT department_name
     FROM   departments
     WHERE  department_id = :did';

  $conn = db_connect();
  $bindargs = array();
  array_push($bindargs, array('DID', $deptid, -1));
  $dn = db_do_query($conn, $query,OCI_FETCHSTATEMENT_BY_COLUMN, $bindargs);

  return($dn['DEPARTMENT_NAME'][0]);
}
anyco.phpファイルを編集します。「Employees」ページのヘッダーに部門名が出力されるようにconstruct_employees()関数を変更します。
$deptname = get_dept_name($conn, $deptid);
ui_print_header('Employees: '.$deptname);
anyco.phpファイルを編集します。「Departments」ページのヘッダーに部門名が出力されるようにconstruct_departments()関数を変更します。
$deptname = get_dept_name($conn, $deptid);
ui_print_header('Department: '.$deptname);
anyco.phpファイルを編集します。ui_print_insert_employee()関数の$emp配列に渡されたセッション・パラメータからデフォルトの部門が取得されるように、construct_insert_emp()関数を変更します。ファイルは、次のようになります。
function construct_insert_emp()
{
  $deptid = $_SESSION['deptid'];

  $conn = db_connect();
  $query = "SELECT job_id, job_title FROM jobs ORDER BY job_title ASC";
  $jobs = db_do_query($conn, $query, OCI_FETCHSTATEMENT_BY_COLUMN);
  $query = "SELECT sysdate FROM dual";
  $date = db_do_query($conn, $query, OCI_FETCHSTATEMENT_BY_COLUMN);
  $emp = array(
    'DEPARTMENT_ID' => $deptid,
    'HIRE_DATE' => $date['SYSDATE'][0],
    'ALLJOBIDS' => $jobs['JOB_ID'],
    'ALLJOBTITLES' => $jobs['JOB_TITLE']
    );
  ui_print_header('Insert New Employee');
  ui_print_insert_employee($emp, $_SERVER['SCRIPT_NAME']);
  ui_print_footer(date('Y-m-d H:i:s'));
}
anyco.phpファイルを編集します。HTMLフォーム・ハンドラの最後のelse文を変更します。ハンドラは、次のようになります。
// Start form handler code
if (isset($_POST['insertemp'])) {
  construct_insert_emp();
}
elseif (isset($_POST['saveinsertemp'])) {
  insert_new_emp();
}
elseif (isset($_POST['modifyemp'])) {
  construct_modify_emp();
}
elseif (isset($_POST['savemodifiedemp'])) {
  modify_emp();
}
elseif (isset($_POST['deleteemp'])) {
  delete_emp();
}
elseif (   isset($_POST['showemp'])) {
  construct_employees();
}
elseif (   isset($_POST['nextdept'])
        || isset($_POST['prevdept'])
        || isset($_POST['firstdept'])
        || isset($_POST['showdept'])) {
  construct_departments();
}
else {
  construct_departments();
}
anyco_ui.incファイルを編集します。ui_print_department()関数で、「Employees」ページをコールできるようにHTMLフォームを変更します。
... <form method="post" action="$posturl"> <input type="submit" value="First" name="firstdept"> <input type="submit" value="< Previous" name="prevdept"> <input type="submit" value="Next >" name="nextdept"> <input type="submit" value="Show Employees" name="showemp"> </form> ...
anyco_ui.incファイルを編集します。ui_print_employees()関数で、「Departments」ページをコールできるようにHTMLフォームを変更します。
... </table> <input type="submit" value="Modify" name="modifyemp"> <input type="submit" value="Delete" name="deleteemp"> <input type="submit" value="Insert new employee" name="insertemp"> <input type="submit" value="Return to Departments" name="showdept"> </form> ...
PHPファイルへの変更を保存します。 ブラウザで、次のURLを入力して、変更をテストします。
Windowsの場合:
http://localhost/chap5/anyco.php
Linuxの場合:
http://localhost/~<username>/chap5/anyco.php
「Departments」ページが表示されます。
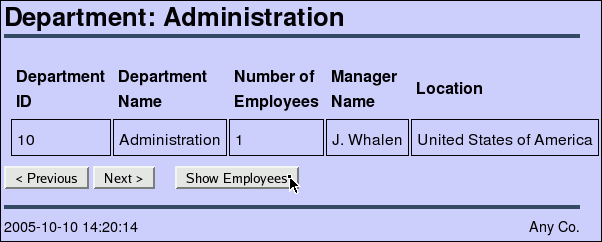
部門の従業員のリストを表示するには、「Show Employees」ボタンをクリックします。
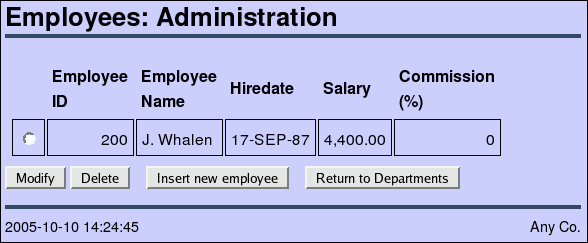
「Return to Departments」ボタンをクリックすると、「Departments」ページに戻ることができます。別の部門にナビゲートし、その従業員を表示して、「Departments」ページと「Employees」ページを切り替えるプロセスを確認します。
エラー管理は、常に設計上の重要な決定事項です。本番システムでは、エラーを分類し、様々な方法で処理する必要がある場合があります。致命的エラーは、標準の「site not available」ページまたはホームページにリダイレクトできます。 新しいレコードの作成で発生したデータ・エラーは、無効なフィールドがハイライト表示された該当するフォームに戻すことができます。
ほとんどの本番システムでは、php.iniファイルのdisplay_errors構成オプションをoffに、log_errors構成オプションをonに設定します。
PHP出力バッファリング機能を使用して、関数の実行中にエラー・テキストをトラップできます。ob_start()を使用すると、エラー・テキストが画面に表示されないようにすることができます。エラーが発生した場合は、ob_get_contents()関数を使用して、以前に生成されたエラー・メッセージを後で表示または分析するために文字列に格納できます。
ここで、カスタム・エラー処理関数を使用して新しいページにエラー・メッセージおよびデータベース・エラーを表示するようにアプリケーションを変更します。これによって、エラーがdb*関数から戻され、暗黙的に保持されます。
anyco_db.incファイルを編集します。出力して終了するのではなく、エラー情報を配列構造に戻すようにdb_error()関数を変更します。ファイルは、次のようになります。
function db_error($r = false, $file, $line)
{
  $err =  $r ? oci_error($r) : oci_error();

  if (isset($err['message'])) {
    $m = htmlentities($err['message']);
    $c = $err['code'];
  }
  else {
    $m = 'Unknown DB error';
    $c = null;
  }

  $rc = array(
    'MESSAGE' => $m,
    'CODE'    => $c,
    'FILE'    => $file,
    'LINE'    => $line
    );
  return $rc;
}
anyco_db.incファイルを編集します。 db_error()関数のすべてのコールに対して、$eという変数に戻り値を割り当て、各コールの後にreturn false;文を追加します。
if (<error test>)
{
  $e = db_error(<handle>, __FILE__, __LINE__);
  return false;
}
<error test>パラメータおよび<handle>パラメータは、各コールに現在指定されているものと同じにしてください。__FILE__定数および__LINE__定数を使用すると、開発時に障害の場所を特定するのに役立ちます。この情報は、アプリケーションの本番デプロイメントで致命的エラーが発生した場合に備えてログに記録しておくと有効な情報です。
anyco_db.incファイルを編集します。すべての関数に$eパラメータを追加して、エラー情報を戻すことができるようにします。 &参照接頭辞を使用して、結果がコール元関数に戻されるようにします。 各関数の宣言は、次のようになります。
function db_connect(&$e) {...}

function db_get_page_data($conn, $q1, $currrownum = 1, $rowsperpage = 1,
                          &$e, $bindvars = array()) {...}

function db_do_query($conn, $statement, $resulttype, &$e,
                     $bindvars = array()) {...}

function db_execute_statement($conn, $statement, &$e,
                              $bindvars = array()) {...}
anyco_db.incファイルを編集します。 db_get_page_data()関数で、エラー・パラメータ$eが渡されるようにdb_do_query()関数へのコールを変更します。
$r = db_do_query($conn, $query, OCI_FETCHSTATEMENT_BY_ROW, $e, $bindvars);
anyco_db.incファイルを編集します。すべてのoci_*関数コールに@接頭辞を追加します。次に例を示します。
@ $r = @oci_execute($stid);
@接頭辞を使用すると、戻された結果がそれぞれテストされるため、エラーが表示されなくなります。エラーが表示されないと、誤ったパラメータの使用が隠されてしまう可能性があるため、この項で行った変更をテストできない場合があります。@接頭辞は追加する必要はありませんが、追加すると、エラーが表示された場合の今後の結果に影響を及ぼす可能性があります。
anyco.phpファイルを編集します。 エラー情報を処理する関数を作成します。
function handle_error($message, $err)
{
  ui_print_header($message);
  ui_print_error($err, $_SERVER['SCRIPT_NAME']);
  ui_print_footer(date('Y-m-d H:i:s'));
}
anyco.phpファイルを編集します。追加のエラー・パラメータが含まれるように、db_*関数へのすべてのコールを変更します。
手順8〜15で新しい関数を完成させるため、この手順で行うコード変更はスキップできます。
すべてのdb_connect()コールをdb_connect($err)に変更します。
すべてのdb_do_query()コールを変更し、4つ目のパラメータとして$errパラメータを挿入します。たとえば、construct_employees()のコールは次のようになります。
$emp = db_do_query($conn, $query,
                   OCI_FETCHSTATEMENT_BY_ROW, $err, $bindargs);
コールごとに既存のパラメータ値が保持されるように、anyco.phpの他の4つのdb_do_query()コールを変更します。
すべてのdb_get_page_data()コールを変更し、5つ目のパラメータとして$errパラメータを挿入します。
$dept = db_get_page_data($conn, $query, $current, 1, $err);
すべてのdb_execute_statement()コールを変更し、3つ目のパラメータとして$errパラメータを挿入します。次に例を示します。
$r = db_execute_statement($conn, $statement, $err, $bindargs);
anyco.phpファイルを編集します。戻されたエラーが処理されるようにconstruct_departments()関数を変更します。ファイルは、次のようになります。
function construct_departments()
{
  if (isset($_SESSION['currentdept']) && isset($_POST['prevdept']) &&
            $_SESSION['currentdept'] > 1)
     $current = $_SESSION['currentdept'] - 1;
  elseif (isset($_SESSION['currentdept']) && isset($_POST['nextdept']))
     $current = $_SESSION['currentdept'] + 1;
  elseif (isset($_POST['showdept']) && isset($_SESSION['currentdept']))
     $current = $_SESSION['currentdept'];
  else
     $current = 1;

  $query =
    "SELECT d.department_id, d.department_name,
            substr(e.first_name,1,1)||'. '|| e.last_name as manager_name,
            c.country_name, count(e2.employee_id) as number_of_employees
     FROM   departments d, employees e, locations l,
            countries c, employees e2
     WHERE  d.manager_id    = e.employee_id
     AND    d.location_id   = l.location_id
     AND    d.department_id = e2.department_id
     AND    l.country_id    = c.country_id
     GROUP BY d.department_id, d.department_name,
              substr(e.first_name,1,1)||'. '||e.last_name, c.country_name
     ORDER BY d.department_id ASC";

  $conn = db_connect($err);

  if (!$conn) {
    handle_error('Connection Error', $err);
  }
  else {
    $dept = db_get_page_data($conn, $query, $current, 1, $err);
    if ($dept === false) {
      // Use === so empty array at end of fetch is not matched
      handle_error('Cannot fetch Departments', $err);
    } else {

      if (!isset($dept[0]['DEPARTMENT_ID']) && $current > 1) {
        // no more records so go back one

        $current--;
        $dept = db_get_page_data($conn, $query, $current, 1, $err);
      }

      $deptid = $dept[0]['DEPARTMENT_ID'];

      $_SESSION['deptid'] = $deptid;
      $_SESSION['currentdept'] = $current;

      $deptname = get_dept_name($conn, $deptid);
      ui_print_header('Department: '.$deptname);
      ui_print_department($dept[0], $_SERVER['SCRIPT_NAME']);
      ui_print_footer(date('Y-m-d H:i:s'));
    }
  }
}
anyco.phpファイルを編集します。エラーが処理されるようにconstruct_employees()関数を変更します。ファイルは、次のようになります。
function construct_employees()
{
  $query =
    "SELECT employee_id,
            substr(first_name,1,1) || '.  '|| last_name as employee_name,
            hire_date,
            to_char(salary, '9999G999D99') as salary,
            nvl(commission_pct,0) as commission_pct
     FROM   employees
     WHERE  department_id = :did
     ORDER BY employee_id asc";

  $deptid = $_SESSION['deptid'];

  $conn = db_connect($err);

  if (!$conn) {
    handle_error('Connection Error', $err);
  }
  else {
    $bindargs = array();
    array_push($bindargs, array('DID', $deptid, -1));
    $emp = db_do_query($conn, $query, OCI_FETCHSTATEMENT_BY_ROW, $err,
    $bindargs);

    if (!$emp) {
      handle_error('Cannot fetch Employees', $err);
    }
    else {
      $deptname = get_dept_name($conn, $deptid);
      ui_print_header('Employees: '.$deptname);
      ui_print_employees($emp, $_SERVER['SCRIPT_NAME']);
      ui_print_footer(date('Y-m-d H:i:s'));
    }
  }
}
anyco.phpファイルを編集します。エラーが処理されるようにconstruct_insert_emp()関数を変更します。ファイルは、次のようになります。
function construct_insert_emp()
{
  $deptid = $_SESSION['deptid'];
  $conn = db_connect($err);
  if (!$conn) {
    handle_error('Connection Error', $err);
  }
  else {
    $query = "SELECT job_id, job_title FROM jobs ORDER BY job_title ASC";
    $jobs = db_do_query($conn, $query, OCI_FETCHSTATEMENT_BY_COLUMN, $err);
    $query = "SELECT sysdate FROM dual";
    $date = db_do_query($conn, $query, OCI_FETCHSTATEMENT_BY_COLUMN, $err);

    $emp = array(
      'DEPARTMENT_ID' => $deptid,
      'HIRE_DATE' => $date['SYSDATE'][0],
      'ALLJOBIDS' => $jobs['JOB_ID'],
      'ALLJOBTITLES' => $jobs['JOB_TITLE']
      );

    ui_print_header('Insert New Employee');
    ui_print_insert_employee($emp, $_SERVER['SCRIPT_NAME']);
    ui_print_footer(date('Y-m-d H:i:s'));
  }
}
anyco.phpファイルを編集します。エラーが処理されるようにinsert_new_emp()関数を変更します。ファイルは、次のようになります。
function insert_new_emp()
{
  $statement =
    'INSERT INTO employees
                 (employee_id, first_name, last_name, email, hire_date,
                 job_id, salary, commission_pct, department_id)
     VALUES (employees_seq.nextval, :fnm, :lnm, :eml, :hdt,
            :jid, :sal, :cpt, :did)';

  $newemp = $_POST;

  $conn = db_connect($err);
  if (!$conn) {
    handle_error('Connect Error', $err);
  }
  else {
    $emailid = $newemp['firstname'].$newemp['lastname'];

    $bindargs = array();
    array_push($bindargs, array('FNM', $newemp['firstname'], -1));
    array_push($bindargs, array('LNM', $newemp['lastname'], -1));
    array_push($bindargs, array('EML', $emailid, -1));
    array_push($bindargs, array('HDT', $newemp['hiredate'], -1));
    array_push($bindargs, array('JID', $newemp['jobid'], -1));
    array_push($bindargs, array('SAL', $newemp['salary'], -1));
    array_push($bindargs, array('CPT', $newemp['commpct'], -1));
    array_push($bindargs, array('DID', $newemp['deptid'], -1));

    $r = db_execute_statement($conn, $statement, $err, $bindargs);
    if ($r) {
      construct_employees();
    }
    else {
      handle_error('Cannot insert employee', $err);
    }
  }
}
anyco.php関数を編集します。エラーが処理されるようにconstruct_modify_emp()関数を変更します。ファイルは、次のようになります。
function construct_modify_emp()
{
  if (!isset($_POST['emprec'])) { // User did not select a record
    construct_employees();
  }
  else {
    $empid = $_POST['emprec'];

    $query =
      "SELECT employee_id, first_name, last_name, email, hire_date,
              salary, nvl(commission_pct,0) as commission_pct
       FROM   employees
       WHERE  employee_id = :empid";

    $conn = db_connect($err);
    if (!$conn) {
      handle_error('Connect Error', $err);
    }
    else {
      $bindargs = array();
      array_push($bindargs, array('EMPID', $empid, -1));

      $emp = db_do_query($conn, $query, OCI_FETCHSTATEMENT_BY_ROW, $err,
             $bindargs);

      if (!$emp) {
        handle_error('Cannot find details for employee '.$empid, $err);
      }
      else {
        ui_print_header('Modify Employee ');
        ui_print_modify_employee($emp[0], $_SERVER['SCRIPT_NAME']);
        ui_print_footer(date('Y-m-d H:i:s'));
      }
    }
  }
}
anyco.phpファイルを編集します。エラーが処理されるようにmodify_emp()関数を変更します。ファイルは、次のようになります。
function modify_emp()
{
  $newemp = $_POST;

  $statement =
    "UPDATE employees
     SET    first_name = :fnm, last_name = :lnm, email = :eml,
            salary = :sal, commission_pct = :cpt
     WHERE  employee_id = :eid";

  $conn = db_connect($err);
  if (!$conn) {
    handle_error('Connect Error', $err);
  }
  else {
    $bindargs = array();
    array_push($bindargs, array('EID', $newemp['empid'], -1));
    array_push($bindargs, array('FNM', $newemp['firstname'], -1));
    array_push($bindargs, array('LNM', $newemp['lastname'], -1));
    array_push($bindargs, array('EML', $newemp['email'], -1));
    array_push($bindargs, array('SAL', $newemp['salary'], -1));
    array_push($bindargs, array('CPT', $newemp['commpct'], -1));

    $r = db_execute_statement($conn, $statement, $err, $bindargs);

    if (!$r) {
      handle_error('Cannot update employee '.$newemp['empid'], $err);
    }
    else {
      construct_employees();
    }
  }
}
anyco.phpファイルを編集します。エラーが処理されるようにdelete_emp()関数を変更します。ファイルは、次のようになります。
function delete_emp()
{
  if (!isset($_POST['emprec'])) { // User did not select a record
    construct_employees();
  }
  else {
    $empid = $_POST['emprec'];

    $conn = db_connect($err);
    if (!$conn) {
      handle_error('Connection Error', $err);
    }
    else {
      $statement = "DELETE FROM employees WHERE employee_id = :empid";
      $bindargs = array();
      array_push($bindargs, array('EMPID', $empid, -1));
      $r = db_execute_statement($conn, $statement, $err, $bindargs);

      if (!$r) {
        handle_error("Error deleting employee $empid", $err);
      }
      else {
        construct_employees();
      }
    }
  }
}
anyco.phpファイルを編集します。エラーが処理されるようにget_dept_name()関数を変更します。ファイルは、次のようになります。
function get_dept_name($conn, $deptid)
{
  $query =
    'SELECT department_name
     FROM   departments
     WHERE  department_id = :did';

  $conn = db_connect($err);
  if (!$conn) {
    return ('Unknown');
  }
  else {
    $bindargs = array();
    array_push($bindargs, array('DID', $deptid, -1));
    $dn = db_do_query($conn, $query, OCI_FETCHSTATEMENT_BY_COLUMN,
                      $err, $bindargs);
    if ($dn == false)
      return ('Unknown');
    else
      return($dn['DEPARTMENT_NAME'][0]);
  }
}
anyco_ui.incファイルを編集します。 新しい関数ui_print_error()を追加します。
function ui_print_error($message, $posturl)
{
  if (!$message) {
    echo '<p>Unknown error</p>';
  }
  else {
    echo "<p>Error at line {$message['LINE']} of "
         ."{$message['FILE']}</p>";  // Uncomment for debugging
    echo "<p>{$message['MESSAGE']}</p>";
  }
  echo <<<END
  <form method="post" action="$posturl">
  <input type="submit" value="Return to Departments" name="showdept">
END;
}
END;行の先頭には空白を配置しないでください。END;行の先頭に空白を配置すると、残りのドキュメントが出力対象テキストの一部として処理されます。
アプリケーション・ファイルへの変更を保存します。 ブラウザに次のURLを入力して、変更をテストします。
Windowsの場合:
http://localhost/chap5/anyco.php
Linuxの場合:
http://localhost/~<username>/chap5/anyco.php
「Departments」ページが表示されます。
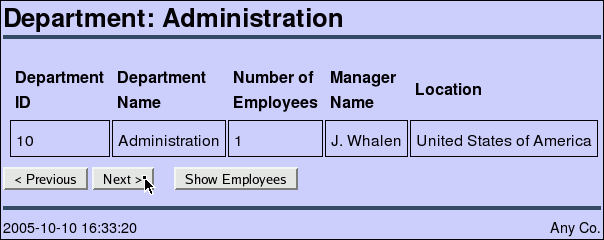
「Next」をクリックして、最後の部門レコード(IDが110の「Accounting」部門)にナビゲートします。「Next」をクリックして、最後の部門レコードを越えてナビゲートしてみます。
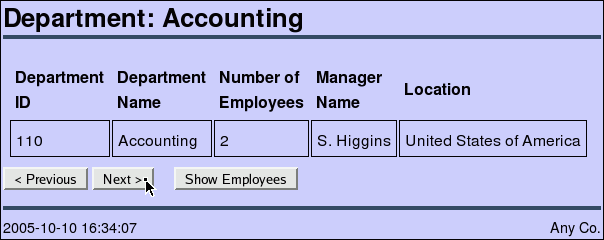
エラー処理によって、最後の部門レコードを越えてナビゲートすることはできません。
給与0(ゼロ)の新しい従業員を挿入した場合、または部門IDを存在しないIDに変更した場合は、「Cannot insert employee」というヘッダーの新しいエラー・ページが表示されます。
特定のOracleエラーを個々に処理できます。 たとえば、「Employees」ページで「Insert new employee」ボタンをクリックして新しい従業員レコードを作成し、部門IDを存在しない部門に変更した場合は、このエラーをトラップし、よりわかりやすいメッセージを表示できます。
anyco.phpファイルを編集します。 insert_new_emp()関数のエラー処理を変更します。
    $r = db_execute_statement($conn, $statement, $err, $bindargs);
    if ($r) {
      construct_employees();
    }
    else {
      if ($err['CODE'] == 2291) {  // Foreign key violated
        handle_error("Department {$newemp['deptid']} does not yet exist",
        $err);
      }
      else {
        handle_error('Cannot insert employee', $err);
      }
    }
アプリケーション・ファイルへの変更を保存します。 次のURLを入力して、変更をテストします。
Windowsの場合:
http://localhost/chap5/anyco.php
Linuxの場合:
http://localhost/~<username>/chap5/anyco.php
「Departments」ページで、「Show Employees」をクリックします。
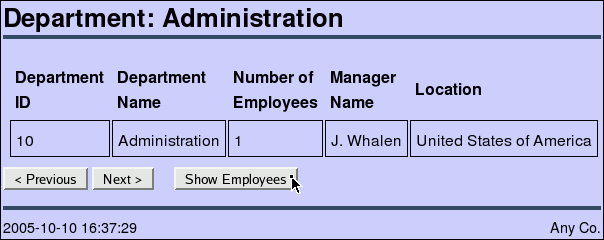
「Employees」ページで、「Insert new employee」をクリックします。
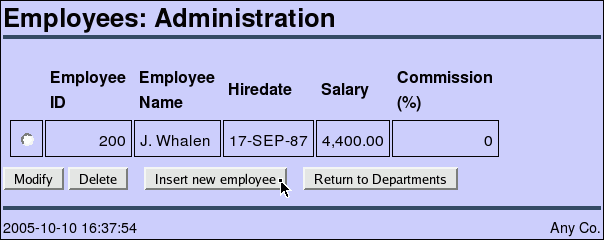
「Insert New Employee」ページで、次に示すように従業員詳細を入力し、「Department ID」を99に設定して、「Save」をクリックします。
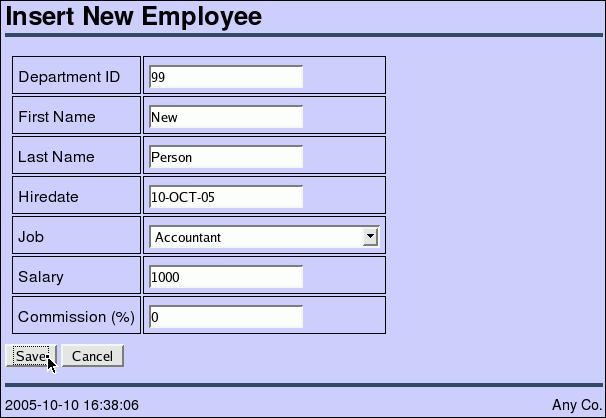
次のエラー・ページが表示されます。
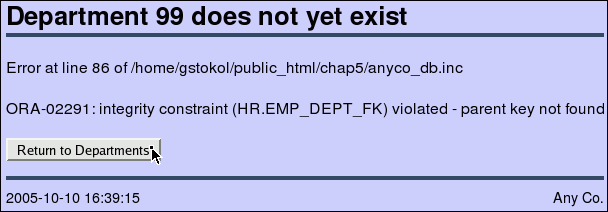
「Return to Departments」をクリックして「Departments」ページに戻り、「Show Employees」をクリックして新しい従業員レコードが「Administration」部門に追加されていないことを確認できます。