2 Setting Up Benefits Administration
This chapter contains the following topics:
2.1 Understanding Benefits Administration Setup
Before you can use the Benefits Administration feature of Human Resources, you must define the information that the system uses when it processes benefits administration functions.
When you set up the benefits administration information, you define all the benefit plans that the company uses. Benefit plans include medical coverage and retirement plans. Before you can enroll employees in benefit plans, you must set up benefit plan information.
When you set up a benefit plan, you include the associated deductions, benefits, and accruals (DBAs), and define:
-
Effective dates.
-
Provider or trustee.
-
Payroll deduction and benefit information.
-
Eligibility tables.
In some cases, the coverage for a plan can vary from employee to employee. For example, in a medical plan, employees might be allowed to choose between individual coverage (employee only) and family coverage (employee plus family). For these plans, you can either set up separate plans for each variation or create a single plan and set up plan options for each variation.
To simplify the process of enrolling employees in benefit plans, you can set up group information, which includes benefit groups and benefit categories. For example, you could set up a benefit group for all management personnel. Your organization might have several benefit categories that apply to the management group, such as medical, dental, and life insurance. You can also link the benefit categories to the benefit groups. After you set up the benefit plans, groups, and categories, you can link the benefit plans and options to the benefit categories.
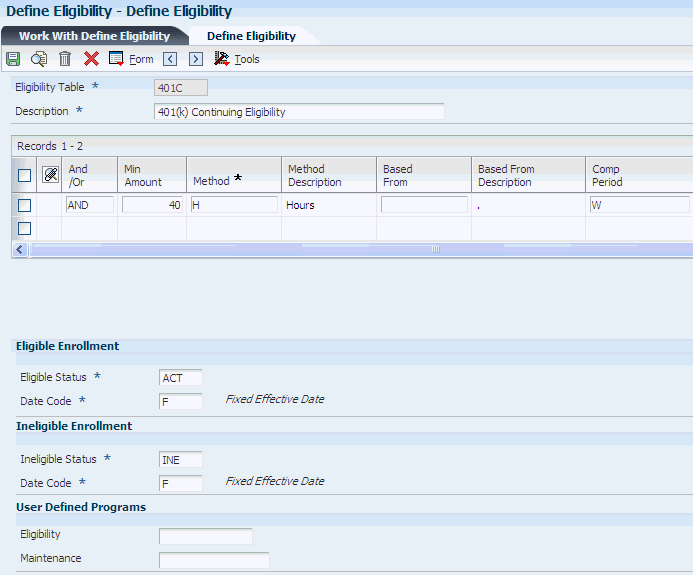
Employees' eligibility for benefit plans might depend on various factors, such as length of service or age. After you set up a benefit plan, you must set up tables that define the eligibility rules for the benefit plan. Typically, eligibility rules are based on criteria such as:
-
Age
-
Length of service
-
Number of hours worked
When you enroll an employee in a benefit plan, the system uses eligibility rules to verify that the employee meets the criteria required to participate in the plan. You can also use eligibility rules to verify that employees continue to meet the criteria after they are enrolled in a plan.
If you have set up any eligibility tables that are based on hours worked (method H), you must set up pay type tables. The system uses pay type tables to calculate the number of hours that an employee worked, and that number determines the employee's eligibility.
To define the dates on which employees can be enrolled in a benefit plan after they have passed or failed the eligibility tests, you set up date codes. You can set up date codes:
-
By a specified day of the month.
-
By amount of time after a specified date.
-
By a specified enrollment date.
When you set up the enrollment parameters, you define which action the system uses to determine eligibility when you enroll employees using the enrollment with eligibility feature.
This graphic illustrates the relationship between benefit groups, categories, plans, and plan options:
Figure 2-1 Relationship between benefit groups, categories, plans, and plan options
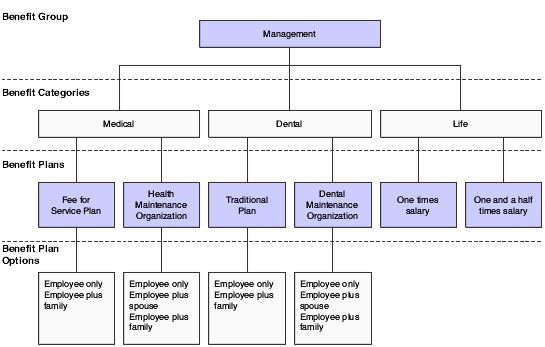
Description of "Figure 2-1 Relationship between benefit groups, categories, plans, and plan options"
The system stores the information that you set up in various tables as indicated:
-
Categories within Benefit Groups (F08350).
-
Generic Message/Rates (F00191).
-
General Message Detail (F00192).
-
-
Plans within Benefit Categories (F08351).
-
Generic Message/Rates (F00191).
-
General Message Detail (F00192).
-
Benefits Plan Master (F08320).
-
Plan Additional Options (F083202).
-
2.2 Understanding UDCs for Benefits
The UDCs described here are specific to the Benefits Administration feature of Human Resources.
2.2.1 Data Items Based From (UDC 08/D1)
You use these codes to specify the date from which eligibility is calculated. For example, to have an employee be eligible for a benefit plan 30 days after the employee begins employment, you use code DST, which refers to the data item for the Date Started field.
2.2.2 Data Items for Dates to Follow (UDC 08/D2)
You use these codes to specify the date for the system to use in conjunction with either the Date of Month field or the End of Month field on the Define Date Codes form to enroll the employee in a benefit plan after he or she has passed eligibility testing. An asterisk (*) indicates the date on which the employee either passes or fails eligibility.
2.2.3 Dependent/Beneficiary Relationship (UDC 08/RL)
You use these codes to define the relationship of the dependent or beneficiary to the employee. Examples of these codes are spouse, parent, child, or other relationship.
Use the Special Handling field in this code to limit a relationship to:
D: Dependent only.
B: Beneficiary only.
A: Both a dependent and a beneficiary.
For example, using the special handling code, you can specify that a spouse relationship qualifies as both a dependent and a beneficiary, but that a friend relationship qualifies a friend as a beneficiary only.
2.2.4 Dependent/Beneficiary Type (UDC 08/DB)
You use dependent/beneficiary type codes in conjunction with dependent/beneficiary relationship codes to further define the relationship of the dependent or beneficiary to the employee. For example, when determining beneficiaries for life insurance, you might designate a primary beneficiary to collect the benefit. You might also designate a secondary beneficiary to collect the life insurance benefit in the event that the primary beneficiary is no longer living. Examples of dependent/beneficiary type codes are Primary and Secondary.
2.2.5 Employee Benefit Status (UDC 06/EA)
You use these codes to indicate an employee's status when you test for benefit eligibility. An * (asterisk) indicates that the guidelines refer to all employee actions that are not otherwise specified. Do not change the codes that are hard-coded, such as A (active) and X (terminated). These are required codes in the system.
2.2.6 Enrollment Status (UDC 08/ES)
You use enrollment status codes to indicate the status of an employee's enrollment in a plan. When you set up enrollment status codes, you must observe these restrictions for the definitions:
-
All codes that indicate active participation in a plan must begin with the letter A.
-
All codes that indicate an ending status that does not result in a new enrollment (such as a termination) must have the letter X in the first position of Description 2 field on the User-Defined Codes form.
-
A code that begins with the letter X, when used as an ending status, represents a mistaken enrollment; no employee deduction, benefit, accrual (DBA) instructions are written.
-
An asterisk (*) indicates all statuses not otherwise specified.
2.2.7 Event Codes (UDC 08/BE)
You use event codes to indicate events for which employees can change their benefit information using benefits self service. Examples of event codes include marriage, birth of a child, new hire, and open enrollment.
2.2.8 ACA Eligibility Status (08/SE) (Release 9.1 Update)
You use ACA Eligibility Status codes to indicate an employee's eligibility, under Affordable Care Act provisions, to be considered a full-time employee and therefore eligible for an offer of health coverage.
The Special Handling column contains a numeric value that is designated as the equivalent of the UDC code value. If you use the Define Eligibility program (P08390) and you want to base eligibility on the ACA Eligibility Status, you need to enter the Special Handling value in the Min Amount or Status field.
The Special Handling column of the eligibility status code contains an equivalent numeric value for the code that is used when defining eligibility criteria in the Define Eligibility program (P08390).
You use the special handling values with the Method AE (ACA Eligibility) when you specify the value in the Min Amount or Status field.
2.2.9 Pay Type Table (UDC 08/TT)
You use pay type table codes to define groups of pay types. These pay type tables identify which pay types are used for calculating particular benefit eligibility information. For example, if employees must work 160 hours before they are eligible for medical benefits, you must define which pay types count toward the 160 hours. To exclude vacation, leave, and sick time when calculating the employees' accumulated hours for the purposes of testing eligibility, you do not include vacation, leave, and sick time pay types in the pay type table that is associated with the eligibility table for the medical plan.
2.2.10 Plan Status (UDC 08/ST)
You use plan status codes to define the current state of a benefit plan. For example, you can use A to define the plan as active or N to define the plan as inactive. This code is used for informational purposes only and does not affect any system calculations or processes.
2.3 Setting Up Common Settings for Benefits Enrollment
This section provides an overview of common settings for benefits enrollment and discusses how to set up common settings for benefits enrollment.
2.3.1 Understanding Common Settings for Benefits Enrollment
Setting up the common settings for benefits enrollment enables you to specify whether to link dependents and beneficiaries to benefit plans and whether to require date of birth and tax ID when adding a new dependent or beneficiary.
The following table describes the common settings for data items that appear on the Work With HRM Common Display Settings (Work With Human Resource Management common display settings) form. On the System Control - Revisions form, you can specify the current setting for each of these data items for enrolling dependents and beneficiaries in benefit plans.
| Common Setting | Usage |
|---|---|
| Associate Beneficiaries to Plans? | This common setting indicates whether to associate beneficiaries with benefit plans. To require that beneficiaries be associated with a plan when you enroll beneficiaries in benefit plans, set this to Yes. |
| Associate Dependents To Benefit Plans? | This common setting indicates whether to associate dependents with benefit plans. To require that dependents be associated with a plan when you enroll dependents in benefit plans, set this to Yes. |
| Date of Birth Required for Dep/Ben?
(Date of Birth Required for Dependent/Beneficiary?) |
This common setting indicates whether date of birth is required for dependents and beneficiaries. To require that you enter the date of birth when you add a new dependent or beneficiary, set this to Yes. |
| Tax ID Required for Dep/Ben? | This common setting indicates whether tax ID is required for dependents and beneficiaries. To require that you enter the tax ID when you add a new dependent or beneficiary, set this to Yes. |
2.3.2 Forms Used to Set Up Common Settings for Benefits Enrollment
| Form Name | FormID | Navigation | Usage |
|---|---|---|---|
| Work With HRM Common Display Settings | W05004A | Self Service Setup (G05BESS4), Common Settings for EE Self Service Appl.
Compensation Mgmt System Setup (G08CM14), HRM Common Settings |
Access System Control - Revisions form. |
| System Control - Revisions | W05004B | On the Work With HRM Common Display Settings form, select the record that contains the data item for which you want to change the setting, and then click Select. | Set up common settings for benefits enrollment.
Note: You cannot delete these data items from the system. |
2.3.3 Setting Up Common Settings for Benefits Enrollment
Access the System Control - Revisions form.
Figure 2-2 System Control - Revisions form
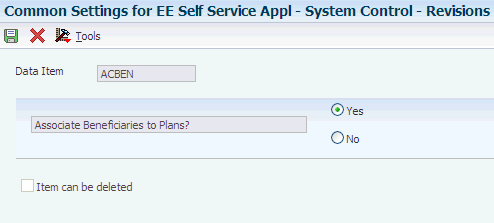
Description of "Figure 2-2 System Control - Revisions form"
To set up common settings for benefits enrollment:
-
Select Yes or No to specify the current setting, and then click OK.
-
To add another data item, on the Work With HRM Common Display Settings form, click Add.
-
On the System Control - Revisions form, complete the Data Item field.
-
Select Yes or No, and then click OK.
-
If you need to delete a data item that you have added, on the Work With HRM Common Display Settings form, select the data item and click Delete.
You cannot delete system-supplied data items.
2.4 Setting Up Benefit Group Information
This section provides an overview of benefit group information and discusses how to:
-
Set processing options for the Benefit Group Descriptions program (P00191).
-
Set up benefit groups.
-
Set processing options for the Group Category Descriptions program (P00191).
-
Set up benefit categories.
-
Link categories to benefit groups.
2.4.1 Understanding Benefit Group Information
A benefit group identifies a set of benefits available to a particular group of employees. For example, you might have a benefit group for executives, another for salaried employees, and another for hourly employees.
Within each benefit group are benefit categories. Benefit categories identify a type of benefit that is available to the members of the benefit group to which the benefit category belongs. For example, you can have a medical category that contains a variety of medical plans from which an individual in the Executive group can elect coverage. You can have another medical category for the Salaried group that offers different medical plans.
2.4.1.1 Setting Up Benefit Groups
To save time and reduce data entry errors when you assign benefit plans to employees, you can set up benefit groups and benefit categories. You set up benefit groups to assign the same benefit plans to a group of employees, such as executives, hourly employees, or part-time employees. A benefit group identifies the type of employee who is eligible for a particular set of benefits that you define.
2.4.1.2 Setting Up Benefit Categories
After you set up a benefit group, you can create benefit categories to organize the plans within the group. Benefit categories group types of benefit plans. For example, an organization might offer two medical plans, a traditional-style plan and a health maintenance organization (HMO). You can define a benefit category called medical and link those two medical plans to that category.
Use benefit categories to associate the different categories of benefits that the company offers to a benefit group. Examples of benefit categories include medical, dental, life, and disability insurance, as well as flexible spending accounts.
When you set up a benefit group or benefit category, the system stores the information in the Generic Message/Rates table (F00191). Any additional or detail information that you include is stored in the General Message Detail table (F00192).
2.4.1.3 Linking Categories to Benefit Groups
After you set up benefit groups and benefit categories, you can link categories to each benefit group. For example, you can link the benefit categories for medical, dental, and life insurance to the management benefit group. When you link a category to a benefit group, all of the employees in that group are eligible for all of the benefit plans in that category.
When you link categories to groups, you can also indicate:
-
The availability of flex plans for the benefit group.
-
The sequence in which the benefit categories appear on the enrollment form.
-
The election criteria for a benefit category.
-
The benefit category type for special flex plans.
-
The benefit category classification.
-
An employee option to print a form for declining benefit coverage.
-
Requirements for employees to stay within the current benefit group options or within a current group of benefit plans.
If a benefit group has flex plans, you must set up a benefit category for employee flex deductions (category type 2). This benefit category controls deduction of a negative flex balance from employee pay. If the employer awards members of the benefit group a lump sum of flex credits, you must set up a benefit category for those lump sum credits (category type 1).
2.4.2 Forms Used to Set Up Benefit Group Information
| Form Name | FormID | Navigation | Usage |
|---|---|---|---|
| Work With Generic Message/Rate Types | W00191A | Benefits Administration Setup (G08BB4), Benefit Group Descriptions
Benefits Administration Setup (G08BB4), Group Category Descriptions |
Access the Enter Generic Message/Rates form. |
| Enter Generic Message/Rates | W00191D | On the Work With Generic Message/Rate Types form, click Add. | Set up benefit groups.
Set up benefit categories. |
| Categories By Benefit Group | W08350B | Benefits Administration Setup (G08BB4), Categories by Benefit Group
On the Work With Benefit Groups form, complete the Benefit Group field and then click Find. Select the benefit group record and then click Select. |
Link categories to benefit groups. |
2.4.3 Setting Processing Options for the Benefit Group Descriptions Program (P00191)
Processing options enable you to specify the default processing for programs and reports.
2.4.3.1 Defaults
- 1. System Code
-
Specify the UDC 98/SY that identifies a system.
- 2. Record Type
-
Specify the record type of the UDC table where you set up the benefit group descriptions.
2.4.3.2 Display
- 1. Text Type
-
Specify the type of text to display. Values are:
1: Display rate text
2: Display message text
- 2. Text Column Display
-
Specify the limit on the text column display. Values are:
1: 60 column display
2: 80 column display
2.4.4 Setting Up Benefit Groups
Access the Enter Generic Message/Rates form.
Figure 2-3 Enter Generic Message/Rates form
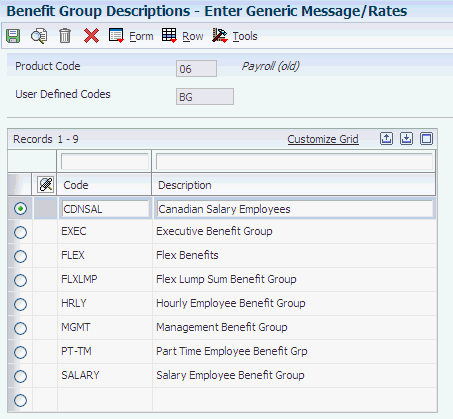
Description of "Figure 2-3 Enter Generic Message/Rates form"
To set up benefit groups:
-
Complete the Code and Description fields in a blank row.
-
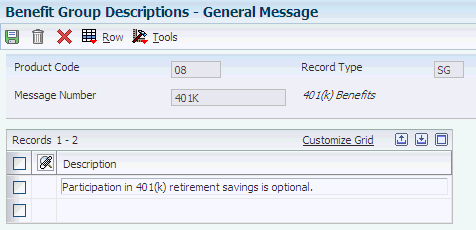
Select the record that you just created, and then select General Message from the Row menu.
-
On the General Message form, enter the benefit group description that you want to appear on the Enter Generic Message/Rates form and on the employee's enrollment form.
-
Click OK to return to the Enter Generic Message/Rates form.
-
Repeat the preceding steps for each benefit group that you need to set up.
After you finish setting up the benefit groups, complete the steps for setting up benefit categories.
2.4.5 Setting Processing Options for the Group Category Descriptions Program (P00191)
Processing options enable you to specify the default processing for programs and reports.
2.4.5.1 Defaults
- 1. System Code
-
Specify the UDC 98/SY that identifies a system.
- 2. Record Type
-
Specify the record type of the UDC table where you set up the group category descriptions.
2.4.5.2 Display
- Text Type
-
Specify the type of text to display. Values are:
1: Display rate text
2: Display message text
- Text Column Display
-
Specify the limit on the text column display. Values are:
1: 60 column display
2: 80 column display
2.4.6 Setting Up Benefit Categories
Access the General Message form.
To set up benefit categories:
-
Complete the Code and Description fields in a blank row.
-
Select the record that you just created, and then select General Message from the Row menu.
-
On the General Message form, enter the benefit category description that you want to appear on the Enter Generic Message/Rates form and on the employee's enrollment form.
-
Click OK to return to the Enter Generic Message/Rates form.
-
Repeat the preceding steps for each benefit category that you need to set up.
After you finish setting up the benefit categories, complete the steps for linking categories to benefit groups.
2.4.7 Linking Categories to Benefit Groups
Access the Categories By Benefit Group form.
Figure 2-5 Categories By Benefit Group form
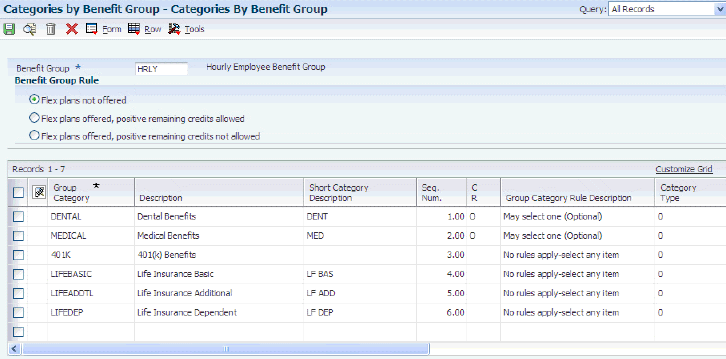
Description of "Figure 2-5 Categories By Benefit Group form"
To link categories to benefit groups:
-
Select one of the options in the Benefit Group Rule group box to indicate whether the benefit group offers flex plans, and if so, how it treats positive remaining credits.
-
Flex plans not offered.
-
Flex plans offered, positive remaining credits allowed.
-
Flex plans offered, positive remaining credits not allowed.
-
-
Complete these fields and click OK:
-
Group Category
-
Seq. Num. (sequence number)
-
C R (category rule)
-
Category Type
-
- Flex plans not offered
-
Select this option to indicate that flex plans are not offered.
- Flex plans offered, positive remaining credits allowed
-
Select this option to indicate that flex plans are offered and the system tracks flex credits that remain after an employee has enrolled in benefit plans.
- Flex plans offered, positive remaining credits not allowed
-
Select this option to indicate that flex plans are offered and the system does not track flex credits that remain after an employee has enrolled in benefit plans.
- C R (category rule)
-
Enter a code for a rule that defines the election criteria for a benefit category. Options are:
Blank: No rule applies. The enrollee can select any items.
O: Optional. The enrollee can select one.
R: Required. The enrollee must select one.
- Category Type
-
Enter a code that identifies categories for DBAs that use special flex calculation plans, such as lump sum employer flex credits and employee flex deductions when remaining flex credits are negative.
2.5 Setting Up Benefit Plans
This section provides an overview of benefit plan setup, lists prerequisites, and discusses how to:
-
Set processing options for the Plan Master program (P08320).
-
Add a new benefit plan.
-
Copy an existing benefit plan.
2.5.1 Understanding Benefit Plan Setup
Before you can enroll employees in benefits, you must set up every benefit plan that the company offers. To deduct benefit payments from employees' pay, you must also assign the DBAs that integrate the benefit plan with the JD Edwards EnterpriseOne Payroll system. The system stores benefit plan information in the Benefits Plan Master table (F08320).
For some benefits, coverage can vary from employee to employee. For example, employees might have the option to purchase medical insurance for their dependents, as well as for themselves. Typically, the cost of insuring dependents is greater than the cost of insuring only the employee. In this case, you can:
-
Set up separate medical plans called Employee Only, Employee Plus One, and Employee Plus Family and link each of these plans to the medical category.
-
Set up a single medical plan, such as MED-HMO, that has options called Employee Only, Employee Plus One, and Employee Plus Family.
When you link MED-HMO to the medical category, the system also links the options.
You can use either of these methods to administer benefit plans. This table lists the main features of each method:
| Administration Method | Features |
|---|---|
| Separate plans |
|
| Single plan with options | Enables you to add or remove options (instead of having to end an entire plan and create a new one. |
When you set up a benefit plan, you assign one or more DBAs to the plan. You can assign a deduction-type DBA to automatically withhold the cost (or a portion of the cost) of a benefit plan from an employee's pay. You can use a benefit-type DBA to track the cost (or portion of the cost) that the company incurs when it provides a particular benefit plan.
|
Important: The system uses a hierarchy method within the categories by benefit group and plan master when calculating the DBAs associated with benefit plans. If a DBA within a plan is based on another DBA in another plan, the plan and category names must be considered. You need to make sure within the benefit group setup the category and plan names are put in alphabetical order. The system will then calculate the DBAs from top to bottom on the Calc/Eligibility tab. For example, if DBA 1001 is based on DBA 1000, DBA 1000 must be in a category and plan that comes alphanumerically before the category and plan that DBA 1001 is in, so they will process in alphanumeric order. |
If you are providing flex benefit plans, you use an employee flex cost DBA to represent the value of the flex credits that an employee must use to enroll in the plan. Use an employer flex-credits DBA to award employees with flex credits for selecting a particular plan. You also use the flex DBAs to calculate remaining credits when an employee enrolls in flex plans. When an employee has negative remaining credits, you use an employee flex deduction DBA to subtract the overspent amount from the employee's pay.
After you set up a benefit plan, you might need to periodically update the amounts or rates that are associated with the DBAs and options for the plan. For example, when a benefit carrier raises its rates, you typically need to increase the employee- and employer-paid deductions for the plan. When you need to update DBAs or plan options, you can access the forms that you need from the master record for the plan or plan options.
After you attach an employee record to a plan, you cannot delete the plan. Even when employees are not active, their records remain attached to the plan. Also, you cannot change the dependent or beneficiary status of a plan if dependents or beneficiaries are enrolled in the plan or if the plan has options with a conflicting dependent or beneficiary type.
2.5.1.1 Adding a New Benefit Plan
Before you can enroll employees in a benefit plan, you must set up the plan. You add a new benefit plan when you need to set up a unique plan or when you are setting up a plan for the first time. When you set up a plan, you must define this information:
-
Effective dates
-
Provider or trustee
-
Enrollment rules
-
Eligibility tables
2.5.1.2 Copying an Existing Benefit Plan
You can copy an existing benefit plan when you need to set up a plan that is similar to a plan that you have already set up. For example, suppose that you have a dental plan already set up that has an effective date of January 1 and an ending date of December 31 of the current year. The dental plan that the organization offers for the following year might be basically the same as this current plan, with only a few minor changes. To save time and reduce data entry errors when you set up the dental plan for the following year, you can copy the current dental plan and then enter only the appropriate changes.
2.5.2 Prerequisites
Before you complete the tasks in this section, you must:
-
Set up the pay types, deductions, benefits, and accruals (PDBAs) that you assign to the plan.
-
Set up the provider or trustee for the plan in the JD Edwards EnterpriseOne Address Book system.
-
Set up eligibility tables associated with the plan. (Optional)
2.5.3 Forms Used to Set Up Benefit Plans
| Form Name | FormID | Navigation | Usage |
|---|---|---|---|
| Plan Master | W08320A | Benefits Administration Setup (G08BB4), Plan Master
On the Work With Plan Master form, click Add. |
Add a new benefit plan. |
| Plan Master Rates Window | W083203A | On the Plan Master form, select Plan Rates from the Form menu.
On the PDBA Detail form, select the PDBA record for which you want to enter a rate, and then click Select. |
Enter a date-sensitive override amount or rate for the employee contribution. |
| Work With Plan Master | W08320B | Benefits Administration Setup (G08BB4), Plan Master
On the Work With Plan Master form, find and select the plan that you want to copy and click Copy. |
Copy an existing benefit plan. |
2.5.4 Setting Processing Options for the Plan Master Program (P08320)
Processing options enable you to specify the default processing for programs and reports.
2.5.4.1 Display
This processing option specifies whether particular fields appear on the Plan Master form.
- 1. EE Flex Cost PDBA and the ER Flex Credits PDBA fields (employee flexible cost and the employer flexible credits pay type, deduction, benefits, accrual fields)
-
Specify whether to display the Employee Flex Costs field and the Employer Flex Credits DBAs field. Values are:
0: Do not display these fields.
1: Display these fields.
2.5.5 Adding a New Benefit Plan
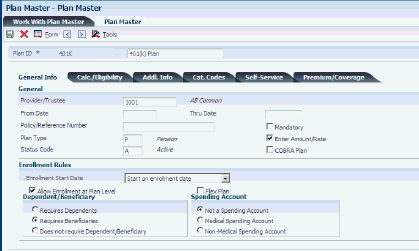
Access the Plan Master form.
To add a new benefit plan:
-
Complete the Plan ID field.
-
In the unlabeled field to the right of the Plan ID field, enter the name of the plan.
-
On the General Info tab, complete the Provider/Trustee field.
-
Complete these optional fields or accept the default values:
-
From Date
-
Thru Date
-
Policy/Reference Number
-
Plan Type
-
Status Code
Note:
You need to assign the same benefit plan type to every plan within a benefit category. For example, all medical plans should be assigned to the medical plan type.
-
-
Select any of these options, if necessary:
-
Mandatory
-
Enter Amount/Rate
-
COBRA Plan (Consolidated Omnibus Budget Reconciliation Act)
-
-
In the Enrollment Rules group box, select an option for the enrollment start date.
-
Select one or both of these options:
-
Allow Enrollment at Plan Level
-
Flex Plan
-
-
Select one of these options in the Dependent/Beneficiary group box:
-
Requires Dependent
-
Requires Beneficiary
-
Does Not Require Dependent/Beneficiary
The Dependent/Beneficiary options define whether a plan is designated as a dependent plan or a beneficiary plan.
-
-
Select one of these options in the Spending Account group box:
-
Not a Spending Account
-
Medical Spending Account
-
Non-Medical Spending Account
You use the Spending Account options to associate the account with medical or other types of expenses.
-
-
Select the Calc./Eligibility (Calculation/Eligibility) tab and complete any of these DBA fields:
-
EE Payroll Deduction (Employee Payroll Deduction)
-
ER Paid Benefit (Employer Paid Benefit)
-
EE Flex Cost (Employee Flex Cost)
-
ER Flex Credits (Employer Flex Credits)
If the plan is a flex plan, complete either the EE Flex Cost field or the EE Flex Credits field.
-
-
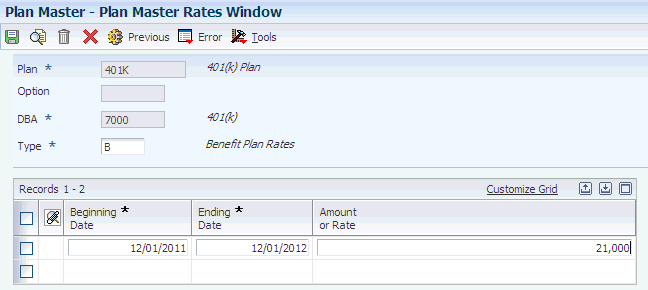
To enter a date-sensitive override amount or rate for the employee contribution, select Plan Rates from the Form menu.
-
On the PDBA Detail form, select the PDBA record for which you want to enter a rate, and then click Select.
Note:
The plan rate or amount that you enter on this form is a date-sensitive override to the rate that exists in the DBA field. You must complete the DBA field before you enter override amounts or rates. You cannot enter an amount or rate for a DBA field that is blank.Entering new rates does not change existing benefit plan information for employees. To recalculate the new premium costs, the employee must enroll in the plan again, or a human resources administrator must process batch enrollment.
-
On the Plan Master Rates Window form, complete any of these override fields, click OK, and then click Cancel.
-
Type
-
Beginning Date
-
Ending Date
-
Amount or Rate
-
-
On the Calc./Eligibility tab of the Plan Master form, complete these fields:
-
Init Elig Table (Initial Eligibility table)
-
Cont Elig Table (Continuing Eligibility table)
-
-
Complete the optional Prerequisite Plan field.
-
To enter information about the plan, select the Addl. Info (additional information) tab, and then enter the information.
-
To track additional data, select the Cat. Codes (category codes) tab and complete the relevant information.
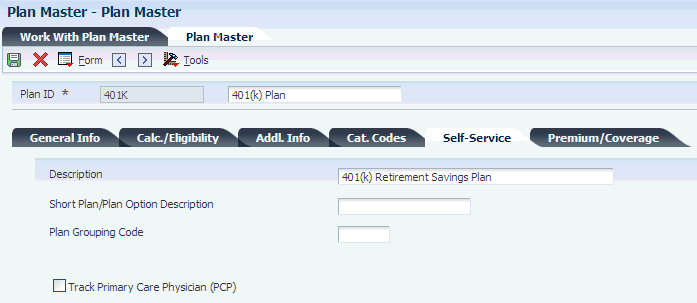
-
If you use Self Service Benefits, select the Self Service tab and complete the Description field.
If you do not enter a description, the plan description appears on self service forms. This description field enables you to enter a longer representation of the benefit plan.
-
Complete the Short Plan/Plan Option Description field.
This description field provides only a short description that is used when benefit plans appear as column titles on self service forms.
-
Complete the Plan Grouping Code field.
We recommend that you use the Plan Master Options program (P083202) instead of the plan grouping code.
You can use plan grouping to associate benefit plans if you do not use benefit plan options. For example, if you create separate benefit plans for employee only, employee plus 1, employee plus family, and employee opt out, you can set up a plan grouping code in UDC 08/PG. You can then assign the plan grouping code to each plan master record.
We recommend that you set up a nonparticipating plan for each benefit category so that employees can elect this plan to select no coverage.
-
To track the primary care physician number, select the Track Primary Care Physician (PCP) option to activate it.
-
If the purpose of the benefit plan is to indicate that an employee is declining coverage, select the Non-Participating Plan Flag option.
The system displays this option only if the plan is set up as a nonparticipating plan.
Note:
We recommend that you set up a nonparticipating benefit plan for every benefit category.If the benefit plan is a dependent plan, the system displays a field at the bottom of the form where you can enter the number of dependents who can enroll in the plan.
-
If the plan is a dependent plan, specify the number of people to be covered (including the employee) by completing the Maximum Dependent field.
-
Select the Premium/Coverage tab and complete either of these fields to specify premium information:
-
Premium Payment
-
Age Rate Table
-
-
Complete these optional fields:
-
Per Coverage Dollars
-
Maximum Premium Amount
-
-
To enter coverage information, complete either of these fields:
-
Amount - Coverage
-
Salary Factor
-
-
Complete the optional Rounding Amount field.
-
Click OK to save the record.
2.5.5.1 General Info
Select the General Info tab.
- From Date
-
Enter the date on which the benefit plan goes into effect.
This date determines whether the plan displays on the Benefit Group Selections form and on the employee's Personal Enrollment form. For example, if the plan has an effective date that is after the employee's effective date on the Benefit Group Selections form or in the batch enrollment, the employee cannot enroll in the plan.
- Thru Date
-
Enter the date that the benefit plan ends.
If this date exists on the Plan Master Information form prior to an employee's enrollment, the effective through date becomes the employee's ending enrollment date when you enroll the employee.
- Policy/Reference Number
-
Enter the certificate or policy number of the benefit plan.
- Status Code
-
Enter a UDC (08/ ST) that defines the current state of the benefit plan. For example, you might use A to define the plan as active.
- Mandatory
-
Enter a code that indicates whether the plan is required for all employees. Codes are:
Y: Yes, all employees must participate in this plan. You should not use this code unless all employees are required to participate in the plan.
N: No, all employees are not required to participate in this plan. The plan is optional.
- Enter Amount/Rate
-
Enter a code that indicates whether you can enter an amount or rate when you enroll an employee in a benefit plan. Typically, you enter Y when the employee determines the amount of a deduction or a benefit. Examples include 401(k) percentages, dependent care, and health care reimbursements.
- COBRA Plan
-
Specify whether a benefit is also a COBRA plan. Values are:
Y: Yes, The plan is a COBRA plan.
N: No, The plan is not a COBRA plan.
Note:
If you enter Y in this processing option, you must define each DBA with the COBRA plan equivalent equal to 1. This field is found on DBA Additional Information.If you specify that this plan is a COBRA plan, then you must also activate the Valid for COBRA option located on the US Leg/Reg (U.S. legislative/regulatory) form in the DBA setup.
- Allow Enrollment at Plan Level
-
Specify whether an employee can enroll in the plan when plan options are available. Values include:
0: The employee cannot enroll.
1: The employee can enroll.
- Flex Plan
-
Enter a code that identifies the plan as a flex plan. When the plan is defined as a flex plan, the system displays the EE Flex Cost (data item PDDP) and the ER Flex Credit (data item PDCP) PDBA fields on the Enrollment with Eligibility and the Employee Self Service benefit forms.
- Requires Dependents, Requires Beneficiaries, and Does not require Dependent/Beneficiary
-
The options in the Dependent/Beneficiary group box define whether a plan is designated as a dependent plan or a beneficiary plan. You must select one of these options.
2.5.5.2 Calc./Eligibility
Select the Calc./Eligibility tab.
Figure 2-7 Plan Master form: Calc/Eligibilty tab
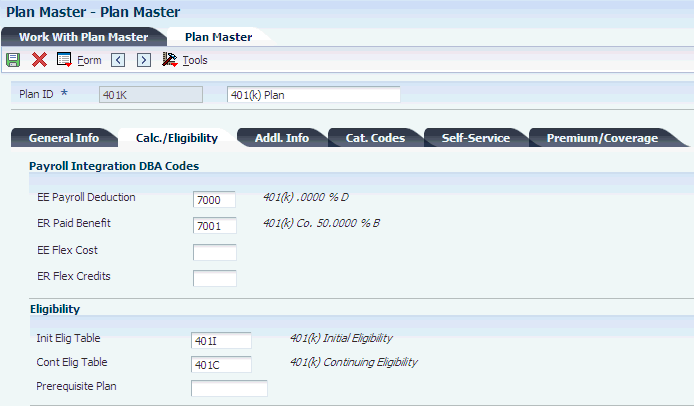
Description of "Figure 2-7 Plan Master form: Calc/Eligibilty tab"
- EE Payroll Deduction (employee payroll deduction)
-
Enter the DBA defined in the Payroll Transactions Constants table (F069116) that is used to calculate the dollar amount that the employee contributes by enrolling in the plan. In most cases, this DBA is defined to deduct pay from the enrolled employee's check.
- ER Paid Benefit (employer paid benefit)
-
Enter the DBA defined in the Payroll Transactions Constants table (F069116) that the system uses to calculate the dollar amount that the employer contributes to the employee enrolled in the plan. In most cases, this DBA is defined as a benefit to add pay to the enrolled employee's check.
- EE Flex Cost (employee flex cost)
-
Enter the DBA defined in the Payroll Transactions Constants table (F069116) that is used to calculate the points amount that the employee contributes by enrolling in the plan in a flexible spending environment.
DBAs used for points in a benefit plan or option must meet two requirements:
The DBA must have blank values in the specification for gross effect and net effect (see data items PAYG and PAYN) so that the use of non-dollar points does not add or subtract dollars from employee pay.
The DBA must have an M in the specification for journal entry (see data item NMTH) so that the use of non-dollar points does not affect the General Ledger system.
- ER Flex Credits (employer flex credits)
-
Enter the DBA defined in the Payroll Transactions Constants table (F069116) that the system uses to calculate the points amount that the employer contributes to an employee enrolled in a flexible spending environment.
DBAs used for points in a benefit plan or option must meet two requirements:
The DBA must have blank values in the specification for gross effect and net effect (see data items PAYG and PAYN) so that the use of non-dollar points does not add or subtract dollars from employee pay.
The DBA must have an M in the specification for journal entry (see data item NMTH) so that the use of non-dollar points does not affect the General Ledger system.
- Prerequisite Plan
-
Indicate the benefit plan, if any, in which the employee must be enrolled before the employee is eligible to participate in this plan.
2.5.5.3 Plan Master Rates Window
Access the Plan Master Rates Window form.
- Type
-
Enter a code to indicate whether the rates are benefit plans or COBRA plans.
- Amount or Rate
-
Enter the monetary amount, a percentage, or an hourly rate that the employee or the employer pays for the employee to participate in a benefit plan. Values are:
1: For a deduction, benefit, or accrual, the meaning of this value depends on the method of calculation. The method determines whether the deduction is a flat monetary amount, a percentage, or a multiplication rate. Table method DBAs, depending on which table method they use, can either use this amount in the calculation or not use it. If there are exceptions to the table calculation, you can override the table code in the detail area, set up a flat monetary DBA amount, or override the amount with a one time override for a timecard.
2: For a pay type, amounts entered in this field override the hourly rate.
2.5.5.4 Self-Service
- Short Plan/Plan Option Description
-
Enter a short description (up to 15 characters) of the benefit plan or benefit plan option.
- Plan Grouping Code
-
Enter a code to designate which benefit plans or benefit plan options are related, based on a provider or other criteria.
- Track Primary Care Physician (PCP)
-
Select to specify whether the benefit plan or benefit plan option tracks primary care physician numbers. If you select this option, then the system displays a form during the enrollment process for an employee to enter the number for a primary care physician.
Select this check box for plans and plan options that track numbers for primary care physicians.
- Non-Participating Plan Flag
-
Enter a code to specify whether an employee can elect to decline participation in the benefit plan.
- Minimum Dependents
-
Enter the minimum number of people that can be covered under a particular plan or plan option. This number includes the employee. For example, if the plan allows an employee plus one dependent, then the minimum number is 2.
- Maximum Dependent
-
Enter the maximum number of dependents that can be enrolled in a benefit plan.
2.5.5.5 Premium/Coverage
Select the Premium/Coverage tab.
Figure 2-10 Plan Master: Premium/Coverage tab
Description of "Figure 2-10 Plan Master: Premium/Coverage tab"
- Premium Payment
-
Enter the premium payment amount that applies to this plan.
- Age Rate Table
-
Indicate the table used if the calculation requires table values.
- Per Coverage Dollars
-
Enter the amount of coverage that is paid for by the amount in the Monthly Premium field (data item PREP). For example, a premium charge can be defined as 30 USD for every 1000 USD of coverage. In this case, the monthly premium is 30, and the value in the Per Coverage Dollars field is 1000.
- Maximum Premium Amount
-
Enter the maximum premium amount permitted.
- Amount - Coverage
-
Enter the dollar amount of coverage that this plan provides to every employee enrolled in the plan.
- Salary Factor
-
Enter a multiplier (factor) that the system uses to calculate the amount of coverage provided to an employee, based on the employee's salary.
For example, a salary factor of 2.0 indicates coverage for an employee in the amount of twice the employee's salary.
- Rounding Amount
-
Enter the amount that the system uses to round the coverage dollars to the nearest whole number. For example, if the coverage dollars are 15,250 USD and you enter 1,000 in this field, the system rounds the coverage dollars to 16,000 USD.
2.5.6 Copying an Existing Benefit Plan
Access the Work With Plan Master form.
To copy an existing benefit plan:
-
Complete the Plan ID and From Date optional fields.
-
To specify whether to display only active plans or all plans, select one of the options in the Plans area.
-
Click Find.
-
In the detail area, select the plan that you want to copy and click Copy.
Note:
If the plan that you copy has associated plan options, the system displays a confirmation message. To copy both the selected plan and its associated plan options, click OK. To copy only the plan, click Cancel. -
On the Plan Master form, complete the Plan ID field.
-
Review and, if necessary, change the name of the plan in the unlabeled field to the right of the Plan ID field.
-
Review and, if necessary, change any of the remaining information on the form that the system copied from the original plan, and then click OK.
2.6 Setting Up Plan Options
This section provides an overview of plan option setup and discusses how to set up plan options.
2.6.1 Understanding Plan Option Setup
When the coverage of a plan varies from employee to employee, you can either set up a separate plan for each variation or set up a plan with several options. For example, an organization might offer a dental plan to employees, and the cost for this plan might vary depending on whether employees elect coverage for themselves only or for themselves plus their dependents. There are two ways to set up this dental plan:
-
Set up separate dental plans called Employee Only, Employee Plus One, and Employee Plus Family, and link each of these plans to the dental category.
-
Set up a dental plan, such as DEN-01, for an employee and include options such as DEN-01 Plus One and DEN-01 Plus Family.
When you link DEN-01 to the dental category, the system also links the options.
When you set up benefit plan options, you can enter different coverage costs for each option. For example, the Employee Only option might cost 20.00 USD (United States Dollar), the Employee Plus One option 40.00 USD, and the Employee Plus Family option 80.00 USD. You can indicate the cost of an option by:
-
Assigning it a separate DBA that has an associated amount or rate.
-
Assigning it the DBA that is associated with the plan.
You can enter an override amount or rate for the option in the Plan Master Rates Window program (P083203).
-
Using the benefit plan DBA and the benefit plan options DBA.
The DBAs must be separate in this case.
When the employee enrolls in a benefit plan option, the system updates the employee's DBA instructions with the amount or rate that you entered for the option.
When you set up options for a single benefit plan, use the option rule to determine how the system calculates additional coverage costs. You can include one or more of these options in the calculation:
-
DBA for the benefit plan.
-
DBA for the option.
-
Additional amount.
When the employee enrolls in a benefit plan option, the system uses the option rule to either add the additional cost or replace the amount in the DBA that you identified in the Plan Master program (P08320). For example, suppose that the plan DBA identifies the amount that the employee pays for coverage when enrolled in DEN-01 only. If the employee enrolls in DEN-01 Plus One, you can add an amount to deduct for the additional coverage. If the employee enrolls in the DEN-01 Plus Family option, you can set up an even greater amount to deduct for the coverage for an entire family.
You can use one of three option rules for a single plan with options. Depending on the value that you select for the option rule, you can include additional factors that the system uses in the calculation, such as DBAs and additional amounts or rates. When you enter plan options, the system stores the information in the Plan Additional Options table (F083202).
This table illustrates the DBA and additional amounts or rates that are enabled with each rule:
| Option Rule | DBA for Plan ID | DBA for Option | Additional Amount |
|---|---|---|---|
| 1 | X | Not Applicable | X |
| 2 | X | X | X |
| 3 | Not Applicable | X | X |
You use the rules for any of the DBA codes that are used for the plan, including the employee payroll deduction and the employer-paid deduction.
|
Note: You cannot delete a benefit plan or plan option when employees are enrolled in that option. Even when employees are not active, their records remain attached to the plan option. Also, you cannot change the dependent or beneficiary status of the plan option when dependents or beneficiaries are enrolled in the plan option. |
2.6.2 Forms Used to Set Up Plan Options
| Form Name | FormID | Navigation | Usage |
|---|---|---|---|
| Plan Master Options | W083202A | Benefits Administration Setup (G08BB4), Plan Master
On the Work With Plan Master form, complete the Plan ID field and click Find. Select a plan, and select Plan Options from the Row menu. |
Set up plan options. |
2.6.3 Setting Up Plan Options
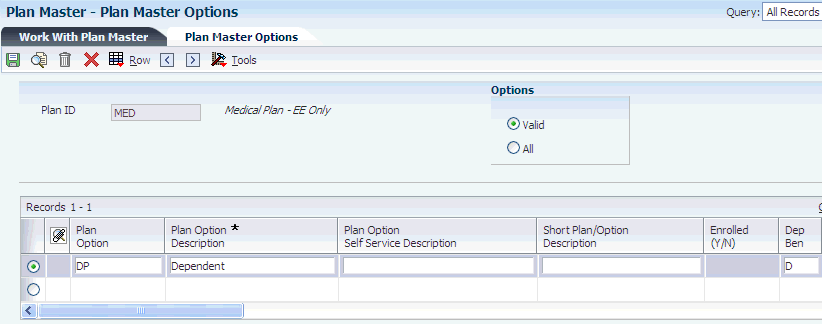
Access the Plan Master Options form.
To set up plan options:
-
Complete these fields:
-
Plan Option
-
Plan Option Description
-
Dep Ben (dependent beneficiary)
-
Additional Premium Payment
-
V O (valid option)
-
-
If you are using self service benefits, complete these fields to set up the plan option for self service:
-
Plan Option Self Service Description
-
Short Plan/Option Description
-
Minimum Dependents
-
Maximum Dependent
-
PCP Flag (primary care physician flag)
-
Non-Participating Plan
If you do not enter a self service description, the system uses the benefit plan option description on self service forms.
-
-
Complete these fields to set up the employee contribution information:
-
Payroll Ded - Option Rule
-
Payroll Ded DBA
-
Payroll Ded - Add'l or Override Rate
-
-
Complete these fields to set up the employer-paid information:
-
Paid Benefit - Option Rule
-
Paid Benefit DBA
-
Paid Benefit - Add'l or Override Rate
-
-
Complete these fields to set up the employee flex cost information:
-
Flex Cost - Option Rule
-
Flex Cost DBA
-
Flex Cost - Add'l or Override Rate
-
-
Complete these fields to set up the flex credits information:
-
Flex Credit - Option Rule
-
Flex Credit DBA
-
Flex Credit - Add'l or Override Rate
-
-
Select one of the DBA fields and select Plan Rates from the Row menu to enter a date-effective override amount or rate for the employee contribution to the DBA item.
-
On the PDBA Detail form, select a record and then click Select.
-
On the Plan Master Rates Window form, complete these fields:
-
Beginning Date
-
Ending Date
-
Amount or Rate
-
-
Click OK to save the amount or rate record, and then click Cancel to return to the Plan Master Options form.
-
Click OK to save the plan record.
- Dep Ben (dependent/beneficiary)
-
Enter a code that indicates whether beneficiary information is required for employees participating in the plan or plan additional option. Codes are:
Blank: No dependent or beneficiary information is required.
D: Dependent information is required.
B: Beneficiary information is required.
- Additional Premium Payment
-
Enter the premium payment amount that applies to this plan.
- V O (valid option)
-
Enter a code to indicate whether an option is valid for the plan. This code enables you to cancel options when they are no longer valid. Values are:
Y: Yes, this is a valid plan option.
N: No, this is not a valid plan option.
When you make an option invalid, that option does not appear on any enrollment form, whether print or online, and no employee can enroll in that option.
- Plan Option Self Service Description
-
Enter a descriptive statement of up to 50 characters in length.
- Short Plan/Option Description
-
Enter a short description (up to 15 characters) of the benefit plan or benefit plan option.
- Minimum Dependents
-
Enter the minimum number of people that can be covered under a specific plan or plan option. This number includes the employee. For example, if the plan allows an employee plus one dependent, then the minimum number is 2.
- Maximum Dependent
-
Enter the maximum number of dependents that can be enrolled in a benefit plan.
- PCP Flag (primary care physician)
-
Select to specify whether the benefit plan or benefit plan option tracks primary care physician numbers. If you select this option, then the system displays a form during the enrollment process for an employee to enter the number for a primary care physician.
- Non-Participating Plan
-
Enter a code that specifies whether an employee can elect to decline participation in the benefit plan.
- Payroll Ded - Option Rule (payroll deduction - option rule)
-
Enter a code that specifies the rule that the system uses to determine the specific DBA to add to an employee's DBA instructions when the employee is enrolled in a plan. This rule also includes the amount or rate to use. Values are:
1: Plan DBA. Use the employee share from the DBA for the specified plan. You can also include an additional amount or rate that the system adds in the calculation. No DBA is allowed for the option.
2: Plan and Option DBAs. The system uses both the DBA for the plan and the DBA for the option. The two DBAs must have different code numbers.
3: Option DBA. Use the employee share from the option DBA. Use the additional amount from the option, if any.
- Payroll Ded DBA (payroll deduction DBA)
-
Enter the DBA defined in the Payroll Transactions Constants table (F069116) that is used to calculate the dollar amount that the employee contributes by enrolling in the plan. In most cases, this DBA is defined to deduct pay from the enrolled employee's check.
- Payroll Ded - Add'l or Override Rate (payroll deduction - additional or override rate)
-
Enter the employee's additional payroll deduction (employee share amount) for optional coverage.
- Paid Benefit - Option Rule
-
Specify a rule that indicates the specific DBA to add to the employee's DBA instructions when an employee is enrolled in a plan. This rule also includes the amount or rate to use. Values are:
1: Plan DBA. The system uses the employee share DBA from the specified plan. It adds the additional amount from the option to the amount or rate from the plan employee share DBA. No DBA is allowed for the option.
2: Both DBAs. For the plan DBA, this is the default amount from DBA definition.
For the option DBA, the system uses the additional amount from the option.
The plan and option DBAs must be different.
3: Option DBA. The system uses the employee share DBA from the option. It uses the additional amount from the option, if any.
- Paid Benefit DBA
-
Enter the DBA defined in the Payroll Transactions Constants table (F069116) that the system uses to calculate the dollar amount that the employer contributes to the employee enrolled in the plan. In most cases, this DBA is defined as a benefit to add pay to the enrolled employee's check.
- Paid Benefit - Add'l or Override Rate (paid benefit- additional or override rate)
-
Enter an additional amount that the employer contributes toward the cost of a benefit option. For example, an employer might pay 100.00 USD toward the cost of the option for family medical coverage.
- Flex Cost - Option Rule
-
Specify a rule that indicates the specific DBA to add to the employee's DBA instructions when an employee is enrolled in a plan. This rule also includes the amount or rate to use. Values are:
1: Plan DBA. The system uses the employee share DBA from the specified plan. Add the additional amount from the option to the amount or rate from the plan employee share DBA. No DBA is allowed for the option.
2: Both DBAs. For the plan DBA, this is the default amount from the DBA definition.
For the option DBA, the system uses the additional amount from the option.
The plan and option DBAs must be different.
3: Option DBA. The system uses the employee share DBA from the option. It uses the additional amount from the option, if any.
- Flex Cost DBA
-
Specify the DBA defined in the Payroll Transactions Constants table (F069116) that is used to calculate the points amount that the employee contributes by enrolling in the plan in a flexible spending environment.
DBAs used for points in a benefit plan or option must meet two requirements:
The DBA must have blanks in the specification for gross effect and net effect (see data items PAYG and PAYN) so that the use of non-dollar points does not add or subtract dollars from employee pay.
The DBA must have an M in the specification for journal entry (see data item NMTH) so that the use of non-dollar points does not affect the General Ledger system.
- Flex Cost - Add'l or Override Rate (flex cost - additional or override rate)
-
Enter the additional points or credits that the employee contributed for optional coverage.
- Flex Credit - Option Rule
-
Specify a rule that indicates the particular DBA to add to the employee's DBA instructions when an employee is enrolled in a plan. This rule also includes the amount or rate to use. Values are:
1: Plan DBA. The system uses the employee share DBA from the specified plan. Add the additional amount from the option to the amount or rate from the plan employee share DBA. No DBA is allowed for the option.
2: Both DBAs. For the plan DBA, this is the default amount from DBA definition.
For the option DBA, the system uses the additional amount from the option.
The plan and option DBAs must be different.
3: Option DBA. The system uses the employee share DBA from the option. It uses the additional amount from the option, if any.
- Flex Credit DBA
-
Enter the DBA defined in the Payroll Transactions Constants table (F069116) that the system uses to calculate the points amount that the employer contributes to an employee enrolled in a flexible spending environment.
DBAs used for points in a benefit plan or option must meet two requirements:
The DBA must have blanks in the specification for gross effect and net effect (see data items PAYG and PAYN) so that the use of non-dollar points does not add or subtract dollars from employee pay.
The DBA must have an M in the specification for journal entry (see data item NMTH) so that the use of non-dollar points does not affect the General Ledger system.
- Flex Credit - Add'l or Override Rate (flex credit - additional or override rate)
-
Enter the additional points or credits the employer contributed for optional coverage.
- Amount or Rate
-
Enter the monetary amount, a percentage, or an hourly rate that the employee or the employer pays for the employee to participate in a benefit plan. Values are:
1: For a deduction, benefit, or accrual, the meaning of this value depends on the method of calculation. The method determines whether the deduction is a flat monetary amount, a percentage, or a multiplication rate. Table method DBAs, depending on which table method they use, can either use this amount in the calculation or not use it. If there are exceptions to the table calculation, you can override the table code in the detail area, set up a flat monetary DBA amount, or override the amount with a one time override for a timecard.
2: For a pay type, amounts entered in this field override the hourly rate.
2.7 Recalculating Plan Option Costs
This section provides an overview of plan option cost recalculations and discusses how to run the batch enrollment program to recalculate plan option costs.
2.7.1 Understanding Plan Option Cost Recalculations
After you set up a plan with options, you might need to update the amounts or rates that are associated with those options. For example, if a benefit carrier raises its rates for family medical coverage, you must update the cost of the family option of the medical benefit plan.
The system uses the Batch Enrollment program (R083800), and the Recalculate Option Costs program (R083810) to recalculate the option costs and update employee DBA instructions with the new costs. To update option costs, you must complete these steps:
-
Change the rate of the option using the Plan Master Options program (P083202).
-
Create a new version of the Batch Enrollment program.
Enter this information when you set up the version:
-
Enter the date on which the new option costs will take effect in the Effective Date processing option on the Date tab.
-
Initially, enter 0 in the Mode processing option on the Process tab. This enables you to process the report in proof mode.
Note:
After you have processed this version in proof mode and verified that the information is correct, you can change this processing option to run the Batch Enrollment program in final mode. This updates employee DBA instructions with the new enrollment records for the updated option costs. -
Enter the plan ID to which the option is attached in the Plan processing option on the Process tab.
-
Enter TRT in the Ending Enrollment Status processing options on the Process tab and on the Recalculation tab.
-
Verify that the data selection for this version selects employees whose benefit status is not equal to blank. You can use additional data selection to narrow the selection criteria.
-
-
Process the newly created version of the Batch Enrollment program in proof mode.
The system automatically generates the Recalculate Option Costs report (R083810).
-
Review the Recalculate Option Costs report and verify that the stop dates, start dates, and new rates are correct.
-
Process the Batch Enrollment program in final mode.
-
To verify that the updates were successful, review the DBA instructions of an employee who was included in the Batch Enrollment process.
In order to update option costs for an employee, you must ensure that:
-
The benefit plan and benefit option are set up.
-
The employee is enrolled in the plan and the option.
-
The employee has history for the DBA that is associated with the plan option.
-
The employee is not locked to a payroll ID at the time that you update plan option costs.
2.8 Linking Plans to Benefit Categories
This section provides an overview of links between plans and benefit categories and discusses how to link plans to benefit categories.
2.8.1 Understanding Links Between Plans and Benefit Categories
To streamline data entry when you enter benefit information for employees, you can link plans to categories within a benefit group. Benefit categories are groups of related types of benefit plans. For example, an organization might offer two medical plans, a traditional-style plan and an HMO. You can define a benefit category called Medical and link those two medical plans to that category.
You can link specific plans for each benefit, or you can link a plan with attached options. For example, you can set up a benefit category called Medical and link three plans to it:
-
MED, for the employee only.
-
MED+ONE, for the employee plus one other person.
-
MED+FAM, for the employee and the employee's family.
Alternatively, you can set up a benefit category called Medical and link to it a single medical plan with options for the employee-plus-one and family coverages.
When you link plans to categories, you can also enter effective beginning and ending dates. The system supplies default dates to the employees' records when you enroll employees in a particular plan.
2.8.2 Forms Used to Link Plans to Benefit Categories
| Form Name | FormID | Navigation | Usage |
|---|---|---|---|
| Plans Within Categories | W08351B | Benefits Administration Setup (G08BB4), Plans Within Categories
On the Work with Categories within Groups form, complete the Benefit Group field and click Find. Select a record and click Select. |
Link plans to benefit categories. |
2.8.3 Linking Plans to Benefit Categories
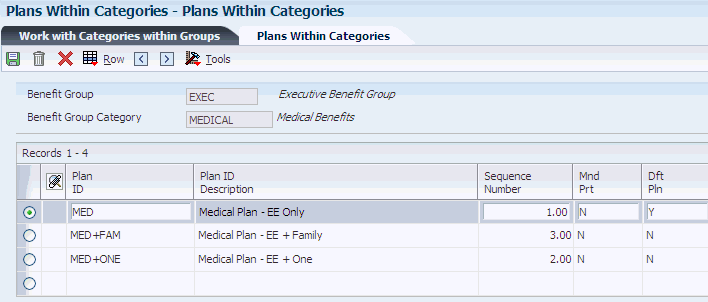
Access the Plans Within Categories form.
- Sequence Number
-
Enter a number to sequence information for review purposes only.
The sequence number determines the order in which the plans are listed in the self service programs. It does not affect the order of plans on the Plans Within Categories form.
- Mnd Prt (mandatory participation)
-
Enter a code to indicate whether the plan is required for all employees. Codes are:
Y: Yes, all employees must participate in this plan. You should not use this code unless all employees are required to participate in the plan.
N: No, all employees are not required to participate in this plan. The plan is optional.
- Dft Pln (default plan)
-
Specify whether the plan is a default plan in the category. An employee is automatically enrolled in this plan if no other plans within the category are selected. Values are:
Y: Yes, this is a default plan.
N: No, this is not a default plan.
- Effective Begin
-
Enter the date on which the benefit plan is included in the benefit category.
- Effective End
-
Enter the last date on which the benefit plan is included in the benefit category.
2.9 Setting Up Date Codes
This section provides an overview of date code setup and discusses how to:
-
Set up date codes for a specified day of the month that occurs after a particular date.
-
Set up date codes for the last day of the month in which a particular date occurs.
-
Set up date codes for a length of time after a specified date.
-
Set up date codes for a specified enrollment date.
2.9.1 Understanding Date Code Setup
To determine eligible and ineligible enrollment dates for a benefit plan, you set up date codes. You must set up the date codes that you need to include on the eligibility table for the benefit plan.
Eligibility tables and date codes work together. For example, an eligibility table can test for 30 days from the date of hire, and the date code can assign the enrollment date to the first of the month following eligibility.
2.9.1.1 Date Codes for a Specified Day of the Month That Occurs After a Particular Date
Use this method to set up a date code when you want enrollment to occur on a specified day of the month that occurs after a particular date.
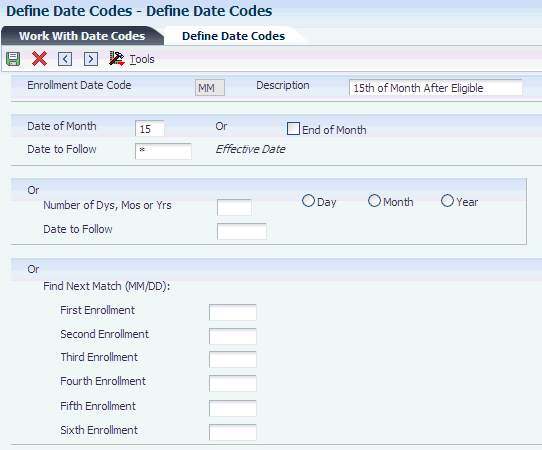
For example, suppose that you want enrollment always to occur on the 15th of the month, and it must occur after an employee's date of hire. In that case, you would enter 15 as the day of the month, and you would use the hire date as the date to follow. Then, when an employee begins work on May 30, eligibility for enrollment in the benefit plan begins on June 15 (the first 15th after the employee's hire date).
Here is another example. Suppose that you want enrollment to occur on the 1st of the month, and it must occur after an employee passes eligibility. You would enter 1 in the Date of Month field and an asterisk (*) as the date to follow. When an employee passes eligibility on June 1, enrollment in the plan occurs on June 1. If the employee passes eligibility on June 2, enrollment in the plan occurs on July 1.
2.9.1.2 Date Codes for the Last Day of the Month in Which a Particular Date Occurs
Use this method to set up a date code when you want enrollment to occur on the last day of the month in which a particular date occurs.
For example, suppose that you want enrollment to occur on the last day of the month in which the date of hire occurs. You would select the End of Month check box and enter the code for the date of hire in the Date to Follow field. In this case, an employee becomes eligible for enrollment on the last day of the month after being hired. If an employee begins work on May 30, eligibility for enrollment in the benefit plan begins May 31. If an employee is hired on the May 31, then enrollment begins on that day.
2.9.1.3 Date Codes for a Length of Time After a Specified Date
Use this method to set up a date code when you want enrollment to occur a specified number of days, months, or years after a particular date.
For example, you can define an enrollment date in a particular stock option plan as exactly two years after the employee's hire date.
2.9.1.4 Date Codes for a Specified Enrollment Date
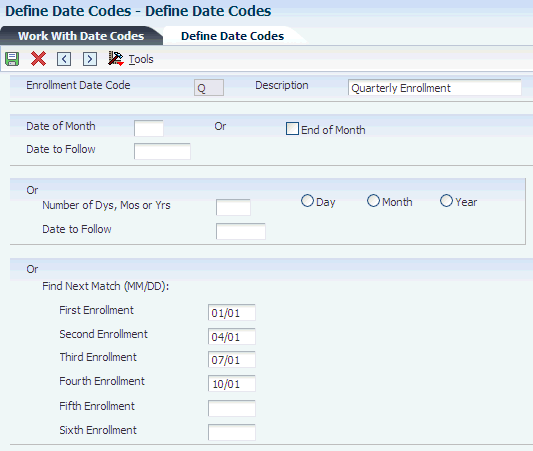
Use this method to set up date codes by an enrollment date. You can enter up to six enrollment opportunities for a date code.
For example, you can enter the first day of each fiscal quarter as an enrollment date so that the system enrolls any employee who meets other eligibility requirements on the first day of the following quarter. Likewise, if you want enrollment to occur on only a single date each year, enter only that date.
2.9.2 Forms Used to Set Up Date Codes
| Form Name | FormID | Navigation | Usage |
|---|---|---|---|
| Work With Date Codes | W08395A | Benefits Administration Setup (G08BB4), Define Date Codes | Access the Define Date Codes form. |
| Define Date Codes | W08395B | On the Work With Date Codes form, click Add. | Set up a date code for a specified day of the month that occurs after a particular date. |
| Define Date Codes | W08395B | On the Define Date Codes form, complete the Enrollment Date Code,Description, and Date to Follow fields.
Select the End of Month option and click OK. |
Set up a date code for the last day of the month in which a particular date occurs. |
| Define Date Codes | W08395B | On the Define Date Codes form, complete the Enrollment Date Code,Description,Number of Dys, Mos, or Yrs and Date to Follow fields.
Select the Day, Month, or Year option in the Basis group box, and then click OK. |
Add a new benefit plan. |
| Define Date Codes | W08395B | On the Define Date Codes form, complete the Enrollment Date Code and Description fields.
Enter a month and day in one or more of the enrollment fields and then click OK. |
Add a new benefit plan. |
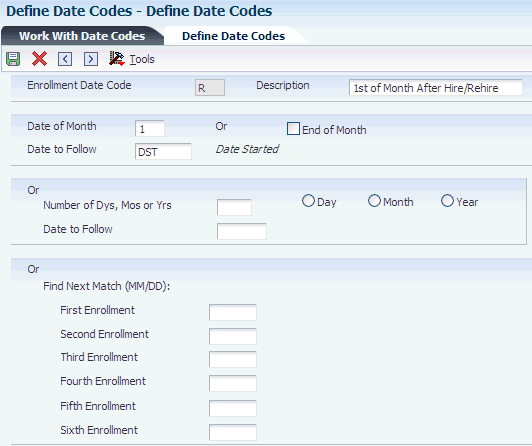
2.9.3 Setting Up Date Codes for a Specified Day of the Month That Occurs After a Particular Date
Access the Define Date Codes form.
- Enrollment Date Code
-
Enter a code to identify the terms for a beginning or ending enrollment date.
- Date of Month
-
Enter the day of the month on which enrollment must begin or end. You can use either this field or the End of Month field. You cannot use both.
For example, a value of 05 in this field means that enrollment either begins or ends on the first 5th of the month that occurs after the date specified in the Date to Follow field. If you enter 05 in this field, you cannot also enter Y in the End of Month field.
- Date to Follow
-
Enter a code to identify the date that the system uses in conjunction with either the Date of Month field (data item DYMO) or the End of Month field (data item ENDM). The codes correspond to the dates that appear on the Dates, Eligibility, and EEO form. You can define this code in UDC 08/D2.
2.9.4 Setting Up Date Codes for the Last Day of the Month in Which a Particular Date Occurs
Access the Define Date Codes form.
- End of Month
-
Select to specify that enrollment either begins or ends on the last day of the month. You can use either this field or the Date of Month field. You cannot use both.
Select this field to have enrollment either begin or end on the last day of the month in which a specified date occurs. You specify that date in the Date to Follow field.
2.9.5 Setting Up Date Codes for a Length of Time After a Specified Date
Access the Define Date Codes form.
- Number of Dys, Mos or Yrs (number of days, months, or years)
-
Use this field in conjunction with the Basis (Day, Month, Year) field and the Date to Follow field to define an enrollment date that is a specified number of days, months, or years after a particular date.
For example, if you want the effective date of enrollment to be one year after the employee's original hire date, define these fields as follows:
-
Enter 1 in this field.
-
Select the Year option.
-
Enter the UDC 08/D2 that indicates original hire date in the Date to Follow field.
When you run an eligibility test, the system searches the Employee Master Information table (F060116) for employees eligible to enroll in the plan because they meet these requirements.
-
- Basis Default
-
Use this field in conjunction with the Number of Dys, Mos or Yrs field and the Date to Follow field to define an enrollment date that is a specified number of days, months, or years after a particular date.
2.9.6 Setting Up Date Codes for a Specified Enrollment Date
Access the Define Date Codes form.
- First Enrollment
-
Enter a date that specifies the first opportunity for enrollment during a given calendar year.
For example, you might create quarterly enrollment opportunities for a 401(k) plan.
- Second Enrollment
-
Enter a date that specifies the second opportunity for enrollment during a given calendar year.
- Third Enrollment
-
Enter a date that specifies the third opportunity for enrollment during a given calendar year.
- Fourth Enrollment
-
Enter a date that specifies the fourth opportunity for enrollment during a given calendar year.
- Fifth Enrollment
-
Enter a date that specifies the fifth opportunity for enrollment during a given calendar year.
- Sixth Enrollment
-
Enter a date that specifies the sixth opportunity for enrollment during a given calendar year.
2.10 Setting Up Pay Type Tables
This section provides an overview of pay type table setup, lists a prerequisite, and discusses how to set up pay type tables.
2.10.1 Understanding Pay Type Table Setup
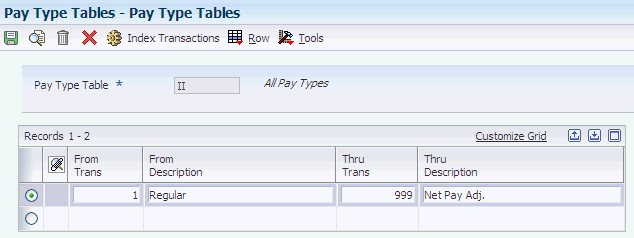
If you plan to set up eligibility tables that are based on timecard hours (method H),you must set up a pay type table for each hour-eligibility requirement that you define for the eligibility table.
When you set up a pay type table, you enter a range of pay type numbers. The system uses this range to calculate the number of hours for each pay type that determines the employee's eligibility.
For example, to include all pay types in the eligibility test, enter pay type 001 through 999. To exclude specified pay types, set up a table with more than one range. For example, to exclude pay type 450 only, set up the following two ranges:
-
001 through 449
-
451 through 999
In each table, you can set up as many ranges as necessary, but you cannot overlap any of the ranges within a table. For example, the system does not accept these two ranges in one table:
-
001 through 449
-
445 through 999
2.10.2 Prerequisite
Before you complete the tasks in this section, you must set up pay type tables in UDC 08/TT.
2.10.3 Form Used to Set Up Pay Type Tables
| Form Name | FormID | Navigation | Usage |
|---|---|---|---|
| Pay Type Tables | W08393A | Benefits Administration Setup (G08BB4), Pay Type Tables
On the Work With Pay Type Table form, click Add. |
Set up pay type tables. |
2.10.4 Setting Up Pay Type Tables
Access the Pay Type Tables form.
- Pay Type Table
-
Displays the name of the table that you defined in UDC 08/TT.
- From Trans
-
Enter the number and description of the PDBA the system uses to calculate the corresponding PDBA. This number is the beginning number in the range that is the basis of the calculation.
When you are defining the range of pay types and the range includes only one pay type, the From Trans and Thru Trans fields must contain the same pay type number.
- Thru Trans
-
Enter the number and description of the PDBA that the system uses to calculate the corresponding PDBA. This number is the ending number in the range that is the basis of the calculation.
When you are defining the range of pay types, the value in the Thru Trans field must be greater than or equal to the value in the From Trans field. If the range includes only one pay type, the From Trans and Thru Trans fields must contain the same pay type number.
2.11 Setting Up Eligibility Tables
This section provides an overview of eligibility tables, lists a prerequisite, and discusses how to:
-
Set up a typical eligibility table.
-
Set up an eligibility table for no eligibility requirements.
2.11.1 Understanding Eligibility Tables
Some benefit plans require that employees meet specified eligibility requirements before they qualify for or maintain enrollment in a benefit plan. If a benefit plan requires eligibility rules, you enter the name of the eligibility table on the plan master for the benefit.
You must set up an eligibility table to define each of the requirements that you use to determine eligibility. You can use the same table for more than one benefit plan if the eligibility requirements are the same for both. For example, an organization might require that employees be employed full time for six months and have worked a minimum of 40 hours in the past week before they qualify for medical insurance and dental insurance. In this case, you could set up an eligibility table and associate that table with both plans.
You can also set up an eligibility table to verify employees' continuing eligibility in a plan. For example, an organization might require that employees continue to work at least 35 hours per week to participate in the organization's medical plan.
After you have set up an eligibility table and included it in the plan master for a benefit, the system can test an employee's eligibility for enrollment in a benefit plan. When the system tests for eligibility, there is one of two outcomes:
-
When an employee passes the eligibility test, the system assigns a status to the enrollment record to indicate eligibility and a beginning enrollment status date based on the date code.
When the enrollment status begins with an A (for active), the system passes the DBA code to the JD Edwards EnterpriseOne Payroll system so that the system can make the necessary deductions or contributions. The system also assigns a participation date and an eligibility date.
-
When an employee does not pass the eligibility test, the system assigns a status to the enrollment record to indicate ineligibility and a beginning enrollment status date based on the date code.
The system does not pass the DBA code to the JD Edwards EnterpriseOne Payroll system. In this case, the system does not assign eligibility and participation dates.
In addition, set up an eligibility table that you use to indicate that a plan has no eligibility requirements. Use this eligibility table for all benefit plans that do not require employees to meet or maintain eligibility requirements to participate in the plans.
2.11.1.1 ACA Eligibility (Release 9.1 Update)
If you are using the Affordable Care Act (ACA) Employee Eligibility program to create and maintain employee ACA eligibility statuses, you can incorporate the employee ACA eligibility status in benefits eligibility rules. To base an eligibility rule on the employee ACA Eligibility Status, you need to create an eligibility condition with the Method AE (ACA Eligibility). This method refers to an employee's current ACA Eligibility Status in the ACA Employee Eligibility table (F081161). With method AE in the Min Amount or Status field, enter the numeric value from the Special Handling column of the ACA Eligibility Status code (UDC 08/SE) on which the eligibility is based.
To work with ACA eligibility status for an employee, you must define a special handling code in the Min Amount or Status field that corresponds to an eligibility status defined in UDC table 08/SE. You also need to specify AE in the Method field.
The system uses the Effective Date from the benefits enrollment process to find the ACA Eligibility Status record in the ACA Employee Eligibility table (F081161). The system selects the record that has an eligibility date in the Eligibility Status Effective Date field nearest to, but less than or equal to, the effective date used in the benefits process. If the system finds more than one ACA eligibility status records in F081161 with the same date qualifying the records for selection, then the system uses the record with the latest parameter control number to determine the ACA eligibility status.
2.11.2 Prerequisites
Before you complete the tasks in this section, you must:
-
Set up the UDCs 08/ES to define the enrollment status.
-
Set up pay type tables to include in any table based on hours worked.
-
Set up the date codes to define eligible and ineligible enrollment dates.
2.11.3 Form Used to Set Up Eligibility Tables
| Form Name | FormID | Navigation | Usage |
|---|---|---|---|
| Define Eligibility | W08390A | Benefits Administration Setup (G08BB4), Define Eligibility
On the Work With Define Eligibility form, click Add. |
Set up a typical eligibility table.
Set up an eligibility table for no eligibility requirements. |
2.11.4 Setting Up a Typical Eligibility Table
Access the Define Eligibility form.
- Eligibility Table
-
Enter a code that identifies the particular table of eligibility rules. The rules determine whether the employee is eligible for enrollment in a plan. Complete this field to name the table.
- And/Or
-
Enter AND or OR to designate whether the test parameters or criteria are based on an And condition or an Or condition.
- Min Amount (minimum amount) or Status
-
Enter the minimum requirement that must be met to satisfy the eligibility requirements. The minimum is associated with the method that you use to calculate eligibility.
(Release 9.1 Update) For defining the method as AE for ACA Eligibility, you must specify a value from the Special Handling field of the 08/SE UDC table, in this field. When the system determines an employee's eligibility for benefits for method AE, it checks the Min Amount or Status value against the ACA Eligibility Status codes that have that same value in the Special Handling column. Use these codes:
1: Not Eligible
2: Standard Eligibility
3: Unknown/To Be Determined
4: Excluded from Test
5: Eligible
Note:
An employee who has an ACA Eligibility Status that has its special handling code equal to 5 is eligible for benefits enrollment.See the Method field (data item MTHD) for more information.
- Method
-
Enter the code that the system uses to calculate eligibility. Use this field in conjunction with the Amount field (data item ELMH).
For example, if the eligibility criteria for a plan includes minimum age, you enter AM (minimum age) in this field and the specific age in the Amount field.
We provide codes for seven of the most common methods. These codes are hard-coded and cannot be changed or deleted:
H: Hours of service
D: Days of service
M: Months of service
Y: Years of service
AM: Minimum age
AX: Maximum age
AE: ACA Eligibility (Release 9.1 Update)
Note:
When using the method AE for ACA Eligibility, you must specify the Special Handling value for the ACA Eligibility Status code from UDC 08/SE in the Min Amount or Status field. (Release 9.1 Update) - Eligible Status
-
Enter the status to be assigned to the enrollment record after the employee becomes eligible for a plan.
You can define this code using a UDC 08/ES. See Enrollment Status (data item XDFS) for restrictions on the allowed values for this field.
- Date Code
-
Enter a code that indicates the date that the employee's new enrollment record begins after the system determines that the employee is eligible for a plan. These codes are defined in the Define Date Codes table (F08395).
(Release 9.1 Update) When basing eligibility on employee ACA Eligibility data, and when using the Look-Back Measurement method to determine an employee's full-time status, you can use a Date Code that indicates to the system to use the Stability Start Date from the employee's ACA Eligibility Status record as the benefits enrollment date. To use the Stability Start Date as the enrollment effective date, define the Date Code ST in the F08395 table.
Note:
When you create the Date Code ST, you do not need to provide any other information on that record, and the system automatically references SPSD (Stability Start Date) column in the ACA Parameters History table (F0811629). - Ineligible Status
-
Enter the status that the system assigns to the enrollment record after it determines that an employee is ineligible for a plan.
You can define this code using UDC 08/ES. See Enrollment Status (data item XDFS) for restrictions on the allowed values for this field.
If the eligible or ineligible enrollment status code begins with an A, such as ACT or AC2, the system writes the DBA code from the Plan Master table to the Employee DBA Instructions table. When a begin enrollment status code begins with a letter other than A, no record is written to JD Edwards EnterpriseOne Payroll.
To indicate an ending status that does not result in a new enrollment, such as termination, you must define the code with an X in the first position in the Description 2 field of the General User-Defined Codes form.
Use a status that begins with an Xas an ending status to indicate a mistaken enrollment. The system does not write instructions to the Employee DBA Instructions table when the status begins with X.
- Date Code
-
Enter a code that indicates the date that the employee's new enrollment record begins after the system determines that the employee is ineligible for a plan. These codes are defined in the Define Date Codes table (F08395).
- Based From
-
Enter a code that defines the date from which eligibility is calculated. Complete this field if eligibility is not based on hours worked. The allowed codes correspond to the dates that appear on the Dates, Eligibility, and EEO form and that are defined in UDC 08/D1. If you do not enter a code in this field, the system uses the employee's hire date.
- Comp Period (computation period)
-
Enter a code that is used to calculate if a person has the minimum number of hours necessary to be eligible for a plan. Complete this field if eligibility is based on hours worked. Codes are:
W: Week (seven days prior to effective date)
M: Previous calendar month
Y: Year (previous year to effective date)
- Number Periods
-
Enter the number of consecutive periods used to calculate eligibility. Complete this field if eligibility is based on hours worked.
- Pay Type Table
-
Enter a code from UDC 08/TT that specifies the pay type table used to calculate the hours worked for plan eligibility. Complete this field if eligibility is based on hours worked.
2.11.5 Setting Up an Eligibility Table for No Eligibility Requirements
Access the Define Eligibility form.
To set up an eligibility table for no eligibility requirements:
-
Complete the Eligibility Table and Description fields to name the table:
-
Enter any value in the Method field.
-
Enter a code that begins with the letter X in the Eligible Status and Ineligible Status fields.
-
Enter a code that indicates a fixed effective date in the two Date Code fields and click OK.
In the eligibility table that is set up for no eligibility requirements, you must still set up an And/Or criterion within the detail area. You cannot set up an eligibility table with no information in the detail area.
2.12 Setting Up Enrollment Parameters
This section provides an overview of enrollment parameters, lists prerequisites, and discusses how to set up enrollment parameters.
2.12.1 Understanding Enrollment Parameters
You can set up enrollment parameters to define which eligibility test and date code the system applies when you enroll employees using enrollment with eligibility or batch enrollment. Enrollment parameters define the action that the system takes when it tests for eligibility. The system compares the employee enrollment information with each enrollment parameter to determine which eligibility test and date code to use. The system then uses the eligibility test and the date code to calculate when to enroll an employee in a benefit plan or whether to terminate the employee's participation.
You can base each enrollment parameter on any combination of these search items:
-
Plan ID
-
Benefit status
-
Enrollment status
-
Valid plan
After you create enrollment parameters, the system searches the records in the Batch Enrollment Parameters table (F08392) based on level of detail. The least detailed parameter appears at the top of the table, and therefore, the system searches it last. The most detailed parameter appears at the bottom of the table, and therefore, the system searches it first. When you enroll an employee in benefits or test for continuing eligibility, the system first compares the employee's enrollment information with the most detailed enrollment parameter (the parameter at the bottom of the table). When the employee's enrollment information does not match the criteria of this enrollment parameter, the system searches for the second most-detailed parameter. The system continues searching, from the most detailed parameter to the least detailed parameter, until it identifies the parameter to use.
When the system locates a parameter that matches the enrollment information for which it is searching, it conducts the eligibility test or assigns the date code and status that is specified in that parameter.
If you do not set up enrollment parameters, the system will:
-
Test continuing eligibility in a plan, when an employee is enrolled in a benefit plan and has an eligible enrollment status as defined by the eligibility test.
-
Test initial eligibility for employees in all other cases.
If you set up parameters for a particular plan, you must also set up the basic parameters for initial and continuing eligibility.
2.12.1.1 Default Enrollment Parameters
If you use batch enrollment to enroll employees in benefit plans, set up default enrollment parameters. When you set up default parameters, you do not identify a plan ID. Therefore, the parameter can be used to determine eligibility for any plan. If eligibility testing is the same for all benefit plans, you can set up only default enrollment parameters.
The following table illustrates examples of default enrollment parameters and the actions that the system takes when the parameters are used. The system uses the most detailed enrollment parameter that corresponds to the employee enrollment record. For example, parameter 1 is the least detailed; therefore, the system uses it only if it does not find a more detailed parameter that specifies how to test the employee's eligibility. Parameter 5 is the most detailed. The system tests this parameter first and uses the information to determine employee eligibility for each employee benefit record that matches its criteria. If the system uses this parameter, it determines the eligibility status for the current benefit enrollment record and then moves to the next enrollment record. The parameter search begins again, starting with parameter 5, and continues through the list of parameters in order of decreasing detail until it finds a valid enrollment parameter. The system then uses that parameter to calculate the employee's new benefit status.
2.12.1.2 Parameter 1
Using parameter 1, the system requires a manual review for any plans that are not valid for the employee. The system treats a plan as invalid if it is not attached to the employee's benefit group.
| Field | Value |
|---|---|
| Plan ID | Not applicable |
| Benefit Status | * |
| Enroll Status | * |
| Valid Plan | N |
| Prev Elig | Not applicable |
| Elig Test | Not applicable |
| Date Code | Not applicable |
| New Status | Not applicable |
| Man Review | Y |
2.12.1.3 Parameter 2
Using parameter 2, the system tests for initial eligibility for all valid plans for each employee.
| Field | Value |
|---|---|
| Plan ID | Not applicable |
| Benefit Status | * |
| Enroll Status | * |
| Valid Plan | Y |
| Prev Elig | Not applicable |
| Elig Test | I |
| Date Code | Not applicable |
| New Status | Not applicable |
| Man Review | N |
2.12.1.4 Parameter 3
Using parameter 3, the system tests for continuing eligibility for all employees who are currently enrolled in valid plans (that is, employees who have a benefit status of Active).
| Field | Value |
|---|---|
| Plan ID | Not applicable |
| Benefit Status | * |
| Enroll Status | ACT |
| Valid Plan | Y |
| Prev Elig | Not applicable |
| Elig Test | C |
| Date Code | Not applicable |
| New Status | Not applicable |
| Man Review | N |
2.12.1.5 Parameter 4
Using parameter 4, the system assigns the terminated status (TRX) to plans that are not valid for employees whose benefit status is X (terminated) at the time that batch enrollment is processed.
| Field | Value |
|---|---|
| Plan ID | Not applicable |
| Benefit Status | X |
| Enroll Status | * |
| Valid Plan | N |
| Prev Elig | Not applicable |
| Elig Test | Not applicable |
| Date Code | T |
| New Status | TRX |
| Man Review | N |
2.12.1.6 Parameter 5
Using parameter 5, the system assigns the terminated status (TRX) to plans that are valid for employees whose benefit status is X (terminated) at the time that batch enrollment is processed. The system searches parameter 5 first. If the employee benefit enrollment record matches the criteria in this parameter, the system uses this parameter to determine the employee's new benefit status. If the criteria in this parameter do not match the benefit enrollment record for the employee, the system then searches parameter 4. The system continues searching enrollment parameters, in order of decreasing detail, until it finds a match. The system then uses the matching parameter to determine the employee's new benefit status.
| Field | Value |
|---|---|
| Plan ID | Not applicable |
| Benefit Status | X |
| Enroll Status | * |
| Valid Plan | Y |
| Prev Elig | Not applicable |
| Elig Test | Not applicable |
| Date Code | T |
| New Status | TRX |
| Man Review | N |
2.12.2 Prerequisites
Before you complete the tasks in this section, you must:
-
Set up the benefit plans.
-
Set up the eligibility tables.
-
Set up the date codes that control when an employee becomes eligible or ineligible for a benefit plan.
2.12.3 Form Used to Set Up Enrollment Parameters
| Form Name | FormID | Navigation | Usage |
|---|---|---|---|
| Batch Enrollment Parameters | W08392H | Benefits Administration Setup (G08BB4), Enrollment Parameters
On the Work With Batch Enrollment Parameters form, click Add. |
Set up enrollment parameters. |
2.12.4 Setting Up Enrollment Parameters
Access the Batch Enrollment Parameters form.
Figure 2-19 Batch Enrollment Parameters form
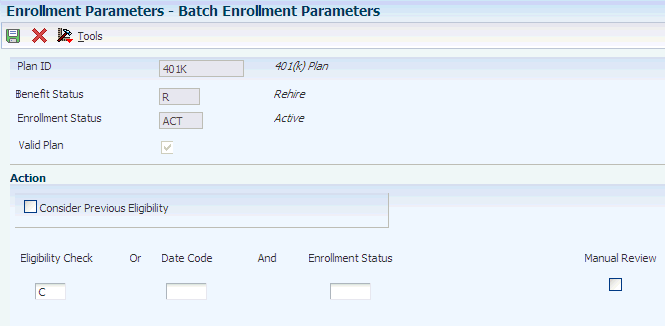
Description of "Figure 2-19 Batch Enrollment Parameters form"
To set up enrollment parameters:
-
Complete these fields for the most detailed parameter:
-
Plan ID
-
Benefit Status
-
Enrollment Status
-
-
Click the Valid Plan option.
-
Complete either the Eligibility Check field or the Date Code field.
-
To use a status that corresponds to a date code, complete the Enrollment Status field in the Action group box.
-
To specify that the enrollments in the plan be printed on a manual review request report and processed manually instead of being processed automatically by the system, select the Manual Review (Y/N) option.
-
To have the system include an employee's previous eligibility information when it tests for eligibility, select the Consider Previous Eligibility option.
When you select this option, a second row of eligibility fields appears on the form.
-
Repeat steps 4 through 6 for the second row of eligibility fields.
When you set up a parameter to review previous eligibility, the first row of eligibility fields applies when previous eligibility is met. The second row applies when previous eligibility is not met.
-
Click OK.
-
For each additional enrollment parameter that you want to set up, repeat steps 1 through 9, completing only the relevant fields.
- Enrollment Status
-
Enter a code from UDC 08/ES that indicates the status of an employee's enrollment in a plan. Use these restrictions for the definitions:
All statuses indicating active participation in a plan must begin with the letter A.
All statuses indicating an ending status that does not result in a new enrollment (such as a termination) must have the letter X in the first position of Description 2 (data item DL02), on the General User-Defined Codes form.
A status beginning with the letter X when used as an ending status, represents a mistaken enrollment. No employee DBA instructions are written.
An asterisk (*) indicates all statuses not otherwise specified.
- Valid Plan
-
Select to indicate whether the specified plan is a valid plan for the employee. A valid plan is one that is available within the employee's benefit group.
- Eligibility Check
-
Enter a code to indicate which eligibility test to run. Codes are:
Blank: Do not test for eligibility.
I: Test for initial eligibility.
C: Test for continuing eligibility.
The system uses this field to test for eligibility when previous eligibility has been met.
- Date Code
-
Enter a code that indicates the date that the employee's new enrollment record begins after the system determines that the employee is not eligible for a plan. These codes are defined in the Define Date Codes table (F08395).
The system uses this field to test for eligibility when previous eligibility has been met.
- Enrollment Status
-
Enter a code that indicates the ending status of an employee's enrollment in a plan. This status represents the reason for ending the old enrollment and is used as the beginning status of any resulting new enrollment.
You can define this code using UDC 08/ES. See data item XDFS (Status - Enrollment) for restrictions on the allowed values.
Note:
An ending status that begins with the letter X represents a mistaken enrollment.The system uses this field to test for eligibility when previous eligibility has been met.
- Manual Review (Y/N) (manual review [yes/no])
-
Enter a code that indicates whether the enrollment being processed should be printed on the Manual Review Requested report so the record can be handled manually rather than through the batch process.
- Consider Previous Eligibility
-
Enter a code that indicates whether the employee was previously eligible for the plan. Values are:
Blank: Do not check for previous eligibility.
Y: Yes, the employee was previously eligible.
N: No, the employee was not previously eligible.
If the system finds a code in this field, it then searches the detail area for further information.
2.13 Linking Allocation Funds to Plans
This section provides an overview of links from allocation funds to plans, lists prerequisites, and discusses how to link allocation funds to plans.
2.13.1 Understanding Links from Allocation Funds to Plans
If the organization offers a retirement or investment plan as a benefit to employees, you can link the plan to the investment programs, or funds, to which employees can allocate their deductions. You must set up all allocation funds as accrual DBAs that are a percentage of the employee and employer contributions. For example, if a 401(k) plan offers employees several investment programs from which employees can choose for their 401(k) deduction, you can link each investment program to the plan.
2.13.2 Prerequisites
Before you complete the tasks in this section, you must:
-
Set up the funds as payees in the JD Edwards EnterpriseOne Address Book system.
-
Set up the deduction DBA for the employee-paid deduction and the benefit DBA for the employer-paid contribution to the investment or retirement plan.
2.13.3 Form Used to Link Allocation Funds to Plans
| Form Name | FormID | Navigation | Usage |
|---|---|---|---|
| Fund Allocation Setup | W08345A | Daily Processing (G08BB1), Fund Allocation Setup | Link allocation funds to plans. |
2.13.4 Linking Allocation Funds to Plans
Access the Fund Allocation Setup form.
To link allocation funds to plans:
-
To locate the retirement or investment plan, complete the Plan ID field and click Find.
-
Select a blank record in the detail area, and then select DBA Setup from the Row menu.
-
On the Work With PDBAs form, click Accrual and then click Add.
-
On the Basic DBA Information form, in the DBA Code field in the header area, enter a number that is greater than both the employee-paid deduction DBA and the employer-paid benefit DBA.
-
Complete the Paystub Text field.
-
Enter G in the Source of Calculation field.
-
Enter % in the Method of Calculation field.
-
Verify that the Calculate Even If No Gross option is cleared.
-
Enter the same values that you entered for the DBA for the employee-paid retirement or investment deduction in the Pay Period of the Month field.
-
Select one of these options:
-
Calculate Only During 1st Period Worked of Month
-
Calculate Only Once Per Pay Period
-
-
Click OK.
-
On the General Accounting/Arrearage Information form, complete these fields and click OK:
-
Effect on GL (effect on General Ledger)
-
Payee
-
-
On the Basis of Calculation form, enter the codes for the employee-paid and employer-paid DBAs in these fields and click OK:
-
From PDBA
-
Thru PDBA
-
-
On the Basic DBA Information form, click Cancel.
-
On the Work with PDBAs form, click Close.
-
On the Fund Allocation Setup form, enter the new PDBA code in the PDBA Code field, and then press Tab.
The new PDBA appears in the detail area.
-
Click OK to save the new PDBA.
- DBA Code
-
Enter a code that defines the type of deduction, benefit, or accrual.
Pay types are numbered from 1 to 999. Deductions and benefits are numbered from 1000 to 9999.
- Paystub Text
-
Enter the text that the system prints on the employee's paystub. If you are using Time and Labor, the system does not create payments. However, this field is required to complete the form. Generally, you enter a description of the PDBA.
- Source of Calculation
-
Enter a code from UDC 07/DB that specifies the basis of a deduction, benefit, or accrual. When the system calculates the gross amount for disposable net wages, it does not use the basis of calculation. The gross amount includes all earnings that have a positive effect on the gross and net payment. For wage attachments, enter one of these values:
1-8: Garnishment, tax levy, wage assignment (child support and maintenance)
R: Loan and interest
0: Fees
- Method of Calculation
-
Enter a code from UDC 07/DM that specifies the method that the system uses to perform calculations. For example, the system uses a method of calculation to calculate deductions, benefits, and accruals (DBAs) and workers' compensation insurance.
The method values are preset. If you use methods 0 to 6,8,9, or G, you must also enter a value in the Table Code field.
For wage attachments, enter one of these values:
C: Wage assignment (child support and maintenance)
G: Garnishment
K: Loan
L: Tax levy
A: Fees
%: Interest
- Calculate Even If No Gross
-
Select this options to calculate the DBA when an employee has no gross pay and no PDBA codes existing in the basis of calculation.
When an employee has no gross pay, the system calculates the DBA when these conditions exist:
-
The Calculate Even If No Gross option is selected.
-
The source of calculation is G.
-
The method of calculation is $.
-
The system then records the resulting amount in arrears and performs one of these functions:
-
Creates an overpayment for a deduction.
-
Calculates it as a benefit or an accrual.
Note:
If the PDBA codes exist in the basis of calculation, the system attempts to calculate the DBA, regardless of this setting. -
- Pay Period of the Month
-
Specify the pay period in which the system calculates the DBA or auto-deposit. Values are:
Y: Calculate the DBA or auto-deposit during the current period.
N: Do not calculate the DBA or auto-deposit during the current period.
*: Calculate the DBA or auto-deposit only during the first pay period of each month that the employee works based on the ending date of this month's pay period.
Blank: Continue to look for a code at the lower level. The system searches for DBA/auto deposit rules first at the employee level, then at the group level, and finally at the DBA master level. If the field is blank at all levels, the system does not calculate the DBA/auto deposit in that period.
M: Applies only to benefits based on gross hours or dollars. An M only in the fifth field indicates that the system calculates the benefit during the special timecard post. An M implies a Yes for a weekly withholding frequency.
- Calculate Only During 1st Period Worked of Month
-
Select to indicate whether the deduction, benefit, or accrual is calculated only during the first pay period that an employee works each month.
- Calculate Only Once Per Pay Period
-
Select to indicate whether the deduction, benefit, or accrual is calculated only once in a pay period if the employee receives more than one check.
- Effect on GL (effect on General Ledger)
-
Specify whether you want journal entries passed from payroll to the general ledger and the method you want to use. Values are:
N: Pass only dollars to General Ledger.
M: Do not pass dollars or hours to the general ledger. This value enables an accrual to be tracked in employee payroll history and the dollars to be omitted from the general ledger.
- Payee
-
Enter the address book number of the investment program. This is for fund allocations.
- From PDBA
-
Enter the number and description of the PDBA that the system uses to calculate the corresponding PDBA. This number is the beginning number in the range that is the basis of the calculation.
- Thru PDBA
-
Enter the number and description of the PDBA that the system uses to calculate the corresponding PDBA. This number is the ending number in the range that is the basis of the calculation.
2.14 Reviewing the Benefit Structure
This section provides an overview of benefit structure review and discusses how to review the benefit structure.
2.14.1 Understanding Benefit Structure Review
After you set up benefit information, you can review the benefit structure, which is the relationship between benefit groups, categories, and plans. You can also print a report that provides more detail about benefit plans and plan options within benefit groups and categories. Both methods enable you to discern which plans are associated with a particular benefit group and which plans are associated with multiple benefit groups.
Use Benefit Structure Inquiry program (P083204) to review the organization of the benefit plans. This program includes the benefit categories and plans within each benefit group.
2.14.2 Form Used to Review the Benefit Structure
| Form Name | FormID | Navigation | Usage |
|---|---|---|---|
| Benefit Structure Inquiry | W083204A | Benefits Administration Setup (G08BB4), Benefit Structure Inquiry | Review the benefit structure. |
2.14.3 Reviewing the Benefit Structure
Access the Benefit Structure Inquiry form.
Figure 2-21 Benefit Structure Inquiry form
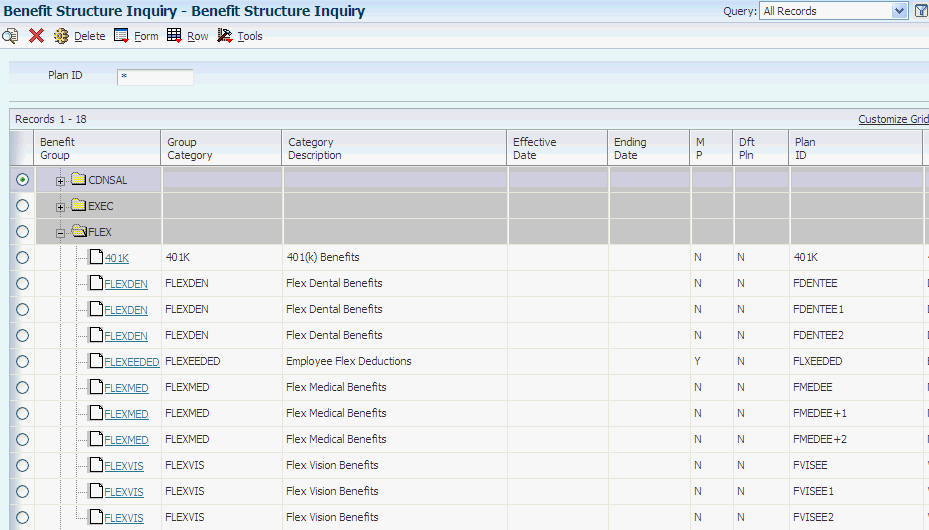
Description of "Figure 2-21 Benefit Structure Inquiry form"
To review the benefit structure:
-
Complete the Plan ID field and click Find.
The system displays information about the benefit groups that are associated with the plan.
Enter an asterisk (*) in the Plan ID field and click Find to list all plans in all benefit groups.
-
To review a list of the plans and plan options, click the plus sign (+) next to the benefit group that you want to review.
-
Click the plus sign (+) next to another benefit group to display the information about the plan and plan options within that benefit group.
Click the minus sign (–) next to any benefit group to close all plan and option information.
