3 JD Edwards EnterpriseOne Integration with Oracle Demantra Demand Management
This chapter contains the following topics:
3.1 Understanding Oracle Demantra Demand Management
The Oracle Demantra Demand Management solution enables you to plan for and proactively respond to demand by sharing a one-number plan that aligns the organization across departments and users. Flexibility and business process automation support a wide range of daily operations with demand intelligence.
This solution is designed to support demand-driven planning. It is built on a flexible, multidimensional data architecture that gives users the ability to view analytic capabilities along any dimension and level of granularity. Every department can organize the data in hierarchies and units of measure, and each department can view its own up-to-date plans while sharing the same base data. Unlike conventional business intelligence tools that only let you view data, Oracle Demantra Demand Management enables you to read and edit data dynamically, with changes automatically split and rolled up or down appropriately. This process is called live read/write capability. Top-down, bottom-up, and middle-out change analysis is supported. The unique middle-out capability enables managers change plans at their level of the organization that are automatically applied up and down the hierarchy.
3.2 Configuring Demantra Demand Management
Complete these customizations to integrate the Oracle Demantra Demand Management application with JD Edwards EnterpriseOne products:
-
Specify the Oracle Demantra extract source folder.
-
Configure the Oracle Demantra Demand Management levels.
-
Configure the JD Edwards EnterpriseOne Upload Integration interface.
-
Change system time.
-
Set the Control System and Engine Max Sales dates.
-
Set the date range for incremental extracts.
3.2.1 Specifying the Oracle Demantra Extract Source Folder
You must specify the physical location of the UBE extract source folder from which Oracle Demantra Demand Management retrieves the extract flat files. This folder should be in a shared file system visible from both JD Edwards EnterpriseOne and Oracle Demantra environments.
The recommended default location for the extract source folder is {Demantra_install_folder}\e1_integration\e1_files.
To modify the folder in which Oracle Demantra looks for these extracts, edit the create_integration_dir.sql file in the {Demantra_install_folder}\e1_integration directory.
3.2.2 Configuring the Oracle Demantra Demand Management Levels
Complete this procedure to enable the Item, Organization, and Site category code levels to appear in Demand Management worksheets:
To configure the category code levels:
1. Log in to Oracle Demantra Business Modeler.
2. From the Configuration menu, select Configure Levels.
The Configure Levels dialog box appears.
3. Right-click the level you want, and select Open, General Properties.
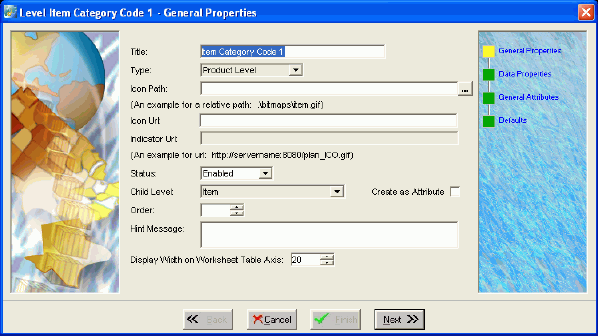
4. In the General Properties dialog box, select Enabled from the Status drop-down list.
5. Click Finish.
6. Click Next until the Defaults dialog box appears.
7. Click Finish.
3.2.3 Configuring the EnterpriseOne Upload Integration Interface
You can configure the EnterpriseOne Upload integration interface to specify the path of the location where the forecast file are generated. The default path for the forecast file is c:\e1_integration\e1_files\forecast.txt.
To specify the EnterpriseOne Upload output path:
1. Log in to the Business Modeler.
2. From the Tools menu, select Integration Interface.
Figure 3-2 Create/Modify Integration Interface form

Description of "Figure 3-2 Create/Modify Integration Interface form"
3. In the Create/Modify Integration Interface dialog box, select the E1 Upload Integration Interface and click OK.
4. Click Next.
Figure 3-3 Integration Interface E1 Upload - Define Data/Level Profiles form
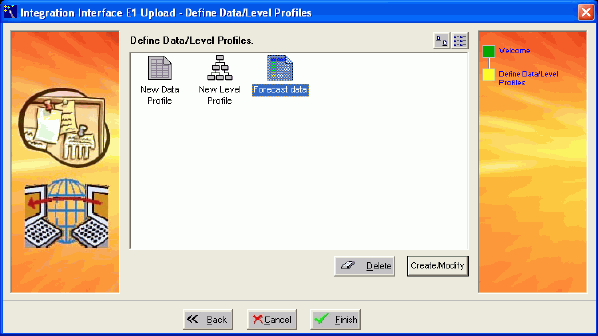
Description of "Figure 3-3 Integration Interface E1 Upload - Define Data/Level Profiles form"
5. Double-click the Forecast Data profile.
The Data Profile Interface dialog box appears.
6. Click Next until the Data Profile Export Properties dialog box appears.
Figure 3-4 Integration Interface E1 Upload - Data Profile Forecast data - Export Parameters form
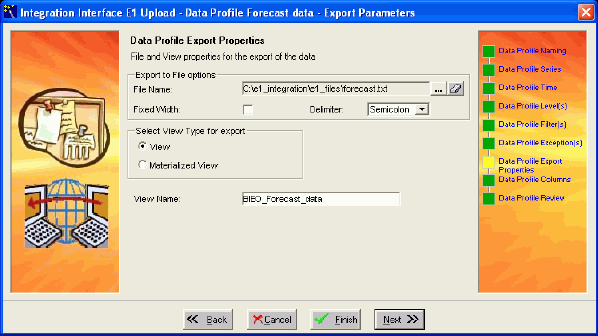
Description of "Figure 3-4 Integration Interface E1 Upload - Data Profile Forecast data - Export Parameters form"
7. In the File Name field, click the browse button.
The Select File for Export dialog box appears.
8. Select the forecast to export and then click Save.
9. Click the Finish button twice.
3.2.4 Changing System Time
Oracle Demantra products use a base time. All other time that appears in the system is an aggregation of this base time. The default time of the Demand Management application is weekly, beginning on Monday. the company may want to change the base time for one of these reasons:
-
Start the week on a different day.
-
Aggregate the week based on the ending day, not the beginning day.
-
Select a daily or monthly base time.
To change the base time:
1. In the Business Modeler, open the Build Model window, and then open the data model Integration Template.
2. Click Next until the Time Bucket window appears.
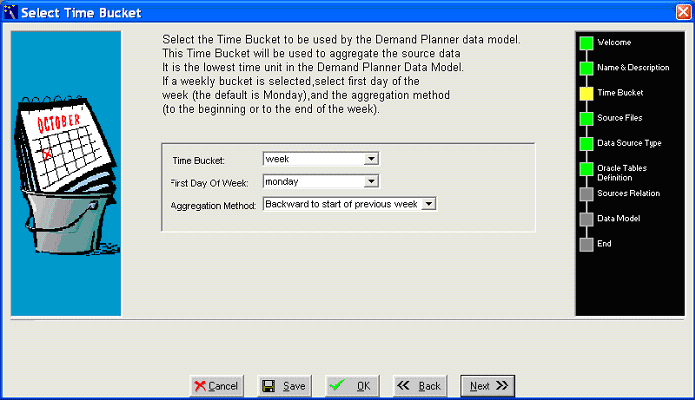
3. Complete these fields:
-
Time Bucket
-
First Day of the Week
-
Aggregation Method
|
Note: The day and month time unit do not designate the first day of the period. Months are assumed to begin on the first and end of the last day of the Gregorian month. |
4. After the changes are saved, the data model should be upgraded, not rebuilt, using the Run Time Bucket option selected.
Figure 3-6 Build/Upgrade model dialog box
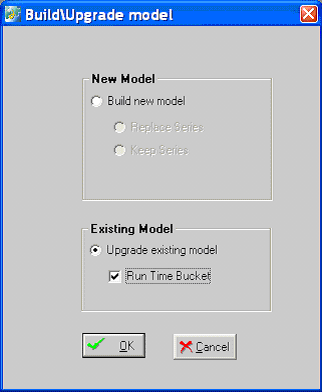
Description of "Figure 3-6 Build/Upgrade model dialog box"
|
Note: If the time bucket is reconfigured, the time aggregation set for all worksheets is modified to match the new time aggregation. Review all used and embedded worksheets. |
Many engine parameters set for a weekly system do not represent a best-practice setting in a monthly and daily system. You may find a good source of default values in the init_params_0_daily and init_params_0_monthly tables. Review engine parameters and change relevant time parameters if you change the time bucket setting.
The value in the Parameter Metrics Period field defines the length of history for which accuracy is calculated as an engine output. The default value for the weekly system is 26. A monthly system is set to 24, and a daily system is set to 60.
3.2.5 Setting Control System and Engine Max Sales Dates
When loading future dates in the EP_LOAD process, you should populate a control parameter to determine how you want the end of history populated. The control parameter, which is called MaxSalesGen, is in the Business Modeler.
To populate the MaxSalesGen parameter:
1. Access the Business Modeler.
2. From the Parameters menu, select System Parameter.
3. Click the System tab and scroll down until you find the MaxSalesGen parameter.
Figure 3-7 System Parameters - MaxSalesGen form
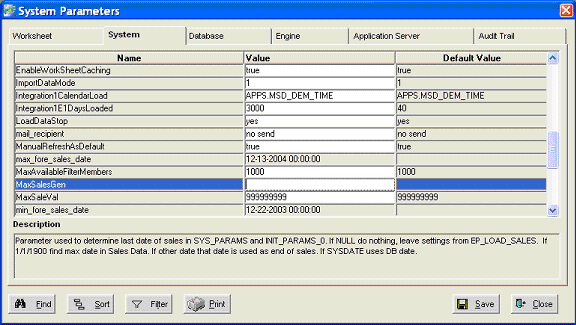
Description of "Figure 3-7 System Parameters - MaxSalesGen form"
4. Enter a value for the MaxSalesGen parameter, for example:
-
Null. Leaving the parameter blank causes the system to continue to behave as it does today. The last date loaded into the system is compared to the current last system date, and the latest of the two settings is the last date of history. This value is recommended for cases in which only historical dates are loaded.
-
Sysdate. Entering Sysdate as the parameter causes the last date of history to be based on the period containing today's date (date in the DB server). If you run the process on February 16, 2007, in a weekly system with weeks beginning on Monday, the last date of history is set to the previous Monday, which is February 12, 2007. For a monthly system run on the same date, the end of history is set to February 1, 2007. This value is recommended for a production environment in which the system date should match the current date, while allowing future information to be loaded.
-
01-01-1900 00:00:00. Setting the parameter to this value sets the end of history to the last date in the sales_data table, where the actual_quantity column>0. For very large systems, this value could add time to loading availability. The data used to drive the engine must be stored in the actual_quantity column.
-
Any date other than 01-01-1900 00:00:00. Entering any other date causes the last date of history to be based on the entered date. In a weekly system with weeks beginning Monday, if the date entered is January 16, 2007, then the last date of history would be set to the previous Monday, January 15, 2007. For a monthly system run with the same parameter setting, the end of history would be set to January 1, 2007. This selection is ideal for testing systems in which the desired end-of-history date does not match the executed date. This selection allows users full control of dates that are assigned as end of history and beginning of forecast.
|
Note: All dates must be entered in the MM-DD-YYY 00:00:00 format. |
3.2.6 Setting the Date Range for Incremental Extracts
JD Edwards EnterpriseOne sales order information can be extracted in full or incrementally. For incremental extracts, a parameter is set in the R34A400_incr.xml file that defines, from today's date, how many days backward and forward to go to generate the date range to be extracted. Within the Business Modeler, set the Integration1E1DaysLoaded parameter to match that used by the R34A400_incr.xml file.
To set the Integration1E1DaysLoaded parameter:
1. Access the Business Modeler.
2. Select System Parameters, and then System. The System Parameters window appears.
Figure 3-8 System Parameters - Integration1E1DaysLoaded form
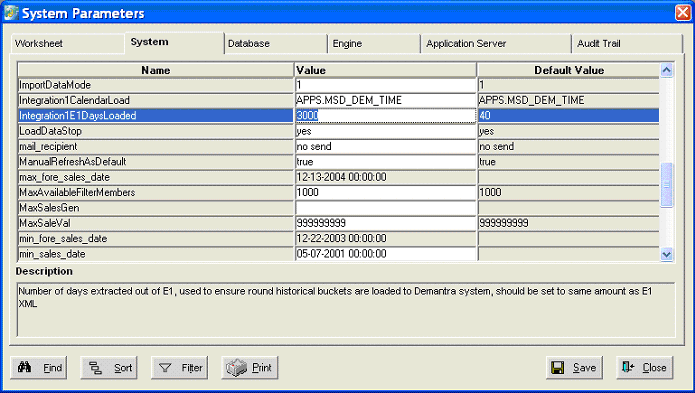
Description of "Figure 3-8 System Parameters - Integration1E1DaysLoaded form"
For example, in a weekly system with weeks beginning Monday, if the extract execution date is January 31, 2007, and the R34A400_incr.xml parameters are –28 and +7, then the parameter Integration1E1DaysLoaded should be set to 28. This setting extracts all orders with a requested ship date between January 3, 2007, and February 7, 2007. When this information is turned into weeks beginning on Monday in the Oracle Demantra products, these weeks receive information:
-
January 1 to 7
-
January 8 to 14
-
January 15 to 21
-
January 22 to 28
-
January 29 to February 5
Since the data extracted for the week beginning January 1 contains information only from January 3, it is an incomplete week and may cause incomplete weekly data to be loaded. The integration process references the parameter Integration1E1DaysLoaded and truncates the week of January 1 from the load, thereby loading information only from January 8 on.
During implementation, it is not realistic to modify the R34A400_incr.xml parameters before every data load. The configuration should attempt to capture the narrowest range of dates which likely captures 99.9 percent of all orders. Since a large gap may occur between an order being requested and its actual shipment, this range greatly depends on the business practices associated with the implementation. Set the parameter Integration1E1DaysLoaded to a number that is smaller than or equal to the first date range parameter in the R34A400_incr.xml. The current default value is set to 3000 to capture the entire date range suitable for a full load and any testing scenarios.
Actual settings vary by business, but they should be driven by these considerations:
-
What is the likelihood that an order is shipped 1, 2, 3... periods late?
-
What is the largest delay ever experienced between an order placement and its shipment?
-
How critical is the capture of all orders?
-
How long a time interval is available for the data extract?
The answers to the previous questions enable you to set a reasonable business-oriented date range. Use these initial settings:
-
Daily system: –2 and 0 to capture a full two weeks.
-
Weekly system: –41 and 0 to capture a full fiscal month of five weeks, regardless of weekday run.
-
Monthly system: –4 and 0 to capture a full quarter, regardless of month day run.