2 Configuring the JD Edwards EnterpriseOne Grower Management System
This chapter contains the following topics:
2.1 Understanding Configuration of the JD Edwards EnterpriseOne Grower Management System
Before you use JD Edwards EnterpriseOne Grower Management, you must define information that the system uses during processing. The system setup for JD Edwards EnterpriseOne Grower Management enables you to configure the system for your business needs and to set up default values that can save you time when processing transactions.
This diagram illustrates the foundational setup for the JD Edwards EnterpriseOne Grower Management system:
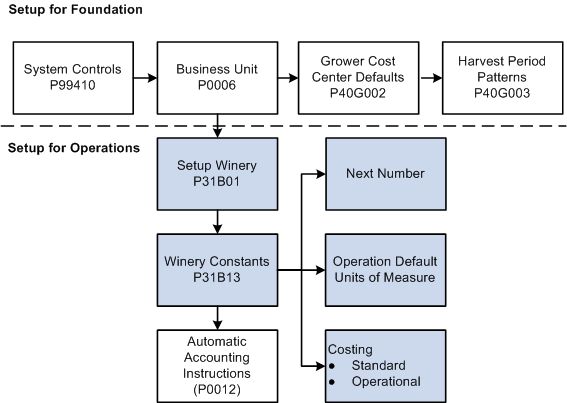
2.1.1 Foundational Setup
To begin using the JD Edwards EnterpriseOne Grower Management system, you must set up foundational information in other JD Edwards EnterpriseOne systems.
This table identifies the additional JD Edwards EnterpriseOne systems that you use to set up the JD Edwards EnterpriseOne Grower Management system:
| JD Edwards EnterpriseOne System | Setup Requirements |
|---|---|
| Foundation | You must activate the JD Edwards EnterpriseOne Grower Management system before you can begin processing grower transactions. You must also set up Address Book records for growers, grower representatives, owners, and suppliers. |
| General Ledger | To set up grower masters and constants, you must first set up a business unit. You must also set up company, fiscal date patterns, and chart of accounts information. |
| Blend Management | You use the winery information and constants programs to define facility information. You also establish owners, variety, material types, end-use reservation (EUR), automatic accounting instructions (AAIs), blend costing, and other constants in the JD Edwards EnterpriseOne Blend Management system. |
| Inventory Management) | You also must setup:
|
| Procurement | General setup for JD Edwards EnterpriseOne Procurement includes document types, line types, order activity rules, and AAIs. |
2.1.2 Winery Clarification
The JD Edwards EnterpriseOne Grower Management and Blend Management systems share many programs. Consequently, you see the term winery in the system. Use winery as any facility that you use in the JD Edwards EnterpriseOne Grower Management system to track and receive products. You can change the terminology during your implementation.
2.1.3 Facility Information
The system stores facility information in the Grower Block Defaults table (F40G002), where the grower is associated with a branch/plant. Use the information that is set up on the Grower Cost Center defaults for block and harvest entry.
You must also set up information in the Winery Master Information program (P31B01) for farming operations. Use the Blend Facility Setup menu (G31B02) to access the Setup Winery program (P31B01) and the Winery Constants program (P31B13). You use information in these programs for operational transactions.
2.1.4 System Activation
Access the EnterpriseOne System Control program (P99410) to verify that data items SY40G (Grower Management), SY31B (Blend), and SY43C (Grower Pricing and Payments) are set to active.
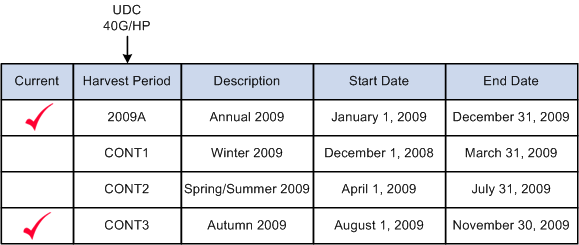
2.1.5 Harvest Patterns
A block can have multiple harvest periods. Each harvest period can have multiple harvests. The harvest is a representation of an individual block usage for a period of a growing cycle.
For example, apples are grown and harvested during an annual cycle. The harvest patterns in the northern hemisphere might be named 2007 NH, 2008 NH, and so forth.
2.1.6 Prerequisites
Before you complete the tasks in this section:
-
Turn on system code SY40G.
-
Set up UDCs for harvest period patterns (40G/HP).
-
Create a supplier master in the Supplier Master Revisions program (P04012).
-
Create a wine master in the Winery Master program (P31B01).
-
Create material types in the Material Type Revisions program (P31B04).
2.2 Setting Up Harvest Period Patterns
This section provides an overview and discusses how to set up harvest period patterns.
2.2.1 Understanding Harvest Period Patterns
A harvest period pattern defines the frequency in which crops mature and are harvested. You set up harvest periods to define the growing period for your products. You create harvest records based on the harvest period pattern that is assigned to a block. Each harvest record is a representation of an individual block for the period of a growing cycle. Each harvest pattern record has specific start and end dates.
Harvest patterns are user-defined and can be setup up according to the crop being grown. The most common example is that of an annual harvest, where the crop matures over the course of a year. Depending on the region where the crop is grown, the harvest period may cross over a calendar year. Tree fruits such as oranges and apples, and many other crops that mature annually are examples of harvests that cross over calendar years.
This diagram illustrates the various types of harvest period pattern setup:
2.2.2 Prerequisite
You must define harvest pattern codes in UDC 40G/HP.
2.2.3 Forms Used to Set Up Harvest Period Patterns
2.2.4 Setting Up Harvest Period Patterns
Access the Harvest Period Patterns Revisions form.
Figure 2-3 Harvest Period Patterns Revisions form

Description of "Figure 2-3 Harvest Period Patterns Revisions form"
- Harvest Pattern
-
Enter a UDC (40G/HP) that represents the harvest pattern. The system populates the harvest pattern by default and you can override the value on the block before you save the record.
- Current Harvest Period
-
Select the check box to indicate that this line is the current harvest period for the harvest pattern.
- Harvest Period
-
Enter the period for a harvest. For example, Q1, Q2, Q3, or Q4 or 2006, 2007, or 2008.
Note:
Even though you can enter 2008 as the harvest period for multiple patterns (ANNUAL and NHCONT), the harvest period should be unique across all harvest patterns. Using the same value represents a potential problem when using the Price Matrix program (P4580). If the order detail group includes harvest period, only one instance of a value is presented in the combo box. - Harvest Start Date
-
Enter the start date for the harvest pattern.
- Harvest End Date
-
Enter the end date for the harvest pattern.
2.3 Setting Up Grower Cost Center Defaults
This section provides an overview of grower cost center defaults, lists a prerequisite, and discusses how to set up grower cost center defaults.
2.3.1 Understanding Grower Cost Center Defaults
The JD Edwards EnterpriseOne system uses the grower cost center default information to associate a cost center with a farm, block, or harvest.
You use the Grower Cost Center Default program (P40G002) to set up default UOM values and harvest patterns. Each grower cost center can have its own set of default values. The JD Edwards EnterpriseOne system populates the block and harvest records with these default values and prohibits this information from being overridden. The grower cost center is required set up to provide the harvest pattern and unit of measure for block and harvest records.
|
Note: If you choose to have the system automatically display a grower cost center when you access a form, you must use the Default Locations and Printers program (P400951). |
2.3.1.1 Harvest Unit of Measure Versus Operation Unit of Measure
This diagram illustrates the relationship between units of measure in the Grower Cost Center Defaults and the Winery Constants programs:
Figure 2-4 Relationship Between Grower Cost Center and Winery Constants
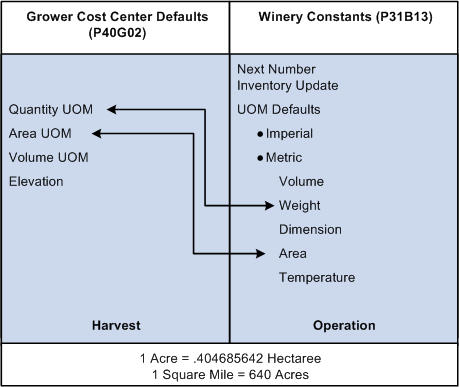
Description of "Figure 2-4 Relationship Between Grower Cost Center and Winery Constants"
The Grower Cost Center Defaults program (P40G002) defines default units of measure for harvest records; whereas the Winery Constants program (P31B13) defines default units of measure for operation records. If the quantity or area unit of measure differs between the programs, you must create a standard unit of measure conversion in the Unit of Measure Conversion program (P41003). For example:
-
For grower operations, you must set up a relationship between the Grower Cost Center Defaults (P40G002) area UOM and the Winery Constants (P31B13) area UOM. You might measure the area of your harvests in hectares and apply a pesticide using a spray operation by the acre. Therefore, you must add a conversion to convert one hectare to 2.471053815 acres.
-
For weigh tag operations, you must set up a relationship between the Grower Cost Center Defaults (P40G002) quantity UOM and the Winery Constants (P31B13) weight UOM. For example, you estimate your harvest output in pounds and receive weigh tags in tons.
This table explains the difference between the units of measure:
| Grower Cost Center Defaults (P40G002) | Winery Constants (P31B13) |
|---|---|
| Uses values from UDC table (00/UM) | Uses values from UDC table (31B/UM) |
| Populates default values onto the block and harvest records. | Provides values that you use in grower operations. |
When you use the JD Edwards EnterpriseOne Grower Management and Blend Management systems, the area units of measure must be the same unless a standard unit of measure conversion is set up.
2.3.2 Prerequisite
You must set up the grower cost center as a valid business unit.
2.3.3 Forms Used to Set Up Grower Cost Center Defaults
2.3.4 Setting Up Grower Cost Center Defaults
Access the Grower Cost Center Defaults Revisions form.
Figure 2-5 Grower Cost Center Defaults Revisions- form

Description of "Figure 2-5 Grower Cost Center Defaults Revisions- form"
- Grower Cost Center
-
Enter the grower cost center for which you are associating the default units of measure. The system uses a grower cost center when you add a grower block.
- Default Quantity UOM (default quantity unit of measure)
-
Enter the default quantity unit of measure for this grower cost center.
- Default Area Unit Of Measure
-
Enter the default planted area unit of measure for this grower cost center.
- Default Volume UOM (default volume unit of measure)
-
Enter the default volume unit of measure for this grower cost center.
- Default Elevation UOM (default elevation unit of measure)
-
Enter the default elevation unit of measure for this grower cost center.
- Harvest Pattern
-
Enter the default harvest pattern to use for this grower cost center. When you create harvest records with the grower cost center, the system populates the harvest pattern by default.
2.4 Setting Up Ownership
This section provides an overview of ownership setup and discusses how to set up ownership records.
2.4.1 Understanding Ownership Setup
Growers harvest crops that are either internally or externally owned, therefore, they must keep the materials separate. Tracking ownership is required to identify legal ownership of the harvested crop through operations and on inquiries and reports.
This diagram represents how the system uses ownership records:
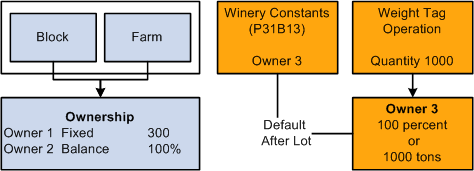
Use owners to identify who owns the associated farm, block, or harvest. A farm, block, or harvest can have multiple owners.
Owner is not a lot attribute of farm operations. Use ownership to identify the legal ownership of a blend lot at any point during the process.
The owner that you set up in the winery constants becomes the owner on the instructed lot attributes for weigh tag operations. You can adjust this ownership during the weight tag operation. You should also set up owners on the block.
2.4.2 Prerequisite
Before you complete the tasks in this section:
-
Set up address book record for owners.
-
Set up owner groups.
-
Add owner groups to the Owner Groups UDC table (31B/OG).
2.4.3 Forms Used to Set Up Ownership
2.4.4 Setting Up Ownership Records
Access the Edit Owner Information form.
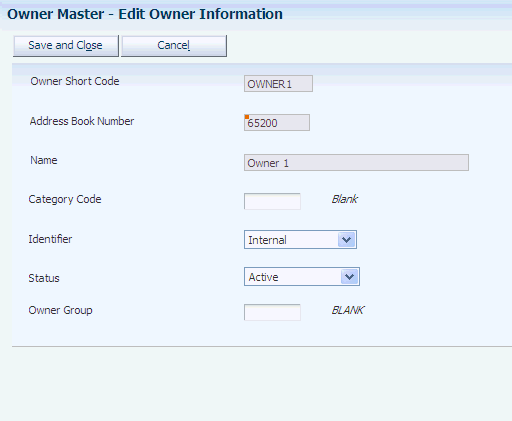
- Owner Short Code
-
Enter a unique identifier for an owner.
- Address Book Number
-
Enter a number that identifies an entry in the JD Edwards EnterpriseOne Address Book system that represents an owner. After you have assigned an address book number to an owner master record, you cannot use this address book number for another owner. If you have used the address book number in an ownership distribution record (P40G101), you cannot delete the owner master record.
- Category Code
-
Enter a UDC (31B/OC) that identifies the owner.
- Identifier
-
Enter whether the owner is internal or external. This field is informational only.
- Status
-
Assign a status to the owner. Only active owners can be assigned to a farm, block, or harvest.
- Owner Group
-
Select a UDC (31B/OG) to assign the owner short code to an owner group.
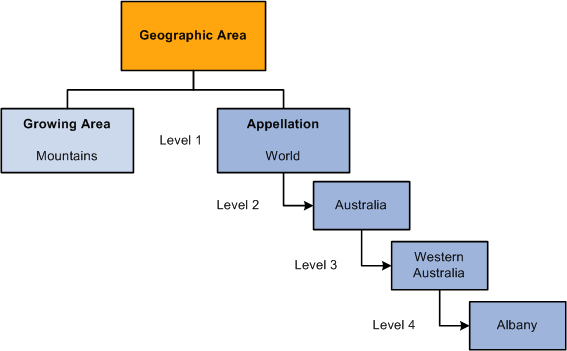
2.5 Setting Up Geographic Areas
This section provides an overview and discusses how to set up geographic areas.
2.5.1 Understanding Geographic Area
A geographic area can be a country or a region within a country, such as a state or province. You can link geographic areas to each other to create a hierarchical view. The JD Edwards EnterpriseOne Grower Management system enables you to define two types of geographic areas: appellation and growing area.
Appellation is the official geographic region as determined by the relevant authorities who guarantee the origin of specified food and beverage products. Examples of appellation authorities include:
-
Australia. The Australian Wine and Brandy Corporation (AWBC).
-
Italy. The Italian Ministry of Agriculture and Forestry
-
France. The National Institute of Appellations of Origin (INAO) created the Appellation d'Origine Contrôlée (AOC) system.
-
United States. The Bureau of Alcohol, Tobacco, and Firearms established American Viticulture Areas (AVAs) to define growing regions.
Growing area is a separate region that is not legally recognized.
This diagram illustrates types of geographic areas:
To support geographic area relationships, the system maintains two geographic area descendents tables. These tables identify the children and grandchildren for any geographic areas. The tables also support the Use Hierarchy functionality of the Harvest Workbench program (P40G032).
|
Note: The system provides a batch program that enables you to rebuild the geographic area descendent tables. You can use the Rebuild Geographic Area Descendents program (R31B37) to restore the descendent tables if a problem occurs when you set up geographic areas. |
2.5.2 Prerequisite
Before you complete the tasks in this section:
-
Select an area type from UDC table 31/GT.
-
Specify a hierarchy level and sort order number for displaying geographic areas.
2.5.3 Forms Used to Set Up Geographic Areas
| Form Name | Form ID | Navigation | Usage |
|---|---|---|---|
| Edit Geographic Area | W31B37D | Farming Activities (G40G1412), Geographic Area and Relationship.
click the Add button on the View Geographic Area form. |
Set up geographic areas |
| Edit Geographic Area Relationship | W31B37F | Select a geographic area and click Relationship on the View Geographic Area form. | Set up geographic area hierarchies. |
2.5.4 Setting Up Geographic Areas
Access the Edit Geographic Area form.
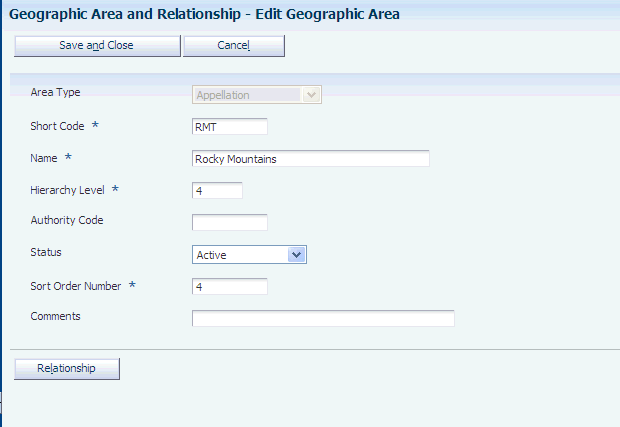
- Area Type
-
Specify the type of area you want to define. Values are:
-
Appellation
-
Growing Area
These values are listed in the Geographic Area Type UDC table (31B/GT).
The system stores geographic areas in the Geographic Area Master table (F31B37). The relationships are stored in the Geographic Area Relationship table (F31B371), and descendents are stored in the Appellation Descendents (F31B373) and the Growing Area Descendents (F31B372) tables.
When you delete a geographic area, the area type determines from which descendent table the system deletes the corresponding record.
-
- Short Code
-
Enter a free-form text field that identifies the area. For example, enter CA for California and AUS for Australia. The system uses this code to populate the descendent tables. If you update the short code, the area type that you defined for the geographic area determines which descendent table to update.
- Hierarchy Level
-
Enter the value that determines the hierarchy level of the geographic area that you are defining.
- Sort Order Number
-
Enter the value the system uses to sequence geographic areas for display within the specified hierarchy level.
- Status
-
Assign a status to the geographic area. You can assign only active geographic areas to a farm, block, or lot.
- Authority Code
-
Enter the governing body that is responsible for the geographic area.
2.5.5 Setting Up Geographic Area Relationships
Access the Edit Geographic Area Relationship form.
Figure 2-10 Edit Geographical Area Relationship form
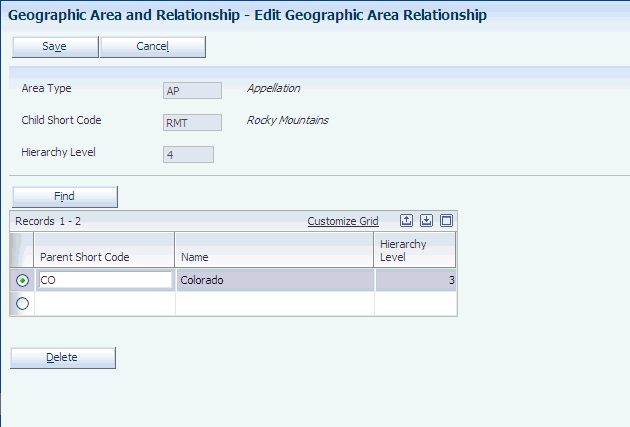
Description of "Figure 2-10 Edit Geographical Area Relationship form"
- Parent Short Code
-
Geographic areas can be setup in levels of hierarchy. Use this field when relating a geographic area to a child geographic area. For example, a child geographic area may be "Mexico" as level 2 in the hierarchy and "World" may be the parent geographic area as level 1. When defining relationships, you can only link geographic areas that have the same area type. For example, you can link appellations to other appellations and growing areas to other growing areas.
2.6 Setting Up Material Types
This section provides an overview of material types, lists prerequisites, and discusses how to:
-
Set up material types.
-
Set up material type combinations
2.6.1 Understanding Material Types
Material types are attributes that represent the physical state of a crop. Typically, you use material types in blending operations, but you can setup a farming operation to change the material type. The item number on the material type is a required field, but it applies to blend operations. The system uses the material type to identify the AAIs that it uses for journal entries created by blend operations.
As you perform farming operations, the material type can change to reflect the stage of the crop as it grows from seed to plant to a mature crop ready for harvesting. When defining a farming operation, you can specify what material types are valid for the operation. For example, a pruning operation may be valid only until a plant flowers, after which no pruning operations are allowed.
Related material types can be grouped into a summary material type. You can set up rules for combining material types. For example, you can set up a rule that states that when juice is combined with grapes, the resulting material type is fermenting must. Additionally, you can set up a rule that states that when juice is combined with must, the resulting material type is juice.
2.6.2 Prerequisites
To set up material types:
-
Set up the Summary Material Type UDC table (31B/SM)
-
Set up temperature conversion charts for spirit material types.
-
Set up an item cross-reference.
2.6.3 Forms Used to Set Up Material Types
| Form Name | Form ID | Navigation | Usage |
|---|---|---|---|
| View Material Type Information | W31B04A | Blend System Setup (G31B01), Setup Material Types | Review existing or add new material types. |
| Edit Material Type Information | W31B04D | Click the Add button on the View Material Type Information form. | Set up material types. |
| Edit Material Type Combination | W31B04C | Click the Combinations button on the View Material Type Information form. | Set up material type combinations. |
2.6.4 Setting Up Material Types
Access the Edit Material Type Information form.
Figure 2-11 Edit Material Type Information form: General tab
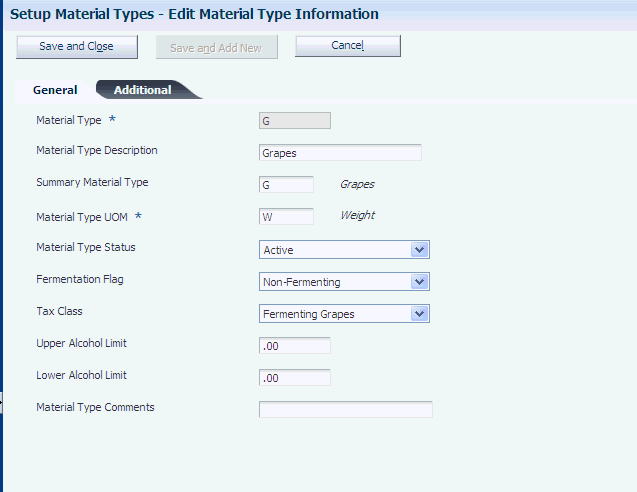
Description of "Figure 2-11 Edit Material Type Information form: General tab"
2.6.4.1 General
Select the General tab.
- Material Type and Material Type Description
-
Enter a code for the material type to define and provide a description.
- Summary Material Type
-
Select a value from UDC table 31B/SM that specifies the parent material type. You can group similar material types under a summary material type. Values are:
C: Culture
CN: Concentrate
F: Fortified Wine
G: Grapes
J: Juice
L: Lees and Scrap
M: Must
S: Spirit
W: Wine
- Material Type UOM (material type unit of measure)
-
Select area as the unit of measure for grower material types. The system expects the material to be located on a block of land which is defined in area. Select weight or volume as the unit of measure that is associated with a blend material type. The values are stored in UDC table 31B/MU. Values are:
Area
Volume
Weight
- Material Type Status
-
Assign a status to the material type. Only active material types can be assigned to blocks.
- Material Type Comments
-
Enter free-form text. This field is typically used to provide a reason for a change.
2.6.4.2 Additional
Select the Additional tab.
Figure 2-12 Edit Material Type Information form: Additional tab
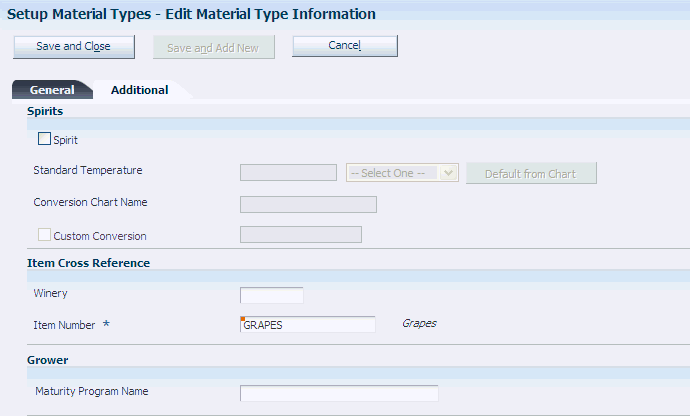
Description of "Figure 2-12 Edit Material Type Information form: Additional tab"
- Spirit
-
Select to indicate that you are defining a material type for spirits. This indicator enables you to set up multiple material types for spirit such as brandy or pure spirit. If you are defining a material type that is not a spirit, leave this option blank.
- Winery
-
Enter the branch/plant for the item that you are using as a cross-reference for costing. The system issues a warning if you did not set up the item for this branch/plant, but you can save the item cross-reference for the material type.
This field is required when you use a bill of lading to receive bulk material with the material type into the JD Edwards EnterpriseOne Blend Management system.
- Item Number
-
Specify an item number as a cross-reference for costing purposes. The system retrieves costs for material with the material type that you are defining from the cost information that you set up for this item number. You set up costs by branch/plant.
- Maturity Program Name
-
If you use JD Edwards EnterpriseOne Grower Management, you can attach a maturity calculation program to the material type record. You use the maturity date calculation program to provide growers with information on the growth status of the crop. This information enables growers to determine the best picking or harvest cut date.
2.6.5 Setting Up Material Type Combinations
Access the Edit Material Type Combination form.
Figure 2-13 Edit Material Type Combination form
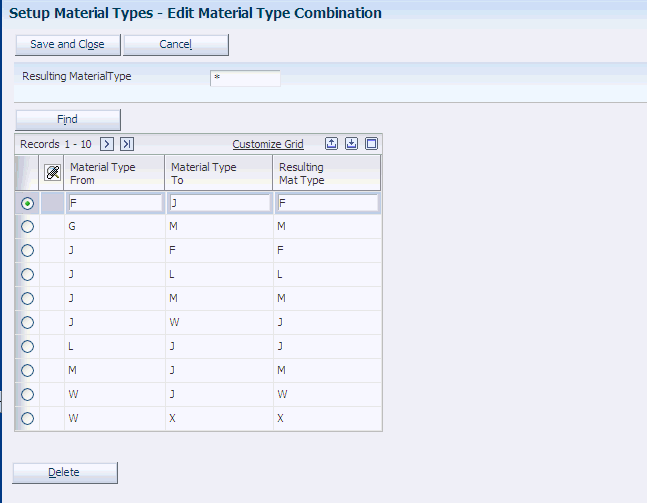
Description of "Figure 2-13 Edit Material Type Combination form"
- Material Type From and Material Type To
-
Enter the combination of material types to permit.
- Resulting Mat Type (resulting material type)
-
Enter the material type that results when you mix two material types in the combination that you indicated.
2.7 Setting Up Varieties
This section discusses how to set up varieties.
2.7.1 Understanding Varieties
Use varieties to define the types of product within an item. For example, you set up an item for apples. You can then set up varieties of apples to include:
-
MacIntosh.
-
Red Delicious.
-
Granny Smith.
-
Michelin.
The system uses the variety, family, and color UDCs, and the authority code for inquiry and reporting purposes.
2.7.2 Forms Used to Set Up Varieties
2.7.3 Setting Up Varieties
Access the Edit Variety Information form.
Figure 2-14 Edit Variety Information form
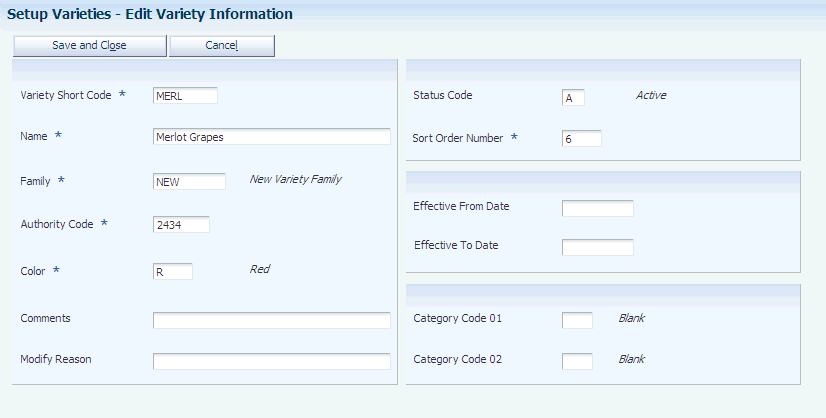
Description of "Figure 2-14 Edit Variety Information form"
- Variety Short Code
-
Specify the short code for the variety, for example, MAC for MacIntosh and MICH for Michelin.
- Name
-
Enter the full name describing the variety.
- Family
-
Enter a UDC (31B/VF) to use to group similar varieties for reporting and inquiry.
- Authority Code
-
Enter a code that represents the standard or official designation of the variety. The system uses this code for legal or standards reporting.
- Color
-
Enter a UDC (31B/VC) that specifies the color of a variety.
- Status Code
-
Enter a UDC (31B/ST) to use to specify whether the variety is active or inactive.
- Sort Order Number
-
Enter the sort order number so that the varieties that are used more frequently are displayed at the top of the search and select form.
- Effective From Date
-
Enter the date that the variety becomes effective.
- Effective To Date
-
Enter the date that the variety becomes ineffective.
- Category Code 01 and Category Code 02
-
Enter a UDC (31B/V1 - V2) to specify variety information.
2.8 Setting Up Style Definitions
This section provides an overview of style definitions and discusses how to:
-
Set processing options for Setup Style Definitions (P31B34).
-
Set up style definitions.
2.8.1 Understanding Style Definitions
Style is a generic term for the recording of various pieces of information about a harvest lot, for example number of irrigation days or the number of times a harvest is sprayed. After you have defined styles and assigned them to a harvest record, use the styles for reports and inquiries. The system stores style definitions in JD Edwards EnterpriseOne Grower Management, in the Block Styles Maintenance table (F40G022).
2.8.2 Forms Used to Set Up Style Definitions
2.8.3 Setting Processing Options for Setup Style Definitions (P31B34)
Use this processing option to define default values.
2.8.3.1 Process
This processing option defines the default status code.
- Status Code
-
Specify the default code used when creating a new style. Values are:
A: Active
I: Inactive
2.8.4 Setting Up Style Definitions
Access the Edit Style Definition Information form.
Figure 2-15 Edit Style Definition Information form
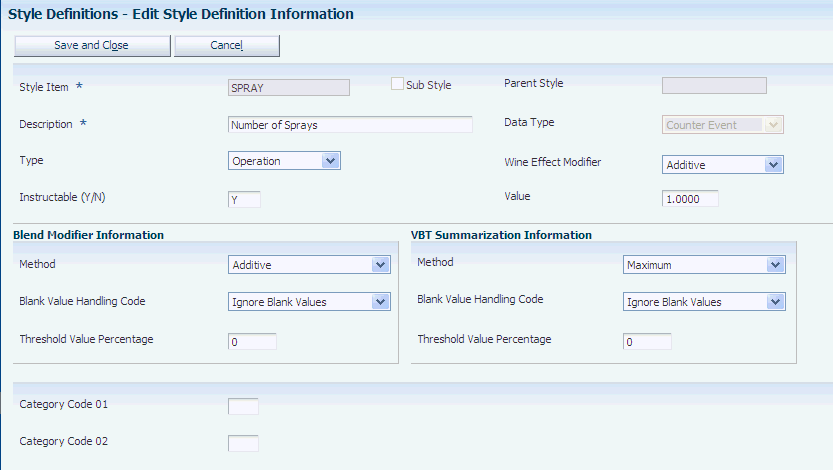
Description of "Figure 2-15 Edit Style Definition Information form"
- Style Item
-
Enter a code that represents the style.
- Data Type
-
Select a data type to indicate how you want to track the effects of operations or vessels on style. For example, you can determine that the style you are defining tracks how much time passes between farming operations. Data types are stored in UDC table 31B/DT. Values are:
Counter Day
Counter Event
Counter Hour
Date
Percent
Time Day
Time Hour
Vessel Counter Day
Vessel Counter Hour
Note:
Use Vessel Counter Day or Vessel Counter Hour to create a vessel counter style in the JD Edwards EnterpriseOne Blend Management system. - Type
-
Enter a UDC (31B/TY) that specifies the type of style. Style types are stored in UDC table 31B/TY. Values are:
Barrel
Block
Equipment
Operation
Tank
Note:
If you use data type Date you must specify Operation as the style type. For JD Edwards EnterpriseOne Grower Management, use either Block or Operation types. - Instructable (Y/N)
-
Specify whether the style can be instructed in a configured operation.
2.8.4.1 Blend Modifier Information
- Method
-
Select a method to specify the rules for calculating the style values when two or more lots of wine with existing styles are blended. Values are
Additive
Average
Maximum
Minimum
Methods are stored in UDC table 31B/BM.
Note:
If you set up a style definition with data type Date, you cannot use the Additive method.
2.9 Setting Up Maturity Date Calculations
This section provides an overview of maturity calculations and discusses how to set up maturity calculations.
2.9.1 Understanding Maturity Date Calculations
Growers need information about the growth status or maturity of their crops so that they can determine when to pick or harvest the crop. You can define a maturity calculation that the system uses to calculate maturity dates and attach the calculation to a material type, grower block, or harvest.
To enable you to associate a maturity calculation with a material type, block, or harvest, you:
-
Set up a maturity calculation program.
-
Select the custom business function that performs the calculation.
-
Attach the program to the material type, block or harvest.
You can use two types of maturity dates—planned maturity and calculated maturity.
2.9.2 Form Use to Set Up Maturity Calculations
| Form Name | Form ID | Navigation | Usage |
|---|---|---|---|
| Add/Edit Maturity Calculation Program Name | W40G50B | Setup (G40G141), Maturity Calculation
Click Add on the Find/Browse - Maturity Calculation Program Name form. |
Set up maturity calculations. |
2.9.3 Setting Processing Options for Maturity Calculation Program Name - Setup (P40G50)
Uses these processing options to enable visual assist and to specify version programs that the system calls from the P40G50 program.
2.9.3.1 Display
- 1. Enable Visual Assist for Business Function ID and Function Name
-
Specify that the Add/Edit Maturity Calculation Program Name application (P40G50) enables the Visual Assist and enables the user to search and select the business functions from the Object Management Workbench Library. Values are:
Blank: Disable Visual Assist. This is the recommended option.
1: Enable Visual Assist.
Since the OMW Library is a control table, accessing this table may not always be allowed based on the OCM setting. Therefore users may get the JAS_MSG346: CROSS_DATA_SOURCE_OPERATION_NOT_SUPPORTED error when trying to use the Visual Assist. Therefore, it is recommended that this option be disabled and users manually enter the Function ID and Function Name.
2.9.3.2 Version
- 1. P40G51 Version
-
Enter a version name for Maturity Calculation Business Function Search and Select program (P40G51). If you leave this option blank, the system uses version ZJDE0001.
2.9.4 Setting Up Maturity Calculations
Access the Add/Edit Maturity Calculation Program Name form.
Figure 2-16 Add/Edit Maturity Calculation Program Name
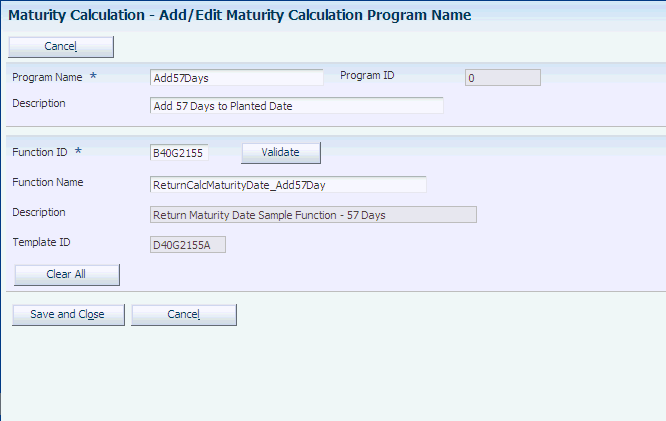
Description of "Figure 2-16 Add/Edit Maturity Calculation Program Name"
- Program Name and Description
-
Enter a name and description for the maturity calculation program to set up.
- Function ID, Function Name, and Description
-
Enter the code for the custom business function to use calculate maturity dates. When you enter the Function ID, the system populates the Function Name and Description fields from the business function record.
Use the Visual Assist button to access the Search & Select - Business Function for Maturity Calculation form. This form provides a search over the OMW library to retrieve business functions for returning a maturity date.
Note:
The system uses the processing options to enable the Visual Assist. - Validate
-
Click to ensure that you selected a valid custom calculation.
- Template ID
-
When you select a business function for the Function ID field, the system populates this field with the template ID from the business function record.
2.10 Setting Up Default Location Information
This section provides an overview of default location information, lists prerequisites, and discusses how to set up a default location.
2.10.1 Understanding Default Location Information
Many of the forms within JD Edwards EnterpriseOne Grower Management require that you specify a location, such as a grower cost center, to which you are assigned. You can set up default locations for each person in the organization. When you set up default location information, you assign a branch/plant, blend business unit, grower cost center, and print queue to a user ID or terminal ID that the system uses every time you sign in to a JD Edwards EnterpriseOne application. If the system uses the default locations, it automatically displays the branch/plant, blend business unit, or grower cost center on the appropriate forms. If no default location information is assigned to a user ID or terminal ID, then the user must enter the locations manually.
Default print queues represent the location where the system sends certain types of documents. You can assign a default print queue so that each time you print, the system sends the document to the default print queue. If you have not assigned a default print queue, the system first accesses the print queues that were assigned in the version list, and then accesses the print queue that is assigned to the user profile. Print programs that you have automatically defined access to the Default Print Queues table (F40096). To display other print programs, modify them to access the F40096 table, and set them up as user-defined codes. When you set up a default location, you also can define an approval route code if you use approval routing for purchase orders.
2.10.2 Prerequisites
Before you complete the tasks in this section:
-
Verify that you have set up branch/plants, blend business units, and grower cost centers.
-
Verify that you have set up print queue codes in UDC table (40/PP).
2.10.3 Forms Used to Set Up Default Location Information
2.10.4 Setting Up a Default Location
Access the Default Location & Approval form.
Figure 2-17 Default Location & Approval form
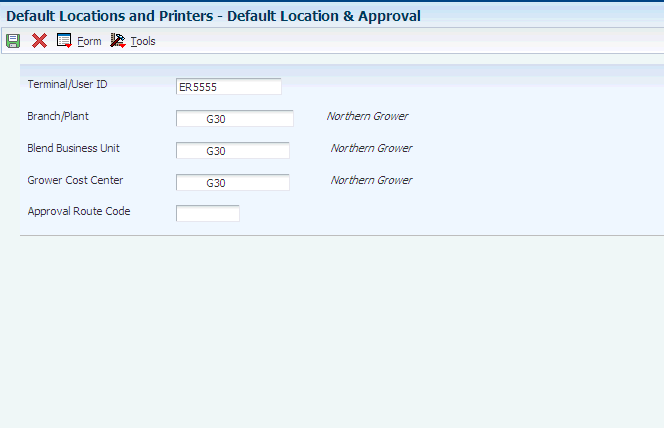
Description of "Figure 2-17 Default Location & Approval form"
- Terminal/User ID
-
Enter the workstation ID number or the user ID.
- Branch/Plant
-
Enter the branch/plant that the system uses as a default.
- Blend Business Unit
-
Enter the blend business unit that the system uses as a default. This field appears only when system SY31B is active. The JD Edwards EnterpriseOne Grower Management system uses the Blend Business Unit in the Farming Activities - Search for Operations and Weigh Tag - Search for Operations forms.
- Grower Cost Center
-
Enter the grower cost center that the system uses as a default. This field appears only when system SY40G is turned on.
- Approval Route Code
-
Enter a code that specifies to whom an order is routed for approval.
2.11 Setting Up UDCs
This section provides an overview of UDCs for JD Edwards EnterpriseOne Grower Management.
2.11.1 Understanding UDCs for JD Edwards EnterpriseOne Grower Management
JD Edwards EnterpriseOne Grower Management UDCs enable you to configure the way the system operates; and to define reporting and inquiry categories. Many programs in the JD Edwards EnterpriseOne Grower Management system use UDCs to process information. Some UDCs are shipped with predefined data. You can change or delete the predefined data if it is not hard-coded, and add UDCs to suit your own needs.
This graphic highlights the various uses for the grower-specific UDCs:
Figure 2-18 JD Edwards EnterpriseOne Grower Management UDCs
Description of "Figure 2-18 JD Edwards EnterpriseOne Grower Management UDCs"
This table lists JD Edwards EnterpriseOne Grower Management UDCs, their description, and where the system uses each UDC:
| UDC | Description | Farm | Block | Harvest |
|---|---|---|---|---|
| 40G/F1–F9 and OF- 5F | Farm attributes | x | ||
| 40G/01–16 | Block attributes | x | ||
| 40G/AD | Action dates | x | x | |
| 40G/AT | Address or contact type | x | x | |
| 40G/BF | EUR distribution type | x | ||
| 40G/BT | Block Type | x | ||
| 40G/CL | Clone | x | ||
| 40G/CM | Coordinates method | x | ||
| 40G/D1 | Longitude direction | x | ||
| 40G/D2 | Latitude direction | x | ||
| 40G/GC | Grower composition code | x | x | x |
| 40G/GD | Growing district | x | x | x |
| 40G/GI | Geographic ID code | x | x | x |
| 40G/GR | Growing region | x | x | x |
| 40/HT | Harvest status | x | ||
| 40G/IT | Irrigation type | x | x | |
| 40G/PL | Plant spacing | x | x | |
| 40G/PM | Pruning method | x | x | |
| 40G/QL | Quality indicator | x | x | |
| 40G/RS | Root stock | x | x | |
| 40G/RW | Row spacing | x | x | |
| 40G/SC | Farm Status | x | ||
| 40G/SM | Operation spray method | x | ||
| 40G/SP | operation spray type | x | ||
| 40G/ST | Soil type | x | x | |
| 40G/ZO | UTM zone | x |
Some UDCs are hard-coded for use in the JD Edwards EnterpriseOne Grower Management system. For example, the system uses the block type codes (40G/BT) to identify whether the block is internal or external.
This is not a complete listing of all UDCs that the JD Edwards EnterpriseOne Grower Management system uses. For example, weigh tag operations use the Bin Type (31B/B1) codes and harvest operations use the Blend UOM (31B/UM) codes.
2.11.1.1 UDCs and Category Codes
You use UDCs to create predefined values that are used on various forms and provide standardized data entry. Some UDCs are shipped with predefined data. You can change or delete predefined data if the data is not hard-coded.
Category codes enable you to group records for reporting and inquiry purposes.
2.12 Setting Up AAIs
This section provides an overview of AAIs for the JD Edwards EnterpriseOne Grower Management system, lists prerequisites, and discusses how to set processing options for JD Edwards EnterpriseOne Grower Management AAIs (P40950).
2.12.1 Understanding AAIs for the JD Edwards EnterpriseOne Grower Management System
You set up AAIs to determine the accounts to which the system distributes general ledger entries.
In JD Edwards EnterpriseOne Grower Management, the system creates journal entries when you create a weigh tag or farming operation.The system uses multiple AAI tables, each of which applies to a certain type of transaction. In each table, you specify a general ledger account for each unique combination of company, document type, and general ledger class. You also can enter memo text for each AAI. The JD Edwards EnterpriseOne Grower Management system uses AAIs from the JD Edwards EnterpriseOne Inventory Management, JD Edwards EnterpriseOne Procurement, and JD Edwards EnterpriseOne Blend systems.
2.12.1.1 AAIs for JD Edwards EnterpriseOne Grower Management
These AAI tables determine which accounts are debited and credited when you enter a weigh tag:
| Table | Table Name | Description |
|---|---|---|
| 4326 | Weigh Tag Price Adjustments | Account derived to handle individual weigh tag price adjustments to the Account Ledger (F0911) table. |
| 4335 | Standard Cost | Account derived to handle the variance amount when the item's Sales/Inventory Cost Method is set to 07, standard cost. |
| 4338 | Reprice Variance/Inventory | Account derived to handle reprice variance amounts for items not using a standard cost method and that have inventory interface of C, D, or Y (stock items). |
| 4339 | Reprice Variance/Non Inventory | Account derived to handle reprice variance amounts for items meeting these conditions:
|
2.12.1.2 AAIs for Variances
These AAI tables determine which accounts are debited and credited when a variance is in the cost of an item:
| Table | Table Name | Description |
|---|---|---|
| 4326 | Weigh Tag Price Adjustments | Journal entry credit or debit to a standard cost or actual cost variance account that is created from the PO Receipts program (P4312). |
| 4335 | Standard Cost | Journal entry credit or debit to a standard cost variance account that is created from the PO Receipts program (P4312) when a weigh tag operation is performed. |
| 4338 | Reprice Variance/Inventory | Journal entry credit or debit to a variance account that is created from the PO Receipts program (P4312) when a weigh tag operation is performed. |
| 4339 | Reprice Variance/Non Inventory | Journal entry credit or debit to a variance account that is created from the PO Receipts program (P4312). when a weigh tag operation is performed |
2.12.2 Prerequisites
Before you complete the tasks in this section:
-
Set up companies.
-
Determine transaction types and set up in UDC table (00/DT).
-
Set up document types in UDC table (00/DT).
-
Set up G/L Class codes in UDC table (41/9).
-
Set up account master information.
2.12.3 Forms Used to Set Up AAIs in JD Edwards EnterpriseOne Grower Management
2.12.4 Setting Processing Options for JD Edwards EnterpriseOne Grower Management AAIs (P40950)
Use these processing options to set default values.
2.12.4.1 Defaults
These processing options enable you to enter default information for the Distribution AAIs (P40950) program.
- AAI Table Number
-
Enter a number that the system uses to specify sequence and retrieve accounting information.
- Availability to Distribution AAI Tables
-
Enter 1 if the Cost Type field should be available to these Distribution AAI tables: 4122, 4124, 4134, 4136, 4220, 4240, and 4310.