20 Entering Employee Instructions
This chapter contains the following topics:
-
Section 20.2, "Entering Employee Deduction, Benefit, and Accrual Instructions"
-
Section 20.6, "Setting Up Instructions to Generate Component Pay Types"
20.1 Understanding Split Time
In addition to labor distribution instructions, we offer a Split Time feature that automatically allocates time entry charges to various accounts during time entry. Split Time is activated in the processing options for the Time Entry MBF Processing Options program (P050002A). When the Split Time feature is activated, it sets up a hierarchy for the system to search to find the appropriate account number as follows:
-
The system first searches for labor distribution instructions at the employee level. If it finds them, it retrieves the percentage or number of hours set up, as well as the account number assigned to each amount.
If the labor distribution instructions are using the hours method instead of the percentage method, the system prorates the hours to determine the amount of the split. The system applies these amounts to all pay types entered on the Time Entry Revisions form regardless of the pay type set up in the labor distribution instructions.
-
If no labor distribution instructions are set up, the system searches the Position Control specifications and selects the allocation, if any.
-
If no labor distribution instructions are set up and no account allocations are defined in the Employee Master program (P0801) specifications, the system proceeds to the automatic accounting instructions and uses the account information defined there.
The Split Time feature was designed for clients who want to avoid setting up numerous automatic accounting instructions. It is intended for those employees who typically charge their time to more than one area. All pay types are split according to the instructions that the system finds. Split Time and labor distribution instructions were not designed to work together. When Split Time is activated, the system includes labor distributions in the hierarchy when searching for the account numbers used to allocate labor charges. When Split Time is not activated, the labor distribution instructions must be manually copied during time entry for non-autopay employees.
When Split Time is activated and the employee also has labor distribution instructions, every pay type entered on the timecard is split according to the labor distribution instructions that are set up for the employee. Therefore, if pay type 1 is set up to be split between two accounts on the labor distribution instructions, then the time is split between the accounts selected on labor distribution instructions.
20.1.1 Examples: Activating Split Time
These are examples of how the system allocates labor charges among accounts based on labor distribution instructions or the Split Time feature.
Example 1: Labor distribution instructions set up at the employee level using the percentage method as shown in this table. Split Time is activated.
| Pay Code | Description | Hours or Percent | Account # |
|---|---|---|---|
| 1 | Regular | 60 | 9.8115 |
| 1 | Regular | 40 | 9.8118 |
On the Time Entry Revisions form, when 40 hours is entered for pay code 801, the system automatically supplies this allocation because the Split Time feature is activated:
| Pay Code | Description | Hours | Account # |
|---|---|---|---|
| 801 | Vacation | 24 | 9.8115 |
| 801 | Vacation | 16 | 9.8118 |
For any pay code entered (including pay code 1) on the Time Entry Revisions form, the system supplies the hours and account number from the labor distribution instructions. The system does not supply the pay code or change the pay code that was entered.
When time is entered you must copy the labor distribution instructions for the employee if the Split Time processing option is not activated. The time is then allocated according to the labor distribution instructions. Only the pay type set up on the labor distribution instructions is allocated on the Time Entry Revisions form.
Example 2: Labor distribution instructions are set up at the employee level using the percentage method. Split Time is not activated.
On the Time Entry Revisions form, when 40 hours is added for pay code 801, the system does not allocate time charged to pay code 801 because the labor distribution instructions were set up to allocate charges to pay code 1 and the Split Time feature is not activated:
| Pay Code | Description | Hours | Account # |
|---|---|---|---|
| 801 | Vacation | 40 | 9.8118 |
When you add 40 hours for pay code 801 on the Time Entry Revisions form and then select copy labor distribution instructions, the system prompts you for the number of hours to charge and allocates those hours of regular pay based on the labor distribution instructions:
| Pay Code | Description | Hours | Account # |
|---|---|---|---|
| 1 | Regular | 24 | 9.8115 |
| 1 | Regular | 16 | 9.8118 |
| 801 | Vacation | 40 | 9.8118 |
The vacation pay code is not split because the labor distribution instructions specified only regular pay (pay code 1).
These are suggestions for using the labor distribution instructions and the Split Time feature:
-
Use Split Time when you want to split every pay code according to either labor distribution instructions or position control.
-
Enter a batch of timecards with the Split Time feature activated, and then deactivate Split Time and enter additional timecards.
20.2 Entering Employee Deduction, Benefit, and Accrual Instructions
This section provides an overview of employee deductions, benefits, and accruals instructions and discusses how to:
-
Enter employee deductions, benefits, and accruals instructions.
-
Delete a DBA instruction
-
Enter rollover overrides.
20.2.1 Understanding Employee Deduction, Benefit, and Accrual Instructions
After you set up deductions, benefits, and accruals (DBAs), you enter DBA instructions to assign DBAs to employees. You can enter DBAs at these levels:
-
One-time DBA override.
-
Employee DBA instructions.
-
Group DBAs.
-
DBA setup.
After you assign DBAs, the system calculates them during the payroll cycle in the same search sequence.
You enter DBA instructions at the employee level to define and maintain DBAs unique to an individual employee. A DBA assigned at the employee level overrides DBA amounts or rates that are defined at the group or DBA setup level, unless the DBA is a table method DBA.
To help you understand how to assign DBAs, this diagram illustrates the order in which the system manages DBA setup and DBA calculations:
Figure 20-1 Order of DBA setup and calculations
Description of ''Figure 20-1 Order of DBA setup and calculations''
This table illustrates the order in which the system handles DBA setup and DBA calculations:
| Process | Order |
|---|---|
| DBA setup | When you set up DBAs, you first set up general DBAs that apply to the majority of your employees. Then you set up DBAs that apply to specific groups of employees or specific employees. Finally, you can apply one-time DBA overrides for specific employees for any one pay period. |
| DBA calculations | During the payroll-cycle processing, the system first calculates one-time DBA overrides. If there are no DBA overrides, then the system searches for DBAs that apply to the individual employee or employee groups. If no employee-specific DBAs or group plan DBAs exist, the system calculates any general DBAs. |
The information that you enter with the Employee DBA Instructions program (P050181) represents the third level of DBA assignment, the employee level.
When you assign DBA instructions at the employee level, you can specify:
-
Exceptions by employee for a group of DBAs.
-
Overrides for DBA amounts, dates, and limitations.
-
Start and stop dates for a DBA.
-
DBAs to calculate only when an employee works in a specified assignment.
|
Note: You can also view expired or cleared DBA transactions. |
To simplify the management of DBAs among employees, you can use benefit groups to avoid entering identical lists of DBAs for each employee. The system refers to groups of DBAs as group plans. Group plans are defined by union codes or group codes. The system automatically assigns group plans to the employee when you are hiring an employee and enter a Union Code in the Employee Organizational Assignments program (P0801ORG).
You can use the EE DBA Review program (P05087) to review existing DBAs assigned to an employee before adding more DBAs. You can also review the DBA itself before assigning it to an employee.
Although you can use this form to assign all DBAs for an employee, maintaining the lists requires considerable effort. For this reason, we recommend that you assign the majority of an employee's DBAs in a group plan and that you use DBAs for an individual employee only for exceptions to the group plans.
You can override a DBA in a group plan on P050181, as well as add DBAs to an employee record.
If you are using the JD Edwards EnterpriseOne Benefits Administration module, the system automatically assigns DBA codes to an employee record when you enroll the employee in benefit plans. The DBA codes for these benefit plans appear on P050181.
|
Note: If you want a DBA to calculate only when an employee works in a specified assignment, you enter an assignment number for that DBA on P050181. When calculating the DBA, the system uses all timecards associated with that assignment as the basis of calculation for the DBA. For example, if the employee works 40 hours during the pay period, but only 20 hours were worked in the specified assignment, the system uses all pay associated with the 20 hours worked in the assignment as the basis of calculation for the DBA.If you want to set up DBAs that use other DBAs as the basis of calculation to calculate only when an employee works in a specified assignment, you would only enter the assignment number on the initial DBA. For example, you want DBA 4999 and DBA 5000 to calculate for an employee only when they work in a specified assignment, and DBA 5000 is based on DBA 4999. You would only enter the assignment number DBA 4999 on P050181. The system would use all pay associated with the specified assignment number as the basis of calculation for DBA 4999, and would use DBA 4999 as the basis of calculation for DBA 5000. Administrators can use the Inception to Date Limits code (CMAX) in the Employee DBA Instructions program (P050181) to specify the maximum payment amount or hours that an accrual can have at any one time. For example, a company might have a vacation policy that allows an employee to roll 40 hours each year over to the following year, but the accrued balance cannot exceed a total of 300 hours at any one time. The system calculates the payroll cycle and year-end rollover up to the limit and takes into account the amounts that the system has processed. |
20.2.1.1 Rollover Overrides
When you set up accruals to calculate leave time, you typically attach a rollover table to the accrual. Rollover tables specify the service requirements and limits associated with leave time rollover. When you attach the rollover table to the accrual, and then attach the accrual to employees, the system use the rollover table that is associated with the accrual to calculate rollovers for all of the employees.
Occasionally, you might find it necessary to override the rollover instructions for one or more employees. Using rollover overrides, you can specify the differences in rollover information at the employee level. For example, as a condition of employment, an employee may be able to keep all accrued time as opposed to the company policy that employees may not roll accrued time from one year to the next. Rather than setting up a new leave accrual, you can use rollover overrides to specify the different rollover schedule for the new employee. You can create a rollover table that specifies rollover rules for this employee, and attach it to the employee's DBA instruction for the leave accrual.
To enter rollover instructions, you must first assign to the employee a leave accrual that is associated with a rollover table, then assign the desired rollover table to the employee on Work With Employee Rollover Table Override.
To implement rollover overrides, you use the Employee DBA Instructions program (P050181). This program uses these tables:
-
Employee Master Information (F060116)
-
Employee Pay Instructions (F06106)
-
Employee Rollover Table Overrides (F0690361)
20.2.2 Forms Used to Enter Employee Deduction, Benefit, and Accrual Instructions
20.2.3 Setting Processing Options for Employee Deduction, Benefit, and Accrual Instructions (P050181)
Processing options enable you to specify the default processing for programs and reports.
20.2.3.1 Process
- 1. Edit Benefit Plan DBA
-
Enter a value to determine if the system allows edits on the Employee DBA Instruction form for DBAs that are attached to a benefit plan. Values are:
Blank: Changes or deletions may only be initiated through the Benefits Administration menu (G08BB - Daily Processing).
1: Allow changes or deletions.
- 2. Overlapping Date Edit Rule
-
Enter a value to determine how Employee DBA Instructions are edited for overlapping dates. Values are:
Blank: Edit for overlapping records in the grid only - Set an error on overlapping records (Default).
1: Edit for overlapping records in the grid only - Set a warning on overlapping records.
2: Edit for overlapping records in the grid and against corresponding cleared items - Set an error on overlapping records.
3: Edit for overlapping records in the grid and against corresponding cleared items - Set a warning on overlapping records.
4: Edit for overlapping records in the grid and against cleared items on new and changed rows only - Set an error on overlapping records.
5: Edit for overlapping records in the grid and against cleared items on new and changed rows - Set a warning on overlapping records.
Note:
When the Cleared Items Checkbox is selected, all instructions are added to the grid. Therefore, the system edits for overlapping dates on all records in the table.
20.2.4 Entering Employee Deduction, Benefit, and Accrual Instructions
Access the Employee DBA Instructions form.
|
Note: As an update to Release 9.1, you can use the Employee DBA Instructions program (P050181) to enter group limit amounts for only those DBAs that are associated with a group limit code. |
Figure 20-2 Employee DBA Instructions form
Description of ''Figure 20-2 Employee DBA Instructions form''
- Employee Identification
-
Enter the employee number, tax ID, or alternate number, depending on the employee number mode that is set up in the Payroll Constants for company 00000.
- Effective On
-
Enter a future date when all changes will take effect or the date when the changes went into effect. If you do not enter a date in this field, the system uses the current date as the effective date.
- Active, Terminated, and All
-
Enter a value for the employee Active/Terminated/All Flag. This flag is used for JD Edwards EnterpriseOne to select and sort employees depending on their status.
- PDBA Code
-
Enter a code that defines the type of pay, deduction, benefit, or accrual.
Pay types are numbered from 1 to 999. Deductions and benefits are numbered from 1000 to 9999.
- Amt/Rt Level 1 (amount/rate level 1)
-
Enter a value that specifies a percentage, a monetary amount, or an hourly rate, depending on where it is used. Values are:
1: For a deduction, benefit, or accrual, the meaning of this value depends on the method of calculation. The method determines whether the deduction is a flat monetary amount, a percentage, or a multiplication rate. Table method DBAs, depending on which table method they use, can either use this amount in the calculation or ignore it. If there are exceptions to the table calculation, you can override the table code in the detail area, set up a flat monetary DBA amount, or override the amount with a one-time override for a timecard.
2: For a pay type, amounts entered in this field override the hourly rate.
- Amt/Rt Level 2 (amount/rate level 2)
-
Enter the second amount or rate associated with a deduction, benefit, or accrual. Because many DBA types require multiple tiers, two levels of Amount (Rate) exist. The system uses the first level, Amount (Rate) 1, until the annual limit is reached. Then, the second level, Amount (Rate) 2, begins the next time the employee is paid. Amount (Rate) 2 continues until the second annual limit is reached.
This field works in conjunction with the annual limit fields. The rate you enter in this field supersedes any other table rate for an employee, except for one-time overrides during time entry.
- Pay Start Date
-
Enter the date an instruction starts, for example, the date the system should start a deduction.
The start date must be less than or equal to the timecard date. To start a DBA at the beginning of a pay cycle, make the start date equal to the first day of the pay cycle. For example, if the pay cycle runs from October 1 to October 15, start the DBA on October 1.
If both the start and stop dates are within the pay period from and through dates, even if the stop date is not less than the timecard date, the system does not calculate the DBA.
For a flat amount DBA, the system calculates the full DBA for any timecard that falls within the DBA start and stop dates.
For DBAs that calculate from a basis amount, such as a percentage rate DBA, the system includes only those timecards that fall within the DBA start and stop dates in the basis of calculation.
- Pay Stop Date
-
Enter the date an instruction stops, for example, the date the system should stop a deduction.
The stop date must be less than the timecard date. To stop a DBA before the next pay cycle, make the stop date one day prior to the first day of the next pay cycle. For example, if the pay cycle runs from October 1 through October 15, set the DBA stop date as September 30.
If both the start and stop dates are within the pay period from and through dates, even if the stop date is not less than the timecard date, the system does not calculate the DBA.
For a flat amount DBA, the system calculates the full DBA for any timecard that falls within the DBA start and stop dates.
For DBAs that calculate from a basis amount, such as a percentage rate DBA, the system includes only those timecards that fall within the DBA start and stop dates in the basis of calculation.
- Voucher Flag
-
Enter a code used to determine whether the system should generate a voucher for the DBA, tax, or wage attachment during the final update phase of the payroll processing cycle. Values are:
N: No
Y: Yes
- Payee No (payee number)
-
Enter the address book number for the supplier who receives the final payment.
In benefits administration, this is the address book number of the company that issues the plan and receives premium payments for it.
For wage attachments, payee is the address book number of the agency, company, individual, or court that is to receive the payment of the check.
- DBA Type
-
Enter a code that specifies the type of payroll entry. Values are:
P: Time Cards (earnings).
D: Deductions withheld.
B: Benefit (both cash and noncash).
A: Time accrual, such as sick and vacation time.
Note:
These values are hard-coded. - Calc Method (calculation method)
-
Enter a code from UDC 07/DM that specifies the method that the system uses to perform certain calculations. For example, the system uses a method of calculation to calculate deductions, benefits, and accruals (DBAs) and workers' compensation insurance.
- Assignment Number
-
Enter a number that identifies a task that is used for resource scheduling. The task number is generated by the system.
- Override Flag
-
Enter Yes or No, indicating whether the system treats the Amount/Rate field as a zero amount override. You use this field primarily when an employee is part of a group plan yet does not receive a particular benefit in that plan.
- Group Code
-
Enter a code that is common to all deduction or benefits that share the same limitations, such as pay period currency amount, percentage, monthly, and annual. The system takes these limits from the first deduction encountered in the group and withholds for all deductions until the limit is reached for the aggregate.
- Table Code
-
Enter the table that the system should use if the calculation requires table values.
- Amount Due
-
Enter the balance or amount due on an open invoice or voucher.
- Prior DBA
-
Enter a code that identifies another DBA whose limit must be met first before this DBA calculates. For example; deduction 1400 has an annual limit of 2,000.00 USD.
After this limit is met, deduction 1500 begins calculation and withholding.
The DBA number of the predecessor must be lower than the successor's number.
- Ded Per 1 (deduction percentage 1)
-
Enter a code designating the pay period in which the system calculates the DBA/auto deposit. Values are:
Y: Take the DBA/auto deposit during the current period.
N: Do not take the DBA/auto deposit during the current period.
*: Take the DBA/auto deposit only during the first pay period of each month that the employee works based on the ending date of this month's pay period.
Blank: Continue to look for a code at the lower level. The system searches for DBA/auto deposit rules first at the employee level, then at the group level, and finally at the DBA master level. If the field is blank at all levels, the system does not calculate the DBA/auto deposit in that period.
M: Applies only to benefits based on gross hours or dollars. An M in the fifth field tells the system to calculate the benefit only during the special timecard post. An M implies a Yes for a weekly withholding frequency.
Note:
Some organizations may have the need to process a sixth, or special, payroll during a month. - Nbr Per (number of periods)
-
Enter the number of periods for which a deduction or benefit should be taken. The system automatically decreases this number by one for each period taken.
You must enter a value in this field if you automate the Number of Periods field.
- DBA Limit $ Pay Period
-
Enter the maximum amount that can be withheld or accrued in a pay period for a deduction or a benefit. This amount is expressed in dollars. This amount refers to the gross pay/amount field.
- DBA Limit Monthly
-
Enter the maximum amount that can be withheld or accrued in a month for a deduction or a benefit. This amount is expressed in dollars. This amount refers to the gross pay/amount field.
- DBA Limit $ Quarterly
-
Enter the maximum amount that can be withheld or accrued in a quarter for a deduction or benefit. This amount is expressed in dollars. This amount refers to the gross pay/amount field.
- DBA Limit $ A/L1 (limit $ annual/level 1)
-
Enter the maximum amount that can be withheld or accrued in a year for a deduction or a benefit. This amount is expressed in dollars. This amount refers to the gross pay/amount field.
For the JD Edwards EnterpriseOne Payroll system, this field can represent either an initial annual limitation or a final limitation in a year.
The amount in the Limit $ A/L1 field represents the first level of the yearly limitation. The value in the Limit $ A/L2 field represents the final limitation.
If an annual limit is specified on a DBA calculation table, the annual limit from the table takes precedence over annual limits defined at the master DBA or employee levels.
- DBA Limit $ A/L2 (limit $ annual/level 2)
-
Enter the maximum amount that can be withheld or accrued in a year for a deduction or a benefit. This amount is expressed in dollars. This amount refers to the gross pay/amount field.
Note:
This field represents the second level annual limitation. It is used when there is an initial limitation and a corresponding rate, which is followed up by a new rate and a final limitation. This field is dependent on the Limit $ A/L1 field. There must be a value in the Limit $ A/L1 field if you specify a value in the Limit $ A/L2 field. - ITD Limit
-
Enter the maximum amount of dollars or hours that an accrual can have at any one time. For example, your company might have a vacation policy that allows an employee to roll over 40 hours each year, but the accrued balance cannot exceed a total of 300 hours at any one time. The system calculates the payroll cycle and year-end rollover up to the limit, taking into account the amounts that you have used.
Note:
If the system rolls over the accrual at the end of a standard year, it applies the limit against payroll month history. If the system rolls the accrual over at the end of a fiscal or anniversary year, it applies the limit against fiscal and anniversary history. - DBA Limit % Period
-
Enter the maximum percentage of pay that the calculated deduction or benefit amount may not exceed. This percentage works in conjunction with the dollar limits of the deduction or benefit, so whichever limit is reached first stops the calculation. For accrual transactions, this field represents an hour's limit.
- Cleared Items
-
Enter a value that specifies whether cleared deductions appear on the form. To display cleared items, select the Cleared Items option.
The system categorizes deductions as cleared when:
The through date of the deduction is older than the system date.
The Declining Balance flag for the deduction is turned on and the amount due is 0.
The Use Number of Periods flag is turned on and the number of periods is 0.
- Rate Control
-
Enter a value that defines the date that is effective for the PDBA. The system uses this field to control the rate that it uses to calculate a DBA when multiple rates are valid within the pay cycle. During payroll and interim processes, this value determines whether the system uses the ending rate, beginning rate, or prorates all rates it finds within a pay cycle period. Values are:
1: Use the rate that is valid at the end of the pay period.
2: Use the rate that is valid at the beginning of the pay period.
3: Prorate the DBA calculation using all rates.
Note:
When you set this value to 3, (prorate the DBA calculation) two results are possible, based on the type of DBA. DBAs that include flat calculations (dollars or accrued hours) use the number of days in the pay period in which the instruction is valid, divided by the total number of days in the pay period, to determine a proration factor. The system then multiplies the flat amount by the proration factor to produce the final DBA calculation. The system performs this calculation for each valid DBA instruction during a pay cycle period. All other calculations use this definition of proration: The DBA uses only items as a basis of calculation which include an effective date that falls within the effective date of the instruction or within the effective dates of the calculation range. - Group Limit Pay Period
-
Displays the maximum amount that can be withheld or accrued in a pay period for DBAs grouped together by Group Limit Code (DGRP).
This amount is expressed in dollars for deductions and benefits. For accruals, this amount is expressed in hours.
- Group Limit Monthly
-
Displays the maximum amount that can be withheld or accrued in a month for DBAs grouped together by Group Limit Code (DGRP).
This amount is expressed in dollars for deductions and benefits. For accruals, this amount is expressed in hours.
- Group Limit Quarterly
-
Displays the maximum amount that can be withheld or accrued in a calendar quarter for DBAs grouped together by Group Limit Code (DGRP).
This amount is expressed in dollars for deductions and benefits. For accruals, this amount is expressed in hours.
- Group Limit Annual
-
Displays the maximum amount that can be withheld or accrued in a year for DBAs grouped together by Group Limit Code (DGRP).
This amount is expressed in dollars for deductions and benefits. For accruals, this amount is expressed in hours.
- Group Limit Maximum Percent
-
Displays the maximum percentage of pay that the calculated DBAs grouped together by Group Limit Code (DGRP) may not exceed. This percentage works in conjunction with the dollar limits of the deduction or benefit, so whichever limit is reached first stops the calculation.
For accrual transactions, this field represents an hour's limit.
20.2.5 Deleting a DBA Instruction
When you need to remove a DBA instruction from an employee record, use caution to avoid deleting a DBA that has already accumulated history information. After a DBA has been active and amounts have been withheld from an employee's compensation, removing the DBA could result in errors on year-end forms.
When deleting a DBA instruction, if the DBA has history information, the system displays a warning message indicating that history information exists. If you receive this message, cancel the deletion procedure.
20.2.6 Entering Rollover Overrides
Access the Employee Rollover Table Overrides form.
- PDBA Code
-
Specify the DBA that you want to associate with the selected leave accrual. The system uses this DBA to store available leave time that is associated with the selected leave accrual. You can enter the code of the DBA that is associated with the selected leave accrual, or you can associate the leave accrual with a different available DBA.
The DBA that you enter in this field must have an associated rollover table. However, you can override the rollover table that the system uses by entering a different table code in the Rollover Table field.
- Hard Override
-
Select this option to specify that the override cannot be changed by subsequent DBA calculations. If you do not select this option, the rollover information that you enter is a soft override, and the system can the override information that you enter during subsequent calculations of the accrual DBA. For example, if you specify that this is a soft override, the system can override the information that you enter here if additional overrides exist at the union or group level. If you select this option, the system uses only this override rollover table to determine rollover limits, which will not be changed by subsequent calculations.
- Rollover Table
-
Enter the code that specifies which rollover table the system uses to calculate rollover service requirements and limits for this employee.
20.3 Entering Labor Distribution Instructions
This section provides an overview of labor distribution instructions entry and discusses how to:
-
Set processing options for labor distribution instructions.
-
Enter labor distribution instructions.
20.3.1 Understanding Labor Distribution Instructions Entry
You enter labor distribution instructions for individual employees to automate the process of distributing an employee's work time to multiple general ledger accounts. You can enter labor distribution instructions for hourly and salaried employees.
Labor distribution instructions simplify time entry. If you enter distribution instructions for an employee who is not set up for autopay, you can obtain the instructions when you enter timecards manually. The system uses the labor distribution instructions that you enter when it creates timecards for autopay employees.
These examples are practical applications of labor distribution instructions:
-
If an employee always spends 80 percent of the time processing payroll and 20 percent managing other staff, then you can allocate the time 80 percent to G/L account Regular Pay and 20 percent to G/L account Regular Pay-Managers using labor distribution instructions.
-
If an employee spends five hours per week performing administrative duties and 35 hours performing regular salaried duties, you can allocate the amount to two different G/L accounts.
-
In the previous example, you can specify the start and stop dates of the instructions.
These dates control when the labor distribution instructions can be used. If you entered a timecard on a different date, the instructions would not apply, and you could not copy them in time entry.
-
If you are entering a batch of timecards for employees whose time needs to be allocated identically, you can assign labor distribution instructions to one employee in the batch and then copy the instructions to all of the other employees in the batch.
An example of this would be a hospital setting where a group of general nurses works on a unit part of the time and also works in the HR Department in Occupational Health evaluating employee on-the-job injuries the rest of the time.
-
When an employee works for a business unit or company other than the home company, you can override the position ID so that budget allocations reflect the position ID of the business unit or company where the employee performed work.
This feature is useful in the public sector and in organizations in which budget tracking by position is critical to maintain or justify the appropriate workforce.
You use labor distribution instructions to:
-
Distribute time to multiple general ledger accounts.
-
Distribute time by either percentage or number of hours.
-
Set effective dates for distributions.
-
Create a template for time entry.
-
Define job type information when the employee has more than one job.
-
Override position ID and AAI accounts for an employee.
20.3.2 Form Used to Enter Labor Distribution Instructions
20.3.3 Setting Processing Options for Labor Distribution Instructions (P050151)
Processing options enable you to specify the default processing for programs and reports.
20.3.3.1 Defaults
This processing option specifies how the system determines the appropriate source for the Worker's Compensation Code.
- 1. Worker's Compensation Code
-
Specify the default Worker's Compensation Code for Employee Labor Distribution. Values are:
1: The Worker's Compensation Code comes from the Employee Master table regardless of the Employee Labor Distribution entry.
2: The Worker's Compensation Code comes from the Employee Master table only if the Employee Labor Distribution field is blank.
3: The Worker's Compensation Code comes from the Data Dictionary only if the Employee Labor Distribution field is blank. (Default)
20.3.4 Entering Labor Distribution Instructions
Access the Labor Distribution Instructions form.
Figure 20-3 Labor Distribution Instructions form
Description of ''Figure 20-3 Labor Distribution Instructions form''
- Employee Identification
-
Enter the employee number, tax ID, or alternate number, depending on the employee number mode that is set up in the Payroll Constants for company 00000.
- Percent or Hours
-
Enter a value that specifies how the system creates or applies labor distribution employee time. Values are:
H: Adds a specified number of hours to the employee time. For example, if you want to charge 20 hours of employee time in every pay period to a specified account, you enter 20 in the Hours/Percent field.
%: Apportions the total hours entered to specified accounts based on the percentages entered in the hours/percent field. For example, if you always want 30 percent of employee time charged to a specified account, and the remaining 70 percent of the time to a different account, you enter in 30 in the hours/percent field in the first row, and 70 in the hours/percent field in the second row. The Totals must equal 100 percent.
- Pay Code
-
Enter a code that defines the type of pay, deduction, benefit, or accrual.
Pay types are numbered from 1 to 999. Deductions and benefits are numbered from 1000 to 9999.
- Hours/ Percent
-
Enter the number of hours associated with each transaction.
- Account Number
-
Enter a value that identifies an account in the general ledger. Use one of these formats to enter account numbers:
Standard account number (business unit.object.subsidiary or flex format).
Third G/L number (maximum of 25 digits).
Account ID number. The number is eight digits long.
Speed code, which is a two-character code that you concatenate to the AAI item SP. You can then enter the code instead of an account number.
The first character of the account number indicates its format. You define the account format in the General Accounting constants.
- Pay Start Date
-
Enter the date that an employee may begin participating in the company's benefit plans or may be included in payroll processing.
Note:
You can use this field only if the method you are using is based on hours. You can set a range of pay period ending dates during which a particular labor distribution instruction is effective. Leave these fields blank for any standard, continuous distribution instructions. - Pay Stop Date
-
Enter the date when an employee should no longer be included in a payroll cycle or the date when an employee stops participating in the company's benefit plans.
Note:
You can use this field only if the method you are using is based on hours. You can set a range of pay period ending dates during which a particular labor distribution instruction is effective. Leave these fields blank for any standard, continuous distribution instructions. - WCI Code (worker's compensation insurance code)
-
Enter a code from UDC 00/W that represents a workers' compensation insurance (WCI) code. This code should correspond to the classifications on your periodic workers' compensation insurance reports.
- WCI Class (worker's compensation insurance class)
-
Enter a code that specifies any special circumstances associated with the workers compensation insurance (WCI) code, resulting in multiple rates for the same WCI code due to location or risk, for example. The subclass should remain blank if multiple rates do not exist. Default codes are:
Blank: There are no special circumstances.
F: There are special circumstances.
- Hourly Rate
-
Enter the employee's hourly rate, which is retrieved during time entry. If you enter a rate in this field on any other form, that rate can override the value in the Employee Master table.
In the Employee Master table, this number is the employee's base hourly rate.
In the Union Rates table, it is the straight time rate.
Note:
If you change the number of the data display decimal digits for this field, you must also change the Rate - Base Hourly (BHRT) and Rate - Hourly (SHRT) fields so that they have exactly the same number of data display decimal digits. - Billing Rate
-
Enter a number that specifies the rate that the system uses to bill for labor services. This rate is often referred to as the billing or recharge rate. The system charges the resulting amount, based on this rate, to the primary distribution account for the timecard. The system also enters an offset to an account that is derived from automatic accounting instructions. This rate does not affect employee payroll.
To allow billing rates in time entry, the employee record type must be set to 2 (payroll and recharge processing) or 3 (recharge processing only) with the Employee Payroll program (P0801PRL).
- Burden Rate
-
Enter an hourly rate to be used when charging burden associated with the actual billing (recharge) amounts.
20.4 Entering Automatic Deposit Instructions
This section provides an overview of automatic deposit instructions entry, lists prerequisites, and discusses how to:
-
Set processing options for auto deposit instructions.
-
Enter automatic deposit instructions.
20.4.1 Understanding Automatic Deposit Instructions Entry
You enter automatic deposit instructions for any employee who wants all or part of each payment deposited directly in a bank account. When you enter automatic deposit instructions, the system creates a prenote record that is sent to the bank for verification. The prenote information can be created during the first payroll cycle in which the employee is processed after the automatic deposit instructions are entered into the system, or you can create prenote transactions outside of the payroll cycle.
Using automatic deposit instructions, you can:
-
Set up a combination of automatic deposit, check, or cash payments.
-
Set up multiple bank accounts for an employee.
-
Start and stop automatic deposits by period.
-
Start and stop automatic deposits by date.
-
Set up a remainder code to automatically process any money remaining when an employee chooses different ways to distribute a payment.
20.4.2 Entering Multiple Remainder Records (Release 9.1 Update)
You can enter multiple remainder records when setting up auto deposit instructions, using Pay Start Date and Pay Stop Date fields.
For example, an employee might want to deposit $1000 USD per pay period into their checking account. They would also like, for the next 2 months, for the remaining amount of their pay to be deposited into savings account A. After the two month period, they want the remainder amount to be deposited into savings account B. To accomplish this, you can set up multiple remainder records using start and stop dates.
If you enter multiple remainder records, the records with the earlier dates must have a Pay Start Date and a Pay Stop Date. The latest remainder record must have a Pay Start Date and leave the Pay Stop Date field blank.
When you enter multiple remainder records, the latest remainder record must have a Pay Start Date that is one day after the Pay Stop Date entered on the earlier remainder record. If a valid remainder record does not exist for the remainder amount during a payroll cycle, a check is created.
20.4.2.1 Example: Multiple Remainder Records
In the following illustration, there are two remainder records set up for the employee, Rod McLind. Rod wants to have all of his pay deposited into account 5555555 between June 15th and November 1st of 2012. After that, Rod wants his pay deposited into account 365910170.
The earlier record, for account 5555555, has a value in both the Pay Start Date and Pay Stop Date fields. The later record includes a start date that is one day after the stop day of the earlier record, and includes no stop date. These dates ensure that only one remainder record is active at any time.
Figure 20-4 Example: Multiple Remainder Records
Description of ''Figure 20-4 Example: Multiple Remainder Records''
The application displays an error message if the last remainder record does not contain a start date.
If there is only one remainder record, it is not necessary to have a pay start date or pay stop date.
20.4.3 Prerequisite
Set up the processing options that provide the originating bank number, service class code, and standard entry class.
20.4.4 Form Used to Enter Automatic Deposit Instructions
20.4.5 Setting Processing Options for Auto Deposit Instructions (P055011)
These processing options specify information codes and formatting that is required so that financial institutions can exchange automatic deposit information accurately.
20.4.5.1 Bank Info.
- 1. Originating Financial Organization No. (originating financial organization number)
-
Enter the transit routing number used to identify the financial organization to which the deposit tape is being sent for processing. Obtain this code from the bank at which your company's payroll account is maintained.
This bank serves as a clearing house for your employees' automatic deposits'. Using the Individuals Financial Organization No (IFO#) and Financial Organization Account Number (FOA#), this bank will route--through electronic funds transfers (EFT)--each employee's deposit to his own account at his own financial institution.
- 2. Service Class Code
-
Enter a code to identify the general classification of dollar entries to be exchanged. This standard is used to facilitate transmission of data between organizations. Automated Clearing House (ACH) entries required for payroll deposits use the following service class codes:
200: ACH entries mixed debit and credits
220: ACH credits only (batch format)
225: ACH debits only (batch format).
At the time of this writing, only the use of class 200 is recommended.
- 3. Standard Entry Class
-
Enter a code to distinguish the various kinds of paperless entries. The following entry classes have been defined:
SIA: Single item authorization
PPD: Pre-arranged payments and deposits.
At the time of this writing, only PPD is recommended for the entry class.
- 4. Off Set Begin Deposit Date
-
Specify whether to use a default for the begin deposit date.
0: Do not default the Begin Deposit Date.
1: Default the Begin Deposit Date.
- 5. Off Set Begin Deposit Date
-
Specify the number of offset days that the system uses for the pay start date.
When you enter 0 or leave this field blank, the system uses the current date. When you enter a value of 1 or greater, the system uses the current date plus that value.
This feature works only when the effective deposit date follows the MMDDYY format, which is required by ACH. Values are:
0 or Blank: The system uses the current date.
X (a value of 1 or greater): The system uses the current date plus the number of days specified.
20.4.6 Entering Automatic Deposit Instructions
Access the Automatic Bank Deposit Instructions form.
Figure 20-5 Automatic Bank Deposit Instructions form
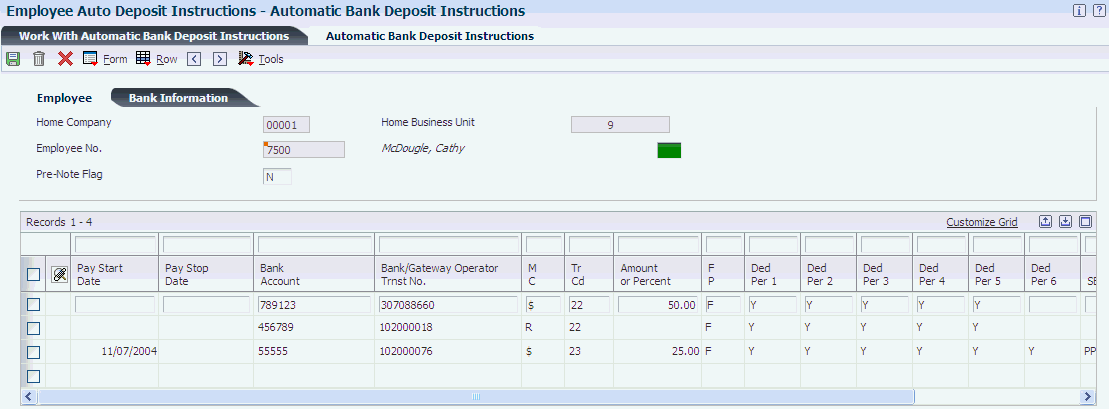
Description of ''Figure 20-5 Automatic Bank Deposit Instructions form''
- Employee Identification
-
Enter the employee number, tax ID, or alternate number, depending on the employee number mode that is set up in the Payroll Constants for company 00000.
- Pre-Note Flag
-
Enter a code to indicate whether you want to test the deposit instructions for one pay period before actually processing a deposit.
Adding an employee to the Automatic Bank Deposit Instructions form automatically activates this person in the automated deposit system. The system prenotes this employee in the next applicable payroll run to test the auto deposit instructions you have set up before actually depositing a check. In the prenote test, the system creates a no-dollar entry for this employee and sends it to the employee's bank account. In addition, the employee receives a check for this amount. After the test, the system changes this field to N. To repeat this test, enter P in this field.
If you leave this field blank, the system uses the default value of P.
If you change an employee's automatic deposit instructions, the system creates a prenote. If you do not want a prenote, you must change the value in the Prenote Flag field to N.
You cannot use this field for Canadian employees.
- Bank Account
-
Enter the employee's unique account number at the financial institution. The number is obtained from the MICR line of a voided check or a deposit slip from the employee's account. You must include dash cue symbols in the field. However, they are recorded in a translated mode as a hyphen (-).
Account numbers can also be obtained from other sources, such as passbooks or debit cards.
When transcribing information, left justify and enter only numbers (0 through 9), alphabetic (A through Z), and hyphens (-). If fewer than 17 characters are required, leave the unused spaces blank. Spaces left within the depositor's account number are ignored when the paperless entry is prepared. For example, 0123 4 56789 appears as 0123456789 in the entry record, and 0123-4 56789 appears as 0123-456789.
If you change this number, the system automatically prenotes the employee's auto deposit record again.
The Financial Organization Account Number (FOA#) is used as the company's unique bank account number rather than the employee's unique bank account number in these tables:
F06560 - Bank Reconciliation - Issue Table
F06561 - Bank Reconciliation - Paid Table
- Bank Trnst No. (bank transit number)
-
Enter the bank transit number for the employee's financial institution. Banks might refer to this number as the ABA or payment routing number. This number can be obtained from the employee's check or deposit slip. It is located between the MICR colons (:) at the bottom of the check.
For U.S. banks, this number contains 9 digits. If this number does not contain nine digits, you must contact the employee's financial institution to obtain the correct number.
For Canadian banks, this number contains 8 digits. Therefore, Canadian clients must enter the bank transit number with a leading zero.
If you change this number for an employee, the system creates a prenote for the employee's next auto deposit.
- M C (method code)
-
Specify the method in which an employee can split up net pay. This code specifies the method(s) in which a segment is to be computed:
$: A specific amount is to be deposited.
%: A percentage of net pay is to be deposited.
C: A specific amount is to be generated as a payroll check.
P: A specific amount is to be generated as cash.
R: The remainder of the net pay, after percent and specific amount segments are processed, is to be deposited in the bank.
Q: The remainder of the net pay, after percent and specific amount segments are processed, is to be generated as cash.
D: The remainder of the net pay, after percent and specific amount segments are processed, is to be generated as a payroll check.
Note:
A remainder record is required and only one method can be specified (R, Q, or D). - Tr Cd (transaction code)
-
Enter a code used to distinguish various types of bank accounts, for example, checking, savings, or credit union. Currently these codes have been assigned:
Demand account credits are:
20: Reserved
21: Credit entry to return automated deposit
22 Automated Deposit
Savings Account credits are:
30: Reserved
31: Credit entry to return automated deposit
32: Automated Deposit
Demand account debits are:
25: Reserved
26: Debit entry to return automated payment
27: Automated Payment
Savings account debits are:
35: Reserved
36: Debit entry to return automated payment
37: Automated Payment
Note:
If you leave this field blank, the system uses the default value of 22. - Amount or Percent
-
Enter the actual gross pay amount for an employee. This amount is to be distinguished from the distributed gross pay amount used for labor distribution. See data item DPAY.
When using Work Order Time Entry, this field is used to record miscellaneous pay for an employee, (for example, piece rate bonus).
- Pay Start Date
-
Enter the date that an employee may begin participating in the company's benefit plans or may be included in payroll processing.
You can also use this field to provide a beginning date for seasonal employees or for employees who work only part of the year (such as a teacher who works only nine months of the year).
- Pay Stop Date
-
Enter the date when an employee should no longer be included in a payroll cycle or the date when an employee stops participating in the company's benefit plans.
You can use this date for terminated employees, seasonal employees, or employees who work only part of the year (such as a teacher who works only nine months of the year). See also data item PSDT.
This date may also be the date that a deduction, benefit, or accrual instruction stops.
- Prenote Flag
-
Enter a code that lets you test the deposit instructions for one pay period before actually processing a deposit. Adding an employee to this form automatically activates this person in the automated deposit system. The system prenotes this employee in the next applicable payroll run to test the auto deposit instructions you have set up before actually depositing a check. In the prenote test, the system creates a no-dollar entry for this employee and sends it to the employee's bank account. In addition, the employee receives a check for this amount. After the test, the system changes this field to N. To repeat this test, enter P in this field.
If you leave this field blank, the system uses the default value of P.
If you change an employee's automatic deposit instructions, the system creates a prenote. If you do not want a prenote, you must change the value in the Prenote Flag field to N.
You cannot use this field for Canadian employees.
- Originating Bank
-
Enter the transit routing number used to identify the financial organization to which the deposit tape is being sent for processing. Obtain this code from the bank at which your company's payroll account is maintained.
This bank serves as a clearing house for your employee automatic deposits. Using the Individuals Financial Organization No (IFO#) and Financial Organization Account Number (FOA#), this bank uses electronic funds transfers (EFT) to route each employee deposit to a financial institution.
- SCC (service class code)
-
Enter the code that identifies the general classification of dollar entries to be exchanged. This standard is used to facilitate transmission of data between organizations. Automated Clearing House (ACH) entries required for payroll deposits use these service class codes:
200: ACH entries mixed debit and credits.
220: ACH credits only (batch format).
225: ACH debits only (batch format).
At the time of this writing only the use of class 200 is recommended.
- SEC (standard entry class)
-
Enter a code that permits various kinds of paperless entries to be distinguished. These entry classes have been defined:
SIA: Single item authorization; and
PPD: Pre-arranged payments and deposits.
At the time of this writing only PPD is recommended for the entry class.
- F P (full/partial code)
-
Enter the code that applies only to method code $ (see BDM). If there is not enough net pay remaining to process the amount specified in the amount/percentage field, these values apply:
F: The full amount cannot be generated. The segment is ignored.
P: A partial amount can be generated for the bank and account specified for the segment.
If you leave this field blank, the system uses F as the default value.
- Ded Per 1 (deduction period 1)
-
Enter a code designating the pay period in which the system calculates the DBA/auto deposit. Values are:
Y: Take the DBA/auto deposit during the current period.
N: Do not take the DBA/auto deposit during the current period.
*: Take the DBA/auto deposit only during the first pay period of each month that the employee works based on the ending date of this month's pay period.
Blank: Continue to look for a code at the lower level. The system searches for DBA/auto deposit rules first at the employee level, then at the group level, and finally at the DBA master level. If the field is blank at all levels, the system does not calculate the DBA/auto deposit in that period.
M: Applies only to benefits based on gross hours or dollars. An M in the fifth field only tells the system to calculate the benefit during the special timecard post. An M implies a Yes for a weekly withholding frequency.
Note:
Some organizations may have the need to process a sixth, or special, payroll during a month.
20.5 Creating Prenote Transaction Records
This section provides an overview of prenote transaction records, list prerequisites, and discusses how to:
-
Run the Auto-Deposit prenote Bank File process.
-
Set processing options for Auto-Deposit prenote Bank File (R055011).
20.5.1 Understanding Prenote Transaction Records
When employees decide to have their payroll payments automatically deposited in their bank accounts, they must provide information about the bank accounts to their employer. The employer must verify that the bank information is accurate before payments are actually deposited into those accounts. The process of verifying employee bank information is called pre-noting.
Pre-noting is a method of electronically testing the accuracy of an automatic deposit bank account before transferring actual funds to the account. If there are problems with the bank account information, the bank provides feedback to the employer to notify them of any errors. Typically, new accounts are prenoted during the first payroll cycle in which the employee is processed after they have submitted their bank account information. During the payroll cycle that the bank information is prenoted, the employee receives an actual paycheck rather than an automatic deposit.
The prenote process consists of these steps:
-
Employees provide bank account information to the payroll department.
-
The bank information is entered into the system.
-
The bank information is typically sent electronically to a regional clearing house association facility.
-
The clearing house facility consolidates all transactions for daily routing to all member banks.
-
Member banks receive and verify that the auto deposit instructions submitted through the clearing house facility are accurate. If errors are discovered, the originator of the test is notified of the problem for correction and retesting.
Note:
This prenote cycle typically requires ten days from the time the clearing house facility receives the transaction.
The Auto Deposit Pre-Note Bank File program (R055011) allows you to generate prenote transactions as soon as you enter automatic deposit instructions into the system. Generating the prenote transaction before the employee is paid expedites the verification process and increases the probability that employees receive their first payment through an automatic deposit rather than a live check. Expediting the verification process reduces the number of live checks that an organization must distribute.
For example, if you hire an employee who is not scheduled to begin working for your organization for several weeks, you can process the employee's prenote transaction before they begin working. By completing the prenote process ahead of time, the employee's first payment can be generated as an automatic deposit rather than a live check.
When you create the prenote transaction using the Auto Deposit Pre-Note Bank File program, the system assigns a start date to the employee's automatic deposit information. This start date is determined by adding the number of days that you enter in the processing options for the Auto Deposit Instructions program (P055011) to the system date. We recommend using a value of 10 days or more to ensure that the prenote process is completed before funds are deposited into the accounts. If the employee is paid before the start date that is associated with their automatic deposit instructions, the employee will receive a live check rather than an automatic deposit.
In addition to pre-noting new automatic deposit instructions, you must also prenote bank information when an employee changes existing automatic deposit instructions. The system uses the value in the Pre-Note Flag and Tr Cd (transaction code) fields on the Automatic Bank Deposit Instructions form to determine which records to include in the prenote process. If the Pre-Note Flag field is set to P, all automatic deposit instructions for the employee are included in the prenote process. If the Pre-Note Flag field is set to N, only automatic deposit records with a value of 23,28,33, or 38 in the Tr Cd field are included in the prenote process.
|
Note: If an employee changes the amount that they want deposited into a bank account, the system does not change the value in the Tr Cd field to a prenote value. The system only changes this value if the bank account information changes. |
After you enter or change automatic deposit instructions for employees, you must generate the prenote file to send to the clearing house facility. If your organization has multiple business units that use unique bank information, you can create separate clearing house facility files for each business unit. To do this, you must set up automatic deposit tape file information for each business unit.
20.5.2 Prerequisites
Set the company options for Company 00000 to determine how the system creates automatic deposit bank tapes.
20.5.3 Running the Auto-Deposit Pre-Note Bank File Process
Select Auto Deposit Information (G05AD), Auto Deposit Pre-Note Bank File.
20.5.4 Setting Processing Options for Auto-Deposit Pre-Note Bank File (R055011)
Processing options enable you to specify the default processing for programs and reports.
20.5.4.1 Company Options
These processing options are used to determine the processing information that is included in the prenote transaction file.
- 1. Enter Effective Deposit Date
-
Specify the date on which funds are to be deposited into an employee's bank account. If you leave this option blank, the system date is used.
Note:
If you enter an offset number in the Offset Effective Deposit Date processing option, the system adds the number of days that you enter in that processing option to the date that you enter in this processing option to determine the effective deposit date. If you leave this processing option blank and enter an offset number, the system adds the number of days tat you enter in that processing option to the system date to determine the effective deposit date. - 2. Off Set Effective Deposit Date
-
Specify the number of days the system should use in the offset formula. If you enter a number in this processing option, the system adds that number of days to the date in the Enter Effective Deposit Date processing option to determine the deposit date for the funds. If that processing option is left blank, the offset days are added to the system date to determine the deposit date. For example, if you enter 1 in this processing option and you leave the Enter Effective Deposit Date processing option blank, the deposit date that the system uses is the system date + 1. If you leave this processing option blank or enter 0, the date that you enter in the Enter Effective Deposit Date processing option is used.
Note:
This feature works only if the date in the Enter Effective Deposit Date processing option is entered using MMDDYY format, as required by the clearing house facility. - 3. Enter Trace Number (7 pos.)
-
Specify the trace number, which is assigned by the ODFI, and is used for the creation of automatic deposit and prenote transaction records. This number, which can be as many as 15 characters in length, is used in conjunction with the batch number, transmission date, and file ID modifier to identify records within a file.
20.5.4.2 Optional Items
These processing options are used to define optional information that the system includes in the prenote transaction file.
- 1. Enter Tape Processor's Name if different from Company Name. If left blank, it will default to Company Name.
-
Specify the name of the ACH operator or sender. Typically, this is the name of your company or the entity for which you are creating an automatic deposit or prenote transaction file.
- 2. Descriptive Date
-
Specify the date description that you want to appear to the receiver of the automatic deposit or prenote transaction file. This 6-character code is used for descriptive purposes only and does not control the timing of fund deposits. Examples of possible entries for this processing option are 011305, 01 05, JAN 13, or JAN 05.
Note:
If you are using the Off Set Descriptive Days processing option, you must enter this date using the MMDDYY format. - 3. Off Set Descriptive Date
-
Specify the number of days the system should use in the offset formula to determine the date for the descriptive date. If you enter a number in this processing option, the system adds this number to the date that is entered in the Descriptive Date processing option. For example, if you enter 2 in this processing option, the actual descriptive date that is used in the prenote transaction file is the date that is entered in the Descriptive Date processing option + 2. If you leave this processing option blank or if you enter 0, the date in the Descriptive Date processing option is used.
Note:
To use this feature, the date in the Descriptive Date processing option must be entered using the MMDDYY format. - 4. Reference Code for Auto Deposits
-
Specify user-defined information that is specific to your organization. This processing option is optional.
- 5. Company Entry Description (10 pos.)
-
Specify a 10-character description of the purpose of the file that you are sending. This code is used for information purposes only and does not affect the processing or calculation of automatic deposit or prenote transaction records. Examples of codes that you might use are REG SALARY, BONUS PAY, or HOLIDAY.
- 6. Enter if Pre-Note is to be run in update or proof mode.
-
Specify the mode of processing when running the prenote transaction program. When you run this process in proof mode, the system creates a report to display the changes that will be made. When you run this process in update mode, the system updates the F060116 and F065016 tables, changing the prenote flag and adding the auto deposit start date. Values are:
0: Proof Mode
1: Update Mode
20.6 Setting Up Instructions to Generate Component Pay Types
This section provides an overview of component pay types and discusses how to set up the instructions to generate component pay types for a base pay type.
20.6.1 Understanding Component Pay Types
Component pay is a method of paying employees or contractors where a single pay type entry automatically results in the creation of multiple timecards based on pre-defined rules that are assigned to the original pay type. You use the Component Pay Instructions program (P05601) to set up instructions to generate component pay transactions for base pay types. You can add multiple component pay instructions for a single base pay type. You can also copy instructions from one base pay type to another.
20.6.2 Forms Used to Set Up Instructions to Generate Component Pay Types
| Form Name | FormID | Navigation | Usage |
|---|---|---|---|
| Work with Component Pay Instructions | W05601A | Pay/Deductions/Benefits Setup (G05BD4), Component Pay Instructions | Review the component pay types for a base pay type. |
| Revise Component Pay Instructions | W05601C | Click Add on the Work with Component Pay Instructions form. | Enter multiple component pay types for a single base pay type. |
| Copy Set of Component Pay Instructions | W05601F | Select a record and select Copy Instructions under the Form menu in the Work with Component Pay Instructions form. | Copy instructions from one base pay type to another. |
20.6.3 Setting Up Instructions to Generate Component Pay Types for a Base Pay Type
Access the Revise Component Pay Instructions form.
Figure 20-6 Revise Component Pay Instructions form
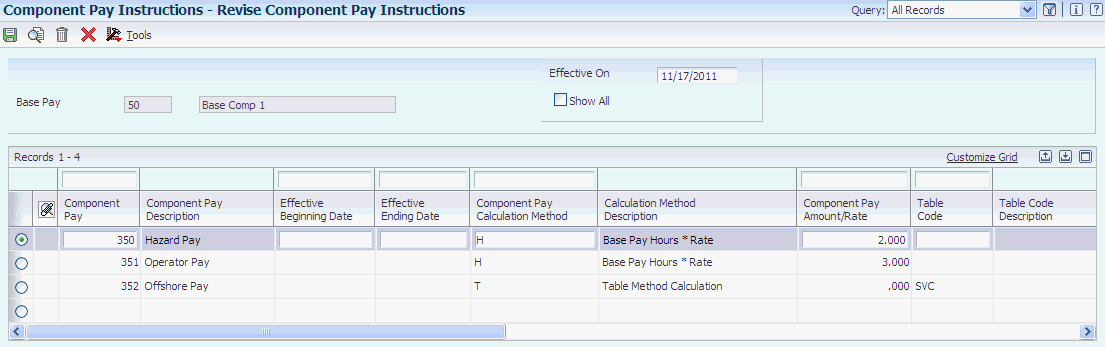
Description of ''Figure 20-6 Revise Component Pay Instructions form''
- Base Pay
-
Enter the base pay type used to generate the component pay.
- Component Pay
-
Enter the component pay type that needs to be generated when a particular base type is entered.
- Effective Beginning Date
-
Enter the date on which an address, item, transaction, or table record becomes active. The effective date could represent any of these:
When a change of address becomes effective.
When a lease becomes effective.
When a price becomes effective.
When the currency exchange rate becomes effective.
When a tax rate becomes effective.
- Effective Ending Date
-
Enter the date on which the item, transaction, or table becomes inactive, or through which you want transactions to appear. This field is used generically throughout the system. It could be a lease effective date, a price or cost effective date, a currency effective date, a tax rate effective date, or whatever is appropriate.
- Component Pay Calculation Method
-
Enter a value from UDC table (05T/CM) to specify the calculation method associated with component pay generation. Values are:
H: Base pay hours * Rate.
I: Base pay pieces * Rate.
%: Percentage of base pay gross.
T: Based on a table method code.
- Component Pay Amount/Rate
-
Enter the amount or rate used to calculate component pay gross.
- Table Code
-
Enter the table used if the calculation requires table values.
- Account Bus Unit Rule
-
Enter a value from UDC table (05T/BU) to specify whether to derive the account business unit from the base pay timecard or the automatic accounting instructions (AAIs) when generating component pay timecards. Values are:
0: Retrieve value from AAIs.
1: Use MCU from base timecard.
2: Use HMCU from base timecard.
3: Use MCUO from base timecard.
- Account Object Rule
-
Enter a value from UDC table (05T/CO) to specify whether to derive the account object from the base pay timecard or AAIs when generating component pay timecards. Values are:
0: Derive account object from AAIs.
1: Derive account object from base pay timecard.
- Account Subsidiary Rule
-
Enter a value from UDC table (05T/CO) to specify whether to derive the account subsidiary from the base pay timecard or AAIs when generating component pay timecards. Values are:
0: Derive account subsidiary from AAIs.
1: Derive account subsidiary from base pay timecard.
- AAI Search Business Unit
-
Enter a value from UDC table (05T/AB) to determine how the Generate Component Pay program (R05601) derives the account number on the Component Pay timecard when searching the Automatic Accounting Instructions (AAIs). Values are:
Blank: Use the account number derived from the Base Timecard. This is the default value.
1: Use the Base Timecard's Business Unit (MCU) to derive the account number from the AAIs.
2: Use the Base Timecard's Home Business Unit (HMCU) to derive the account number from the AAIs.
3: Use the Base Timecard's Job Location (MCUO) to derive the account number from the AAIs.
Note:
Note: A value of Blank is only valid when the Busines Unit, Object, and Subsidiary Rules are all not equal to '0' as defined on the Component Pay Instruction record (F05601). This means that each value that makes up the account number is taken directly from the Base Timecard.
20.7 Revising the Pay Calculation Table
This section provides an overview of the pay calculation table and discusses how to revise a pay calculation table.
20.7.1 Understanding the Pay Calculation Table
You use the Pay Calculation Tables program (P059022) to create a table of pay rates similar to the existing DBA calculation tables. Calculation tables provide calculations based on values that vary from employee to employee. The calculation table includes a table-method code that defines how to calculate the pay. You set up calculation tables to define the parameters for calculating DBAs that are based on variable values. You set up calculation tables to define the parameters that the system uses to calculate pay. Calculation tables contain user-defined information to help define your standard pay methods of calculation.
20.7.2 Forms Used to Revise the Pay Calculation Table
| Form Name | FormID | Navigation | Usage |
|---|---|---|---|
| Work with Pay Calculation Tables | W059022A | Pay/Deductions/Benefits Setup (G05BD4), Pay Calculation Tables | Review the pay calculation table details. |
| Revise Pay Calculation Table | W059022C | Click Add on the Work with Pay Calculation Tables. | Revise the pay calculation details for a particular table. |
20.7.3 Revising a Pay Calculation Table
Access the Revise Pay Calculation Tables form.
Figure 20-7 Revise Pay Calculation Table form
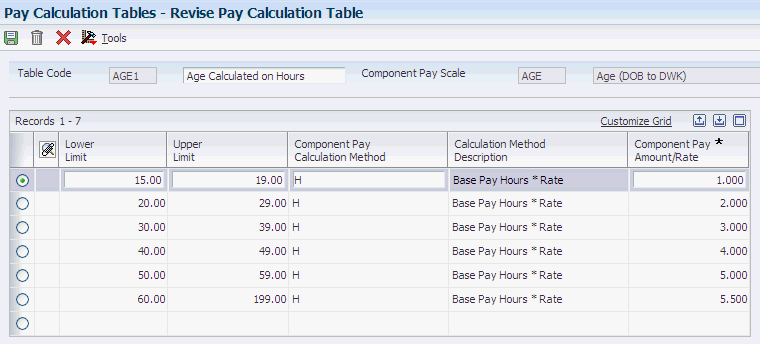
Description of ''Figure 20-7 Revise Pay Calculation Table form''
- Table Code
-
Enter a code that specifies the table that the system accesses in the Payroll Generic Tables (F069026).
- Component Pay Scale
-
Enter a value from UDC table (05T/CP) to specify the criteria for determining the pay rates in the pay calculation tables. Values are:
AGE: Age from the date of birth to date worked on the timecard.
GEN: Gender.
SAL: Current salary.
PGR: Pay grade and step.
DSM: Length of service in months from date started to date worked on the timecard.
DSW: Length of service in weeks from date started to date worked on the timecard.
OHM: Length of service in months from the original hire date to the date worked on the timecard.
OHW: Length of service in weeks from the original hire date to the date worked on the timecard.
SHF: Shift code.
C01: Category code 1.
C02: Category code 2.
C03: Category code 3.
C04: Category code 4.
C05: Category code 5.
C06: Category code 6.
C07: Category code 7.
C08: Category code 8.
C09: Category code 9.
C10: Category code 10.
- Lower Limit
-
Enter the minimum amount to be compared.
- Upper Limit
-
Enter the maximum amount to be compared.
- Component Pay Calculation Method
-
Enter the calculation method associated with component pay generation.
- Component Pay Amount/Rate
-
Enter the amount or rate used to calculate component pay gross.