7 Inquiring on Job Information
This chapter contains the following topics:
-
Section 7.4, "Reviewing Job Information with User Defined Columns"
-
Section 7.6, "Reviewing Accounts Payable Information by Job"
7.1 Understanding Job Cost Inquiries
After you have set up a job, you can begin tracking costs and units by task and account. You can review all of the information that relates to a project or job at any time during the progress of the work. You review job information to identify variances between the amounts budgeted and the actual amounts, as well as to track commitments and projected final amounts, and to compare different ledgers.
The system provides several inquiry programs that you can use to review job-related information:
-
Job Status Inquiry: Basic (P512100).
Use this program to display account balance information from the Account Balances table (F0902) in predefined columns that you can select to display by setting processing options.
-
Job Status Inquiry: User Defined Columns (P512000).
Use this program to display the account balance and detail information using columns that you select or create. Based on the selection criteria that you define, the system retrieves account information from both the Account Balances and the Account Detail (F0911) tables.
-
Revised Budget by Ledger Type (P51216).
Use this program to display all amounts and units entered for all revised budget ledgers.
-
Accounts Payable Inquiry by Job (P04220).
Use this program to display all of the vouchers entered for a specific job or supplier.
7.1.1 Mobile Applications for Inquiring on Job Information (Release 9.1 Update)
The following mobile applications are available, and can be used to inquire job information on a mobile device:
-
Project Status Review (Smartphone and Tablet)
These applications require system administrator configuration before they are available to individual users. Contact your system administrator to determine whether these applications are available for use.
Additionally, see the following topics in the JD Edwards EnterpriseOne Applications Mobile Enterprise Applications Implementation Guide:
7.2 Common Fields Used in This Chapter
- Period/Date
-
Enter the period number or the date for which you want to review amount and unit information. If you enter a period, the system converts it to a date and uses the last day of the period. If you enter a date that is not the last day of the period, the system updates it to the last day of the period in which the date falls. The system uses the date pattern that is assigned to the company that is assigned to the job to determine the last day of each period.
- Inception, Cumulative, or Period
-
Specify the type of information to display on the form. Options are:
Inception: The system displays job-to-date totals for each account through the period or date specified. When you select this option, the system includes the balance forward amount from the previous year.
Cumulative: The system displays year-to-date totals for each account through the period or date specified.
Period: The system displays the period-date-totals for each account for the period or date specified.
- Subledger
-
Enter the subledger type and subledger to use to retrieve account information.
- Revised Budget Amounts
-
Enter the sum of the amounts in the revised budget ledgers for the period specified.
- Revised Budget Units
-
Enter the sum of the units in the revised budget ledgers for the period specified.
- Actual Amounts
-
Enter the amount from the AA ledger for the period specified.
- Actual Units
-
Enter the unit from the AU ledger for the period specified.
- Original Budget Amount
-
Enter the sum of the amounts that are in the BORG field (budget original) for all revised budget amount ledgers for the period specified.
- Original Budget Units
-
Enter the sum of the units that are in the BORG field (budget original) for all revised budget unit ledgers for the period specified.
- Percent Complete
-
Enter the amount for the period specified in the F% ledger. If the amount in the F% ledger is zero, the system calculates the percent complete based on the computation method that is assigned to the account.
7.3 Reviewing Basic Job Information
This section provides an overview of basic job inquiry and discusses how to:
-
Set processing options for Job Status Inquiry: Basic (P512100).
-
Review basic job information.
7.3.1 Understanding Basic Job Inquiry
You use the Job Status Inquiry: Basic program to review the actual costs and units, budgeted costs and units, committed costs and units, and projected final values from the Account Balances table using columns that are predefined. Processing options enable you to specify which columns to display so that you can customize the inquiry form as needed. The form provides options to display period, cumulative (year-to-date), or inception-to-date amounts. Inception-to-date includes the balance forward amount from the prior year in conjunction with the year-to-date totals. For original budget amounts and units, the system displays information from the BORG field (original budget) for the amount or units ledger. For revised budget amounts and units, the system displays information from the period amount fields (AN01 - AN14) for the amount or units ledger.
|
Note: Revised budget ledgers include the JA and JU ledgers, plus any additional ledgers that you set up and use in JD Edwards EnterpriseOne Job Cost. |
7.3.2 Form Used to Review Basic Job Information
7.3.3 Setting Processing Options for Job Status Inquiry: Basic (P512100)
Processing options enable you to specify the default processing for programs and reports.
7.3.3.1 Display
- 1. Default Cost Code Range
-
From Cost Code
Specify the beginning cost code (subsidiary) account in the range of accounts to display. If you leave this processing option blank, the system displays all cost codes through the value entered in the Thru Cost Code field.
Thru Cost Code
Specify the ending cost code (subsidiary) account in the range of accounts to display. If you leave this processing option blank, the system displays all cost codes from the value entered in the From Cost Code field.
- 2. Default Cost Type Range
-
From Cost Type
Specify the beginning cost type (object) account in the range of accounts to display. If you leave this processing option blank, the system displays all cost types through the cost type entered in the Thru Cost Type field.
Thru Cost Type
Specify the ending cost type (object) account in the range of accounts to display. If you leave this processing option blank, the system displays all cost types from the value entered in the From Cost Type field.
- 3. Restrict Account Range
-
Specify whether to revise the range of accounts in the Default Cost Code Range and Default Cost Type Range processing options on the form. Values are:
Blank: Revise the range of accounts for display.
1: You cannot revise the range of accounts that appear on the form. The system disables the account processing options on the Additional Selections area of the form. You can, however, add accounts within the range specified.
- 4. AA Ledger
-
Specify whether to display the column for the actual amounts (AA ledger type). Values are:
Blank: Do not display actual amounts.
1: Display actual amounts.
- 5. AU Ledger
-
Specify whether to display the column for the actual units (AU ledger type). Values are:
Blank: Do not display actual units.
1: Display actual units.
- 6. JA Ledger-Original Budget (BORG)
-
Specify whether to display the original budget amounts (BORG field from the Account Balances table) for the JA ledger type. Values are:
Blank: Do not display original budget amounts for the JA ledger type.
1: Display original budget amounts for the JA ledger type.
- 7. JA Ledger-Original and Revised Budgets
-
Specify whether to display the original and revised budget amounts for the JA ledger type. Values are:
Blank: Do not display original and revised budget amounts for the JA ledger type. This is the default.
1: Display the original and revised budget amounts for the JA ledger type.
- 8. JU Ledger: BORG
-
Specify whether to display the column for the original budget units (BORG field from the Account Balances table) for the JU ledger. Values are:
Blank: Do not display original budget units.
1: Display original budget units.
- 9. JU Ledger
-
Specify whether to display the column for the revised budget units in the JU ledger. Values are:
Blank: Do not display units.
1: Display units.
- 10. PA + AA Ledgers
-
Specify whether to display the column for the total commitment amount (sum of the amounts from the PA and AA ledgers). Values are:
Blank: Do not display total commitment amount.
1: Display total commitment amount.
- 11. PA Ledger
-
Specify whether to display the column for the open commitment amounts from the PA ledger. Values are:
Blank: Do not display open commitment amounts.
1: Display open commitment amounts.
- 12. PU + AU Ledgers
-
Specify whether to display the column for the total commitment units (sum of the units from the PU and AU ledgers). Values are:
Blank: Do not display total commitment units.
1: Display total commitment units.
- 13. PU Ledger
-
Specify whether to display the column for the open commitment units in the PU ledger. Values are:
Blank: Do not display open commitment units.
1: Display open commitment units.
- 14. HA Ledger
-
Specify whether to display the column for the projected final amounts in the HA ledger. Values are:
Blank: Do not display projected final amounts.
1: Display projected final amounts.
- 15. HU Ledger
-
Specify whether to display the column for the projected final units in the HU ledger. Values are:
Blank: Do not display projected final units.
1: Display projected final units.
- 16. Revised Budget Amt Ledgers-Original Budget (BORG)
-
Specify whether to display the original budget amounts for the Revised Budget Amount Ledger Types defined in UDC 51/RB. Values are:
Blank: Do not display original budget amounts for the Revised Budget Amount ledgers (51/RB).
1:Display original budget amounts for the Revised Budget Amount ledgers (51/RB).
- 17. Revised Budget Amt Ledgers-Original and Revised Budgets
-
Specify whether to display the original and revised budget amounts for the Revised Budget Amount Ledger Types defined in UDC 51/RB. Values are:
Blank: Do not display the original and revised budget amounts for the Revised Budget Amount ledgers(51/RB).
1: Display the original and revised budget amounts for the Revised Budget Amount ledgers(51/RB).
- 18. Revised Budget Unit Ledgers: BORG
-
Specify whether to display the column for the sum of the original budget units (BORG field from the Account Balances table) for the revised budget ledgers. Values are:
Blank: Do not display the sum of the original budget units.
1: Display the sum of the original budget units.
- 19. Revised Budget Unit Ledgers
-
Specify whether to display the column for the sum of the revised budget unit ledgers. Values are:
Blank: Do not display the sum of the revised budget unit ledgers.
1: Display the sum of the revised budget unit ledgers.
- 20. F% Ledger
-
Specify whether to display the column for the percent complete (amount from the F% ledger). If the percent complete is zero, the system displays the result based on the method of computation that you assign to the account. Values are:
Blank: Do not display percent complete.
1: Display percent complete.
- 21. JA: AA Ledgers
-
Specify whether to display the column for the budget variance amount (the difference between the amounts in the JA and AA ledgers). Values are:
Blank: Do not display the budget variance amount.
1: Display the budget variance amount.
- 22. JU: AU Ledgers
-
Specify whether to display the column for the budget variance units (the difference between the units in the JU and AU ledgers). Values are:
Blank: Do not display budget variance units.
1: Display budget variance units.
- 23. HA: JA Ledgers
-
Specify whether to display the column for the projected final over/under amounts (the difference between the amounts in the HA and JA ledgers). Values are:
Blank: Do not display projected final over/under amounts.
1: Display projected final over/under amounts.
- 24. HU: JU Ledgers
-
Specify whether to display the column for the projected final over/under units (the difference between the units in the HU and JU ledgers). Values are:
Blank: Do not display projected final over/under units.
1: Display projected final over/under units.
7.3.3.2 Versions
- 1. Progress Entry Version (P510212)
-
Specify the version of the Progress Entry program to use when you select Job Progress from the Form menu. If you leave this processing option blank, the system uses version ZJDE0001.
- 2. Budget Revisions Version (P510171)
-
Specify the version of the Budget Revisions program to use when you select Job Budgets, Budget Original from the Form menu. If you leave this processing option blank, the system uses version ZJDE0001.
- 3. Job Progress Entry Version (P510211)
-
Specify the version of the Job Progress Entry program to use when you select Account Progress from the Row menu. If you leave this processing option blank, the system uses version ZJDE0001.
- 4. Select Button Exits
-
Specify the form to display when you select an account on the Work with Job Status Inquiry: Basic form. Values are:
Blank: Display the Progress Entry form.
1: Display the Progress Entry by Job form.
2: Display the Work With Account Ledger form.
7.3.4 Reviewing Basic Job Information
The system uses processing option selections to determine the columns that display on the form.
Access the Work with Job Status Inquiry: Basic form.
- Revised Budget Amounts: JA
-
Enter the revised budget amounts in the JA ledger for the period specified.
- Revised Budget Units: JU
-
Enter the revised budget units in the JU ledger for the period specified.
- Original Budget Amounts: JA
-
Enter the amount from the BORG (budget original) field in the JA ledger for the period specified.
- Original Budget Units: JU
-
Enter the unit from the BORG (budget original) field in the JU ledger for the period specified.
- Total Commitment Amount
-
Enter the sum of the amounts for the period specified in the AA and PA ledgers for the period specified.
- Total Commitment Units
-
Enter the sum of the units for the period specified in the AU and PU ledgers for the period specified.
- Open Commitment Amounts
-
Enter the amount for the period specified in the PA ledger for the period specified.
- Open Commitment Units
-
Enter the unit in the PU ledger for the period specified.
- Projected Final Amounts
-
Enter the amount in the HA ledger for the period specified.
- Projected Final Units
-
Enter the unit in the HU ledger for the period specified.
- Budget Variance Amount
-
Enter the difference between the amount in the JA ledger and the amount in the AA ledger for the period specified.
- Budget Variance Units
-
Enter the difference between the unit in the JU ledger and the amount in the AU ledger for the period specified.
- Projected Final Over/Under Amounts
-
Enter the difference between the amount in the HA ledger and the amount in the JA ledger for the period specified.
- Projected Final Over/Under Units
-
Enter the difference between the unit in the HU ledger and the amount in the JU ledger for the period specified.
7.4 Reviewing Job Information with User Defined Columns
This section provides overviews of mobile enterprise applications for field status review and the Job Status Inquiry-User Defined Columns program (P512000) and discusses how to:
-
Define inquiry columns.
-
Set processing options for Job Status Inquiry User Defined Columns (P512000).
-
Review job information with user defined columns.
7.4.1 Mobile Enterprise Applications for Field Status Review (Release 9.1 Update)
The following mobile applications are available, and can be used to review field status on a mobile device:
-
Field Status Review (Tablet and Smartphone)
These applications require system administrator configuration before they are available to individual users. Contact your system administrator to determine whether these applications are available for use.
Additionally, see the following topic in the JD Edwards EnterpriseOne Applications Mobile Enterprise Applications Implementation Guide:
7.4.2 Understanding Job Status Inquiry-User Defined Columns Program (P512000)
The Job Status Inquiry User Defined Columns program (P512000) provides the most flexibility for reviewing the important job or project information. Unlike the Job Status Inquiry Basic program, which retrieves information only from the Account Balances table, the P512000 program can retrieve information from both the Account Balances table and Account Ledger (F0911) table. You can use dates for partial periods and select unposted records from the F0911 table.
Using this program, you decide the columns to display, the sequence in which to display the information, and the search criteria to use to retrieve the information, such as dates, cost code ranges, posted status, and so on. Processing options let you specify default values for search criteria, and column versions let you save selected columns. By using both processing options and column versions, you can set up multiple versions of the inquiry program for different types of searches.
7.4.2.1 Setting Up Columns
You select the columns to display on the Job Status Inquiry form from a list that contains the most frequently used columns. Each column on the list is set up using a formula that determines the type of information that the system retrieves. The standard formulas are hard-coded to retrieve amounts, units, and units at the header level of the account.
You use the Define Column Inquiry program (P51921) to add, review, and revise column information. The program provides a list of the standard formula numbers that are used in the predefined columns. You can create new columns to display additional information by setting up the standard formulas in an equation. You use the basic math symbols (+, –, *, ÷) in conjunction with the standard formula numbers to create the equations for new columns. You can also use parentheses () to nest equations.
For example, original budget amounts for the JA ledger are hard-coded to use formula 2 and revised budget amounts are hard-coded to use formula 3. If you wanted to display the variance between these two amounts, you could set up a column for budget variance and enter the equation 2 – 3 as the formula. You can also create formulas for ledger types other than those used in the standard formulas, such as JA, AA, and HA, by completing the Description 01,Description 02, and Special Handling fields of user-defined code (UDC) 51/IL. When the fields are completed, the corresponding numeric codes for the amount and unit ledgers appear in the standard formula list.
See Understanding UDCs for Job Cost.
This program also provides a Multiplier field to assist you with keeping formulas simple. For example, if you wanted to multiply the result of the formula by 3, rather than using nested equations, you can enter 3 as the multiplier. You can also assign a data item to the column and use it to add glossary information.
The system stores column information in the Inquiry Columns table (F5192).
7.4.2.2 Setting Up and Using Column Versions
When you finish setting up the Job Cost Inquiry form with the columns that you want, you can save the columns specified in a version. You can select up to 20 columns to appear on the form and save in a version, and you can save as many versions as you want. When you have a version saved, you enter that version into the Column Version field on the Job Status Inquiry form, and the system displays the columns specified. You create column versions by selecting Save Columns from the Form menu on the Job Status Inquiry form. When you save a version, the system displays an additional form that you use to name the version. The system stores versions by user ID.
Although you must specify columns for this program, you do not have to save them as versions. When you exit the job status inquiry program, the system automatically saves the columns that you set up as a column version and assigns it the user ID. When you access the program again, the system automatically uses the version that it saved for the user ID, unless you enter another column version. Using column versions, set up several inquiry formats that are interchangeable. Because you can modify column versions, using the feature is not a disadvantage. Column versions are also used by the progress entry programs.
To revise the columns in an existing version, you remove the columns from the column selection on the Job Status Inquiry form and save the version. You do not need to rename the version to revise it; however, you can use an existing version to create another version, that you can modify. To delete a column version, you must use the Column Versions - User Overrides program (P98950). Because this program is used by several systems, you must enter the program number for the P512000 in the Application field to display the correct versions, and then click Delete.
|
Important: Do not use the Copy feature in the Column Versions - User Overrides program to create new versions. The P512000 program does not recognize versions that are copied in this manner. To copy a version, save an existing version on the Job Status Inquiry form and assign it a new name. |
7.4.3 Forms Used to Review Job Information with User: Defined Columns
7.4.4 Defining Inquiry Columns
Access the Define Inquiry Columns form.
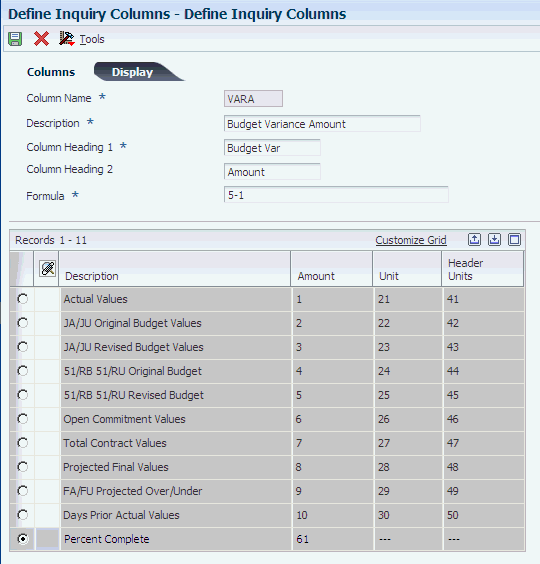
- Column Heading 1
-
Enter up to 10 characters to describe the first line of the column heading that appears on the Job Status Inquiry form. The system automatically centers this line for the column.
- Column Heading 2
-
Enter up to 10 characters to describe the second line of the column heading that appears on the Job Status Inquiry form. The system automatically centers this line for the column.
- Formula
-
Enter a predefined formula number or an equation using multiple formula numbers from the list of formulas that the system displays to calculate the value for column. The math symbols that you can use in the equation are:
+ Addition.
– Subtraction.
* Multiplication.
/ Division.
() Left and right parenthesis for nesting equations.
- Multiplier
-
Enter the factor by which the amounts or units in a column are multiplied. The system multiplies the result of the calculation in the Formula field by the multiplier factor before it displays the result on the Job Status Inquiry form.
For example, if you want to scale large numbers to thousands, enter .001. If you want percentages to appear as whole numbers, enter 100.
- Data Item
-
Enter the data item from the Data Dictionary that describes the information about the column, which includes the related glossary description, display code, decimals, and item properties that the system uses. Changes to the column definition must be maintained using the Data Dictionary applications.
7.4.5 Setting Processing Options for Job Status Inquiry User Defined Columns (P512000)
Processing options enable you to specify the default processing for programs and reports.
7.4.5.1 Defaults
- 1. Account Sequence
-
Specify the default value to display in the Sequence Code processing option to control the order in which the system displays account information. Values are:
Blank: Job, Cost Code, and Cost Type.
1: Account Category Code 01.
2: Account Category Code 02.
3: Account Category Code 03.
A: Alternate Cost Code.
C: Cost Code, Cost Type, and Job.
O: Job, Cost Type, and Cost Code.
T: Cost Type, Cost Code, and Job.
- 2. Default Cost Code Range
-
From Cost Code
Specify the beginning cost code (subsidiary) account in the range of accounts to display. If you leave this processing option blank, the system displays all cost codes through the value entered in the Thru Cost Code field.
Thru Cost Code
Specify the ending cost code (subsidiary) account in the range of accounts to display. If you leave this processing option blank, the system displays all cost codes from the value entered in the From Cost Code field.
- 3. Default Cost Type Range
-
From Cost Type
Specify the beginning cost type (object) account in the range of accounts to display. If you leave this processing option blank, the system displays all cost types through the cost type that is entered in the Thru Cost Type field.
Thru Cost Type
Specify the ending cost type (object) account in the range of accounts to display. If you leave this processing option blank, the system displays all cost types from the value that is entered in the From Cost Type field.
- 4. Default Company Number
-
Specify the company number to use as the default value for the corresponding field on the form.
- 3. Restrict Account Range
-
Specify the range of accounts in the Default Cost Code Range and Default Cost Type Range processing options to be modified on the form. Values are:
Blank: Revise the range of accounts for display.
1: You cannot revise the range of accounts that appears on the form. The system disables the account processing options on the Additional Selections area of the form. You can, however, add accounts within the range specified.
- 6. Column Version
-
Specify the column version to use as the default value for the corresponding field on the form.
- 7. Restrict Column Version
-
Revisions to the column versions. Values are:
Blank: Do not enable.
1: Enable.
- 8. Header Accounts
-
Specify whether to select the check box to display header accounts as default values. Values are:
Blank: Select the check box.
1: Do not select the check box.
- 9. Zero Accounts
-
Specify whether to select the check box to display accounts with zero amounts as the default value. Values are:
Blank: Do not select the check box.
1: Select the check box.
7.4.5.2 Process
- 1. Account Ledger
-
Ledger Type 1
Specify the default ledger type to assign to the corresponding field when you access the Account Ledger Inquiry program (P09200) from the Row menu. If you leave this processing option blank, the system assigns ledger type AA.
Ledger Type 2
Specify the default ledger type to assign to the corresponding field when you access the Account Ledger Inquiry program from the Row menu. If you leave this processing option blank, the system does not assign a default ledger type.
7.4.5.3 Version Exits
Use these processing options to specify the default version to use for the program specified.
- 1. Account Progress Entry (P510211)
-
Specify the version of the Account Progress Entry program to use when you select Progress Entry, Account from the Row menu. If you leave this processing option blank, the system uses version ZJDE0001.
- 2. Job Progress Entry (510212)
-
Specify the version of the Job Progress Entry program to use when you select Progress Entry, Job from the Row menu. If you leave this processing option blank, the system uses version ZJDE0001.
- 3. Performance Based Labor Progress Entry (P510312)
-
Specify the version of the Performance Based Labor Progress Entry program to use when you select Progress Entry, Performance Labor from the Row menu. If you leave this processing option blank, the system uses version ZJDE0001.
- 4. Original Budget (P510121)
-
Specify the version of the Original Budget program to use when you select Budgets, Budget Original from the Row menu. If you leave this processing option blank, the system uses version ZJDE0001.
- 5. Budget Revisions (P510171)
-
Specify the version of the Budget Revisions program to use when you select Budgets, Budget Revisions from the Row menu. If you leave this processing option blank, the system uses version ZJDE0001.
- 6. Scheduling Workbench (P48201)
-
Specify the version of the Scheduling Workbench program to use when you select Work Orders, WO Sch Workbench from the Form menu. If you leave this processing option blank, the system uses version ZJDE0001.
- 7. Account Ledger Inquiry Version (P19200)
-
Specify the version of the Account Ledger Inquiry program to use when you select General Accounting, Account Ledger from the Row menu. If you leave this processing option blank, the system uses version ZJDE0001.
- 8. Select Button Exit
-
Specify the form to display when you select an account on the Job Status Inquiry form. Values are:
Blank: Display the Progress Entry form.
1: Display the Progress Entry by Job form.
2: Display the Work With Account Ledger form.
3: Display the Work With Performance Based Labor Activity form.
7.4.6 Reviewing Job Information with User-Defined Columns
Access the Job Status Inquiry form.
The Job Status Inquiry form has fields that you use to enter selection and display criteria.
This form displays header information that is related specifically to Options.
7.4.6.1 Display
Select the Display tab.
- Job Posting Edit
-
Enter the posting edit code that is assigned to the job or project in the Business Unit Master table (F0006).
- Column Version
-
Enter the version of the inquiry columns that you want to display. If you leave this field blank, the system automatically displays the version that is associated with the user ID, which it created for you automatically the last time that you used the program. If no version is associated with the user ID, you must manually select the columns to display.
- From Date/Period and Thru Date/Period
-
Enter the range of period numbers or dates to use to retrieve account information. If you enter dates for partial periods, the system retrieves the information from the Account Ledger table (F0911) and adds it to the period information from the Account Balances table.
7.4.6.2 Additional Selections
Select the Additional Selections tab.
- Display Zero Accounts
-
Select this check box to display accounts that have zero amounts.
- Display Header Accounts
-
Select this check box to display header accounts.
- Display Header Description
-
Select this check box to display the description for the header account if you selected the Display Header Accounts check box.
7.4.6.3 Project
Select the Project tab.
- Job Type
-
Enter the job type to use to select the records to display.
- List
-
Select this option to display each account separately for each job.
If the search criteria displays multiple jobs by project or company, you can select to display each account separately or consolidate the information for the same account across multiple jobs and projects.
- Consolidation
-
Select this option to display one summarized account for multiple jobs.
If the search criteria displays multiple jobs by project or company, you can select to display each account separately or consolidate the information for the same account across multiple jobs and projects.
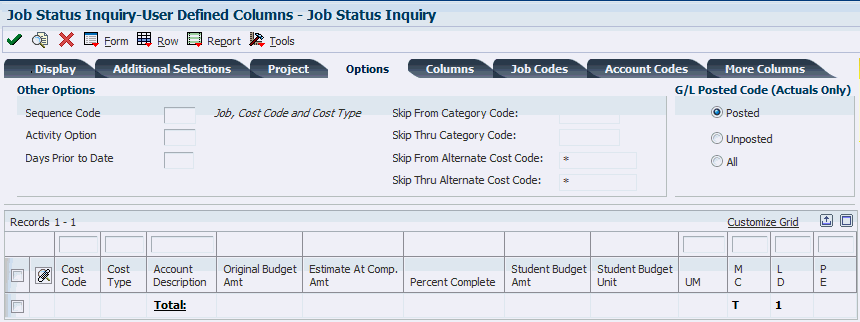
7.4.6.4 Options
Select the Options tab.
- Skip From Category Code:
-
Enter the first category code value in the range of category code values to select the records to display on the form. The system enables the Skip From Category Code and Skip To Category Code fields only when the value of the Sequence Code field is 1,2, or 3. Depending on the value, the system selects a range of values from category code 1, category code 2, or category code 3.
- Skip Thru Category Code:
-
Enter the last category code value in the range of category code values to select the records to display on the form. The system enables the Skip From Category Code and Skip To Category Code fields only when the value of the Sequence Code field is 1,2, or 3. Depending on the value, the system selects a range of values from category code 1, category code 2, or category code 3.
- Skip From Alternate Cost Code:
-
Enter the first alternate cost code in the range of alternate cost code values to select the records to display on the form. The system enables the Skip From Alternate Cost Code and Skip To Alternate Cost Code fields only when the value of the Sequence Code field is A.
- Skip Thru Alternate Cost Code:
-
Enter the last alternate cost code in the range of alternate cost code values to select the records to display on the form. The system enables the Skip From Alternate Cost Code and Skip To Alternate Cost Code fields only when the value of the Sequence Code field is A.
- Sequence Code
-
Enter the code that specifies the sequence that the system uses to display the accounts on the form. The system automatically displays the column based on the sequence that you select. For example, if you select A, the system adds the column for Alternate Cost Code. Values are:
Blank: Job, Cost Code, and Cost Type (Business Unit, Subsidiary, Object)
1: Account Category Code 01.
2: Account Category Code 02.
3: Account Category Code 03.
A: Alternate Cost Code.
C: Cost Code and Cost Type.
O: Job, Cost Type, and Cost Code.
T: Cost Type and Cost Code.
- Activity Option
-
Enter the code that describes how to limit the account information that the system displays based on the activity in the account. Values are:
A: Display only accounts with actual costs (AA ledger).
B: Display only accounts that have projected final amounts (HA ledger) that are less than 100 percent.
C: Display only accounts that have actual amounts (AA ledger) with a percent complete that is less than 100 percent.
D: Display only accounts that are 100 percent complete.
E: Display only accounts that have a projected final amount (HA) that is greater than the revised budget ledger value.
F: Display only accounts that have a projected final amount (HA) that is less than the revised budget ledger value.
G: Display only accounts that have actual amounts (AA ledger) or budget amounts.
- Days Prior to Date
-
Enter the number of days prior to the date entered in the Thru Date/Period field to use to retrieve account information. For example, if the through date is June 30, 2008, and you enter 5 in this field, the system uses a through date of June 25, 2008 to display account information.
You can use this field to display information for an irregular period of time, such as a five-day workweek, that occurs in the middle of a financial period.
Note:
This field works only for the AA and AU ledgers, and affects only columns with formulas that include code 10, 30, or 50. The Days Prior to Date field has no effect on any other columns. - Posted, Unposted, and All
-
Select one of these buttons to limit the account information that the system displays to posted or unposted transactions from the AA and AU ledgers.
7.4.6.5 Columns
Select the Columns tab.
- Column 01throughColumn 10
-
Enter column names in these fields that correspond to the account information that you want to display.
7.4.6.6 Job Codes
Select the Job Codes tab.
- Cat. Code 01throughCat. Code 25
-
Select a value from the user-defined code table that is associated with the category code.
7.4.6.7 Account Codes
Select the Account Codes tab.
- Cat. Code 01throughCat. Code 23
-
Select a value from the user-defined code table that is associated with the category code.
7.4.6.8 More Columns
Select the More Columns tab.
- Column 11throughColumn 20
-
Enter column names that correspond to the account information that you want to display.
7.5 Reviewing Budget Information by Ledger Type
This section provides an overview of the Revised Budget by Ledger Type program (P51216) and discusses how to review budget information by ledger type.
7.5.1 Understanding the Revised Budget by Ledger Type Program (P51216)
You use the Revised Budget by Ledger Type program (P51216) to review the activity for a specific account for all of the budget revision ledger types. The system provides a detail line for each budget ledger type that has amounts or units for the account specified. You can select whether to display amounts, units, or both. The program displays these fields for amounts and units, depending on the option that you select:
-
Original budget
-
Beginning balance
-
YTD changes
-
Revised budget
The system retrieves information from the Account Balances table (F0902) based on the period or date that you specify.
7.5.2 Form Used to Review Budget Information By Ledger Type
7.5.3 Reviewing Budget Information by Ledger Type
Access the Work With Revised Budget Account Balance form.
- Beg Balance Amount (beginning balance amount)
-
Enter the cumulative prior year-end balance. The system uses this amount as the beginning balance for balance sheet and job cost accounts.
Note:
Do not confuse this amount with the prior year-end net posting amount. The prior year-end net posting amount includes only the postings from the prior year. It does not include the ending balance of the previous year. The prior year-end net postings are typically used for profit and loss statement comparisons. - YTD Changes Amount (year-to-date changes amounts)
-
Enter the total amount to revise the original budget amount through the period or date specified.
- Revised Budget Amount
-
Enter the sum of the original budget amount and the year-to-date changes amount.
7.6 Reviewing Accounts Payable Information by Job
This section provides an overview of the Accounts Payable Inquiry by Job program (P04220) and discusses how to review accounts payable information by job.
7.6.1 Understanding the Accounts Payable Inquiry by Job Program (P04220)
Use the Accounts Payable Inquiry by Job program (P04220) to review accounts payable vouchers that were matched during the procurement process, as well as those that were manually entered for the job by each supplier. This information helps you track the costs that are associated with each task of the job (based on supplier) and the job as whole.
The system displays the gross amount, open amount, discount information, dates (general ledger and invoice), and other referential information such as the invoice number, purchase order number, and bank account. You can review each pay item of the voucher separately or you can summarize all of the pay items to display information by document number. The program also provides information about whether the voucher is paid. If the voucher is paid, you can review payment information by selecting the voucher record.
Because this program is informational only, to revise voucher information or place the voucher on hold for payment, you must use the Standard Voucher Entry program (P0411).
The system displays information from the Accounts Payable Ledger table (F0411).
7.6.2 Form Used to Review Accounts Payable Information by Job
7.6.3 Reviewing Accounts Payable Information by Job
Access the Work With Accounts Payable Inquiry by Job form.
- Summarize
-
Select this check box to display voucher transactions by document type instead of pay item. For example, if voucher 123 has 55 pay items, you can display each pay item of the voucher, or you can select the Summarize check box to display one detail line for the voucher; all the pay items are summarized into one document.