8 Entering Cases
This chapter contains the following topics:
8.1 Understanding Cases
As the main component of Oracle's JD Edwards EnterpriseOne Support systems, the JD Edwards EnterpriseOne Case Management system captures the details of customers' problems and provides a process to track cases from creation to resolution.
Use the Case - Manage form to enter and review all information related to a case. This form provides tabs and access to the Case Entry program (P90CG501), the Solution program (P90CG502), the Activities program (P90CG510), and the Related Actions program (P90CG503). You can also attach both internal and external messages or documents to the case using media objects.
You can create various objects related to a case, such as sales orders, quotes, scripts, service work orders, equipment work orders, leads, and returned material authorizations (RMAs), all within the context of a case using the Related Actions program.
Click the Related Links link in the Manage Case form to access each area of a case that you want to review. You can access multiple contact, customer, supplier, employee, item, equipment, and contracts programs using this link.
|
Note (Release 9.1 Update): You can also access related programs (contact, customer, supplier, case time entry, item/equipment, contracts, supplemental data, and case history) from the Row menu on the Work With Case Management form of the Case Entry program (P17500). This option of accessing related programs from the Work With Case Management form is helpful if you use the Speed Case Entry program (P90CG601) because you cannot access the related programs from the Speed Case Entry form. |
Use the Activities program to assign issues related to the case to other team members in order to resolve a customer problem. Activities, a foundational component of JD Edwards EnterpriseOne Customer Relationship Management (CRM), enable users to track case-related actions such as meetings, tasks, and to-dos. Activities appear on the calendar control.
8.1.1 Speed Case Entry (Release 9.1 Update)
You can set processing options in the Case Entry program (P17500) to use the Speed Case Entry program (P90CG601) to quickly add a new case or update an existing case. The add and update mode of the Speed Case Entry program contains logical grouping of fields in nine collapsible groupboxes. Use the Speed Case Entry program to:
-
Access existing case information, enter new cases, or edit existing cases.
-
Access the Related Actions program (P90CG602) to view existing related actions or add new related actions. You can view the status of the related actions (wherever possible) in the grid of the Manage Related Actions form.
See Entering and Updating Cases Using the Speed Case Entry Program (P90CG601) (Release 9.1 Update) and Entering and Reviewing Related Actions for Speed Case Entry (Release 9.1 Update).
8.2 Entering Basic Case Information
This section provides an overview of basic case information, lists a prerequisite, and discusses how to enter basic case information.
8.2.1 Understanding Basic Case Information
Before you can process a case and enter additional information (such as activities, billing, and solutions), you must enter basic data in the system—for example, a customer or item number—so the system can assign a case number and begin processing the case.
8.2.2 Prerequisite
Before you can enter a case, you must:
-
Complete the steps described in the chapter named "Setting Up Case Management Fundamentals."
-
Exist in the Address Book and be defined as a service provider.
-
Complete the steps described in the chapter named "Setting Up Provider Groups."
See Setting Up Case Management Fundamentals.
See Setting Up Provider Groups.
and
8.2.3 Forms Used to Enter Basic Case Information
| Form Name | FormID | Navigation | Usage |
|---|---|---|---|
| Work With Case Management | W17500A | Daily Support Processing (G90CE01), Case Entry | Search for cases. |
| Add Case | W90CG504A | Click the Add button on the Work With Case Management form. | Enter basic case information. |
8.2.4 Entering Basic Case Information
Access the Add Case form.
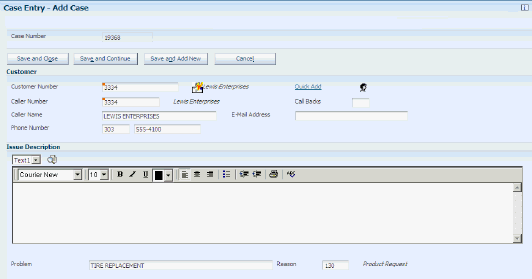
Figure 8-2 Add Case form: Detail tab (2 of 2)
Description of "Figure 8-2 Add Case form: Detail tab (2 of 2)"
8.2.4.1 Customer
- Customer Number
-
Enter the customer number.
If the customer exists in the system, the system retrieves information about that customer, such as a telephone number. This information appears by default. You can override default values, if necessary.
If the customer does not in exist the Address Book, click the Quick Add link and add the customer record.
- Call Backs
-
Enter a value from UDC 17/CB to specify the number of callbacks for the case.
- Caller Number
-
Enter the caller number to associate a third-party with the case, such as a technician or a customer service representative. The customer number appears by default in this field.
- Caller Name
-
Enter the customer contact name for the case.
If the caller does not exist not in the Address Book, click the ellipsis (...) link and add the contact information.
- Problem
-
Enter a short description for the case.
Depending on how you have set the processing options, you can use the first 80 characters from the media object as the default value for this field. If you are not using Solution Advisor and the Solution system constant is not selected, you can also click the Search button to select a failure description
- Reason
-
Enter the reason for the customer issue.
Note:
To attach additional text to the case, enter additional text in the text box on the form. When you define status rules, you can define when the text attached to a case is protected. When you protect text, you prevent changes to the text attached to a case. You can add to text that is protected; click the Append Text link. You cannot modify the existing text. The system appends a time stamp to the text area when the information changes. - Priority
-
Enter a value from UDC 17/PR to specify the case priority code. In conjunction with the F1753 table, this field determines the response time.
- Case Status
-
Enter a value from UDC 17/ST to specify the case status, such as Open, Active, and so forth.
- Case Type
-
Enter a value from UDC 17/CT to specify the case type.
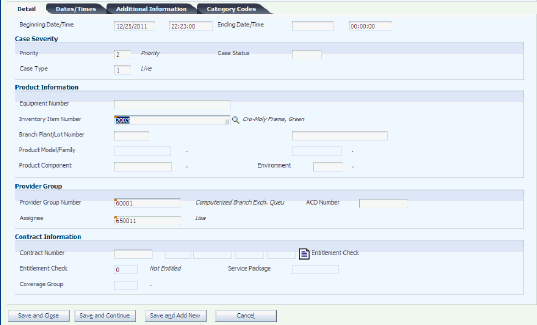
- Equipment Number
-
Enter an identification code that represents an asset. You might enter a serial number in this field based on the equipment constants. Enter the identification code in one of these formats:
Asset number: A computer-assigned, eight-digit numeric control number.
Unit number: A 12-character alphanumeric field.
Serial number: A 25-character alphanumeric field.
Every asset has an asset number. You can use unit number and serial number to further identify assets. If this is a data entry field, the first character you enter indicates whether you are entering the primary format that is defined for the system, or one of the other two formats. A special character, such as a forward slash (/) or asterisk (*), in the first position of this field indicates the asset number format that you are using. You assign special characters to asset number formats on the Fixed Asset System Constants form.
- Inventory Item Number
-
Enter a number that the system assigns to an item. It can be in short, long, or third item number format.
- Product Model/Family
-
Enter a code that classifies an inventory item into a model for customer service.
Note:
Based on the equipment number that you set up in the equipment record, the system retrieves the inventory item number, branch/plant log, and product model/family. If you do not enter the equipment number, the system retrieves the branch/plant lot and the product model/family, based on the inventory item number. - Product Component
-
Enter the components that make an equipment number or components associated with a customer site.
- Environment
-
Enter the operating environment of the user.
- Provider Group Number
-
Enter the provider group number. If you set up routing rules, the system automatically assigns the case to a particular provider group, based on the case type or generically. The provider group is assigned based on the routing rules. If the provider group is manually entered or appears by default from the processing options; it is not assigned based on the routing information.
If you enter a value other than the Address Book number—such as the long address or tax ID—you must precede it with the special character that is defined in the Address Book constants. When the system locates the record, it returns the Address Book number in this field.
For example, if the Address Book number 4100 (total solutions) has a long address TOTAL and an asterisk (*) distinguishes it from other entries (as defined in the Address Book constants), you might type *TOTAL into the field. The system would return 4100.
- Assignee
-
Enter the assignee manually; or assign by the routing information or the escalation routine if you are using escalation by skill level.
If you are manually assigning cases, enter the Address Book number for the assignee.
If you enter a value other than the Address Book number—such as the long address or tax ID—you must precede it with the special character that is defined in the Address Book constants. When the system locates the record, it returns the Address Book number in this field.
If you are escalating using skill levels and an assignee has been entered or appears by default from routing rules and the assignee is not an employee for the provider group, the case is reassigned to a provider group member in the escalation process.
If you set up routing rules that specify the case to be directed to an assignee, this field contains the default information.
and
- Service Package
-
Displays the service package by default if the case is entitled. A service package contains the service type, coverage type, response time, and coverage group.
- Coverage Group
-
Displays default information for the service package. The coverage group consists of unlimited cost codes and the percentage covered for each cost code.
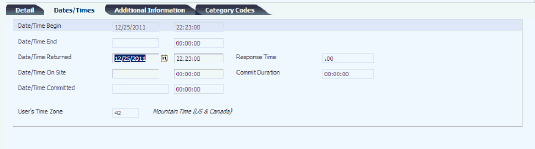
8.2.4.2 Dates/Times
Select the Dates/Times tab.
Figure 8-3 Add Case form: Dates/Times tab
Description of "Figure 8-3 Add Case form: Dates/Times tab"
- Date/Time Returned
-
Enter the date that the job is executed. When a case is first assigned, the system supplies the current date and time in this field and the Date/Time Begin field.
- Date/Time On Site
-
Enter the date that the service provider arrives at the customer site.
- Date/Time Committed
-
Displays the system-calculated commitment date and time.
If the case is covered under a contract, this field uses the current date and time plus the response time guaranteed in the contract.
If the case is not covered under a contract, this field displays the current date and time plus a guaranteed response time that is based on the provider group and case type. This value is multiplied by the commitment percentage, which is based on the provider group and priority.
See Setting Up Case Priorities Using Notification Escalation Method.
and
See Setting Up Priorities Using Skill-Level Escalation Method.
- Users Time Zone
-
Displays the time zone defined in the service provider information listed in the Address Book record for the user entering the case.
- Commitment Duration
-
Displays the amount of time that has elapsed between case entry and case assignment.
8.2.4.3 Additional Information
Select the Additional Information tab.
Figure 8-4 Add Case form: Additional Information tab
Description of "Figure 8-4 Add Case form: Additional Information tab"
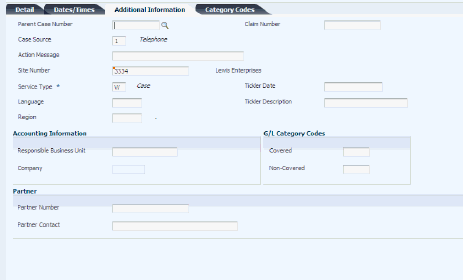
- Parent Case Number
-
Enter the parent case number if the case is a child of another case or if cases are related.
- Claim Number
-
Enter a claim number to link a claim that product end user submits. Claim numbers are found often on preprinted forms.
- Case Source
-
Enter a value from UDC 17/SC to specify the source of a case, such as telephone, email, or web.
- Tickler Date
-
Enter the date on which the transaction takes effect. The effective date is used generically. It can be the date of the next raise, a lease effective date, a price or cost effective date, a currency effective date, a tax rate effective date, or any other date that is appropriate.
When you enter tickler dates, the system creates a message in the mailbox of the provider group or assignee with the tickler date. For example, you can use the tickler fields if you want to call a customer after closing the case to ensure that the issue does not require further attention.
- Tickler Description
-
Enter a user-defined name or remark.
- Responsible Business Unit
-
Enter the entity for where you want to track costs; for example, a warehouse location, job, project, work center, or branch/plant
You can assign a business unit to a voucher, invoice, fixed asset, and so forth, for responsibility reporting. The system provides reports of open accounts payable and accounts receivable by business unit, for example, to track equipment by responsible department.
Business unit security can prevent you from running inquiries on business units for which you have no authority.
- Covered
-
Enter a value from UDC 41/9 to identify the general ledger offset to use when the system is searching for the account to which it posts the covered portion (by warranty or contract) of the accounting transaction. If you do not want to specify a general ledger offset, you can enter four asterisks (****) in this field or you can leave the field blank. If you leave the field blank, the system uses the general ledger offset from Oracle's JD Edwards EnterpriseOne Inventory system.
- Non-Covered
-
Enter a value from UDC 41/9 to identify the general ledger offset to use when the system is searching for the account to which it posts the non-covered portion of the accounting transaction. If you do not want to specify a general ledger offset, you can enter four asterisks (****) in this field or you can leave the field blank. If you leave the field blank, the system uses the general ledger offset from the JD Edwards EnterpriseOne Inventory system.
- Partner
-
Enter the partner number. A partner can be a third-party that you attach to a case. For example, a partner might be a company that you use to resolve a case.
8.2.4.4 Category Codes
Access the Category Codes form. Select the Category Codes tab.
- Case Category Codes and Equipment Category Codes
-
Review and enter category codes for cases or equipment. Complete the category code fields, as necessary.
8.3 Entering Billing Information for a Case
This section lists a prerequisite and discusses how to enter billing information.
8.3.1 Prerequisite
Before you complete the tasks in this section, you must complete the tasks required for setting up billing for cases.
8.3.2 Form Used to Enter Billing Information for a Case
| Form Name | FormID | Navigation | Usage |
|---|---|---|---|
| Billing Information | W90CG501B | Daily Support Processing (G90CE01), Case Entry
Select the customer on the Work With Case Management form, and click Select From Case Entry, click the Billing link. |
Enter billing information for a case. |
8.3.3 Entering Billing Information
Access the Billing Information form.
|
Note: If you are running an inquiry on a case that you have already billed, some of the fields in this task might be disabled.The system displays the Billing Information form only if you activated the Bill for Cases processing option on the Process tab for the Case Update program (P90CG501). |
8.3.3.1 Customer Info
- Bill To Number and Send Invoice To Number
-
Enter the Address Book number for the bill-to address or the send-to invoice address. If you enter a value other than the Address Book number—such as the long address or tax ID—you must precede it with the special character that is defined in the Address Book constants. When the system locates the record, it returns the Address Book number in this field.
For example, if the Address Book number 4100 (total solutions) has a long address TOTAL and an asterisk (*) distinguishes it from other entries (as defined in the Address Book constants), you might type *TOTAL into the field, and the system would return 4100.
- PO Number
-
Enter an alphanumeric value used as a cross-reference or secondary reference number. Typically, this is the customer number, supplier number, or job number.
- Payment Terms
-
Specify the terms of payment, including the percentage of discount available if the invoice is paid by the discount due date. Use a blank code to indicate the most frequently-used payment term. You define each type of payment term on the Payment Terms Revisions form. Examples of payment terms include:
Blank: Net 15.
001: 1/10 net 30.
002: 2/10 net 30.
003: Due on the 10th day of every month.
006: Due upon receipt.
This code prints on customer invoices.
- Payment Instrument
-
Enter a value from UDC 00/PY to specify how payments are made by the customer. For example:
C: Check
D: Draft
T: Electronic funds transfer
- Responsible Business Unit
-
Enter the entity within the business for which you want to track costs; for example, a warehouse location, job, project, work center, or branch/plant. This field is alphanumeric.
You can assign a business unit to a voucher, invoice, fixed asset, and so forth, for responsibility reporting. The system provides reports of open accounts payable and accounts receivable by business unit, for example, to track equipment by responsible department.
Business unit security can prevent you from running inquiries on business units for which you have no authority.
8.3.3.2 Pricing Info
Select the Pricing Info (pricing information) tab.
- Flat Rate and Time And Material
-
Enter a value that specifies whether a type of service is priced based on a flat rate or based on actual time and materials. Values are:
Blank: A blank value is only valid when defining the method of pricing for a service provider. It is used to indicate that the service provider is an internal service provider and is not paid.
F: Charges for labor are based on a flat rate. Charges for parts are already included in the flat rate.
T: Charges for labor are based on actual labor hours. Charges for parts are based on actual parts used.
- Cost Type
-
Designate each element of cost for an item. Examples of the cost object types are:
A1: Purchased raw material.
B1: Direct labor routing roll-up.
B2: Setup labor routing roll-up.
C1: Variable burden routing roll-up.
C2: Fixed burden routing roll-up.
Dx: Outside operation routing roll-up.
Xx: Extra add-ons, such as electricity and water.
The optional add-on computations usually operate with the type Xx (extra add-ons). This cost structure can use an unlimited number of cost components to calculate alternative cost roll-ups. The system then associates these cost components with one of six user-defined summary cost buckets.
- Adjustment Schedule
-
Enter a value from UDC 40/AS to identify the price and adjustment schedule. A price and adjustment schedule contains adjustment types for which a customer or an item might be eligible. The system applies the adjustments in the sequence that you specify in the schedule. You link customers to a price and adjustment schedule through customer billing instructions. When you enter a case, the system copies the schedule attached to the sold-to address into the order. You can override this schedule at the header level.
- Price Effective Date
-
Enter the price effective date. The system uses the Price Effective Date field to determine the base price and all advanced pricing adjustments. The value loaded in this field is stored in the F4009 table.
- Pricing Units
-
Enter the amount billed for a case. Depending on the type of charge calculated (the bill item rate basis), the value in this field multiplied by the billing rate produces the gross charge amount.
- Pricing Unit of Measure
-
Enter a value from UDC 00/UM to specify the unit of measure for an amount or quantity. For example, it can represent a barrel, box, cubic meter, liter, hour, and so forth.
- Taxable
-
Select this check box if the case is taxable. The system enters default values in the Tax Explanation Code field and the Tax Rate/Area field.
(Release 9.1 Update) The alternate tax rate/area assignment functionality enables you to assign an alternate tax rate/area when the countries of the entities involved in a transaction are in the European Union (EU).
You can set up the company, the responsible business unit and the site address number to use the alternate tax rate/area assignment functionality. When retrieving the billing information, the system checks if the alternate tax rate/area assignment functionality is enabled for the company. If the functionality is enabled, the system retrieves the tax rate/area for the cases added or modified, based on the combination of responsible business unit and site countries.
You can change the tax area from this form on the Pricing Info tab and you can change the entity Responsible Business Unit on the Customer Info tab. If you receive an error message, you can cancel the action and manually change the tax rate/area. If you manually change the tax rate/area, then the system does not overwrite the value you enter.
8.3.3.3 Billing Amounts
Select the Billing Amounts tab.
- Currency
-
Identify the transaction currency.
- Exchange Rate
-
Enter the number that a foreign currency amount is multiplied by or divided by to calculate a domestic currency amount.
The number in this field can have a maximum of seven decimal positions. If more are entered, the system adjusts to the nearest seven decimal positions.
- Foreign
-
Displays amounts in the domestic or foreign currency. Select this field to have the system display amounts in the foreign currency. Clear this field to have the system display amounts in the domestic currency.
- Minimum Amount
-
Enter the minimum monetary amount to charge the customer. If the billable amount is less than the minimum amount, the system charges the customer for the minimum amount instead of the billable amount. This monetary amount is expressed in the currency of the company.
- Flat Rate Amount
-
Enter the monetary amount charged to the customer regardless of how many hours are spent or how many parts are used in performing the service. The monetary amount is expressed in the currency that is set up for the company initiating the transaction.
The system retrieves the flat rate amount from the Advanced Pricing application. You can override this amount. If you override the amount and later need to retrieve the original default price from the Advanced Pricing application, select Reprice Flat Rate from the Form menu.
Review the billable amount. If you entered a minimum amount and a flat rate amount, the system uses the greater of the two values as the billable amount.
- Discount Percent
-
Select this check box to indicate that this case is subject to a discount. If you use the discount percentage, the system calculates the discount based on a percentage of the billable amount.
- Discount Amount
-
Enter the amount of the discount available, as opposed to the amount of the discount actually taken. The discount calculated is based on the invoice amount rather than the revenue amount.
- Total Taxable Amount, Tax, and Total Billable Amount
-
Review the amounts in these fields. The system calculates the tax amount by using the tax rate area and the tax explanation code from the Pricing Info tab. The total billable amount is the sum of the Total Taxable Amount and the Tax fields.
- Billable
-
Select this check box.
Note:
The Billable check box must be selected to generate an entry successfully when you run the Case Workfile Generation program (R17675).
8.4 Working with Solutions
This section provides an overview of solutions, lists a prerequisite and common fields used in this section, and discusses how to:
-
Assign solutions to a case.
-
Send solutions.
-
Review frequently used solutions.
-
Search for solutions to a case.
|
Note: Solution Advisor is an additional application that can be used with cases. |
8.4.1 Understanding Solutions
When you enter or review a case, you can access and assign solutions by using the Solutions tab in the Case Revisions program. The Solutions application enables you to:
-
Review the attempted solutions.
-
Review the frequently-used solutions.
-
Search for solutions.
-
Send solutions to a customer through email.
-
Create a new solution that can be added to the solution repository.
8.4.1.1 Resolution Statuses
When you assign a solution to a case, it can have one of these statuses:
-
IC (in consideration): You have not suggested this solution. The solution appears in the list of attempted solutions and is available when you're ready to try it.
-
FR (failed resolution): The caller or technician attempted the solution, but the solution did not solve the problem.
-
SR (successful resolution): The solution solved the problem. You can associate this status with only one solution listed in the Attempted Solutions grid for the selected case.
-
WC (waiting on customer): You have suggested this solution, but you don't know whether the solution worked.
-
WD (withdrawn): The solution should not be associated with the case and is not presented to the caller.
8.4.1.2 Resolution Process
You use Solution Advisor to search for resolutions to cases. You can search for solutions, cases, work orders, and scripts to find possible case resolutions. You access the basic and advanced search fields from the Solution tab on the Manage Case form. When you search for cases, solutions, work orders and scripts, the Solution Advisor returns results that match the search criteria. The system displays the score value of each search result. Typically, search results with the highest score provide the most valuable information, as they most closely match the search criteria that you enter. You can perform these searches with Solution Advisor:
-
Wildcard searches.
You can use asterisks (*) as wildcards when searching for solutions. For example, to search for cases that are related to items R500, R500A and R5001, you can enter R500* in the search criteria.
-
Media object text searches.
You can search the text in the notes that are attached to cases and solutions. Notes are attached to cases and solutions as media objects.
|
Note: Resolutions do not change the status of the case. After you assign a successful solution for a case, the case status is updated to 999 (complete or closed). You must reopen the case by updating the Case Status field on the Case Update form before you can change the solution status. |
This graphic illustrates the solution search and resolution process for cases:
Figure 8-5 Solution search process to resolve cases
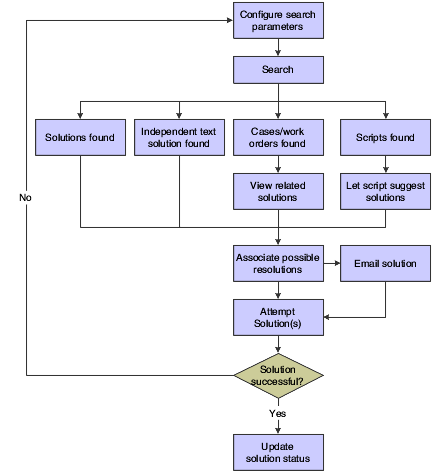
Description of "Figure 8-5 Solution search process to resolve cases"
8.4.2 Prerequisites
Before you can search for and assign solutions to cases, a solution administrator needs to:
-
Set up Solution Advisor.
-
Define solution libraries.
-
Define solutions.
-
Specify in the S/WM (Service and Warranty Management) System Constants (P17001) for cases to use Solution Advisor.
8.4.3 Common Fields Used in This Section
- Display
-
Select the number of records that are displayed. The system searches only until it reaches that amount. For example, if you select 25 rows, the system searches until it finds the first 25 records that match the search criteria determined in the Search Solution fields. Click Search to display the results. When a user searches more than one search object (for example, cases and solutions) the selected number of display records for each object are added together to define the upper limit of the search result set.
- ID
-
Click the ID link to review or execute a record included in the search result set.
For example, if solutions appear on the Frequently Used form, you can click the ID link to view the details of the Solution record. On the Advanced Search form, you can click the ID of a result set record to view the details of solutions, work orders, and cases. If you search for scripts, you can execute a script by clicking the script ID.
- Select
-
Select a solution from the Attempted Solutions form to send the solution to the customer through email. You can select up to five solution records at a time.
When you assign solutions to the case from the Frequently Used, and Search forms, those solutions appear in the Attempted Solutions grid on the Attempted Solutions form.
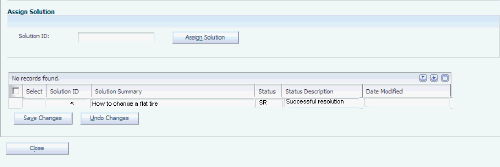
- Solution ID
-
Enter the unique identification number assigned to the solution in the Solutions program. On the Attempted Solutions form, you must enter a solution ID and then click the Assign Solution button to assign the solution to the case.
- Solution Summary
-
Enter solution summary information in this field to search for possible solutions. You define this field when you set up solutions to enable searches.
8.4.4 Form Used to Work with Solutions
| Form Name | FormID | Navigation | Usage |
|---|---|---|---|
| Manage Case | W90CG501J | Daily Support Processing (G90CE01), Case Entry
Search for and select the case. |
Review case information. |
8.4.5 Assigning Solutions to a Case
Access the Manage Case form. Select the Solutions tab.
Figure 8-6 Manage Solutions for Case {number} form (1 of 2)
Description of "Figure 8-6 Manage Solutions for Case {number} form (1 of 2)"
Figure 8-7 Manage Solutions for Case {number} form (2 of 2)
Description of "Figure 8-7 Manage Solutions for Case {number} form (2 of 2)"
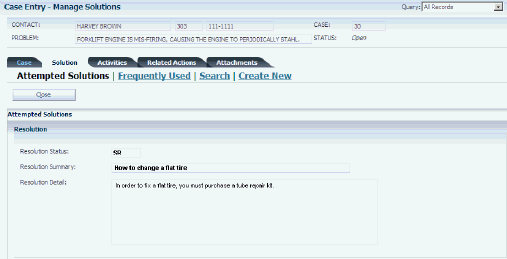
Use this form to view solutions that have been assigned to the cases and access the email application that enables users to send solutions to customers. You can assign solutions from the Search, Frequently Used, and Create New forms; however, you must always return to the Attempted Solutions form to view the list of solutions that you have associated with the case and to send selected solutions to the customer.
- Resolution Status
-
Enter SR (successful resolution) in the Status field of an attempted solution record; the system populates this field. The value appears by default from the Status field of the updated solution record in the Attempted Solutions grid.
- Resolution Summary
-
Enter SR (successful resolution) in the Status field of an attempted solution record; the system populates this field. The value appears by default from the Solution Summary field of the updated solution record in the Attempted Solutions grid.
- Resolution Detail
-
Enter SR (successful resolution) in the Status field of an attempted solution record; the system populates this field. The value appears by default from the Details field of the updated solution record in the Attempted Solution grid.
- Status
-
Select a solution status from UDC 90CE/AS. When solutions initially appear on this list, they have a status of IC (in consideration).
To specify that a solution has resolved the case, enter SR (successful resolution) in the Status field of the appropriate attempted solution record. When you enter SR, the system updates the Resolution Status, Resolution Summary, and Resolution Detail fields. After you assign a solution with a status SR, you cannot change the status of other solutions.
If you determine that a solution does not resolve a case after you have assigned it a status SR, reopen the case, click Resolution Failed and the system returns the solution to the Records area of the form with a status FR (failed resolution). You can then assign another solution to the case and edit the status of other solutions, including the solution that you marked as a failed resolution.
Note:
After you assign a successful solution for a case, the case status is updated to 999 (complete or closed). You must reopen the case by updating the Case Status field on the Case Update form before you can change the solution status.
8.4.6 Sending Solutions
Access the Email form by selecting up to five attempted solutions and clicking the Email Selected Solution(s) button.
You can send solutions to distribution lists or individuals that are set up in the system, or you can add external email addresses to forward solutions to additional contacts. To display the Email form, you must select solutions and click Email Select Solution(s) on the Attempted Solutions form.
When you assign solutions to the case, you must first click Save Changes to display the Email Select Solution(s) button. The email address of the contact listed on the case appears by default in the External Address grid of the Email application.
8.4.6.1 Detail
- Create activity for contacts
-
Select this field to create an activity in the Activities program for the contact.
- Body
-
Enter additional text or edit default text. The email message consists of this text.
- Email Group Lists
-
Select a group. If you have set up email distribution lists, click Add Email Group to search and to select additional groups that receive the details of the selected solution records.
- Person List
-
Select the individuals who receive the solution. If individuals are set up in the system, click Add Person to search for and select individuals.
- External Email
-
Enter additional email addresses to forward solutions to individuals not listed in the Person or Group lists. The email address for the case contact appears by default.
8.4.7 Reviewing Frequently Used Solutions
Access the Frequently Used form. Click the Frequently Used link on the Solutions tab.
Use this form to search for solutions associated with an item. If you complete the Inventory Item Number field on the Case Entry form, the Frequently Used form displays the list of solutions that have solved cases or work orders associated with the same item number as the current case record. The solutions listed on this form are sorted in descending order based on the total number of cases and work orders that the solution has solved.
If no results appear on this form, you cannot search for additional solutions; however, you can use the Query By Example (QBE) line to narrow the results if the item is associated with numerous solutions.
- Solved Count
-
Enter a number to search for a specific solved count. This field records how many cases and work orders the solution has solved.
8.4.8 Searching for Solutions to a Case
The Solution Basic and Advanced Search program (P90CE030) is a search utility supported by Secured Enterprise Search (SES). This program supports expanded functionality in the Case Entry program (P17500).
8.4.8.1 Forms Used to Search for Solutions to Cases
| Form Name | FormID | Navigation | Usage |
|---|---|---|---|
| Work With Case Management | W17500A | Daily Support Processing (G90CE01), Case Entry
Search for and select the case. |
Search for Cases. |
| Manage Solutions | W90CG501J | Search for and select a case | Conduct basic and advanced searches for solutions. |
|
Note: It is recommended to set an upper limit of 100 records for the views used by P90CE030program. |
Access the Manage Case form. Click the Search link on the Solutions tab.
You can conduct basic and advanced searches. When you click the Search link, the default form, the Basic Search form, appears.
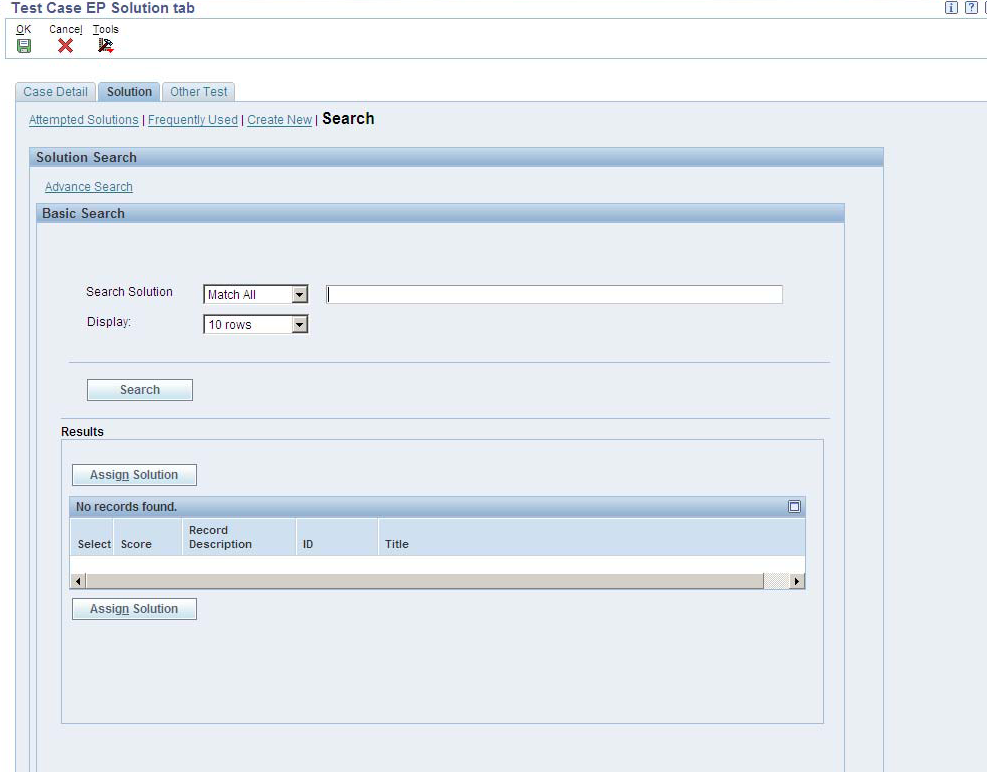
8.4.8.2 Basic Search
- Search Solution
-
Select criteria from this list to conduct the search and then enter text to search for a solution. This list searches the Solution Summary, Solution Details, and Symptoms Description fields. Values are:
- Keywords (s)
-
Enter the type of search to run. Values are:
Generic Query: Searches for a simple key phrase with SES specific qualifiers. Example: Fuzzy Search, Crisms~ will search for word "Christmas".
Match All: Place an AND between the words entered.
Match Any: Place an OR between the words entered.
Match Exact: Runs a query that includes only the combination of words in a particular sequential order.
- Score
-
Review the value in this field to determine which solution best matches the search criteria. The system displays score values in whole numbers from zero to 100. Typically, the results with the highest score value are most valuable.
8.4.8.3 Advanced Search
Access the Advanced Search form. Click the Advanced Search link.
Select the appropriate option to activate the desired search fields. You can search by multiple items. For example, select Case and Solution to search using both areas. You must conduct the search in one transaction. You cannot conduct a search on solutions and then conduct a search on cases to have the system combine the results.
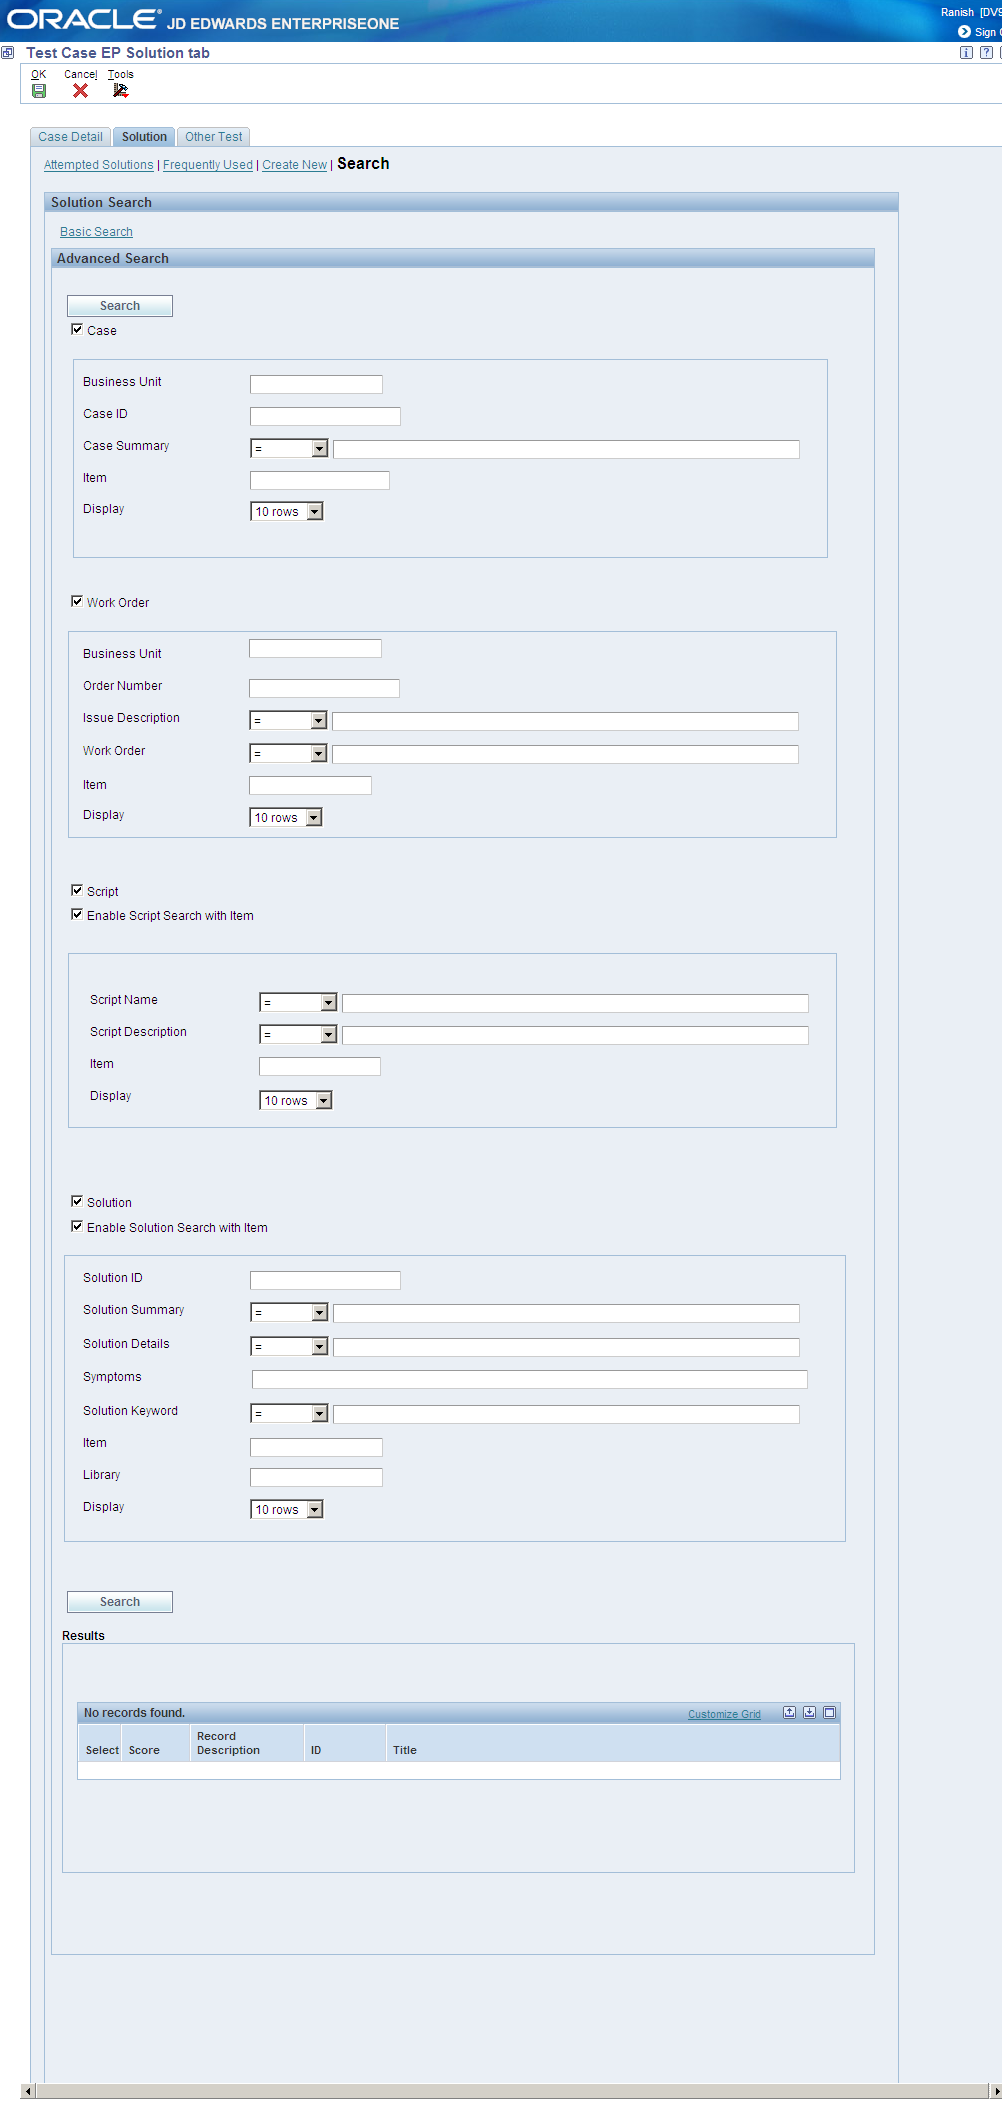
- Case
-
Select this option to activate the case related search fields. A case enables you to capture the details of customers' problems and provides a process for tracking cases from creation to resolution. You can also attach either internal and external messages or documents to a case using media objects.
- Business Unit
-
Enter text in this field to identify a separate entity within a business for which you want to track costs, for example, a warehouse location, job, project, work center, or branch/plant. The Business Unit field is alphanumeric. Business Unit Security can prevent you from inquiring on business units for which you have no authority.
- Case ID
-
Enter the number to search for the solutions that identifies an original document. This document can be a voucher, a sales order, an invoice, unapplied cash, a journal entry, and so on.
- Case Summary
-
Enter a description of the customer issue. Values are:
=: Is Equal to.
! =: Not Equal to.
Contains: Have within.
- Item
-
Enter an item number to search for solutions, scripts, cases, or work orders that are associated with the item.Note: You can use the item field to search for cases, work orders, scripts, and solutions.
- Display
-
Enter a row number to display the search for solutions, scripts, cases, or work orders associated to the search solutions.
Note: You can use the Display field to search for cases, work orders, scripts, and solutions.
- Work Order
-
Select this option to activate the work order related search fields. Work orders enable you to track all of the necessary phases of the work to resolve a customer's issue, from scheduling a technician to the technician's arrival and successful completion of the work.
- Business Unit
-
Enter a text in this field to identify a separate entity within a business for which you want to track costs. For example, a business unit might be a warehouse location, job, project, work center, branch, or plant.
- Order Number
-
Enter the number of work orders for which you want the solutions that identifies an original document. This document can be a voucher, a sales order, an invoice, unapplied cash, a journal entry, and so on.
- Issue Description
-
Enter a description of the customer issue. Values are:
=: Is Equal to.
! =: Not Equal to.
Contains: Have within.
- Work Order
-
Enter a user-defined name or remark. Values are:
=: Is Equal to.
! =: Not Equal to.
Contains: Have within.
- Script
-
Select this option to activate the script related search fields. A script is a predefined set of questions or statements that are joined together in a specific order and used to gather information from respondents. When the script is processed, which is known as runtime, a questioner follows the script and records the respondent's answers.
- Enable Script Search with Item
-
Select this option to activate the script search with item related search fields. The Enable Script Search with Item check box enables you to activate the Item Number field. Use the Item Number field to enter an item number in the applicable area to search for scripts associated to an item.
- Script Name
-
Enter the name of the script. Values are:
=: Is Equal to.
! =: Not Equal to.
Contains: Have within.
- Script Description
-
Enter text in this field to search for a branch script record based on the script's detailed description. Values are:
=: Is Equal to.
! =: Not Equal to.
Contains: Have within.
- Solution
-
Select this option to activate the solution related search fields. Solutions are records of known resolutions that can assist agents or customers issues. Each solution record stores a number of attributes designed to help you locate a solution quickly or to resolve the issue.
- Enable Solution Search with Item
-
Select this option to activate the Enable Solution Search with Item related search fields. The Enable Script Solution with Item checkbox enables you to activate the Item Number field. Use the Item Number field to enter an item number in the applicable area to search for solutions associated to the item.
- Solution ID
-
Enter a system-defined number that uniquely identifies each solution record that you create. The system generates the solution ID after the user successfully saves the solution record for the first time.
- Solution Summary
-
Enter a summary of the solution details and content. The Solution Summary field is available for searching via the solution advisor basic and advanced search functionality. Values are:
=: Is Equal to.
! =: Not Equal to.
Contains: Have within.
- Solution Details
-
Enter a detailed description of the solution record and the steps that user must complete to resolve the issue. Values are:
=: Is Equal to.
! =: Not Equal to.
Contains: Have within.
- Symptoms
-
Enter a textual description of the symptoms that may be causing the problem identified by the caller. The solution details are designed to address and resolve the symptoms listed in this field. Values are:
=: Is Equal to.
! =: Not Equal to.
Contains: Have within.
- Solution Keyword
-
Enter a summary of words or phrases that is valuable when searching for the solution record. Values are:
=: Is Equal to.
! =: Not Equal to.
Contains: Have within.
- Library
-
Enter a solution library. When you set up solutions, you can add a level of organization to solutions by creating libraries to group solutions.
- Score
-
Review the value in this field to determine which solution best matches the search criteria. The system displays score values in whole numbers from 0 to 100. Typically, the results with the highest score value are most valuable.
- Record Description
-
Review the type of record. This field specifies whether the result is a case, work order, solution, or script. You can assign solutions to cases only; however you can access work order, case, or script records through the ID field to determine the solution.
This field enables you to search for and run a script. If you run a script, the Related Actions tab records a script instance for the script.
8.5 Entering Activities for a Case
This section provides an overview of activities and discusses how to enter activities for a case.
8.5.1 Understanding Case Activities
Often, an agent must assign issues to other team members in order to resolve a customer's problem. Activities track case-related actions, such as meetings, tasks, and to-dos. Activities appear on the calendar control, enabling users to manage their daily activities. To manage cases, add activities (such as messages or calendar items) to a case through the Case Activities program, which you access on a tab off the Case Revisions form.
8.5.2 Forms Used to Enter Activities for a Case
| Form Name | FormID | Navigation | Usage |
|---|---|---|---|
| Manage Case | W90CG501J | Daily Support Processing (G90CE01), Case Entry
Locate and select the case on the Work With Case Management form and click Select. |
Review case information. |
| Manage Activities | W90CG510B | Select the Activities tab on the Manage Case form.
Alternatively, select Daily Support Processing (G90CE01), Activity. |
Review case activities. |
| Add Activity | W01301B | Click Add Activity on the Manage Activities form. | Add case activities. |
8.6 Entering and Reviewing Related Actions
This section provides an overview of related actions and discusses the forms used to relate actions to a case.
8.6.1 Understanding Related Actions
You can attach these objects to a case:
-
Equipment work order
-
Sales order
-
Lead
-
Quote
-
Script
-
RMA
-
Service Work order
Use the Related Actions program (P90CG503) to create and associate objects, such as sales orders, quotes, service work orders, equipment work orders, leads, scripts, and RMA to a case. You can then access the revision forms for these related actions through links on the form. These associations to the case are in the F90CG503 table, which records the case or work order number, association type, lead ID, RMA number, and script ID.
8.6.1.1 Relating a Script to a Case
If the organization uses scripting, you use the Script Runtime program (P90CF180) to guide you through a case solution. A script is a predefined set of questions or statements that are joined in a specific order and used to gather information from respondents. You can use branch scripts or linear scripts to find a solution to an active case.
If you use branch scripts, the system displays different questions based on the answers provided by the respondent. Linear scripts present the same questions and responses to each respondent, regardless of the answers to previous questions. Scripts enable you to find the proper solution for a case.
You can access scripts by using either the Related Actions tab or the Solutions tab.
8.6.2 Forms Used to Relate Actions to a Case
| Form Name | FormID | Navigation | Usage |
|---|---|---|---|
| Manage Case | W90CG501J | Daily Support Processing (G90CE01), Case Entry
Locate and select the case on the Work With Case form and click Select. |
Review case information. |
| CRM Case Related Actions | W90CG503B | Click the Related Actions link on the Manage Case form. | Enter related actions, such as equipment work orders, service work orders, sales orders, leads, quotes, RMAs, and scripts. |
|
See Also: |
8.7 Entering Comments (Attachments)
This section provides an overview of comments and lists the forms used to enter comments.
8.7.1 Understanding Comments
Use the Attachments form to enter case comments. On this form, you can specify whether comments are external comments (which are visible to both the customer and the organization) or internal comments (which are visible only within the organization). You can then define customer reports that include only external comments.
8.7.2 Form Used to Enter Comments
| Form Name | FormID | Navigation | Usage |
|---|---|---|---|
| Case External Attachment | W90CG509A | Daily Support Processing (G90CE01), Case Entry
Locate and select the case on the Work With Case form and click Select. Click the Attachments link on the Manage Case form. |
Enter internal and external comments for the case by using the Attachments tab. |
8.8 Creating Tasks
This section provides an overview of tasks and discusses how to create a task.
8.8.1 Understanding Tasks
A task is an action that is related to a case. You can add multiple tasks to the same case. You can also add an attachment to a task to enter detailed information. When you complete a task, you need to close it. The task and the case are separate; you can close one without closing the other. For example, you can complete a task but keep the case open.
You cannot assign the same case to multiple users. However, you can assign the associated tasks to multiple people and assign case ownership to one person. You can assign tasks as needed to other users who assist in resolving the case.
8.8.2 Forms Used to Create Tasks
| Form Name | FormID | Navigation | Usage |
|---|---|---|---|
| Work With Tasks | W17504A | Daily Support Processing (G90CE01), Case Entry
Locate and select the case on the Work With Case form and select Work With Tasks from the Row menu or select the folder button. |
Work with case tasks. |
| Task Revisions | W17504B | Click Add on the Work With Tasks form. | Set up and assign tasks to associate with the case.
Note: You can also attach a task to a case; on the Manage Case form, click the Related Links link. |
8.8.3 Creating a Task
Access the Task Revisions form.
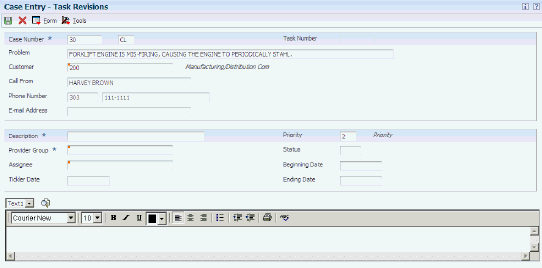
- Case Number
-
Enter the case number. The Problem, Customer, and Call From field values appear by default from the case.
- Description
-
Enter a value from UDC 17/TN to specify the task.
- Provider Group
-
Enter the provider group number to assign the task to a provider group.
- Assignee
-
Enter the Address Book number to assign the task to an assignee.
If you click the visual assist, the Distribution List form appears, and you can select a distribution list; you cannot search for individual Address Book records.
8.9 Using the Case History Form
This section provides an overview of case history and lists the forms used to access case history.
8.9.1 Understanding Case History
Access the Case History form to review case information changes such as caller, assignee, provider group, and so forth. From the Work With Case History Form menu, you can access failure analysis information associated with the case and work center.
|
Note (Release 9.1 Update): You can also access the Case History program from the Row menu of the Work With Case Management form of the Case Entry program (P17500). This option of accessing the Case History program is helpful if you are using the Speed Case Entry program (P90CG601) to enter and update cases because the History link is not available in the Speed Case Entry form. |
8.9.2 Forms Used to Access Case History
| Form Name | FormID | Navigation | Usage |
|---|---|---|---|
| Work With Case History | W17500A | Daily Support Processing (G90CE01), Case Entry
Search for and select a case. |
Review case information. Click the History link to review case history. |
| Work Center | W012503F | Select Work Center from the Form menu on the Work With Case History form. | Review work center information. |
| Work With Failure Analysis | W17766C | Select Failure Analysis from the Form menu on the Work With Case History form. | Review failure analysis information. |
8.10 Using Related Links
This section provides an overview of related links and lists the forms used to access related links.
8.10.1 Understanding Related Links
By clicking the Related Links link on the Case Entry program, you can specify each part of a case that you want to review. You can access multiple contact, customer, supplier, employee, item, equipment, and contracts programs by clicking this link.
|
Note (Release 9.1 Update): You can also access related programs (contact, customer, supplier, case time entry, item/equipment, contracts, supplemental data, and case history programs) from the Row menu on the Work With Case Management form of the Case Entry program (P17500). This option of accessing related programs from the Work With Case Management form is helpful if you use the Speed Case Entry program (P90CG601) because you cannot access the related programs from the Speed Case Entry form. |
8.10.2 Form Used to Access Related Links
| Form Name | FormID | Navigation | Usage |
|---|---|---|---|
| Manage Case | W90CG501J | Daily Support Processing (G90CE01), Case Entry
Search for and select the case. |
Review case information. Click the Related Links link and then select the application that you want to access. |
8.11 Entering and Updating Cases Using the Speed Case Entry Program (P90CG601) (Release 9.1 Update)
This section provides an overview of speed case entry and discusses how to enter and update cases using the Speed Case Entry program (P90CG601).
8.11.1 Understanding Speed Case Entry
The Speed Case Entry program is a simplified and alternative program to the Case Add program (P90CG504) and the Case Update program (P90CG501). The add and update mode of the Speed Case Entry program contains logical grouping of fields in nine collapsible groupboxes. You can click the Tab key to easily move across fields from top to bottom and from bottom to right in the same groupbox. If you click the Tab key in the last field of a groupbox, the cursor moves to the next groupbox that is in expanded state.
You can set processing options in the Case Entry program (P17500) to use the Speed Case Entry program (P90CG601) to add a new case or update an existing case. You can set processing options to collapse or expand eight of these nine groupboxes before you load the Speed Case Entry program:
-
Case header: The title of this groupbox displays the case number. By default, this groupbox is collapsed in add mode and expanded in update mode. You cannot control the state of this groupbox through processing option.
-
Customer
-
Issue Description
-
Attachments
-
Case Detail
-
Product Information
-
Category Codes
-
Additional Information
-
User Reserved Fields
If you enter incorrect information in the fields, the system displays the links of the errors at the top of the form. If you click on an error link, the system expands the groupbox (if it was collapsed earlier) that has the field with the error.
Access Related Actions information using a button in the Case Revisions form to view existing related actions or add new related actions.
|
Note: You can access case history and related links programs from the Row menu on the Work With Case Management form. |
8.11.2 Forms Used to Enter and Update Cases Using Speed Case Entry Program (P90CG601)
| Form Name | FormID | Navigation | Usage |
|---|---|---|---|
| Work With Case Management | W17500A | Daily Support Processing (G90CE01), Case Entry (P17500) | Search for and review existing cases. |
| Speed Case Entry | W90CG601B | Click Add on the Work With Case Management form. | Enter case details. |
| Case Revisions | W90CG601B | Select a case and click Select on the Work With Case Management form. | Update case information. Access the Related Actions form through the Related Actions button. |
8.11.3 Updating Cases Using the Speed Case Entry Program
Access the Case Revisions form.
Figure 8-11 Case Revisions form: groupboxes in collapsed state (1 of 5)
Description of "Figure 8-11 Case Revisions form: groupboxes in collapsed state (1 of 5)"
Figure 8-12 Case Revisions form: Case, Customer, and Issue Description groupboxes in expanded state (2 of 5)
Description of "Figure 8-12 Case Revisions form: Case, Customer, and Issue Description groupboxes in expanded state (2 of 5)"
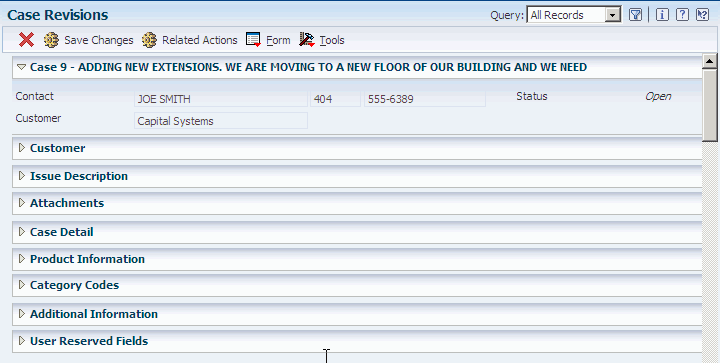
The Case Revisions form contains nine collapsible groupboxes. You can set processing options to collapse or expand eight groupboxes in both the Add and Update mode of the Speed Case Entry program before you load the program:
8.11.3.1 Case header
The system populates the fields in this groupbox with the customer's name, customer's phone number, and the status of the case in the Case Revisions form. These fields do not have any values in the Speed Case Entry form.You cannot edit these fields in add and update mode.
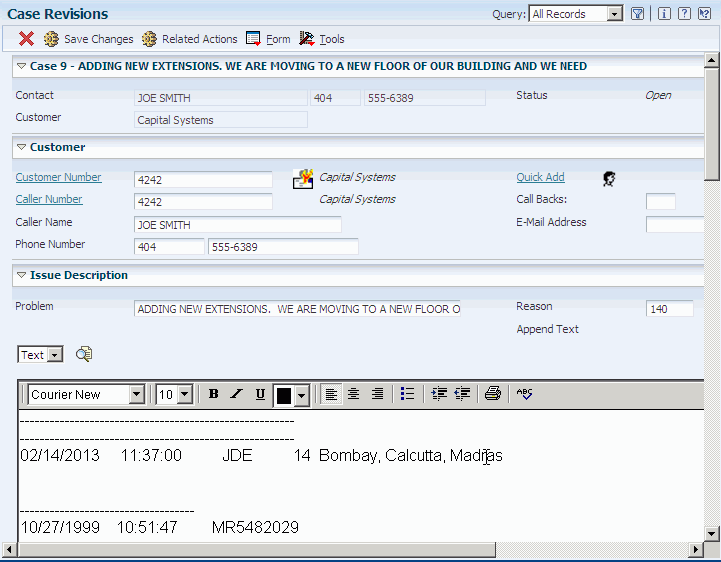
8.11.3.2 Customer
The Customer groupbox includes fields that you can use to enter the customer's address book number, number of call backs for the case, caller's name, caller's address book number, phone number, and email address of the person associated with the case. The customer number appears by default in the Caller Number field. If the customer does not exist in the Address Book, click the Quick Add link and add the customer information. If the caller does not exist in the Address Book, click the ellipsis (...) link and add the caller information.
8.11.3.3 Issue Description
The Issue Description groupbox includes the Problem field that you can use to enter the description of the problem and the Reason field that you can use enter the reason for the problem. The system displays the Failure Code field if:
-
You have selected the Failure Analysis Tree for Selecting Failure Analysis Codes option in the General tab of the S/WM System Constants Revisions form.
-
You have not selected the Use Solution Advisor option in the Case tab of the S/WM System Constants Revisions form.
If you have set the constants to fulfil these conditions, the system displays and locks the Problem field and populates it with the associated description of the failure code that you entered in the Failure Code field. The system uses the failure description as the default value for the problem description and you cannot edit it. You can set the Validate Failure Codes processing option to not validate problem codes against failure codes. Then, you can edit the Problem field and can override the failure description.
If you have not set the constants to fulfil the conditions, the system does not display the Failure Code field and the problem description that you enter in the Problem field is not validated against failure codes.
You can also enter few lines of texts to describe the problem or attach a media object to explain the problem.
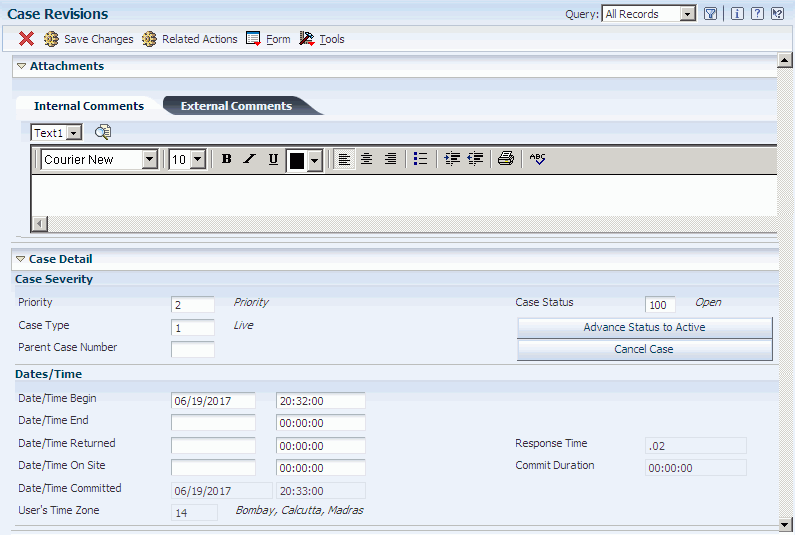
Figure 8-13 Case Revisions form: Attachments and Case Detail groupboxes in expanded state (3 of 5)
Description of "Figure 8-13 Case Revisions form: Attachments and Case Detail groupboxes in expanded state (3 of 5)"
8.11.3.4 Attachments
The Attachments groupbox includes two tabs, Internal Comments and External Comments. Use the Internal Comments tab to enter comments which are visible only within the organization and the External Comments tab to enter comments which are visible to both the customer and the organization.
8.11.3.5 Case Detail
The Case Detail groupbox has two sections, the Case Severity section and the Dates/Time section.
8.11.3.5.1 Case Severity:
The Case Severity section includes fields that you can use to enter the case priority code, the case type, case status (Open, Active, and so forth), and the parent case number.
This groupbox also includes two buttons:
-
Advance Status: You can use the Advance Status button to easily update the status of a case after you have finished working on it. When you click this button, the system advances the case status with the next status based on the case activity rules and displays the text of the next status on the button. If case status activity rules are not applicable for your case or if the status is complete and no more statuses are available, then the system does not display this button.. Even if the button does not appear, you can use the Case Status field to manually select a status.
-
Cancel Case: You can use the Cancel Case button to automatically cancel the case. You can set a processing option to define the value to use for cancelled status.
You can also define the fields that you must enter information before the system advances a case to the next status in the queue. You can define required fields on specific request document types, request queues, and request types; or you can set required fields to cover all document types, queues, and request types. The system uses the Check required fields processing option in the Process tab of the Case Master Business Function program (P90CG002) processing options to determine whether to check required fields when advancing a status.
8.11.3.5.2 Dates/Time:
The Dates/Time section includes fields that you can use to provide information of when the job was executed, when the service provider arrived at the customer site, the commitment date and time, the time zone defined in the service provider information, and the commitment duration.
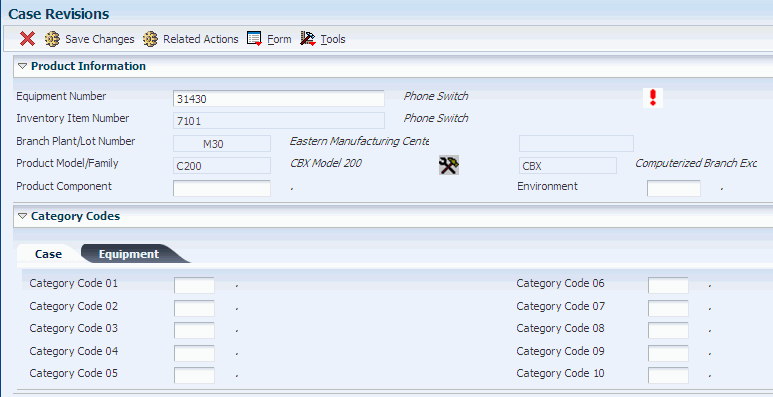
Figure 8-14 Case Revisions form: Product Information and Category Codes groupboxes in expanded state (4 of 5)
Description of "Figure 8-14 Case Revisions form: Product Information and Category Codes groupboxes in expanded state (4 of 5)"
8.11.3.6 Product Information
The Product Information groupbox includes fields that you can use to enter the equipment number, inventory item number, branch plant or lot number, product model, product component, and the operating environment.
8.11.3.7 Category Codes
The Category Codes groupbox includes category codes fields from one to ten that you can use for cases or equipment.
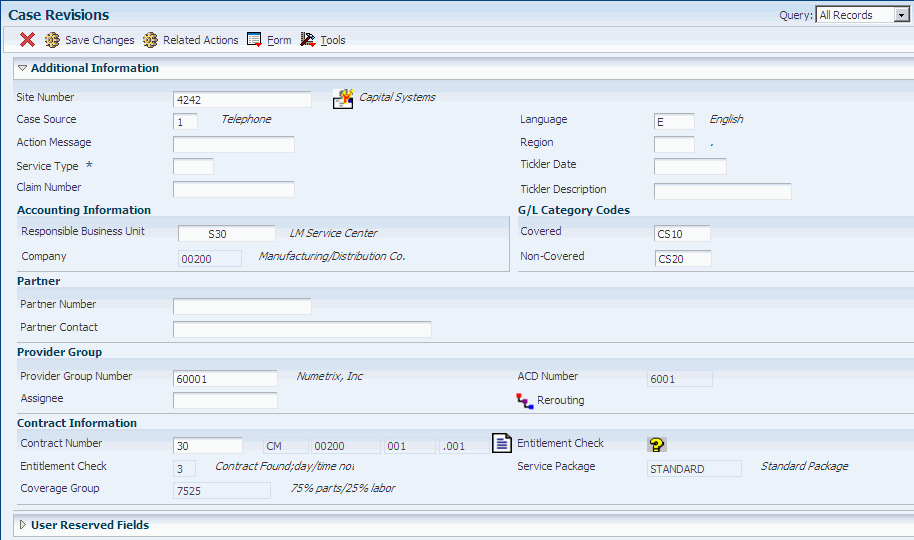
Figure 8-15 Case Revisions form: Additional Information groupbox in expanded state (5 of 5)
Description of "Figure 8-15 Case Revisions form: Additional Information groupbox in expanded state (5 of 5)"
8.11.3.8 Additional Information
The Additional Information groupbox includes additional case information in the groupbox header and four sections:
8.11.3.8.1 Accounting Information:
The Accounting Information section includes fields that you can use to enter the business unit for which you want to track costs and values (from UDC 41/9). The system uses the business unit to identify the general ledger offset that the system uses when searching for the account to post the covered and non-covered portion of the accounting transaction.
8.11.3.8.2 Partner:
The Partner section includes fields that you can use to enter the partner's address book number and phone number.
8.11.3.8.3 Provider Group:
The Provider Group section includes fields that you can use to enter the following:
-
Address book number of the provider group to assign the task to a provider group.
-
Assignee address book number to assign the task to an assignee
-
ACD (automatic call distributor) phone number to search for the address book number of an entity using a phone number.
8.11.3.8.4 Contract Information:
The Contract Information section includes a field that you can use to enter the contract number and the Entitlement Check icon that you can click to perform entitlement checking. The system provides the results of the entitlement check, the coverage group, and the service package type to which the customer is contractually entitled.
8.11.3.9 User Reserved Fields
The User Reserved Fields groupbox includes fields that you can use to reserve a number, code, amount, date, or reference specifically for your use. You can set a processing option to hide this section.
|
See Also:
|
8.12 Entering and Reviewing Related Actions for Speed Case Entry (Release 9.1 Update)
This section provides an overview of related actions and discusses the forms used to relate actions to a case for speed case entry.
8.12.1 Understanding Related Actions for Speed Case Entry
You can access the Related Actions program (P90CG602) from the Speed Case Entry program (P90CG601) to create and associate objects to a case. The Case Revisions form includes the Related Actions button that you can click on to access the Manage Related Actions form. This button is available only in the Case Revisions form and is not available in the Speed Case Entry form.
You can attach these objects to a case:
-
Equipment work order
-
Sales order
-
Lead
-
Quote
-
Script
-
RMA
-
Service work order
The system displays the status of each type of related action in the grid along with the associated description. The system does not display a status for sales order transactions and sales quotes because they do not have statuses.
8.12.2 Forms Used to Relate Actions to a Case for Speed Case Entry
| Form Name | FormID | Navigation | Usage |
|---|---|---|---|
| Work With Case Management | W17500A | Daily Support Processing (G90CE01), Case Entry (P17500) | Search for and review existing cases. |
| Case Revisions | W90CG601B | Daily Support Processing (G90CE01), Case Entry (P17500)
Select a case and click Select on the Work With Case Management form. |
Update case information. Access the Related Actions form through the Related Actions button. |
| Manage Related Actions | W90CG602A | In the Case Revisions form, select a case and click the Related Actions button. | Enter related actions, such as equipment work orders, service work orders, sales orders, leads, quotes, RMAs, and scripts. |