3 Setting Up Product Costing and Manufacturing Accounting
This chapter contains the following topics:
-
Section 3.3, "Defining Accounting Cost Quantities for Standard Costing"
-
Section 3.8, "Assigning Values to User-Defined Cost Components"
3.1 Understanding UDCs for Product Costing
Many fields throughout the JD Edwards EnterpriseOne Product Costing and Manufacturing Accounting systems require UDCs. UDCs enable you to establish and maintain valid codes for various types of information to meet the needs of the organization. Codes are categorized by system and code type.
This table lists the UDCs that are used by the JD Edwards EnterpriseOne Product Costing and Manufacturing Accounting systems:
3.1.1 Example: Setting Up Cost Bucket Codes for Costed Bills of Material
You can group similar cost components for review and reporting purposes. For example, you can define A1 and A2 cost components as Purchasing. You do this by assigning them the same sequence number in the Description 2 field. The sequence number also determines in which order the groups appear on costed bill inquiries and reports. You can then use the costed bill inquiries and reports to review the total costs for the group Purchase.
Each cost bucket can contain several defined cost components.
This example illustrates how you might define the buckets and UDCs:
| Bucket Number | Description |
|---|---|
| Bucket 1 | Purchase: Includes cost components A1 (material), A2 (scrap), and D1 (outside operations). |
| Bucket 2 | Labor: Includes cost components B1 (direct labor), B2 (setup), and B4 (labor efficiency). |
| Bucket 3 | Machine: Includes cost component B3 (machine run). |
| Bucket 4 | Overhead: Includes cost components C1 (machine variable) and C2 (machine fixed). |
| Bucket 5 | Extras: Includes cost components X1 (taxes) and X2 (electricity). |
This example of UDC 30/CB illustrates how you might define the UDCs in the software:
| Codes | Description 01 | Description 02 | Hard-Coded |
|---|---|---|---|
| A1 | Purchase | 1 | Y |
| A2 | Purchase | 1 | Y |
| B1 | Labor | 2 | Y |
| B2 | Labor | 2 | Y |
| B3 | Machine | 3 | Y |
| B4 | Labor | 2 | Y |
| C1 | Overhead | 4 | Y |
| C2 | Overhead | 4 | Y |
| C3 | Overhead | 4 | Y |
| C4 | Overhead | 4 | Y |
3.2 Understanding Costing Information Setup
You can set up JD Edwards EnterpriseOne Product Costing and Manufacturing Accounting to meet specific manufacturing environment needs. The system uses the values that you define to determine the costs of the items that you manufacture.
3.3 Defining Accounting Cost Quantities for Standard Costing
The system uses accounting cost quantities to determine the allocation of fixed costs for an item. Accounting cost quantities represent the standard quantity of a work order or rate schedule for this item. During cost rollup, the system divides the fixed costs by the accounting cost quantity that you specify to determine a per unit fixed cost.
You use the Item Branch/Plant program (P41026) to define accounting cost quantities for standard costing.
|
Note: If you use either of the actual cost methods (02 or 09) for an item, you do not need to complete this task. |
3.3.1 Form Used to Define Accounting Cost Quantities for Standard Costing
3.3.2 Defining Accounting Cost Quantities for Standard Costing
Access the Additional System Info form.
Figure 3-1 Additional System Info form: Plant Manufacturing tab
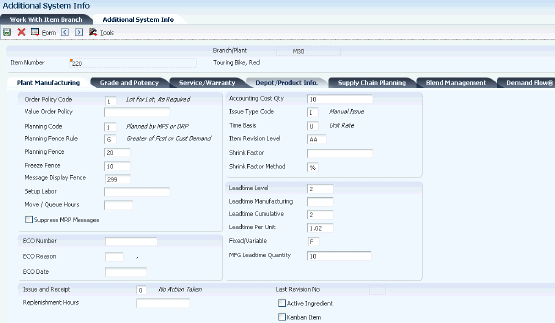
Description of "Figure 3-1 Additional System Info form: Plant Manufacturing tab"
- Accounting Cost Qty (accounting cost quantity)
-
Enter the amount that the system uses in cost rollup to determine the allocation of setup costs. The system totals the setup costs and divides the sum by this quantity to determine setup costs per unit. The default value is 1.
3.4 Defining Inventory Cost Levels
This section provides an overview of inventory cost levels and discusses how to define inventory cost levels.
3.4.1 Understanding Inventory Cost Levels
The cost level that you assign to an item indicates the level at which the system maintains costs. You determine whether the system maintains one overall cost for an item (cost level 1) or a different cost for the item in each branch/plant (cost level 2). The system can also maintain a different cost for each location and lot within a branch/plant (cost level 3).
You should assign cost level 3 if you use actual costing. For configured items, you must assign cost level 3. However, the system does not support cost level 3 for standard costing.
After you have initially assigned an inventory cost level to an item in the Item Master program (P4101), you should not change the cost level manually on the Item Master Revisions form. Instead, use the Item Cost Level Conversion program (R41815) to change the cost level for an item.
3.4.2 Form Used to Define Inventory Cost Levels
3.4.3 Defining Inventory Cost Levels
Access the Item Master Revisions form.
- Inventory Cost Level
-
Enter the level at which you want the system to maintain inventory costs. The system stores inventory costs with the inventory cost level in the Item Cost table (F4105). Values are:
1: Item level
2: Item/Branch level
3: Item/Branch/Location level
- Lot Process Type
-
If you use actual costing and selected cost level 3, complete this field.
The lot process type is a code that indicates whether lot or serial number is assigned. Lot and serial number processes use the Lot Master table (F4108). Values are:
0: Lot assignment is optional.
You can assign numbers manually. Quantity can be greater than one. (Default)
1: Lot assignment is required.
The system assigns numbers using the system date in YYMMDD format. Quantity can be greater than one.
2: Lot assignment is required.
The system assigns numbers in ascending order using Next Numbers. Quantity can be greater than one.
3: Lot assignment is required.
You must assign numbers manually. Quantity can be greater than one.
4: Serial number assignment is optional except during shipment confirmation.
Quantity must not exceed one.
5: Serial number assignment is required.
The system assigns numbers using the system date in YYMMDD format. Quantity must not exceed one.
3.5 Defining Cost Methods and Item Costs
This section provides an overview of cost methods and item costs, lists a prerequisite, and discusses how to:
-
Set processing options for Cost Revisions (P4105).
-
Define cost methods and item costs.
3.5.1 Understanding Cost Methods and Item Costs
You must provide cost information for each item that you use so that the system can track inventory costs. When you define an item with cost level 2 or 3, you specify the cost method that the system uses to determine the cost of an item for sales transactions, inventory transactions, and purchase orders in the Branch/Plant Constants program (P41001). You can override the values that you defined in the branch/plant constants for a particular item at the item branch/plant level. For example, you can specify that the system use the weighted average cost method to determine the inventory cost for an item and use the last-in cost method to determine the item's unit cost for purchase orders.
You can set up the JD Edwards EnterpriseOne Manufacturing Accounting system for these costing types:
For every cost method that you assign to an item, you must specify an item cost. For actual costing methods you can either enter an initial cost or let the system update it with the last manufactured cost.
3.5.2 Prerequisite
To define cost methods and costs for items, you must first set up the Cost Method UDC table (40/CM).
3.5.3 Form Used to Define Cost Methods and Item Costs
3.5.4 Setting Processing Options for Cost Revisions (P4105)
These processing options control default processing for the Cost Revisions program.
3.5.4.1 Process
This processing option controls whether you can change standard costs.
- Process
-
Enter 1 to prevent the standard cost from being changed.
3.5.4.2 Interop
This processing option controls whether interoperability is enabled.
- Transaction type
-
Specify the transaction type for the interoperability transaction. If you leave this processing option blank, outbound interoperability processing is not used.
3.5.4.3 Flex Acct
This processing option controls whether flex accounting is enabled.
- Flex Accounting
-
Specify whether to enable flex accounting. If you leave this processing option blank, the system does not use flex accounting.
Note:
To use this processing option, you must first enable flex accounting for AAIs 4134 and 4136.
3.5.5 Defining Cost Methods and Item Costs
Access the Cost Revisions form.
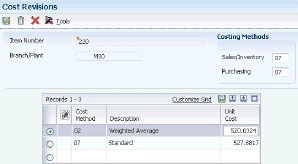
- Sales/Inventory
-
Enter a value from UDC table 40/CM that indicates the cost method that the system uses for the inventory value and to calculate the cost of goods sold (COGS) for the item. Cost methods 01 through 19 are reserved for JD Edwards EnterpriseOne system use.
If you maintain costs at the item level, the system retrieves the default value for this field from the data dictionary. If you maintain costs at the item and branch/plant levels, the system retrieves the default value from branch/plant constants.
- Purchasing
-
Enter a value from UDC table 40/CM that indicates the cost method that the system uses for the inventory value and to calculate the cost of goods that are sold for the item. Cost methods 01 through 19 are reserved for JD Edwards EnterpriseOne system use.
If you maintain costs at the item level, the system retrieves the default value for this field from the data dictionary. If you maintain costs at the item and branch/plant level, the system retrieves the default value from branch/plant constants.
- Cost Method
-
Enter a value from UDC table 40/CM that specifies the basis for calculating item costs. Cost methods 01 through 19 are reserved for use by the JD Edwards EnterpriseOne system.
- Unit Cost
-
Enter the cost for one unit of this item in the primary unit of measure, based on the corresponding cost method.
You can change the monetary amount for any cost method at any time except for cost method 07 (standard). You can prevent standard costs from being changed by setting the processing option.
Best practice for changing standard costs is running the Frozen Update program (R30835). If you change the amount for the cost method that you use to value inventory and to track costs of goods sold, the system applies the new amount to the on-hand quantity of the item and creates journal entries to account for the difference between the old and the new amounts.
Certain programs update the monetary amount for some cost methods. Examples include:
-
Last-in method
The system interactively updates this unit cost based on the last cost of the item at the time of a purchase order receipt or after an inventory adjustment.
-
Weighted average method
The system calculates and updates this amount by adding transaction quantities, adding transaction costs, and dividing the total cost by the total quantity.
-
Purchase method
The system updates cost amounts similarly to the last-in method, but without landed costs.
-
|
Note: If you enter a cost method for sales and inventory or purchasing and do not set up a cost amount for that method, a warning message appears. If you do not enter a cost amount for the cost method, the system assigns a cost of zero. |
3.6 Setting Up Manufacturing Constants
This section provides an overview of manufacturing constants and discusses how to set up manufacturing constants for product costing and manufacturing accounting.
3.6.1 Understanding Manufacturing Constants
You must define product costing and manufacturing accounting information that is unique to the branch/plant.
You use the Manufacturing Constants program (P3009) to specify this cost calculation information:
-
Whether to maintain costs at the work center level or the cost component level.
-
Which overhead costs to calculate.
-
Whether the program considers work center efficiency when calculating direct labor and overhead.
-
Whether overhead costs are entered as percentages or rates.
If you use actual costing, you can specify the sources for labor and machine rates that the system uses to calculate labor and machine costs.
3.6.1.1 Costing by Work Center
You can also use the manufacturing constants to specify the level of detail that you want to use for costing. You can cost items by cost component or you can set up the branch/plant to perform costing separately for each work center.
3.6.2 Form Used to Set Up Manufacturing Constants
3.6.3 Setting Up Manufacturing Constants
Access the Manufacturing Constants Revision form.
Select the Costing Options tab.
Figure 3-4 Manufacturing Constants Revision form: Costing Options tab
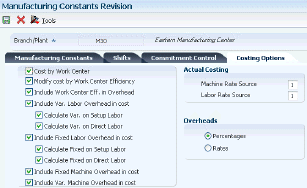
Description of "Figure 3-4 Manufacturing Constants Revision form: Costing Options tab"
- Cost by Work Center
-
Select to indicate that the system tracks cost variances for discrete and process items on a summarized level in the Item Cost Component Add-Ons table (F30026) or on a detailed level by cost component and work center in the Item Cost Component Detail table (F300261).
- Modify cost by Work Center Efficiency
-
Select to indicate that the cost rollup creates cost component B4 (for labor efficiency) based on the direct labor value (cost component B1) and the Work Center Efficiency percentage from the Work Center Master table (F30006).
- Include Work Center Eff. in Overhead (include work center efficiency in overhead)
-
Select to indicate that the cost rollup includes work center efficiency when you calculate overhead values if you specified that you want to modify costs by work center efficiency.
- Include Var. Labor Overhead in cost (include variable labor overhead in cost)
-
Select to indicate that the cost rollup creates cost type component C3 (for variable labor overhead) in the Item Cost Component Add-Ons table (F30026).
- Calculate Var. on Setup Labor (calculate variable on setup labor)
-
Select to indicate that the cost rollup includes setup labor expenses (cost component B2) in the total that is used to calculate variable setup overhead (cost component C3).
- Calculate Var. on Direct Labor (calculate variable on direct labor)
-
Select to indicate that the cost rollup includes direct labor expenses (cost component B1) in the total that is used to calculate variable labor overhead (cost component C3).
- Include Fixed Labor Overhead in cost
-
Select to indicate that the cost rollup creates cost component C4 (for fixed labor overhead) in the Item Cost Component Add-Ons table.
- Calculate Fixed on Setup Labor
-
Select to indicate that the cost rollup includes setup labor expenses (cost component B2) in the total that is used to calculate fixed setup overhead (cost component C4).
- Calculate Fixed on Direct Labor
-
Select to indicate that the cost rollup includes direct labor expenses (cost component B1) in the total that is used to calculate fixed labor overhead (cost component C4).
- Include Var. Machine Overhead in cost (include variable machine overhead in cost)
-
Select to indicate that the cost rollup creates cost component C1 (for variable machine overhead) in the Cost Components table (F30026).
- Include Fixed Machine Overhead in cost
-
Select to indicate that the cost rollup creates cost component C2 (for fixed machine overhead) in the Item Cost Component Add-Ons table.
- Machine Rate Source
-
Enter a value that specifies the source for machine rates when the system calculates routing costs in the Production Cost table (F3102). Values are:
1: Work Center Rates table (F30008)
2: Equipment Rates table (F1301)
- Labor Rate Source
-
Enter a value that specifies the source for labor rates when the system calculates the routing costs in the Production Cost table (F3102). Values are:
1: Work Center Rates table (F30008)
2: Employee Labor Rates table (F00191)
- Overheads
-
Specify whether values for overhead fields (cost components C1 through C4) in the Work Center Rates table are expressed as percentages or rates.
To specify whether the system expresses the overhead fields as percentages or rates, click either Percentages or Rates under the Overheads heading.
3.7 Setting Up Standard Rate and Factor Codes
This section provides an overview of standard rate and factor codes and discusses how to set up standard rate and factor codes.
3.7.1 Understanding Standard Rate and Factor Codes
Standard rate and factor codes represent overhead costs or other indirect costs that you cannot assign directly to a certain production process or operation, but that must be accounted for in the costs of an item. These types of costs include utilities, insurance, research and development costs, rent or lease payments, and other types of operating costs.
|
Note: Rate and factor codes are user-defined, but you do not use the User Defined Codes program to enter and maintain rate and factor codes. Instead, you use the Generic Message/Rates Records program (P00191) to enter and revise rate and factor codes. |
The Cost Simulation program (R30812) uses the rates and factors that you define to calculate the extra costs that appear in the Cost Components program (P30026).
3.7.2 Form Used to Set Up Standard Rate and Factor Codes
3.7.3 Setting Up Standard Rate and Factor Codes
Access the Enter Generic Message/Rates form.
Figure 3-5 Enter Generic Message/Rates form
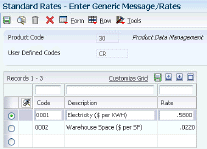
Description of "Figure 3-5 Enter Generic Message/Rates form"
- Code
-
Place the cursor in the first blank line and enter a code that the Cost Components program uses in conjunction with the factor code to calculate extra costs.
- Description
-
Enter a description of the code.
- Rate
-
Enter a code that is used to define rate information in the General Rate/Message Records table (F00191). The system uses the rate that you set up with up to four decimal places to calculate the extra costs for this code.
3.8 Assigning Values to User-Defined Cost Components
This section provides an overview of user-defined cost component values, lists prerequisites, and discusses how to:
-
Assign values to user-defined cost components.
-
Assign values to cost components by work center.
-
Review simulated and frozen costs and rates.
-
Review costs by work center.
-
Review calculation basis for unit costs at routing operations.
3.8.1 Understanding User-Defined Cost Component Values
After you set up cost components and standard rate and factor codes, you must assign a monetary value to each. The system adds these values to the net amount of each item that you set up. You can assign a net-added value manually, or you can assign a predefined value.
You can also assign a calculated value based on the total value of another cost component. In this case, the system calculates the net-added value based on the total for an existing cost component. In addition, you can assign a calculated value based on the net-added value of another cost component. The system calculates the net-added value based on the net-added value for an existing cost component. In both circumstances, the system calculates this value when you enter information in the Cost Components program. The costs are then rolled up into the cost of the item when you run the Cost Simulation program.
For extra costs, the system can calculate the net-added value by multiplying a rate and factor. If you enter both amounts, the system multiplies the two numbers to calculate the net-added cost for the cost component for that item.
3.8.1.1 Cost Components by Work Center
To enable you to track variances not only on the cost-component level, but also on the work-center level, you can enter different cost component values for different work centers. This method enables you to track cost variations in each work center even if other inputs to the manufacturing process, for example items, routing, bill of material, work center rates, shop floor transactions, total costs, and total variance are the same.
To identify variances by cost center, you define different values for cost components in the work centers that you use on a routing. You can track and analyze material and labor costs by work center. The system enables you to review the net-added unit cost at each routing operation step on the Work With Work Center Cost form for the cost component that you select. For labor-related costs, you can access the Work With Cost Calculation form to display the calculations that the system uses to derive the net-added unit cost at each routing step; however, this information is not available for material costs.
3.8.2 Prerequisites
Before assigning values to user-defined cost components, you must:
-
Set up standard rate and factor codes.
-
Set up work centers and select the Cost by Work Center option in the manufacturing constants if you want to track cost information by work center.
3.8.3 Forms Used to Assign Values to User-Defined Cost Components
3.8.4 Assigning Values to User-Defined Cost Components
Access the Enter Cost Components form.
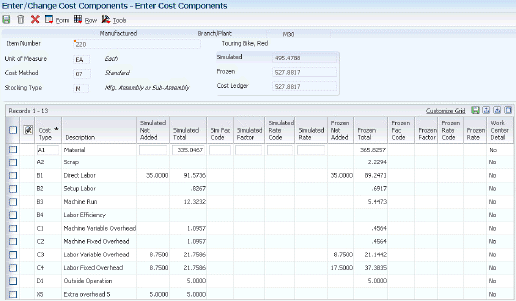
- Cost Type
-
Enter a code that designates each element of cost for an item. Examples of cost component types are:
A1: Purchased raw material.
B1: Direct labor routing rollup.
B2: Setup labor routing rollup.
C1: Variable burden routing rollup.
C2: Fixed burden routing rollup.
Dx: Outside operation routing rollup.
Xx: Extra add-ons, such as electricity and water.
The optional add-on computations usually operate with the type Xx extra add-ons. This cost structure enables you to use an unlimited number of cost components to calculate alternative cost rollups. The system then associates these cost components with one of six user-defined summary cost buckets.
- Simulated Net Added and Frozen Net Added
-
If you want to assign a net-added value manually, enter the appropriate value for the cost component. The system uses this value to calculate costs during the simulation process.
This is the cost to build this item at its level in the bill of material. This cost does not include materials (lower-level components).
The program displays costs that you manually enter in the Simulated Total field.
If you have run the Item Cost Component - Frozen Update program (R30835), the system displays frozen net-added costs.
- Simulated Total and Frozen Total
-
Enter the sum of the net added cost at this level plus the sum of the total costs of the direct components of the item (which includes lower-level component costs of those items.) The heading above the Net Added and Total columns indicates whether the costs are simulated or frozen values.
The system uses this value to calculate the cost of all the lower levels during the simulation process for the designated cost method.
If you have run the Item Cost Component - Frozen Update program, the system displays frozen total costs.
- Sim Fac Code (simulated factor code)
-
To assign a predefined value to a cost component for extra costs, select one of the values that you defined for the factor code (30/CF) in the Generic Message/Rates table (F00191). The system multiplies the value in this field by the value in the Simulated Rate field.
Note:
To review the valid factor codes, use the Search button or select Factors from the Form menu.To assign a value to a cost component based on the total value of another cost component, select a cost component type and type & followed by the cost component code in the Sim Fac Code (simulated factor code) field.
Because of the way in which the system rolls up the costs, the cost component that you reference must come before the cost component that you are defining. For example, to define cost component X2, you can reference cost component X1 by entering &X1 in this field, but you cannot define cost component X1 by referencing cost component X2.
To assign a calculated value based on the net added value of another cost component, you must enter specific information in this field: * followed by the based on cost-component code.
Because of the way in which the system rolls up the costs, the cost component that you reference must come before the cost component that you are defining. For example, to define cost component X2, you can reference cost component X1 by entering *X1 in this field, but you cannot define cost component X1 by referencing cost component X2.
The system retrieves the total value or net-added value for the based on cost component and multiplies it by the value in the Simulated Rate Code field or the Simulated Rate field.
- Simulated Rate Code
-
To assign a predefined value to a cost component for extra costs, select one of the values that you defined for the rate code (30/CR) in the Generic Message/Rates table (F00191). The system multiplies the value in this field with the value in the Sim Fac Code field.
Note:
To review the valid rate codes, use the Search button or select Rates from the Form menu. - Frozen Net Added
-
For standard costing, this field displays the net added costs after you run the frozen cost update process.
If you use actual costing (cost method 02 or 09), you enter the actual costs directly into this field.
3.8.5 Assigning Values to Cost Components by Work Center
Access the Enter Cost Components by Work Center form.
Figure 3-7 Enter Cost Components by Work Center form

Description of "Figure 3-7 Enter Cost Components by Work Center form"
Enter cost component information for each work center to which you want to assign separate costs.
3.8.6 Reviewing Simulated and Frozen Costs and Rates
Access the Cost Component Detail form.
Review cost component detail information for the selected cost component. If you have set up costing by work center, the system displays the work center to which the simulated and frozen costs and rates for the cost component apply.
3.8.7 Reviewing Costs by Work Center
Access the Work With Work Center Cost form.
Review the net-added unit costs by cost component at each routing operation step.
3.8.8 Reviewing Calculation Basis for Unit Costs at Routing Operations
Access the Work With Cost Calculation form.
Figure 3-9 Work With Cost Calculation form
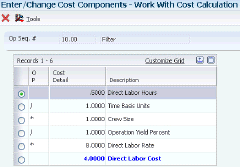
Description of "Figure 3-9 Work With Cost Calculation form"
Review the calculations that the system uses to derive the net-added unit costs at each routing step for the selected cost component.
|
Note: You cannot review the calculation basis for material costs. |
3.9 Setting Up Simulated Rates for Work Centers
This section provides an overview of simulated rates, lists a prerequisite, and discusses how to create simulated rates for work centers.
3.9.1 Understanding Simulated Rates
You can effectively manage changes to a work center by tracking rates for labor and machine costs. You can update simulated rates for machine and labor hours by work center and cost method. The system uses these values in other manufacturing calculations that are used in costed routings, labor rate variance reports, and direct labor efficiency reports.
If you use standard costing, you must set up the simulated rates for work centers.
If you use actual costing, you can use work center rates for machine and labor costs. You set up the source for machine and labor rates in the manufacturing constants.
You can set up the work center rates even if you have decided to use labor or machine rates. The system uses the work center rate as the default rate if no other rates have been selected.
3.9.2 Prerequisite
Before you set up simulated rates for work centers, you must set up work centers.
3.9.3 Form Used to Set Up Simulated Rates for Work Centers
3.9.4 Creating Simulated Rates for Work Centers
Access the Work Center Rate Revisions form.
Figure 3-10 Work Center Rate Revisions form
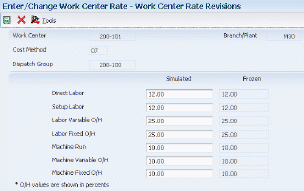
Description of "Figure 3-10 Work Center Rate Revisions form"
- Work Center
-
Review the number that identifies a branch, plant, work center, or business unit.
- Direct Labor
-
Enter a rate, in cost per person per hour, that the system uses, together with the run labor hours of the associated routing, to calculate the standard run labor cost.
- Setup Labor
-
Enter a rate that the system uses together with the setup labor hours of the associated routing to calculate the standard setup labor cost.
- Labor Variable O/H (labor variable overhead)
-
Enter a rate or percentage, as determined in the manufacturing constants, that the system uses to calculate the standard cost for variable labor overhead. If this field contains a rate, it is the cost per hour. If this field contains a percentage, it is the percentage of direct labor.
Enter percentages as whole numbers. For example, enter five percent as 5.00.
- Labor Fixed O/H (labor fixed overhead)
-
Enter a rate or percentage, as determined in the manufacturing constants, that the system uses to calculate the standard cost for fixed labor overhead. If this field contains a rate, it is the cost per hour. If this field contains a percentage, it is the percentage of direct labor.
Enter percentages as whole numbers. For example, enter five percent as 5.00.
- Machine Run
-
Enter a rate that the system uses, together with the run machine hours of the associated routing, to calculate the standard machine labor cost.
- Machine Variable O/H (machine variable overhead)
-
Enter a rate or percentage, as determined in the manufacturing constants, that the system uses to calculate the future standard cost for machine overhead. If this field contains a rate, it is the cost per hour. If this field contains a percentage, it is the percentage of machine run.
Enter percentages as whole numbers. For example, enter five percent as 5.00.
- Machine Fixed O/H (machine fixed overhead)
-
Enter a rate or percentage, as determined in the manufacturing constants, that the system uses to calculate the standard cost for fixed machine overhead. If this field contains a rate, it is the cost per hour. If this field contains a percentage, it is the percentage of machine run.
Enter percentages as whole numbers. For example, enter five percent as 5.00.
3.10 Setting Up General Ledger Class Codes
This section provides an overview of general ledger class codes and lists the forms used to set up general ledger class codes.
3.10.1 Understanding General Ledger Class Codes
General ledger (GL) class codes are used by the AAIs to determine which accounts the system posts transactions to for specific items.
You set up the GL class code in the Item Master and the Branch/Plant program (P41026). When you associate the item with the item location, the system copies that value to the Item Location table (F41021). You can revise the GL class code for an item using the Location Revisions program. The AAIs retrieve the appropriate GL class code from the Item Location table.
Because the system generates journal entries based on GL class codes and AAIs, you should set up the class codes carefully and in collaboration with the accounting department.
3.10.2 Forms Used to Set Up General Ledger Class Codes
3.11 Defining Manufacturing AAIs
This section provides an overview of manufacturing AAIs and discusses how to:
-
Set processing options for Automatic Accounting Instructions (P40950).
-
Define manufacturing AAIs.
3.11.1 Understanding Manufacturing AAIs
Each transaction for which the system creates journal entries requires AAIs that instruct the program to post amounts to specific accounts in the general ledger. User-defined AAIs connect manufacturing accounting, the chart of accounts, and financial reporting. You should create AAIs for each unique combination of company, transaction, document type, general ledger class, and cost component.
AAIs use these five keys to retrieve the object account number to use to create general ledger entries for work order transactions:
-
Company number.
-
Document type of the transaction (except for AAIs 3120 and 3401)
If no transaction is associated with the activity, for example, in AAI 3120 (Work in Process), the AAI does not specify a document type for the transaction
-
General ledger class code.
-
Document type.
-
Cost component.
To retrieve an AAI, the system searches first for an exact match between company and the general ledger class code. If the system does not find a match, it searches for the default company and the general ledger class code for the item. If it does not find a match, it searches for the company and uses **** (four asterisks) for the general ledger class code.
Each AAI or record type points to a specific object account in the general ledger. Business unit and a subsidiary can also be supplied in the AAI table or supplied by default from other sources.
Manufacturing AAIs are defined at the 3000 level, as illustrated in this table:
| AAI | Description |
|---|---|
| 3110 Inventory/Raw Materials | This AAI specifies which balance sheet accounts in the general ledger the system uses when it issues raw materials or parts from inventory to work in process (transaction document type IM). You also use this AAI to issue completed subassemblies from inventory back into work in process.
The system uses this AAI when you run the Manufacturing Accounting Journal Entries program (R31802A). |
| 3120 Work in Process | For debit transactions, this AAI increases the value of work in process by issuing raw materials and parts to work orders or rate schedules (document type IM) and recording labor, machine, and overhead costs from the routing (document type IH).
For credit transactions, during completion (document type IC), this AAI records the transfer of costs for a work order or a rate schedule from work in process to subassemblies and finished goods inventory. The system uses this AAI when you run the Manufacturing Accounting Journal Entries program. |
| 3130 Sub-Assembly/Finished Goods | This AAI specifies which balance sheet accounts in the general ledger the system uses when it receives subassemblies or finished goods from work in process into inventory (document type IC) or scrap (document type IS).
The system uses this AAI when you run the Manufacturing Accounting Journal Entries program (R31802A). |
| 3210 Clear Work in Process | For actual costing, this AAI posts any additional cost of goods sold that were not included when completions were entered.
The system uses this AAI when you run the Variance Journal Entries program (R31804). |
| 3220 Labor | Use this AAI when the actual hours are different from the planned hours that are associated with shop floor activities on document type IV. This is applicable to all cost components except A1 and A2.
Variances are posted as positive or negative, depending on whether they are favorable or unfavorable. The system uses this AAI when you run the Variance Journal Entries program. |
| 3240 Material | Use this AAI when the actual costs are different from the planned costs for cost components A1 and A2. The variance results from either over-issues or under-issues.
Variances are posted as debits or credits, depending on whether they are favorable or unfavorable. The system uses this AAI when you run the Variance Journal Entries program. |
| 3260 Planned | Use this AAI when the planned costs are different from the current costs that are associated with shop floor activities on document type IV.
This variance results from either of the items listed:
Variances are posted as positive or negative, depending on whether they are favorable or unfavorable. The system uses this AAI when you run the Variance Journal Entries program. |
| 3270 Engineered | Use this AAI when the current costs are different from the standard (frozen) costs that are associated with shop floor activities on document type IV. This variance results from a change to the standard bill of material or the standard routing.
Variances are posted as positive or negative, depending on whether they are favorable or unfavorable. The system uses this AAI when you run the Variance Journal Entries program. |
| 3280 Other | Use this AAI when the completed cost is different from the standard cost that is associated with shop floor activities on document type IV. This variance results when a cost rollup is performed in the middle of the cycle, or it is generated when the quantity completed plus the quantity scrapped does not equal the work or rate schedule quantity. The variance might also be rounding.
Variances are posted as positive or negative, depending on whether they are favorable or unfavorable. The system uses this AAI when you run the Variance Journal Entries program. |
| 3401 Accruals | This AAI specifies the profit-and-loss accounts that offset work-in-process labor, machine, and overhead transactions to work orders or rate schedules (document type IH).
The system uses this AAI when you run the Manufacturing Accounting Journal Entries program. |
3.11.2 Form Used to Define Manufacturing AAIs
3.11.3 Setting Processing Options for Automatic Accounting Instructions (P40950)
These processing options control default processing for the Automatic Accounting Instructions program.
3.11.3.1 Defaults
These processing options control default settings for entering and retrieving AAI information.
- AAI Table Number
-
Specify the default value for the Skip to AAI field on the Work With AAIs form.
- Cost Type
-
Specify whether to define cost types. If you selected the Use Product Cost Detail option in the Branch/Plant Constants program, enter 1 to define cost types for these distribution AAIs:
4122
4124
4134
4136
4220
4240
4310
3.11.4 Defining Manufacturing AAIs
Access the Account Revisions form.

- Co (company)
-
Specify the company. The company code must already exist in the Company Constants table (F0010) and must identify a reporting entity that has a complete balance sheet. At this level, you can have intercompany transactions.
Note:
You can use company 00000 for default values such as dates and AAIs. You cannot use company 00000 for transaction entries. - Do Ty (document type)
-
Specify the transaction document type. You select a document type from the Document Type UDC table (00/DT) that identifies the origin and purpose of the transaction. The system reserves several prefixes for document types, such as vouchers, invoices, receipts, and timesheets. The reserved document type prefixes for codes are:
P: Accounts payable documents
R: Accounts receivable documents
T: Time and Pay documents
I: Inventory documents
O: Purchase order documents
S: Sales order documents
Manufacturing transactions use these values:
IM: Material issue
IH: Routing transactions
IC: Completions
IS: Parent scrap
IV: Variance
- Or Ty (order type)
-
Specify the document type for the work order. Enter a value from the Document Type UDC table that identifies the type of document. This code also indicates the origin of the transaction.
- Cost Type
-
Specify a code that designates each element of cost for an item. Examples of the cost object types are:
A1: Purchased raw material.
B1: Direct labor.
B2: Setup labor.
B3: Machine run.
C1: Machine variable overhead.
Dx: Outside operation routing rollup.
Xx: Extra add-ons, such as electricity and water.
This cost structure enables you to use an unlimited number of cost components to calculate alternative cost rollups. The system then associates these cost components with one of six user-defined summary cost buckets.
- Obj Acct (object account)
-
Specify an object account number. The AAI table is the only place where the object account portion of the general ledger account number is defined.
Note:
If you use a flexible chart of accounts and the object account is set to six digits, you should use all six digits. For example, entering 000456 is not the same as entering 456 because if you enter 456, the system enters three blank spaces to fill a six-digit object. - Sub (subsidiary)
-
Enter a code that indicates a subsidiary account, which is a subset of an object account. Subsidiary accounts include detailed records of the accounting activity for an object account.
Note:
If you are using a flexible chart of accounts and the object account is set to six digits, you must use all six digits. For example, entering 000456 is not the same as entering 456 because, if you enter 456, the system enters three blank spaces to fill a six-digit object.If you leave this field blank, the system uses the value that you entered on the work order in the Cost Code field.