12 Working with Interim Payments
This chapter contains the following topics:
12.1 Understanding Interim Payments
An interim payment is any payment that you prepare outside of the normal payroll cycle. Typically, you create interim payments when you need to create a payment outside of the regular payroll processing cycle. You can also use the Interim Payment Workbench to perform calculations such as gross-up payments and calculated advance payments.
When you enter an interim payment, you can use existing timecard records, enter new timecard information that specifically relates to the current interim payment, or enter amounts into the interim entry form without using timecards. The system uses this information to calculate the gross pay, taxes, deductions, benefits, and accruals (DBAs), and net pay by processing pre-payroll for each payment. You can enter interim payments individually or, in some cases, you can automatically create interim payments for selected groups of employees.
When you enter interim payments, you can override tax and DBA information to create a payment that includes predefined amounts. The system creates workfiles that store all tax and DBA amounts for interim payments regardless of whether the amounts are calculated or overridden.
This diagram illustrates where typical interim payments might occur in relationship to the payroll cycles:
Figure 12-1 Payroll cycle: interim payments
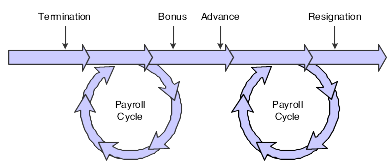
Description of ''Figure 12-1 Payroll cycle: interim payments''
You can use the Interims Workbench to create printed payments, automatic deposit information, and reports for interims. The Interims Workbench is useful when you need to create payments quickly and you do not have time to process a complete payroll cycle. You can also create printed payments, automatic deposit information, and reports for interims during the regular payroll cycle. Regardless of the method that you use to create printed payments, automatic deposit information, and reports, you must run all interim payments through a complete payroll cycle to create journal entries and to update employee payroll history.
|
Note: Depending on the number of interim payments that you enter, creating printed payments using the Interim Payment Workbench might significantly shorten the processing time of the print payments step of the regular payroll cycle. Processing interim payments along with the regular payroll might significantly increase the processing time of the payroll cycle, so you might also consider processing interim payments through a separate interims-only payroll cycle to shorten the processing time of the regular payroll cycle. |
The Interim Payment Workbench enables you to:
-
Prevent all DBAs from being calculated for an interim payment.
-
Override employee auto deposit instructions.
-
Override tax and DBA information.
-
Create advance payments.
-
Calculate and create gross-up payments.
-
Enter negative amounts to adjust employee payroll history.
-
Print checks and automatic deposit advices.
-
Create automatic deposit information to send to the bank.
-
Create reports for interim payments.
12.1.1 Purposes of Interim Payments
This table explains some typical purposes of interim payments:
| Purpose | Description |
|---|---|
| Enter a flat-amount advance on pay. | You can create a flat-amount advance payment for an employee. |
| Enter a calculated advance on pay. | Calculated advances are used to advance an entire paycheck to an employee or to advance pay for a certain number of hours that an employee might already have worked. You create a calculated advance interim to pay an employee his or her net pay amount in advance. |
| Enter a bonus payment. | Many employers make bonus payments to employees and do not want these payments included with the employees' regular paychecks. Processing bonus payments with regular payroll payments might cause voluntary deductions such as medical insurance premiums, retirement plan elections, and charitable contributions to be withheld from these bonus payments.
You can use the interim process to specify that, other than taxes, no deductions are to be withheld from the payment. You can also use the interim process to specify that you want to create printed checks regardless of whether employees have automatic deposit instructions. This might be useful if you want to distribute bonus checks in person (for example, during a company meeting). |
| Enter a termination payment. | When an employee is terminated, most states require that the final paycheck be disbursed within a specified amount of time. Many companies generate a final paycheck immediately when the termination is involuntary. Timecards can be entered during the interim process to account for severance pay and vacation or sick leave pay that an employee has earned, and current timecards that would normally be processed during the next regular payroll cycle can be used to generate the termination paycheck.
Using the Interim Payment Workbench, you can print the payment immediately, and then process the interim payment through the next regular payroll cycle to create reports and journal entries, and to update employee payroll history. You can also generate a printed check regardless of whether the employee is set up to receive payroll payments as automatic deposits. |
| Enter information from manual payments (typed or handwritten). | You can enter information from typed or handwritten manual payments, including earnings, tax, and deduction details. The system creates journal entries and merges this information into payroll history when the interim is processed through a payroll cycle. |
| Adjust historical data for an employee. | You can adjust historical data for an employee. Using interim payments to adjust historical data enables you to enter negative payments into the system and provides an audit trail for future reference. The system does not generate a printed payment if you specify that it not do so. |
| Convert payroll history. | You can use interim payments to load historical data for all employees who are involved in a midyear conversion to JD Edwards EnterpriseOne software. To update the history records for employees who are converting midyear, you can use the interim process to enter a one-time payment of year-to-date amounts. Doing so correctly updates the history files in the JD Edwards EnterpriseOne Payroll system and provides an audit trail for future reference, without creating payments for the employees. |
| Calculate gross-up amounts. | The gross-up process enables you to enter a desired net amount for an employee and have the system calculate the gross amount for the payment to cover taxes and achieve the desired net amount. You can also create gross-up payments for individual employees or for a group of employees. |
| Reissue payment of a voided paycheck. | If a payment that was created during the regular payroll cycle is incorrect after it has been processed through final update, you can void the payment and generate a corrected payment using interim processing. You would process this interim payment through a full payroll cycle to ensure that the corrected information is updated in historical records. |
Regardless of the purpose for creating an interim payment, you can generate the interim payment using these methods:
| Method | Description |
|---|---|
| Computer | The system performs the tax and earnings calculations and generates the bank file or printed payment. |
| Hand Manual | The payment is calculated manually and typed or written outside of the JD Edwards EnterpriseOne Payroll system. The amounts on the manual interim are then entered into the system and processed through a payroll cycle to update history and create appropriate accounting entries. The system does not print manual payments. |
| Auto Manual | The system calculates the payment using the data in the system (deduction amounts and tax history determine the appropriate amounts to withhold from the payment), and the payment can be typed or manually written outside of the system. The interim is then processed through a payroll cycle to update history and create appropriate accounting entries. The system does not print manual payments. |
12.2 Common Fields Used in This Chapter
- Auto Deposit Advice
-
Select to print automatic deposit advices.
- Auto Deposit Advice Message
-
Enter the message to print on the automatic deposit advices.
- Auto Deposit Bank File
-
Select to create the automatic deposit bank file.
- Check Message
-
Enter the message to print on the checks.
- Checks
-
Select to print checks.
- From Interim ID
-
Complete this field if you have selected the Reassign Interim ID to Another ID option.
- Next Advice Number
-
Enter the beginning or next available number of the forms on which employees' auto deposit advices are printed. The system does not check for duplicate advice numbers because you might be using multiple bank accounts. You must track advice numbers manually.
- Next Check Number
-
Enter the beginning or next available number of the forms on which employees' checks are printed. The system does not notify you of duplicate check numbers because you might be using multiple bank accounts. You must track check numbers manually.
- Reassign Interim ID to Another ID
-
Select to reassign interim payments to another interim ID.
- Reset Interim Calculations
-
Select to reset the interim calculations. You must reset the calculations for interim payments before you can reset interim header records or reassign interims to another ID. If you have already reset the calculations for the interims, or if the interims have not yet been processed, you do not need to select this option.
- Reset Payment Headers
-
Select this option to reset interim header records.
- To Interim ID
-
Complete this field if you selected the Reassign Interim ID to Another ID option.
12.3 Entering Interim Payments
This section provides an overview of interim payments entry, lists prerequisites, and discusses how to:
-
Enter an interim payment.
-
Enter a group of gross up payments.
-
Create interims with the Time Entry Interim Generator.
12.3.1 Understanding Interim Payments Entry
You use the Interim Entry program (P070701) when you need to create payments that are outside of the normal payroll cycle. You can enter a standard interim (off-cycle) payment for payments such as bonuses or terminations that occur outside of the normal payroll cycle. You can also enter interim payments to allow employees to receive flat-amount or calculated advances on their earnings. You can enter interim payments to record manual payments that were given to employees and to calculate gross-up amounts for individuals or groups of employees. You can also use interim payments to convert or adjust employee payroll history. The Interim Entry program also generates the component pay timecards.
If you enter interim payments for more or less than a full pay period, you can also specify that you want the DBAs that are associated with that payment to calculate at a rate other than what the system would normally calculate during a regular pay period. Using the DBA factors, you can specify the percentage of the pay period for which you want the DBAs to be calculated.
To create an interim payment, you must first set up an interim payroll ID. Each interim payment that you enter must be associated with an interim payroll ID. If you process interim payments during the regular payroll cycle, the system generates reports, journal entries, and payroll history for the interim payments and the regular payroll payments at the same time. In addition, if you have not printed payments or created bank files using the interim payment workbench, the system prints payments and creates bank files for interim payments and regular payments during the payroll process. The system does not re-create printed payments or bank file information during regular payroll processing if those steps were completed using the Interim Payment Workbench. Alternatively, you can process a separate payroll cycle for interim payments.
You can enter interim payments using either interactive or batch processing. When you use interactive processing, the system automatically calculates the interim payments and updates the interim payment workfiles when the payment is entered into the system. Interactive processing enables you to print payments from the Interims Workbench immediately after they are entered into the system.
When you use batch processing, you must enter the interim payments and then run the Interim Calculations program (R07280) to process the interims. You can run a single version of the calculation program to process all interim payments that are associated with an interim ID, or you can run multiple versions of the calculation program at once.
|
Note: To enter interim payments for calculated advances, you must use interactive processing. Because the system needs to calculate deduction and tax amounts before the net payment amount is determined, you cannot enter calculated advance interims using batch processing. In addition to calculated advances, individual gross-up payments are also available only in interactive mode. |
If you process a large number of interim payments, you might want to use multiple versions of the calculation program to process interim payments. To do so, you must create multiple versions of the Interim Calculations program and set up those versions to run during step I (Interims Multiple Processing) of the reports setup that you are using for interim payments. Each version that you enter in the reports setup should have unique data selection. When you run the calculation programs, the system launches each version simultaneously and calculates the interim payments that meet the data selection criteria that is entered for that version. This process can significantly shorten processing time.
For example, if you enter interim payments for employees who work in three different companies, you might want to set up three different versions of the Interim Calculations program. You might set up the data selection for each version to select employees from one of the three companies. After you enter the interim payments, you can process them using the multiple versions functionality, launching all three versions of the Interim Calculations program simultaneously. Each version would process interim payments for one of the companies. Depending on how the system is set up, each of these versions might be able to run at the same time. Therefore, processing the three smaller jobs might be significantly faster than processing one job to calculate all of the interim payments for all three companies.
After you run the batch processors, you can print the interim payments from the Interims Workbench. The processing options for the Interim Payment Workbench determine whether you create interim payments using interactive or batch processing.
|
Note: If you process multiple versions of interim calculation processing, you should create one version for each processor in the system. Contact the system administrator to determine whether running multiple versions is an acceptable option for the organization.Also, if you process interim payments using the batch method, you cannot override the information on the Employee Tax Information tab during interim entry. This tab includes these fields: Work Tax Area Resident Tax Area School District Code Work Tax Area Source Residency Status Source of SUI Reporting (source of state unemployment insurance reporting) DOB (date of birth) EIC Status (earned income credit status) Tax Method In addition, you must use the Tax Overrides selection from the Form menu to enter tax override information. The tax override tabs are disabled when you process interim payments using the batch method. |
You can use standard interim payments (also known as off-cycle interims) to create payroll payments outside of the regular payroll cycle. You might need to create termination, bonus, or other payroll payments at a time when it is not convenient to process an entire payroll cycle.
For example, when an employee is terminated between payroll cycles, you might need to generate the employee's last payment immediately. If you are using JD Edwards Enterprise Workflow Management, you can automate some of the processes that are involved in creating a termination payment. If you are not using the termination workflow, you can enter an off-cycle interim payment for the employee using the Interims Workbench.
You can enter new timecards, use timecards that are already in the system, or use a combination of the two to create the interim payment. You can also override employee automatic-deposit instructions, tax information, and DBA calculations on an interim payment.
12.3.1.1 Calculating DBAs Using the DBA Factor
On occasion, you must pay an employee for more or less than a full pay period. For example, an employee's first or last employment period with the organization is likely not to be a full pay period. The employee might have commenced work in the middle of a pay period, or have been terminated two days after a pay period had started. You must pay the employee for the portion of the pay period that was worked. In addition, you must calculate the employee's DBAs accordingly.
When you enter regular timecards and process those timecards through a payroll cycle, the system calculates the amount of pay that the employee receives during that payroll cycle and then calculates the DBA amounts that are associated with the employee's earnings. Therefore, if you were to enter timecards for a partial pay period, but process them through a regular payroll cycle, the system would treat the amount of pay as if it were earnings for a full pay period. Without taking into account the fact that the employee had not worked a full pay period, the system would calculate the employee's DBAs as if he or she had worked a full pay period, which would result in incorrect DBA amounts.
To ensure that DBAs for employees who work more or less than a full pay period are calculated correctly, you must create interim payments to process partial pay period earnings. On the Interim Entry form, you can enter a value in the DBA Factor field. The value in this field represents the amount of time that the employee worked during the pay period. The system uses this value to calculate the employee's DBAs for the period. For example, if an employee worked 3 of the 12 days in the pay period, you would enter a value that represents .25. The system would use this value to calculate DBA amounts at .25 of what they would normally be.
Depending on the amount of time that the employee worked, you can either enter the value directly into the field, or set up a value in user-defined code (UDC) 07/DO. The DBA Factor field is a one-character field; therefore, if you want to multiply DBA calculations by a value of 0 through 9, you can enter that value directly into the field. However, if you want to enter a value that is more than one character, you must set up a one-character code in UDC 07/DO that represents the value, and then enter that value in the DBA Factor field.
You can use values that are more or less than a full pay period. For example, if you want to pay an employee for one-and-a-half pay periods, you can set up a code in UDC 07/DO and enter 1.5 in the second description for that code. You then enter the code in the DBA Factor field on the Interim Entry form.
|
Note: In the earlier example of the employee who works 3 of the 12 days in the pay period, you want the DBAs to be calculated at .25 of what they would normally be. Because .25 is greater than one character in length, you must set up a code in UDC 07/DO. For example, you might set up code A in the UDC table, giving it a description of 25 percent, and entering .25 in the second description field. When the system calculates the interim payment, if the value in the DBA Factor field is 0 through 9, the system multiplies the DBA amounts by this value. If the value in this field is anything other than 0 through 9, the system retrieves the value from the second description of the code in UDC 07/DO. |
12.3.1.2 Manual Calculations
You might need to calculate a manual payment outside of the JD Edwards EnterpriseOne Payroll system and then update the JD Edwards EnterpriseOne Payroll system with historical data for the employee. For example, you might issue a manual check for moving expense reimbursement from the Travel Accounting bank account. Doing so would require an employee's payroll history to be updated to record the reimbursement. In this situation, you could record the payment that was issued from the Travel Accounting bank account through the interim process without generating a payment from the JD Edwards EnterpriseOne Payroll system.
If you have created a payment manually, you can use the interim payment feature to enter the manual calculations into the system. Entering manual calculations ensures that the employee's payroll history is accurate, which in turn ensures the accuracy of year-end tax information. You can enter the tax amounts that you calculated manually and prevent the system from recalculating the taxes, or you can omit the tax information and let the system calculate the taxes automatically, using tax withholding information from the F060116 table. You can enter up to eight tax overrides. You can also override the employee's DBA instructions on the interim payment to ensure that payroll history exactly reflects the information that was included on the manual payment.
12.3.1.3 Calculated Advances
You might want to allow employees to receive their regular payroll payment before the payment is regularly created. For example, you might provide employees with vacation payments before they take a vacation leave, or you might advance pay to a newly hired employee if waiting until the next regular payroll cycle places a financial strain on the employee. You can enter an interim payment to pay an employee in advance of a regular pay period. This payment can replace the regular payment for one or more pay periods. If the payment spans more than one pay period, you must enter a vacation or taxation factor so that the system accurately calculates the taxes for the advance payment. When taxes are calculated, the employee's rate of pay is annualized to determine the percentage of tax to be withheld. For example, suppose that a weekly paid employee receives four weeks of vacation pay in one payment. Without the calculation factor, the annualized salary is four times greater than the employee's actual annual salary because four weeks of vacation pay are being taxed as if all of the earnings were attributed to one week. This method of calculation results in a higher amount of taxes being withheld for that payment. When you use the calculation factor, the payment is taxed over the entire four-week period even though the entire four-week payment is made at one time. The system also uses this factor to calculate DBA information accurately for the period that is covered by the payment. In addition, if you enter values in the Pay Cycle Bypass Count and Benefit Cycle Bypass Count fields, the system does not create payroll payments for the employee during the periods that are covered by this advance payment.
To create a calculated advance, you enter the gross amount of the employee's earnings that you are going to advance to the employee. The system then calculates the amount of taxes and deductions that would normally be withheld from the employee's gross earnings, and creates a flat-amount interim payment for the calculated net pay amount. When you create a calculated advance interim payment, you enter information into the Interim Entry form just as you would for a standard interim payment; however, you must select the Calculate Interim Details option for the system to determine the net amount of the interim payment. When the interim payment is processed, the system creates a record in the employee's DBA instructions using the advance DBA that you enter in the processing options of the Work With Interims Workbench program. The amount of the advance DBA is the same as the net amount of the interim payment. No tax or PDBA (pay types, deductions, benefits, and accruals) history other than the advance DBA is updated for this interim payment. During subsequent payrolls, the amount that is associated with the advance DBA is deducted from the employee's pay according to the rules that are set up on the advance DBA. You can choose how much to recover from the employee's future paychecks, if any, and at what rate to recover the advance payment.
To pay an employee in advance for scheduled leave, you select the Timecard Selection tab, and then select Load only pay in advance timecards to grid. This option displays timecards that were previously entered with the pay in advance field set to Y (yes).
|
Note: You must use the interactive mode to process interim payments to enter calculated advance interims. Because the system must perform calculations to determine what the amount of the payment is before the payment is entered, you cannot enter calculated advance interim payments if you use batch processing. |
12.3.1.4 Flat-Amount Advances
You enter a flat amount interim payment to pay an advance on an employee's wages. For example, if an employee requests a 500 USD advance on earnings, you can generate a flat-dollar advance interim payment for 500 USD. The system creates a deduction for the advance amount and enters this deduction in the employee's DBA instructions so that the amount is deducted from the employee's next payment. The system does not calculate or deduct any taxes from the advance payment. With the default process, the system deducts the entire advance in one lump sum from the net amount of the employee's next payment. If the employee does not have enough earnings to cover the deduction, the system collects any remaining balance during future payrolls. If you do not want to recover the full amount of the advance at once, you can change the amount that the system deducts per pay period using the employee's DBA instructions.
|
Note: You can change the way that the advance is recovered from the employee by changing the settings in the advance DBA. |
12.3.1.5 Adjustments to Historical Information
You enter an interim payment to adjust historical information when you need to void a specific amount of an employee's payment, but not the entire payment. For example, suppose that an employee is set up to receive 500 USD of his payment in the form of a check and the remainder of the payment in an automatic deposit. If the check is lost, but the automatic deposit occurs as usual, you can use the adjustment feature to manually void the part of the payment that was lost without affecting the automatic deposit. To create the manual void, you enter an adjustment interim payment for negative 500 USD. To issue a replacement check, you create a standard interim payment.
When you create an adjustment interim payment, the system automatically specifies that the interim is a manual interim. Therefore, the system does not automatically create a printed payment for adjustments.
|
Note: For adjustment interims, you manually enter all the required information (wages, time entry information, DBAs, taxes, and taxable balances) to adjust payroll history directly. |
Additional circumstances exist in which you might need to adjust employee payroll history information. Some examples of such circumstances are:
-
An employee was taxed incorrectly, so you need to adjust the tax amounts.
-
An employee's personal information changed, and the payroll office was not notified.
-
An employee transferred from one division or company to another for which year-to-date limits need to be considered in payment calculations and government reporting.
-
An employee was overpaid and then paid the company back outside of the regular payroll process.
The amount that the employee paid back is the net overpayment of earnings, less deductions and taxes. For the adjustment interim, you enter negative amounts for:
-
Time entry information.
-
Gross wages for each applicable tax type.
-
Excludable wages for each applicable tax type.
-
Excess wages for each applicable tax type.
-
DBAs.
-
Taxes.
-
-
An employee was set up in one state for work and residence, but actually works in one state and lives in another.
Therefore, you need to transfer taxable wages from one state to another. You must enter positive amounts for the state to which you are transferring the wages, and negative amounts for the state from which you are transferring the wages. You need to manually enter these amounts for:
-
Time entry information.
-
Gross wages for each applicable tax type.
-
Excludable wages for each applicable tax type.
-
Excess wages for each applicable tax type.
-
DBAs.
-
-
A Canadian employee exceeded the contribution limit for employee insurance (EI), Canadian pension plan (CPP), or Quebec pension plan (QPP).
Employees in Canada contribute to EI, CPP, and QPP, which have various contribution limits. You need to refund the overpayment of taxes and decrease or increase the excess and excludable amount, without altering the gross amount. You must enter positive or negative amounts for:
-
EI.
-
CPP or QPP.
-
Excess wages for each applicable tax type.
-
Excludable wages for each applicable tax type.
-
-
An employee, who is on a leave of absence and does not receive a paycheck, sent in a payment for a loan or benefit deduction that is normally withheld from his or her paycheck.
You need to update payroll DBA and tax history to reflect the payment. You must enter amounts for:
-
DBA.
-
Gross wages for each applicable tax type, if the DBA is pretax.
-
Excess wages for each applicable tax type, if the DBA is pretax.
-
Excludable wages for each applicable tax type, if the DBA is pretax.
-
12.3.1.6 Gross-Up Payments
You can enter a desired net amount and direct the system to calculate taxes and determine the gross amount of the payment. This calculation is called a gross-up. You might want to create gross-up interim payments if you want the employees to receive payments for a specified net amount (for example, to reimburse an employee for moving expenses). Assume that an employee incurs 5,000 USD in moving expenses. In this case, you create a payment with a net amount of 5,000 USD. If you entered a regular interim payment for 5,000 USD, the employee would receive less than 5,000 USD after taxes were withheld. Using the gross-up process, the system determines what the gross amount of the payment must be so that the net amount, after taxes are calculated, is 5,000 USD.
You can enter individual gross-up payments, or the system can automatically create similar gross-up payments for a selected group of employees. For example, to give every employee in a department a 100 USD bonus for meeting a departmental goal, you could use the group gross-up feature. The gross-up interim payments do not include deductions, benefits, and accruals. To create a group of gross-up payments, you must first create an employee group. Also, all of the employees in the group must receive the same net pay amount.
|
Note: To enter interim payments for individual gross-up payments, you must use interactive processing. |
12.3.1.7 Time Entry Interim Generator
You can use the Time Entry Interim Generator feature to associate all timecards with a default interim payroll ID. Organizations that process large numbers of timecards and create payments multiple times during a single pay period might use this feature on an ongoing basis. Other organizations might periodically use this feature to facilitate the creation of special interim payments. When you enter timecards using the Time Entry Interim Generator, the system generates interim header records for each timecard. After you enter the timecards, you must process the interim header records using the Interim Payment Workbench to create the actual interim payments.
When you use the Time Entry Interim Generator, the default interim ID that is assigned to the timecards appears on the time entry form that you use to enter timecards. This system uses this interim ID for each timecard that is entered unless it is overridden on the individual timecard.
|
Note: You can also create interim payments for timecards that are entered while the Time Entry Interim Generator feature is disabled. To do so, you must first activate the Time Entry Interim Generator feature. Then, using the Speed Time Entry Revisions form, you can assign the default interim ID to all of the timecards that appear on the form by clicking the Assign Timecards Default Interims button. |
This example illustrates how an organization might use this feature on an ongoing basis.
Company A receives over 100,000 timecards during each weekly pay period. These timecards are received on a continuous basis throughout the period, and are entered into the system as they are received. Many of the employees in this organization do not work during all of the days in the pay period. The company prints payments several times during the pay period. This dramatically decreases the processing time that is associated with printing payments at the end of the pay period.
To process payments in this way, you use the Time Entry Interim Generator feature on a continuous basis. All timecards that are entered into the system generate interim payment records that are associated with a default interim payroll ID. Using the Interim Payment Workbench, you can process payments for this interim payroll ID several times during the period, and then process a complete payroll at the end of the period.
This example illustrates how an organization might use this feature on a periodic basis.
Company B wants to give each of its 2,000 employees a merit bonus at the annual company party. The amount of the bonus is different for each employee. To generate these bonus payments as separate payments from the regular payroll payments, you must generate interim payments for the bonuses. Due to the large number of employees, the payroll clerk might want to enter bonus information using the Speed Time Entry program (P051121) rather than to enter individual interim payments for each employee.
To create interim bonus payments using the Speed Time Entry program, you can activate the Time Entry Interim Generator feature for a specified time period. The system automatically creates interim payment records for each timecard that is entered during that period. These timecards are associated with a default interim payroll ID. You can then process the interim payroll ID to process the interim payments. After all bonus timecards are entered into the system, you can disable the Time Entry Interim Generator feature and enter timecards without generating interim payment records.
To use the Time Entry Interim Generator feature, you must first set up the processing options for the Time Entry MBF program (P050002A). After you set those processing options, you must specify the version of the Time Entry Master Business Function (MBF) program to use in the processing options for the time entry programs that you use. Using the information in the processing options of the Time Entry Master Business Function, the system determines which default interim ID to use to create interim payments during time entry. When the Time Entry Interim Generator is functioning correctly, the default interim payroll ID appears on the time entry forms.
You can also generate interim payments when you upload timecards using the batch timecard process. To do so, you must set up a version of the Time Entry Master Business Function that enables the Time Entry Interim Generator feature. Then, you must enter that version in the processing options for the Time Entry Batch Processor program (R05116Z1I). After you upload the timecards, you can review them to verify that they are attached to the correct interim ID.
|
Note: You can use the Time Entry Interim Generator program only to create standard computer interim payments. To create advance, gross-up, or manual interim payments, you must use the Interim Payment Workbench.Also, whether you are using batch processing or interactive processing for interim payments, you must use the Interim Payment Workbench to process interims that are created using the Time Entry Interim Generator. The processing method for interim payments is defined by the processing option settings for the Interim Payment Workbench. Before you create interims with the Time Entry Interim Generator, set up a default interim payroll ID and set the Time Entry MBF Processing Options (P050002A) to enable time entry to generate interim payments. If you use the Time Entry Interim Generator to create multiple payments for employees during a single pay period, verify that company options and DBA setup information is set up correctly to ensure that DBA limits and arrearages are calculated correctly. |
12.3.2 Prerequisites
Before you complete the tasks in this section:
-
Create an interim payroll ID.
-
Verify that the processing options for the Interim Payment Workbench are set up correctly.
-
Set up a report model that includes all of the reports that you want to generate during the interim process.
-
Set up DBA factor codes in UDC 07/DO, if necessary.
12.3.3 Forms Used to Enter Interim Payments
12.3.4 Entering an Interim Payment
Access the Interim Entry form.
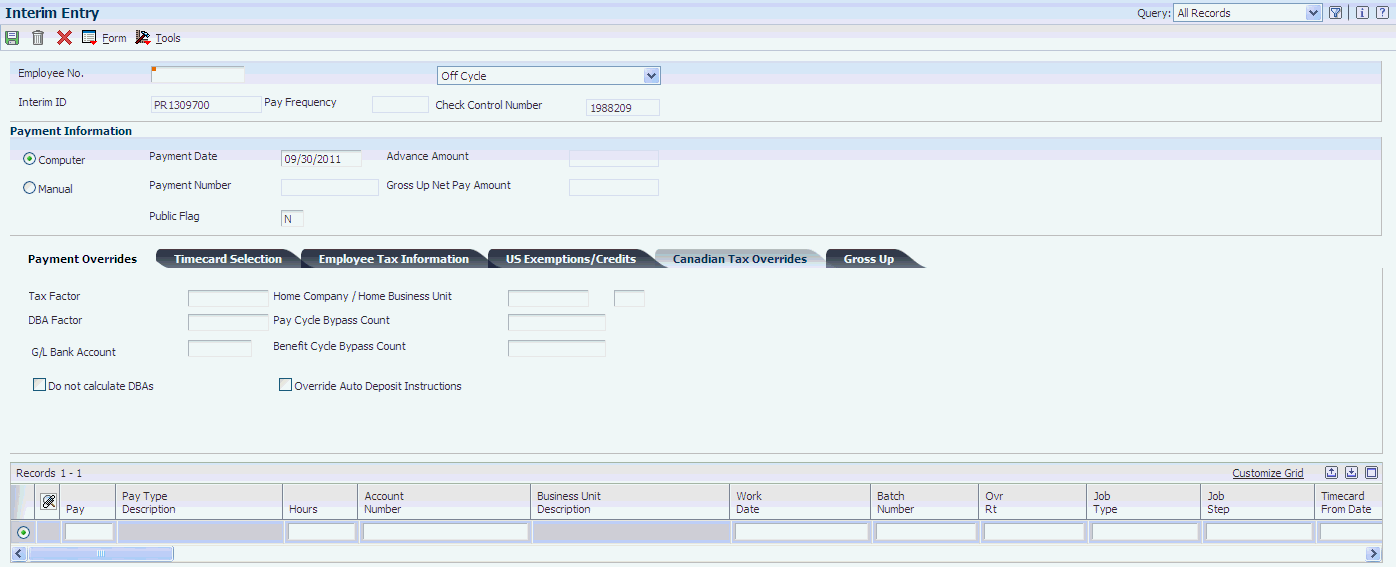
If you have selected the Project and Gov Contract Accounting Used check box in the Service Billing Constants program (P48091), the system displays the Contract Labor Category field on the Interim Entry form.
To enter an interim payment:
-
Complete these fields:
-
Employee Number
-
Interim Payment Code
-
Gross Up Net Pay Amount
-
Payment Date
-
Payment Number
-
-
Select one of these options:
-
Computer
-
Manual
-
-
Complete these fields on the Gross Up tab to create an interim for a gross-up payment:
-
Gross Up Pay Type
-
Federal Withholding Tax Rate
-
State Withholding Tax Rate
Note:
The remaining tabs on the Interim Entry form are disabled during the entry of a gross-up interim payment. -
-
Complete any of these fields on the Payment Overrides tab to override payment information:
-
Tax Factor
-
DBA Factor (deductions, benefits, and accruals factor)
-
G/L Bank Account (general ledger bank account)
-
Home Company / Home Business Unit
-
Pay Cycle Bypass Count
-
Benefit Cycle Bypass Count
-
-
Select the Do not calculate DBAs option to prevent all DBAs from calculating for this interim payment.
-
Select the Override Auto Deposit Instructions option to create a check for this interim, regardless of the employee's automatic deposit instructions.
Note:
If you override the automatic deposit instructions at the interim ID level, this option is disabled. -
Complete these fields on the Timecard Selection tab to include existing timecards in the interim payment:
-
From Date
-
Thru Date
-
Pay Cycle Group Code
-
Home Business Unit
-
Home Company
-
-
Select one of these options:
-
Load existing timecards to grid.
-
Unload existing timecards from grid.
-
Load only pay in advance timecards to grid.
Note:
The system includes all timecards on the Interim Entry form in the interim payment calculations. -
-
Go to step 11 if you are not creating an adjustment interim.
-
Access the Work With Tax Overrides form, complete these fields, click OK, and then go to step 15 if you are creating an adjustment interim.
-
Work Tax Area
-
T (tax type)
-
Current Tax Amount
-
Gross Pay
-
Excess Gross
-
Excludable Gross
Note:
The system calculates the amount in the Taxable Gross field, based on the values that you enter in the other fields on this form. The formula that the system uses is Taxable Gross = Gross Pay − (Excess Gross + Excludable Gross).The system also automatically populates the Override Type field with F (flat override), which indicates that these tax amounts replace the tax that was computed from the tax table.
-
-
Complete these fields on the Employee Tax Information tab to override employee tax information for the interim payment:
-
Work Tax Area
-
Resident Tax Area
-
School District Code
-
Work Tax Area Source
-
Residency Status
-
Source of SUI/SDI Reporting (source of state unemployment insurance/state disability insurance reporting)
-
DOB (date of birth)
-
EIC Status (earned income credit status)
-
Tax Method
-
Federal
-
Work
-
Resident
-
Local
Note:
This tab is disabled if you are processing interim payments using the batch method. The method of processing is determined by the processing options for the Work With Interims Workbench (P07210I). -
-
Complete the steps for entering country-specific tax overrides for interim payments, to override tax exemption and credit information for the interim payment, and to complete the remaining steps of this task.
-
Complete the time entry grid that appears on the Interim Entry form to enter new timecard records for the interim payment.
-
Click the Calculate Interim Details button at the bottom of the form and review the payment information and to calculate and view the interim payment calculations, and then click Close.
Note:
This step is required only if you are entering a calculated advance interim payment. Also, this option is enabled only if you are processing interim payments using interactive processing. If you do not want to review the calculations when you enter the interim payment, you do not need to complete this step. You can change information on the Interim Entry form and click the Calculate Interim Details button as many times as necessary before you proceed to the next step. -
Click OK on the Interim Entry form.
- Interim Payment Code
-
Select a payment code from the available options.
To create a standard or manual interim payment, select Off Cycle.
To create an interim payment for a calculated advance, select Calculated Advance.
To create a net advance interim payment, select Net Advance.
To create an interim payment to adjust historical information, select Adjustment.
To create an individual gross up interim payment, select Gross Up.
- Computer
-
Select this option to perform the tax and earnings calculations, generate the payment on computer paper, and update the employee's payroll history.
- Manual
-
Select this option when you manually type or write an interim payment. The system records the manual calculations and updates the employee's payroll history.
- Gross Up Net Pay Amount
-
Enter the net pay amount. The system will calculate the gross pay from this amount.
- Payment Date
-
Enter the payment date.
Note:
This field is automatically populated with the system date or with the date that the system calculates using the payment offset. You can override the payment date by entering a value in this field. - Payment Number
-
Enter the payment number. Complete this field if you are entering a manual payment.
12.3.4.1 Gross Up
- Gross Up Pay Type
-
If you leave this field blank, the system uses the pay type that is in the processing option for the Interims Workbench to calculate gross-up information. If that processing option is also blank, the system uses pay type 1.
12.3.4.2 Payment Overrides
- Tax Factor
-
Enter the tax factor. A value in this field represents the number of pay periods that this check is to cover. The JD Edwards EnterpriseOne Payroll system uses this field to direct the Vertex payroll tax program to treat the pay as a vacation advance. The computed taxes are automatically averaged over the number of pay periods. See the Vertex system manual for an explanation of the method of calculating tax on vacation advances.
- DBA Factor (deductions, benefits, and accruals factor)
-
Enter the DBA factor. This is a code that designates the number of periods that the check represents, and therefore, the number of periods to which the flat-dollar deductions are to apply. This number is multiplied by the standard deduction amount to calculate the amount to be subtracted from the employee's check.
- G/L Bank Account (general ledger bank account)
-
Enter the number of the bank account (general ledger account) to be updated automatically when receipts or disbursements are entered. The bank account number is assumed to be the same for every document in a batch. Therefore, it is not cleared from entry to entry. However, if you leave this field blank, the system retrieves a default bank account number from the F0012 table, item number RB for accounts receivable, and PB for accounts payable.
- Home Company / Home Business Unit
-
Enter the code that indicates the company that is used on the interim payment. If you leave this field blank, the system uses the employee's home company on the interim payment. The system displays a warning when you enter an interim payment if timecards exist on which the home company is overridden.
If you enter a value in the Home Company field on the Timecard Selection tab of the Interim Entry form, that value is automatically entered and the field is disabled. Therefore, if you enter a value in the Home Company field, the system includes all existing timecards with that home company value (if you choose to include existing timecards) and uses that home company on any additional timecards that you create for the interim payment. If this field is blank, the system overrides the home company on the timecards with the home company from the F060116 table.
Note:
Before you enter a value in this field, you should review the Company Options for company 00000 to determine how the organization manages overrides to home company information on employee timecards. If you enter a value in this field that is different from the home company in the F060116 table, the system uses the value in this field as the home company for the interim payment regardless of how the company options are set. For example, if the company options are set to override the home company on a timecard with the home company from the F060116 table, and you enter a value in this field that is different from the home company from the F060116 table, the system does not override the home company on the timecard. - Pay Cycle Bypass Count
-
Enter he number of pay cycles (paychecks) that the system bypasses. You normally specify this number during the interim check process for short term absences such as vacations and jury duty. The system prints a normal paycheck for an employee only when this number is zero.
For Flexible Spending Accounts Auto Deposit Instructions Only: To bypass the auto deposit feature and write a manual check, you can use this field to specify the number of pay cycles that you want to bypass. Reasons for bypassing pay cycles might include an employee's involvement in jury duty, vacation, or leave of absence.
- Benefit Cycle Bypass Count
-
Enter the number of pay cycles (paychecks) to bypass the benefit calculations. Typically, you specify this information during the interim check process. If you leave this field blank when you enter an interim check, the system bypasses the same number of cycles that you enter in the Replace Next N Checks field. This number must be equal to or greater than the number of pay bypasses. If you specify a value that is less than this number, the system bypasses the same number of pay cycles that you entered in the Replace Next N Checks field.
When you enter a value in this field, the system updates the employee's master record. If you change or delete the other information on the interim check, the system does not remove or adjust the bypass count. You must use the Change value on the Additional Parameters form to change the value in the F060116 table. However, if you delete the interim check, the system also deletes the value from the F060116 table.
12.3.4.3 Timecard Selection
- Pay Cycle Group Code
-
Enter the UDC (06/PG) that indicates a pay cycle group. If you enter a pay cycle group code here, the system processes only those timecards for which the business unit has the pay cycle group that is assigned in the business unit constants. The type code determines which business unit is used in the selection process.
This field and the accompanying Type field override the DREAM Writer home business unit selection. Employees must first be selected in the DREAM Writer data selection; then, timecards for those employees are selected based on pay cycle group code and type.
- Home Business Unit
-
Enter the business unit that the system uses to search on existing timecards. If you include existing timecards in the interim payment, the system includes only timecards with the business unit that you enter in this field.
- Home Company
-
Enter the company that the system uses to search for existing timecards. If you include existing timecards in the interim payment, the system includes only those timecards with the company that you enter in this field.
If you leave this field blank and include existing timecards on the interim payment, the system includes all existing timecards that meet the search criteria on the timecard selection tab, regardless of the home company. The system then overrides the home company on the timecards with the value in the Enter Company if Different than Home Company field on the Payment Overrides tab. If this field is also blank, the system overrides the home company on all of the timecards that are associated with the interim payment with the home company in the F060116 table.
The system displays a warning if the home company on the timecards will be overridden.
12.3.4.4 Employee Tax Information
- School District Code
-
Enter the code in UDC 06/SD that determines the school district tax for taxation purposes. Vertex automatically calculates the school district tax. This feature is primarily used by the public sector.
- Residency Status
-
Enter the value that identifies out-of-state employees for whom an employer must withhold tax for the state of residence. Values are:
N (default): Uses the employee residence state to calculate taxes. Because the work state has a reciprocal agreement with the employee state of residence, the system uses the employee residence state from the F060116 table.
W: Uses only the work state to calculate taxes.
- Source of SUI/SDI Reporting (source of state unemployment insurance/state disability insurance reporting)
-
Enter the work tax area that is used for SUI reporting. You can specify that the system use either the resident state or the work state, regardless of where the employee worked. FUI is calculated in the same state where SUI is calculated. Weeks worked are the number of weeks that the employee worked in the taxed state. Values are:
N: Use the work tax area in the time entry record to determine SUI. This is the default value.
R: Always use residence tax area from the F060116 table, even if the time entry record is different.
W: Always use work tax area from the F060116 table, even if the time entry record is different.
- Tax Method
-
Enter a code that specifies the tax method that the Vertex payroll-tax calculation system uses to calculate certain taxes. The codes are defined in UDC 07/TM.
This code can also determine the form that the employee receives for year-end tax reporting. For example, when you enter C, a contract employee receives IRS Form 1099-M rather than IRS Form W-2. If a form is not specified in the Description 2field, the system generates IRS Form W-2.
For employees who are paid multiple times within one pay period, the system should review previous payments within the same pay period and then adjust tax amounts. To specify this function, enter S.
If a tax method exists for an employee in addition to the normal tax method that is set up in the F060116 table, the system can use the alternative tax method to interactively process interim payments. To specify this function, enter Z.
Some values, such as S and Z, might require additional setup in the UDC table.
|
See Also: |
12.3.5 Entering a Group of Gross-Up Payments
Access the Calculate Group Gross Up form.
Figure 12-3 Calculate Group Gross Up form
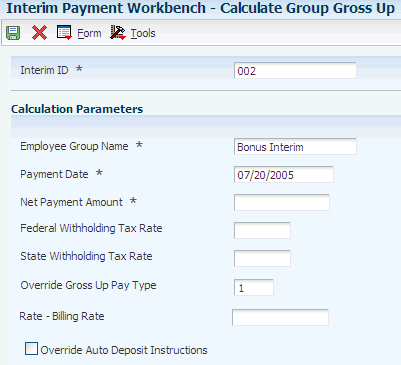
Description of ''Figure 12-3 Calculate Group Gross Up form''
- Federal Withholding Tax Rate and State Withholding Tax Rate
-
Enter the withholding tax rate. Values are:
1: For a deduction, benefit, or accrual, the meaning of this value depends on the method of calculation. The method determines whether the deduction is a flat monetary amount, a percentage, or a multiplication rate. Table method DBAs, depending on which table method they use, can either use this amount in the calculation or ignore it. If exceptions to the table calculation exist, you can override the table code in the detail area, set up a flat monetary DBA amount, or override the amount with a one-time override for a timecard.
2: For a pay type, amounts that are entered in this field override the hourly rate.
- Employee Group Name
-
Enter the user-defined name for an employee group.
- Net Payment Amount
-
Enter the net amount of the payment.
Before the net-deduction phase of the pre-payroll process runs, this amount equals gross pay, less taxes and less deductions that are based on gross pay.
After the net-deduction phase, this amount represents the true net pay.
For additional information that is related to this calculation process, see data items NPY1 and DESQ.
- Override Gross Up Pay Type
-
Enter the code that defines the type of pay, deduction, benefit, or accrual.
Pay types are numbered from 1 to 999. Deductions and benefits are numbered from 1000 to 9999.
- Override Auto Deposit Instructions
-
Select this option to create a check for the employee, regardless of the employee's automatic deposit instruction. The system cannot create an automatic deposit for a manual interim check.
12.3.6 Creating Interims with the Time Entry Interim Generator
Access the time entry program that you use to enter timecards.
To create interims with the Time Entry Interim Generator:
-
Complete the steps to enter timecard records.
-
Select Payroll Workbench (G07BUSP11), Interim Payment Workbench.
-
Complete the Interim ID field and click Find on Work With Interims Workbench.
-
Select a record, and then from the Row menu, select Process Interims and then select Process Single.
If you are running multiple versions of the Interim Calculation program, from the Row menu, select Process Interims and then select Process Multiple.
-
Click OK on Process Interims Confirmation.
|
See Also: |
12.4 Reviewing and Revising Interim Payments
This section provides an overview of reviewing and revising interim payments and discusses how to review and revise interim payments.
12.4.1 Understanding Reviewing and Revising Interim Payments
You can review interim payments before you create payments and reports, and before you process them in a payroll cycle. If you find an error in an interim payment before you process the payment in a payroll cycle, you can correct the information. After you correct and process the interim payment, the system recalculates the gross amount, taxes, and DBAs. You can make unlimited changes to the interim payment until you process it through a payroll cycle. If you find mistakes on the interim payment after you process it through a payroll cycle, you can void it and then enter a new interim payment with the correct information.
You can review individual interim payments, or you can review all interims that are associated with a specified interim payment ID.
|
Note: You cannot change the type of interim payment after you have entered the payment into the system. If an interim payment was entered using the wrong payment type, you must delete the interim and then enter another interim with the correct payment type. |
12.4.2 Forms Used to Review and Revise Interim Payments
12.5 Printing Interim Payments
This section provides an overview of printing interim payments, lists prerequisites, and discusses how to:
-
Set up payment information.
-
Print interim payments by interim ID.
-
Print selected interim payments.
-
Reset the print status for interim payments by interim ID.
-
Reset the print status for selected interim payments.
12.5.1 Understanding Printing Interim Payments
You typically print interim payments when you process those payments in a payroll cycle. However, in some cases, you might need to issue an interim check to one or more employees or generate their automatic deposit advice and bank information before you are ready to process the interims in a payroll cycle. In these cases, you can create checks, advices, and automatic deposit information for the bank using the Interim Payment Workbench, and then process the interims in a payroll cycle at a later date. You can create payments for all of the interim checks that are associated with an interim ID, or you can create payments for selected interims only.
For example, if an employee's regular payroll payment is incorrect, you can void the payment and create an interim payment for the employee with the correct information. To reduce the inconvenience to the employee, you might print an interim check immediately, instead of waiting until you process the payroll cycle that includes interim payments. If the employee typically receives payroll payments using automatic deposit, you can use the Interim Payment Workbench to print the advice slip and create the automatic deposit information to send to the bank.
When you process a full payroll cycle that includes these interim payments, the system does not create the payments again, either for printed payments or for automatic deposit information.
If an incident such as a printer failure prevents one or more interim payments from printing, or if you determine that the information on a printed payment is incorrect, you can reset the print status for a payment and then reprint it.
Before you can print payments from the Interim Payment Workbench, you must set up payment information. This information is used to identify which versions of the payment programs the system uses to create interim payments.
|
Note: If you print interim payments using the Interim Payment Workbench, the system uses the dates that are associated with the interim payment when it updates employee history. When you print interim payments during the regular payroll cycle, the system uses the dates that are associated with the payroll process to update employee history.If you create manual interim payments (which are not printed during the payroll process) or when you use the Interim Payment Workbench, the system updates employee history using the dates that are associated with the interim payment. |
12.5.2 Prerequisites
Before you complete the tasks in this section:
-
Enter the interim payments.
-
Set up a report model for interim payments if you want to produce reports during the printing process.
12.5.3 Forms Used to Print Interim Payments
12.5.4 Setting Up Payment Information
Access the Print Payment Setup form.
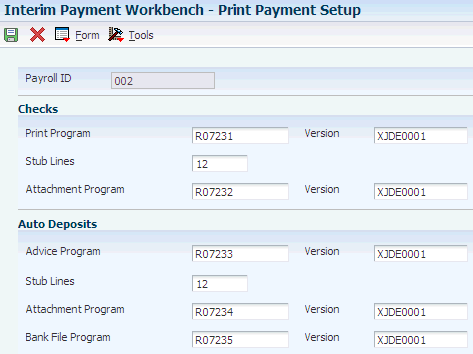
- Print Program
-
Indicates the program that prints payroll checks.
- Stub Lines
-
Enter the number of lines to print on the automatic deposit advice.
- Attachment Program
-
Indicates the program that prints the automatic deposit advice attachments.
- Advice Program
-
Indicates the program that prints the automatic deposit advices.
- Bank File Program
-
Indicates the program that creates the automatic deposit file.
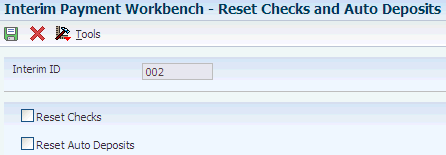
12.5.7 Resetting the Print Status for Interim Payments by Interim ID
Access the Reset Checks and Auto Deposits form.
Figure 12-5 Reset Checks and Auto Deposits form
Description of ''Figure 12-5 Reset Checks and Auto Deposits form''
12.6 Resetting and Reassigning Interim Payments
This section provides an overview of resetting and reassigning interim payments and discusses how to:
-
Reset or reassign interim payments by interim ID.
-
Reset or reassign selected interim payments.
12.6.1 Understanding Resetting and Reassigning Interim Payments
After you enter interim payments, you might find that the information on the interim payments is incorrect. If you do not want to delete and re-enter the interim payments, you can reset the calculations that are associated with the payments. After you reset the calculations for the payments, you can revise the incorrect information and then recalculate the payments. You can reset all interim payments that are associated with a specified interim ID, or you can reset the calculations for a specified payment. When you reset the calculations that are associated with an interim payment, you delete from the system all of the calculated amounts, such as taxes and DBAs, that are associated with that interim. Therefore, after you reset an interim ID and correct the information for the associated payments, you must recalculate the payments to restore all calculated values in the system.
You can also reset interim header records. When you do, the system deletes the interim payment header information, but does not delete the timecards that are associated with the interim payments. You might use this option if you have created interim payments using the Time Entry Interim Generator, but later decide that you do not want to process those timecards as interim payments. By resetting the interim header records, you delete the interim payments but keep the timecard records intact. Those timecards can then be processed within a regular payroll cycle.
In addition, you can reassign interim payments from one interim ID to another. You might do this if you want to print all interim payments that are currently in the system, but you want to print payments only once. In this scenario, you can reassign interim payments from several interim IDs to one interim ID. After you have reassigned all interim payments to one interim ID, you can use that ID and complete the steps to print payments.
|
Note: When you reset calculations for interim payments, you can reset all payments that are associated with an interim ID, or you can reset only those payments that have not been printed already. The system uses the processing options for the Work With Interims Workbench program (P07210I) to determine whether to reset printed payments. |
You would typically reset interim header records and reassign interim payments to another interim ID using the Interim Payment Workbench. However, if you are creating interim payments using the Time Entry Interim Generator, you might want to specify the interim payments to reset or reassign (or both) using data selection other than interim ID. To do this, you can process the reset and reassign options by running the Reset Interim Payment Header Records program (R07350I). You can access this program by selecting Advanced and Technical operations (G07BUSP3), Reset/Reassign Payment Headers.
|
Note: You can reassign interim payments only to a different interim ID or reset interim header records for unprocessed interim payments. Therefore, if you enter interim payments using the interactive method, or if you have already selected the Process selection from the Work With Interims Workbench menu, you must reset the calculations of the interim payments before you can reassign them to a different interim ID or reset the interim header records.After you reassign interim payments to an interim ID, you must reprocess those payments to restore the payment calculations in the system. |
12.6.2 Forms Used to Reset and Reassign Interim Payments
12.6.3 Resetting or Reassigning Interim Payments by Interim ID
Access the Reset/Reassign Interim ID form.
Figure 12-6 Reset/Reassign Interim ID form
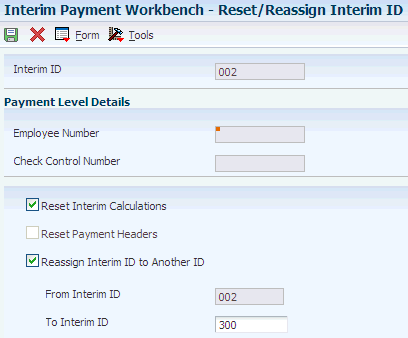
Description of ''Figure 12-6 Reset/Reassign Interim ID form''
12.6.4 Resetting or Reassigning Selected Interim Payments
12.7 Creating Reports for Interim Payments
This section provides an overview of reports for interim payments, lists prerequisites, and discusses how to create reports for interim payments.
12.7.1 Understanding Reports for Interim Payments
Using the Interim Payment Workbench, you can create reports for all interim payments that are included in a specified interim ID. You can create reports to verify whether the information that is included in the interim payments is correct before you process the payments through a payroll cycle.
You can generate reports using the Interim Payment Workbench in three ways. If you are creating interim payments using batch processing, you can set up reports to print when you select Process from the Work With Interims Workbench. You can also set up reports to print when you print interim payments from the Work With Interims Workbench. Finally, you can set up reports to print when you launch reports from the Interim Payment Workbench.
To create reports using the Work With Interims Workbench, you set up a report model that specifies which reports the system creates for interim payments. You must enter this report model in the processing options for the Work With Interims Workbench program (P07210I). You can then set up the reports that you want to print for each interim ID by selecting reports from the report model that you have entered in the processing options. If you leave this processing option blank, the system uses the default report model, which includes these reports for interim payment processing:
| When the Report is Produced | Report Name |
|---|---|
| Process Interims (Step 6) | R073012 - Payroll Register |
| Process Interims (Step 6) | R073013 - Summary Payroll Register |
| Process Interims (Step 6) | R073051 - Time and Pay Entry Journal |
| Process Interims (Step 6) | R053191 - Payroll Exception Report |
| Interim Print Payments (Step 7) | R07238 - Payroll Payment Register |
| Interim Reports Only (Step 8) | R073665 - Employee Social Security Register |
| Interim Reports Only (Step 8) | R053001 - Time and Pay Entry Register |
| Interim Reports Only (Step 8) | R073012 - Payroll Register |
| Interim Reports Only (Step 8) | R073013 - Summary Payroll Register |
| Interim Reports Only (Step 8) | R073053 - D/B/A Transaction Audit Report |
| Interim Reports Only (Step 8) | R073062 - D/B/A-Register |
| Interim Reports Only (Step 8) | R073170 - Federal Tax Distribution Summary |
| Interim Reports Only (Step 8) | R773162 - Provincial Tax Distribution Summary (Canada) |
| Interim Reports Only (Step 8) | R773170C - Tax Distribution Summary - Federal (Canada) |
| Interim Reports Only (Step 8) | R77323 - Employee Earnings & Tax Register (Canadian) |
| Interim Reports Only (Step 8) | R773660 - Employment Insurance Register (Canada) |
12.7.2 Prerequisites
Before you complete the tasks in this section:
-
Create a report model to use for interim payment reports.
-
Enter the report model that you created for interim payments in the processing options for the Work With Interims Workbench program (P07210I).
12.7.3 Form Used to Create Reports for Interim Payments
12.7.4 Creating Reports for Interim Payments

12.8 Deleting Interim Payments
This section provides an overview of interim payment deletion and discusses how to delete interim payments.
12.8.1 Understanding Interim Payment Deletion
If you have not yet processed an interim payment in a payroll cycle, you can delete the interim payment. However, you cannot delete an interim payment if the system is currently in the process of printing the payment. If you have already printed the payment, you must reset it before you can delete the payment from the system.
When you delete an interim payment, consider that:
-
If you delete the timecards that are associated with the interim payment that you are deleting, the system does not delete any timecards that you have posted to the general ledger during a special timecard post.
-
If you do not delete the timecards that are associated with the deleted interim payment, the system can include the timecards in future payroll cycles.
-
If you do not delete the DBA transactions that are associated with the deleted interim payment, the system can include the transactions in future payroll cycles.
Important:
You cannot delete an interim payment by clicking the Cancel button on the Interim Entry form. To maintain the integrity of the payroll history, you must follow the steps in this task to delete an interim payment.
12.8.2 Forms Used to Delete Interim Payments
12.8.3 Deleting Interim Payments
Access the Work With Interim Payments form.
To delete selected interim payments:
-
Select the record in the detail area that you want to delete.
Note:
To select multiple interim payments in the detail area, hold down the Shift key and select all of the interim payments that you want to delete. -
Select Reset Functions and then Reset Print Pymts from the Row menu if you have printed the check already.
-
Select one of these options on Reset Checks and Auto Deposits, and then click OK:
-
Reset Checks
-
Reset Auto Deposits
-
-
Click OK on Reset Checks and Auto Deposits Confirmation.
-
Click Delete on Work With Interim Payments.
-
Click OK on Confirm Delete.
-
Select the Delete Timecard Transactions? option on Delete Interims to delete all of the timecards that are associated with the interim payment.
-
Select the Delete DBA Transactions option to delete all of the DBA records that are associated with the interim payment.
-
Click OK.
12.9 Processing Interim Payments in a Payroll Cycle
This section provides an overview of processing interim payments in a payroll cycle, lists a prerequisite, and discusses how to process interim payments in a payroll cycle.
12.9.1 Understanding Processing Interim Payments in a Payroll Cycle
You process interim payments to create payments, generate reports and journal entries, and update employee payroll history information. You can create printed payments, automatic deposit information, and reports using the Interims Workbench, or you can create this information during a regular payroll cycle. Regardless of the method that you use to create printed payments, automatic deposit information, and reports, you must process interim payments in a regular payroll cycle to create journal entries and update employee payroll history.
You can process interim payments through a regular payroll cycle using one of two methods:
| Method | Description |
|---|---|
| Merge interim payments | The system processes interim payments with the regular payroll payments. The system prints computer interim payments along with the regular payroll payments. To be included in the payroll cycle, an interim payment must have a payment date that occurs on or earlier than the payment date for the payroll cycle. |
| Process interim payments only | The system processes interim payments only, and prints all computer interim payments that are included in the payroll cycle. To be included in the payroll cycle, an interim payment must have a payment date that occurs on or earlier than the payment date for the payroll cycle. |
|
Note: If you create printed payments or automatic deposit information for interims using the Interim Payment Workbench, the system will not generate those payments again when the payments are included in a regular payroll process. |
12.9.1.1 Printing Interim Checks
In some cases, you might need to give an employee an interim check before you are ready to process that interim check in a payroll cycle. In this case, you can print the check and then process the payroll cycle at a later date.
When you process the payroll cycle that includes this interim check, the system does not print the check again. This printing feature is available for checks only. You cannot print automatic deposits before you process them in a payroll cycle.
12.9.2 Prerequisite
Create a payroll ID to use for processing interim payments.