6 Processing Receipts
This chapter contains the following topics:
-
Section 6.3, "Entering Unapplied Receipts and Prepaid Rent Receipts"
-
Section 6.5, "Applying Receipts to Invoices Using Type Input Codes"
6.1 Understanding Receipts Processing
An important step in the accounts receivable process is to enter payments that you receive from the tenants to evaluate your current cash position. You use the RE Receipts Entry program (P15103) to enter and maintain various types of receipts.
The process to enter receipts and adjust invoices in the JD Edwards EnterpriseOne Real Estate Management system is similar to the process that is used in the JD Edwards EnterpriseOne Accounts Receivable system, with these exceptions:
-
The JD Edwards EnterpriseOne Real Estate Management system uses lease numbers and bill codes to apply receipts.
The bill codes can have different priorities that affect how the system applies payments to invoices. You can apply payments automatically by bill code priority.
-
The P15103 program has additional processing options that are specific to processing real estate receipts.
6.2 Understanding Dates and Document Types
When you enter and process manual receipts, you must be familiar with how the system uses receipt dates and general ledger dates. Because document types are part of the key data that the system uses to locate transactions, you must also be familiar with the document types that the system assigns to invoice and receipt records.
6.2.1 Receipt Dates and General Ledger Dates
When you enter a receipt, you must enter both a receipt date and a general ledger date:
-
Receipt date
The date that you enter for the receipt date can be the date that you entered the receipt into the system or the date on the customer's check. The system does not use the receipt date for any accounting purposes. The system maintains this date for information only.
-
General ledger date
The system uses the general ledger date for exchange rate calculations to determine whether a discount is earned, and to update account information when you post the receipt. Because the system uses the general ledger date for so many reasons, you cannot change the general ledger date after you enter the receipt.
6.2.2 Invoice Document Types
Invoice document types can be user-defined or system-defined (RR, for example). Invoice transactions can exist in the system autonomously, that is, they do not depend upon the existence of other transactions. The system stores invoices in the Customer Ledger table (F03B11).
The system assigns the document type for all receipt transactions. Receipts cannot exist without a corresponding record in the F03B11 table. The document type that the system assigns to a receipt is stored in the matching Document Type field, unless the receipt generates an invoice record.
The receipt programs generate the following invoice records:
-
Unapplied receipts (RU)
-
Chargebacks (RB)
-
Deductions (R5)
-
Drafts (R1)
When you display open items for a customer, each pay item consists of an invoice document type. When you apply the receipt to the invoice, the system generates a receipt document for the invoice.
This table describes common invoice document types:
| Document Type | Description |
|---|---|
| RI (Regular Invoice) | Unless you modify the processing option in the Invoice Entry MBF Processing Options program (P03B0011), the system assigns RI to all invoice documents that are created by the JD Edwards EnterpriseOne Sales Order Management system, as well as those that you enter manually using Standard Invoice Entry (P03B11) or Speed Invoice Entry (P03B11SI). |
| RM (Credit Memo) | Unless you modify the processing option in the Invoice Entry MBF Processing Options program (P03B0011), the system assigns RM to credit memos that you enter manually using P03B11 or P03B11SI. |
| RR (Recurring Invoice) | The system assigns RR to all recurring invoices that you enter with frequency and number of payments. |
| RN (Manual Billing) | The system assigns RN to all invoices that are generated from manual billings. |
| RD (Recurring Billing) | The system assigns RD to all invoices that are generated from the recurring billings. |
| RH (Expense Participation) | The system assigns RH to all invoices that are generated from the expense participation billings. |
| RJ (Sales Overage) | The system assigns RJ to all invoices that are generated from the sales overage billings. |
| RL (Escalation) | The system assigns RL to all invoices that are generated from the escalation billings. |
| RT (AR Fee & Interest) | The system assigns RT to all invoices that are generated from the fee and interest billings. |
| RB (Chargeback Invoice) | The system assigns RB to invoice chargeback records that are generated when you enter a receipt. The chargeback indicates that you are pursuing payment for an unearned discount or disputed invoice amount. |
| R5 (Deduction) | The system assigns R5 to invoice deduction records that are generated when you enter a receipt. The deduction indicates an unpaid amount that must be resolved. |
| R1 (Draft) | The system assigns R1 to draft invoice records. A draft is a promise to pay a debt. This document can be a paper record or an electronic record. A draft includes the amount to be paid, the due date, banking information and, possibly, information about underlying liabilities. |
| RF (Delinquency Fee) | The system assigns RF to fee invoices. The fee invoice represents the total amount of all fees that are generated for all eligible invoices for the customer for the time period that is specified. |
| NP (Partial NSF) | The system assigns NP to standalone invoice records that are generated for the insufficient funds (NSF) amount when you enter a partial NSF draft. |
6.2.3 Receipt Document Types
When you apply the receipt to an invoice, the system creates two records:
-
A receipt header record that stores information such as the amount of the receipt, the check number and the receipt and general ledger dates.
The system stores receipt header records in the Receipts Header table (F03B13).
-
A receipt detail record that stores the amount of the receipt that is applied to each invoice.
The system stores receipt detail records in the Receipts Detail table (F03B14).
The system assigns receipt document types to the receipt detail record in the F03B14 table.
This table describes receipt document types:
| Document Type | Description |
|---|---|
| RC (receipt) | The system assigns this document type when you enter a receipt. |
| RO (void receipt) | The system assigns this document type when you void a receipt. |
| RS (spread receipt) | The system assigns this document type when you apply a credit memo to an invoice on a zero-amount receipt. The system does not assign this document type when you apply an unapplied receipt to an invoice. |
| RV (insufficient funds receipt) | The system assigns this document type when a customer does not have sufficient funds in the bank to pay the payment. |
| RU (unapplied receipt) | The system assigns this document type to a receipt that is not applied to a specific invoice. The system applies this receipt to the customer's overall account to reduce the open balance. |
| RL (logged receipt) | The system assigns this document type to a receipt that is not associated with a customer or payor. |
| RR (rounding record) | The system assigns this document type when the receipt is either fully applied on the foreign side, but not fully applied on the domestic side, or fully unapplied on the foreign side, but not fully unapplied on the domestic side. This rounding record is at the receipt level and is not associated with any particular invoice pay item. |
6.3 Entering Unapplied Receipts and Prepaid Rent Receipts
This section provides overviews of unapplied receipts and prepaid rent receipts, lists a prerequisite, and discusses how to:
-
Set processing options for RE Receipts Entry (P15103).
-
Enter unapplied and prepaid receipts.
6.3.1 Understanding Unapplied Receipts
The fastest and easiest method to determine the current cash position for the business and to credit the tenant's account is to enter unapplied receipts. Unapplied receipts enable you to apply a receipt to a tenant's account without applying it to a specific invoice or group of invoices. For example, you might want to include the receipt in the daily bank deposit and later apply it to the appropriate invoices. Unapplied receipts remain open until you apply them to the appropriate invoices. You also use unapplied receipts to enter security deposits.
This table lists the tables that the system updates and describes the record that the system creates when you enter an unapplied receipt:
| Table | Description |
|---|---|
| Customer Ledger (F03B11) | Because a receipt document must be associated with an invoice record, the system generates an invoice record for the unapplied receipt and assigns it a document type RU.
The invoice record for the unapplied receipt:
|
| Receipts Header (F03B13) | The receipt record for the transaction. |
| Receipts Detail (F03B14) | The receipt record that is associated with the invoice that it pays.
Unapplied receipt (RU), chargeback (RB), and deduction (R5) invoice records, which are generated from the receipt application, have a corresponding detail record that is used for posting purposes. The system creates the invoice records (F03B11) with a posting status of D. You must post the receipt records (F03B14) to update the general ledger. |
After you enter unapplied receipts, you must post them. When you post unapplied receipts, the system debits the bank account and credits the AR trade account that is associated with the automatic accounting instruction (AAI) item RCUC, unless you override the Unapplied Bill Code field on the receipt.
6.3.1.1 Issuing Refund Checks
There may be cases in which you must reimburse funds to a tenant. For example, you may reimburse funds if a tenant overpays or makes a payment in error. In those cases, you can convert unapplied receipts to credit memos to issue a refund check to the tenant. You can issue a refund check for unposted or posted unapplied receipts.
See "Understanding How to Convert Unapplied Receipts to Credit Memos" in the JD Edwards EnterpriseOne Applications Accounts Receivable Implementation Guide
6.3.2 Understanding Prepaid Rent Receipts
It is common for a landlord to receive rent payments before the month that the rent is due. Public companies are required to record these early rent payments in an unearned revenue liability account in the month the payment was received. You can use the JD Edwards EnterpriseOne Real Estate Management system to enter these types of rent payments as prepaid rent receipts.
Prepaid rent receipts are similar to unapplied receipts. The system classifies an unapplied receipt as a prepaid rent receipt under the following circumstances:
-
The Allow Prepaid Rent processing option in the RE Receipts Entry program (P15103) is set to 1.
-
The Prepaid Rent Bill Code field on the RE Receipts Entry form contains a valid bill code.
-
The GL date of the receipt is less than the invoice date that the receipt is applied to.
The system does not consider a receipt to be prepaid rent if the GL date of the receipt is in the same period or a later period as the invoice that the receipt is being applied to.
When working with prepaid rent receipts, you enter the receipt when the payment is received and then apply the rent payment by selecting or loading an invoice. The system automatically creates the additional accounting entries during the posting process. In the month that you receive the prepaid rent, the system debits the bank and credits the Unearned Revenue -Prepaid Rent liability account. On the date of the invoice, the system debits the Unearned Revenue -Prepaid Rent liability account and credits the Tenant Receivables (A/R) account. Therefore, when working with prepaid rent receipts, the system creates additional records in the Receipts Detail table (F03B14).
|
Note: The system does not support prepaid rent for receipt entry types other than simple match, such as a chargebacks or write-offs. |
If the receipt amount is the same as the invoice amount, it is a simple invoice match. For example, if a billing invoice is created for March 1st for 1,000.00 and payment is received on February 20th for 1,000.00, the system creates the following entries when you run the post program:
| G/L Date | Account Number | Account Description | Debit/Credit | Amount |
|---|---|---|---|---|
| February 20th | 15020.1110.FIB | First Interstate Bank | Debit | 1,000.00 |
| February 20th | 15555.4300 | Unearned Revenue -Prepaid Rent | Credit | 1,000.00 |
| March 1st | 15555.4300 | Unearned Revenue -Prepaid Rent | Debit | 1,000.00 |
| March 1st | 15555.1211 | Tenant Receivables | Credit | 1,000.00 |
If the receipt amount is greater than the invoice amount, it is an overpayment and the system applies the additional receipt amount to unapplied cash. For example, if a billing invoice is created in March for 1,000.00 and payment is received on February 20th for 1,200.00, the system creates the following entries when you run the post program:
| G/L Date | Account Number | Account Description | Debit/Credit | Amount |
|---|---|---|---|---|
| February 20th | 15020.1110.FIB | First Interstate Bank | Debit | 1,200.00 |
| February 20th | 15555.4300 | Unearned Revenue -Prepaid Rent | Credit | 1,000.00 |
| February 20th | 15555.3000 | Unapplied Cash | Credit | 200.00 |
| March 1st | 15555.1211 | Tenant Receivables | Credit | 1,000.00 |
| March 1st | 15555.4300 | Unearned Revenue -Prepaid Rent | Debit | 1,000.00 |
Also, there may be a situation in which you do not specifically enter a receipt as prepaid rent, but the system processes the receipt as prepaid because the transaction has met the conditions for prepaid rent processing. If you enter and post a receipt as unapplied cash, and then later you spread the unapplied cash to a single future invoice or multiple future invoices, you have effectively created a prepaid rent receipt.
For example, you might enter and post an unapplied cash receipt from February 20th for 1,000.00 and then decide to associate that receipt with an invoice from March 1st for 1,000.00. In this case, the system prompts you to enter a prepaid rent bill code, since the receipt meets the conditions for prepaid rent processing. The system creates the following entries when you run the post program:
| G/L Date | Account Number | Account Description | Debit/Credit | Amount |
|---|---|---|---|---|
| February 20th | 15555.4300 | Unearned Revenue - Prepaid Rent | Credit | 1,000.00 |
| February 20th | 150.1212 | Unapplied Cash | Debit | 1,000.00 |
| March 1st | 15020.1211 | Tenant Receivables | Credit | 1,000.00 |
| March 1st | 15555.4300 | Unearned Revenue -Prepaid Rent | Debit | 1,000.00 |
6.3.2.1 Deleting or Voiding Prepaid Rent Receipts
The system performs different actions depending on which form you use to delete or void a prepaid rent receipt. Review the following scenarios:
-
If you select a prepaid rent receipt and click the Delete button or select Void/Delete from the Row menu on the Work with Customer Receipts Entry form, the system first determines if the prepaid rent receipt is posted. If the prepaid rent receipt is posted, the system marks the receipt as voided in the Receipts Header table (F03B13) and creates new reversing records in the Batch Control Records (F0011) and Receipts Detail (F03B14) tables. The system deletes the additional records that were added to the F03B14 table for prepaid rent receipts. If the prepaid rent receipt is not posted, the system deletes the receipt header record from the F03B13 table and the receipt detail record, along with the additional prepaid rent records, from the F03B14 table.
-
If you select a prepaid rent receipt and click the Delete button or select Void/Delete from the Row menu on the RE Receipts Entry form, the system only deletes the receipt detail records in the F03B14 table. If you select another invoice, the system checks the invoice dates and determines whether to create a prepaid rent receipt or a normal receipt. If you do not select another invoice, the system processes the receipt as an unapplied cash receipt.
See Understanding Deleting and Voiding Receipts
Example: Voiding a Prepaid Rent Receipt in the Same Period as the Associated Invoice
You have a posted prepaid rent receipt from 02/20/2017 for 1,000.00 that is associated with an invoice from 03/01/2017 for 1,000.00. If you void this posted prepaid rent receipt on 03/05/2017, the system creates the following entries:
| G/L Date | Account Number | Account Description | Debit/Credit | Amount |
|---|---|---|---|---|
| 02/20/2017 | 15555.1211 | Tenant Receivables | Debit | 1,000.00 |
| 02/20/2017 | 15555.4300 | Unearned Revenue -Prepaid Rent | Credit | 1,000.00 |
| 03/05/2017 | 15020.1110.FIB | First Interstate Bank | Debit | 1,000.00 |
| 03/05/2017 | 15555.4300 | Unearned Revenue -Prepaid Rent | Credit | 1,000.00 |
Example: Voiding a Prepaid Rent Receipt During the Period In Which it Was Entered
You have a posted prepaid rent receipt from 02/20/2017 for 1,000.00 that is associated with an invoice from 03/01/2017 for 1,000.00. If you void this posted prepaid rent receipt on 02/25/2017, the system creates the following entries:
| G/L Date | Account Number | Account Description | Debit/Credit | Amount |
|---|---|---|---|---|
| 02/25/2017 | 15555.1211 | Tenant Receivables | Debit | 1,000.00 |
| 02/25/2017 | 15555.4300 | Unearned Revenue -Prepaid Rent | Credit | 1,000.00 |
| 03/01/2017 | 15020.1110.FIB | First Interstate Bank | Debit | 1,000.00 |
| 03/01/2017 | 15555.4300 | Unearned Revenue -Prepaid Rent | Credit | 1,000.00 |
Example: Voiding a Prepaid Rent Receipt in a New Calendar Year
You have a posted prepaid rent receipt from 12/15/2017 for 1,000.00 that is associated with an invoice from 01/01/2018 for 1,000.00. If you void this posted prepaid rent receipt on 12/17/2017, the system creates the following entries:
| G/L Date | Account Number | Account Description | Debit/Credit | Amount |
|---|---|---|---|---|
| 12/17/2017 | 15555.1211 | Tenant Receivables | Debit | 1,000.00 |
| 12/17/2017 | 15555.4300 | Unearned Revenue -Prepaid Rent | Credit | 1,000.00 |
| 01/01/2018 | 15020.1110.FIB | First Interstate Bank | Debit | 1,000.00 |
| 01/01/2018 | 15555.4300 | Unearned Revenue -Prepaid Rent | Credit | 1,000.00 |
6.3.3 Prerequisites
Before you complete the tasks in this section, you must complete the following prerequisites:
-
Set up the appropriate offset account for the AAI item RCxxxx, where xxxx is the unapplied bill code. If you do not specify an unapplied bill code value, the system uses RCUC because UC is the default unapplied bill code value.
-
Set up the appropriate offset account for the AAI item RCxxxx, where xxxx is the prepaid rent bill code.
|
See Also:
|
6.3.4 Forms Used to Enter Unapplied and Prepaid Rent Receipts
| Form Name | FormID | Navigation | Usage |
|---|---|---|---|
| Work With Customer Receipts Inquiry | W15103A | Real Estate Receipts (G1513), RE Receipts Entry | Review and select receipt records. |
| RE Receipts Entry | W15103C | On the Work With Customer Receipts Inquiry form, click Add. | Enter unapplied and prepaid rent receipts. |
6.3.5 Setting Processing Options for RE Receipts Entry (P15103)
Processing options enable you to specify the default processing for programs and reports.
6.3.5.1 Display
- 1. Company
- 2. Bank Account
- 3. G/L Date
- 4. Receipt Date
- 5. Payor Number
- 6. Customer Number
- 7. Remark
- 8. Currency
- 9. Exchange Rate
- 10. Payment Instrument
- 11. Cleared/Value Date
- 12. Lease Number
-
Specify whether to retain the company number, bank account, GL date, receipt date, payor number, customer number, remark, currency, exchange rate, payment instrument, cleared/value date, or lease number that you enter on the RE Receipts Entry form. If you are entering similar types of receipts, retaining these values can reduce data entry. Values are:
Blank: Do not retain.
1: Retain.
6.3.5.2 Defaults
Use these processing options to specify default values on the Work with Customer Receipts Inquiry, Receipt Entry, Additional Information, Load Invoices, and Select Invoices forms. When you enter the receipt, you can override any of the values that you enter in these processing options.
- 1. Display Receipt Type
-
Specify which type of receipts to display on the Work With Customer Receipts Inquiry form. Values are:
1: All
2: Unapplied
3: Logged
4: General Ledger
- 2. Date Type
-
Specify the default date type to use for the Date Selection From and Through fields. Values are:
1: Receipt date
2: GL date
- 3. Type Input Code
-
Specify the default type input code for applying receipts to invoices automatically. Use this processing option with the Automatic Application processing option. If you set the Automatic Application processing option to 1 (do not allow auto application), the system ignores this processing option. Values are:
Blank: The system does not use a default value.
10: Simple invoice match.
11: Match auto chargeback discount.
15: Match with write-off.
16: Match with chargeback.
17: Match with deduction.
- 4. Remark
-
Specify the default remark to assign to receipt detail records. Values are:
Blank: Use the remark from the invoice record.
1: Use the remark from the receipt header.
- 5. Receipt Numbering
-
Specify whether the system assigns the receipt number automatically using the Next Numbers program (P0002). Values are:
Blank: Do not automatically assign the receipt number. You must manually enter the receipt number.
1: Automatically assign the receipt number.
- 6. Deduction Reason Code
-
Specify a user-defined code (UDC) from UDC table 03B/CR that identifies the default deduction reason for entering a deduction amount. If you leave this processing option blank, you must enter the deduction reason code in the detail area on the RE Receipts Entry form.
- 7. Override Company Number
-
Specify the default company number to use on the Load, Select, and Remittance forms. Values are:
Blank: Use the company number from the RE Receipts Entry form.
1: Use * for all companies.
- 8. Bill Code for Unapplied Receipts
-
Specify whether to use the value in the G/L Offset field of the customer record (F03012) as the default value for the Unapplied Bill Code field when you enter unapplied receipts. The system locates the AR trade account based on the bill code that you use. Values are:
Blank: Do not use the value from the customer record. The system uses the first bill code that it locates in the Billing Code Extension table (F1512) that has a value of UNC in the Special Processing Code field.
1: Use the GL offset from the customer record. If the customer record does not have a GL offset defined, the system uses the first bill code that it locates in the Billing Code Extension table (F1512) that has a value of UNC in the Special Processing Code field.
6.3.5.3 Edits
- 1. Receipt Number
-
Specify whether the system requires a receipt number when you enter a receipt. Values are:
Blank: Do not require.
1: Require.
- 2. Write-Offs
-
Specify whether to allow write-offs on receipts. Values are:
Blank: Allow.
1: Do not allow.
- 3. Delete/NSF Unposted Receipts
-
Specify whether to allow the delete and NSF operations on unposted receipts. Values are:
Blank: Allow.
1: Do not allow.
- 4. Overpayment Edit
-
Specify the severity of the error that the system issues when you overpay an invoice. Values are:
0: No edit
1: Warning
2: Error
Note:
When you overpay an invoice, the system displays it as a negative open amount. - 5. Duplicate Receipt Edit
-
Specify the severity of the error that the system issues when a duplicate receipt number is detected. The system searches for duplicate receipt numbers for all records in the Receipts Header table (F03B13), not for individual customers. Values are:
0: No edit
1: Warning
2: Error
- 6. Validate Program ID
-
Specify the action that the system takes when the program ID of a record in the F03B11, F03B13 or F03B14 tables is a value other than the Real Estate Receipts program (P15103). Values are:
0: No error
1: Warning
2: Error
6.3.5.4 Process
- 1. Apply Invoices
-
Specify how to apply receipts to invoices that appear in the detail area when you specify a default type input code. If you leave the Type Input Code processing option on the Defaults tab blank, the system ignores this processing option. Values are:
-
Blank: Apply invoices up to the receipt amount. The system automatically applies invoices up to the receipt amount. Remaining invoices that appear in the detail area are not considered. If you select both credit memos and invoices, you must select credit memos first so that the system can process them.
For example:
Processing option for Type Input Code (Defaults tab) = 10
Processing option for Apply Invoices = Blank (apply up to the receipt amount)
Receipt amount = 100
Invoice amount = 200, due date = June 15, 2007
Credit memo amount = 100, due date = June 30, 2007
When you use the Load feature to display open invoices for the customer, the system displays the invoice record before the credit memo because it has an earlier due date. Because you have type input code 10 specified in the processing option, the system applies the receipt amount of 100 to the invoice and leaves the invoice open for 100. The system does not consider the credit memo because the full amount of the receipt is applied to the first invoice.
-
1: Apply all invoices. The system applies the receipt to the invoice open amount, regardless of whether the receipt amount is exceeded. The system considers all invoices and credit memos that appear in the detail area.
Note:
This processing option also affects how the system processes write-offs, chargebacks, and deductions. For example:Processing option for Type Input Code (Defaults tab) = 15
Processing option for Apply Invoices = 1 (apply all invoices)
Processing option for Maximum Write-off Amount = 25 (automatic and manual)
Receipt amount = 80
Invoice amount = 100
The system displays the type input code as 15 (manual write-off), applies 100 to the invoice, and ignores the write-off. The system returns an error because the amount that is applied to the invoice exceeds the amount of the receipt. For the system to process the write-off, you must change the transaction payment amount to 80.
-
- 2. Journal Entry Creation Method
-
Specify whether the post program creates one summarized journal entry for a batch of receipts, or one journal entry for each receipt. The system assigns the value that you enter in this processing option to the A/R Post field in the Receipts Header record (F03B13). The post program uses this value to create the journal entry records. Values are:
Blank: Summarized journal entries. The system creates one journal entry with the document type RK for each batch of receipts that you post. The system assigns the receipt batch number as the document number of the journal entry. To use this method, ensure that the offset method in the AR Constants equals B (batch mode) and the batch does not contain any foreign transactions.
1: Detail journal entries. The system creates one journal entry with the document type RC for each receipt in the batch. The system uses Next Numbers for journal entry documents (system 09) to assign the document number to the receipt journal entry.
To provide an audit trail, the system updates these fields in the Receipts Detail table (F03B14) with the journal entry information:
JE document type (RZDCTG)
JE document number (RZDOCG)
JE document company (RZKCOG)
- 3. Display Invoices
-
Specify whether to display all invoices or only invoices with an approved pay status. Values are:
Blank: Display all invoices.
1: Display only approved invoices.
6.3.5.5 Currency
- 1. Edit Effective Date
-
Specify whether to validate the effective date that is used to retrieve the exchange rate against the GL date that you enter on the receipt. Values are:
Blank: Do not validate.
1: Validate. The system issues a warning when the effective date of the exchange rate that is retrieved from the Currency Exchange Rates table (F0015) is not in the same period as the GL date of the receipt.
- 2. Alternate Currency Receipts
-
Specify whether to allow the payment of an invoice in an alternate currency (a currency other than the base or transaction currency of the invoice). Values are:
Blank: Do not allow.
1: Allow.
6.3.5.6 Chargeback
- 1. Pay Status
-
Specify a code from UDC 00/PS that indicates the default pay status to assign to chargeback invoice records. If you leave this processing option blank, the system uses the value that is set up in the Data Dictionary for item PST.
- 2. Date Option
-
Specify the invoice date and net due date to assign to chargeback invoice records. Values are:
Blank: Use the receipt GL date.
1: Use the corresponding dates from the invoice that is used to generate the chargeback.
- 3. Reason Code
-
Specify the default reason code from UDC 03B/CB to assign when you enter a chargeback amount. If you leave this processing option blank, you must enter the chargeback reason code manually.
6.3.5.7 Auto Write-Off
These processing options activate the automatic write-off feature and enable you to establish write-off limits for both underpayments and overpayments. You must designate the write-off reason code that the system uses when you activate the automatic write-off feature. To activate the automatic write-off feature, you must enter values in all four processing options.
- 1. Maximum Underpayment Amount
-
Specify the limit to use to write off underpayments. If the difference between the payment amount and open amount of the invoice is equal to or less than the amount that is specified, the system automatically writes off the remaining amount when you enter the receipt.
- 2. Underpayment Reason Code
-
Specify whether to activate the automatic write-off process, and specify the default reason code the system assigns when it automatically writes off an underpayment. Write-off reason codes are defined in UDC 03B/RC. You must also set up a corresponding AAI item (RAxx, where xx is the reason code) for the write-off reason code that you specify.
- 3. Maximum Overpayment Amount
-
Specify the maximum amount for which the system writes off overpayments. If the difference between the payment amount and the open amount of the invoice is equal to or less than the amount that is specified, the system automatically writes off the remaining amount when you enter the receipt.
Enter the value as a negative amount.
- 4. Overpayment Reason Code
-
Specify whether to activate the automatic write-off process, and specify the default reason code for the system to assign when it automatically writes off an overpayment. Valid write-off reason codes are defined in UDC 03B/RC. You must also set up a corresponding AAI item (RAxx, where xx is the reason code) for the write-off reason code that you specify.
6.3.5.8 Mnl Write-Off
These processing options enable you to establish write-off limits for both underpayments and overpayments, and to set up a default write-off reason code.
- 1. Maximum Underpayment Amount
-
Specify the maximum amount for which you can write off an underpayment. If the difference between the payment amount and the open amount of the invoice is equal to or less than the amount that is specified, you can write off the remaining amount when you enter the receipt.
- 2. Maximum Overpayment Amount
-
Specify the maximum amount for which you can write off an overpayment. If the difference between the payment amount and the open amount of the invoice is equal to or less than the amount that is specified, you can write off the remaining amount when you enter the receipt.
Enter the value as a negative amount.
- 3. Write-Off Reason Code
-
Specify the default reason code from UDC 03B/RC that the system assigns when you enter a write-off amount. You must also set up a corresponding AAI item (RAxx, where xx is the reason code) for each write-off reason code that you specify.
6.3.5.9 Discount
- 1. Discount Available
-
Specify whether to allow the discount taken to be greater than the discount available. Values are:
Blank: Do not allow.
1: Allow.
- 2. Discount Applied
-
Specify whether to allow the discount taken to be greater than the payment amount. Values are:
Blank: Do not allow.
1: Allow.
- 3. Grace Period Days
-
Specify how many days to add to the discount due date to extend the period during which the discount can be taken. The system uses this processing option only when it calculates the discount taken automatically.
- 4. Discount Reason Code
-
Specify the discount reason code the system uses when discounts are taken. You can override this code, if necessary, when you enter the receipt. The discount reason code that you enter must exist in UDC 00/DE. You must also set up a corresponding AAI item (RKDxxx, where xxx is the reason code) for each discount reason code that you specify.
6.3.5.10 Match Priority
- 1. Invoice Match
- 2. Sales Order Match
- 3. Customer Reference Match
- 4. Statement Match
- 5. Lease Number Match
-
Specify values in the fields to identify the sequence of search methods that the system uses to select invoices on the Remittance Entry form.
Values are blank, 1,2,3,4, and 5.
If you leave a search method field blank, the system excludes that search method and uses the other methods that you specify. If you leave all search method fields blank, the system searches using all methods in the order that is listed in this definition.
6.3.5.11 RE Edits
- 1. Exclude Type Input Codes
-
Specify the type input codes in the Input Code 1 through Input Code 8 fields to disable when you apply receipts to invoices. You can specify up to eight type input codes to disable. The system returns an error if the type input code is used.
- 2. Automatic Application
-
Specify whether the system applies the receipt to open invoices automatically; use this processing option with the Type Input Code processing option. For example, if the Type Input Code processing option is set to 10, and this processing option is blank (apply receipts automatically), the system automatically copies the type input code that is specified into the corresponding field for all open invoices.
If the Type Input Code processing option is blank, the system ignores this processing option.
Values are:
Blank: Allow auto application.
1: Do not allow auto application.
- 3. Credit Auto Application
-
Specify whether to include credit memos (negative invoices) when the system applies receipts automatically; use this processing option with the Type Input Code processing option. Values are:
Blank: Apply credit memos automatically. Depending on the setting of the Automatic Application processing option and whether the Priority Code Application check box (using the Load feature) is selected, the system either displays credit memos only or displays and applies them.
If you leave the Automatic Application processing option blank, the system includes credit memos when the receipt is applied automatically. Additionally, if you select the Priority Code Application check box when invoices are loaded, the system displays and applies only those credit memos that are assigned bill codes that have a priority application code (PRAP) equal to 00.
If you set the Automatic Application processing option to 1, the system displays the credit memos in the detail area of the form, but does not automatically apply them. Additionally, if the Priority Code Application check box is selected when invoices are loaded, the system displays only those credit memos that are assigned bill codes that have a PRAP equal to 00.
1: Do not apply credit memos automatically. The system does not display or apply credit memos regardless of the setting of the Automatic Application processing option or the setting of the Priority Code Application check box.
- 4. Security Group Display
-
Specify whether the system displays security group records, which are invoices for bill codes with the value S in the Security Group field (SECG) in the Billing Code Extension table (F1512). Values are:
Blank: Display all invoices.
1: Do not display security group records.
- 5. Batch Entry
-
Specify whether the system allows receipts to be entered for multiple companies in the same batch. Values are:
Blank: Allow receipts to be entered in a single batch regardless of the company number.
1: Do not allow receipts to be entered for multiple companies in the same batch; all receipts in the batch must be entered for the same company.
- 6. Unapplied Receipt Company Validation
-
Specify whether to validate the company. Values are:
Blank: Do not validate.
1: Validate. The system issues an error if the company that is entered on the unapplied receipt is different from the company that is entered on the lease. If you do not specify a lease number on the unapplied receipt, the system locates the first lease that is entered for the tenant and validates the company number from that lease.
Note:
This processing option applies only when you enter an unapplied receipt, not when it is applied to invoices. - 7. Process Prepaid Rent
-
Specify whether the system allows you to process payments that are received before the date the rent is due, which is called prepaid rent. Values are:
Blank: The system does not process prepaid rent.
1: The system does process prepaid rent.
- 8. Default Prepaid Rent Bill Code
-
Specify the default prepaid rent bill code that the system displays in the Prepaid Rent Bill Code field on the Cash Receipts Entry form. If you leave this processing option blank, the system does not enter a default prepaid rent bill code.
- 9. Allow Override of Default Prepaid Rent Bill Code
-
Specify whether the system allows you to override the default prepaid rent bill code in the Prepaid Rent Bill Code field on the Cash Receipts Entry form. Values are:
Blank: You can override the default prepaid rent bill code.
1: You cannot override the default prepaid rent bill code.
6.3.5.12 Versions
These processing options enable you to specify the version of the programs that run when you access them from the Form menu. If you leave either of these processing options blank, the system uses the ZJDE0001 version.
- 1. Tenant Ledger (P15222)
-
Specify the version of the P15222 program to use.
- 2. Customer Master (P03013)
-
Specify the version of the P03013 program to use.
6.3.6 Entering Unapplied and Prepaid Rent Receipts
Access the RE Receipts Entry form.
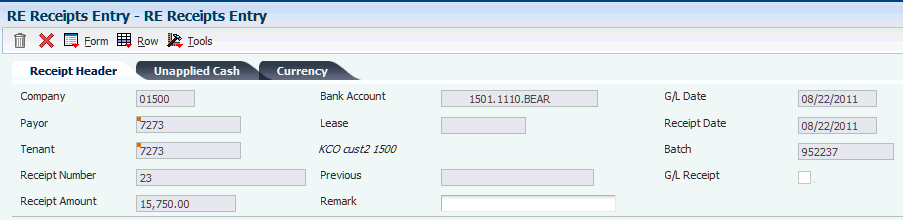
Complete only the header portion of the RE Receipts Entry form when you enter an unapplied receipt.
6.3.6.1 Receipt Header
- Payor
-
Enter the user-defined name or number that identifies an address book record. You can use this number to locate and enter information about the address book record. If you enter a value other than the address book number (AN8), such as the long address or tax ID, you must precede it with the special character that is defined in the Address Book constants. When the system locates the record, it returns the address book number to the field.
For example, if address book number 4100 (Total Solutions) has a long address TOTAL and an asterisk (*) distinguishes it from other entries (as defined in the Address Book constants), you could enter *TOTAL. and the system would display address book number 4100.
- Receipt Number
-
Enter the alphanumeric code that identifies a check or receipt.
Depending on the setting of the processing option for Duplicate Receipt Edit, the system might display a warning or error if the receipt number has already been entered.
- Receipt Amount
-
Enter the actual amount of the receipt or payment.
- Bank Account
-
Enter the value that identifies an account in the general ledger. Enter either a standard account number, a third GL number, an account ID number, or a speed code. The first character of the account number indicates its format. You define the account format in the General Accounting constants.
If you leave this field blank, the system uses the bank account that is set up for AAI RB for the company number.
- Lease
-
Enter a lease number. If you enter a tenant but do not enter a lease number, the system uses the first lease, building, and unit for the tenant as the default value.
- Receipt Date
-
Enter the date on a payment or the date on which a receipt was entered.
In the JD Edwards EnterpriseOne Accounts Payable system, this is the manual payment date and the general ledger date that the system uses when it posts payments. The system also uses this date to retrieve the exchange rate for foreign payments from the Currency Exchange Rates table (F0015).
In the JD Edwards EnterpriseOne Accounts Receivable system, this is the date on the check or the date that you enter the receipt into the system. The receipt date is used for information and reporting purposes only.
- Prepaid Bill Code
-
Enter the bill code that the system uses to track prepaid rent. The system uses this code in accounts receivable and accounts payable to correspond to automatic accounting instructions to determine the account for automatic offsets.
If you specify a default bill code value in the Default Prepaid Rent Bill Code processing option, the system displays that value. If you set the Allow Override of Default Prepaid Rent Bill Code processing option appropriately, you can override the default bill code value.
After you enter a receipt, you cannot change the value in this field.
Note:
The system displays this field only if the Allow Prepaid Rent processing option is set to allow prepaid rent functionality.
6.3.6.2 Unapplied Cash
- Unapplied Bill Code
-
Enter the bill code that the system uses to track unapplied cash. If you leave this field blank, the system uses UC as the default value.
- Building
-
Enter the building. If this lease is for multiple units and you do not enter a building or unit for the lease, the system displays a warning that indicates that the system applies cash to the first building and unit on the lease.
- Unit
-
Enter the unit. If this lease is for multiple units and you do not enter a building or unit for the lease, the system displays a warning that indicates that the system applies cash to the first building and unit on the lease.
- Receipt Reference
-
Enter the alphanumeric value that you can use as secondary reference on the receipt or draft.
- Payment Instrument
-
Enter a code from UDC 00/PY that specifies the method that the customer uses to make payments. Examples include:
C: Check
D: Draft
T: Electronic funds transfer
- Cleared Date
-
Enter the date on which the payment amount was debited or credited to the bank account. The value date is not the date on which the bank reconciled the payment. The system automatically populates this field with automatic payments. If you are making manual payments and have set a processing option to display the value date, you can manually enter the value date.
6.3.6.3 Currency
- Currency
-
Enter the code that identifies the currency of a transaction.
The system automatically populates this field based on the information from the lease, but you can override all information on this tab except the base currency.
- Exchange Rate
-
Enter the exchange rate. The system automatically populates this field based on the information from the lease, but you can override all information on this tab except the base currency.
6.4 Displaying Open Invoices to Enter Receipts
This section provides overviews of the receipt entry process and the methods to display open invoices for tenants, lists a prerequisite, and discusses how to:
-
Load open invoices.
-
Select open invoices.
-
Select open invoices by remittance.
6.4.1 Understanding the Receipt Entry Process
Use the RE Receipts Entry program (P15103) to apply receipts to invoices that were generated from the billing programs in the JD Edwards EnterpriseOne Real Estate Management system. When you use the P15103 program, you specify the invoices that the receipt pays and how to apply the payment. You also use this program to enter security deposits.
|
Note: Do not use the receipt entry programs for the JD Edwards EnterpriseOne Accounts Receivable system. |
You use type input (TI) codes to specify how you want the system to apply payment amounts. Based on the payment amount and the type input code, the system can calculate write-off, chargeback, and deduction amounts, as well as determine whether discounts are earned. You can also overpay invoices to generate credits to tenant accounts. You can use processing options to secure TI codes that you do not use.
You enter receipts in batches, just as you enter invoices in batches. Depending on the settings of the Accounts Receivable constants, the system might display a batch control form where you can enter information about the batch, such as the number of transactions and total amount. To simplify the bank reconciliation process, you might want to group the different types of receipts into different batches.
|
Note: The system assigns a new batch number only when you exit the Work With Customer Receipts Inquiry form (not the Receipts Entry form) and access it again. The status of the batch remains In Use until you exit the Work with Customer Receipts Inquiry form. The system assigns the batch type RB to all records that are generated by the receipts applications. |
When you apply a receipt to invoices, the system creates one document to represent the receipt, which is stored in the Receipts Header table (F03B13), and one document for each invoice to which you apply the receipt, which is stored in the Receipts Detail table (F03B14).
6.4.1.1 Fields That Are Updated During Receipt Entry
When you enter a receipt, the system updates specific fields with the account ID. The system locates the AAI based on how the receipt is applied to invoices. The system uses this account ID when you post the receipt to create automatic entries.
This table lists the fields that the system updates based on the type of payment application and the AAI that the system uses to locate the account:
| Account | Type of Payment Application | Type Input Code | Field Updated | Table Updated | AAI Used |
|---|---|---|---|---|---|
| Bank Account | All | not applicable | GLBA | Receipts Header (F03B13) | The system uses the bank account number that is entered on the receipt. If you leave the Bank Account field blank, the system locates the account based on this hierarchy:
|
| AR Trade | Applied payment | 10 | AID | Receipts Detail (F03B14) | The system does not use an AAI. Instead, the system uses the account in the AID field of the invoice record in the F03B11 table. |
| AR Trade | Unapplied payment | not applicable | AID | Receipts Header (F03B13) | The system locates the account using this hierarchy, where xxxx is the value of the Unapplied Bill Code field:
|
| AR Trade | Payment that generates a chargeback | 11 and 16 | AIDC and AID | Receipts Detail (F03B14) and Customer Ledger (F03B11) | The system locates the account using this hierarchy, where xxxx is the value of the Chargeback GL Offset field:
|
| AR Trade | Standalone chargeback | 26 | AIDC | Receipts Detail (F03B14) | The system locates the account using this hierarchy, where xxxx is the value of the Chargeback GL Offset field:
|
| Discount Taken | Payment with a discount | 10 | AIDD | Receipts Detail (F03B14) | The system uses this hierarchy:
|
| Write-off | Payment with a write-off | 10 and 15 | AIDW | Receipts Detail (F03B14) | The system uses this hierarchy, where xx is the write-off reason code:
|
| Write-off | Standalone write-off | 25 | AIDW | Receipts Detail (F03B14) | The system uses this hierarchy, where xx is the write-off reason code:
|
| Deduction Suspense | Payment with a deduction | 17 | DAID | Receipts Detail (F03B14) | The system uses this hierarchy:
|
| Deduction Suspense | Standalone deduction | 27 | DAID | Receipts Detail (F03B14) | The system uses this hierarchy:
|
6.4.2 Understanding the Methods to Display Open Invoices for Tenants
To specify which invoices a receipt pays, you must display the open invoices in the RE Receipts Entry form. You must complete the header portion of the RE Receipts Entry form, as if you were entering an unapplied receipt, before you can select the method to display open invoices. Regardless of the method that you use to locate open invoices, the system returns the invoices that meet the specified criteria on the RE Receipts Entry form.
This table describes the methods for displaying open invoices in the P15103 program:
| Display Method | Description |
|---|---|
| Load open invoices | The system displays all the open invoices for the specified payor that meet the additional search criteria:
|
| Select open invoices | The system displays all the open invoices that meet the search criteria:
Additionally, you can use the query by example (QBE) row to specify additional search criteria such as lease number or bill code. After the system displays the invoices that meet the search criteria, you select each invoice pay item to pay and click Select. The system displays a check mark next to each invoice when it is selected. To remove the selection, select the invoice and click Select again. After you select the invoices to pay, you can change the search criteria to select more invoices. The system tracks the invoices that you select and displays the total number of selected invoices and the total amount of the selected invoices. Also, the system displays the total open amount of the invoices in the grid and the difference amount between the invoices that are selected in the grid and the total of all invoices in the grid. When you click Close on the Select Invoices form, the system lists all the invoices on the RE Receipts Entry form in the order that you selected them. |
| Select open invoices by remittance | You can enter the remittance information from the bank. Enter information about the invoice, such as the invoice number, in the Invoice Reference field, and the system indicates the number of invoices that meet the search criteria. Use a separate detail line to specify different search criteria.
Note: If the invoice does not contain the information that you enter in the header portion of the form, in addition to the detail information about the invoice, the system cannot locate the invoice record. Processing options enable you to set up a default search order that the system uses to locate the invoices based on the value that is entered in the Invoice Reference field. The system displays all the open invoices that meet the search criteria:
With the exception of statement number, the system uses the invoice reference to locate invoices from the Customer Ledger table (F03B11). The system locates invoices using the statement number from the A/R Notification History Detail table (F03B21). |
Regardless of the method that you use to display open invoices, the system does not retrieve RU (unapplied receipt) or R5 (deduction invoices).
|
Note: The system does not display invoices when the bill code is set up with a spread code value of N. |
See Setting Up Bill Codes and Adjustment Reason Codes.
If you set a processing option to use a default type input code, the system populates the TI field with the value that you specified when you displayed the invoices on the form.
6.4.3 Prerequisite
Before you complete the tasks in this section, you must verify that the processing options on the Match Priority tab of the RE Receipts Entry program (P15103) are set up appropriately if you select invoices by remittance.
6.4.4 Forms Used to Display Open Invoices to Enter Receipts
| Form Name | FormID | Navigation | Usage |
|---|---|---|---|
| Work With Customer Receipts Inquiry | W15103A | Real Estate Receipts (G1513), RE Receipts Entry | Review and select receipt records. |
| RE Receipts Entry | W15103C | On the Work With Customer Receipts Inquiry form, click Add or select an unapplied receipt. | Access the menus to display open invoices. |
| Load Invoices | W15103G | On the RE Receipts Entry form, complete the header portion of the form and select Load from the Form menu. | Load open invoices. |
| Select Invoices | W15103E | On the RE Receipts Entry form, complete the header portion of the form and choose Select from the Form menu. | Select open invoices. |
| Select Invoices by Remittance | W15103H | On the RE Receipts Entry form, complete the header portion of the form and select Remittance from the Form menu. |
|
6.4.5 Loading Open Invoices
Access the Load Invoices form.
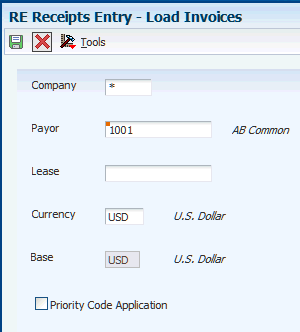
- Company
-
Enter a company number to load invoices for the company that you specify. Enter * to load all invoices for all companies.
- Payor
-
Enter the payor.
- Lease
-
Enter the lease.
- Currency
-
Enter the transaction currency code. The system selects invoices that are entered for the transaction currency code that you specify in this field. Enter * to load invoices for all transaction currency codes.
- Priority Code Application
-
Select this check box to list the invoices by priority code on the RE Receipts Entry form. If you do not select this check box, the system lists the invoices by due date.
6.4.6 Selecting Open Invoices
Access the Select Invoices form.
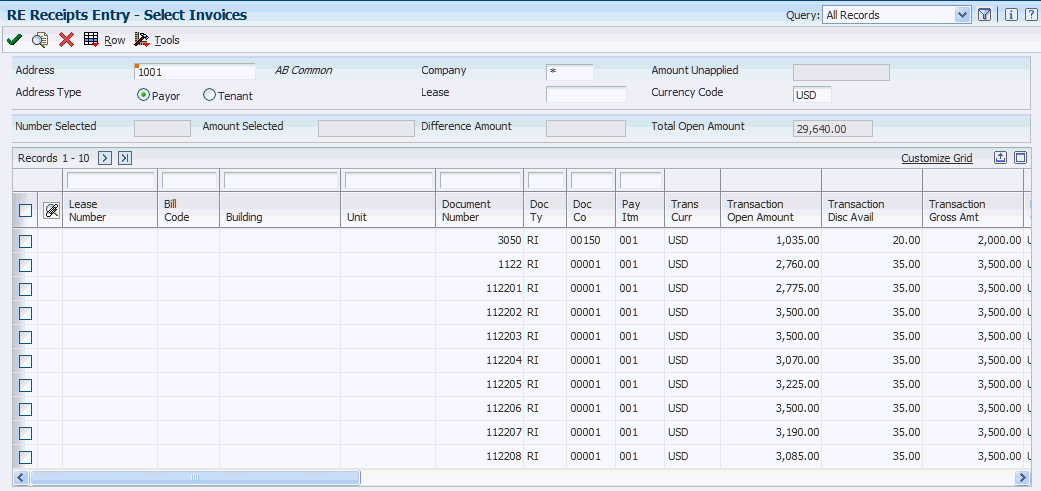
- Number Selected
-
The system displays the total number of selected invoices in the grid.
- Amount Selected
-
The system displays the total amount of selected invoices in the grid.
- Difference Amount
-
The system displays the difference amount between the invoices that are selected in the grid and the total of all invoices in the grid. This value represents the difference amount between the values in the Amount Selected field and the Total Open Amount field.
- Total Open Amount
-
The system displays the total amount of all invoices in the grid.
- Address Number
-
The system displays the tenant number that you entered in the receipt header. You can select invoices for another tenant by entering his or her address number in this field.
- Payor
-
The system displays whether the address book number that is entered specifies a payor or a tenant.
- Tenant
-
The system displays whether the address book number that is entered specifies a payor or a tenant.
- Company
-
Enter * to locate open invoices for all companies.
- Lease
-
The system displays the lease number that you entered in the receipt header. You can select invoices for another lease by overriding the value in this field.
6.4.7 Selecting Open Invoices by Remittance
Access the Select Invoices by Remittance form.
- T I (type input)
-
Enter the code that specifies how the system processes a transaction during receipts entry. The system does not process transactions with a blank or invalid type input.
You can enter a type input code to override the default value that is specified in the processing option. However, the system ignores any value that you enter unless you specify a remittance amount for tracking purposes
- Invoice Reference
-
Enter the identification number that the system uses to locate invoice records for receipt matching. The system can locate invoices by these references:
Invoice number
Statement number
Sales order number
Customer reference number
Shipment number
The system uses the value of this field with the processing options on the Match Priority tab to determine which of the five options the value represents, unless you complete the Override Type field.
The system searches the A/R Notification History Detail table (F03B21) to locate the statement number; therefore, you must use the Statement Notification Refresh program (R03B500X) or the Print Statements program (R155001) to generate statements for the system to locate invoices by statement number.
- Remittance Amount
-
Enter the remittance amount. To keep a running total of the remittance amounts, you can complete the Remittance Amount and Remittance Discount fields to update the remittance totals on the bottom of the form; however, the system does not use the amounts that are entered as the payment and discount amounts on the receipts entry form. You must specify the payment amount on the receipts entry form when the system displays the invoices you that specified.
- Remittance Discount
-
Enter the remittance discount. If you have to keep a running total of the remittance amounts, you can complete the Remittance Amount and Remittance Discount fields to update the remittance totals on the bottom of the form; however, the system does not use the amounts that are entered as the payment and discount amounts on the receipts entry form. You must specify the payment amount on the receipts entry form when the system displays the invoices that you specified.
- Doc Type (document type)
-
Enter a code from UDC 00/DT that identifies the origin and purpose of the transaction. The system reserves several prefixes for document types, such as vouchers, invoices, receipts, and timesheets. The reserved document type prefixes for codes are:
P: Accounts payable
R: Accounts receivable
T: Time and Pay
I: Inventory
O: Purchase order
S: Sales order
- Doc Co (document company)
-
Enter the number that, with the document number, document type, and GL date, uniquely identifies an original document, such as an invoice, voucher, or journal entry.
If you use the Next Numbers by Company/Fiscal Year feature, the Automatic Next Numbers program (X0010) uses the document company to retrieve the correct next number for that company.
If two or more original documents have the same document number and document type, you can use the document company to locate the desired document.
- Pay Item
-
Enter the number that identifies the pay item for a voucher or an invoice. The system assigns the pay item number. If the voucher or invoice has multiple pay items, the numbers are sequential.
- Override Type
-
Enter the number that the system uses to identify which matching process to run to locate invoices. If you leave this field blank, the system uses the matching process that is specified in the processing options for the Standard Receipts Entry program (P03B102). Values are:
1: Invoice Match
2: Sales Order Match
3: Customer Reference Match
4: Statement Number Match
5: Shipment Number Match
To reduce processing time, you can specify the search criteria for the system to use to locate the invoice based on the information that is entered. For example, if you enter an invoice number in the Invoice Reference field, you can enter 1 in this field and the system searches for the invoice by invoice number only and ignores the Match Priority processing options.
- Items Found
-
Displays the number of invoices that the system located based on the information that is provided on the remittance form.
6.5 Applying Receipts to Invoices Using Type Input Codes
This section provides an overview of type input codes, lists prerequisites, and discusses how to apply receipts to invoices.
6.5.1 Understanding Type Input Codes
When you apply receipts to invoices, you use type input (TI) codes to automatically calculate amounts to apply for payments, discounts, write-offs, chargebacks, and deductions.
This table lists the types input codes for standard receipts entry or draft entry and describes how you can use them to automatically calculate any necessary amounts:
| Type Input Code | Calculations |
|---|---|
| 10: Simple Invoice Match | You can use this code to calculate these amounts:
|
| 11: Invoice Match with Automatic Chargeback for Discount Amount | You can use this code to calculate these amounts:
|
| 15: Invoice Match with Write-Off | You can use this code to calculate these amounts:
|
| 16: Invoice Match with Chargeback | You can use this code to calculate these amounts:
|
| 17: Invoice Match with Deduction | You can use this code to calculate these amounts:
|
6.5.1.1 Examples: Using Type Input Codes to Enter Receipts
These examples illustrate how you can use type input codes to enter receipts or drafts. For each example, the outstanding invoice amount is 1000.00, and the payment terms are 1/10, net 30.
6.5.1.2 Example: Simple Invoice Match (Type Input Code 10)
In this example, you receive 990.00 for invoice 123 within the discount period. This tables illustrates
| Type Input Code | Amount Applied | Discount | Write-Off | Chargeback | Gross Amount | Document Number | Pay Item | Document Type |
|---|---|---|---|---|---|---|---|---|
| 10 | 990.00 | 10.00 | NA | NA | 1000.00 | 123 | 001 | RI |
With type input 10, the system applies 990.00 and allows the discount of 10.00.
6.5.1.3 Example: Invoice Match with Automatic Chargeback for Discount Amount (Type Input Code 11)
In this example, you receive 990.00 for invoice 123 after the discount period has expired.
| Type Input Code | Amount Applied | Discount | Write-Off | Chargeback | Gross Amount | Document Number | Pay Item | Document Type |
|---|---|---|---|---|---|---|---|---|
| 11 | 990.00 | NA | NA | 10.00 | 1000.00 | 123 | 001 | RI |
With type input 11, the system applies the 990.00 and creates a chargeback for 10.00.
6.5.1.4 Example: Invoice Match with Write-Off (Type Input Code 15)
In this example, you receive 970.00 for invoice 123 within the discount period. You decide to create a write-off for the 20.00 instead of creating a chargeback invoice.
| Type Input Code | Amount Applied | Discount | Write-Off | Chargeback | Gross Amount | Document Number | Pay Item | Document Type |
|---|---|---|---|---|---|---|---|---|
| 15 | 970.00 | 10.00 | 20.00 | NA | 1000.00 | 123 | 001 | RI |
With type input 15, the system applies the 970.00, allows 10.00 for the discount, and creates a write-off for 20.00.
6.5.1.5 Example: Invoice Match with Chargeback (Type Input Code 16)
In this example, you receive 600.00 for invoice 123 within the discount period.
| Type Input Code | Amount Applied | Discount | Write-Off | Chargeback | Gross Amount | Document Number | Pay Item | Document Type |
|---|---|---|---|---|---|---|---|---|
| 16 | 600.00 | 10.00 | NA | 390.00 | 1000.00 | 123 | 001 | RI |
With type input 16, the system applies the 600.00, allows 10.00 for the discount, and creates a chargeback for 390.00.
6.5.1.6 Example: Invoice Match with Deduction (Type Input Code 17)
In this example, you receive 850.00 for invoice 123 within the discount period. You decide to create a deduction for the remaining amount of 140.00, which you research and resolve at a later time.
| Type Input Code | Amount Applied | Discount | Write-Off | Deduction | Gross Amount | Document Number | Pay Item | Document Type |
|---|---|---|---|---|---|---|---|---|
| 17 | 850.00 | 10.00 | NA | 140.00 | 1000.00 | 128 | 001 | RI |
With type input 17, the system applies the 850.00, allows the discount of 10.00, and creates a deduction for 140.00.
6.5.1.7 Example: Simple Invoice Match (Type Input Code 10)
You use type input code 10 when the receipt pays all or part of the invoice and you do not want to specify manual write-offs, chargebacks, or deductions. The system automatically takes any discount that is earned (that is, the GL date is on or before the discount due date). You indicate the amount of the invoice that the receipt pays in the Payment Amount field. If you leave this field blank, the system pays the entire open amount of the invoice, up to the receipt amount.
After you enter receipts, you must post them to the general ledger. When you post receipt records, the system debits the bank account for the amount of the receipt and credits the AR trade account that was used when the invoice was posted.
6.5.1.8 Example: Invoice Match with Discount (Type Input Code10)
When you apply a receipt to an invoice or group of invoices, you can allow the discount. If the tenant pays the invoice in full on or before the discount due date, the discount is earned and the system automatically completes the Discount Taken field with the amount of the discount. If the discount is not earned (that is, the GL date of the receipt is after the discount due date), the system does not automatically complete the Discount Taken field, but you can override it and apply a discount amount manually. If you do not allow the discount, the system leaves the invoice open in the amount of the discount.
You can set processing options to allow the amount of the discount taken to be more than the discount available, or to allow the discount taken to be more than the applied (payment amount). For example, you might issue a credit to a tenant in the form of a discount for a disputed item. You can also specify grace days to add to the discount due date.
After you enter receipts with discounts, you must post them. When you post payments with earned discounts, in addition to the bank account and AR trade account, the system updates a discount taken account.
The system uses this hierarchy to locate the discount taken account:
-
The system searches for AAI item RKDxxx, where xxx is the discount reason code that you entered for the company that you entered on the receipt.
-
If the system does not locate this AAI, it uses RKDxxx for company 00000.
-
If the system does not locate RKDxxx for company 00000, it returns an error.
6.5.1.9 Example: Invoice Match with Chargeback (Type Input Codes 11 and 16)
When you apply a receipt to an invoice, you can create a chargeback if the amount that you receive is less than the open amount for the invoice. For example, a tenant might issue a payment for an invoice, less the discount amount, even though the terms of the discount have expired.
This table describes the types input codes that you can use to generate a chargeback invoice:
| Type Input Code | Description |
|---|---|
| 11 | Use this type input code when you want the system to create a chargeback for an unearned discount. The system automatically completes the Chargeback Amount field with the discount available. |
| 16 | Use this type input code when you want the system to generate a chargeback for a short payment that is not an unearned discount. The system automatically completes the Chargeback Amount field with the difference between the payment amount that you enter and the open amount of the invoice. |
When you enter a receipt with a chargeback, the system generates specific records. This table lists the tables and describes the records that the system generates in the tables:
| Table | Description |
|---|---|
| Customer Ledger (F03B11) | The system generates a chargeback invoice record, which takes the place of a specific invoice, for the disputed amount that you are charging back to the tenant. The system closes the original invoice and marks it as paid, and creates a new chargeback invoice record and assigns it a document type of RB.
The chargeback invoice record:
The posted codes for the payment records in the Receipts Header table (F03B13) and Receipts Detail table (F03B14) remain blank until the receipt is posted. |
| Receipts Header (F03B13) | The system generates a receipt record. |
| Receipts Detail (F03B14) | The system generates a detail record that pays the invoice from which the chargeback was generated. |
Regardless of the type input code that you use, if you specify a chargeback amount and reason code, the system creates a chargeback record.
After you enter receipts with chargebacks, you must post them. When you post receipts with chargebacks, in addition to updating the bank account and AR trade account, the system might update a different AR trade account for the chargeback amount, depending on whether you complete the Chargeback G/L Offset field on the receipt record.
6.5.1.10 Example: Invoice Match with Write-Off (Type Input Codes 10 and 15)
If the payment that you receive is not enough to satisfy the open amount of the invoice, or if you receive a small overpayment, you might want to write off the difference and close the invoice. For example, you might receive a payment from a tenant that is slightly less than the invoice amount. To maintain a good relationship with the tenant, you might write off the minor amount instead of creating a chargeback invoice for the difference or leaving the amount open.
This table describes the two options for performing write-offs:
| Option | Description |
|---|---|
| Automatic write-off
(Type Input Code 10) |
The system calculates the difference between the payment amount and the open amount of the invoice. If the difference is within the tolerance limits that are defined in the processing options, the system automatically performs the write-off.
For example, assume that you establish the maximum write-off amount as 10.00 and the invoice open amount is 500.00, and you enter a receipt for 490.00. The system automatically writes off 10.00, if you either enter 490.00 in the Payment Amount field or accept the system default. You do not have to calculate or specify a write-off amount. Automatic write-offs require you to enter a default reason code in the processing options, which the system uses to determine the write-off (adjustment) account. When you enter the receipt, you cannot override the write-off reason code for automatic write-offs. When you apply the payment to invoices, the system displays a remaining open amount. After you enter the receipt and review it, the system displays the write-off amount and write-off reason code. You can override the write-off reason code at this time. |
| Manual write-off
(Type Input Code 15) |
Specify that the system performs a write-off by using type input code 15, in which case the system calculates the write-off amount for you. If you exceed the maximum manual write-off amount that is specified in the processing options, the system issues an error when you click OK. You can then manually adjust the write-off amount.
You can set up a default reason code to use for manual write-offs, but this is not required, and you can override it when you enter the receipt. |
Regardless of the type input code that you use, if you specify a write-off amount and reason code, the system generates a write-off.
For the write-off to occur on amounts that exceed the invoice open amount, such as overpayments, you must override the transaction payment amount with the receipt amount. Otherwise, the system generates an unapplied receipt record for the amount. For example, if the payment amount is 100.00 and the invoice amount is 95.00, and you want to write off 5.00 automatically, you must change the payment amount in the detail area from 95.00 to 100.00. Otherwise, the system generates an unapplied receipt record 5.00.
After you enter receipts, you must post them. When you post payments with write-offs, in addition to crediting the bank account and debiting the AR trade account, the system updates a write-off account that you specify for the AAI item RAxx, where xx is the write-off (adjustment) reason code. You must set up an AAI for each write-off (adjustment) reason code that you use.
6.5.1.11 Example: Invoice Match with Deduction (Type Input Code 17)
Entering receipts with deductions is a method of postponing a response to a short payment from the tenant without delaying payment entry. You can enter the payment immediately while another person researches and resolves the deduction.
Here are some common reasons that a tenant might take a deduction:
-
Taking unearned discounts
-
Billing errors
-
Refusing to pay tax
Specify that the system calculates deductions by using type input code 17. If the amount that is applied to the invoice is less than the receipt amount, the system automatically updates the Deduction Amount field for the difference. The system also updates the deduction reason code with the default value that you specify in the processing options.
When you enter a receipt with a deduction, the system generates documents in three tables. This table lists the tables and describes the records that the system generates in the tables:
| Table | Description |
|---|---|
| Customer Ledger (F03B11) | The system generates a deduction invoice document, which takes the place of a specific invoice or group of invoices, for the disputed amount you are researching and resolving. The system closes the invoice, marks it as paid, creates a new deduction invoice record, and assigns document type R5 to the new record.
The deduction invoice record has these characteristics:
The posted codes for the payment records in the Receipts Header table (F03B13) and Receipts Detail table (F03B14) remain blank until the receipt is posted. |
| Receipts Header (F03B13) | The system generates a receipt record. |
| Receipts Detail (F03B14) | The system generates a detail record that pays the invoice from which the deduction was generated. |
Regardless of the type input code that you use, if you specify a deduction amount and reason code, the system creates a deduction record.
After you enter receipts, you must post them. When you post payments with deductions, in addition to updating the bank account and AR trade account, the system debits the deduction suspense account that is set up for the AAI item RN. The system also creates records in the A/R Deduction Management table (F03B40). The deduction record enables you to research and resolve the reason for the deduction at a later time.
|
Note: To change the deduction amount or void the payment after it is posted, you must first reverse or void the deduction record in the F03B40 table using the deduction program. You can, however, revise other nondeductible payment detail records. |
6.5.1.12 Example: Invoice Match Using Multiple Type Input Codes
You can enter a receipt and apply it simultaneously to a group of invoices that require individual actions. For example, in a group of three invoices, you can allow the discount on one invoice, charge back the discount amount on another invoice, and create a write-off of a minor underpayment on the last invoice.
When you apply a receipt to invoices using multiple type input codes, you can address each invoice individually by using the type input codes in any combination.
The system uses these criteria to determine the payment amount for each receipt detail line:
-
Receipt amount
-
Open invoice amount
-
Type input code
-
Unapplied amount
For example, if you neglect to indicate the receipt amount, and you attempt to pay multiple invoices, the system attempts to compensate for the first payment amount that you enter by completing the Payment Amount field on the second detail line with a negative payment amount.
6.5.2 Prerequisites
Before you complete the tasks in this section, you must:
-
Verify that the appropriate accounts are specified for these AAI items:
-
RKD for discounts taken.
-
RCxxxx, where xxxx is the chargeback general ledger offset code, for the chargeback AR trade account.
-
RAxx, where xx is the write-off reason code.
-
RN for the deduction suspense account.
-
-
Verify that these UDC tables are set up to specify the reason codes:
-
00/DE for discount reason codes.
-
03B/CB for chargeback reason codes.
-
03B/RC for write-off reason codes.
-
03B/CR for deduction reason codes.
-
-
Verify that the processing options are set up appropriately for discounts, chargebacks, write-offs, and deductions, as well as for any type input codes that you allow.
6.5.3 Forms Used to Apply Receipts to Invoices Using Type Input Codes
| Form Name | FormID | Navigation | Usage |
|---|---|---|---|
| Work With Customer Receipts Inquiry | W15103A | Real Estate Receipts (G1513), RE Receipts Entry | Review and select receipt records. |
| RE Receipts Entry | W15103C | On the Work With Customer Receipts Inquiry form, click Add or select an unapplied receipt. | Apply receipts to invoices. |
6.5.4 Applying Receipts to Invoices
Access the RE Receipts Entry form.
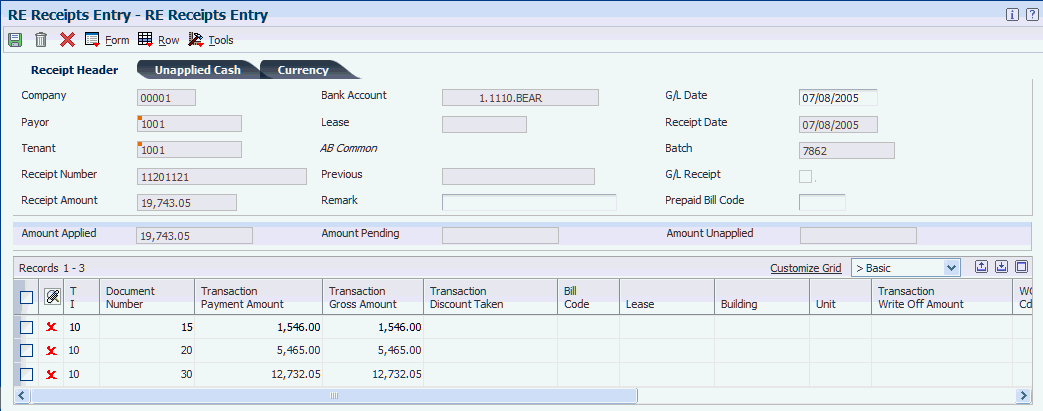
- T I (type input code)
-
Enter a type input code to specify the application method to use. The system does not process transactions with a blank or invalid type input. Values are:
10: The system automatically completes the Payment Amount field with the amount of the invoice when you exit this field. If the invoice has an earned discount, the system also completes the Discount Taken field with the amount in the Discount Available field.
11: The system completes the Payment Amount field with the amount of the invoice and the Chargeback Amount field with the amount in the Discount Available field when you exit this field.
15: The system automatically completes the Write-Off Amount field with the difference between the payment amount that you enter and the open amount of the invoice when you exit this field.
16: The system automatically completes the Chargeback Amount field with the difference between the payment amount that you enter and the open amount of the invoice when you exit this field.
17: The system automatically completes the Deduction Amount field with the difference between the payment amount that you enter and the open amount of the invoice when you exit this field.
- Transaction Payment Amount
-
Override the value in this field if necessary. This is the amount of the receipt that is expressed in the transaction (foreign) currency.
Note:
If the payment amount is greater than the open amount of the invoice, the system does not calculate chargeback, write-off, or deduction amounts until you override the payment amount to be less than the open invoice amount.If you specify a payment amount that is greater than the open amount of the invoice, the system displays the overpayment as a negative open amount on the invoice.
Depending on the processing option settings, the system might automatically write off the difference between the open amount of the invoice and the payment amount that you enter.
- Transaction Disc Avail (transaction discount available)
-
Enter the amount of discount allowable on the pay item. You can manually assign an amount or let the system calculate it based on either the payment terms in the lease or the terms that you specify when you enter the invoice.
- Transaction Discount Taken
-
Enter the amount by which an invoice is reduced if paid by a specific date. The discount taken does not have to be the same as the discount available.
If the discount is earned and the invoice is paid in full, the system completes this field with the amount of the discount available.
If the discount is not earned (that is, the general ledger date of the payment is after the discount due date), or the invoice is not paid in full, the system does not complete this field.
You can override the value in this field to specify a different discount amount, including zero.
- Transaction Write Off Amount
-
Enter the amount that the system subtracts from the open amount of the invoice and does not require the customer to pay.
- WO Cd (write-off code)
-
If you entered 15 in the TI field, enter the code that identifies the reason for the write-off. Typical reason codes are:
BD: Bad debt
DC: Damaged goods
MW: Minor amount write-off
TF: Tax or freight dispute
- Transaction Charge Back Amount
-
Enter the unpaid invoice amount for which you want to create a new invoice record to charge the customer.
- CB Cd (chargeback code)
-
Enter the code that identifies the reason that a chargeback was generated for an invoice during receipt entry if you entered 11 or 16 as the type input code. Typical chargeback reason codes are:
DA: Disputed amounts.
DD: Unearned (disallowed) discount amount.
Note:
The system does not accept blank as a value, even if it is defined in the UDC table. - Transaction Deduction Amount
-
Enter the amount of the deduction in the currency of the transaction from which the deduction was generated. For example, if the deduction was generated from Customer Ledger Inquiry, the transaction currency is the currency in which the invoice was entered. If the deduction was generated from a receipt, the transaction currency is the currency in which the receipt or draft was entered.
The currency that is associated with this amount appears in the Transaction Currency Code field (TCRC).
- DD Cd (deduction code)
-
Enter the code that identifies the reason that a customer did not fully pay an invoice if you entered 17 as the type input code. Typical deduction reason codes include:
DG: Damaged goods
SS: Short shipment
UD: Undefined deduction
Note:
The system does not accept blank as a value, even if it is set up in the UDCs. Depending on the setting of processing options, the system might automatically supply the value for the reason code. - Chargeback G/L Offset
-
Enter the code that indicates the AR trade account that the system uses when you post the chargeback if you entered 11 or 16 as the type input code to direct the offset for the chargeback to a different AR trade account. To locate the account, the system concatenates this code to the AAI item RC. The system uses this hierarchy to locate the AR trade account to use for the chargeback record:
If you use multicurrency, the system searches for RCxxx, where xxx is the currency code of the receipt.
If the system does not locate the AAI, it uses RCxxxx, where xxxx is the value in the Chargeback G/L Offset field.
If the system does not locate the AAI, it uses RCxx, where xx is the chargeback reason code.
If the system does not locate the AAI, it uses RC for the company that is specified on the receipt.
If the system does not locate the AAI, it uses RC for company 00000.
- Amount Pending
-
Displays the amount pending. If you have fully applied the receipt to invoices, the amount pending should equal the receipt amount that appears in the header portion of the entry form.
- Amount Unapplied
-
Displays the unapplied record that the system created for the amount.
6.6 Applying Receipts Using Other Methods
This section provides overviews of the process to apply unapplied receipts to invoices, the process to apply credit memos to invoices, the process to enter general ledger receipts, and lists the forms used to apply receipts using other methods.
6.6.1 Understanding the Process to Apply Unapplied Receipts to Invoices
After you enter an unapplied receipt, you can apply it to the appropriate invoice or group of invoices using all of the available type input codes. To match an unapplied receipt to invoices, you select the unapplied receipt first, and then display the open invoice records. You cannot use the Load, Select, or Remittance features in the RE Receipts Entry program (P15103) to display unapplied invoice records along with the open invoices.
When you select the unapplied receipt record, the system enables you to override the GL date. The general ledger date that you assign does not change the general ledger date of the unapplied receipt record in the Receipts Header table (F03B13). The system uses the general ledger date for the records that it creates in the Receipts Detail table (F03B14) to pay the invoices; it does not affect the date on which the system updated the bank account when the receipt was posted.
When you fully apply an unapplied receipt to invoices, the system performs these functions for each invoice to which the receipt was applied:
-
Creates a new batch record in the Batch Control Records table (F0011) for batch type RB if the unapplied payment is posted when you apply it against invoices.
-
Closes the RU invoice document in the Customer Ledger table (F03B11) by updating the pay status to P.
-
Closes the RN or RD invoice document in the Customer Ledger table (F03B11) by updating the pay status to P if the invoice is fully paid.
-
Creates RC documents in the Receipts Detail table (F03B14).
If you fully apply an unapplied receipt to invoices before it is posted, the system deletes the RU record from the F03B11 and F03B14 tables.
Regardless of whether the unapplied receipt is posted before you apply it to an invoice, you must post the receipt after you apply it to invoices to update the appropriate accounts in the general ledger.
6.6.2 Understanding the Process to Apply Credit Memos to Invoices
When the customer has outstanding credit memos, you can apply them to outstanding invoices using the RE Receipts Entry program (P15103). Because you do not have a physical payment, you enter zero in the Receipt Amount field. You can use the Load, Select, or Remittance feature to display the credit memo and invoice, and then you use the appropriate type input code to apply the credit memo to the invoice. If the credit memo does not fully pay the invoice, you can leave the invoice open for the amount that remains, or create a write-off, chargeback, or deduction record for the difference.
When you fully apply a credit memo to an invoice, the system:
-
Closes the RM credit memo document in the Customer Ledger table (F03B11) by updating the pay status to P.
-
Closes the RN or RD invoice document in the Customer Ledger table (F03B11) by updating the pay status to P if the invoice is fully paid.
-
Creates a record in the Receipts Header table (F03B13) for a zero amount.
-
Creates RS receipt documents in the Receipts Detail table (F03B14) for both the credit memo and the invoice.
After you apply credit memos to invoices, you must post the batch to update the general ledger.
6.6.3 Understanding the Process to Enter General Ledger Receipts
When you receive a check that is not associated with a tenant's account, such as a refund check from an insurance company or a rebate, you can enter the check by entering a general ledger receipt using the RE Receipts Entry program (P15103). A general ledger receipt enables you to credit the appropriate general ledger account and include the amount in the bank deposit.
You enter the general ledger receipt exactly as you enter an unapplied receipt; however, because the receipt is not associated with a tenant, you do not complete the Customer or Payor fields, nor do you display invoices to pay. You enter the information about the receipt and then select an option from the Form menu to enter the general ledger information, such as the account and distribution amount. You can distribute a receipt to as many general ledger accounts as required as long as you distribute the entire amount.
After you enter general ledger receipts, you must post them to update the bank and the general ledger accounts.
6.6.4 Forms Used to Apply Receipts Using Other Methods
| Form Name | FormID | Navigation | Usage |
|---|---|---|---|
| Work With Customer Receipts Inquiry | W15103A | Real Estate Receipts (G1513), RE Receipts Entry | Review and select unapplied receipt records to apply to invoices. |
| RE Receipts Entry | W15103C | On Work With Customer Receipts Inquiry, click Add or select an unapplied receipt. |
|
| G/L Receipts Entry | W03B0001C | On the RE Receipts Entry form, complete the header portion of the form, and select General Ledger from the Form menu. | Enter account information to distribute the receipt. |
6.7 Entering Standalone Transactions
This section provides an overview of standalone transactions, lists prerequisites, and discusses how to:
-
Enter standalone write-offs.
-
Enter standalone chargebacks.
-
Enter standalone deductions.
6.7.1 Understanding Standalone Transactions
Standalone records are write-offs, chargebacks, and deductions that are not associated with any known invoice. You create standalone records when the customer or tenant sends a payment for several invoices, but the payment amount does not equal the total amount of the invoices. You can also use the standalone feature when an unapplied receipt is applied to several invoices and a small difference between the totals exists. In these scenarios, the system matches the payment to invoices, but the shortage is recorded without specifying a particular invoice.
After you enter a standalone record with invoice match on the RE Receipts Entry form, the system adds a new detail line, creates a payment amount for the standalone transaction, and assigns the appropriate type input code. You should use the standalone feature with invoice match, whenever possible.
You can also use the standalone feature without performing an invoice match. You use standalone write-off without invoice match if you want to write off a small overpayment. You use standalone chargeback without invoice match when you want to enter and distribute an unapplied receipt among multiple tenant accounts. When you use the standalone feature without invoice matching, you must enter the amount as a credit (negative); otherwise, the system creates an unapplied receipt for twice the specified amount.
After you enter a standalone transaction without invoice match on the RE Receipts Entry form, the system adds a new detail line, creates a positive payment amount for the standalone transaction, and assigns the appropriate type input code.
|
Note: If you are creating standalone chargebacks to distribute an unapplied receipt among multiple tenant accounts, enter a standalone transaction without invoice match for each tenant to whom you want to distribute an amount. |
6.7.1.1 Standalone Write-Offs (TI Code 25)
A standalone write-off is a write-off for an amount that is not associated with any specific invoice. For example, when you receive a receipt to pay multiple invoices, and the tenant has not indicated which invoice should receive the short payment, you can write off this amount using a standalone entry. Additionally, you might use the standalone feature for write-offs that are not associated with any invoice. For example, you might use a standalone write-off when you receive a duplicate payment for a small amount and want to write it off.
When you create a standalone write-off (type input code 25), the system reduces the customer's (or tenant's) open balance by the amount of the write-off.
6.7.1.2 Standalone Chargebacks (TI Code 26)
When an amount in dispute is not associated with a specific invoice, you can create a standalone chargeback for the amount. A standalone chargeback enables you to reinvoice the tenant for the disputed amount. Typically, you enter standalone chargebacks when the payment amount does not total the invoices that are being paid and you want to charge back the difference to the tenant. In this case, you enter a standalone chargeback with invoice match. The system increases the tenant's open balance by the amount of the short payment.
You enter a standalone chargeback without invoice match when you want to distribute an unapplied receipt among multiple tenant accounts. When you do this, the system creates a record in the Receipts Header table (F03B13) for the payor, and creates associated records in the Receipts Detail (F03B14) and Customer Ledger (F03B11) tables for the chargeback amount (as a credit) to each tenant. This process simulates the creation of an unapplied receipt for each account.
6.7.1.3 Example: Using Standalone Chargebacks to Distribute an Unapplied Receipt Among Multiple Tenants
When you receive one payment to be distributed among multiple tenants without applying it to invoices, you use the standalone chargeback feature.
For example, you receive a receipt for 15,000 from payor 3001 to be applied as:
-
5,000 to tenant 3004
-
5,000 to tenant 3333
-
5,000 to tenant 3334
Using the standalone chargeback feature, you specify the tenant and amount to distribute. Enter the payment amount as a credit (negative amount). You repeat the process until the amount is fully distributed among the tenants.
This table displays the records that the system creates when you use standalone chargebacks to distribute an unapplied receipt among multiple tenants:
| Table | Document Type | Gross Amount | Tenant Number | Payment ID |
|---|---|---|---|---|
| F03B13 | not applicable | 15,000 | 3001 | 521 |
| F03B11 | RB | –5,000 | 3004 | 521 |
| F03B11 | RB | –5,000 | 3333 | 521 |
| F03B11 | RB | –5,000 | 3334 | 521 |
| F03B14 | RC* | –5,000 | 3004 | 521 |
| F03B14 | RC* | –5,000 | 3333 | 521 |
| F03B14 | RC* | –5,000 | 3334 | 521 |
* This is the matching document type (DCTM).
The system uses the payment ID to provide an audit trail from the F03B11 and F03B14 records to the original F03B13 payment record.
|
Note: Later, you must apply the negative chargeback invoices to invoices that you want to pay. |
6.7.1.4 Standalone Deductions (TI Code 27)
When the amount of the payment does not equal the amount of the invoices that it pays, you can create a standalone deduction to postpone the resolution of the short-payment until a later date. Additionally, you might use the standalone feature for deductions that are not associated with any invoice. For example, you would use this feature if you receive a duplicate payment for a small amount and are unsure about how to process it.
When you create a standalone deduction (type input code 27), the system reduces the tenant's account by the amount of the short-payment.
When you post the deduction, the system creates a record in the A/R Deduction Management table (F03B40) that you use to resolve the issue.
6.7.2 Prerequisites
For standalone write-offs, you must:
-
Ensure that you set the maximum amount on the Mnl Write-Off tab of the P15103 processing options high enough so that the system accepts the entry.
-
Verify that the account for each write-off reason code is set up for the AAI item RAxx, where xx is the write-off reason code.
-
Verify that the processing option on the Edits tab is set up to allow write-offs.
-
Verify that the values for the write-off reason code are set up in UDC table 03B/RC.
For standalone chargebacks, you must:
-
Verify that the chargeback AR trade account is set up for the AAI item RCxxxx, where xxxx is the chargeback general ledger offset code.
-
Verify that the processing options under the Chargeback tab are set up.
-
Verify that the values for the chargeback reason code are set up in UDC table 03B/CB.
For standalone deductions, you must:
-
Verify that the deduction suspense account is set up for the AAI item RN.
-
Verify that the values for the deduction reason code are set up in UDC table 03B/CR.
6.7.3 Forms Used to Enter Standalone Transactions
| Form Name | FormID | Navigation | Usage |
|---|---|---|---|
| Work With Customer Receipts Inquiry | W15103A | Real Estate Receipts (G1513), RE Receipts Entry | Review and select receipt records. |
| RE Receipts Entry | W15103C | On the Work With Customer Receipts Inquiry form, click Add or select an unapplied receipt. | Access the menus to enter standalone records. |
| Create Standalone Transaction | W15103D | On the RE Receipts Entry form, complete the header portion and select one of these options from the Form menu: Standalone Write-Off, Standalone Chargeback, or Standalone Deduction. |
|
6.7.4 Entering Standalone Write-Offs
Access the Create Standalone Transaction form.
Figure 6-5 Create Standalone Transaction form
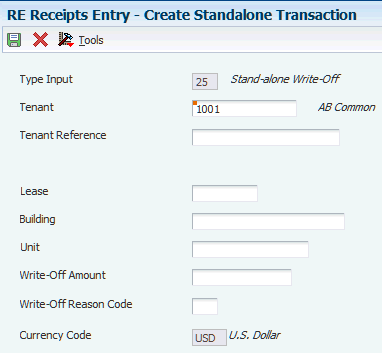
Description of ''Figure 6-5 Create Standalone Transaction form''
- Type Input
-
Displays 25 to indicate a standalone write-off.
- Write-Off Amount
-
Enter the amount by which you want to reduce the customer's account balance. The system updates the account that is specified in the AAI item RAxx, where xx is the write-off reason code with the amount specified. Complete this field for standalone write-offs.
- Write-Off Reason Code
-
Enter the code that identifies the reason that the write-off occurred. Complete this field for standalone write-offs. Examples include:
BD: Bad debt
DC: Damaged goods
MW: Minor amount write-off
TF: Tax or freight dispute
Note:
The system does not accept blank as a value, even if it is defined in the UDC table. If you leave this field blank, the system does not use the default write-off reason code from the processing options.
6.7.5 Entering Standalone Chargebacks
Access the Create Standalone Transaction form.
- Type Input
-
Displays 26 to indicate a standalone chargeback.
- Chargeback G/L Offset
-
Enter the code that indicates the AR trade account that the system uses when you post the chargeback. To locate the account, the system concatenates this code to the AAI item RC. Complete this field for standalone chargebacks. If you do not use a separate account to track the offset for chargebacks, you can leave this field blank.
The system uses this hierarchy to locate the AR trade account to use for the chargeback record:
-
If you use multicurrency, the system searches for RCxxx, where xxx is the currency code of the receipt.
-
If the system does not locate the AAI, it uses RCxxxx, where xxxx is the value in the Chargeback G/L Offset field.
-
If the system does not locate the AAI, it uses RCxx, where xx is the chargeback reason code.
-
If the system does not locate the AAI, it uses RC for the company that is specified on the receipt.
-
If the system does not locate the AAI, it uses RC for company 00000.
-
- Chargeback Amount
-
Enter the unpaid invoice amount for which you want to create a new invoice record so that you can charge the customer. Complete this field for standalone chargebacks.
- Chargeback Reason Code
-
Enter the code that identifies the reason that a chargeback was generated for an invoice during receipt entry. Complete this field for standalone chargebacks. Examples include:
DA: Disputed amounts.
DD: Unearned (disallowed) discount amount.
Note:
The system does not accept blank as a value, even if it is defined in the UDC table. If you leave this field blank, the system does not use the default chargeback reason code from the processing options.
6.7.6 Entering Standalone Deductions
Access the Create Standalone Transaction form.
- Type Input
-
Displays 27 to indicate a standalone deduction.
- Deduction Amount
-
Enter the domestic amount of the deduction. The currency that is associated with this amount appears in the Base Currency Code field (BCRC). Complete this field for standalone deductions.
- Deduction Reason Code
-
Enter the code that identifies the reason that a customer did not fully pay an invoice. Complete this field for standalone deductions. Examples include:
DG: Damaged goods
SS: Short shipment
UD: Undefined deduction
Note:
The system does not accept blank as a value, even if it is defined in the UDC table. If you leave this field blank, the system does not use the default deduction reason code from the processing options.
6.8 Approving and Posting Receipts
This section provides overviews of the receipt posting process, journal entries created by the receipt post process, the automatic entries created by the receipt post process, and discusses how to:
-
Post receipts.
-
Set processing options for General Ledger Post (R09801).
6.8.1 Understanding the Receipt Posting Process
After you enter receipts, you must post them to the general ledger to update the appropriate account information. Depending on the organization's policy, management approval might be required before you can post receipt batches. The process to review and approve batches is the same regardless of the batch type.
|
Note: The status of the receipt batch header remains In Use until you exit the Work With Customer Receipts Inquiry form. |
After you approve receipts, you can post them to the general ledger using the General Ledger Post program (R09801). Because the system creates all of the entries in the Account Ledger table (F0911) when you post receipts, balancing errors occur only when the post program is interrupted. If the system terminates the post program before it finishes, run the post program again to delete the entries that the system created, and then run the post program a third time to create new entries.
During the post, the system selects unposted receipt transactions from the Receipts Header (F03B13) and the Receipts Detail (F03B14) tables and validates each transaction.
If no errors occur, the system:
-
Debits the appropriate bank account for the receipt amount, which creates bank deposit records in the Account Ledger table (F0911).
-
Creates automatic offsets (credits) for the AR trade account in the Account Ledger table (F0911).
-
Creates automatic entries for the discount, write-off, chargeback, or deduction accounts, if applicable.
-
Updates balances in the Account Balances table (F0902).
-
Marks the transactions as posted (P) in the Account Ledger table (F0911).
-
Updates the Receipts Header table (F03B13) and Receipt Detail table (F03B14) with a D in the Posted Code field.
-
Updates the status of the Batch Control Record table (F0011) to D.
You can also post receipts from the Work With Batches form that you access when you select the Receipts Journal Review or Real Estate Journal Review program (P0011), which is located on the same menu as the post program.
|
Note: The system creates unapplied receipt (RU), chargeback (RB), and deduction (R5) invoices with a posted status of D in the Customer Ledger table (F03B11). To determine whether these records are posted, you must locate and verify the posted status of the receipt document from which they originated. |
|
See Also:
|
6.8.2 Understanding the Journal Entries Created by the Receipt Post Process
When you post receipts to the general ledger, the system creates a record in the Account Ledger table (F0911). In the P15103 processing options, you specify the journal entry creation method that the system uses when creating the record.
Regardless of the method that you use to create journal entries, the system creates a journal entry and updates these fields in the receipt detail record in the F03B14 table:
-
RZDCTG (Document Type - JE)
-
RZDOCG (Document Number - JE)
-
RZKCOG (Document Company - JE)
6.8.2.1 Detailed Journal Entries
If you set the processing option to create detailed journal entries, when you enter the receipt, the system updates the A/R Post Status (ISTR) field in the Receipts Header table (F03B13) to 1.
When you post receipts, the system:
-
Creates one document in the Account Ledger table (F0911) for each receipt in the batch.
-
Assigns the journal entry for the bank account a document type of RC.
-
Assigns the document number from next numbers for system 09, line 2 (Journal Entry).
The system does not use the receipt number because the field lengths are not the same. The receipt number is a 25-character number, and the journal entry document number is an 8-character number.
-
Updates the record in the Receipts Detail table (F03B14) with the document number that is assigned to the journal entry for audit purposes.
6.8.2.2 Summary Journal Entries
If you set the processing option to create summarized journal entries, when you enter the receipt, the system does not update the A/R Post Status (ISTR) field in the Receipts Header table (F03B13).
When you post receipts, the system:
-
Creates one document in the Account Ledger table (F0911) for each batch of receipts that are posted.
-
Assigns the journal entry a document type of RK to the entry for the bank account.
-
Assigns the batch number as the document number.
For the system to create summarized journal entries, you must also verify that:
-
The offset method in the Accounts Receivable Constants is set to a value of B (batch mode).
-
The intercompany settlement option in the General Accounting Constants is set to a value other than 2 or 3.
Otherwise, the system creates detailed journal entries.
6.8.2.3 Journal Entry Types
This table indicates the type of journal entry that the system creates according to the settings in the constants in the General Accounting system and the Accounts Receivable system:
| Intercompany Settlements (General Accounting Constants) | Offset Method (Accounts Receivable Constants)* | Journal Entry Creation Method in the P15103 program (Summary or Detail) | Journal Entry Created in the F0911 table |
|---|---|---|---|
| 1 (Hub) | B | 1:Detailed | Detail |
| 1 | Y | 1:Detailed | Detail |
| 1 | S | 1:Detailed | Detail |
| 2 (Detail) | B | 1:Detailed | Detail |
| 2 | Y | 1:Detailed | Detail |
| 2 | S | 1:Detailed | Detail |
| 3 (Configured Hub) | B | 1:Detailed | Error (not allowed) |
| 3 | Y | 1:Detailed | Detail |
| 3 | S | 1:Detailed | Detail |
| 1 | B | Blank: Summary | Summary |
| 1 | Y | Blank: Summary | Detail |
| 1 | S | Blank: Summary | Detail |
| 2 | B | Blank: Summary | Summary |
| 2 | Y | Blank: Summary | Detail |
| 2 | S | Blank: Summary | Detail |
| 3 | B | Blank: Summary | Error (not allowed) |
| 3 | Y | Blank: Summary | Detail |
| 3 | S | Blank: Summary | Detail |
* Offset Method
|
not applicable | not applicable | not applicable |
6.8.2.4 Posting Voided and NSF Receipts
The system also creates different journal entries when you post a receipt that has been voided or designated as insufficient funds (NSF).
Regardless of the processing option setting for the journal-entry creation method, when you post a voided receipt, the system creates a journal entry with the document type RO and when you post a receipt that is designated as NSF, the system creates a journal entry with the document type RV.
The system updates the DOCQ,DCTQ, and KCOQ fields in the F03B13 record with the document number and document type that the system assigns to the journal entry.
6.8.2.5 Posting Zero Amount Receipts
When you fully apply credit memos or unapplied receipts to invoices, the system does not generate journal entries to the bank account because the amount of the receipt is zero.
Additionally, the system creates an automatic entry (document type AE) only when the AR trade account to which the unapplied receipt or credit memo was posted is different from the AR trade account to which the invoice was posted. If the trade accounts are the same for the credit memo or unapplied receipt and the invoice, the system does not generate AE entries or produce a posting edit report.
See Also
-
"Posting Foreign and Alternate Currency Payments" in the JD Edwards EnterpriseOne Applications Multicurrency Processing Implementation Guide.
6.8.3 Understanding the Automatic Entries Created by the Receipt Post Process
When you post receipts, the system creates automatic entries (document type AE) in the Account Ledger table (F0911). The system uses the account IDs from fields that the system updated when you entered the receipt.
This table lists the fields that the system uses during the post process to locate the account for the AE entry based on the type of receipt:
| Account | Type of Receipt | Field | Table |
|---|---|---|---|
| AR Trade | Applied Receipt (TI code 10) | AID | F03B14 |
| Unapplied Receipts | AID | F03B13 | |
| Chargebacks (TI codes 11, 16, and 26) | AIDC | F03B14 | |
| Discount Taken | Discounts (TI code 10) | AIDD | F03B14 |
| Write-off | Write-offs (TI codes 10, 15, and 25) | AIDW | F03B14 |
| Deduction Suspense | Deduction (TI codes 17 and 27) | DAID | F03B14 |
6.8.3.1 Company 00000
When the system always assigns company 00000 to the document company field of the journal entry (KCO) when creating automatic entries for receipts, regardless of the setting of the offset method in the constants. The system must assign company 00000 because of the one-to-many relationship that is inherent in the receipt entry process. That is, one receipt can pay many invoices from different companies. If the post did not use company 00000, the system creates additional journal entries to accommodate each invoice document company.
6.8.4 Posting Receipts
Use one of these navigations:
Select Manual Receipts Processing (G03B12), Post Receipts to G/L.
Select Real Estate Receipts (G1513), Post Receipts.
6.8.5 Setting Processing Options for General Ledger Post (R09801)
Processing options enable you to specify the default processing for programs and reports.
6.8.5.1 Print
- 1. Account Format
-
Specify the account format to print on the General Ledger Post report. Values are:
Blank: Default account format.
1: Structured account.
2: Short account ID.
3: Unstructured account.
- 2. Print Error Messages
-
Specify whether to print errors on the General Ledger Post report. If you leave this processing option blank, the system still prints an error in the work center when an error is detected. Values are:
Blank: Do not print.
1: Print.
6.8.5.2 Versions
These processing options specify versions of the corresponding programs to run. If a version is not specified, the system does not run the program. If a version is specified, the system runs the program after the post program finishes.
- 1. Detail Currency Restatement Version
-
Specify the version of the R11411 program that the system uses to create entries. If you leave this processing option blank, the system does not run the R11411 program and does not create detailed currency restatement entries.
- 2. Fixed Asset Post Version
-
Specify the version of the R12800 program that the system uses to create fixed asset entries. If you leave this processing option blank, the system does not run the R12800 program and does not create fixed asset entries.
- 3. 52 Period Post Version
-
Specify the version of the R098011 program the system uses to update the Account Balances (F0902) and Account Balances - 52 Period Accounting (F0902B) tables. If you leave this processing option blank, the F0902B program does not run and does not update the tables.
- 4. Create Burdening Transactions Version (R52G11)
-
Specify the version of the R52G11 program to use to update the Government Burdened Detail Ledger (F52G11) and Government Burdened Summarized Ledger (F52G02) tables. If you leave this processing option blank, the Create Burdening Transactions program does not run and does not update the tables.
6.8.5.3 Edits
- 1. Update Transaction
-
Specify whether the system updates Account ID, Company, Fiscal Year, Period Number, Century, and Fiscal Quarter on unposted records in the Account Ledger table (F0911). You might have to update these fields if you have records in the F0911 table that were created by a custom program and may not contain the correct values in these fields.
Values are:
Blank: No editing
1: Update transaction.
The system uses the value in the G/L Account Number field of the unposted record in the F0911 table to update the Account ID and Company fields.
The system calculates the correct values for the Fiscal Year, Period Number, and Century fields using the value in the GL date field of the unposted record in the F0911 table.
The system updates the Fiscal Quarter field on the unposted record in the F0911 table to blank.
6.8.5.4 Taxes
- 1. Update Tax File
-
Specify whether and how to update the Taxes table (F0018) when you post transactions with tax information to the general ledger. Values are:
Blank: The system does not update the F0018 table.
1: The system updates the F0018 table for these tax explanation codes only: V,VT,V+,U, and UT.
2: The system updates the F0018 table for all tax amounts. The system does not update the Taxes table for transactions with tax explanation code E (exempt).
3: The system updates the F0018 table for all tax explanation codes, including E (exempt).
- 2. Update VAT Discounts
-
Specify whether to adjust the tax amount fields, and which fields to adjust, when discounts are taken. The system adjusts the tax amount fields only for transactions with tax explanation code V.
Note:
You must select the Tax on Gross Including Discount and Discount on Gross Including Tax options in the tax rules to use this processing option:Values are:
Blank: Does not adjust tax amounts for discounts taken.
1: Updates only the Tax Amount field (STAM).
2: Updates the Tax (STAM), Taxable (ATXA), and Extended Price (AEXP) Amount fields.
The system uses these algorithms to calculate the adjustment amounts to the tax, taxable, and gross (extended price) amount fields for discounts taken:
Adjustment to the gross amount (extended price) = discount taken
Adjustment to the taxable amount = (taxable amount ÷ gross amount) × discount taken
Adjustment to the tax amount = (tax amount ÷ gross amount) × discount taken. For example:
Tax Rate = 25 percent
Discount Taken = 12.50 USD
Gross Amount (Extended Price) = 1,250.00 USD
Taxable Amount = 1,000.00 USD
Tax Amount = 250.00 USD
Based on the example, using the adjustment algorithms, the system calculates these adjustment amounts:
Adjustment to the Gross Amount = 12.50
Adjustment to the Taxable Amount = 10.00
Adjustment to the Tax Amount = 2.50
To calculate the adjustments, the system subtracts the adjusted amount from the original amount:
Adjusted Gross Amount: 1,250.00 − 12.50 = 1,237.50
Adjusted Taxable Amount: 1,000.00 − 10.00 = 990.00
Adjusted Tax Amount: 250.00 − 2.50 = 247.50
- 3. Update VAT Receipts and W/O
-
Specify whether to adjust the tax fields, and which fields to adjust, when the receipt has a write-off. The system adjusts the tax amount fields only for transactions with tax explanation code V. Values are:
Blank: Does not adjust tax amounts for write-offs.
1: Updates only the Tax Amount field (STAM).
2: Updates the Tax (STAM), Taxable (ATXA), and Extended Price (AEXP) amount fields.
The system uses these algorithms to calculate the adjustment amounts to the tax, taxable, and gross (extended price) amount fields for write-off amounts:
Adjustment to the gross amount (extended price) = write-off amount
Adjustment to the taxable amount = (taxable amount ÷ gross amount) × write-off amount
Adjustment to the tax amount = (tax amount ÷ gross amount) × write-off amount. For example:
Tax Rate = 25 percent
Write-off Amount = 12.50 USD
Gross Amount (Extended Price) = 1,250.00 USD
Taxable Amount = 1,000.00 USD
Tax Amount = 250.00 USD
Based on the example, using the adjustment algorithms, the system calculates these adjustment amounts:
Adjustment to the Gross Amount = 12.50
Adjustment to the Taxable Amount = 10.00
Adjustment to the Tax Amount = 2.50
To calculate the adjustments, the system subtracts the adjusted amount from the original amount:
Adjusted Gross Amount: 1,250.00 − 12.50 = 1,237.50
Adjusted Taxable Amount: 1,000.00 − 10.00 = 990.00
Adjusted Tax Amount: 250.00 − 2.50 = 247.50
6.8.5.5 Process
- 1. Explode parent item time
-
Specify whether the system explodes the time entries for a parent asset down to the children of the parent asset. If you enter 1 for this processing option, the General Ledger Post Report program (R09801) creates time entries for the parent asset's children. The system uses the unit of time from the parent asset entries and the rates from the child asset to calculate the appropriate entries. This processing option applies only to batch type T entries. Values are:
Blank: Do not explode.
1: Explode.
6.8.5.6 Cash Basis
- 1. Units Ledger Type
-
Specify the units ledger type to assign for cash basis entries. You must enter a valid ledger type from the Ledger Type Master Setup program (P0025). If you leave this processing option blank, the system uses a default ledger type of ZU.
- 2. Create Cash Basis Entries Version (R11C850)
-
Specify which version of the Create Cash Basis Entries program (R11C850) to run. If you leave this processing option, the system does not create cash basis entries.
6.9 Working with Receipts
This section provides overviews of receipt revisions, deleting and voiding receipts, and NSF receipts, lists a prerequisite, and discusses how to:
-
Delete or void a receipt.
-
Delete or void invoice pay items from a receipt.
6.9.1 Understanding Receipt Revisions
After you enter receipts, you might have to revise them. For example, you might have applied a receipt to the wrong invoice or customer, or used the wrong general ledger date. Depending on the posting status and the data you are changing, delete or void the receipt, and then enter it again.
You can revise unposted receipts that are in the current general ledger period only, unless you enable the Allow PBCO Postings option within the General Accounting constants.
This table describes the fields that you can revise based on the type of receipt:
| Type of Receipt | Field Description |
|---|---|
| Unposted receipts | You can revise these fields on an unposted receipt:
* These fields can be revised only on unapplied receipts, and only when you use the RE Receipts Entry program (P15103). You can also change the payment amount or type input code, remove invoice pay items, or select other invoices to pay. |
| Posted receipts | After you post a receipt, you can change the information in these fields only:
You do not have to post the receipt again. You can also void invoice pay items and specify new invoices to pay. If you revise payment information, you must post the receipt again. |
|
Note: Depending on the setup of the AAI item for the receivables trade account (RC), the system might generate an error when you try to revise the building on an unposted receipt.When you enter an unapplied receipt, the system uses the default AAI item RCUC to retrieve the AR trade account unless you enter an unapplied general ledger offset. If you enter an unapplied general ledger offset, the system uses the account that is set up for AAI item RCxxxx, where xxxx is the value of the general ledger offset. If the AAI does not have a business unit specified, the system uses the building number (MCU2) that is entered on the unapplied receipt as the business unit for the account. The system updates the AID field of the Receipts Header record (F03B13) based on the account that is retrieved from the AAI. If you change the building number on an unapplied receipt, the system does not rewrite the value of AID field. Based on the AAI setup, if the system determines that a different account should be updated to the AID field, it generates an error. You must delete the unapplied receipt and re-enter it. |
6.9.2 Understanding Deleting and Voiding Receipts
When you cannot revise the information on a receipt, such as the payor or the general ledger date, you must delete or void the receipt. You follow the same steps to delete and void a receipt: if the receipt is unposted, you delete the receipt and the system removes all the receipt detail records; if the receipt is posted, you void the receipt and the system creates new reversing records.
When you delete or void a receipt, the system:
-
Restores the open amount of the invoice or group of invoices to which the receipt applied.
-
Changes the pay status on the invoices from paid (P) to approved (A).
Additionally, if you void a receipt, the system:
-
Marks the receipt as voided in the Receipts Header table (F03B13).
-
Creates new records in the Batch Control Records (F0011) and Receipts Detail (F03B14) tables.
You must post the new batch to update the general ledger accounts with reversing information. When you post a voided receipt, the system creates a record in the Account Ledger table (F0911) with the document type RO.
6.9.3 Understanding NSF Receipts
When the payor's bank account does not have sufficient funds available to pay the invoices that they have specified, you can designate a receipt as NSF and reopen the invoice or group of invoices. You follow the same steps to designate a receipt as insufficient whether the receipt is posted or unposted.
When you designate a receipt as NSF, the system:
-
Indicates the insufficient fund status of the record in the Receipts Header table (F03B13).
When you analyze the payment trends of the customer or tenant, this indication helps you to distinguish insufficient funds receipts from reversals for entry errors. If the receipt is not posted when it is designated as insufficient funds, the system also marks the posted status of this record as D.
-
Restores the open amount of the invoice or group of invoices to which the receipt applied.
-
Changes the pay status of the invoices from paid (P) to approved (A).
-
Creates a new record in the Batch Control Records table (F0011) if the receipt is posted.
-
Creates a new record in the Receipts Detail table (F03B14) with a matching document type RV if the receipt is posted.
If the receipt is not posted when it is designated as insufficient funds, the system deletes the original record in the F03B14 table.
You must post the new batch to update the general ledger accounts with reversing information. When you post a receipt that is designated as insufficient funds, the system creates in the Account Ledger table (F0911) a record with the document type RV.
6.9.4 Prerequisite
Before you complete the tasks in this section, you must verify that the Void/NSF reason codes are set up in UDC 03B/VR.
6.9.5 Forms Used to Work with Receipts
| Form Name | FormID | Navigation | Usage |
|---|---|---|---|
| Work With Customer Receipts Inquiry | W15103A | Real Estate Receipts (G1513), RE Receipts Entry |
|
| RE Receipts Entry | W15103C | On the Work With Customer Receipts Inquiry form, select the receipt record. | Delete or void invoice pay items from receipts. |
| Void/NSF Receipt | W15103B | On the Work With Customer Receipts Inquiry form, select a receipt, and click Delete. | Enter a GL date and reason code.
Note: The system displays this form only when the receipt is posted. |
6.9.6 Deleting or Voiding a Receipt
Access the Work With Customer Receipts Inquiry form.
To delete or void a receipt:
-
On Work With Customer Receipts Inquiry, select the receipt to delete or void.
-
Select Delete from the tool bar or select Void/Delete from the Row menu.
-
On Confirm Delete, click OK.
-
If the receipt is not posted, the system removes the records. If the receipt is posted, complete the G/L Date and Reason Code fields on the Void/NSF Receipt form.
-
Click OK.
6.9.7 Deleting or Voiding Invoice Pay Items from Receipts
Access the RE Receipts Entry form.
To delete or void an invoice pay item from a receipt:
-
Select the pay item to delete or void on the RE Receipts Entry form.
-
Select Void/Delete from the Row menu.
-
Click the OK button on the Confirm Delete form.
If the receipt is not posted, the system removes the pay item record.
-
Complete the Reason Code field and click OK if the receipt is posted on Void/NSF Receipt.
On the RE Receipts Entry form, the system marks the voided pay item with X and creates a new pay item for a reversing amount.
-
Select another invoice to distribute the payment amount, or click OK to create an unapplied receipt for the amount of the voided pay item on the RE Receipts Entry form.
6.10 Reviewing Applied Receipts
This section provides an overview of the process to review applied receipts and discusses how to:
-
Set processing options for Tenant Ledger Inquiry (P15222).
-
Review transactions invoices.
6.10.1 Understanding the Process to Review Applied Receipts
After you enter a receipt, you can use the Tenant Ledger Inquiry program (P15222) to verify that you applied it to the correct invoices or view the current open amount for the tenant. When you use this program to review paid and partially paid invoices, you can also review information about the receipt that was applied to the invoice, such as the receipt number, payment ID, and batch number, as well as the write-off, chargeback, and deduction amounts.
6.10.1.1 Chargebacks, Deductions, and Unapplied Receipts
When you apply receipts to invoices, you might create open chargeback, deduction, or unapplied receipt records. The system assigns document types RB, R5, and RU to these invoices, respectively, and a receipt batch type of RB (not 2B). Because these invoices are open, you cannot review the receipt that generated these invoices using the option from the Row menu.
This table outlines the methods you can use to locate the receipt, depending on the invoice type:
| Invoice Type | Methods for Locating the Receipt |
|---|---|
| Chargeback (RB) generated from a receipt. |
|
| Deduction (R5) generated from an invoice or receipt. |
|
| Chargeback (RB) generated from a deduction. | Locate the payment ID on the chargeback record, and enter it in the QBE row. Verify that the search criteria includes the option All, and then click Find. The system displays the chargeback and deduction records. Select the deduction (R5), and then select RE Rec/Draft Dtls from the Row menu. |
| Unapplied receipt (RU) | Use the payment ID to locate the receipt on the Work With Customer Receipts Inquiry form, which you access when you select RE Receipts Entry. |
6.10.2 Forms Used to Review Applied Receipts
| Form Name | FormID | Navigation | Usage |
|---|---|---|---|
| Work with Tenant Ledger Inquiry | W15222A | Real Estate Receipts menu (G1513), Tenant Ledger Inquiry |
|
| Receipt Details | W15222E | On the Work with Tenant Ledger Inquiry form, select a paid invoice, and select RE Rec/Draft Dtls from the Row menu. | Review the receipt detail records (F03B14) for paid invoices. |
6.10.3 Setting Processing Options for Tenant Ledger Inquiry (P15222)
Processing options enable you to specify the default processing for programs and reports.
6.10.3.1 Versions
These processing options specify the version of the programs to run when they are accessed from the Form menu. If you leave any of the following processing options blank, the system uses the ZJDE0001 version.
- 1. Standard Invoice Entry (P03B11)
-
Specify the version of the P03B11 program to use.
- 2. Manual Billing Entry (P1511)
-
Specify the version of the P1511 program to use.
- 3. Lease Information (P1501)
-
Specify the version of the P1501 program to use.
- 4. Recurring Billing (P1502)
-
Specify the version of the P1502 program to use.
- 5. RE Receipts Entry (P15103) (real estate receipts entry)
-
Specify the version of the P15103 program to use.
6.10.3.2 Currency
- 1. As If Currency Code
-
Specify the as if currency and whether to display the As If Curr Code field on the Work with Tenant Ledger Inquiry form. The system recalculates domestic amounts based on the as if currency and the date in the Exchange Rate Date processing option, and displays them in the as if columns in the detail area on the form.
If you leave this processing option blank, the system does not display the As If Curr Code field or as if currency columns.
- 2. Exchange Rate Date
-
Specify the date to use to retrieve the exchange rate between the as if currency and the domestic currency. If you leave this processing option blank, the system uses the value that you specify in the Thru Date field on the Work with Tenant Ledger Inquiry form. If you leave this processing option blank and do not specify a value in the Thru Date field, the system uses the most recent exchange rate that was entered. If an exchange rate does not exist, the system generates an error.
6.10.3.3 Process
- 1. Customer Self-Service in Java/HTML
-
Specify whether to activate customer self-service functionality in Java/HTML environments. Values are:
Blank: Do not activate.
1: Activate.
6.10.4 Reviewing Transactions Invoices
To review transaction invoices:
-
From the Real Estate Receipts menu (G1513), select Tenant Ledger Inquiry to access the Work with Tenant Ledger Inquiry form.
-
Search for the invoices you want to review. You can do an open search, or complete any of the fields in the header area to define your search criteria, and then click Find.
-
Parent
If you complete this field, the system returns tenant records for both the parent and first-level children. The system does not return records for subsequent levels of parent/child relationships.
-
Include Security Deposits
Select this option to display transactions that are related to security deposits. If you do not select this option, the system excludes security deposit transactions.
-
All, Paid, Open, and Include Partial
You must select one of these options if you use the As Of Date feature. Additionally, the Include Partial option only displays if you select the Paid option.
-
As Of Date
Enter the as of date. The system compares the general ledger date of the receipt to the as of date to determine whether the invoice was open or paid on that date. To use this feature, you must select the All option to include invoices regardless of pay status.
-
-
To review the general ledger distribution information, select an invoice, and then select G/L Distribution from the Row menu.
(Release 9.1 Update) If your invoice was not included in the revenue recognition process, the system takes you to the G/L Distribution form. If your invoice was included in the revenue recognition process, the system takes you to the Revenue Recognition G/L Distribution form, and displays the revenue accounts that the invoice entries will be distributed to when revenue is recognized. This form does not display the performance liability accounts that are used during the revenue recognition process.
-
Click OK to return to the Work With Tenant Ledger Inquiry form.
-
To review the receipt detail records (F03B14) for paid invoices, select a paid invoice and then select RE Rec/Draft Dtls from the Row menu.
-
Click OK to return to the Work With Tenant Ledger Inquiry form, and click OK to exit the program.