6 Setting Up Supplier Release Scheduling
This chapter contains the following topics:
6.1 Understanding Supplier Release Scheduling Setup
To perform supplier release scheduling, you need to set up information for each of the suppliers and for the items that you are planning to purchase. The information that is required to generate supplier release schedules varies, depending on whether you want to generate schedules that are based on blanket orders or ad hoc schedules. You can enter ad hoc schedules interactively through the self-service portal work spaces or generate them when running the Supplier Schedule Generation program (R34400).
If you want to schedule releases against blanket orders, you set up supplier schedule master information that is tied to a blanket order, such as:
-
Shipment pattern and dates.
This setup indicates the days of the week that you accept deliveries.
-
Supplier split percentages.
You use this value to use more than one supplier for an item.
-
Frozen days
You use this value to specify the time period after the schedule generation date during which quantities cannot be changed and no releases are permitted.
-
Releasable schedule days
Releasable schedule days indicate the time fence from the schedule generation date for releasing committed quantities.
To create ad hoc schedules, you can set up shipment patterns and dates, as well as split percentages without a blanket order; and use information set up for the item in the Item Branch program (P41026), such as:
-
Supplier
-
Freeze fence
You do not have to set up a release fence for ad hoc schedules until you actually run the Supplier Schedule Release Generation program (R34410). You use a processing option to define the period in days from the generation start date within which committed quantities can be converted into purchase orders.
6.2 Defining Supplier Contract Information
This section provides an overview of supplier contract information, lists a prerequisite, and discusses how to:
-
Set processing options for Supplier Schedule Master Revisions (P4321).
-
Set up supplier contracts.
6.2.1 Understanding Supplier Contract Information
When you set up a supplier contract that is based on a blanket order, you can define information such as time fence periods and releasable schedule days. You can also specify a delivery location, a minimum shipment quantity, and a shipment lead time. Finally, you can define whether you display the supplier schedule in days, weeks, or months.
When you generate a schedule, the system:
-
Sorts blanket order releases that are outstanding into appropriate time periods.
-
Accumulates past due quantities and quantities that you received before the requested date.
-
Expresses past due amounts as positive numbers in the Past Due field.
-
Expresses early receipt amounts in the Early Receipt field and adds the amounts to the cumulative received quantity.
When you regenerate the schedule, the system displays the quantities in the Past Due and Early Receipt fields on the Vendor Schedule Master Revisions form. When you delete supplier information, the system deletes the entire record, including the history.
|
Note: It is recommended that you specifically designate items for which you want to create vendor schedules. You can use category codes to use an item for supplier release scheduling. |
6.2.2 Prerequisite
Using blanket scheduling, create a blanket order line for every item that you want to schedule.
6.2.3 Form Used to Set Up Supplier Contracts
| Form Name | FormID | Navigation | Usage |
|---|---|---|---|
| Vendor Schedule Master Revisions | W4321C | DRP Daily Operations (G3411), Enter/Change Supplier Info
MRP Daily Operations (G3413), Enter/Change Supplier Info On the Work With Vendor Schedule Master form, complete the Order Number, Line Number, Order Type, and Order Company fields and click Add. |
Enter the schedule information that represents the supplier contract. |
6.2.4 Setting Processing Options for Supplier Schedule Master Revisions (P4321)
These processing options specify the default processing for programs and reports.
6.2.4.1 Versions
This processing option specifies the version of each program.
- 1. Purchase Order Header, Purchase Order Header (P4310)
-
Specify the program version the system will use.
If you leave this option blank, the system uses ZJDE0001.
- 2. Purchase Orders, Work With Purchase Order Detail (P4310)
-
Specify the program version the system will use.
If you leave this option blank, the system uses ZJDE0001.
- 3. Supplier Schedule (P34301)
-
Specify the program version the system will use.
If you leave this option blank, the system uses ZJDE0001.
- 4. Supplier Split Percentage (P43211)
-
Specify the program version the system will use.
If you leave this option blank, the system uses ZJDE0001.
6.2.4.2 Defaults
These processing options specify the default processing.
- 1. Enter the Document Type to display
-
Specify a user-defined code (UDC) (00/DT) that identifies the origin and purpose of the transaction. The reserved document type prefixes for codes are:
P: Accounts payable
R: Accounts receivable
T: Time and pay
I: Inventory
O: Purchase order
S: Sales order
- 2. Work Day Calendar Type
-
Specify a UDC (42/WD) to define how to use the calendar. For example, the calendar might be specific to an industry, such as banking, or you might use it to schedule delivery persons for a route.
Note:
If you use the default value of * (asterisk), the system updates the value to blank even though blank is not set up as a value in the UDC table. - 3. Work Day Calendar Key
-
Specify a code to classify values within a calendar type. For example, if the calendar type is ROUTE, you can enter a code that specifies a particular route, such as Daily or Weekend.
Note:
The system does not validate the code that you enter.
6.2.5 Setting Up Supplier Contracts
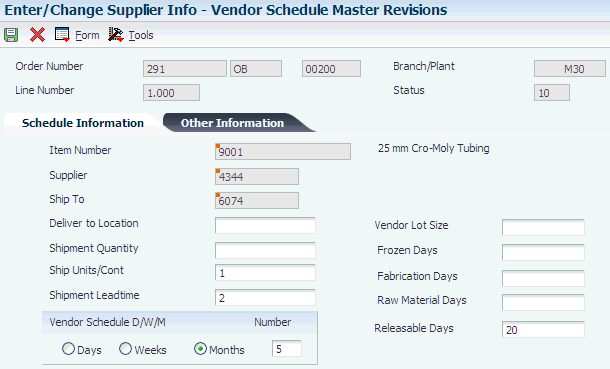
Access the Vendor Schedule Master Revisions form.
Figure 6-1 Vendor Master Schedule Revisions form

Description of ''Figure 6-1 Vendor Master Schedule Revisions form''
- Releasable Days
-
Enter a time fence that indicates the number of workdays from the generation start date to use when identifying the cutoff date for actual blanket order releases. The system uses the time fence when you run the supplier schedule release generation program.
- Deliver to Location
-
Enter the location to which a shipment should be delivered, such as a particular receiving dock or work center.
- Shipment Quantity
-
Enter the minimum quantity that the supplier is willing to ship.
- Ship Units/Cont (ship units/container)
-
Enter the standard quantity of containers that you use in the manufacturing process (typically, in a repetitive manufacturing environment). The quantity that you enter determines the number of bar code labels that you will need for shipping. It also modifies order release quantities.
This value identifies the container requirements of the supplier. When the system generates the supplier schedule, it calculates the shipping units per container as a multiple and adjusts the planned quantities as needed.
- Shipment Leadtime
-
Enter the time it takes a shipment to move from the supplier's dock to the customer's dock. The system uses this value to offset the required date to determine the actual date that the shipment should take place. The shipment leadtime is also known as transit time. The level leadtime for a purchased item should include the shipment leadtime.
- Vendor Lot Size
-
Enter a value that identifies the lot size requirements of the supplier. When the system generates the supplier schedule, it calculates the vendor lot size as a multiple and adjusts the planned quantities as needed.
- Frozen Days
-
Enter the number of workdays from the generation start date that the quantity buckets will be frozen with no changes and releases possible. The system also uses this value to calculate the cumulative frozen quantity shown in the Cum Frozen field on the Other Information tab.
- Fabrication Days
-
Enter the number of workdays, from the generation start date, that the customer guarantees the fabrication costs for the quantity that was ordered.
- Raw Material Days
-
Enter the number of workdays, from the generation start date, that the customer guarantees the raw material costs for the quantity that was ordered.
- Vendor Schedule D/W/M (vendor schedule days/weeks/months)
-
Select an option to create the vendor schedule in days, weeks, or months.
- Number
-
Enter the number of workdays, weeks, and months to display on the supplier schedule.
6.3 Defining Shipment Patterns
This section provides an overview of shipment patterns and discusses how to:
-
Create shipment patterns.
-
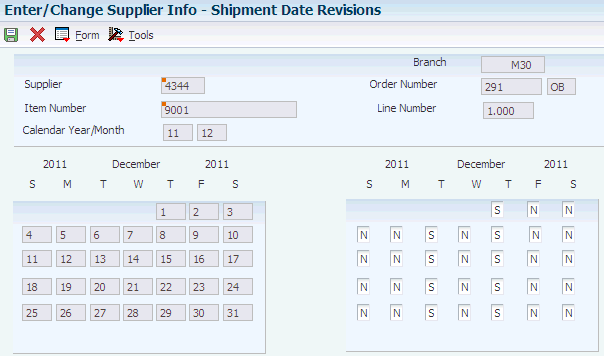
Revise shipment dates.
6.3.1 Understanding Shipment Patterns
You must define which days are valid to receive a shipment. You can define a pattern that governs the frequency of supplier deliveries. For example, you can define shipment patterns such as:
-
All work days.
-
Every Monday.
-
Monday through Friday of the first and third weeks of the month.
To set up shipment patterns and shipment dates for a supplier schedule that is based on a blanket order, you access the Shipment Pattern Revisions (P43212) and Shipment Date Revisions (P43213) programs from the Supplier Schedule Master Revisions program.
|
Note: If you are creating ad hoc schedules and need to set up a shipment pattern for the supplier, you access these programs from the menu. |
6.3.2 Forms Used to Define Shipment Patterns
| Form Name | FormID | Navigation | Usage |
|---|---|---|---|
| Shipment Pattern Revisions | W43212A | DRP Daily Operations (G3411), Enter/Change Supplier Info
MRP Daily Operations (G3413), Enter/Change Supplier Info On the Vendor Schedule Master Revisions form, select Shipment Pattern from the Form menu. |
Enter the date pattern for the shipments that you receive from a supplier. |
| Shipment Date Revisions | W43213B | On the Vendor Schedule Master Revisions form, select Shipment Dates from the Form menu.
On the Work With Shipment Dates form, select a record and click Select. |
Revise the shipment pattern you created previously. |
6.3.3 Creating Shipment Patterns
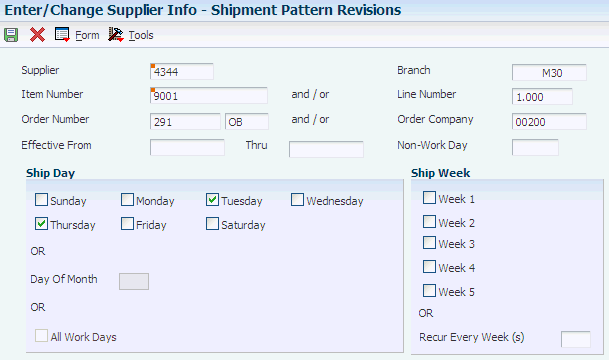
Access the Shipment Pattern Revisions form.
Figure 6-2 Shipment Pattern Revisions form

Description of ''Figure 6-2 Shipment Pattern Revisions form''
- Day of Week
-
Select the check boxes to indicate the day or days that you allow shipments. Selecting any of the check boxes disables the Day Of Month and All Work Days options.
- Day Of Month
-
Enter a specific day of the month (1 through 31) when you allow shipments.
- All Work Days
-
Select this check box to allow shipments on any work day.
- Week of Month
-
Select the check boxes to indicate the week or weeks that you allow shipments. Selecting the fourth check box indicates that the shipment pattern is valid from the 22nd through the 28th of the month.
- Recur Every Week(s)
-
Enter a code that determines the weekly pattern that the system builds based on the effective from date.
Codes are:
1: Every week is scheduled.
2: Every second week is scheduled.
6.3.4 Revising Shipment Dates
6.4 Defining Supplier Split Percentages
This section provides an overview of supplier split percentages and discusses how to set up supplier split percentages.
6.4.1 Understanding Supplier Split Percentages
Buyers can order the same item from multiple suppliers to avoid relying on a single supplier. Supplier scheduling enables multiple suppliers to supply a single item based on a predetermined split percentage. Use the Supplier Split Percentages Revisions program (P43211) to define the split percentages among the suppliers.
6.4.2 Form Used to Set Up Supplier Split Percentages
| Form Name | FormID | Navigation | Usage |
|---|---|---|---|
| Work With Supplier Split Percentages | W43211C | DRP Daily Operations (G3411), Supplier Split Percentages
MRP Daily Operations (G3413), Supplier Split Percentages |
Define the delivery volume percentage for each supplier, if you use more than one supplier. |
| Supplier Split Percentage Revisions | W43211A | On the Work With Supplier Split Percentages form, complete the Branch/Plant and Item Number fields and select Add. | Set up supplier split percentages. |
6.4.3 Setting Up Supplier Split Percentages
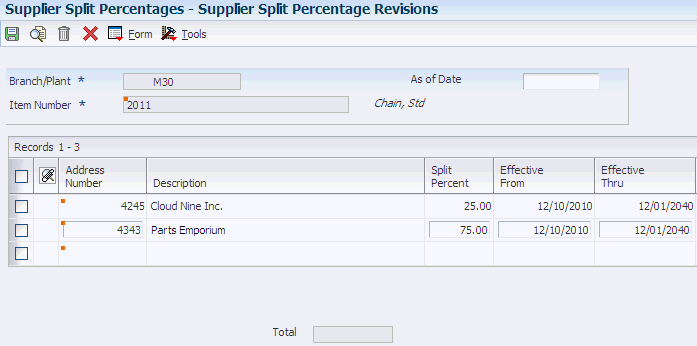
Access the Supplier Split Percentage Revisions form.
Figure 6-4 Supplier Split Percentage Revisions form

Description of ''Figure 6-4 Supplier Split Percentage Revisions form''
- Split Percent
-
Enter the percentage to apply.
For Suppler Release Scheduling, enter the percentage of the planned quantity that the system applies to the corresponding supplier. The total planned quantity must equal 100 percent. Otherwise, the system displays an error message.
