2 Setting Up Warehouse Management
This chapter contains the following topics:
-
Section 2.13, "Setting Up Locations for Carton Recommendation"
-
Section 2.14, "Setting Up Carton Recommendation Methods for Items"
-
Section 2.15, "Setting Up Carton Fill Percentages for Items"
-
Section 2.16, "Working with Standard Pack Carton Recommendations"
2.1 Understanding Warehouse Setup
This section discusses:
-
Setup considerations.
-
Locations.
-
Fixed and random locations.
-
Item warehouse information.
2.1.1 Setup Considerations
To set up the warehouse and items, you must consider:
-
The physical layout and characteristics of the warehouse.
-
The dimensions and capacities of all storage areas, racks, and locations.
You also must determine:
-
Whether to group items based on similarities, dimensions, or units of measure.
-
Which factor is most important in managing the warehouse (you can change these at any time to suit the needs of the business).
-
Maximizing storage capacity.
-
Maximizing productivity by reducing the number of trips that employees make for putaway, picking, or replenishment of stock.
-
Using other criteria that you define.
When you define the warehouse and its contents to the JD Edwards EnterpriseOne Warehouse Management system, you construct a model of the warehouse and all of the items it contains.
2.1.2 Locations
Three types of locations exist in the JD Edwards EnterpriseOne Warehouse Management system:
-
Logical locations, which the system uses for reporting on particular transactions. A logical location does not physically exist in the warehouse, although it does exist as a record in the JD Edwards EnterpriseOne Warehouse Management system. An example of a logical location is the variance location, which is the location that the system uses when you are confirming a smaller quantity than the suggested quantity during putaway confirmation. The system stores the remaining (leftover) quantity in the variance location. Then the system can record the variations in quantity during movement confirmation. Another example of a logical location is the primary location.
-
Physical locations, which are locations that physically exist in the warehouse or are zones that are considered to be a part of the warehouse. An example of a physical location is an aisle or bin.
-
Staging locations, which are locations for temporarily holding items. Staging locations can be logical or physical locations. Examples of staging locations are a variance location (a logical location) and a receiving/shipping dock (a physical location). When you define a staging location in the Location Profile program (P46020), you do not specify any dimension or weight capacity information. The system assumes that staging locations have unlimited capacity.
When you set up locations, you first must assign attributes to each warehouse location within the Location Master table (F4100). Attributes are characteristics that describe the purpose and physical position of each location in the warehouse. To assign attributes to warehouse locations, you use the Location Profile program. The system uses the attributes during inventory movement to select locations for putaway, picking, and replenishment.
The Allow Putaway, Allow Picking, and Allow Replenishment options enable you to define which movement (putaway, picking, or replenishment) you want to allow in each location. By defining movements for locations, you can use each location for different purposes.
Before you select the options for allowing putaway, picking, and replenishment, you should verify that you have defined zones for putaway, picking, and replenishment in the Location Master program (P4100).
These are examples of locations that you use for different purposes and the options that you should use for allowing putaway, picking, and replenishment:
-
Storage location. For a location in a storage area, you typically select all three options. By selecting the Allow Putaway option, you can store inventory in the location. By selecting Allow Picking, you enable warehouse personnel to pick items in pallets from the location. By selecting the Allow Replenishment option, you enable warehouse personnel to use the items that they pick from the storage location to replenish another location.
-
Picking location. For a picking location, you select the Allow Picking option and do not select the Allow Putaway and Allow Replenishment options. Although you pick from this location and, therefore, must replenish inventory to it, you do not want to use the picking location to replenish another location. You also do not want to use the picking location for putaway because you want inventory to continue circulating throughout the warehouse so that sales orders are filled promptly.
-
Dormant location. For locations that you are temporarily not using, you do not select the Allow Putaway, Allow Picking, or Allow Replenishment options. For example, you might leave a location empty because you are planning to remodel the location.
-
Multipurpose location. For staging locations, overflow locations, holding locations, receiving locations, and shipping locations, you should select all three options-Allow Putaway, Allow Picking, and Allow Replenishment. However, for a variance location, you might select the Allow Putaway and Allow Picking options and not select the Allow Replenishment option. The variance location temporarily holds remaining quantity when you have confirmed a smaller quantity than the suggested quantity during putaway confirmation.
You also must enter sequence codes for locations. Sequence codes are numbers that the system typically uses for two purposes:
-
To identify the order of locations in which warehouse personnel work
-
To identify the order in which the system prints move documents
After you enter sequence codes for locations, you can build a tiebreaker table that the system uses to select between locations when the system has suggested multiple locations for putaway, picking, or replenishment. The system uses the sequence codes that you specified to select between equally suitable locations.
You also can use sequence codes to specify the order in which move documents, such as move tags, are printed. By printing move tags in the order in which locations appear in the warehouse, you can maximize the efficiency of warehouse operations.
There are several different types of picking that you define by entering sequence codes:
-
Right-hand picking
-
Alternate picking
Right-hand picking means that locations are sequenced so that warehouse personnel pick inventory from the right side of an aisle. When the employee reaches the end of the aisle, the employee turns around and follows the location sequence, continuing to pick from the right side of the aisle.
Although right-hand picking is usually productive, the disadvantage is that the employee has to travel through the aisle twice (one trip to the end of the aisle and one trip back to the beginning). Right-hand picking is most productive under these circumstances:
-
The aisle ends at a wall.
-
A conveyor belt runs in the middle of the aisle.
The aisle contains a large quantity of inventory that must be picked, thus offsetting the time that the employee spends traveling up and down the aisle.
Alternate picking means that locations are sequenced so that warehouse personnel begin picking inventory from the first location on the right side of the aisle, followed by the first location on the left side of the aisle. Then the employee returns to the right side of the aisle, picks from the second location, crosses to the left side of the aisle, and picks from the second location. The employee repeats the progression of picking from the right side followed by the left side until the employee reaches the end of the aisle.
Alternate picking is most productive when warehouse personnel use machinery such as forklifts to pick pallets in an aisle that does not end with a wall. The machinery might be too large to turn around in the aisle, although diagonal, forward movements enable warehouse personnel to pick inventory efficiently.
Alternate picking in U-shaped format means that warehouse personnel pick from multiple locations on the right side of the aisle first, and then make a U-turn to pick from the locations on the left side. Assuming that the employee is driving a piece of equipment to load the picked items, the employee stops the equipment in the middle of the aisle in a place that is central to all picking locations, completes the picking, and moves forward to repeat the same procedure.
Alternate picking in a U-shaped format is most productive under these circumstances:
-
Warehouse personnel use equipment that is compact enough to turn 360 degrees in an aisle.
-
The right-hand side contains a greater quantity of items to be picked so that the U-turn and picking from the left side does not impede efficiency.
Some advantages to alternate picking in U-shaped format are:
-
Warehouse personnel travel once through the aisle.
-
The number of stops is reduced, if the employee stops the equipment in a central location from which multiple locations can be picked.
Finally, you can define latitude, longitude, and height, which are measurements that consist of location coordinates in the warehouse. The system uses these coordinates to calculate the distance between locations. The system uses the coordinates as tiebreakers in the Movement Instructions table (F46095) and with the base picking and putaway locations that are defined in the Item Profile Revisions program (P46010).
After you specify information about latitude, longitude, and height, you can build a tiebreaker table that the system uses to select between locations when the system has suggested multiple locations for putaway, picking, or replenishment. The system uses the latitude, longitude, and height information that you specify to select between equally suitable locations.
If you have specified sequence codes and want to build a tiebreaker table, you do not specify latitude, longitude, and height information, although doing so does augment the location information that you have entered.
2.1.3 Fixed and Random Locations
Depending on the type of items that you store in the warehouse, you might use fixed or random locations or both.
In a warehouse where you store items in the same locations for the same movements (putaway, picking, or replenishment), you typically set up fixed locations for each type of movement.
In a warehouse where it is advantageous to store items in varied, multiple locations, you set up random rules. Random rules are sets of criteria that each location must meet to qualify as a location for an item. For example, assume that you have an order consisting of items that require refrigeration. After you create a random rule that requires that a location be refrigerated, you create a random locations table, which is a list of all the random locations that meet the requirements of the random rule. Assuming that you have created the tiebreaker table, which stores information about each location such as sequence number, available space, and proximity, the system suggests a series of random locations for putaway, picking, or replenishment.
You might use fixed locations in these circumstances:
-
After you have received perishable foods (such as poultry or dairy products) that are not stored in the warehouse, using fixed locations enables you to move the items directly from the receiving dock to the locations from which the items are picked.
-
When you routinely receive items that require specific storage conditions, such as temperature, lighting, and humidity, using fixed locations enables you to use the same locations repeatedly for the same purpose.
You might use random locations when you receive pallets. For example, random locations enable you to store the pallets in many different locations in the warehouse. Typically, pallets share the same dimensions and characteristics, which enables flexibility for where the pallets can be put away and picked in the warehouse.
2.1.4 Item Warehouse Information
The JD Edwards EnterpriseOne Warehouse Management system and the Inventory Management system are closely integrated. By using Inventory Management, you create information about items and branch/plants that provides basic information for the JD Edwards EnterpriseOne Warehouse Management system.
2.1.4.1 Item Classification Codes
An item classification code represents a group to which you must assign an item. The system uses these codes to select the movement instruction tables (for putaway, picking, or replenishment) that determine location selection. The two types of item classification codes are:
-
Item dimension group, which the system can use optionally to categorize items with identical or similar dimensions. For example, if you distribute compact discs, you probably have many item numbers for all of the compact discs, and all the compact discs share the same dimensions. By defining an item dimension group called CD, you can assign all of the item numbers to this group. By defining information about size and movement for the group, you do not have to define the information for each item individually.
-
Warehouse process group, which the system must use to indicate how certain items are to be handled in the warehouse. For example, if you receive refrigerated products, you might create a warehouse process group called COLD to indicate to warehouse personnel that all items within the group are to be put away, picked, and replenished in a particular zone in the warehouse.
2.1.4.2 Item Profile Information
You must create an item profile for every item in the JD Edwards EnterpriseOne Warehouse Management system. The item profile contains basic information, such as:
-
Whether you can store items of different types or ages in the same location.
-
Whether to use one-phase or two-phase movement confirmation for putaway, picking, and replenishment.
-
The default locations of the item.
One-phase movement confirmation enables you to confirm inventory movement in one step after you move the items out of the From location and into the To location.
Two-phase movement confirmation enables you to confirm inventory movement in two steps: first, when you move the items out of a From location into a temporary staging location, and second, when you move the items from the staging location to the To location.
2.2 Setting Up Locations
This section provides an overview of locations, lists a prerequisite, and discusses how to:
-
Create the warehouse.
-
Define warehouse specifications.
-
Enter locations interactively.
-
Define zones.
-
Define the level of detail for locations.
-
Set processing options for Location Master.
-
Define location dimensions.
-
Define location characteristics.
-
Define location profile information for a single location.
-
Define location profile information for multiple locations.
-
Define location capacity.
2.2.1 Understanding Locations
A location is a place that you use to put away (store), pick (retrieve), or replenish (refill) items that you stock in the warehouse. The warehouse might consist of many locations, each with its own characteristics, such as:
-
Length
-
Width
-
Height
-
Weight capacity
-
Proximity to other locations
Setting up locations is a major step in defining the warehouse. By setting up locations, you can match stock items to the locations based on this criteria:
-
Item size and weight
-
Maximum quantity by location
-
Location characteristics
-
Storage in an item's existing location
-
Storage in an empty location
When you enter locations, the system stores them in the F4100. You select the naming convention (a combination of numbers, letters, or both, such as A/3/4 or 6/B/2/A), and you use the format that you specified on Branch/Plant Constants (a separator character such as "/" or "." to name locations A/3/4 or 3.C.9). Enter locations interactively if you have only a few locations to create or if you do not want to use the batch process.
2.2.1.1 Warehouse Specifications
You define warehouse specifications to:
-
Define the format in which the system displays a location, such as 1.A.1 or C/3/5
-
Specify the inclusion rule that defines the order types and statuses for which you want the JD Edwards EnterpriseOne Warehouse Management system to create requests
-
Define the default units of measure for dimensions, weight, and volume
-
Define the default locations for receiving and shipping
2.2.1.2 Zones
You use zones to group similar locations. After you define a zone, you can use it to make inquiries without having to access each location contained in the zone. The three most common zones in a warehouse are for putaway, picking, and replenishment. For one location, you can have a putaway zone, a picking zone, and a replenishment zone. This situation enables you to use one location for different purposes.
You can also use zones to set up areas for items that require special storage conditions, such as explosion safeguards, refrigeration, low humidity, and low light.
Defining zones is optional. However, by defining zones, you can save processing time and help structure employees' movement patterns through the warehouse.
2.2.1.3 Level of Detail for Locations
You use levels of detail to control how the system displays storage areas for picking and replenishment, their capacities, and available space. You define what each level of detail represents (aisles, racks, bins, and so on). For example, if you use the Location Utilization inquiry program (P46220) to view the contents of the warehouse using a level of detail of 1 (warehouse level), the system displays one location (the warehouse). If you use a level of detail of 4 (rack level), for example, the system displays zones, aisles, and racks, and displays the capacities and available space for each rack.
You can create a blank location, such as / /, and assign it to a level of detail of 1. Then you can use level 1 to review the contents of the entire warehouse for reporting purposes or specify a logical warehouse named warehouse.
2.2.1.4 Location Dimensions
You define the dimensions of each location to maximize the use of warehouse space. After you specify the dimensions of a location, the system can determine which items fit best into the location with a minimum of wasted space. You can define:
-
Gross and usable dimensions (width, depth, and height)
-
Gross and usable volume, which the system calculates from the dimensions
-
Maximum weight that a location can hold
If you do not specify a maximum storage weight, the system assumes that the location has an unlimited capacity for weight.
The system can use the location dimensions that you define to verify that the location has enough space for the item to fit. You can define a capacity method to provide the best match of an item to a location. You can use volume checking (capacity method 1), layering (capacity method 2), or quantity capacity checking (capacity method 3) when you set up item information using the Item Unit of Measure Definition program (P46011).
-
In volume checking, the system compares the volume of the item that you are putting away to the available volume of space in the location. This method is most effective for items that are cubical in shape.
-
In layering, in addition to performing volume checking, the system compares the length, width, and height of the item to the length, width, and height of the available space in the location. The system also can rotate the placement of the items during putaway.
-
In quantity capacity checking, the system compares the quantity of the item to store to the quantity that you can still fit into the location.
If you use random locations for putaway, you must rebuild the tiebreaker table whenever you define or change the dimensions of a random location.
2.2.1.5 Location Characteristics
A characteristic is anything that makes a location (or a location group) unique. For example, you might stock items that must be kept cold to prevent spoilage, so you must identify locations, such as a refrigerator, with characteristics that include Cold. You can assign an unlimited number of characteristics to each location in the warehouse.
|
Important: If you want the system to select locations randomly for putaway, picking, or replenishment (instead of using fixed locations), you must define location characteristics. If you use random locations for putaway, picking, or replenishment and you change characteristics for any of those random locations, you must regenerate the Random Locations table (F46821) to ensure that the system uses a current table when it searches for random locations. |
If you use random locations for putaway, you must rebuild the tiebreaker table whenever you change the characteristics of a random location.
You can select a predefined characteristic from the Select User Define Code form. If the predefined characteristics do not meet the needs of the business, you can define the new characteristic and then reference that characteristic on the Work with Location Characteristics form.
Use location characteristic groups to reduce the number of locations for which you must define characteristics by grouping them.
2.2.1.6 Location Profile Information
You define location profile information to attach specific attributes to each location. These attributes specify the location's purpose, and its physical position in the warehouse. The system can use these attributes during inventory movement to select locations for putaway, picking, or replenishment, and determine what location is the best fit for the item, based on the attributes. You define attributes such as:
-
Location sequences, which can form the routes that warehouse employees follow for putaway, picking, and replenishment
-
Relative coordinates for each location in the warehouse, which the system uses to calculate the distance between two locations
-
The maximum number of items you can have in the location
-
A location dimension group for the location
-
A characteristic group for the location (optional)
-
Whether you can mix container types, or old and new items in the location
-
Whether the location is for putaway, picking, replenishment, or for staging inventory during two-phase movement
If you use random locations for putaway, you must rebuild the tiebreaker table whenever you change the putaway sequence or proximity (latitude, longitude, or height) of a random location.
2.2.1.7 Location Capacity
Each location has a finite capacity to hold items (except staging locations). You can define location capacity by location dimension group, such as bin, flow rack, pallet, or bulk (according to the size of the locations). Alternatively, you can define location capacity individually by quantity. You then specify how many items can fit in each location dimension group by an item's unit of measure.
You can define location capacity methods by setting up items to use one of these capacity checking methods:
-
Volume. The system compares the item's cubic dimensions with the available cubic dimensions in the location.
-
Layering. The system performs volume checking and compares the item's length, width, and height to the length, width, and height of the available space in the location. You must also specify whether the item's unit of measure definition enables the system to rotate the item during putaway.
-
Quantity. The system compares the quantity of the item to store to the quantity that you can still fit into the location.
A location dimension group only defines the volume of each location in the group. If you define an item's unit of measure to use quantity when you verify a location's capacity, you must use Location Capacity Definition (P46024) to define the quantity of the item that fits into a location. The system enables you to toggle between item and item dimension group format. If you use the quantity capacity checking method, defining quantities by item dimension group is faster because you do not have to define quantities and capacities for every item that you stock.
2.2.2 Prerequisite
Before you complete the tasks in this section, verify that you have identified the characteristics, dimensions, and physical position of each location in the warehouse.
2.2.3 Forms Used to Set Up Locations
2.2.4 Creating the Warehouse
Access the Branch/Plant Constants form.
- Branch/Plant
-
Enter an alphanumeric code that identifies a separate entity within a business for which you want to track costs. For example, a business unit might be a warehouse location, job, project, work center, branch, or plant.
You can assign a business unit to a document, entity, or person for purposes of responsibility reporting. For example, the system provides reports of open accounts payable and accounts receivable by business unit to track equipment by responsible department.
Business unit security might prevent you from viewing information about business units for which you have no authority.
- Address Number
-
Enter a number that identifies an entry in the JD Edwards EnterpriseOne Address Book system, such as employee, applicant, participant, customer, supplier, tenant, or location.
- Location Control (Y/N)
-
Select to indicate that the system uses only locations that are defined in the Location Master table. When Warehouse Control is selected, the Location Control option must also be selected.
- Warehouse Control (Y/N)
-
Select to indicate the system creates warehouse transactions for the branch/plant.
2.2.5 Defining Warehouse Specifications
Access the Branch Location Definition form.
Figure 2-2 Branch Location Definition form

Description of ''Figure 2-2 Branch Location Definition form''
- Separator Character
-
Enter a character that divides the elements of the location. For example, you might use a / as a separator character to divide elements such as aisle, bin, and shelf in a location code. Companies commonly use a "." as the separator character. Separators are not stored in the tables. However, the system uses separators to edit a location on a form or report. If you do not want to use separators, leave this field blank.
- Aisle
-
Enter a number, 1 through 8, that identifies the number of characters to represent the tank (or aisle for packaged stock).
Specify whether the system should use left or right justification for the aisle format.
- Bin
-
Enter a number, 1 through 8, that identifies the number of characters to represent the owner for commingled bulk stock (or bin for packaged stock).
Specify whether the system should use left or right justification for the bin format.
- Code 3
-
Enter the number of characters to represent Code 3 in the location format specification. Specify whether the system should use left or right justification.
Access Warehouse Control
- Request Inclusion Version
-
Enter a user-defined code (UDC) (40/RV) that identifies an inclusion rule the system uses for this branch/plant. The JD Edwards EnterpriseOne Manufacturing and Warehouse Management systems use inclusion rules as follows:
-
For Manufacturing:
Enables multiple versions of resource rules for running MPS, MRP, or DRP.
-
For Warehouse Management:
Enables multiple versions of inclusion rules for running putaway and picking. The system processes only those order lines that match the inclusion rule for a specified branch/plant. You use the inclusion rule to define the orders for which to create requests based on the next status code that is assigned to the order.
-
- Dimension Unit of Measure
-
Enter a UDC (00/UM) that identifies the unit of measure that the system uses to display dimensions for the warehouse. The system provides the ability to establish inches, centimeters, meters, and so forth, as a measuring standard.
- Volume Display UOM
-
Enter a UDC (00/UM) that identifies the unit of measure that the system uses to display volume for this branch/plant. The system inputs a value in this field from Branch/Plant Constants - Page 2 (P41001). You can override this default value.
- Weight Display UOM
-
Enter a UDC (00/UM) that identifies the unit of measure that the system uses to indicate weight for this item. You can specify ounces, grams, kilograms, and so on, as weight standards. The system uses this unit of measure for the item or overrides it for an individual item or container.
- Receiving Location
-
The area in the warehouse where you receive inventory. The format of the location is user-defined and you enter the location format for each branch/plant.
- Shipping Location
-
The location that the system uses as the default location when you pick inventory and move the inventory for shipping. The format of the location is user-defined by branch/plant (P41001).
2.2.6 Entering Locations Interactively
Access the Enter Location Information form.
Figure 2-3 Enter Location Information form
Description of ''Figure 2-3 Enter Location Information form''
- Location
-
Enter the area in the warehouse where you receive inventory. The format of the location is user-defined and you enter the location format for each branch/plant.
A location format comprises elements and, optionally, a separator character. Elements represent more specific locations in a branch/plant. The total length of all elements in this field, including separators, cannot exceed 20 characters. If you leave this field blank and do not use a separator character, the system displays the location as an asterisk. If you use a separator character, the system displays the location with the correct number of spaces for each element, followed by the separator character.
The location for a single tank can contain up to the number of characters identified in the Length of Tank/Aisle field on Branch/Plant Constants - Page 2. If the tank contains commingled stock, include the separator character defined on Branch/Plant Constants - Page 2 and identify the owner. The owner ID can contain up to the number of characters identified in the Length of Owner/Bin field on Branch/Plant Constants - Page 2.
2.2.7 Defining Zones
Access the Enter Location Information form.
- Put Zone
-
Enter a code (46/ZN) that identifies areas in the warehouse where goods are put away or stored.
- Pick Zone
-
Enter a code (46/ZN) that identifies an area from which items are picked for shipment.
- Replen Zone
-
Enter a code (46/ZN) that identifies replenishment zones, which are areas in the warehouse from which items are retrieved to replenish or refill picking locations. You assign zones to locations using Location Master (P4100).
2.2.8 Defining the Level of Detail for Locations
Access the Enter Location Information form.
- LOD (level of detail)
-
Enter a UDC (H40/LL) that summarizes or classifies locations and provides a hierarchy of locations for review purposes. For example, you can assign aisles to level 2, and individual bins within the aisle as level 3.
Use the Detail Level field to specify the beginning level of detail the system displays for the location.
2.2.9 Setting Processing Options for Location Master (P4100)
Processing options enable you to specify the default processing for programs and reports.
2.2.9.1 Display
Use this processing option to specify how the system displays information.
- 1. Omit item location records.
-
Enter 1 to omit item location records with no quantity available and no quantity inbound/outbound when calling Availability by Location.
2.2.10 Defining Location Dimensions
Access the Location Dimension Revisions form.
Figure 2-4 Location Dimension Revisions form
Description of ''Figure 2-4 Location Dimension Revisions form''
- Loc. Dimension Group (location dimension group)
-
Enter a code (46/LD) that identifies a group of locations that share the same dimensions. A location dimension group defines the dimensions for all locations that belong to the group. After you set up a location dimension group, you can assign locations to the group through Location Profile Revisions (P46020).
You must define location dimensions if you plan to use volume-based putaway.
Access the Usable Cubic Dimensions section:
- Width
-
Enter the available storage width of the location(s) defined within the location dimension group. The system uses this width only if you use one of two capacity methods to select a putaway location for an item:
-
Volume checking (where the system compares the volume of the item to the usable volume of a putaway location)
-
Layering (where the system compares the length, width, and depth of an item to the usable length, width, and depth of a putaway location)
The system uses the values that you enter for gross width, gross depth, and gross height as default values for the Usable Cubic Dimensions section of the form unless you enter new values.
-
- Depth
-
Enter the available storage depth of the location(s) defined within the location dimension group. The system uses this depth only if you use one of two capacity methods to select a putaway location for an item:
-
Volume checking (where the system compares the volume of the item to the usable volume of a putaway location)
-
Layering (where the system compares the length, width, and depth of an item to the usable length, width, and depth of a putaway location)
The system uses the values that you enter for gross width, gross depth, and gross height as default values for the Usable Cubic Dimensions section of the form unless you enter new values.
-
- Height
-
Enter the available storage height of the location(s) defined within the location dimension group. The system uses this height only if you use one of two capacity methods to select a putaway location for an item:
-
Volume checking (where the system compares the volume of the item to the usable volume of a putaway location)
-
Layering (where the system compares the length, width, and depth of an item to the usable length, width, and depth of a putaway location)
The system uses the values that you enter for gross width, gross depth, and gross height as default values for the Usable Cubic Dimensions section of the form unless you enter new values.
-
- Maximum Weight
-
Enter a number that indicates the maximum weight that is allowed for this location.
|
Note: If maximum weight is left blank, the system allows unlimited weight for the location. |
2.2.11 Defining Location Characteristics
Access the Location Characteristics Revisions form.
Figure 2-5 Location Characteristics Revisions form
Description of ''Figure 2-5 Location Characteristics Revisions form''
- Location Characteristic
-
Enter a code (46/DF) defines a characteristic for a location or location group. You can define unlimited characteristics (such as Cold, Dark, Dry, Heavy, and Secure) for any location or location group.
- Characteristic Group
-
Enter a code (46/LC) that identifies a group of locations that share the same characteristics. A location characteristics group defines the characteristics for all locations that belong to the group. After you set up a location characteristics group, you can assign locations to the group through Location Characteristics (P46021).
2.2.12 Defining Location Profile Information for a Single Location
Access the Location Profile Revisions form.
Figure 2-6 Location Profile Revisions form
Description of ''Figure 2-6 Location Profile Revisions form''
- Level of Detail
-
Enter a code that summarizes or classifies locations and provides a hierarchy of locations for review purposes. For example, you can assign aisles to level 2, and individual bins within the aisle as level 3.
- Freeze Rule
-
Enter a code (H46/HR) that indicates what putaway restrictions you want to place on a location during the pick process. Values are:
Leave blank and the system does not perform any automatic restrictions.
Enter 1: to freeze when empty. Do not put away to this location after you pick the location empty.
Enter 2: to freeze when picked (auto reset). Do not put away to this location after picking. When you pick the location empty, the system automatically resets the putaway flag to allow putaway to this location.
Enter 3: to freeze when picked (manual reset). Do not put away to this location after picking. When you pick the location empty, you must manually reset the putaway flag to allow putaway to this location.
- Maximum Items
-
Enter a number from 1 to 99 that specifies the maximum number of different items that can be stored in this location simultaneously.
If you leave the field blank or enter 0, the system does not limit the number of different items in the location.
- Tax Code
-
Enter a code (46/LT) that indicates whether the location contains tax-paid inventory (in-bond versus duty paid). If an item has an assigned tax code, the system puts the item away only in locations with the same tax code.
You assign tax codes to items through Item Profile (P46010).
- Minimum Put Percent (minimum putaway percentage)
-
Enter the minimum percentage of the total location capacity the system uses during putaway. You specify a minimum putaway percentage when you want an item to fill at least this percentage of an empty putaway location.
- Minimum Pick Percent (minimum pick percentage)
-
Enter the minimum percentage of the total location capacity the system uses during picking. If you use this minimum percentage, the system first determines how many of the items fit in the location. It divides the quantity of the item being picked by the maximum quantity that fits in the location and compares the result to the minimum pick percentage. The system performs this check only if you defined the pick movement instructions to have the system do so.
- Verification Code
-
Enter a two-character code that uniquely identifies a location. The Movement Confirmations program uses the code that you enter to verify that the system used the correct location during putaway or picking.
- Container Code
-
Enter a code (46/EQ) that identifies a storage container or a shipping carton. A storage container can be an open container where items are stored on the container (for example, a pallet), or a closed container where items are stored in the container (for example, a box). You use the Container and Carton Codes program (P46091) to define storage containers.
- Dimension Group
-
Enter a code (46/LD) that identifies a group of locations that share the same dimensions. A location dimension group defines the dimensions for all locations that belong to the group. After you set up a location dimension group, you can assign locations to the group through Location Profile Revisions (P46020).
You must define location dimensions if you plan to use volume-based putaway.
- Characteristics Group
-
Enter a code (46/LC) that identifies a group of locations that share the same characteristics. A location characteristics group defines the characteristics for all locations that belong to the group. After you set up a location characteristics group, you can assign locations to the group through Location Characteristics (P46021).
- Staging Locn (staging location)
-
Select to indicate the location is a staging location, where you hold items temporarily before moving them somewhere else. Staging locations (such as the receiving and shipping docks) do not require a group definition for dimensions, volume, or weight, because they have unlimited capacity. Clear to indicate this location is not a staging location.
- Recommend Crtn (recommend cartons)
-
Select to have the system recommend shipping cartons when picking from this location. The system recommends a carton only if you have set up the Carton Recommendation Method for the item. Clear and the system does not make carton recommendations when picking from this location.
- Mix Containers
-
Select to indicate you want to allow multiple types of storage containers for an item to be stored in the location. Clear to indicate you do not allow multiple types of containers in this location
You can also set up the item profile to allow mixing of containers.
You use Allowed Containers (P46026) to define which containers are allowed in the location.
- Mix Dates
-
Select to indicate you want the system to store items with different receipt dates in the same location. Clear to indicate you do not store items with different receipt dates in the same location.
You must set up the location profile and the item profile in the JD Edwards EnterpriseOne Warehouse Management system to allow the mixing of dates.
- Allow Putaway
-
Select to indicate the location is valid for putaway selection. Clear to indicate the location is not valid for putaway.
- Allow Pick
-
Select to indicate this location is valid for picking. Clear to indicate this location is not valid for picking.
- Allow Replenish
-
Select to indicate you allow replenishment from a location. Clear to indicate that you do not allow replenishment from a location.
2.2.13 Defining Location Profile Information for Multiple Locations
Access the Enter Location Profile Information form.
Figure 2-7 Enter Location Profile Information form
Description of ''Figure 2-7 Enter Location Profile Information form''
- Putaway Sequence
-
Enter a number that you assign to a location to determine its place in the putaway sequence. Putaway is the movement of inventory to storage after receipt. A sequence of locations describes the path that warehouse employees follow through the warehouse during movement tasks. You can specify in the Movement Instructions (P46095) whether the system uses the putaway sequence as a tiebreaker when there are multiple locations selected for putaway. For example, you can establish sequencing for the most efficient putaway routing.
- Picking Sequence
-
Enter a number that you assign to a location to determine its place in the picking sequence. Picking is the movement of inventory from storage to satisfy an order. A sequence of locations describes the path that warehouse employees follow through the warehouse during movement tasks. You can specify in the Movement Instructions (P46095) whether the system uses the picking sequence as a tiebreaker when there are multiple locations selected to pick from. For example, you can establish sequencing for the most efficient pick routing.
- Replenish Sequence
-
Enter a number that you assign to a location to determine its place in the replenishment sequence. Replenishment is the movement of inventory from storage locations to picking locations. A sequence of locations describes the path that warehouse employees follow through the warehouse during movement tasks. You can specify in the Movement Instructions (P46095) whether the system uses the replenishment sequence as a tiebreaker when there are multiple locations selected to replenish from. For example, you can establish sequencing for the most efficient replenishment routing.
- Distance Latitude
-
Enter a value for the X or latitude coordinate of a location in the warehouse. The system can use latitude, longitude, and height as a tiebreaker when suggesting locations for putaway and picking.
- Distance Longitude
-
Enter a value for the Y or longitude coordinate of a location in the warehouse. The system can use latitude, longitude, and height as a tiebreaker when suggesting locations for putaway and picking.
- Maximum Items
-
Enter a number from 1 to 99 that specifies the maximum number of different items that can be stored in this location simultaneously.
Enter a number. If you leave the field blank (or zero), the system does not limit the number of different items in the location.
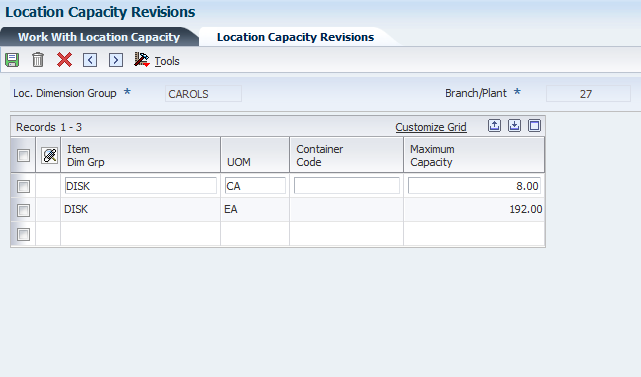
2.2.14 Defining Location Capacity
Access the Location Capacity Revisions form.
Figure 2-8 Location Capacity Revisions form
Description of ''Figure 2-8 Location Capacity Revisions form''
The Location Capacity Revisions form displays all the records for the selected location dimension group.
To filter records specific to an item:
-
On the Work With Location Capacity form, select a record.
-
Select the Item Number option.
-
Enter item number and branch/plant values in the Item Number and Branch/Plant fields respectively.
-
From the Row menu, select Revisions.
The system displays location dimension group records on the Location Capacity Revisions form for the item number you entered on the Work With Location Capacity form.
|
Note: The system uses the value you enter in the Item Number field on the Work With Location Capacity form to filter records on the Location Capacity Revisions form.However, the system does not use the value you enter in the Item Dimension Group field on the Work With Location Capacity form to filter records on the Location Capacity Revisions form. |
- Loc. Dimension Group (location dimension group)
-
Enter a code (46/LD) that identifies a group of locations that share the same dimensions. A location dimension group defines the dimensions for all locations that belong to the group. After you set up a location dimension group, you can assign locations to the group through Location Profile Revisions (P46020).
You must define location dimensions if you plan to use volume-based putaway.
- Item Dim Grp (item dimension group)
-
Enter a code (41/01) that identifies a group of items that share the same dimensions. An item dimension group defines the dimensions for all items that belong to the group. After you set up an item dimension group, you can assign items to the group through Classification Codes (P4101).
- UOM (unit of measure)
-
Enter a UDC (00/UM) that indicates the quantity in which to express an inventory item, for example, CS (case) or BX (box).
- Container Code
-
Enter a code (46/EQ) that identifies a storage container or a shipping carton. A storage container can be an open container where items are stored on the container (for example, a pallet), or a closed container where items are stored in the container (for example, a box). You use the Container and Carton Codes program (P46091) to define storage containers.
- Maximum Capacity
-
Enter the maximum of an item or item dimension group that can fit in the specified location dimension group. You can also define a storage container to limit the quantity.
2.3 Setting Up Fixed Locations and Zones
This section provides an overview of fixed locations and zones, lists a prerequisite, and discusses how to:
2.3.1 Understanding Fixed Locations and Zones
A fixed location is a place that you use for the same purpose, such as putaway, picking, and replenishment for a given item. A zone is a group of locations that you use for a particular purpose. For example, a flow rack near the shipping dock always holds the same item for picking, and a bulk location near the receiving dock always holds pallets of the same item. You use a fixed zone as one large location from which to replenish fixed picking locations.
2.3.1.1 Fixed Putaway Locations
You set up fixed putaway locations to use the same locations consistently for storing a given item. This consistency enables you to segregate putaway locations for certain items from other locations, or to keep putaway locations near their picking and replenishment locations. Often, the fixed putaway locations are the same as the fixed picking locations.
2.3.1.2 Fixed Picking Locations
You set up fixed picking locations to use the same locations consistently for picking a given item. This consistency enables you to segregate picking locations from other locations, or to keep certain items' picking locations near their putaway and replenishment locations. Often, the fixed picking locations are the same as the fixed putaway locations.
You might not want to create replenishment suggestions with a quantity that exceeds the quantity that a location can hold. Before you set up a fixed picking location, verify that the sum of each picking location's normal replenishment quantity and maximum replenishment quantity do not exceed the location's maximum capacity quantity. If they do exceed the location's maximum capacity quantity, the system prints movement documents to replenish a greater quantity than the location can hold because the system does not perform any capacity checking. You might not be able to store all of the items in the picking location.
You must set up fixed picking locations if you intend to use replenishment. Replenishment is the process by which the system refills picking locations in which items are depleted.
2.3.1.3 Fixed Replenishment Zones
You set up one or more fixed replenishment zones to connect replenishment locations with picking locations. The replenishment locations then refill the same picking locations consistently. This process enables you to segregate replenishment zones from other locations or to keep the replenishment locations for certain items near their picking locations.
If you have not set up a fixed replenishment zone for a picking location, the system searches for a replenishment zone that is attached to a picking zone. If you have not set up a picking zone, the system displays an error.
2.3.2 Prerequisite
Before you complete the tasks in this section, verify that the appropriate movement instruction table can access fixed locations.
2.3.3 Forms Used to Set Up Fixed Locations and Zones
2.3.4 Setting Up Fixed Putaway Locations
Access the Fixed Putaway Location Revisions form.
Figure 2-9 Fixed Putaway Location Revisions form
Description of ''Figure 2-9 Fixed Putaway Location Revisions form''
- Location
-
Enter the area in the warehouse where you receive inventory. The format of the location is user-defined and you enter the location format for each branch/plant.
2.3.5 Setting Up Fixed Picking Locations
Access the Fixed Picking Location Revisions form.
Figure 2-10 Fixed Picking Location Revisions form
Description of ''Figure 2-10 Fixed Picking Location Revisions form''
- Maximum Pick Quantity
-
Enter a number to indicate the maximum quantity to be picked for an item in a specific unit of measure at a location. The system does not suggest this location if the quantity to be picked exceeds the maximum pick quantity you define in this field.
- Max Replenishment Quantity
-
Enter a number to specify the maximum quantity to be replenished to a fixed picking location. You must enter a quantity in this field if you are implementing economic replenishment. You specify in the processing options for the Location Selection Driver program (R46171) for automatic, or online, replenishment and in the processing options for the Batch Replenishment program (P461601) to perform economic replenishment
- Normal Replenishment Point
-
Enter a number to indicate the normal level of inventory at a fixed picking location that the system uses during batch replenishments to generate replenishment requests. You can have the system perform replenishment when the quantity in a fixed picking location reaches either the normal replenishment point or the minimum replenishment point. During automatic, or online, replenishment, the system uses the minimum replenishment point. For batch replenishment, you specify in the processing options of the Batch Replenishment program (P461601) which replenishment point you want the system to use
- Min Replenishment Point
-
Enter a number to indicate the minimum quantity of inventory at a fixed picking location that the system uses to generate an online replenishment request. You can have the system perform replenishment when the quantity in a fixed picking location reaches either the normal replenishment point or the minimum replenishment point. During automatic, or online, replenishment, the system uses the minimum replenishment point. For batch replenishment, you specify in the processing options of the Batch Replenishment program (P461601) which replenishment point you want the system to use
2.3.6 Setting Up Fixed Replenishment Zones
Access the Fixed Replenishment Zone Revisions form.
Figure 2-11 Fixed Replenishment Zone Revisions form
Description of ''Figure 2-11 Fixed Replenishment Zone Revisions form''
Figure 2-12 Fixed Replenishment Zone Revisions form
Description of ''Figure 2-12 Fixed Replenishment Zone Revisions form''
- Replenishment Zone
-
A code (46/ZN) that identifies replenishment zones, which are areas in the warehouse from which items are retrieved to replenish or refill picking locations. You assign zones to locations using Location Master (P4100).
2.4 Setting Up Random Requirements
This section provides an overview of random requirements and discusses how to:
-
Define location characteristics by location or group.
-
Assign characteristic groups to locations.
-
Set up random rules.
-
Create the Random Locations table.
-
Build the tiebreaker table.
2.4.1 Understanding Random Requirements
A random requirement is a set of instructions that determine how the system builds random locations in the warehouse. Random requirements allow you to use warehouse space more efficiently because the system selects locations randomly. By creating this flexibility in storage, you enable the process of location selection to operate in a more efficient manner.
2.4.1.1 Location Characteristics
You define location characteristics to create random requirements. The system uses the random requirements to create random locations, which are groups of locations that correspond to a random rule. The random rule then can be assigned to the movement instructions.
For example, assume that you have an order that consists of items that require refrigeration and are stored in liquid form. Two of the characteristics that you would define might be cold and wet.
2.4.1.2 Characteristic Groups
You can assign characteristic groups to locations to create random rule requirements. You may also assign characteristics to a location using the Location Characteristics program (P46021).
For example, assume that you have created a characteristic group for an order that consists of refrigerated items that are stored in liquid form. You must specify locations in the warehouse that are suitable in temperature and space for storing the items.
2.4.1.3 Random Rules
You use random rules to make location selection more efficient by randomly distributing items throughout the warehouse instead of using fixed locations for putaway, picking, and replenishment. You create a random rule using random requirements that are based on location characteristics.
After you set up a random rule, you can include that random rule in a putaway, picking, or replenishment instruction table.
After you add or change a random rule or a location characteristic, you must build the Random Locations table using the Build Random Location Table program (R46821). If you do not run the Build Random Location Table program, the first putaway request that attempts to use the random rule causes the system to automatically rebuild the F46821 table. The rebuild might result in slower processing of the movement request.
2.4.1.4 Random Locations Table
The F46821 table contains a list of all the random locations for a rule. You run the Build Random Location Table program after you change the random rule requirements or after you change the characteristics of random locations.
When you run the Build Random Location Table program, the system matches location characteristics with random rule characteristics and updates the Random Locations table.
2.4.1.5 Tiebreaker Table
Whenever you move inventory, the system uses information from the F46095 table to suggest locations for picking, putaway, or replenishment. If several locations meet the criteria, the system uses the information stored in a tiebreaker table to select the optimum location. To determine tiebreaker information for putaway to random locations, you must create a tiebreaker table that stores this information about every location in the warehouse:
-
Sequence number
-
Available space
-
Proximity to a base location
You build a tiebreaker table using a program that selects locations and calculates their proximity and available space. You can use the generic program to build a tiebreaker table for all locations in the warehouse, or you can modify the program to create a table with fewer locations.
You must rebuild the tiebreaker table whenever you change any of this data:
-
Putaway, Picking, or Replenishment Sequence Codes
-
Location characteristics
-
Location dimensions
-
Location proximity (latitude, longitude, or height)
2.4.2 Forms Used to Set Up Random Requirements
2.4.3 Defining Location Characteristics by Location or Group
Access the Location Characteristics Revisions form.
Figure 2-13 Location Characteristics Revisions form
Description of ''Figure 2-13 Location Characteristics Revisions form''
2.4.5 Setting Up Random Rules
Access the Random Requirements Revisions form.
Figure 2-14 Random Requirements Revisions form
Description of ''Figure 2-14 Random Requirements Revisions form''
- Random Rule
-
Enter a code (46/SR) that identifies a random requirements table. If you use Random, Empty or Existing locations for the movement method, you can enter a random rule code to consider only locations whose characteristics match the random rule. You can leave Random Rule blank to have the system consider all locations for each movement method.
- Sequence
-
Enter a number that ranks optional characteristics in a random rule. During random putaway, picking, and replenishment, the system selects locations with characteristics that match the random rule's characteristics, according to the random characteristic sequence. If a characteristic is required, the system does not use the random sequence.
- Rel. (relationship)
-
Enter a code ((H46/PU) that indicates what location characteristics should be included or excluded when choosing locations with a random rule. Each characteristic specified on a random rule must have a relationship code. You assign relationships on Random Tables (P46822). Values are:
Enter EQ: to search for locations with characteristics that equal the random rule characteristics
Enter NE: to search for locations with characteristics that do not equal the random rule characteristics
- R O (required or optional)
-
Enter a code (H46/RQ) that indicates whether a location characteristic is required or optional for a random rule to select the location. The random rule selects locations that have characteristics matching the random rule's required characteristics. The random rule does not necessarily select locations matching the random rule's optional characteristics. Values are:
Enter R: to use only locations that have this required characteristic
Enter O: to use locations that have this optional characteristic, if possible
- Characteristic
-
A code (46/DF) defines a characteristic for a location or location group. You can define unlimited characteristics (such as Cold, Dark, Dry, Heavy, and Secure) for any location or location group.
2.4.6 Creating the Random Locations Table
Select Advanced & Technical Ops (G4631), Build Random Location Table.
2.4.7 Building the Tiebreaker Table
Select Advanced & Technical Ops (G4631), Build Tiebreaker Information.
2.5 Setting Up Item Warehouse Information
This section provides an overview of item warehouse information, and discusses how to:
-
Define unit of measure structures.
-
Set processing options for Item Master (P4101).
-
Define item classification codes.
-
Set up item profiles.
-
Set up item unit of measure and capacity definitions.
-
Set processing options for Item Unit of Measure Definition.
2.5.1 Understanding Item Warehouse Information
You must provide warehouse information about each item before the system can process items. For example, you can classify items by their size or the demand for them. You must set up units of measure such as each and box; and define a unit of measure structure that describes the relationship of each unit of measure to the other units of measure. You also must specify default locations for items and whether items can mix with different items in the same locations.
2.5.1.1 Unit of Measure Structures
You must define a unit of measure structure to process an item in the JD Edwards EnterpriseOne Warehouse Management system. A unit of measure structure describes the relationship between the smallest unit of measure and larger units of measure, such as each to box, box to case, and case to pallet. For example, if you lack bulk floor space and you receive a pallet of 500 items, the unit of measure structure enables you to convert a pallet to a smaller unit of measure automatically and to store the items in smaller locations. The system uses the unit of measure structure to select the most efficient unit of measure for picking, putaway, and replenishment.
You can define an unlimited number of unit of measure conversions for an item. For example, you can define conversions such as 24 items per case, 16 cases per pallet, and so on. However, the system limits the structure to 5 unit of measure levels. You assign a code (1 through 5) to each unit of measure level in the structure.
Each item must have a primary unit of measure. The primary unit of measure is the smallest unit of measure that the system can track. You should assign a structure code of 1 to the largest unit of measure, such as a pallet. The system automatically assigns the highest numeric structure code for an item (up to five unit of measure levels) to the primary (smallest) unit of measure.
The system uses the unit of measure conversions based on how you set the unit of measure conversion in System Constants. You can use conversions that were defined for the item in a specific branch/plant, or you can define conversions for an item that apply to all branch/plants. If you do not set the unit of measure conversion, the system searches for the item's conversion in the Item Master table.
The system overrides the Unit of Measure structures for each item that is tracked in the system by a serial number. For these items, the primary unit of measure is always in level one, with a quantity of one. The system tracks serial numbers using one record for each serial number. You cannot merge these records.
2.5.1.2 Item Classification Codes
An item classification code is a group to which you assign an item. During inventory movement (putaway, picking, and replenishment), the system uses these codes to select the movement tables that determine location selection. You use two types of item classification codes for the warehouse:
-
Item dimension group
-
Warehouse process groups
For example, you can assign a compact disc to the item dimension group DISK and to the warehouse process group FAST because it is a popular item and does not remain in stock very long.
2.5.1.3 Item Profiles
Every item that you process through the warehouse must have an item profile. The item profile contains basic information such as:
-
Whether you can store items of different types or ages in the same location.
-
Whether to use one or two-phase movement for putaway, picking, and replenishment.
-
The item's various default locations.
For example, you can set up a profile for item Compact Disc to:
-
Allow mixing with other items.
-
Use two-phase putaway, picking, and replenishment.
-
Use location V/ / as its default variance location.
2.5.1.4 Item Unit of Measure and Capacity Definitions
You define information about each item's units of measure, such as each, box, and case, to allow the system to perform putaway, picking, and replenishment of that item. You define the item's units of measure when you create the Item Master record for the item.
Each item's unit of measure definition includes information such as:
-
The default storage container.
-
A switch that controls license plate tracking for that unit of measure when license plates are activated.
-
The dimensions that the system uses to calculate volume.
A unit of measure structure describes the relationship of eaches to boxes, boxes to cases, cases to pallets, and so on. If you use a unit of measure structure, you define each unit of measure in the structure during the creation of the basic Item Master record for the item. If you do not use a unit of measure structure, you must define the primary unit of measure for the item.
You use the Work With Item Unit of Measure Definition form to define the unit of measure's dimensions and how the system processes each unit of measure for an item's structure. You can define units of measure by item or item dimension group, and the system enables you to specify whether to display item or item dimension group information.
You select an item dimension group from UDCs. If the predefined item dimension groups do not meet the needs of the business, you can define a new item dimension group on the User Defined Codes form and then reference that group on Unit of Measure Group Revisions.
If you set up an item unit of measure definition, it always overrides an item group unit of measure definition. The item unit of measure is specific to that item, whereas you use the item group unit of measure to supply the unit of measure information for all items in the group during inventory movement. You can set up an item dimension group and then set up item unit of measure definitions for items that vary from the normal dimensions of the group.
2.5.2 Forms Used to Set Up Item Warehouse Information
2.5.3 Setting Processing Options for Item Master (P4101)
Processing options enable you to specify the default processing for programs and reports.
2.5.3.1 Defaults
These processing options define the default information that the system uses, such as unit of measure.
- 1. Primary Unit of Measure
-
Identify the primary unit of measure (00/UM) that the system uses. If you leave this processing option blank, the system uses EA (each).
- 2. Weight Unit of Measure
-
Identify the unit of measure (00/UM) for weight that the system uses. If you leave this processing option blank, the system uses LB (pounds).
- 3. Volume Unit of Measure
-
Enter a UDC (00/UM) that indicates the unit of measure by metric conversion for ambient volume. For example, the unit of measure code for a gallon might be GL, or for a liter it might be LT.
- 4. Template
-
Enter a template name that you can use when entering items on Item Master Revisions (P4101). This name is case sensitive. If you use any capital letters in the template name when you add it, you must enter those letters in capitals whenever you search for or attach the template to Item Master Revisions.
2.5.3.2 Process
These processing options enable you to specify the effective from and thru dates that the system uses in the Item Notes table and whether the system displays certain forms when you add or change information on the Item Master Revisions form.
- 1. Notes From Date
-
Specify the effective from date that the system uses in the Print Messages table (F4016). If you leave this processing option blank, the system uses the system date.
- 2. Notes Thru Date
-
Specify the effective through date that the system uses in the Print Messages table (F4016). If you leave this processing option blank, the system uses the last day of the default century.
- 3. Category Codes
-
Specify whether the system displays the Category Codes form when you add or change information on the Item Master Revisions form. Values are:
Leave blank and the system does not display the form.
Enter 1: to display the form.
- 4. Additional System Information
-
Indicate whether the system displays the Additional System Information form when you add or change information on the Item Master Revisions form. Values are:
Leave blank and the system does not display the form.
Enter 1: to display the form.
- 5. Storage/Shipping
-
Specify whether the system displays the Storage/Shipping form when you add or change information on the Item Master Revisions form. Values are:
Leave blank and the system does not display the form.
Enter 1: to display the form.
- 6. Cost Revisions (Conditional)
-
Specify whether the system displays the Cost Revisions form when you add or change information on the Item Master Revisions form. Values are:
Leave blank and the system does not display the form.
Enter 1: to display the form.
Note:
In order for the system to display the Cost Revisions form, you must also set the value for the Inventory Cost Level field to 1 on the Item Master Revisions form. - 7. Price Revisions (Conditional)
-
Specify whether the system displays the Price Revisions form when you add or change information on the Item Master Revisions form. Values are:
Leave blank and the system does not display the form.
Enter 1: to display the form.
Note:
In order for the system to display the Price Revisions form, you must also set the value for the Sales Price Level field to one on the Item Master Revisions form. - 8. Unit Of Measure Conversions (Conditional)
-
Specify whether the system displays the Unit of Measure form when you add or change information, and when the system performs the unit of measure conversations at the item level. Values are:
Leave blank and the system does not display the Unit of Measure form.
Enter 1: and the system displays the Unit of Measure form.
- 9. Item Branch
-
Specify whether the system displays the Item Branch form when you add or change information on the Item Master Revisions form. Values are:
Leave blank and the system does not display the Item Branch form.
Enter 1: to display the Item Branch form, but return to the Item Master form.
Enter 2: to display and remain on the Item Branch form.
- 10. Attachments
-
Specify whether the system displays the Item Notes form when you select a media object on the Work With Item Master Browse form. Values are:
Leave blank and the system displays only the internal attachments.
Enter 1: to display the Item Notes form.
- 11. Use Templates
-
Specify whether you want to use templates for segmented items. Values are:
Leave blank and the system does not use templates.
Enter 1: to use templates.
2.5.3.3 Global Update
This processing option enables you to update changes made to the second or third item numbers to records in selected tables.
- 1. Transfer Changes
-
Specify which tables that the system updates when you have made changes to item numbers in the item branch records. You use the UDC (40/IC) to compile the list of tables. Values are:
Leave blank and the system does not update any tables.
Enter 1: and the system updates only those tables that contain item branch information with changes to the second and third item numbers.
Enter 2: and the system updates only selected tables that contain item branch information with changes to the second and third item numbers.
2.5.3.4 Versions
These processing options enable you to specify the versions for various programs that you access from the Item Master program. Versions control how the system processes and displays information. Therefore, you must set the processing options to meet the specific needs of the business.
- 1. Item Availability (P41202)
-
Specify the version that the system uses for the Item Availability program (P41202). If you leave this processing option blank, the system uses version ZJDE0001.
- 2. Item Branch (P41026)
-
Specify the version that the system uses for the Item Branch program (P41026). If you leave this option blank, the system uses version ZJDE0001.
- 3. Cost Revisions (P4105)
-
Specify which version that the system uses when you access the Cost Revisions program (P4105). If you leave this processing option blank, the system uses version ZJDE0001.
- 4. Segmented Item Availability (P41206)
-
Specify which version that the system uses when you access the Segmented Item Availability program (P41206). If you leave this processing option blank, the system uses version ZJDE0001.
- 5. Item Segment Selection (P410015)
-
Specify which version that the system uses when you access the Item Segment Selection (P410015). If you leave this processing option blank, the system uses version ZJDE0001.
2.5.3.5 Interop
These processing options allow you to specify whether the system performs outbound interoperability processing and whether the system creates a record of a transaction before changes to the transaction.
- 1. Transaction Type
-
Enter the type of document, UDC (00/TT), for which you want the system to search.
This UDC identifies the type of transaction, such as an invoice or a sales order. You can either enter the transaction type or select it from the Select User Define Code form. The system uses the transaction type as the default value.
Note:
If you leave this processing option blank, the system does not perform export processing. - 2. Before/After Image Processing
-
Specify whether the system creates a record of a transaction after the transaction is changed, or whether the system creates records of a transaction before and after a transaction is changed. Values are:
Leave blank to create a record of a transaction after changes.
Enter 1: to create two records: one record before changes and one record after changes
2.5.4 Defining Unit of Measure Structures
Access the Item Unit of Measure Conversions form.
- From UoM (from unit of measure)
-
Enter a UDC (00/UM) that identifies the unit of measure for an item. For example, it can be eaches, cases, boxes, and so on.
- Quantity
-
Enter the factor that the system uses to convert one unit of measure to another unit of measure.
- To UoM (to unit of measure)
-
Enter a UDC (00/UM) that indicates a secondary unit of measure.
- Structure Code
-
A code that determines the hierarchy of items in containers or pallets.
For example:
Unit of Measure
-
1 Pallet = 24 Cases: structure code 1
-
1 Case = 12 Interpacks: structure code 2
-
1 Interpack = 3 Boxes: structure code 3
-
1 Box = 6 Eaches: structure code 4
Assign structure code 1 to the largest unit of measure, with smaller units assigned to codes 2, 3, and 4.
Given the previous structure example, when one item is stored in the warehouse the location detail (F4602) would have a structure of:
1 Pallet/ with 24 Cases on the Pallet/ with 12 Interpacks in each Case/with 3 Boxes in each Interpack/ with 6 Eaches in each Box
Note:
It is not necessary to define the primary unit of measure within a structure. The default value is always the lowest level. Or, if you are changing the structure in a program, the system verifies that the primary is present in the structure and is the lowest level. -
2.5.5 Defining Item Classification Codes
Access the Category Codes form.
- Item Dimension Group
-
Enter a UDC (41/ 01) that identifies a group of items that share the same dimensions. An item dimension group defines the dimensions for all items that belong to the group. After you set up an item dimension group, you can assign items to the group through Classification Codes (P4101).
- Warehouse Process Grp 1
-
Enter a UDC (41/02) that identifies a group of items to move the same way. A process group determines what movement instructions the system uses for putaway, picking, and replenishment. You use the Classification Codes program (P4101) to assign items to process groups.
- Warehouse Process Grp 2
-
Enter a UDC (41/02) that identifies a group of items to move the same way. A process group determines what movement instructions the system uses for putaway, picking, and replenishment. You use the Classification Codes program (P4101) to assign items to process groups.
- Warehouse Process Grp 3
-
Enter a UDC (41/02) that identifies a group of items to move the same way. A process group determines what movement instructions the system uses for putaway, picking, and replenishment. You use the Classification Codes program (P4101) to assign items to process groups.
2.5.6 Setting Up Item Profiles
Access the Item Profile Revisions form.
- Overflow Location
-
Enter a code that identifies the location that the system uses when an item cannot fit into the suggested putaway locations. You can monitor movement suggestions for the overflow location by accessing the audit report (P46175) or by inquiring on the location detail (F4602).
- Variance Location
-
Enter a code that identifies the location that the system uses when you confirm a smaller quantity than the suggested quantity during putaway confirmation. You do this through Change/Split Suggestion during putaway confirmation, where you enter a quantity that is smaller than the suggested quantity, and confirm with a variance to the suggested quantity. The system places the variance (remaining) quantity in the variance location.
- Holding Location
-
Enter a code that identifies the location that the system uses when you confirm a larger quantity than the suggested pick quantity during pick confirmation. You do this through Change/Split Suggestion during pick confirmation, where you enter a quantity that is greater than the suggested quantity, and confirm with a variance to the suggested quantity. The system places the variance (extra) quantity in the holding location.
- Base Putaway Location
-
Enter a code that identifies the base putaway location that the system uses to calculate proximity when you specify proximity as the tiebreaker in a putaway instruction. If you use a tiebreaker that sequences locations according to proximity, the system ranks the locations based on their distance from this base putaway location. The system calculates distance based on the coordinates (longitude, latitude, and height) you defined in the location profile (P46020).
- Base Picking Location
-
Enter a code that identifies the base picking location that the system uses to calculate proximity when you specify proximity as the tiebreaker in a picking instruction. If you use a tiebreaker that sequences locations according to proximity, the system ranks the locations based on their distance from this base picking location. The system calculates distance based on the coordinates (longitude, latitude, and height) you defined in the location profile (P46020).
- 1 or 2 Phase Putaway
-
Enter a UDC (H46/PT) that indicates whether you use 1- or 2-phase confirmation during putaway.
-
1-phase confirmation means the process is confirmed as one step after goods have moved from the starting location to the destination location.
-
2-phase confirmation means the process is confirmed in two steps: the first when the goods have moved from the starting location to the staging location, and the second when the goods have moved from the staging location to the destination location.
If you use 2-phase confirmation, you can specify whether the confirmation is logical or physical.
-
Logical 2-phase confirmation generates one document and does not indicate physical movement to the staging location.
-
Physical 2-phase confirmation generates two documents: the first indicates movement from the starting location to the staging location, and the second indicates movement from the staging location to the destination location.
Values are:
I: Use 1-phase confirmation
L: Use logical 2-phase confirmation
P: Use physical 2-phase confirmation
-
- 1 or 2 Phase Picking
-
Enter a UDC (H46/PK) that indicates whether you use 1- or 2-phase confirmation during picking.
-
1-phase confirmation means the process is confirmed as one step after goods have moved from the starting location to the destination location.
-
2-phase confirmation means the process is confirmed in two steps: the first when the goods have moved from the starting location to the staging location, and the second when the goods have moved from the staging location to the destination location.
If you use 2-phase confirmation, you can specify whether the confirmation is logical or physical.
-
Logical 2-phase confirmation generates one document and does not indicate physical movement to the staging location.
-
Physical 2-phase confirmation generates two documents: the first indicates movement from the starting location to the staging location, and the second indicates movement from the staging location to the destination location.
Values are:
I: Use 1-phase confirmation
L: Use logical 2-phase confirmation
P: Use physical 2-phase confirmation
-
- 1 or 2 Phase Replenishment
-
Enter a UDC (H46/RP) that indicates whether you use 1- or 2-phase confirmation during replenishment.
-
1-phase confirmation means the process is confirmed as one step after goods have moved from the starting location to the destination location.
-
2-phase confirmation means the process is confirmed in two steps: the first when the goods have moved from the starting location to the staging location, and the second when the goods have moved from the staging location to the destination location.
If you use 2-phase confirmation, you can specify whether the confirmation is logical or physical.
-
Logical 2-phase confirmation generates one document and does not indicate physical movement to the staging location.
-
Physical 2-phase confirmation generates two documents: the first indicates movement from the starting location to the staging location, and the second indicates movement from the staging location to the destination location.
Values are:
I: Use 1-phase confirmation
L: Use logical 2-phase confirmation
P: Use physical 2-phase confirmation
-
- Mix Items (Y/N)
-
Select to indicate you want the system to store different items in the same location.
- Mix Dates/Lots (Y/N)
-
Select to indicate you want the system to assign items to a location.
You must set up the location profile and the item profile in the JD Edwards EnterpriseOne Warehouse Management system to allow the mixing of dates.
- Split Lines (Y/N)
-
Select to indicate the system can split a purchase order line when you create a putaway suggestion for the order line.
2.5.7 Setting Processing Options for Item Unit of Measure Definition (P46011)
Processing options enable you to specify the default processing for programs and reports.
2.5.7.1 Display
Use these processing options to specify how the system displays information.
- 1. Select Item Dimension Group
-
Enter a UDC (46/IG) to display information about item numbers or item dimension groups. Values are:
Leave blank or enter 0:to display item dimension group information.
Enter 1: to display item number information.
- 2. Item UOM Definition Tab to Display
-
Leave blank to display the Process Rules Tab or enter 1to display the Capacity Requirements Tab when working with Item Unit Of Measure revisions.
2.5.8 Setting Up Item Unit of Measure and Capacity Definitions
Access the U/M Definition by Item Revisions form.
Figure 2-15 U/M Definition by Item Revisions form
Description of ''Figure 2-15 U/M Definition by Item Revisions form''
2.5.8.1 Process Rules
Select Process Rules.
- Default Pack Code
-
Enter a code (46/PK) that identifies the packing materials to use (such as opaque shrink wrap, or foam nuggets) if repacking is required before putaway. If you set the Repack (Y/N) field to Y, you must enter a code in this field.
- Container Code
-
Enter a code (46/EQ) that identifies a storage container or a shipping carton. A storage container can be an open container where items are stored on the container (for example, a pallet), or a closed container where items are stored in the container (for example, a box).
- Capacity Method
-
A code that indicates the capacity method the system uses to calculate whether the quantity to be put away fits in a location. Values are:
1: Volume checking. The system compares the available cubic dimensions of a location to the cubic dimensions of the item to be put away.
2: Layering. The system compares the item's dimensions to the usable dimensions of the location. This method lets you layer goods in a location. If you specify this capacity method, you must also specify whether the item can be rotated. If there is enough available volume, and the item's dimensions fit in the location, the system suggests the location for putaway
3: Quantity checking. The system examines the quantity of the item that should fit in the location, as you defined it through Location Capacity Definition (P46024).
- U/M Usage
-
A code that indicates whether the default storage container assigned to the specified item in this unit of measure is an open, pallet-type container or a closed, box-type container. The system calculates the item's volume and weight based on container type. Valid codes are:
1: The container is an open, pallet-type container. The system calculates its volume and weight as follows: Height = the height of the container plus the height of the items on the container Weight = the weight of the container plus the weight of the items on the container Width = the larger of the width of the container or the items on the container Depth = the larger of the depth of the container or the items on the container
2: The container is a closed, box-type container. The system calculates its volume and weight as follows: Weight = The weight of the container plus the weight of the goods in the container Height, width, and depth are pulled from Container and Carton Code (P46091) information, where you also define the container's weight.
Note:
If you do not specify a default container for the specified item in this unit of measure, the system uses the height, width, depth, and weight defined on this form. - Carton Rcmd Method
-
A code that indicates the method that the system uses to recommend a carton for the specified item in this unit of measure. Values are:
Blank: Do not recommend cartons for the specified item in this unit of measure.
1: Recommend shipping cartons for the specified item in this unit of measure based on the volume of the item and the volume of the shipping carton.
2: Recommend shipping cartons for the specified item in this unit of measure based on the percentage of the shipping carton that the item and unit of measure occupy.
3: Recommend shipping cartons for the specified item in this unit of measure based on the warehouse standard pack of the item and unit of measure.
- Putaway Tag Method
-
A code that indicates the number of move tags that the system prints for putaway of this item. Valid codes are:
N: Do not print move tags for putaway
T: Print one move tag per putaway trip
1: Print a move tag for each unit of this unit of measure for putaway
- Picking Tag Method
-
A code that indicates the number of move tags that the system prints for picking of this item. Valid codes are:
N: Do not print move tags for picking
T: Print one move tag per picking trip
1: Print a move tag for each unit of this unit of measure for picking
- Replen Tag Method
-
A code that indicates the number of move tags that the system prints for replenishment of this item. Valid codes are:
N: Do not print move tags for replenishment
T: Print one move tag per replenishment trip
1: Print a move tag for each unit of this unit of measure for replenishment
- License Plate
-
Indicate whether you want the system to automatically create a license plate number for the specified item or item dimension group in this unit of measure.
- Breakdown
-
Indicate whether you allow the system to break a unit of measure (such as a pallet) down into smaller units of measure (such as cases).
- Rollup
-
Indicate whether you allow rollup during picking.
- Repack
-
Indicate whether the specified item in this unit of measure should be repacked before putaway.
Note:
You must also specify a packing method by entering a code in the Default Pack Code field. - Allow Rotation
-
A code that indicates whether you allow the system to rotate an item 90 degrees to determine whether the item fits into a location.
Note:
You must enter a code in this field if you use capacity method 2 (layering).
2.5.8.2 Capacity Requirements
Select Capacity Requirements.
- Gross Dimensions
-
Enter the gross width of the location as defined within the:
-
Location dimension group.
-
Unit Of Measure Definition form (by item or group).
-
Storage container or shipping container.
The unit of measure can be defined on the Branch/Plant Constants - Location Definition form.
-
- Gross Weight
-
Enter the gross weight of one unit of the item in this unit of measure, or the weight of an empty storage container or shipping carton. The system enters these as the default values in the F4602 and uses the values in maximum weight calculations for specified locations during putaway.
2.6 Setting Up Inclusion Rules
This section provides an overview of inclusion rules, and discusses how to:
-
Define inclusion rules.
-
Set processing options for Supply/Demand Inclusion Rules (P34004).
2.6.1 Understanding Inclusion Rules
An inclusion rule specifies which order type, line type, and status combinations that you process through the warehouse. The inclusion rules therefore determine the steps at which the system creates putaway requests (during purchase order receipts entry) or picking requests (during sales order processing).
You must define the inclusion rule and include the order type, next status, and line type for the order for which you want to create a putaway or picking request.
2.6.2 Forms Used to Set Up Inclusion Rules
2.6.3 Setting Processing Options for Supply/Demand Inclusion Rules (P34004)
Processing options enable you to specify the default processing for programs and reports.
2.6.3.1 WO Types
Use this processing option to indicate which line of the data dictionary column title the system uses for the text description of this data item.
- 1. Work Order Document Types.
-
Enter 1: to indicate the system uses the first line of the Data Dictionary column title for the text description of this data item. Enter 2: indicates the system uses the second line of the Data Dictionary column title for the text description. If this field is blank, the system uses the Data Dictionary row description. These can be stacked up one after another for multiple document types. If you leave this processing option blank, the system uses WO.
2.6.4 Defining Inclusion Rules
Access the Work With Supply/Demand Inclusion Rules form.
Figure 2-16 Work With Supply/Demand Inclusion Rules form
Description of ''Figure 2-16 Work With Supply/Demand Inclusion Rules form''
2.7 Setting Up Order Groups
This section provides an overview of order groups, and discusses how to set up order groups.
2.7.1 Understanding Order Groups
An order group is a set of document types, such as purchase orders or sales orders, that you use as a group to select movement instructions for putaway, picking, and replenishment. You define the order group to identify which putaway, picking, or replenishment instruction table to select during process selection.
You can use a blank name for the most commonly used order group.
You must assign each order type that you use to an order group. For replenishment, you must assign document type IQ to each order group that you use. Additionally, you must set up order groups to perform online replenishment.
2.7.2 Forms Used to Set Up Order Groups
2.7.3 Setting Up Order Groups
Access the Order Group Revisions form.
- Order Group
-
Enter a UDC (46/DT) that identifies a group of order types to process as one for putaway, picking, and replenishment transactions.
You set up order group codes on the User Defined Codes form, then add order types to the code on Order Groups (P46092). You specify an order group on Picking Instructions (P46095) to limit the order types that trigger replenishment after picking.
- Order Type
-
A code (00/DT) that identifies the type of document, such as an order or an invoice.
2.8 Setting Up Unit of Measure Groups
This section provides an overview of unit of measure groups, and discusses how to set up unit of measure groups.
2.8.1 Understanding Unit of Measure Groups
A unit of measure group is a set of units of measure the system processes in the same way during putaway, picking, and replenishment. This method saves you time during warehouse setup. You can use unit of measure groups by assigning the groups to movement instruction tables to control inventory movement.
You can assign a unit of measure to only one unit of measure group.
2.8.2 Forms Used to Set Up Unit of Measure Groups
2.8.3 Setting Up Unit of Measure Groups
Access the Unit of Measure Group Revisions form.
Figure 2-18 U/M Definition by Group Revisions form
Description of ''Figure 2-18 U/M Definition by Group Revisions form''
- Unit of Measure Group
-
Enter a UDC (46/UG) that identifies a group of units of measure the system process as one for putaway, picking, and replenishment transactions.
You use unit of measure groups to set up movement instructions for putaway, picking, or replenishment.
2.9 Setting Up Mixed Sequence Packing Groups
This section provides an overview of mixed sequence packing groups and discusses how to setup mixed sequence packing groups.
2.9.1 Understanding Mixed Sequence Packing Groups
A mixed sequence packing group is a group of items the system processes in the same container for use with a standard pack rule.
2.9.2 Forms Used to Set Up Mixed Sequence Packing Groups
| Form Name | Form ID | Navigation | Usage |
|---|---|---|---|
| Work With Mixed Item Packing Group | W460151A | Shipping and Packaging Setup (G46412), Mixed Sequence Packing Groups
Click Find on Work With Mixed Item Packing Group. |
Inquire on mixed item packing groups. |
| Mixed Item Packing Group Revisions | W460151A | On Work With Mixed Item Packing Group click Add. | Set up mixed item packing groups. |
2.9.3 Setting Up Mixed Sequence Packing Groups
Access the Mixed Item Packing Group Revisions form.
Figure 2-19 Mixed Item Packing Group Revisions form
Description of ''Figure 2-19 Mixed Item Packing Group Revisions form''
- Mixed Package Group
-
Enter a UDC (46/MP) value that identifies a group of item numbers that can be packaged in a mixed sequenced standard pack.
2.10 Setting Up Storage Containers
This section provides an overview of storage containers, and discusses how to:
-
Define storage containers.
-
Set up allowed containers for each location.
-
Set up item standard packs.
-
Set up processing options for Item Standard Packs (P460131).
-
Set up pallet standard packs.
2.10.1 Understanding Storage Containers
You can use storage containers, such as boxes, canisters, or pallets, to store items while they are in the warehouse. You set up storage containers to specify how much space that the container requires in the storage location. You can also specify which containers are allowed in a particular location. The system uses this information to select locations during putaway.
Two types of storage containers are available:
-
Open or pallet-type containers, which you can overfill to exceed the container's dimensions to create storage space on top of the container
-
Closed or box-type containers, which you cannot overfill
You define the dimensions, weight, capacity, and purpose (for example, whether a storage container is shippable) of each container to use in the warehouse. You can also define container pieces and enter Advance Ship Notice information about a shipping container. The system uses this information when choosing locations for putaway and also for transactions that involve other JD Edwards EnterpriseOne systems.
The system contains predefined container codes that identify various storage containers or shipping cartons, such as codes for packaging, pieces, or expendable containers. If the container codes do not meet the needs of the business, you can add codes on the User Defined Codes form.
The system enables you to put any type of container in a location. However, you can restrict the container types allowed in a location. You can enter a single container code, or you can define a list of allowed containers.
To calculate the space that you need for a storage container, you must define whether the item's container is pallet-type (open) or box-type (closed) on the Item U/M Definition - Capacity Requirements form.
2.10.1.1 Item Standard Packs
The required quantity of items is called the item standard pack. You can set up the quantity of items in a carton, based on the customer and the item's unit of measure. Using the Item Standard Packs application, you can set up item standard pack information by specifying the highest or largest item unit of measure that the system places in the first shipping container to be tracked.
You can also set up item standard packs for a group of similar items by using the mixed item packaging group. You use the Select Item Group processing option on the Process tab to specify the default display. When locating records on the Work With Item Standard Packs form (W460131A), you can also select whether to view item numbers or the item dimension group and packing groups.
|
Note: You specify an item's dimension group on the Category Codes form (W4101B) in the Item Master or Item Branch (P41026) applications. |
The system uses standard pack information to create the carton detail for the Advance Ship Notice. Because a standard pack can vary by Sold To and Ship To values, you can set up item standard packs by Sold To and Ship To values, or both.
You can also enter a recommendation sequence for alternate cartons, which is informational only. If you print labels for a shipment, the system generates a label for each layer that is set up.
The system uses the Standard Pack Recommendation Rules table (F460131) to process standard pack information.
2.10.1.2 Pallet Standard Packs
You can use the Pallet Standard Packs application (P460132) to specify standard pack quantities for other types of packaging, such as the number of cartons on a pallet. Because a standard pack can vary by Sold To and Ship To values, you can set up pallet standard packs by Sold To and Ship To values, or both.
The system uses the Standard Pack Recommendation Rules table to process standard pack information.
2.10.2 Forms Used to Set Up Storage Containers
2.10.3 Defining Storage Containers
Access the Container and Carton Codes Revisions form.
Figure 2-20 Container and Carton Codes Revisions form
Description of ''Figure 2-20 Container and Carton Codes Revisions form''
- Container Code
-
Enter a UDC (46/EQ) that identifies a storage container or a shipping carton. A storage container can be an open container where items are stored on the container (for example, a pallet), or a closed container where items are stored in the container (for example, a box). You use the Container and Carton Codes program (P46091) to define storage containers.
- Dimensionless Container
-
Select to specify that the carton dimensions are not used when calculating the size of the piece. For the calculations of the size of the piece, the system uses Item/UOM Dimensions.
You can set up the carton as a dimensionless carton. You can create cartons such as own or shrink wrap.
Clear and the system uses the carton to determine the size of the piece.
- Width
-
Enter the gross width of the location as defined within the:
-
Location dimension group.
-
Unit Of Measure Definition form (by item or group).
-
Gross width of a storage container or shipping container.
The unit of measure can be defined on the Branch/Plant Constants - Location Definition form.
-
- Depth
-
Enter the gross depth of the location as defined within the:
-
Location dimension group.
-
Unit Of Measure Definition form (by item or group).
-
Storage container or shipping container.
The unit of measure can be defined in Branch/Plant Constants - Location Definition.
-
- Height
-
Enter the gross height of the location as defined within the:
-
Location dimension group.
-
Unit Of Measure Definition form (by item or group).
-
Storage container or shipping container.
The unit of measure can be defined on the Branch/Plant Constants - Location Definition form.
-
- Cubes
-
Enter the gross cubic dimensions of the locations defined within the:
-
Location dimension group.
-
Unit Of Measure Definition form (by item or group).
-
Storage or shipping container.
The unit of measure is defined in Branch/Plant Constants - Page 2 (P41001).
-
- Dimension UM
-
Enter a UDC (00/UM) that identifies the unit of measure that the system uses to display dimensions for the warehouse. The system provides the ability to establish inches, centimeters, meters, and so forth, as a measuring standard.
- Cubes UM
-
Enter a UDC (00/UM) that identifies the unit of measure that the system uses to display volume for this branch/plant. The system inputs a value in this field from Branch/Plant Constants - Page 2 (P41001). You can override this default value.
- Weight
-
Enter the gross weight of one unit of the item in this unit of measure, or the weight of an empty storage container or shipping carton. The system enters these as the default values in the F4602 and uses the values in maximum weight calculations for specified locations during putaway.
- Weight UM
-
Enter a UDC (00/UM) that identifies the unit of measure that the system uses to indicate weight for this item. You can specify ounces, grams, kilograms, and so on, as weight standards. The system uses this unit of measure for the item or overrides it for an individual item or container.
- Maximum Weight
-
Enter the maximum weight of a carton, including the weight of the carton itself and its contents. You define the maximum weight in the Container and Carton Codes program (P46091). The system uses the defined maximum weight during warehouse cartonization. In addition, the system gives you a warning during the Carton Reorganization process (P4620) if a carton exceeds its maximum weight.
2.10.3.1 Cartonization
Select Cartonization.
- Tolerance Percent (tolerance percentage)
-
Enter the minimum percentage of a shipping carton that must be filled before it can be shipped. If the content of the carton does not reach this percentage, the system recommends a smaller carton. The default minimum percentage is 85 percent.
Note:
For standard packs the requirement is 100 percent. - Ship Priority
-
Enter a number that identifies this shipping carton's place in the priority list that the system uses to make carton recommendations. When the system makes a carton recommendation, it uses shipping priority to determine which carton it should select first, second, and third. If you want the system to look from large to small containers (downsizing), you should assign priority 1 to the largest container and priority 2 to the next largest.
- Available Container
-
Select to specify this container is available as a shipping carton for packing picked items. The system uses available containers during carton recommendation.
- Shipping Container
-
Select to use this container as a shipping carton.
Note:
A container can be either a Shipping Container or a Tote Container, but not both. - Tote Container
-
Select to use this container as a non-shippable tote.
Note:
A container can be either a Shipping Container or a Tote Container, but not both. - None
-
Select if you do not want to use this container as a shipping carton or tote container.
2.10.3.2 Ship Notice
Select Ship Notice.
- Packaging Code
-
Enter a UDC (41/X1) corresponding to accepted values in the EDI X12 definition for data element 103. It is a combination of a Packaging Form (3 chars) and a Packaging Material (2 digits).
- Package Terms
-
Enter a UDC (47/PT) that identifies packaging terms and conditions.
- Pkg Responsibility
-
Enter a UDC (47/PR) that identifies the agency that is responsible for packaging.
- Expendable Container
-
Select to specify a container is expendable and can incur a sales order charge.
- Container Piece
-
Select to specify a container is a piece of a parent container.
- Create Sales Order Charge
-
Select to specify the system creates a charge on the sales order for cartons. The charge is based on carton quantity (which is calculated from carton detail information) and the price setup for the item number that is assigned to the carton.
2.10.3.3 License Plate
Select License Plate.
- Container UM
-
Enter a UDC (00/UM) to indicate the unit of measure in which to express a container, for example, CS (case) or BX (box). The system uses this UM to populate the license plate UM field that resolves conflicts during identification of movement instructions for mixed item license plates.
- Container Process Grp 1
-
Enter a UDC (41/02) that identifies the default Process Group for a License Plate when the Process Groups of the items on the license plate do not match. The system uses the default Process Group to determine which movement instructions to use for putaway, picking and replenishment.
- Container Process Grp 2
-
Enter a UDC (41/02) that identifies the default Process Group for a License Plate when the Process Groups of the items on the license plate do not match. The system uses the default Process Group to determine which movement instructions to use for putaway, picking and replenishment.
- Container Process Grp 3
-
Enter a UDC (41/02) that identifies the default Process Group for a License Plate when the Process Groups of the items on the license plate do not match. The system uses the default Process Group to determine which movement instructions to use for putaway, picking and replenishment.
2.10.3.4 Associated Item
- Item Number
-
Enter a number that the system assigns to an item. It can be in short, long, or third item number format.
2.10.4 Setting Up Allowed Containers for Each Location
Access the Allowed Containers by Location - Revisions form.
Figure 2-21 Allowed Containers by Location — Revisions form

Description of ''Figure 2-21 Allowed Containers by Location — Revisions form''
2.10.5 Setting Processing Options for Item Standard Packs (P460131)
Processing options enable you to specify the default processing for programs and reports.
2.10.5.1 Display
Use this processing option to display an item dimension group.
- 1. Select Item Dimension Group
-
Specify the default value for displaying information about item numbers, item dimension groups, or mixed sequence packing groups. Values are:
Blank: Display item number information.
1: Display item dimension group information.
2: Display mixed sequence packing group information.
2.10.5.2 Versions
Specify the version of Item Unit of Measure Definitions.
- 1. Item Unit of Measure Definitions (P46011)
-
Specify the version of Item Unit Of Measure Definition (P46011) you use as the default display for the application. Leave blank to use ZJDE0001.
2.10.6 Setting Up Item Standard Packs
Access the Work With Item Standard Packs form (W460131A).
Figure 2-22 Work With Item Standard Packs form
Description of ''Figure 2-22 Work With Item Standard Packs form''
- Display Item Number
-
Select this button to display Item Number information.
- Display Item Dimension Group
-
Select this button to display Item Dimension Group information.
- Display Mixed Package Group
-
Select this button to display Mixed Package Group information.
On this form you can launch several programs from the Row menu to process standard pack information.
| Row Exit | Usage |
|---|---|
| Container Codes | Launches the Container and Carton Codes application (P46091). You define the dimensions, weight, capacity, and purpose (for example, whether a storage container is shippable) of each container to use in the warehouse. You can also define container pieces and enter Advance Ship Notice information about a shipping container. |
| UOM Conversion | Launches the Unit of Measure Conversions - Item application (P41002). You can define a unit of measure structure to process an item. A unit of measure structure describes the relationship between the smallest unit of measure and larger units of measure, such as eaches to boxes, boxes to cases, and cases to pallets. |
| Container BOM | Launches the Container Bill of Material application (P46098). You can specify the pieces that constitute a container. The system uses this information on the Advance Ship Notice. |
| Pallet Standard Pack | Launches the Pallet Standard Packs application. You can specify standard pack information for higher-level packaging, such as pallets. |
| Item UOM Definition | Launches the Item Unit of Measure Definition application. When the system creates an item standard pack row, it also creates a row in the Item Unit Of Measure Definition table (F46011) for the related item and unit of measure to calculate the gross weight. |
| Mixed Sequence | Launches the Mixed Item Packing Group application. You can assign items to a user-defined mixed item packing group. |
Access the Item Standard Pack Revisions form.
Figure 2-23 Item Standard Pack Revisions form
Description of ''Figure 2-23 Item Standard Pack Revisions form''
- Item Number
-
A number that the system assigns to an item. It can be in short, long, or third item number format.
- Item Dimension Group
-
A code (system 41/type 01) that identifies a group of items that share the same dimensions. An item dimension group defines the dimensions for all items that belong to the group. After you setup an item dimension group, you can assign items to the group through Classification Codes (P4101).
- Mixed Package Group
-
The unique identifier for a group of item numbers that can be packaged in a mixed sequenced standard pack.
- Container Code
-
Enter a UDC (46/EQ) that identifies a storage container or a shipping carton. A storage container can be an open container where items are stored on the container (for example, a pallet), or a closed container where items are stored in the container (for example, a box). You use the Container and Carton Codes program (P46091) to define storage containers.
- Customer Carton ID
-
Enter a code that the customer uses to represent a carton in the system.
- Standard Pack
-
Enter a number that indicates the standard quantity within a container.
- Recommendation Sequence
-
Enter a number that indicates the order in which the system chooses a carton. The system selects the carton with the lowest recommendation sequence first.
|
Note: The Item Number, Item Dimension Group, and Mixed Package Group fields are not displayed on this form at the same time. The field displayed is based upon the respective option selected on the Work With Item Standard Packs form. |
2.10.7 Setting Up Pallet Standard Packs
Access the Pallet Standard Pack Revisions form.
Figure 2-24 Pallet Standard Pack Revisions form
Description of ''Figure 2-24 Pallet Standard Pack Revisions form''
- Inner Carton
-
Enter a code that identifies the container the item is stored on or in when in a location in the warehouse. If an item is stored on or in a container when it is picked, you must update this field for the system to be able to make recommendations for shipping cartons.
- Outer Carton
-
Enter a UDC (46/EQ) that identifies a storage container or a shipping carton. A storage container can be an open container where items are stored on the container (for example, a pallet), or a closed container where items are stored in the container (for example, a box). You use the Container and Carton Codes program (P46091) to define storage containers.
- Customer Carton
-
Enter a code that the customer uses to represent a carton in the system.
2.11 Setting Up Container Bill of Materials
This section provides an overview of container bill of materials, and discusses how to set up container bill of materials.
2.11.1 Understanding Container Bill of Materials
A container bill of material makes up the pieces of a container, such as drawers, shelves, dividers, and so on. These pieces may also be parent pieces that contain child pieces. For example, a tote may contain drawers, and each drawer may have dividers.
You set up a container bill of material by the branch/plant and container. If the pieces differ by a customer or Ship To value, you must set up separate container codes for each configuration. The system uses the container pieces when processing the Advance Ship Notice.
The Work With Container Bill of Material form (W46098C) displays the container bill of material in a tree structure. The container is the first node, and expanding the node displays the pieces for a container. Because a piece can be made up of one of more pieces, you can continue expanding the tree until the last piece is displayed.
The detail area provides this type of information about the container piece:
-
Container description
-
Container code for the piece
-
Piece description
-
Quantity
-
Branch/Plant
You can delete the child pieces of a container, but if you delete the top node, the system deletes the entire bill of material for the container. Deleting a child piece that contains associated child pieces does not delete those associations. Deleting the container or piece for the bill of material does not delete it from container and carton codes.
The system uses the Container Bill of Material table (F46098) to process information.
2.11.2 Forms Used to Set Up Container Bill of Materials
2.11.3 Setting Up Container Bill of Materials
Access the Container Bill of Material Revisions form.
Figure 2-25 Container Bill of Material Revisions form

Description of ''Figure 2-25 Container Bill of Material Revisions form''
- Container Code
-
Enter a (46/EQ) that identifies a storage container or a shipping carton. A storage container can be an open container where items are stored on the container (for example, a pallet), or a closed container where items are stored in the container (for example, a box). You use the Container and Carton Codes program (P46091) to define storage containers.
- Container Piece Code
-
Enter a code that identifies a piece in a parent container.
2.12 Setting Up Shipping Cartons
This section provides an overview of shipping cartons, and discusses how to set up shipping cartons.
2.12.1 Understanding Shipping Cartons
You set up shipping cartons to define what cartons exist, which cartons are available, and the percentage of space in the carton that an item can fill. The system uses this information to recommend shipping cartons during picking.
After you have set up a carton and after the carton has been picked, you have the option of reorganizing its contents and its placement within a shipment before shipping. The Carton Reorganization program (P4620) not only enables you to reorganize a carton's contents, but also enables you to create and organize new cartons.
2.12.2 Forms Used to Set Up Shipping Cartons
2.12.3 Setting Up Shipping Cartons
Access the Container and Carton Codes Revisions form.
Figure 2-26 Container and Carton Codes Revisions form
Description of ''Figure 2-26 Container and Carton Codes Revisions form''
- Maximum Weight
-
Enter a number that indicates the maximum weight of a carton, including the weight of the carton itself and its contents. The system uses the defined maximum weight during warehouse cartonization. In addition, the system gives you a warning during the Carton Reorganization process (P4620) if a carton exceeds its maximum weight.
2.13 Setting Up Locations for Carton Recommendation
This section discusses how to set up locations for carton recommendations.
2.13.1 Forms Used to Set Up Locations for Carton Recommendations
2.14 Setting Up Carton Recommendation Methods for Items
This section lists a prerequisite, and discusses how to set up carton recommendation methods for items.
You must set up each item's carton recommendation method in that item's unit of measure definition. You can recommend cartons by item volume or by the percentage of the carton that the item fills.
2.14.1 Prerequisite
Before you complete the tasks in this section, verify that you have set the processing option in the Task and Trip Creation program (R46471).
2.14.2 Forms Used to Set Up Carton Recommendation Methods for Items
2.14.3 Setting Up Carton Recommendation Methods for Items
Access the U/M Definition by Item Revisions form.
- Carton Rcmd Method (carton recommendation method)
-
Enter a code that indicates the method the system uses to recommend a carton for the specified item in this unit of measure. Values are:
Leave blank and the system does not recommend cartons for the specified item in this unit of measure
Enter 1: to recommend shipping cartons for the specified item in this unit of measure based on the volume of the item and the volume of the shipping carton
Enter 2: to recommend shipping cartons for the specified item in this unit of measure based on the percentage of the shipping carton that the item and unit of measure occupy
Enter 3: to recommend shipping cartons for the specified item in this unit of measure based on the standard pack for the item.
You define the dimensions of the carton through Container and Carton Codes (P46091).
2.15 Setting Up Carton Fill Percentages for Items
This section provides an overview of carton fill percentages for items, lists a prerequisite, and discusses how to set up carton fill percentages for items.
2.15.1 Understanding Carton Fill Percentages for Items
Each item can fill a portion of each available shipping carton. If you select cartons according to the percentage of the carton that an item occupies, you must define how much of each carton's space that a particular item can fill.
If you store the item in a container, you must specify each valid container. The fill percentage that you enter should consider the dimensions of the item's container.
2.15.2 Prerequisite
Before you complete the tasks in this section, verify that you have set the processing option for carton recommendation in the Task and Trip Creation program.
2.15.3 Forms Used to Set Up Carton Fill Percentages for Items
2.15.4 Setting Up Carton Fill Percentages for Items
Access the Item/Carton Recommendation Rules Revisions form.
- Fill Percentage
-
Enter the percentage of space in a carton that a single quantity of the unit of measure occupies. If the item is in a container when you pick it, this percentage indicates how much space the container takes up in the carton.
The system uses the fill percentage if you use fill percentage as the carton recommendation method for the item's unit of measure. You define an item's carton recommendation method through Unit of Measure Definition by Item/Item Group (P46011).
2.16 Working with Standard Pack Carton Recommendations
This section provides overviews of standard pack carton recommendations and carton charges for expendable containers, lists prerequisites, and discusses how to:
-
Activate standard pack recommendations.
-
Revise standard pack carton recommendations.
-
Revise carton quantities.
-
Calculate round to standard pack.
-
Set processing options for Standard Pack Carton Recommendations (P4615).
-
Add cartons to a shipment.
-
Reorganize cartons and items in a shipment.
-
Review carton detail information.
-
Set processing options for Carton Reorganization (P4620).
-
Run the Carton Recommendations report (R46151).
-
Set up carton charges for expendable containers.
2.16.1 Understanding Standard Pack Carton Recommendations
You can use the Standard Pack Carton Recommendations application to generate carton detail when you set the Version of Carton Reorganization processing option. A carton recommendation summarizes the number and weight of pallets or cartons, and can make carton and pallet recommendations.
If an item is packed in two different types of cartons there are two separate lines for the item on the Work With Carton Recommendations form. This form summarizes on each detail row the shipment number, item, and the innermost and outermost carton. The row for the outer most carton has a blank outer carton.
For example, a carton recommendation would list this information on the Carton Hierarchy form:
-
Shipment number
-
Type of cartons
-
Total number of cartons and pallets needed
-
Weight of items and cartons
-
Customer carton ID
When using expendable or alternate packaging, you can manually change the recommendations. You can manually change recommendations using Standard Pack Carton Recommendations if the system has not created carton detail for the shipment. No automatic changes can occur to carton recommendations after you have manually changed a carton recommendation.
Packaging is based on the rules for standard pack. Recommendations are across all sales orders on a shipment, meaning, a carton can hold the same item number from multiple sales orders and a pallet can hold cartons from multiple sales orders.
The system does not recommend mixed cartons. Unless you use mixed packed groups, only parts with the same item number are put in an innermost carton. If the system does not find standard pack information for an item, the system adds the item as a loose piece on the shipment (based on the transaction unit of measure). If an inventory storage container is set up for the item in the warehouse management module, it is the default container for the loose piece but it does not have a customer carton number.
|
Note: Carton recommendations impact the Transportation Management, Sales Order Management, and Demand Scheduling systems. The system creates carton recommendations during the shipment creation process and updates recommendations automatically when a shipment changes.The JD Edwards EnterpriseOne Warehouse Management system does not recognize the carton recommendations created for standard packs, and you can process standard packs with the JD Edwards EnterpriseOne Warehouse Management system on or off. To ensure that sales orders remain out of the JD Edwards EnterpriseOne Warehouse Management system, you can set up a separate status flow for the order types that use standard pack recommendations. You should exclude the order type status from the inclusion rules used to create warehouse requests. |
The system generates the recommendation when creating shipments, based on the type of order established in the Document Type Master table (F40039) and whether you have activated carton recommendation processing for the document type in the Document Type Maintenance application (P40040). When you activate carton recommendations, you can:
-
Select standard pack recommendations. The system recommends the innermost carton and any additional packaging layers that are set up in standard pack rules.
-
Specify the Carton Creation Status. This is the status for recommendations created by the system.
-
Specify the Carton Change Status. The status for recommendations that have been manually changed or Carton Detail has been created. Once the carton is at this status, the system does not automatically re-calculate packaging recommendations if the sales order quantity is changed for an item.
-
Specify shipment sequencing. The system indicates that the document type enables manual entry of production sequencing fields Job Number (PSJOBNO) and Job Sequence (JOBSQ).
The system also uses these tables for processing carton recommendations:
-
Carton Recommendations (F4615)
-
Carton Detail Information (F4620)
-
Container and Carton Codes (F46091)
-
Shipment Header (F4215)
-
Shipment Detail (F4942)
-
Document Type Master (F40039)
-
Standard Pack Recommendation Rules (F460131)
-
Mixed Sequenced Packing Groups (F460151)
2.16.1.1 Partial Cartons and Pallets
You can use partial cartons when you are not using standard pack rounding for demand scheduling. Cartons may contain smaller cartons or items, but you cannot mix items in the same immediate carton unless you are using mixed sequence standard packs.
The system considers pallets as any packaging that is in addition to the innermost carton. If you create carton detail using carton recommendations, you can set the Allow Partial Pallets for Carton Detail processing option on the Process tab to prohibit the creation of partial pallets. If you do not allow partial pallets, the system does not create a pallet if there are not enough cartons to make a full pallet. In this case, the system creates cartons as loose pieces on the shipment. The pieces can be put on a pallet later during staging using the Carton Reorganization application. This option is useful when loose pieces are built onto a mixed pallet. However, this option should not be used with mixed sequence pallets.
These scenarios are examples of partial pallet processing when you do not allow partial pallets:
-
If there are ten cartons per pallet but only five cartons are being shipped, the system uses carton detail to create five loose cartons, and the pallet would not be written to carton detail.
-
If there are two boxes per carton and ten cartons per pallet, but only nineteen boxes are being shipped, the system creates nine cartons with two boxes per carton, for a total of eighteen boxes and one loose box. The system does not write the pallet to carton detail because there are not enough cartons to make a full pallet. A carton was not created to hold the loose box because it would have been a partial carton.
2.16.1.2 Carton Hierarchy
You can review in a tree structure the contents of a carton for a shipment. The first line represents the carton type you entered. If the carton type has a plus sign, you can navigate to the next container, and do so until the lowest container is displayed. The form displays additional information about the container on the selected line, such as:
-
Standard pack
-
Inner carton code
-
Inner carton quantity
-
Item number
-
Item description
-
Item quantity
-
Unit of measure
-
Customer carton ID
-
Branch plant
-
Mixed Packaged Group
2.16.1.3 Round to Standard Pack
You can use the Standard Pack Calculator form (W4615E) to display standard pack information for items or cartons and change their quantities. You can override the values for the standard pack and produce useful planning calculations to review how the system builds standard packs and how pallets are affected when you change quantities.
You calculate the number of cartons and pallets that are necessary based on these values:
-
Sold To
-
Ship To
-
Item
-
Unit of measure
-
Quantity
2.16.1.4 Carton Detail
You can expand a carton recommendation and revise the details when you set the Version of Carton Reorganization processing option of Standard Pack Carton Recommendations program. For example, suppliers use expendable containers when they run out of returnable containers. Typically the cost is charged to the customer. You can add additional packaging costs to a sales order and override carton detail with the changed information. The container information (including any expendables) must be reported on the ASN.
Carton detail includes information such as the label serial number, shipment number, carton type, standard pack quantity, and sales order lines that form the carton. The detail also describes the relationship between shipping cartons, such as which cartons are on a specific pallet.
After you make changes to carton detail, the system displays the number of cartons that you added at the bottom of the shipment's list of contents.
When you add cartons, the cartons that you add are empty. You must reorganize the other cartons or items within the shipment so that the new cartons have contents. Otherwise, when you confirm the reorganization, the system automatically deletes any empty cartons from the shipment.
When you create carton detail, the system expands the carton recommendation and builds detail records for each carton. The system allocates items to sales order lines and links the data to the transportation tables.
2.16.1.5 Sales Order
This table is an example of a sales order:
| Order | Line | Shipment | Item | UOM | Quantity |
|---|---|---|---|---|---|
| 1 | 1 | 1234 | 210 | EA | 20 |
2.16.1.6 Standard Pack Carton Recommendations (P4615, F4615)
This table is an example of carton detail:
| Shipment | Item | UOM | Carton Type | Pieces | Standard Pack | Quantity |
|---|---|---|---|---|---|---|
| 1234 | 210 | EA | Carton | 4 | 5 | 20 |
| 1234 | - | - | Pallet | 2 | 2 | 4 |
2.16.1.7 Carton Reorganization (P4620) (Carton Detail Information (F4620))
This table continues the example:
| Shipment | Serial # | Carton Type | Item | Quantity | Order | Line |
|---|---|---|---|---|---|---|
| 1234 | 1213 | Pallet | - | - | - | - |
| 1234 | 4213 | Carton | 210 | 5 | 1 | 1 |
| 1234 | 4214 | Carton | 210 | 5 | 1 | 1 |
| 1234 | 2214 | Pallet | - | - | - | - |
| 1234 | 4315 | Carton | 210 | 5 | 1 | 1 |
| 1234 | 4316 | Carton | 210 | 5 | 1 | 1 |
You can create carton detail using these methods:
| Method | Usage |
|---|---|
| Scanning | You can use third-party or custom modification used for data collection and scanning to automatically create carton detail. |
| Standard Pack Carton Recommendations | You can use carton recommendations to create carton detail when scanning is not used.
After you create carton detail, the system displays the Carton Reorganization form (W4620C). You can review or revise the carton details of a shipment. You can access accurate weight calculations, review the carton detail status and label information, and reorganize the items within a carton. You can also modify individual items within a carton. |
|
Note: Changes you make in this application affect carton detail, not sales detail. You should not create carton detail until after running the Print Pick Slips program (R42520). Pick slips may split the sales order line, and the system does not update line splits to the sales order information in carton detail from this process. |
The system uses information from carton detail to generate the Demand Scheduling Bill of Lading (R49116), label data and ASN information. The system uses these tables to process carton detail:
-
Carton Detail Information (F4620)
-
Carton Recommendations (F4615)
-
Sales Order Detail File (F4211)
-
Shipment Header (F4215)
-
Sales Order Detail – Tag File (F49211)
2.16.1.8 Reorganization
After you have set up a carton and after the carton has been picked, you have the option of reorganizing its contents and its placement within a shipment before shipping. The Carton Reorganization program not only enables you to reorganize a carton's contents, but also enables you to create and organize new cartons, and allocate carton quantities to sales orders.
When you are working with cartons, you might reorganize the cartons in many ways, including:
-
Adding new cartons to a shipment
-
Consolidating one carton into another carton
-
Splitting the contents of one carton into two cartons
-
Changing the level of one carton to another carton level (for example, you might change a box to a pallet)
-
Updating the carton status reconciliation
When you are working with the contents of a carton, you might reorganize items in one of these ways:
-
Move items from one existing carton to another within a shipment (for example, you might move a group of items onto a pallet)
-
Move an entire quantity, in a particular unit of measure, to another carton (for example, you might move one case of canned goods from one carton to another)
-
Move a partial quantity, in a particular unit of measure, to another carton (for example, you might move half a case of canned goods from one carton to another)
-
Move items from an existing carton to a new carton (for example, you might remove four tires from a pallet and place them inside a carton)
-
Remove a carton from a parent carton and designate the removed carton as another parent-level carton
-
Remove an item from a carton, leaving the item outside of any cartons
The system automatically calculates weight limit information when you reorganize a carton. If you set the appropriate processing option, the system displays a warning if the carton that you have reorganized exceeds its weight limit.
When you are moving items within a shipment, you can set the appropriate processing option in the Carton Reorganization program to allow you to specify the quantity of the item that you are moving. If you leave the processing option blank, the system moves the entire quantity of the item.
It is recommended that you set the appropriate processing options in the Carton Reorganization program to create or update these tables:
-
F4620
-
SO Pack Confirm Detail (F4216)
-
Shipment Pieces (F4943)
-
Shipment Reference Numbers (F4217)
These tables contain detailed information about cartons, their contents, and the shipping and tracking information that must be created or updated every time you create or reorganize a carton. For example, by setting the appropriate processing options, you ensure that you are maintaining current UCC 128 compliance information in the system and can provide customers with ASNs (advance ship notices) and bar-coded shipping container labels. ASNs communicate the contents of a shipment to a customer. When the customer receives the shipment, the customer scans the bar-coded container labels on the contents of the shipment and matches the contents to the ASN as part of an automated receipts process.
After you create or reorganize cartons in a shipment, you also might want to review carton detail information. The Carton Detail Inquiry program (P4621) enables you to review this type of carton detail information:
-
Carton identification information
-
Item information
-
Weight and dimension information
-
Related sales order information
-
UCC 128 information
When you revise carton details, the system calculates accurate weight values and updates the carton detail status. Use the processing options on the Status tab in the Carton Reorganization to specify how the system processes the statuses.
You can use the Form menu on Carton Reorganization to confirm sales order lines. You can correct carton data if the line level reconciliation fails or a change is made to quantity shipped during confirmation.
If you want to send an ASN to the customer, first add the appropriate statuses to the order activity rules for order type S4S in the Order Activity Rules program (P40204).
|
Note: Changes you make in this application affect carton detail, not sales detail. |
2.16.1.9 Carton Recommendations Report
You can run the Carton Recommendations Report to analyze and review carton recommendations and specific shipment information. The system displays separate pages with header information for each shipment number when processing multiple shipment numbers.
You can run this report either during the pack pick slip process or as a standalone batch application. The system uses the F4615 or F4620 table for processing this report.
2.16.2 Understanding Carton Charges for Expendable Containers
You can set up billable charges for expendable cartons and track the cartons as inventory, similar to tracking a stock item. At shipment confirmation, the system creates a sales order line for each line on the order that has an item packed in a carton with the Create Sales Order Charge (CSOC) field set to 1. You assign this field value to a carton type in the Container and Carton Codes application. The system carries this value forward to the carton detail.
You can base the charge on either the item quantity or the number of expendable containers used. This table describes how the system processes carton-based and item-based charges.
| Charges Based On | Process |
|---|---|
| Carton Quantity | The system writes a sales order line using the line type Carton (CA). This line type enables you to relieve the carton as inventory at sales update while excluding the carton in the data selection for the ASN, which prevents the carton charge from being extracted to the ASN as a line item.
To prevent the carton charge lines from being placed onto a new shipment, ensure that you do not include this order type/line type combination in UDC 49/SD. The order quantity reflects the number of cartons being shipped. Because outer cartons do not always contain sales order information, this information comes from the first inner carton record found with populated sales order information. Additionally, when a carton contains multiple sales order lines, the system associates the charge with the first sales order line found in the carton detail. |
| Item Quantity | The system writes two sales order lines. The first line is a stock line containing the actual number of cartons. The system uses the line type Carton Inventory (CI) for inventory relief during sales update. The system prevents advanced pricing from processing this line by setting the price to zero and the price override flag to 1.
The system uses another line type Carton Charge (CC) to write the sales order lines holding the carton charges. This order type/line type combination must also not be included in UDC 49/SD to prevent the system from assigning the line a new shipment number. |
The system records the charge lines in the Related Order Cross Reference table (F4080) to provide a link between the carton charge sales order lines and the item's sales order line. This link enables the system to roll up charges for the ASN. The system includes the charge on the Advanced Ship Notice (ASN), but does not extract the charge to the ASN when running the EDI Advanced Ship Notice Extraction program (R47032). The system receives this number on the inbound 850 document for purchase orders.
You must set up these versions for Sales Order Entry (P4210) to process expendable containers.
| Version | ZJDE0019 | ZJDE0020 | ZJDE0021 |
|---|---|---|---|
| Version Title | Carton Charges by Carton Quantity | Carton Inventory Relief based on Item Quantity | Carton Charges by Item Quantity |
| Description | Writes sales order lines based on carton quantities. | Relieves carton inventory based on item quantity. | Writes sales order lines based on item quantity. |
| Order Type | S4 | S4 | S4 |
| Line Type | CA | CI | CC |
| Override Next Status | 580 | 620 | 580 |
| Line Number Increment | .01 | .01 | .01 |
| Status Code Limit for Changes | 560 | 560 | 560 |
| Inventory Commitment Checking | Blank = Bypass Availability Checking | Blank = Bypass Availability Checking | Blank = Bypass Availability Checking |
The system uses these tables for processing carton charge information:
-
F4620
-
F46091
-
F4080
2.16.2.1 Example: Carton Charges Based on Carton Quantity
This table displays the F4211 table after the system creates carton charges at shipment confirmation when the charge is based on carton quantity. The outer carton does not contain sales order information, and therefore the system retrieves this information from the sales order information found on the first inner carton.
| Order Number | LineNumber | Line Type | Item Number | Order Quantity | Location | Price | Extended Price |
|---|---|---|---|---|---|---|---|
| 1 | 1.000 | S | Item A | 750 | 1.A.1 | 25.00 | 18,750 |
| 1 | 1.010 | CA | 7890 | 1 | - | 5.00 | 5 |
| 1 | 1.020 | CA | 8741 | 1 | - | 5.00 | 5 |
| 1 | 2.000 | S | Item A | 250 | 1.B.1 | 25.00 | 6,250 |
| 1 | 2.010 | CA | 7890 | 1 | - | 5.00 | 5 |
The CA (Carton) line type indicates that the line type is identical to the stock line type. This line type enables you to relieve the carton as inventory at sales update and to exclude the charge from the EDI Advanced Ship Notice Extraction. The system writes these lines using the sales order entry version for carton-based quantities.
After the system writes the sales order lines, the lines and parent lines are added to the F4080 table when you run the EDI Advanced Ship Notice Extraction program.
In this example, the Related Order Cross Reference table would appear as follows:
| Related Order Set ID | Related Order ID | Order ID | Product Code | Order Number | Order Line Number | Item Number (Carton) |
|---|---|---|---|---|---|---|
| 1 | 1 | 1 | 42 | 1 | 1.000 | - |
| 1 | 1 | 2 | 42 | 1 | 1.010 | 7890 |
| 1 | 1 | 3 | 42 | 1 | 1.020 | 8741 |
| 1 | 2 | 1 | 42 | 1 | 2.000 | - |
| 1 | 2 | 2 | 42 | 1 | 2.010 | 7890 |
2.16.2.2 Example: Carton Charges Based on Item Quantity
This table displays the F4211 table after the system creates carton charges at shipment confirmation when the charge is based on item quantity.
| Order Number | Line Number | Line Type | Item Number | Order Quantity | Location | Price | Extended Price | Price Override |
|---|---|---|---|---|---|---|---|---|
| 1 | 1.000 | S | Item A | 750 | 1.A.1 | 25.00 | 18,750 | - |
| 1 | 1.010 | CI | 7890 | 1 | - | 0.00 | 0 | 1 |
| 1 | 1.020 | CI | 8741 | 1 | - | 0.00 | 0 | 1 |
| 1 | 1.030 | CC | 7890 | 250 | - | 5.00 | 1,250 | - |
| 1 | 1.040 | CC | 8741 | 750 | - | 5.00 | 3,750 | - |
| 1 | 2.000 | S | Item A | 250 | 1.B.1 | 25.00 | 6,250 | - |
| 1 | 2.010 | CI | 7890 | 1 | - | 0.00 | 0 | 1 |
| 1 | 2.020 | CC | 7890 | 250 | - | 5.00 | 1,250 | - |
| 1 | 2.030 | CC | 8741 | 250 | - | 5.00 | 1,250 | - |
The CI (Carton Inventory) line type (a user-defined value) indicates that the carton is identical to the stock line type. A CI line type enables you to relieve the carton as inventory at sales update and to exclude the charge from the EDI Advanced Ship Notice Extraction process. The system writes these lines using the inventory-relief sales order version for carton-based quantities.
For the non-stock lines containing the carton charge, the system writes the lines using the inventory-relief sales order version for item-based quantities. After the system writes the sales order lines, the lines and parent lines are added to the F4080 table when you run the EDI Advanced Ship Notice Extraction program.
In this example, the Related Order Cross Reference table would appear as follows:
| Related Order Set ID | Related Order ID | Order ID | Product Code | Order Number | Order Line Number | Item Number (Carton) |
|---|---|---|---|---|---|---|
| 1 | 1 | 1 | 42 | 1 | 1.000 | - |
| 1 | 1 | 2 | 42 | 1 | 1.030 | 7890 |
| 1 | 1 | 3 | 42 | 1 | 1.040 | 8741 |
| 1 | 2 | 1 | 42 | 1 | 2.000 | - |
| 1 | 2 | 2 | 42 | 1 | 2.020 | 7890 |
| 1 | 2 | 3 | 42 | 1 | 2.030 | 8741 |
2.16.3 Prerequisites
Before you complete the tasks in this section:
-
Ensure that you have set up the UDC Carton Status (46/RS).
-
Activate the Enable Creation of Sales Order Lines for Carton Charge processing option on the Process tab of the confirmation source, such as:
-
Transportation Shipment Confirmation (P49645)
-
Batch Transportation Shipment Confirmation (R49500)
-
Transportation Load Confirmation (P49640)
2.16.4 Forms Used to Use Standard Pack Carton Recommendations
2.16.5 Activating Standard Pack Recommendations
Access Shipment on the Document Type Revisions form.
- Carton Creation Status
-
Enter a UDC (46/RS) that specifies which status the system uses when creating cartons in the Carton Recommendations table (F4615).
- Carton Change Status
-
Enter a UDC (46/RS) that specifies which status the system uses when changing cartons in the Carton Recommendations table (F4615).
If a recommendation has been changed, the system does not automatically re-calculate recommendations when a sales order is changed.
- Recommend Standard Packs
-
Select to activate carton recommendations for standard packs at the order type level.
2.16.6 Revising Standard Pack Carton Recommendations
Access the Standard Pack Recommendation Revisions form.
Figure 2-28 Standard Pack Recommendation Revisions form
Description of ''Figure 2-28 Standard Pack Recommendation Revisions form''
- Qty Of Cartons (quantity of cartons)
-
Enter the number of pieces, pallets, containers, and so forth which constitute a shipment.
For shipments that do not have piece information defined in the Pieces table (F4943), the system calculates the estimated piece count by converting the quantity in the transaction unit of measure to the shipping unit of measure.
To obtain the whole piece number, the system rounds the unit of measure down.
The weight and volume of the leftover quantities from all detail lines are added and the sum total is divided by the maximum piece weight and volume.
The system rounds the resulting piece weight or volume up to the next whole number. This number is added to the whole piece number to obtain the piece count.
- Carton Type
-
Enter a code (46/EQ) that identifies a storage container or a shipping carton. A storage container can be an open container where items are stored on the container (for example, a pallet), or a closed container where items are stored in the container (for example, a box). You use the Container and Carton Codes program (P46091) to define storage containers.
- Standard Pack Qty (standard pack quantity)
-
Enter a number that indicates the standard quantity within a container.
- Inner Carton Quantity
-
Enter the total quantity in primary unit of measure for this location detail.
- Inner Carton
-
Enter a code that indicates whether a carton is located inside a larger carton.
- Item Quantity
-
Enter the total quantity in primary unit of measure for this location detail.
- UM (unit of measure)
-
Enter a UDC (00/UM) that indicates the quantity in which to express an inventory item, for example, CS (case) or BX (box).
- Item Number
-
Enter a number that the system assigns to an item. It can be in short, long, or third item number format.
- Net Weight
-
Enter the weight of goods currently in a location. The system calculates this amount from the weight from the item/unit of measure profile and the weight of the container if the level 1 unit of measure for this location detail has a storage container.
- Tare Weight
-
Enter the gross weight of one unit of the item in this unit of measure, or the weight of an empty storage container or shipping carton. The system enters these as the default values in the F4602 and uses the values in maximum weight calculations for specified locations during putaway.
- Gross Weight
-
Enter the gross weight of one unit of the item in this unit of measure, or the weight of an empty storage container or shipping carton. The system enters these as the default values in the F4602 and uses the values in maximum weight calculations for specified locations during putaway.
- Wt UOM (weight unit of measure)
-
Enter a UDC (00/UM) that identifies the unit of measure that the system uses to indicate weight for this item. You can specify ounces, grams, kilograms, and so on, as weight standards. The system uses this unit of measure for the item or overrides it for an individual item or container.
- Customer Carton
-
Enter a code that the customer uses to represent a carton in the system.
- Carton Item Number
-
Enter a number that identifies a carton as an item. When you specify an item number, the system creates a relationship between the item number and the carton code for tracking and pricing purposes.
- Rec Status (recommendation status)
-
Enter a UDC (46/RS) that indicates the status of standard pack recommendations.
- Branch Plant
-
Enter a code that identifies a separate entity within a business for which you want to track items and costs. This entity might be a warehouse location, job, project, work center, or branch/plant. The Branch/Plant field is alphanumeric.
2.16.7 Revising Carton Quantities
Access the Carton Recommendation Fix/Inspect form.
Figure 2-29 Carton Recommendation Fix/Inspect form
Description of ''Figure 2-29 Carton Recommendation Fix/Inspect form''
2.16.8 Calculating Round to Standard Pack
Access the Standard Pack Calculator form.
Figure 2-30 Standard Pack Calculator form
Description of ''Figure 2-30 Standard Pack Calculator form''
- UM (unit of measure)
-
Enter a UDC (00/UM) that indicates the quantity in which to express an inventory item, for example, CA (case) or BX (box).
- Item Quantity
-
Enter the total quantity in primary unit of measure for this location detail.
- Item
-
Select to view calculated packaging based on the item information.
- Carton
-
Select to view calculated packaging based on the type of carton.
2.16.9 Setting Processing Options for Standard Pack Carton Recommendations (P4615)
Processing options enable you to specify the default processing for programs and reports.
2.16.9.1 Process
Specify whether to allow partial pallets when creating carton detail.
- 1. Allow Partial Pallets for Carton Detail
-
Leave blank and the system does not allow partial pallet processing when you are working with carton detail information.
Enter 1: to allow partial pallet processing.
2.16.9.2 Versions
Specify the version for Carton Reorganization (P4620).
- 1. Version of P4620 Carton Reorganization
-
Specify which version of the Carton Reorganization program (P4620) the system uses. If you leave this processing option blank, the system uses version ZJDE0001.
2.16.9.3 Display
Use these processing options to specify whether to display the shipment status.
- 1. From Shipment Status
-
Specify a start value for the range of a shipment status code. The system uses this value for data selection when loading records to the detail area. If you leave this processing option blank, the system does not perform data selection that is based upon shipment status.
- 2. To Shipment Status
-
Specify an end value for the range of a shipment status code. The system uses this value for data selection when loading records to the detail area. If you leave this processing option blank, the system does not perform data selection that is based upon shipment status.
2.16.10 Adding Cartons to a Shipment
Access the Carton Detail Add/Update form.
Figure 2-31 Carton Detail Add/Update form
Description of ''Figure 2-31 Carton Detail Add/Update form''
Access the Carton Detail Add/Update form.
To add cartons to a shipment:
-
Enter values in these fields:
-
Carton Code
-
Number of Cartons
-
-
To manually assign a pack number, select Serial Number and enter a value in the Serial Number field.
-
To have the system automatically assign tare and pack numbers, select either or both of these options:
-
Generate Tare SSCC
-
Generate Pack SSCC
-
-
To manually assign an EPC, select Type in an EPC and enter a value in the EPC field.
-
To have the system automatically assign an EPC, select Generate EPC.
-
Click OK.
-
On Carton Reorganization, review the cartons that you added.
-
Carton Code
Enter a UDC (46/EQ) that identifies a storage container or a shipping carton. A storage container can be an open container where items are stored on the container (for example, a pallet), or a closed container where items are stored in the container (for example, a box). You use the Container and Carton Codes program (P46091) to define storage containers.
-
Number of Cartons
Enter the number of units that the system applies to the transaction.
-
Serial Number
Select this option and enter a value in the Serial Number field for the system to apply to the carton.
-
Generate Tare SSCC
Select this option and the system generates a new Pack SSCC number to apply to the carton.
-
Generate Pack SSCC
Select this option and the system generates a new Pack SSCC number to apply to the carton.
-
Generate Label Next Number
Select this option and the system generates a new Label Next Number to apply to the carton.
-
Type in an EPC
Select this option and enter a value in the EPC field for the system to apply to the carton.
-
Generate EPC
Select this option and the system generates a new EPC number to apply to the carton.
-
2.16.11 Setting Processing Options for Carton Reorganization (P4620)
Processing options enable you to specify the default processing for programs and reports.
2.16.11.1 Processing
Use these processing options to create transportation information.
- 1. Create Transportation Shipping Pieces table (F4943).
-
Leave blank and the system does not create Transportation Shipping Pieces.
Enter 1: to create Transportation Shipping Pieces.
- 2. Create Shipment Tracking Numbers (F4217).
-
Leave blank and the system does not create Shipment Tracking Numbers.
Enter 1: to create Shipment Tracking Numbers.
Note:
The Create Transportation Shipping Pieces table (F4943) processing option must be activated to use this processing option. - 3. Use Label Serial Number Preference values instead of values defined on the Serial Number tab.
-
Enter 1: to use the Label Serial Number Preference (Advanced Preference #38)
Leave blank and the system does not use Label Serial Number Preference.
2.16.11.2 Defaults
Use these processing options to select default information.
- 1. Allow partial quantity Item Moves.
-
Leave blank and the system assume item moves are for the entire quantity of the item and UOM.
Enter 1: to prompt for a quantity when performing Item Moves.
- 2. Allow Carton Code changes.
-
Leave blank and the system does not allow carton code changes.
Enter 1: to allow carton code changes.
- 3. Error if carton is over weight.
-
Leave blank and the system issues a warning.
Enter 1: and the system issues a hard error.
- 4. Allow Add Items to Carton Detail for a shipment.
-
Allow items to be added to carton detail. The sales order must be updated separately.
Leave blank and the system does not allow addition of items to carton detail.
Enter 1: to allow addition of items to carton detail. The sales order must be updated separately.
- 5. Allow Remove Items from the Carton Detail for a shipment.
-
Allow removal of items from carton detail. The sales order must be updated separately.
Leave blank and the system does not allow removal of items from carton detail. The sales order must be updated separately.
Enter 1: to allow removal of items from carton detail. The sales order must be updated separately.
2.16.11.3 Status
Use these processing options to select status information
- 1. Enter the Shipment Status at or beyond which changes cannot be made to cartons.
-
Enter a UDC (41/SS) for the shipment status representing a status at or beyond which changes cannot be made to cartons. Statuses typically refer to events, for example confirmed or hold.
- 2. Enter the Sales Order Line Status at or beyond which changes cannot be made to cartons.
-
Enter a UDC (40/AT) for the sales order line representing a status at or beyond which changes cannot be made to cartons.
- 3. Enter the Carton Status to update cartons to.
-
Enter a UDC (46/CS) that the system assigns to a carton. Each status code represents a different stage in the distribution cycle.
- 4. Enter the Carton Status at or beyond which changes cannot be made to cartons.
-
Enter a UDC (46/CS) that the system assigns to a carton representing a status at or beyond which changes cannot be made to cartons. Each status code represents a different stage in the distribution cycle.
- 5. Enter the Carton Status for Reconciled Cartons.
-
Enter a UDC (46/CS) to specify the status for reconciled cartons.
2.16.11.4 Serial Number
- 1. Serial Number Creation process value.
-
Enter a code that indicates what type of serial number the system generates for cartons. Values are:
Leave blank and the system does not create serial numbers for cartons.
Enter 1: to create serial numbers based on the UCC-128 standard.
Enter 2: to create serial numbers from next numbers setup in P4625 Label Next Numbers.
Enter 3: to create serial numbers based on Electronic Product Code, EPC, standard.
Enter 4: to create two serial numbers, one after the UCC-128 SSCC standard and the other after the Electronic Product Code, EPC, standard.
Enter 5: to create two serial numbers, one after the setup in P4625 Label Next Numbers and the other after the Electronic Product Code, EPC, standard.
- 2. Company UCC Code to use for SSCC Number generation.
-
Enter a UDC (41/UC) to indicate what type of Company UCC Code to use for SSCC Number generation. Leave blank and the system uses the first UDC entry for 41/UC.
- 3. Document Type to use to retrieve the Serial Number for SSCC Number generation.
-
Enter a UDC (00/DT) that identifies the origin and purpose of the transaction. Several prefixes are reserved for document types, such as vouchers, invoices, receipts, and timesheets. The reserved document type prefixes for codes are:
Leave blank to use next number 40/08.
- 4. Document Key Company to use to retrieve the Serial Number for the SSCC number generation.
-
Enter a number that, along with order number and order type, uniquely identifies an order document (such as a purchase order, a contract, a sales order, and so on).
If you use the Next Numbers by Company/Fiscal Year facility, the Automatic Next Numbers program (X0010) uses the order company to retrieve the correct next number for that company. If two or more order documents have the same order number and order type, the order company lets you locate the desired document.
If you use the regular Next Numbers facility, the order company is not used to assign a next number. In this case, you probably would not use the order company to locate the document.
Leave blank to use next number 40/08.
- 5. Function to use for SSCC number generation. Function Generate SSCC Number is available.
-
Enter GenerateSSCCNumber to generate SSCC numbers.
Leave blank and the system does not generate SSCC numbers.
- 6. Function Name to use for SSCC number validation. Function Calculate UCC128 Check Digit is available.
-
Enter CalculateUCC128CheckDigit to generate SSCC names.
Leave blank and the system does not generate SSCC names.
- 7. Use Carton Label Preference.
-
Enter 1: to use the Carton Label Preference (Advanced Preference #39). You can use the Carton Label Preference to determine which carton types (setup in P46091) are assigned serial numbers. If the preference is not being used, serial numbers are assigned to all cartons. If UCC-128 SSCC numbers are being created, the preference can be set up to generate either a Tare or Pack SSCC for the carton type.
Leave blank and the system does not use Carton Label Preference.
2.16.12 Reorganizing Cartons and Items in a Shipment
Access the Carton Reorganization form.
|
Note: If the system generates an EPC number, this form also displays an EPC Column. |
To reorganize cartons and items in a shipment:
-
Perform any of these tasks:
-
To place a carton or item inside another carton, click the carton you want to move. Drag and drop the carton on top of the parent carton. Click the plus sign next to the parent carton to review its contents.
-
To remove a carton or item from one carton and place it in another carton, click the plus sign next to the parent carton, click the carton or item to remove, and drag and drop the carton or item on top of the new parent carton. If you are moving an item and have set the Allow Partial Quantity Item Moves processing option on the Defaults tab of Carton Reorganization to allow movement of partial quantities of an item, you must specify the quantity of the item you want to move on the Item Move Quantity form. If this processing option is left blank, the system moves the entire quantity and does not display the Item Move Quantity form.
-
To remove a carton or item from a parent carton and place the carton or item at a parent level, drag and drop the carton or item on top of the shipment button at the top of the shipment contents list. The system places the carton or item at the bottom of the shipment contents list. If you are moving an item and have set the Allow Partial Quantity Item Moves processing option on the Defaults tab of Carton Reorganization to allow movement of partial quantities of an item, you must specify the quantity of the item to be moved on the Item Move Quantity form. If this processing option is left blank, the system moves the entire quantity and does not display the Item Move Quantity form.
-
-
To update a carton, shipment, or item, select the item and click Select.
-
On Carton Detail Add/Update, enter a value in the Carton Code field.
-
Select the Type in a Serial Number option and enter a value in the Serial Number field.
-
select one of these options and click OK:
-
Generate Tare SSCC
-
Generate Pack SSCC
-
Generate Label Next Number
-
-
select one of these options and click OK:
-
Type in an EPC. Enter a value in the EPC field.
-
Generate EPC Number
-
-
Click Confirm.
On Carton Reorganization, the system displays the updated information. The packing structure is only modified when the user saves changes.
2.16.13 Reviewing Carton Detail Information
Access the Carton Detail form.
- Carton ID
-
Displays a system-assigned number that identifies each carton. The system uses this number for the picking, packing, and shipment processes.
- Item Number
-
Displays a number that the system assigns to an item. It can be in short, long, or third item number format.
- Order Number
-
Displays a number that identifies a document. For example, the document can be a purchase order, invoice, or sales order.
- UPC
-
Displays the Universal Product Code number which must conform to the UCC structure for UPC numbers.
2.16.14 Setting Processing Options for Generate Sequenced Cartons (R46474)
Processing options enable you to specify the default processing for programs and reports.
2.16.14.1 Process
- 1. View Only
-
Enter blank to create carton detail information, and print the report.
Enter 1: to only print the report based on existing carton detail information.
2.16.14.2 Versions
- 1. Version for P4620 (Carton Reorganization) = ZJDE0001
-
Enter the version of Carton Reorganization (P4620) that the system launches. Leave blank to launch version ZJDE0001.
2.16.15 Generating Sequenced Cartons (R46474)
Select Warehouse Movement Documents (G4621), Generate Sequenced Cartons.
2.16.16 Setting Processing Options for Carton Recommendations Report (R46151)
Processing options enable you to specify the default processing for programs and reports.
2.16.16.1 Process
Use this processing option to determine whether to generate packing instructions.
- 1. Generate carton detail packing instructions (F4620)
-
Leave blank if you do not want to generate packing instructions.
Enter 1to generate packing instructions.
2.16.16.2 Version
Use this processing option to indicate which version of the Carton Reorganization program the system uses.
- 1. Version of Carton Reorganization (P4620)
-
Enter the version of Carton Reorganization the system to runs. Leave blank to run version ZJDE0001.
2.16.17 Running the Carton Recommendations Report (R46151)
Select Shipping and Packaging Management (G4615), Carton Recommendations Report.
If you are creating many F4620 records you can use this report instead of processing them through the Work With Shipments process.
2.16.18 Setting Up Carton Charges for Expendable Containers
Access the Carton Charge Reference Setup Revisions form.
Figure 2-33 Carton Charge Reference Setup Revisions form
Description of ''Figure 2-33 Carton Charge Reference Setup Revisions form''
- Customer Purchase Order
-
Enter an alphanumeric value used as a cross-reference or secondary reference number. Typically, this is the customer number, supplier number, or job number.
- Charge Reference
-
Enter a number that identifies the charge amount.
- Carton Quantity
-
Select to indicate the system calculates the carton charges using the number of cartons that are shipped.
- Item Quantity
-
Select to indicate the system calculates the carton charges using the number of items that are shipped inside the cartons.
2.17 Setting Up UCC 128 Processing
This section provides an overview of UCC 128 processing, lists prerequisites, and discusses how to:
-
Set up hierarchical configurations.
-
Set up ship notice/manifest requirements.
-
Set up item information.
2.17.1 Understanding UCC Identification Codes
Each company can assign product identification codes. The Uniform Code Council (UCC), the Electronic Commerce Council of Canada (ECCC), and the EAN (outside of Canada and the United States) assign member companies the company identification. In the company identification codes, the first digit is the region code. For North America, the region code is 0. Therefore, the company identification can be seven digits if you include the first digit 0. Because each UCC code contains the company number, all numbers are unique.
2.17.1.1 Universal Product Code (UPC)
Each company can assign the Universal Product Code (identified as UPC in North America and EAN-13 outside of North America) to both a consumer unit and the lowest saleable unit for a specific product. For example, a can of soda would have the UPC identification on the can because it can be sold individually. The UPC code is a fixed code that identifies one unit of a specific product.
This graphic illustrates the structure of UPC code:

The UPC code is made up of a:
-
Single-digit check character.
-
5-digit Product ID assigned by the company.
-
7-digit company (or manufacturer) ID that is assigned by the UCC/EAN. For North American companies, 6 characters represent the company ID because the leading 7th digit is always 0 and can be left off the code.
Typically, a company maintains its own product identification codes for internal use but does cross-reference the internal product identification codes to the UPC code.
2.17.1.2 Shipping Container Code (SCC)
Companies assign the SCC (identified as the SCC-14 in North America and EAN-14 outside of North America) to an intermediate pack for a specific product. For example, cans of soda are sold in various configurations. One possible configuration is four six-packs in each case. Therefore, the case would have an intermediate pack identifier (SCC-14) on it.
The SCC, like the UPC, is a fixed code that identifies the specific number of consumer packs of a specific product. The SCC code on the case of soda represents four consumer packs, each with six sodas or a total of 24 sodas.
The SCC-14 code is made up of a:
-
Single-digit check character.
-
5-digit Product ID assigned by the company.
-
7-digit company (or manufacturer) ID assigned by the UCC/EAN.
-
Single-digit Packaging Indicator that identifies the packaging. This identifier is assigned by the company and may vary from product to product. This identifier is fixed and has these values:
-
0 indicates that the Product ID on the SCC is different from the product identification on the UPC codes contained within the package.
-
1 - 8 indicates company-defined packaging. For example, for soda, a 1 might mean a case containing six packs and a 2 might mean a case containing 12-pack boxes. When you set up item information, you can enter UPCs and SCCs with product identifiers 1-8.
-
9 indicates that the amount of product inside the package varies from package to package even though there is the same product identification in the UPC codes of the consumer pack contained within the package.
-
In the system, an SCC code is equivalent to an item code for a specific unit of measure. For any item, there would be one UPC code but several SCC codes.
2.17.1.3 Serial Shipping Container Code (SSCC)
SSCC (SSCC-18) is a unique serial number that is assigned to cartons or shipping containers, including entire truckloads or shipments.
The SSCC code is a variable code that can be a hierarchical structure of SCCs and UPCs. The code is a key to a database record. For example, an SSCC may be put on a pallet that has 10 cases of soda and 10 cases of juice.
This graphic illustrates the structure of SSCC-18 code:
The SSCC-18 code is made up of a:
-
Single-digit check character.
-
9-digit serial number that identifies the shipping method that is assigned by the company.
-
7-digit company (or manufacturer) ID that is assigned by UCC/EAN.
-
Single-digit packaging type. This identifier is fixed and has these values:
-
0 indicates the shipping container is a case or carton.
-
2 indicates that shipping container is a pallet (larger than a case).
-
3 indicates the shipping container is undefined.
-
4 indicates the shipping container that you use internally for intra-company use.
-
5 - 9 are reserved for future use.
-
To process orders that comply to UCC 128 specifications, you must set up customer and item information. For example, you can define customer preferences for transmitted information and standard identification codes for products.
2.17.1.4 Customer Information
You must set up customer specifications that are maintained for UCC 128 Compliance. These specifications might include the customer-specific format for transmitted information and additional UCC 128 processing information, such as transportation equipment, routing, and reference numbers.
2.17.1.5 Hierarchical Configurations for Customer Information
When you transmit order information, you can establish a format that relays the information about the shipment, the orders within the shipment, and the items within the order. You define hierarchical configurations to transmit information that meets customers' needs.
You can set up any structure based on the needs of the business. These are examples of hierarchical structures:
| Structure | Usage |
|---|---|
| Pick and Pack | This is the most flexible configuration because you can combine products at the tare and pack levels. |
| Standard Carton Pack | Within this configuration, there can only be one UPC present in subordinate tare and pack levels. |
Within the configurations, you can define hierarchies based on the customer preferences. These are examples of configuration levels:
| Level | Usage |
|---|---|
| Shipment (S) | There can only be one Shipment level in each transaction set that is transmitted. This contains information such as the bill of lading number, ship to, and sold from information. |
| Order (O) | The order level contains information related to the supplier's sales order and the customer's purchase order. |
| Tare (T) | The optional tare level contains information related to pallets and other large product collections. |
| Pack (P) | The optional pack level contains information related to intermediate packs. |
| Item (I) | The item level contains information about the product that is shipped, such as UPC number and quantity. |
One customer may need shipment, order, item information, in that order, while another may prefer shipment, order, tare, pack, item information, in that order. You define hierarchical configurations to transmit information that meet customer's needs.
This diagram illustrates the hierarchical configurations for pick and pack structures:
Figure 2-36 Hierarchical Configurations/Pick and Pack Structure
Description of ''Figure 2-36 Hierarchical Configurations/Pick and Pack Structure''
2.17.1.6 Item Information
You must provide the system with information about the items that you stock. When you enter item master information, you provide the system with details such as:
-
Item identifiers
-
Item descriptions
For UCC 128 processing, the item identifiers can be the UPC or SCC codes that you assign to the product unit and intermediate packs.
2.17.1.7 Using Package Indicators
If you are setting up the SCC, use these Packaging Indicators to identify the type of packaging:
-
0 indicates that the Product ID on the SCC is different from the product identification on the UPC contained within the package. You can use this product identifier for kits.
-
1-8 indicates company-defined packaging. For example, for soda, a 1 might mean a case containing six packs and a 2 might mean a case containing 12-pack boxes.
-
9 indicates that the amount of product inside the package varies from package to package even though there is the same product identification in the UPC of the consumer pack contained within the package. The system does not support variable unit of measures.
2.17.1.8 Setting Up Aggregate SCCs
You can set up aggregate SCCs to represent kits with non-inventory components. A kit is a collection of inventory items, called components, that are associated with a description name, called a parent item. The aggregate SCC represents the parent item. You can access the Item Cross-Reference Revisions form to assign component UPCs to the aggregate SCC for the kit. You only enter cross-reference information for non-inventory items. For example, you do not stock bandages, an item for which you do not record inventory or UPCs. You do sell first aid kits, which include bandages. Depending on customer requirements, you can enter the aggregate SCC for the first aid kit and item cross-reference information for the components, such as bandages, that comprise the first aid kit.
If the components are inventory items, you do not have to enter cross-references. When you enter an order for a kit, the system retrieves the kit information, which includes the component UPCs, from the Item Master table (F4101).
To set up identification for kits with non inventory items, you can set up an SCC with a product identifier equal to 0, which indicates that the SCC is different from the product identification on the UPCs it contains. To assign the UPCs to the aggregate, you can enter information in the Item Cross-Reference field.
On Item Cross Reference, you must enter the cross-reference type, UP, to indicate UPCs. The cross-reference item number is the UPC code and the cross-reference description is the unit of measure.
2.17.2 Prerequisites
Before you complete the tasks in this section:
-
Set up the UCC-assigned vendor number in UDC (41/UC).
-
Verify that you have set up the shipping document types in UDC (49/SD).
|
See Also: |
2.17.3 Forms Used to Set Up UCC 128 Processing
2.17.4 Setting Up Hierarchical Configurations
Access the Hierarchical Configuration Definition Revisions form.
- Address Number
-
Enter a number that identifies an entry in the Address Book system, such as employee, applicant, participant, customer, supplier, tenant, or location.
- Hierarchical Configuration
-
Enter the EDI 856 transaction set hierarchy configuration codes that specify the levels present in the Ship Notice/Manifest. This field is made up of a combination of 2 character Hierarchical Level Codes (HLC) (values from the X12 specification for data element 735 - HLC). There can be up to 9 combinations of HLCs in this field.
- Hierarchical Structure Code
-
Enter a code indicating the hierarchical application structure of an EDI transaction set that utilizes the HL segment to define the structure of the transaction set.
- Level
-
Displays a number used to organize the table into a logical group for online viewing and reporting.
- Field Name
-
Enter a UDC (47/FD) for the data dictionary item name. Examples include F#MMCO or F#CO for company; F#MMCU or F#MCU for business unit; and F#RP01-30 for business unit category codes 01 through 30.
Special characters are not allowed as part of the data item name, except #, @, $.
If you want to create protected data names that software updates do not overwrite, use $xxx and @xxx, where xxx is user-defined.
- Ascending Descending
-
Enter an A: to designate ascending sorting sequence or D: for descending sorting sequence.
Note:
For use within OPNQRYF command to designate the UNIQUEKEY parameter. The number of key sequence fields specified with these codes represent the number assigned to the UNIQUEKEY parameter. This parameter eliminates duplicate records for the specified keys.U: Ascending
V: Descending
- Total Level
-
Enter a level break, not to be confused with Account Master or Business Unit Master level of detail concept. You might specify the level of totaling to place on this field. Up to 9 levels of totals are permissible. If levels of totals are not specified in an order consistent with the sequence parameters, unpredictable results may occur.
For example:
Level 01 - Department Totals - Sort Sequence 03
Level 02 - Branch Totals - Sort Sequence 03
Level 03 - Division Totals - Sort Sequence 01
Level 10 - Grand Totals
If you specify the same totaling level on multiple data fields, you must enter a 1 in the 1st position of total level for all secondary fields.
For example:
Level 01 - Business Unit (description comes from here)
Level 11 - Object (description ignored)
Level 11 - Subsidiary (description ignored)
2.17.5 Setting Up Ship Notice/Manifest Requirements
Access the Customer Master Revision form.
2.17.6 Setting Up Item Information
Access the Storage/Shipping form.
- UPC
-
Enter the unit of measure at the Universal Product Code level. (The lowest consumer-saleable package.)
- UPC Number
-
Enter the Universal Product Code number which must conform to the UCC structure for UPC numbers
- SCC(PI=1) through SCC(PI=8)
-
Enter a UDC (00/UM) for the unit of measure that is associated with an SCC pack with a packaging indicator of 1 through 8.
- Default Aggregate UPC UOM
-
Enter the unit of measure code to use for each universal product code (UPC) quantity that is contained in the aggregate service class code (SCC) pack.
- SCC(PI=0)
-
Enter the unit of measure that is associated with an SCC pack that has a Packaging Indicator of 0.
2.18 Setting up Label Information
This section provides an overview of label information, lists prerequisites, and discusses how to:
-
Set up additional outbound label information.
-
Set up label next numbers.
2.18.1 Understanding Label Information
The system and third parties can exchange detailed carton information that describes the physical shipment. Third parties must send inbound label information describing the physical shipment such as label serial number, relationship of packaging (such as cartons on a pallet), and carton type.
You generate outbound label data from system tables to a third-party for formatting and printing. The outbound label information includes the Ship To address, EDI data and demand scheduling data, such as the supplier or plant code (Party Type 1 and 2).
You can produce label output as follows:
-
From demand scheduling by using CUM Maintenance (P40R12)
-
From Carton Detail Inquiry if the carton detail has been created from carton recommendations or other methods
-
From Sales Order Entry if you are not using demand scheduling
Note:
If you specify output for a carton or sales detail, the label data is for the entire shipment.
Then the third-party labels, stages or builds pallets, assigns labels to shipments and performs tasks such as label verification during scanning.
The third-party sends data generated from the label process back to the JD Edwards EnterpriseOne system. The system stores the label data in the F4620 table. This table must be updated with accurate information from the physical shipment, because the system uses this information to create packaging information on the ASN and the Bill of Lading.
Through shipment carton reconciliation you can use scanning to verify that the shipment item quantity matches the carton detail item quantity, and then correct discrepancies.
You can add or update label serial numbers that are unusable because of errors or damages in packaging. The system uses the Unusable Label Numbers table (F4622) to process unusable label information.
2.18.1.1 What If the Scanned Carton Quantity is Less Than the Sales Order Quantity?
Changes to carton detail are not reflected in the sales detail and vice versa.
To pass reconciliation, you can:
-
Decrease the sales quantity by changing demand
-
Decrease sales quantity in shipment confirmation
-
Add cartons to carton detail
2.18.1.2 What If the Scanned Carton Quantity is Greater Than the Sales Order Quantity?
To pass reconciliation, you can:
-
Increase sales quantity by changing Demand
-
Increase sales quantity in ship confirm
-
Remove cartons from carton detail
The system uses these tables for processing label information:
-
Additional Demand Label Data (F40R31)
-
F4622
-
Label Next Numbers (F4625)
-
Demand Detail (F40R11)
-
F4211
-
F4215
-
F4620
2.18.1.3 Outbound and Label Processing
For outbound label information, the system provides label information for the GM1724 label standard. You can specify whether to generate label serial numbers from label next numbers, or they can be generated externally. You set up label next numbers by branch/plant or use a default branch/plant value. The system sends the label number in the outbound label data but does not store this information in the system until after third-party scanning, when creating the carton detail. The third-party stores and validates the label serial number.
The system does not format data for a label, print the label or create the barcode that is printed on the label. It is up to the third parties to determine if that data describes what is physically on the pallet and whether to use that information on the label. Third parties are responsible for carton counts on labels, label format, printing, barcode, pallet staging, and label verification.
You can use the Additional Label Data application (P40R31) to set up additional data for the outbound label message. This data includes the branch/plant, Sold To and Ship To values, the column name and table name that contains the column to use for the label, and supplemental data for categorizing values such as approval steps or requisition requirements.
2.18.2 Prerequisites
Before you complete the tasks in this section:
-
Set up the UDCs for Additional Label Tables (40R/TN) and Additional Label Supplemental DB Codes (46/AL).
Note:
The display mode for the supplemental data type must be C. -
Set up UDC Unusable Label Reason Code (46/UL).
2.18.3 Forms Used to Set Up Label Information
2.18.4 Setting Up Additional Outbound Label Information
Access the Additional Label Data Revision form.
Figure 2-37 Additional Label Data Revision form
Description of ''Figure 2-37 Additional Label Data Revision form''
- Table Name
-
Enter a UDC (40R/TN) that represents the name of the table containing the column that the system uses for a label.
- Column Name
-
Enter a descriptive remark for the label.
- SDB Code (supplemental database code)
-
Enter a UDC (00/SD) that sets up databases for groups of related supplemental data types. This code differentiates the supplemental data types for various systems. For example, the Employee (E) supplemental database contains data types that you use to track additional employee information, such as education and job skills.
If you specified that the Supplemental Data table (F00092) is a table name for UDC 40R/TN, complete this field; otherwise this field must remain blank.
- Ty Dt (type data)
-
Enter a code that you assign to supplemental data so that you can group data by categories. Values include:
A: Approval steps
B: Requisition requirements
C: Interview process
N: Requisition notes
- SDB Code Name (supplemental database name code)
-
Displays a SDB code name.
2.18.5 Setting Up Label Next Numbers
Access the Label Next Number Revision form.
2.19 Setting Up License Plate Processing
This section provides an overview of license plate processing and discusses how to:
-
Activate license plate processing for a UOM and item dimension group.
-
Activate license plate processing for a UOM and item.
-
Set up license plate numbering constants.
-
Set up segment definitions for license plate numbers (LPN).
2.19.1 Understanding License Plate Setup
You can track large units of measure, such as a pallet, by assigning an LPN when you create a movement request. For example, you can assign an LPN to a pallet of stereo equipment to locate it easily.
If you use license plate tracking for a particular item or unit of measure combination, the system generates one tracking number for each unit of measure of that item. You should use license plate tracking only for an item's Level 1 unit of measure, the largest in the unit of measure structure, such as a pallet.
You can assign LPNs at the branch/plant level by item, unit of measure or both. For example, a pallet of item ABC may influence a license plate, but a case of item ABC may not. License plates supports mixed lots of both single and mixed items. The system checks item compatibility if items are mixed on a single license plate. You can set up multilevel parent/child license plate nesting structures, such as a license plate within a license plate after the items are on hand in the branch/plant. You can add items to a license plate manually at any time, including after purchase order receipts and manufacturing completions processes.
|
Note: You can activate license plates for a Branch/Plant only if there are no F4602 records in the table for that Branch/Plant. |
You use these JD Edwards EnterpriseOne applications to set up license plate processing:
2.19.1.1 Item Unit of Measure Definition
You can activate license plate functionality for creating LPN automatically for a UOM and item dimension group relationship (or definition), or for a UOM and item relationship (or definition). You can set up several UOMs in the structure with automatic LPN generation.
|
Note: Automatic License Plate creation can only occur if you are not using manual numbering and the item is not a Dual UOM item. It only occurs in certain applications (Adjustments, To Side of Transfers, PO Receipts (Inbound ASN and Receipt Routing included), and WO Completions) and can be turned off for each of these applications, even if the item UOM definition has it turned on. |
2.19.1.2 License Plate Numbering Constants (P46L001)
You activate license plate functionality and set up constants for processing, such as default container code and the generation method for numbering.
|
Note: Storage unit numbers are no longer known as license plate numbers in this version of the JD Edwards EnterpriseOne Warehouse Management system and can no longer be created. |
2.19.1.3 License Plate Segment Definition (P46L010)
You can set up segment definitions for LPNs. Segment details include the sequence and the length, which combined, form the license plate number. You also specify which segment types appear and in which order. Segment types include hard coded values, look up types such as container codes, next numbers, or check digits.
You can set up complicated formulas or simple formulas. Formulas are made up of segments. An example of a simple segment would be using Next Numbers. Or, you can set up any combination of hard coded, Next Number, look-up types, container-based UDC, and check digit segments, up to a length of 40. An example might be to set up a hard-code value to identify the branch/plant followed by a next number range.
2.19.1.4 Container and Carton Codes
You can set up default License Plate container type processing groups and associate the default License Plate unit of measure to a container type, such as a case or box, dimensions, weight, and maximum weight. All of these groups are important to license plates and their default values.
2.19.1.5 Tables Used for License Plate Processing
The system can use these tables for license plate processing:
-
License Plate Numbering Constants (F46L001)
-
License Plate Segments (F46L010)
-
License Plate Next Numbers (F46L011)
-
LPN Supplier Inbound ASN Levels (F46L060)
For future use.
-
LPN Supplier Cross Reference (F46L070)
For future use.
-
License Plate Master (F46L10)
-
License Plate Item Detail (F46L11)
-
License Plate Commitment (F46L12)
-
License Plate Cross Reference (F46L20)
-
Location Capacity (F46L30)
-
License Plate Cycle and Tag Count (F46L42)
-
License Plate History (F46L99)
You must set up these UDCs for license plate processing:
-
46L/SC (License Plate Status Code)
-
46L/RC (License Plate Reason Code)
-
46L/CR (Cross Reference Type)
-
46L/CT (Commitment Type)
-
46L/LG LP (Generation Method)
-
46L/LT LP (Lookup Type)
-
46L/TT (Transaction type)
-
46L/ST (Segment Type)
-
46L/LS (Location Capacity Status)
-
46L/IA (Inbound ASN DD Column)
2.19.2 Prerequisites
Before you complete the tasks in this section ensure that you convert or remove existing data before activating license plates.
2.19.3 Forms Used to Set Up License Plate Processing
2.19.4 Activating License Plate Processing for a UOM and Item Dimension Group or UOM and Item
Access the U/M Definition by Item Revisions form.
- License Plate
-
Select to specify the system creates a license plate number automatically for the item/UOM or item dimension group/UOM in this unit of measure.
2.19.5 Setting Up License Plate Numbering Constants
Access the License Plate Numbering Constants form.
Figure 2-38 License Plate Numbering Constants form (Release 9.1 Update)
Description of ''Figure 2-38 License Plate Numbering Constants form (Release 9.1 Update)''
|
Note: This numbering method is the default value. You can override this number at any time when creating the license plate and during certain transactions, such as PO Receipts, work order completion, PO receipt routing, inventory adjustments, and inventory transfers. Also, data collections can also scan or read the LPNs and send them into the system to create the license plates. |
- LPN Switch
-
Enter 0: and the system does not use LPNs for the Branch/Plant.
Enter 1: to use LPNs for the Branch/Plant.
- LPN Method
-
Enter the value, UDC (46L/LG), to indicate what license plate number generation method the system uses for the branch/plant. Values are:
Enter 01: for manual entry. The system does not automatically create LPNs. You must manually create the license plate number.
Enter 02: to create using a user-defined formula. A user-defined formula enables you to specify how the system creates LPNs. This method is similar to that of the tracking numbering used in pick, pack, and ship. To use this method at any time, you must set up the formula at the branch/plant level in License Plate Segment Definition (P46L010).
Enter 03: to create EPC (electronic product code) number. The system uses the Electronic Product Code processes to create the license plate number.
2.19.5.1 LPN Master Settings
- LPN Process On/Off
-
Select to specify whether the system uses LPNs for the Branch/Plant.
- LPN Default Container Code
-
Enter a UDC (46/EQ) that identifies a storage container or a shipping carton.
For license plates, the specified container code is the default container code for every license plate containing mixed items. Non-mixed LPNs use the container code setup for the specific Item/UOM in Item Unit of Measure Definition (P46011) and not by creating building automatically or a UOM structure. You can override this default container code for a license plate only if it was created automatically or by UOM structure.
- LPN Generation Method
-
Enter the value, UDC (46L/LG), to indicate what license plate number generation method the system uses for the branch/plant. Values are:
Enter 01: for manual entry. The system does not automatically create LPNs. You must manually enter the license plate number.
Enter 02: to create using a user-defined formula. A user-defined formula enables you to specify how the system creates LPNs. This method is similar to that of the tracking numbering used in pick, pack, and ship. To use this method at any time, you must set up the formula at the branch/plant level in License Plate Segment Definition (P46L010).
Enter 03: to create EPC (electronic product code) number. The system uses the Electronic Product Code processes to create the license plate number.
- License Plate Status Code
-
Enter a UDC (46L/SC) to set a License Plate Status Code for the License Plate Number. Examples of possible UDC status codes are 01 for open and 02 for close.
2.19.6 Set Up Segment Definitions for LPNs
Access the License Plate Segment Revisions form.
Figure 2-39 License Plate Segment Revisions form
Description of ''Figure 2-39 License Plate Segment Revisions form''
- LP Segment Sequence
-
Enter a number that specifies what sequence this segment is to appear in the license plate number. For example, if the sequence is 1, then the segment appears first when the license plate number is constructed.
- Segment Length
-
Enter the number that specifies the length of this segment of the license plate. A single segment must be from 1 to 40 characters long. The total length of all segments for a branch/plant numbering formula cannot exceed 40 characters.
- Segment Type
-
Select an option to specify the type of license plate segment.
-
Hard Coded Value
-
Lookup Type
-
Container Code Based UDC
-
Next Number
-
Check Digit (segment length must be 1 character)
-
User Defined Function (must be the only segment for the branch/plant numbering formula)
-
- Product Code
-
Enter a UDC (98/SY) defined for license plate segments. The values should match the segment type selected. The system retrieves a UDC value based on the segment type and uses the UDC description as the value for the segment. If the segment is defined with a length of 10, then the system uses the first ten characters of the UDC description to populate the segment.
- User Defined Code
-
Enter a UDC (98/SY) defined for license plate segments. The values should match the segment type selected. The system retrieves a UDC value based on the segment type and uses the UDC description as the value for the segment. If the segment is defined with a length of 10, then the system uses the first ten characters of the UDC description to populate the segment.