9 Working with Material Planning Operations for Apparel Management
This chapter contains the following topics:
-
Section 9.1, "Understanding Material Planning Operations for Apparel Management"
-
Section 9.2, "Working with Planning Messages for Style Items"
9.1 Understanding Material Planning Operations for Apparel Management
JD Edwards EnterpriseOne Requirements Planning is part of Oracle's JD Edwards EnterpriseOne Supply Chain Management product line. JD Edwards EnterpriseOne Requirements Planning consists of these features:
-
Resource and Capacity Planning
Resource and Capacity Planning enables you to prepare a feasible production schedule that reflects demand forecasts and production capability. Resource and Capacity Planning consists of:
-
Resource Requirements Planning (RRP)
-
Rough Cut Capacity Planning (RCCP)
-
Capacity Requirements Planning (CRP)
-
-
Material Planning Operations
Material Planning Operations provide a short-range plan to cover material requirements that are needed to make a product. Material Planning Operations analyze demand from all the operational areas. Material Planning Operations consist of these feature sets:
-
Distribution Requirements Planning (DRP)
-
Master Production Scheduling (MPS)
-
Material Requirements Planning (MRP)
-
Multifacility Planning
-
Project Requirements Planning (PRP)
-
The JD Edwards EnterpriseOne Requirements Planning and JD Edwards EnterpriseOne Apparel Management systems integrate to support material planning for style items. The systems facilitate message review and preserve data consistency by enabling a matrix view of the lowest level child style items.
Some companies use Microsoft Excel spreadsheets to create forecasts, extrapolate the forecast to lowest level child items, and import the spreadsheet into the JD Edwards EnterpriseOne system.
|
Note: The manual spreadsheet process does not use electronic data interchange. |
You run the MRP/MPS Requirements Planning (R3482) and Master Planning Schedule - Multiple Plant (R3483) programs to create MRP messages for the lowest level child style items. You use the MRP/MPS Detail Message Revisions program (P3411) to add new messages.
You use the Matrix Management of Messages (PCW47), Material Analysis (PCW96), and Grouping Messages (PCW97) programs to manage messages for child style items.
This diagram illustrates the material planning process for child style items:
Figure 9-1 Material planning process for style items
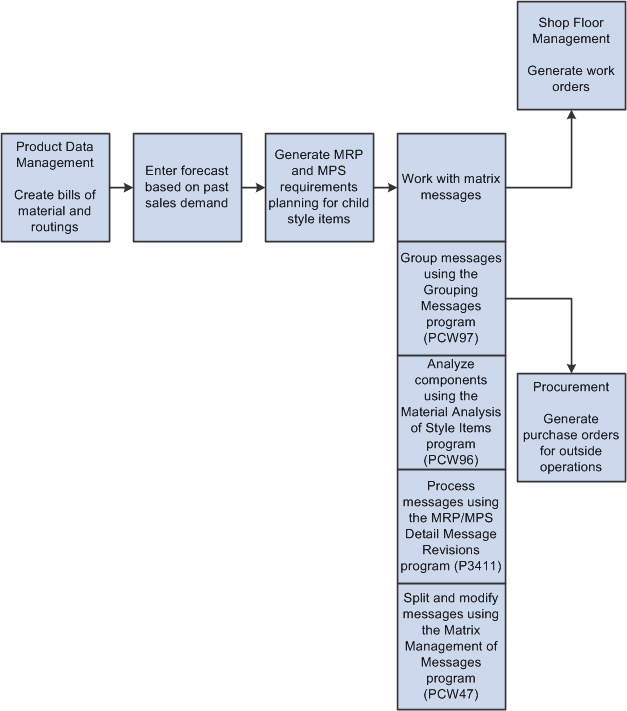
Description of "Figure 9-1 Material planning process for style items"
9.1.1 Example: Apparel Industry
In the apparel industry, you develop an initial forecast for the following requirements before the development of the collection is complete:
-
Grey fabrics booking for blanket orders.
-
Manufacturing human resources booking.
-
Collection and style item level.
You create the forecast for style item and color, and confirm (purchase) one-third of the fabrics at the color level. Note that the apparel industry has an industry standard, according to supplier requirements, that 30 percent of the supplies are purchased at the time the forecast is created.
You review the forecast after three to five weeks of selling and complete the following tasks:
-
Extrapolate the collection to the lowest level child items.
-
Isolate atypical orders.
-
Calculate additional forecast for replenishment orders.
-
Complete purchase of the fabrics.
9.2 Working with Planning Messages for Style Items
This section provides overviews of planning messages for style items, availability calculations, and adjustment calculations, lists prerequisites, and discusses how to:
-
Set processing options for Matrix Management of Messages (PCW47).
-
Process messages for style items.
-
Add quantities in messages by size for style items.
-
Split messages for style items.
-
Group messages for style items.
-
Calculate adjustments for style items.
-
Generate transfer orders for style items.
9.2.1 Understanding Planning Messages for Style Items
The Matrix Management of Messages program (PCW47) provides a consolidated view of all messages through a matrix display. The Matrix Management of Messages program enables matrix message modification for the lowest level child style items. You can manage existing messages only. You can group and split messages to create orders. You cannot add new messages.
The size grid columns that appear in the Matrix Management of Messages program are based on the size grid defined in the Matrix Grid program (PCW03). The size grid columns that the Matrix Management of Messages program displays are not based on the sizes selected on the orders for the style items. For example, the size grid in the Matrix Grid program displays all 23 columns, even though only seven sizes are selected for the style item on an order.
The Matrix Management of Messages program displays all size grid columns to support all style items that can have a varying number of sizes. If the Work With Matrix Management of Messages form lists two style items and the first style item has seven sizes and the second style item has nine sizes, then the system displays all sizes for both items. Thus, the system always displays style item sizes based only on the size grid. You cannot enter data into the quantity fields in the size columns on the Work With Matrix Management of Messages form.
You generate a semi-finished good from the Work With Matrix Management of Messages form by selecting a row and then selecting Semi-Finish Good Gen (semi-finish good generation) from the Row menu.
Both work orders and purchase orders manage multiple child style items. The system enables processing of style items grouped for purchase order and work order generation using the Grouping Messages program (PCW97). For example, you group work orders for style items manufactured of the same fabric for master work order creation.
You can split a message into several messages if the suggested quantity is too large for a single order. You split one order into two orders with different dates.
You use the MRP/MPS Detail Message Revisions program (P3411) to add new messages for style items.
9.2.2 Understanding Availability Calculations
You determine the availability of components using the Material Analysis program (PCW96). You can monitor component shortages and apply quantity changes to planning messages based on shortage calculations.
You calculate material shortages using the Shortage Calculation option on the Form menu of the Work With Material Analysis of Style Items form if you want to use additional branch/plants. Otherwise, the shortage calculation runs automatically. You do not need to select the Shortage Calculation option on the Form menu if you use one branch/plant.
You can set processing options for the Material Analysis program. On the Process tab, set the Additional Branch/Plant processing option to specify the branch/plant to use with the message branch/plant for the component shortage calculation.
On the Process tab, set the Order Multiplier processing option to specify the multiplier quantity to use during the adjustment calculation to change the work order quantity.
On the Process tab, set the Minimum Quantity processing option to specify the minimum quantity to use during the adjustment calculation to change the work order quantity.
On the Work With Material Analysis of Style Items form, the Additional Branch/Plant field in the form header specifies the branch/plant to use for the shortage calculation in conjunction with the branch/plant specified in the planning message.
You can change the value in the Transaction Quantity field in the grid for each message.
To perform the shortage calculations, the system verifies the demand based on the bill of material (BOM) for the child style item in the message to determine the components and quantities required. The system then compares the component availability to the demand in the BOM to determine any material shortage. The system uses the following equation to calculate material shortage:
(Material shortage) = (Component demand) − (Availability based on message branch/plant)
If you use an additional branch/plant from which to supply material, then the shortage is calculated as:
(Material shortage) = (Component demand) − (Availability based on message branch/plant) − (Availability based on additional branch/plant)
9.2.2.1 Example: Availability Calculation
For example, a planning message indicates a requirement for a quantity of 200 EA of style item XPJ01.B.0–3. The table illustrates the components and quantities indicated by the BOM:
| Component | Quantity and UOM |
|---|---|
| XFBPJ.B | 25000 CM |
| XLINPJ.B | 2400 CM |
| XZPJ.B.XS | 200 UN |
The table illustrates the demand and availability the system uses to calculate material shortage:
| Component | Demand | Availability (Based on Message Branch/Plant) | Shortage |
|---|---|---|---|
| XFBPJ.B | 25000 CM | 18800 CM | 6200 CM |
| XLINPJ.B | 2400 CM | 1800 CM | 600 CM |
| XZPJ.B.XS | 200 UN | 160 UN | 40 UN |
In this example, the shortage for style item XFPJ.B is calculated as (Material shortage) = (25000) − (18800) = 6200.
This table illustrates the demand and availability that the system uses to calculate material shortage if you use an additional branch/plant from which to supply material:
| Component | Demand | Availability (Based on Message Branch/Plant) | Availability (Based on Additional Branch/Plant) | Shortage |
|---|---|---|---|---|
| XFBPJ.B | 25000 CM | 18800 CM | 1000 CM | 5200 CM |
| XLINPJ.B | 2400 CM | 1800 CM | 200 CM | 400 CM |
| XZPJ.B.XS | 200 UN | 160 UN | 30 UN | 10 UN |
In this example, the shortage for style item XFPJ.B is calculated as (Material shortage) = (25000) − (18800) − (1000) = 5200.
9.2.3 Understanding Adjustment Calculations
You use the Material Analysis program to adjust the style item quantities on work orders. The Adjustment Calculation form displays the transaction quantity for each child style item and the total quantity for all style items.
The system uses values in the Total Transaction Quantity, New Quantity, Multiplier Quantity, and Minimum Quantity fields to perform adjustment calculations and then updates the quantity of each child style item.
The system completes the following steps to perform adjustment calculations:
-
Calculates the percentage of each style item based on the total transaction quantity.
Style item percentage = (Item transaction quantity) ÷ (Total transaction quantity) * 100
-
Distributes the new quantity among the style items.
Style item calculated quantity = (Style item percentage) * (Total new transaction quantity) ÷ 100
-
Compares and verifies that the calculated value is greater than the value in the Minimum Quantity field.
Calculated value > Minimum Quantity
-
Rounds the calculated quantity so that the value is a multiplier of the value in the Multiplier Quantity field.
For example, 185 is a multiple of 5. (Rounded calculated quantity) = 37 * 5 = 185
The rounded calculated value is the final value. This is the new quantity for the style items.
You can also select Automatic Split from the Form menu on the Adjustment Calculation form to distribute the new quantity among the items proportionately. Minimum and multiplier quantity constraints are applied after the automatic splitting occurs.
9.2.3.1 Example 1: Adjustment Calculation
For example, use the following criteria to perform an adjustment calculation:
| Element | Value |
|---|---|
| Total Transaction Quantity | 1505 |
| Total New Quantity | 1800 |
| Item Transaction Quantity | 155 |
| New Quantity | 2 |
| Multiplier Quantity | 5 |
| Minimum Quantity | 1 |
The system completes the following steps to perform adjustment calculations:
-
Style item percentage = (155) ÷ (1505) * 100 = 10.29%
-
Style item calculated quantity = (10.29) * (1800) ÷ 100 = 185.22
-
Calculated value > Minimum Quantity = 185.22 > 1
-
(Rounded calculated quantity) = 37 * 5 = 185
9.2.3.2 Example 2: Adjustment Calculation
Use the following criteria to perform an adjustment calculation:
| Element | Value |
|---|---|
| Total Transaction Quantity | 1505 |
| Total New Quantity | 2000 |
| Item Transaction Quantity | 155 |
| New Quantity | 2 |
| Multiplier Quantity | 9 |
| Minimum Quantity | 170 |
The system completes the following steps to perform adjustment calculations:
-
Style item percentage = (155) ÷ (1505) * 100 = 10.29%
-
Style item calculated quantity = (10.29) * (2000) ÷ 100 = 205.8
-
Calculated value > Minimum Quantity = 205.8 > 170
-
(Rounded calculated quantity) = 22* 9= 198
(Rounded calculated quantity) = 23* 9= 207
Because 207 exceeds the calculated quantity of 205.8, 198 becomes the new quantity for the style items.
9.2.4 Prerequisites
Before you begin the tasks in this section:
-
Set the processing options for your versions of the MRP/MPS Detail Message Revisions (P3411), MRP/MPS Requirements Planning (R3482), and Master Planning Schedule - Multiple Plant (R3483) programs.
-
Run the MRP/MPS Requirements Planning (R3482) and Master Planning Schedule - Multiple Plant (R3483) programs.
-
Set the processing options for your version of Material Analysis (PCW96).
-
Set the processing options for your version of Grouping Messages (PCW97).
9.2.5 Forms Used to Work with Planning Messages for Style Items
| Form Name | FormID | Navigation | Usage |
|---|---|---|---|
| Work With Matrix Management of Messages | WCW47A | Material Planning (G41F16), Matrix Management of Messages | Process messages for style items. |
| Matrix Management - Detail Message Revisions | WCW47C | On the Work With Matrix Management of Messages form, select a row and click Select. | Work with detail message revisions. |
| Matrix Management - Split Messages | WCW47D | On the Matrix Management - Detail Message Revisions form, select a row and select Split Messages from the Row menu. | Split messages for style items. |
| Matrix Management - Add Quantity by Size | WCW47E | On the Matrix Management - Detail Message Revisions form, select a row and select Add Quantity by Size from the Row menu. | Add quantities in messages by size for style items. |
| Message Grouping Detail | WCW97A | On the Work With Matrix Management of Messages form, select records and select Group Messages from the Row menu. | Group messages for style items. |
| Work With Material Analysis of Style Items | WCW96A | On the Work With Matrix Management of Messages form, select Material Analysis from the Form menu.
On the Work With Matrix Management of Messages form, select a row and select Material Analysis from the Row menu. |
Review the availability of components for style items. |
| Adjustment Calculation form | WCW96D | On the Work With Material Analysis of Style Items form, select Adjustment Calc. from the Form menu.
On the Work With Material Analysis of Style Items form, select a row and select Adjustment Calc. from the Row menu. |
Calculate adjustments for style items. |
| Detailed Parts List | WCW96B | On the Work With Material Analysis of Style Items form, select a row and select Detailed Parts List from the Row menu. | Review the detailed parts list for child style items.
The Detailed Parts List form displays all the component items for the style item with associated quantity. |
| Consolidated Parts List | WCW96C | On the Work With Material Analysis of Style Items form, select Consolidated List from the Form menu. | Review the consolidated parts list for child style items.
You can determine the component shortage by comparing the quantity ordered and quantity available. |
| Work With Detail Messages | W3411D | On the Work With Matrix Management of Messages form, for a row selected with a green check mark, select Validate from the Form menu.
DRP Daily Operations (G3411), DRP Detail Message Review MPS Daily Operations (G3412), MPS Detail Message Review MRP Daily Operations (G3413), MRP Detail Message Review |
Process messages for style items.
Add messages for child style items. Note: You cannot add a message for style items when calling the MRP/MPS Detail Message Revisions program from the Matrix Management of Messages program. You can only process or validate the messages. To add a new message for style items, you must call the MRP/MPS Detail Message Revisions program separately. |
9.2.6 Setting Processing Options for Matrix Management of Messages (PCW47)
Processing options enable you to specify the default processing for programs and reports.
9.2.6.1 Process
- 1. Message Processing Status
-
Specify the type of message processing status. Enter a value that is set up in user-defined code (UDC) table H01/MR.
- 2. Work Order Document Type
-
Specify the document type that the system uses when creating work orders. Enter a value from UDC 00/DT (Document Type - All Documents).
If you leave this processing option blank, then the system uses document type WO.
You can specify multiple work order types in a string without any separator. The system parses every two digits of the string.
- 3. Distribution Branch/Plant
-
Specify the distribution branch/plant. The value that you enter in this field appears as the default value in the Item/Branch Plant program (P41026).
- 4. Transfer Order Document Type
-
Specify the order type that you want the system to use for new transfer orders. Enter a value from UDC 00/DT (Document Type - All Documents).
If you leave this field blank, then the system uses OT as the default order type.
- 5. Transfer Lead Time
-
Specify the lead time in days for the transfer order generation.
- 6. Semi-Finished Goods Stocking Type
-
Specify the stocking type that the system uses to process semi-finished goods. The system retrieves information about stocking types from the Item Branch table (F4102). The stocking type is a UDC (41/I) that indicates how you stock an item. For example, you might stock an item as finished goods or raw materials. The stocking types that you can specify for this processing option are hard-coded, and you should not change them. For each stocking type, the first character of Description 2 indicates whether the item is purchased (P) or manufactured (M). Values are:
O: Phantom.
B: Bulk Floor Stock.
C: Configured Item.
E: Emergency / Corrective Maintenance.
F: Feature.
K: Kit or Parent Item.
N: Non-stock Item.
You can specify multiple stocking types in a string without any separator. The system parses every one digit of the string.
- 7. Message Status for Transfer Order Generation
-
Specify the type of message status for transfer order generation. Enter a value that is set up in UDC table H01/MR.
- 8. Message Status for Semi-Finished Goods Generation
-
Specify the type of message status for semi-finished goods generation. Enter a value that is set up in UDC table H01/MR.
- 9. Message Status for Grouping (PCW97)
-
Specify the type of message status for grouping messages. Enter a value that is set up in UDC table H01/MR.
- 10. Message Status for Material Analysis (PCW96)
-
Specify the type of message status for material analysis. Enter a value that is set up in UDC table H01/MR.
9.2.6.2 Versions
- 1. MRP/MPS Detail Message Revisions (P3411)
-
Specify which version of the MRP/MPS Detail Message Revisions program (P3411) the system uses to process messages.
If you leave this option blank, then the system uses ZJDE0001 as the default version.
- 2. Material Analysis (PCW96)
-
Specify which version of the Material Analysis program (PCW96) the system uses for work order simulation.
If you leave this option blank, then the system uses ZJDE0001 as the default version.
- 3. Grouping Messages (PCW97)
-
Specify which version of the Grouping Messages program (PCW97) the system uses for grouping messages.
If you leave this option blank, then the system uses ZJDE0001 as the default version.
9.2.7 Processing Messages for Style Items
Access the Work With Matrix Management of Messages form.
To process messages for style items:
-
Enter the style item root level 0 in the Style Item Root Level 0 field and click Find.
-
Select a row to process based on message type and demand quantities, and click Select from the Row menu.
The system displays a green check mark in the row.
Note:
You use the Deselect option on the Row menu to remove a row from message processing. The system displays a red X in the row. -
With the row selected, select Validate from the Form menu.
-
Click Find on the Work With Detail Messages form.
-
Select all the rows and select Process Message(s) from the Row menu.
You can also select Auto Process from the Row menu.
-
Review the master work order number in the Previous Master Work Order Number field.
The system generates a master work order number using next numbers. The system uses the master work order to process all the selected style items for manufacturing.
-
Review the work order number in the Order Number field for all records.
The system processes the selected messages and generates a work order number for every child style item message. The system stores records in the Work Order Header for Style Items (FCW65) and Work Order Detail for Style Items (FCW66) tables with the master work order number. All records are now firm orders.
-
Click Close.
9.2.8 Adding Quantities in Messages by Size for Style Items
Access the Matrix Management - Add Quantity by Size form.
To add quantities by size for style items:
-
Enter quantities in the size fields as required.
-
Click OK.
9.2.9 Splitting Messages for Style Items
Access the Work With Matrix Management of Messages form.
To split messages for style items:
-
Enter the style item root level 0 in the Style Item Root Level 0 field and click Find.
-
Select a row based on the message type and total demand that you want to process and click Select.
-
Select a row on the Matrix Management - Detail Message Revisions form.
-
Select Split Messages from the Row menu.
-
Add new rows containing start date and quantity information on the Matrix Management - Split Messages form.
For example, if you want to split the initial order into two orders, then enter the dates and quantities of the second order in a new line.
In the first order line, the system maintains the initial dates. The first order line also maintains quantities that are equal to the difference between the initial quantities and those chosen for the second order.
-
Click OK.
The system displays the Matrix Management - Detail Message Revisions form with the new split quantities.
-
Click OK.
The system displays the Work With Matrix Management of Messages form with new split quantities and other modified data.
-
Process the style items as required.
9.2.10 Grouping Messages for Style Items
Access the Message Grouping Detail form.
To group messages for style items:
-
Enter values in the Start Date, Requested Date, and Message Type fields in the header.
If you update the start date or other data, then the system groups the messages together based on the start date or other data entered.
You can also group messages by different sizes by selecting the messages on the Work With Matrix Management of Messages form.
-
Select the rows to group messages for style items.
-
Click OK.
9.2.11 Calculating Adjustments for Style Items
Access the Adjustment Calculation form.
To calculate adjustments for style items:
-
Enter values in the New Quantity, Multiplier Quantity, and Minimum Quantity fields.
-
Select Automatic Split from the Form menu to have the system automatically split the adjustments.
The system splits the new quantity among the child style items displayed on the Adjustment Calculation form.
-
Select Save results from the Form menu to save the results of the adjustment calculation.
|
Note: The system performs the calculation using the value in the Multiplier Quantity field. When you define a new quantity, the system computes each single quantity per child style item as a multiple of the multiplier quantity. If the resulting quantity is less than the value in the Multiplier Quantity field, then the system applies the minimum quantity. |
9.2.12 Generating Transfer Orders for Style Items
Access the Work With Matrix Management of Messages form.
To generate transfer orders for style items:
-
Enter the style item root level 0 in the Style Item Root Level 0 field and click Find.
-
Select a row based on the message type and total demand that you want to process.
-
Select Transfer Order Gen from the Row menu.
-
On the Message form, click OK.
The system creates a new transfer message with order type S.