4 Synchronizing Project Data
This chapter contains the following topics:
-
Section 4.1, "Understanding the Project Synchronization Process"
-
Section 4.2, "Project Integration Assumptions and Constraints"
-
Section 4.4, "Importing Project Data into Contract Management"
4.1 Understanding the Project Synchronization Process
The first step in the synchronization process for the Contract Management integration is to create project, cost code, and budget information in the EnterpriseOne system.
|
Note: To create these records in the EnterpriseOne system, Oracle recommends that you have a strong functional understanding of the JD Edwards EnterpriseOne Job Cost system. Detailed information and instructions about how to create jobs, cost codes, and budgets can be found in the JD Edwards EnterpriseOne Job Cost 9.0 Implementation Guide. |
After you create this data in EnterpriseOne, you can synchronize that data from EnterpriseOne to Contract Management. You use data extract programs to extract selected data from EnterpriseOne and store the data in XML files. These files can then be transferred to a predefined location that is accessible to the Contract Management system, and the Contract Management Exchange application is then used to import the data into the Contract Management database.
There are two data extract programs that you can run to synchronize project data from EnterpriseOne to Contract Management:
-
Project and Contract Header for Contract Management (R51006CMD)
This program extracts project header data and creates an XML file that can be sent to Contract Management. You can run this program alone to extract only project header data, or you can set the processing options for this program to call the Cost Codes and Original Budgets for Contract Management program. When you call this additional program, the system extracts project header, cost code, and budget data for the selected projects.
-
Cost Codes and Original Budgets for Contract Management (R51901CMD)
This program extracts cost code and budget data for selected projects. This program is called directly from the R51006CMD program, and cannot be processed alone.
You use the Project and Contract Header for Contract Management (R51006CMD) program to transfer project header information from EnterpriseOne to Contract Management. This program generates an XML file that contains project header information that is extracted from the Business Unit table (F0006) and the Extended Job Master table (F5108). This program can be run alone, or you can set the processing options to call the Cost Codes and Original Budgets for Contract Management (R51901CMD). If you call this program, the system includes cost codes and original budget data in the XML file. Cost code and budget data are extracted from the F0901 and F0902 tables based on the business unit, fiscal year, and century that are defined in the R51006CMD.
When you run one or both of these programs, the system updates the CM Project Cross Reference table (F51006X).
The project data extract programs support these types of project data synchronizations:
-
Create new project.
Project header data can be created in EnterpriseOne and sent to Contract Management at any time. Synchronizing this type of data results in the creation of a new project in Contract Management.
-
Create new cost code.
Account master details can be created in EnterpriseOne for an existing project, and sent to Contract Management at any time. Synchronizing this type of data results in the creation of new cost code schedule records in Contract Management. You can create new cost codes after you have synchronized cost codes from EnterpriseOne to Contract Management.
-
Create budgeted contract.
Original budget amounts can be created in EnterpriseOne and sent to Contract Management at any time before the project is approved in Contract Management. Synchronization of this type of data results in a new budgeted contract in Contract Management.
Note:
To synchronize budget changes after the project is approved in Contract Management, you must use the change request process. -
Update existing project.
Existing project header details can be updated in EnterpriseOne and sent to Contract Management at any time. Synchronizing these updates results in an update to the existing project in Contract Management.
-
Update existing cost code.
Updates to an existing account master can be made in EnterpriseOne and sent to Contract Management at any time before the project is approved in Contract Management. Synchronizing these updates results in an update to the existing cost code schedule information in Contract Management. Additionally, you can create new cost codes after initial synchronization of cost codes.
Note:
To synchronize changes to existing cost codes after the project is approved in Contract Management, you must use the change request process. However, you can create new cost codes without any budget and synchronize them at any time. -
Update existing budget contract.
Updates to existing budget contracts can be made in EnterpriseOne, however, these updates will not be reflected in the Contract Management budgeted contract information during synchronization. Changes to existing budget contract amounts must be handled using the change order process flow.
A typical project synchronization flow might include the following steps:
-
A project is created in the EnterpriseOne system.
A project consists of a business unit and the extended job master in EnterpriseOne.
See JD Edwards EnterpriseOne Applications Job Cost Implementation Guide, "Setting Up Jobs."
Note:
You can synchronize project data from EnterpriseOne to Contract Management at this point, or you can create the additional financial information that is associated with the job, and then synchronize all of the data together. -
Accounts that are associated with that project are then created in the EnterpriseOne system using cost code structures.
The cost code structure in EnterpriseOne is the equivalent of the cost codes in Contract Management.
-
After you create the job and cost code structure, you enter budget information for the job.
Budget information includes the monetary amounts and the number of units, or quantities, related to each account. Budgets are classified as either original or revised. Creating budgets for a job is optional, and is not required for this integration.
-
After data is entered into the EnterpriseOne system, the EnterpriseOne user creates an XML file that contains the project data.
The XML file is created by running the Project and Contract Header for Contract Management program (R51006CMD). This program can be run alone, or can be set to call the Cost Codes and Original Budgets for Contract Management program (R51901CMD) to include cost code and budget information in the file. Depending on how you set these programs to run, you can include project data in the XML file as follows:
-
Users can include only the project data.
-
Users can include the project data and financial accounts (cost codes).
To send financial account information, the project header must already have been synchronized, or also be included in the files.
-
Users can include the project header, and the original budget.
To send budget information, the project header and financial account information must already have been synchronized, or also be included in the files.
-
Users can include the project header, financial accounts, and the original budget.
-
-
The files are sent to the specified Contract Management server location using either the automated or manual method.
If you are using the automated method, FTP scripts automatically send the file to the specified location when you run the data extract programs. If you are using the manual method, the EnterpriseOne user must manually send the files to a Contract Management user, or manually move the files to a specified location.
-
The user signs into the Contract Management Exchange application and imports the file into Contract Management.
See Using Contract Management Exchange, "Using Contract Management Exchange.".
-
The Contract Management users must sign out and then sign back in to see the imported data.
Note:
Users must sign out of, and then back into Contract Management in order to see newly synchronized projects. However, if you are sending cost code or budget data for projects that have already been synchronized to Contract Management, it is not necessary to sign out and back in to see the new data.
4.2 Project Integration Assumptions and Constraints
This section discusses the issues, assumptions, and constraints that you must be aware of when integrating project data between JD Edwards EnterpriseOne and Contract Management.
-
When you synchronize budget information from EnterpriseOne to Contract Management, you are sending original budget information to Contract Management as a budgeted contract. The budgeted contract is created in an unapproved status in Contract Management. You use standard budget approval methods within the Contract Management system to approve the budgeted contract. Once the budgeted contract is approved, no original budget information will be consumed by the Contract Management system. Until the budgeted contract is approved, you can continue to send original budget information from EnterpriseOne. After the budgeted contract is approved, updates to the budgeted contract must be handled using change requests.
-
The budget amounts are sent to Contract Management using the currency of the EnterpriseOne company that is associated with the related project.
Because Contract Management can consume any currency code that EnterpriseOne sends, it is assumed that the EnterpriseOne currency and the Contract Management currency for each project are the same. This integration does not support currency conversion of budgeted amounts between Contract Management and EnterpriseOne.
-
When sending project data from EnterpriseOne to Contract Management, you must include only one project per XML file.
4.3 Running Project Data Extract Programs
After you create project data in the EnterpriseOne system, you use data extract programs to select and format the data so that it can be sent to, and read by, the Contract Management system. Before you can run these programs, you must set the processing options so that data is processed correctly. After you set the processing options, you can run the extract programs directly from the Contract Management Integration Workbench.
|
Note: To process data extract programs for projects, cost codes, and budgets, you run the R51006CMD from the Contract Management Integration Workbench. This program processes project header information and calls the R51901CMD to process cost code and budget information, if available. If you are using FTP to transfer files, these programs automatically generate and send the XML file(s) to the specified location, where they are available to the Contract Management system for consumption. If you experience an error during the file transfer process, you can execute the FTP scripts again using the workbench. Alternatively, you can manually send the files to a Contract Management user. |
This section discusses how to
-
Set processing options for the Cost Codes and Original Budgets for Contract Management (R51901CMD)
-
Set processing options for the Project and Contract Header for Contract Management (R51006CMD)
See Chapter 3, "Using the Contract Management Integration Workbench."
4.3.1 Setting Processing Options for the Cost Codes and Original Budgets for Contract Management Program (R51901CMD)
Before running data extract programs, you must set the processing options so that data is processed correctly.
4.3.1.1 Process Tab
Use the processing options on this tab to specify how the system processes cost code and budget data.
- 1. Budget Amount Ledger Type
-
Use this processing option to specify the ledger type that the system uses to retrieve the original budget amount. If left blank, the system uses ledger type JA.
- 2. Budget Units Ledger Type
-
Use this processing option to specify the ledger type that the system uses to retrieve the original budget units. If left blank, the system uses ledger type JU.
- 3. Suppress Zero Balances
-
Use this processing option to specify whether the system suppresses adding lines to the original budget that has no balance. Values are:
1: Suppress budget line items with zero balances.
Blank: Write budget lines for all cost codes selected.
4.3.2 Setting Processing Options for the Project and Contract Header for Contract Management Program (R51006CMD)
Before running data extract programs, you must set the processing options so that data is processed correctly.
4.3.2.1 Process Tab
Use the processing options on this tab to specify how the system processes project data.
- 1. Contact Address Number
-
Use this processing option to specify which address book data item the system uses to retrieve the default contact name. Values are:
1: AN8 – Job site Address
2: AN8O – Owner Address
3: ANPA – Supervisor Address
4: AN8GCA1 – Address Number 1
5: AN8GCA2 – Address Number 2
6: AN8GCA3 – Address Number 3
7: AN8GCA4 – Address Number 4
8: AN8GCA5 – Address Number 5
If this option is left blank a default contact will not be written to the XML file.
- 2. Contact Who's Who Line Number
-
Use this processing option to specify the who's who line number that the system uses when retrieving the default contact name. This option is used in conjunction with option 1, and is used only if a valid address book data item was entered in option 1. If this option is left blank, and a valid address book value was entered in option 1, the system uses Line 0 as the default value. If a who's who record is not found in the F0111 (Address Book - Who's Who) a default contact will not be written to the XML file.
- 3. Document Date
-
Use this processing option to specify which date the system uses on the budget contract. Enter a 1 in this option to use the company's current period end date, or leave this option blank to use the system date.
- 4. Include Original Budget
-
Use this processing option specify whether to include original budgets in the XML file. Values include:
1: Include original budgets, regardless of whether they have previously been synchronized for the specified project(s).
2: Include original budgets only if they have not been previously synced for the specified project(s).
Blank: Do not write any original budget information to the file.
- 5. Original Budget Version
-
Use this processing option to specify the version of the Cost Codes and Original Budgets for Contract Management program (R51901CMD) to call. This program retrieves the original budget amounts for the project. If you leave this option blank, the system uses version XJDE0001.
- 6. Exclude Project Header
-
Use this processing option to specify whether to exclude project header information in the resulting XML file. This option enables users to limit the amount of data that is included in the XML file, and is typically set to exclude project header information only if changes are made to a project that has already been synchronized. Values are:
1: Exclude project header information.
Blank: Write project header information to the file.
- 7. Exclude Cost Codes
-
Use this processing option to specify whether to exclude cost code data from the XML file. Values are:
1: Exclude cost code information in the resulting XML file.
Blank: Include cost code information in the XML file.
- 8. Cost Code Version
-
Use this processing option to specify the version of the Cost Codes and Original Budgets for Contract Management program (R51901CMD) to call. This program retrieves the list of cost codes for the project. If you leave this option blank, the system uses version XJDE0001.
- 9. Fiscal Year
-
Use this processing option to specify the fiscal year to use for original budgets. If left blank the system uses the current fiscal year for the company of the project.
- 10. Number of Projects to Include
-
Use this processing option to specify number of projects to include in each XML file. If you enter 0 (zero), all of the selected projects are included in a single XML file.
4.3.2.2 File Transfer Tab
Use the processing options on this tab to specify details about the file transfer process.
- 1. Manual File Transfer Path - where XML files will be written
-
Use this processing option to specify the file location that the system uses for storing the resulting XML files when running in manual mode. The name of the resulting XML file will be in the format of E1toCMProject_MMDDYYYY_hhmmss.xml. The file name will be appended to the value entered in this processing option to determine the fully qualified path and name.
For example if you enter C:\B9\DV900\Export\ in this option, the resulting XML file will be written as:
C:\B9\DV900\Export\ E1toCMProject _MMDDYYYY_hhmmss.xml
All directories specified in the path must already exist. These examples illustrate what the path might be for a Linux and an IBM i on IBM Power Systems implementation:
Linux: /slot/ems3561/appmgr/CMExchange/E1toCMProject/
IBM i on IBM Power Systems: /E900SYS_9/CMExchange/E1toCMProject/
If this processing option is left blank, the resulting XML files will be written to the B9 directory where R51006CMD is running. For example C:\B9\.
- 2. Automated File Transfer Path – including FTP script name
-
Use this processing option to specify the file location and name of the FTP script on the enterprise server. Include the file extension, for example:
C:\CMExchange\E1toCMProject.bat, /E900SYS_9/CMExchange/E1toCMProject/E1toCMProject_IBMi.sh, or /slot/ems1234/CMExchange/E1toCMProject.sh.
Use this option only when running in automated mode.
These examples illustrate what the path might be for a Linux and an IBM i on IBM Power Systems implementation:
Linux: /slot/ems3561/appmgr/CMExchange/E1toCMProject.sh
IBM i on IBM Power Systems: /E900SYS_9/CMExchange/E1toCMProject_IBMi.sh'
This path also indicates where the resulting XML files are written. They will be in a subdirectory of the path indicated. The name of the resulting XML files will be in the format of E1toCMProject_MMDDYYYY_hhmmss.xml. All directories specified in the path must already exist.
- 3. Automated Mode
-
Use this processing option to specify if the process is running in automated mode or manual mode. Automated mode allows for files to be transferred to CM by FTP. Manual mode allows the files to be transferred by user after they are created. Values are:
0 or blank: Manual Mode, no FTP.
1: Automated Mode, use FTP.
4.4 Importing Project Data into Contract Management
After you create XML files by running data extract programs in EnterpriseOne, you can then import those files into Contract Management, where the data is added to the database and made available for use.
4.4.1 Importing Project Data into Contract Management
To import project data into Contract Management, complete the following steps. Your system administrator can assist you with determining which values to use during this task.
-
Access the Contract Management Exchange application.
See Using Contract Management Exchange, "Using Contract Management Exchange.".
-
Complete these fields and then click Next:
-
CM Server Host
-
CM Server Port
-
CM Service Type
-
-
Enter a valid user name and password for the Contract Management system and then click Next.
Note:
The user that you log in as must have access and permission to insert data into the Contract Management database. If the user credentials that are entered do not have sufficient access, the system will produce an error, and the user will not be able to continue. -
Select the Contract Management database you want to import data into and then click Next.
-
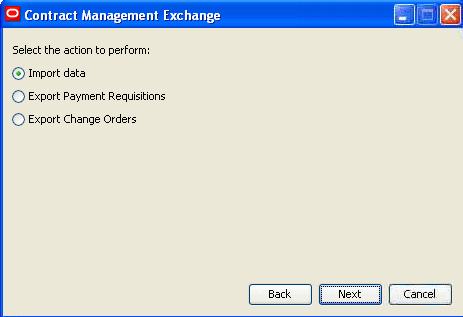
Select the Import Data option and then click Next.
-
Specify the location of the file that you want to import and then click Next.
Figure 4-2 Specify the import file location
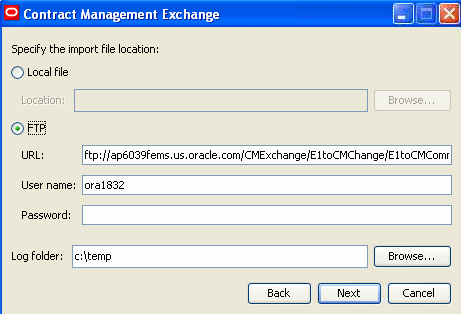
Description of "Figure 4-2 Specify the import file location"
-
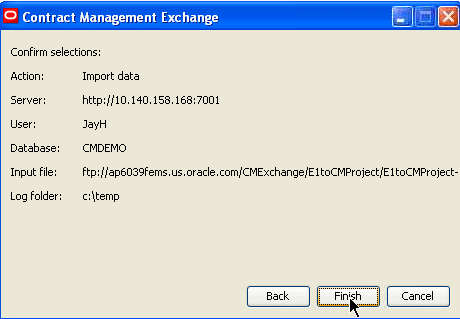
Review the information on the confirmation screen and then click Finish.
The system imports the selected data and produces a log file for review.
|
Note: You can import only one file at a time. If you created multiple files from the EnterpriseOne system, you must run this process multiple times for each file that you want to import into the Contract Management system. |