| Oracle® Beehive Central Help Release 2 (2.0.1.7) Part Number E20268-01 |
|
|
PDF · Mobi · ePub |
| Oracle® Beehive Central Help Release 2 (2.0.1.7) Part Number E20268-01 |
|
|
PDF · Mobi · ePub |
Central Help
Release 2 (2.0.1.7)
E20268-01
July 2012
Last updated July 2012
Oracle Beehive Central provides Web-based single-point access to efficiently manage your Beehive delegation and sharing privileges, set preferences, download supported Beehive applications, and access other Oracle Web-based applications.
This section contains the following topics:
Oracle Beehive Central is a Web-based application that provides Oracle Beehive users with a central location to:
access and change your account settings
delegate permissions or grant sharing permissions to other Beehive users to your personal workspace for:
calendars
tasks
contacts
download supported Oracle Beehive applications
access other Beehive Web-based applications:
Oracle Beehive Conferencing Center
Oracle Beehive Webmail
Oracle Beehive Team Collaboration
set user preferences
access Oracle Beehive Help
The new functionality described in the Oracle Beehive Central Help is dependent on running the Beehive 2.0 product and installing the Oracle Beehive 2.0.1.6 patch. If this is not already done, contact your system administrator on installing the Oracle Beehive Conferencing 2.0.1.6 patch.
Note:
Features of Oracle Beehive Central vary depending on the version. If you are running an older version (prior to 2.0), refer to either Oracle Beehive Central 1.5 Help or Oracle Beehive Central 1.5.x Help.Features include new account preferences, more downloads, improved access rights, voice mail settings, additional notifications, setting preferred Conference client, and Instant Messaging and Presence options.
New Conference option in Oracle Beehive Central 2.0.1.6
Users have the ability to set the default conferencing client from the two available options: Java-based Oracle Beehive Conferencing Client or Oracle Beehive Conferencing Desktop Client. For more information, refer section How do I set conferencing preferences?
Note:
The services that are displayed in the My Account page depends on the provisioning of services in your deployment. For information on provisioning of Oracle Beehive products, contact your administrator.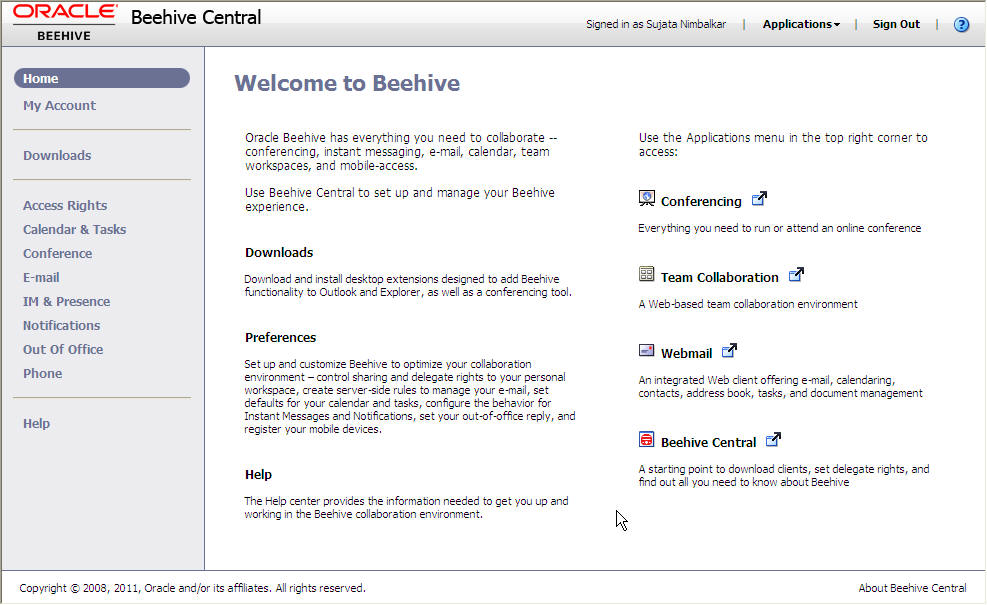
Home – Read overview and feature information; access Beehive Web-based applications.
My Account – Set preferred language, country, time zone; check available disk space, and Beehive services currently in use.
Downloads – Download other Beehive applications and tools.
Access Rights – Delegate permissions or grant sharing permissions to your personal workspace to other users.
Calendar & Tasks – Set working hours; apply sensitivities and priorities to, and enable reminders for meetings and tasks.
Conference – Set your conferencing client preference.
E-Mail – Create and manage server-side rules for your Beehive e-mail.
IM & Presence– Set your preferences for, and presence on Instant Messages.
Notifications – Enable/disable notification options and set delivery channels.
Out Of Office – Create, and enable/disable an out-of-office reply to incoming e-mail messages.
Phone – Register and manage mobile devices, change office phone messaging and forwarding options, and reset your voice mail PIN.
Note:
You can still start and join your Beehive conferences by clicking Conferencing on the Home page. As a separate Web page, the Conferencing center is designed to enhance your conferencing experience by providing more details about each conference, links to more information, in addition to quick access to all your upcoming and ongoing conferences.This section includes the following topics:
Oracle Beehive Central provides a public Home page and a private Home page. All users within an Oracle Beehive deployment can access and view the Oracle Beehive Central public Home page.
To access and view the private Home page, users must provide credentials for authentication.
To access Oracle Beehive Central:
Open a supported Web browser and enter the URL for Oracle Beehive Central. Typically, the URL for Oracle Beehive Central will match the following structure:
http://<Your-Server-Name>:<Port-Number>/bcentral
or
https://<Your-Server-Name>:<Port-Number>/bcentral
To access the private Home page of Oracle Beehive Central, click Sign In and enter your user name and password.
Downloads can be accessed from both the Oracle Beehive Central public Home page, and from the Home page for signed-in users.
Follow the steps below to download an application from Beehive Central any time, whether or not you are signed in.
From the Public Home page (without signing in), Oracle Beehive Central displays a list of applications available for download for your operating system.
If you are signed in, from the Home page left menu, click Downloads. Oracle Beehive Central displays a list of applications available for download for your operating system. Follow the steps below to download an application.
To download applications:
Click the button for your operating system next to the application you want to download.
On the landing page, view the install instructions, and other system information, then click Download for [your operating system].
Note:
Check the specific Oracle Beehive application's Help page for a list of supported versions and browsers. Click Help in the left menu.Links to other (Web-based) Beehive applications are located directly on the Home page.
From the Oracle Beehive Central left menu, click Home (opens by default after signing in). You can access other Beehive applications directly from the home page, or from the Applications list when you are not on the Home page.
To access other Beehive applications:
From the Beehive Central Home page, on the right of the title bar, click Applications, and select the Beehive application that you want to access:
Conferencing – to start or join a conference
Team Collaboration – to collaborate with other team members through workspaces
Webmail – for Web-based access to your e-mail, calendar, contacts, and tasks
Beehive Central – to open another instance of Beehive Central in a new tab or window (depending on your browser setup)
In Beehive Central, you can view your account settings and change preferences by simply clicking an item in the left menu. You can set your out-of-office replies, server-side rules, notifications, assign calendar and task sensitivities, priorities, and reminders, apply Instant Message settings, and change your office and mobile phone preferences.
This section includes the following topics:
How do I view/set my language, location, time zone, and check account status?
How do I manage delegates and grant permissions to my workspace?
How do I set my schedule, calendar and tasks preferences, and meeting reminders?
Use the My Account menu to set or change your preferred language, country, and time zone settings. You can also check your available disk space and verify the Beehive services that you currently use.
From the Beehive Central left menu, click My Account.
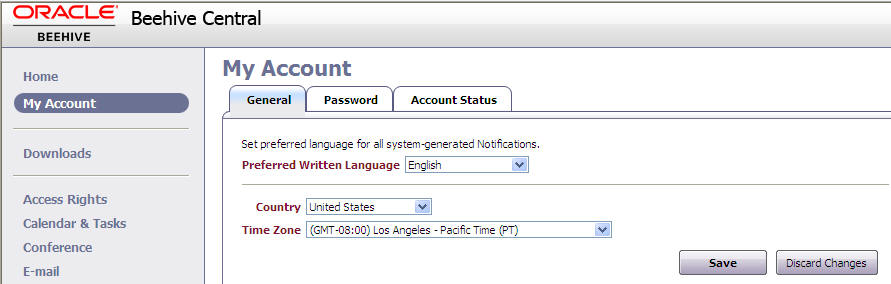
From the My Account page, you can:
Under the General tab, click to set your preferred written and spoken languages. This ensures you receive communications (such as notifications, and voice mail) in the language you prefer to read, and/or hear.
Note:
Depending on your configuration, you may not have access to change your preferred written language. Check with your Beehive administrator for more information.When you change your time zone, the date and time specified in your calendar notifications and reminders will be displayed in your specified time zone.
Note:
The time zone setting in Beehive Central is used for meeting reminders and notifications. This time zone setting does not affect the settings in Oracle Beehive Extensions for Outlook or Oracle Beehive Webmail which uses the time zone set on the user's desktop.Oracle Beehive Extensions for Outlook synchronizes your time zone information between the application and the Beehive server using the time zone on your Windows desktop for reference.To change your country and time zone:
On the My Account page, in the General tab (open by default), click to select your country.
Click to select your time zone.
Click Save.
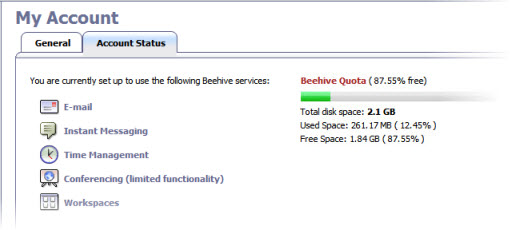
To view current services and check disk space:
On the My Account page, in the Account Status tab, view Beehive services for which you are currently set up, and your Beehive Quota.
Use the Access Rights menu to grant access to other users, or add delegates, to view and/or manage one or more areas within your personal workspace (Calendar, Tasks, Inbox, Contacts, Notes, and Journal):
From the Permissions Tab, you can select which users will have access to your data based on permissions you set. Use this tab if you want to grant a user the ability to view items within your personal workspace.
From the Delegation Tab, you can assign a user to be your delegate. A delegate can act on your behalf with management-level access to your data based on permissions you grant that delegate. Use this tab to grant a user the ability to not only view, but actually manage items within your personal workspace.
From the Beehive Central left menu, click Access Rights.
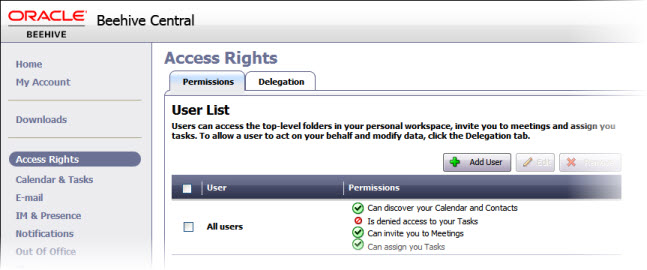
From the Access Rights page, you can:
Assign/Change Permissions:
Assign/Change Delegation:
This section will help you understand available permissions, their definitions, and applications. You may want to refer back to this section as a guideline for setting permissions and delegation, and knowing what access rights you are actually granting for each service.
This section covers the following topics:
Use the Permissions tab (open by default) when you want to grant access to one or more users to view items in your personal workspace.
This section covers the following topics:
Note:
Certain exceptions and limitations may apply to access rights you set for users. For more information, see Access Rights Exceptions and Limitations.To begin adding/editing users and assigning permissions:
As a quick way to grant the same access rights to all users, you can select the All Users option. Generally, users have certain viewing rights, and the All Users option defines what rights are available. (By default, the option is not selected.) When you select All Users, the associated general access rights are extended to all users. Depending on your configuration, you may have the ability to edit these rights to change it for all users. However, the option cannot be deleted.
Caution:
The All Users option is not available in Delegation. Settings for a particular user override the "All users" option in Permissions.If you want certain users to have different access rights than all other users, click Add User to add them individually to the list, and select rights for each.
Whether you add a user, or select a user to edit their permissions, you can assign or change access rights for anyone at any time.
User Permission Types (Access Rights)
When you select a user, for each service, you can select from the following permissions:
Standard – Inherits the top-level item's sensitivities. (When the "All Users" option is selected, access rights for all users are equivalent to Deny for a selected delegate on the Delegation tab.)
Review – When selected, "Normal" and "Public" sensitivities are selected. (See Sensitivity Levels.) Selected sensitivities allow the user to review items that have that sensitivity. Sensitivities not selected allow the user "Discover" access to items that have those sensitivities.
Discover – Similar to Review except no sensitivities are selected. (See Sensitivity Levels.) Any sensitivities you select allow the user to review items that have that sensitivity. Sensitivities left clear allow the user view access to items that have those sensitivities. (Discover access applied to Inbox, Journal, and Notes items prevents users from viewing those items. See Services and Access Guidelines.)
Deny – Denies access to folders for the selected service. No sensitivities are selected, which denies users any access to items with that sensitivity.
When you allow users access, the following default sensitivities are available to assign to items in each service area:
Normal – Allows users to discover items, but denies read, write, delete access, and prohibits sending items to any user.
Public – Allows users to discover and read items, but denies write, delete access, and prohibits sending items to any user.
Confidential – Allows users to discover items, but denies read, write, delete access, and prohibits sending items to any user.
Private – Allows users to discover items, but denies read, write, delete access, and prohibits sending items to any user.
Personal – Allows users to discover items, but denies read, write, delete access, and prohibits sending items to any user.
Note:
Normal, Confidential, Private, and Personal sensitivities are the same. Only Public allows users to not only discover, but also read items on your behalf. However, all sensitivities prohibit the user from sending items to any other user.Each service operates differently according to selected sensitivities and items marked with those sensitivities whether you use Oracle Beehive Extensions for Outlook, or Oracle Beehive Webmail.
Services and Access Guidelines
Depending on the permissions you select for each service, one or more sensitivities are automatically associated with some permissions (by default). Permissions are based on their sensitivity, which means access is controlled by any sensitivities you may have already applied to those items in Oracle Beehive Extensions for Outlook or Oracle Beehive Webmail.
As a result, many variables can affect how access is actually granted for each service. The variances may not be apparent when determining which permissions to use. In general, the following rules, options, or exceptions apply (when default sensitivities are selected/left clear):
Calendar
Selected option allows the selected user to invite you to meetings. (Not available for Delegation.)
Review permission: Normal and Public sensitivities selected. Allows the user to review items in your Calendar based on their sensitivity.
Discover permission: No sensitivities are selected. Allows the user to view start and end times on your calendar events only. Otherwise, access on calendar items with sensitivities selected does not allow read access.
Tasks
Selected option allows the selected user to assign you tasks.
Note:
Selected sensitivities for Tasks can be read, cleared sensitivities do not allow read access. This differs from Calendar sensitivities in which Discover access on calendar items with sensitivities selected does not allow read access.Review permission: Normal and Public sensitivities selected. Allows the user to review your tasks based on their sensitivity.
Discover permission: (No sensitivities are selected.) Allows the user to view start and end times on calendar events only.
Discover permission: (Not available for Tasks.)
Inbox, Journal, Notes
Note:
Due to the service implementation, permissions only apply to documents in your Inbox, not to e-mail messages. See also Access Rights Exceptions and Limitations.Review permission: Normal and Public sensitivities selected. Allows the user to read (but not send) documents in your Inbox, Journal, or Notes based on their sensitivity.
Discover permission: (No sensitivities are selected.) Prevents the user from reading any items in your Inbox, Journal, or Notes folders.
Note:
Unlike Calendar, cleared sensitivities do not allow read access due to the service implementation.Contacts (Address Book)
Discover permission: (No sensitivities are selected.) Allows the user access at the folder level to sub-folders within your contacts (Address books) folder.
Note:
Unlike Calendar, cleared sensitivities do not allow read access due to the service implementation.To add a user:
On the Access Rights page, click the Permissions tab (open by default).
On the User List, click Add User.
Enter the name of the user, then click Search. The user (or a list of possible matches) appears in the box.
Select the user you want to add, then click Add -> to move the user to the Shared Users box.
Click Next.
Select the sharing permissions for each folder you want to grant to the user.
Optionally, select whether the user may also read items marked Normal, Public, Private, Confidential, or Personal.
For Calendar and Tasks, indicate whether the user can invite you to meetings (Calendar), and assign you tasks (Tasks).
Click Finish.
To edit a user:
On the Access Rights page, click the Permissions tab.
From the User List, select the user you want to edit shared permissions for, (or select the check box on the header row to select all users) and click Edit Selected.
Next to each folder type, select (or change) the permissions granted to the selected user.
Optionally, if Review is selected for Calendar and Tasks, select whether the user may also read items marked Normal, Public, Confidential, or Private.
Click Save.
To remove a user:
On the Access Rights page, click the Permissions tab.
From the User List, select the user you want to remove (or select the check box on the header row to select all users), and click Remove Selected. The user is removed from the User List.
Use the Delegation tab to allow another user to act on your behalf, as a delegate.
This section covers the following topics:
Note:
Certain exceptions and limitations may apply to access rights you set for delegates. For more information, see Access Rights Exceptions and Limitations.To begin adding/editing delegates and granting permissions:
Users cannot manage items in your Calendar, Tasks, Inbox, and Contacts. When you want someone else to manage these services for you, you need to select a delegate.
For example, while you are on vacation, you can add or select a delegate (from the Delegation tab) to manage services such as documents in your Inbox, meetings on your calendar, or contacts in your address books. The delegate can then act on your behalf by not only viewing, but managing data associated with the services you select.
Delegate Permission Types (Access Rights)
When you select a delegate, for each service, you can select from the following permissions:
Standard – Inherits the top-level item's sensitivities. On the Permissions tab, when the "All Users" option is selected, access rights for all users are equivalent to Deny for the selected delegate.
Manage – (Delegation only). Default permission for all services in the Delegation tab. When Manage is selected, "Normal" and "Public" sensitivities are selected. (See Sensitivity Levels.) Selected sensitivities allow the delegate to manage items that have that sensitivity. Sensitivities not selected allow the delegate "Discover" access to items that have those sensitivities.
Review – When selected, "Normal" and "Public" sensitivities are selected. (See Sensitivity Levels.) Selected sensitivities allow the delegate to review items that have that sensitivity. Sensitivities not selected allow the delegate "Discover" access to items that have those sensitivities.
Discover – Similar to Review except no sensitivities are selected. (See Sensitivity Levels.) Any sensitivities you select allow the delegate to review items that have that sensitivity. Sensitivities left clear allow the delegate view access to items that have those sensitivities. (Discover access applied to Inbox, Journal, and Notes items prevents delegates from viewing those items. See Services and Access Guidelines.)
Deny – Denies access to folders for the selected service. No sensitivities are selected, which denies delegates any access to items with that sensitivity.
When you assign a delegate to act on your behalf, the following default sensitivities are assigned to items in each service area:
Normal – Allows delegate to discover items, but denies read, write, delete access, and prohibits sending items to any user.
Public – Allows delegate to discover and read items, but denies write, delete access, and prohibits sending items to any user.
Confidential – Allows delegate to discover items, but denies read, write, delete access, and prohibits sending items to any user.
Private – Allows delegate to discover items, but denies read, write, delete access, and prohibits sending items to any user.
Personal – Allows delegate to discover items, but denies read, write, delete access, and prohibits sending items to any user.
Note:
Normal, Confidential, Private, and Personal sensitivities are the same. Only Public allows delegate to not only discover, but also read items on your behalf. However, all sensitivities prohibit the delegate from sending items to any user.Each service operates differently according to selected sensitivities and items marked with those sensitivities whether you use Oracle Beehive Extensions for Outlook, or Oracle Beehive Webmail.
Services and Access Guidelines
Depending on the permissions you select for each service, one or more sensitivities are automatically associated with some permissions (by default). Permissions are based on their sensitivity, which means access is controlled by any sensitivities you may have already applied to those items in Oracle Beehive Extensions for Outlook or Oracle Beehive Webmail.
As a result, many variables can affect how access is actually granted for each service. The variances may not be apparent when determining which permissions to use. In general, the following rules, options, or exceptions apply (when default sensitivities are selected/left clear):
Calendar
Review permission: Normal and Public sensitivities selected. Allows the user or delegate to review items in your Calendar based on their sensitivity.
Discover permission: No sensitivities are selected. Allows the user or delegate to view start and end times on your calendar events only. Otherwise, access on calendar items with sensitivities selected does not allow read access.
Manage permission: By default, Normal and Public sensitivities are selected. Allows delegate to manage any items with selected sensitivities; also enables write and delete access.
Tasks
Note:
Selected sensitivities for Tasks can be read, cleared sensitivities do not allow read access. This differs from Calendar sensitivities in which Discover access on calendar items with sensitivities selected does not allow read access.Review permission: Normal and Public sensitivities selected. Allows the delegate to review your tasks based on their sensitivity.
Discover permission: (No sensitivities are selected.) Allows the delegate to view start and end times on calendar events only.
Manage permission: By default, Normal and Public sensitivities are selected. Allows delegate to read, create, modify, and delete tasks based on their sensitivity.
Inbox, Journal, Notes
Note:
Due to the service implementation, permissions only apply to documents in your Inbox, not to e-mail messages. See also Access Rights Exceptions and Limitations.Review permission: Normal and Public sensitivities selected. Allows the delegate to read documents (but not send items) in your Inbox, Journal, or Notes based on their sensitivity.
Discover permission: (No sensitivities are selected.) Prevents the delegate from reading any items in your Inbox, Journal, or Notes folders.
Note:
Unlike Calendar, cleared sensitivities do not allow read access due to the service implementation.Manage permission on Inbox: By default, Normal and Public sensitivities are selected. Allows delegate to send e-mail on your behalf. Any other permissions applied disables this access; but still allows the delegate to read, create, modify, and delete documents in your Inbox. E-mail messages are visible based on the folder permissions, but not the sensitivities.
Contacts (Address Book)
Discover permission: (No sensitivities are selected.) Allows the delegate access at the folder level to sub-folders within your contacts (Address books) folder.
Note:
Unlike Calendar, cleared sensitivities do not allow read access due to the service implementation.To add a delegate and set permissions:
On the Access Rights page, click the Delegation tab.
Above the Delegate List, click Add Delegate.
Enter the name of the user, then click Search. The user (or a list of possible matches) appears in the box.
Select the user you want to add, then click Add -> to move the user to the Delegates box.
Click Next.
Next to each Service type, select the permissions which you want to grant to the delegate.
Click Finish.
To edit a selected delegate:
On the Access Rights page, click the Delegation tab (open by default).
From the Delegate List, select the delegate you want to edit permissions for (or select the check box on the header row to select all delegates), and click Edit Selected.
Next to each Service type, select (or change) the permissions granted to the selected delegate(s).
Click Save.
To remove a delegate:
On the Access Rights page, click the Delegation tab (open by default).
From the Delegate List, select the delegate you want to remove (or select the check box on the header row to select all delegates), and click Remove Selected. The delegate is removed from the Delegate List.
The following tables describe access rights exceptions and limitations associated with certain permissions and services. The first table describes exceptions when access is granted for users, and the second table, for delegates.
| Service | User Permissions - Standard | User Permissions - Review | User Permissions - Discover |
|---|---|---|---|
| Calendar | Can view meeting detail (when all sensitivities selected) in both Oracle Beehive Extensions for Outlook, and Beehive Webmail. | Can review meeting details (when all sensitivities selected) in both Oracle Beehive Extensions for Outlook, and Beehive Webmail. (In Beehive Webmail, the user can review Calendar only.) | NA |
| Contacts | NA | NA | Cannot view owner's contacts (when all sensitivities are selected) in both Oracle Beehive Extensions for Outlook, and Beehive Webmail. |
| (Other) | NA | NA | Note: Selecting all sensitivities under the Discover permission allows the user Review access in Oracle Beehive Extensions for Outlook and Oracle Beehive Webmail. |
| Service | Delegate Permissions - Standard | Delegate Permissions - Manage | Delegate Permissions - Review | Delegate Permissions - Discover |
|---|---|---|---|---|
| Calendar | Cannot view any meetings in owner's Calendar (when all sensitivities selected) | Can view owner's meetings, but not meeting details (when no sensitivities selected).
*Applies to Manage, Review, and Discover Permissions for delegates. |
Can view owner's meetings, but not meeting details (when no sensitivities selected).
*Applies to Manage, Review, and Discover Permissions for delegates. |
Can view owner's meetings, but not meeting details (when no sensitivities selected).
*Applies to Manage, Review, and Discover Permissions for delegates. |
| Inbox | Access rights granted to the owner's Inbox extend to documents only, not to the messages contained in the Inbox. | Access rights granted to the owner's Inbox extend to documents only, not to the messages contained in the Inbox. | Access rights granted to the owner's Inbox extend to documents only, not to the messages contained in the Inbox. | Access rights granted to the owner's Inbox extend to documents only, not to the messages contained in the Inbox. |
| Contacts | NA | NA | NA | Cannot view owner's contacts (when all sensitivities are selected) in both Oracle Beehive Extensions for Outlook, and Beehive Webmail.
*Delegate can view only sub-folders, but not items. |
| (Other) | NA | NA | NA | Note: Selecting all sensitivities under the Discover permission allows the delegate Review access in Oracle Beehive Extensions for Outlook. |
Use the Calendar and Tasks menu to set your working days and hours in a given work shift. You can also set the level of default sensitivities and priorities for calendar events and tasks, as well as enable meeting and task reminders.
From the Beehive Central left menu, click Calendar &Tasks.
Changes to these settings are made on the Beehive server, and therefore are applied across all supported Beehive applications (with some exceptions, where noted).
From the Calendar and Tasks page, you can:
The hours you work in a given week are considered when reporting your availability to other users. Time outside of your work shift(s) will be reflected as "out-of-office" under Attendee Availability in all versions of Microsoft Outlook.
Note:
Working hours preferences are not synchronized with Microsoft Outlook's Calendar Options for "Calendar work week" preferences.If you use Beehive time management applications, Oracle Beehive Extensions for Outlook and Oracle Beehive Webmail do not currently synchronize with working hours stored on the Beehive server. Therefore, any changes you make to your working hours preferences in Beehive Central will not be reflected in these Beehive applications.
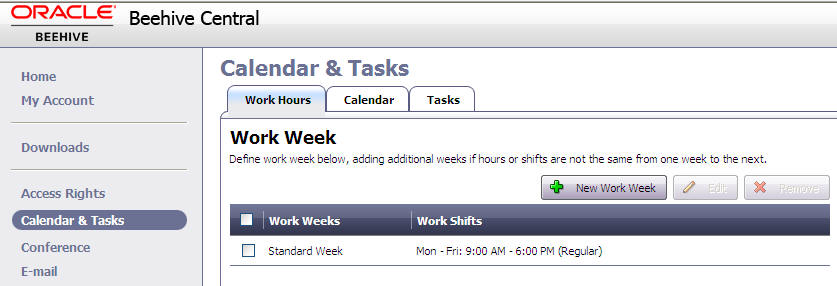
Follow the step below to either edit the default "Standard week" hours, or create a new work week. Adding additional work shifts allows you to reflect several schedules at once. This is useful if your work week varies, with different hours depending on the day.
To change hours in your standard work week:
In Calendar and Tasks, click the Working Hours tab (open by default).
Select Standard Week, then click Edit.
For Work Days, select the days you work.
For Working Hours, set a time range.
Select your Shift Type.
Optionally, to add a second set of working hours and dates, click Add Work Shift. (See steps to create a new work week.) To delete the shift, click Delete This Work Shift.
When finished, click Save.
The server returns a message when your settings have been updated.
To create a new work week:
In Calendar and Tasks, click the Working Hours tab (open by default).
Click New Work Week.
On the New Work Week page, click Add Work Shift and select New Shift.
For Work Days, select the days you work.
For Working Hours, set a time range.
Select your Shift Type.
Optionally, to delete the shift, click Delete This Work Shift
When finished, click Save.
The server returns a message when your settings have been updated.
If you have multiple work weeks, define the start date of the first week (Week 1).
For each drop-down selection, the server updates your changes.
New entries created in your default calendar will be set to this configured sensitivity.
Note:
Sensitivity preferences you set here may not apply in all cases. For example, when you create a new meeting in Microsoft Outlook, Outlook's calendar defaults will be used.To change your default sensitivity for new calendar entries:
In Calendar and Tasks, click the Calendar tab.
Select a default level of sensitivity for new meetings.
Select a default priority level for new meetings that you create.
When finished, click Save.
The server returns a message when your settings have been updated.
New tasks created in your default task list will be set to this configured sensitivity, and priority.
Note:
Sensitivity preferences you set here may not apply in all cases. For example, if someone assigns you to a task, these default sensitivities will be used.To change your default sensitivity for new tasks:
On the Calendar and Tasks page, click the Tasks tab.
Select a default level of sensitivity for new tasks.
Select a default priority level for new tasks that you create.
When finished, click Save.
The server returns a message when your settings have been updated.
If you want to receive reminders for your new tasks, you can enable the Beehive server to send the reminder to you automatically.
To enable reminders for new tasks:
On the Calendar and Tasks page, click the Tasks tab.
Select a default level of sensitivity for new tasks.
Select a default priority level for new tasks that you create.
Click Save. The server returns a message when your settings have been updated.
If you want to receive meeting reminders, you can enable the Beehive server to send the reminder to you automatically.
Note:
Time management reminder settings only effect new events and tasks (those created after you change settings). Any tasks or events already created will still reflect your previous settings.To enable reminders for meetings:
On the Calendar and Tasks page, click the Calendar tab.
Select the option Enabled default reminder for meetings.
From the list, select the amount of time before your meeting that want to receive the reminder.
Click Save. The server returns a message when your settings have been updated.
If you want to receive notifications whenever any required attendees to your meeting have not yet accepted, you can enable the Beehive server to send the notification to you automatically.
To set up required attendee notifications:
On the Calendar and Tasks page, click the Calendar tab.
Select the option Notify me when there are required attendees who have not accepted my meeting.
Click Save. The server returns a message when your settings have been updated.
You can choose to make your free/busy information publicly accessible to non-Beehive users. (When not selected, your free/busy information is private; viewable by internal system users only.)
To publish your free/busy information (to non-Beehive users):
On the Calendar and Tasks page, click the Calendar tab.
Select the option Publish my free/busy information.
To allow others to see your information, select the option Publish my free/busy information. When selected, a URL where your information is published appears. You must provide this URL to users who want to view your availability.
http://<Your-Server-Name>:<Port-Number>/caldav/<organization>/home/<username>/icalendar/publicfreebusy.ifb
http://<Your-Server-Name>:<Port-Number>/caldav/<organization> /home/<username>/icalendar/publicfreebusy.ics
Click Save.
You can set your default conferencing client using the Conference option from the Beehive Central menu. Oracle Beehive Conferencing allows you to select from the following two options:
Java-based Oracle Beehive Conferencing Client - The Oracle Beehive JavaFX Conferencing client is the primary client used to participate in Beehive conferences. When you join a conference, you will automatically launch into Java-based conferencing application.
Oracle Beehive Conferencing Desktop Client - The Oracle Beehive Conferencing Desktop Client is a desktop-based application recommended for users using platforms not supported by the JavaFX client.
Note:
The Java-based Oracle Beehive Conferencing Client can be used in the Windows, Mac OS, Linux platforms, whereas the Oracle Beehive Conferencing Desktop Client is compatible with Windows and Mac OS only.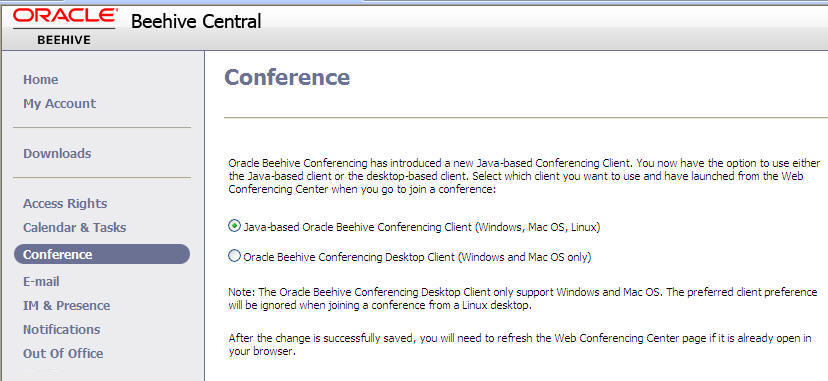
To change the settings:
From the Beehive Central left menu, click Conference to change your conference client.
On the Conference page, select the preferred client by clicking the radio button.
Java-based Oracle Beehive Conferencing Client
Oracle Beehive Conferencing Desktop Client
Click Save to save your changes.
From the Beehive Central left menu, click E-Mail to access server-side rules.
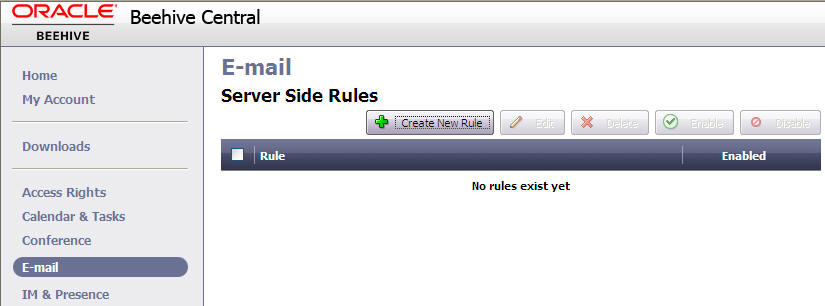
From the E-mail (Server Side Rules) page, you can:
To create a server-side rule:
On the E-mail page, click Create New Rule.
Enter a name for the rule. To enable the rule upon creation, select Enable. (See also Enable/Disable a Server-Side Rule.)
In the Rule Details section, click Add Condition to select conditions, then click Add Exception to add any exceptions you want to apply from the corresponding list, then enter a value for each rule.
Conditions are the required criteria which the server uses to filter e-mail messages for the given rule. Exceptions are the "catch-all" criteria which alerts the server to exclude certain messages matching those exceptions. Condition and Exception criteria include Subject, From, To, Cc, To or Cc, and Priority.
After selecting your conditions and exceptions, you must decide what the server should do with the filtered messages.
Note:
You must specify at least one condition and one action. See also Limitations for server-side rules recommendations for conditions and exceptions.In the Rule Actions section, select the actions you want to apply, and any corresponding values.
Optionally, if you want to notified by text message, and/or Instant Message, select the SMS and/or IM option(s).
Click Save.
To change a server-side rule:
On the E-mail page, select a rule from the list, and click Edit.
On the Edit Rule Detail page, make changes to rule details or actions, and select or clear any options.
Click Save.
On the E-mail page, select a rule from the list, and click Delete.
There are two ways to enable/disable a server-side rule. You can either enable/disable multiple rules from the list on the E-mail page, or from the Edit Rule Detail page for a selected rule.
To enable/disable a server-side rule from the E-mail page:
To enable/disable a rule from the E-mail page, select a rule from the list and click Enable or Disable. Alternatively, click the "enable" (green checkmark) or "disable" (red circled line) icon to the right in the row for that rule.
To enable/disable a server-side rule from the Edit Rule Detail page:
On the E-mail page, select the rule and click Edit.
Under the Rule Name, select/clear the Enable option.
Click Save.
When you are working offline, you can choose to send your Instant Messages to your e-mail inbox, or change your presence settings to let others know your status and availability.
From the Beehive Central left menu, click IM & Presence.
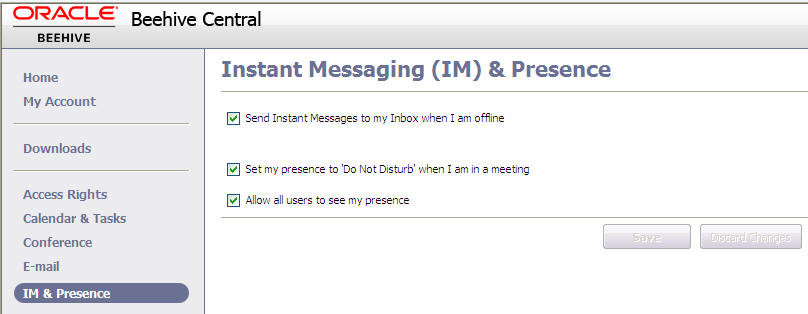
To enable/disable sending IMs to your inbox:
Select/clear the following options:
Send Instant Messages to my Inbox when I am offline
When selected, Instant Messages you receive will be forwarded to your e-mail Inbox whenever you are offline.
Archive Instant Messages in My Personal Workspace in the following folder [folder selection box]
Note:
This option is only available if your administrator has enabled archiving on the server. Check with your administrator for more information.Set my presence to 'Do Not Disturb' when I am in a meeting
When selected, your presence will show 'Do Not Disturb' to others whenever you are unavailable.
Note:
If users have access rights to view your calendar, they will see the title of the meeting.Allow all users to see my presence
When selected, your presence (status message) will be viewable by all other users.
Click Save.
If you set up your calendar or tasks to receive reminders and notifications, you can use the Notifications page to select and enable the type of notifications you want to receive, and method of delivery.
From the Beehive Central left menu, click Notifications.
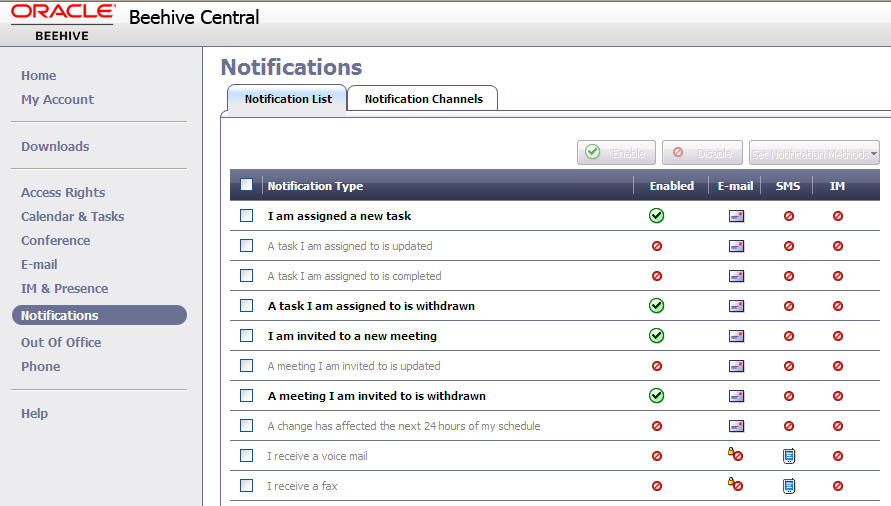
From the Notifications page, you can:
The Notifications List displays all the notification types you can request to receive. For notifications you select, you can specify how you want to receive your notifications.
To select and enable notifications you want to receive:
On the Notifications page, click the Notifications List tab (open by default).
Under Notification Type, select the types of notifications you want to receive.
For each notification type, click the icons under the desired column to specify the method of notification: E-Mail, SMS, or IM (Instant Message).
Note:
At least one channel must be selected for each notification, such as E-mail.For each notification type and method you select, click Enable or Disable.
Continue with steps to further configure notification channels settings.
You can configure the channels for each notification type you selected by setting or changing the channels through which your notifications will be sent. For text messages, you can also specify when you want to receive those notifications.
To set/change notifications channels:
On the Notifications page, click the Notifications Channels tab.
Select/clear the following notification channel options:
Email to Inbox
When enabled, notifications will be delivered as e-mail messages to your Inbox.
Instant Messenger (IM)
When enabled, notifications will be delivered as Instant Messages.
Text Message (SMS)
When enabled, notifications will be delivered as text messages.
The notifications you select are enabled to use that particular delivery channel, and will be delivered. However, when notifications are not selected, they are disabled. When disabled, no notifications will be delivered to that channel.
If you selected SMS notifications, you can specify when you want text messages to be sent. Select All the Time or Customized Time. When Customized Time is select, enter a time range for delivery.
Click Save.
You can have Oracle Beehive automatically send a reply message to notify others when you will be out of the office or unavailable.
From the Beehive Central left menu, click Out Of Office.
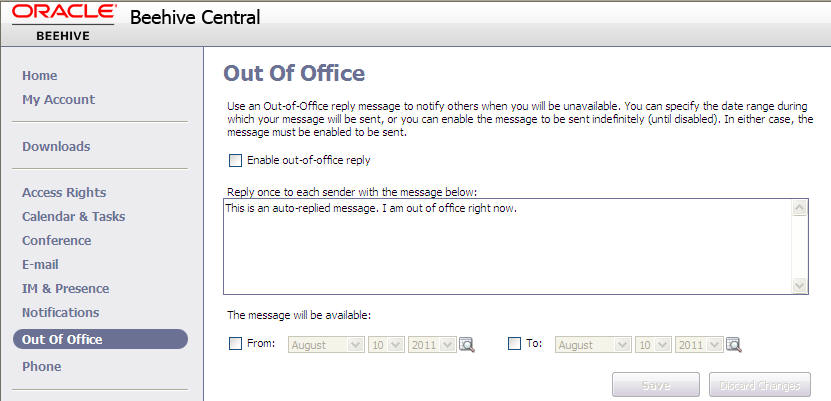
To set your out-of-office reply:
On the Out Of Office page, type your reply message in the box.
Select the From and To fields to set a date range during which the message will be available, then enter dates, or click the "view calendar" icon to select dates.
Note:
Specify either the date range during which you want your message to be sent, or enable the message to be sent indefinitely (until disabled). Either way, you must enable the out of office reply to ensure it is sent.When you are ready to enable your message, select Enable out-of-office reply.
Click Save. When enabled, your message will be sent as a reply (once per user) automatically each time you receive an e-mail message.
From the Beehive Central left menu, click Phone.
From the Phone page, you can:
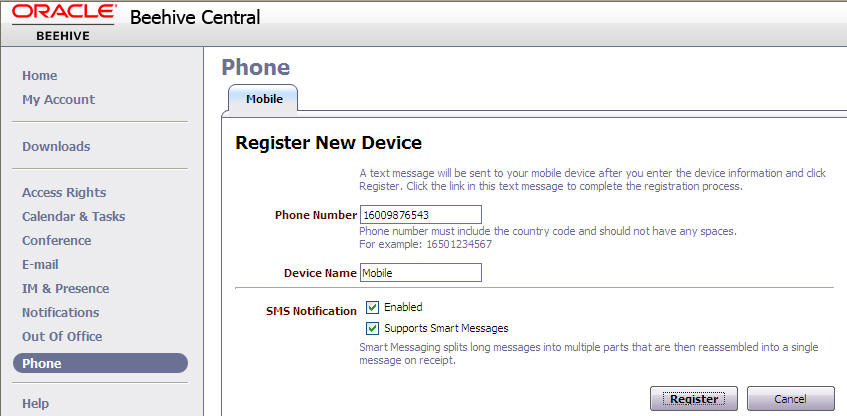
To register a mobile device:
On the Phone page, click the Mobile tab (open by default).
Under My Mobile Devices, click New.
Enter the phone number to your mobile device (using the format shown in the example).
Note:
Carrier charges may apply for receiving a text message.Enter a name for this device.
Optionally, in the SMS Notifications section, if you want to receive SMS (text message) notifications on your device, select Enabled. (An SMS is a communication method for sending/receiving short text messages to/from mobile phone devices.) See also Enable/Disable SMS Notifications.
If you selected to enable SMS messages, and your device supports smart messages, select Supports Smart Messages.
Note:
If you receive blank messages after selecting the "Smart Messages" option, then your device does not support smart messaging, and the option should be disabled.Click Register. Oracle Beehive sends a Short Message Service (SMS) message to your mobile device.
On your mobile device, click the URL provided in the SMS message to complete the registration. (Your device appears in the My Mobile Devices list with the status "Pending" until registration is complete.)
Note:
If your device fails to receive the SMS message, you will need to manually access the mobile device User Preferences page from your mobile browser using:http://<Your-Server-Name>:<Port-Number>/mobiledm/ or https://<Your-Server-Name>:<Port-Number>/mobiledm/After registering a device, (or while a device registration is pending), you can edit/update your information or notification requirements.
To edit a mobile device:
On the Phone page, click the Mobile tab (open by default).
Select the mobile device you want to update, and click Edit.
On the Edit Device page, change your device name and enable/disable SMS notifications by selecting/clearing the Enabled and or Supports Smart Messages options.
Note:
Smart messaging allows your device to receive messages more efficiently. With smart messaging enabled (on a device that supports smart messaging), longer messages are split into multiple parts which can be reassembled into a single message upon receipt.Optionally, if you are editing a registered, provisioned device that has been synchronized at least once, the Mobile Alarms section appears. You can use these settings to receive meeting and task reminders on your mobile device.
Note:
Mobile Alarms settings are available only for mobile devices that have Oracle Beehive installed, and have been fully registered, provisioned, and successfully synchronized at least once on the Oracle Beehive server.To enable meeting reminders, select Enable meeting reminders, and set the number of minutes before the event when you want to receive the reminder.
To enable task reminders, select Enable task reminders, and set the number of minutes before the task when you want to receive the reminder.
Caution:
If you have not yet synchronized data on your device, any changes you made will not be saved, even after clicking "Save".Click Save.
For more information about configuring and customizing your device to work with Oracle Beehive, refer to Oracle Beehive Registering and Configuring Mobile Devices page.
After registering a device, (or while a device registration is pending), you can delete the device from the My Mobile Devices list.
To delete a mobile device:
From the My Mobile Device list, select the device you want to delete, and click Delete. Alternatively, click Delete from the Edit Device page.
After registering a device, (or while a device registration is pending), you can enable or disable SMS notifications on the device, directly from the My Mobile Devices list.
To enable/disable notifications:
From the My Mobile Device list, select the device you want to enable, and click Set Notifications, and select either Enable SMS Notification, or Disable SMS Notification (depending on the device's current notification status). Alternatively, click the "enabled" (mobile phone) or "disabled" (red circled line) icon to the right of the device to change it.
Note:
By default, Oracle Beehive only sends reminders as SMS messages when you enable this option. Non-reminder notifications are sent to your Inbox. To set or change your notifications and communications channels, see Select and Enable Notifications from the Notifications List.Click Refresh to ensure your changes are reflected.
When you are away from your office, you can change your office phone greetings to let callers know your availability. When travelling, or expecting an important call, you may want to have your calls forwarded to another number. Use the Office tab to set your outgoing greeting message, and forward your calls.
Note:
To record your greeting, use your phone's record greeting options.To set greeting and/or forward calls:
On the Phone page, click the Office tab.
To set your greeting, select a message type from the Greeting Messages list:
Default
This is your standard outgoing greeting (enabled by default) when you are unavailable.
Alternate
This is an optional outgoing greeting which may be used when your availability changes.
Extended Absence
This is an outgoing greeting which can be used to notify callers of your unavailability over a longer period of time.
Personal
This is a personal outgoing message for callers who may want to know your current situation or availability. (If you record a personal greeting, it replaces the default system greeting.)
To forward your calls, select the Optionally forward office calls to another phone number option.
Note:
If you enable call forwarding, in your recorded greeting you must instruct callers to press the "8" key to be forwarded to your alternate phone number.Click Save. Your office phone selections are now set.
Use the Voice Mail PIN tab to reset your personal identification number (PIN) to access your voice mail remotely.
To reset your voice mail PIN:
On the Phone page, click the Voice Mail PIN tab.
Enter the old PIN. (If you forgot your PIN, click the link to use your Beehive password to reset your PIN.)
Enter a new PIN.
Re-enter the new PIN to confirm.
Click Save. Your office phone voice mail PIN is now changed.
This section contains the following known limitations:
Server-side rules for e-mail that use the "Equals" condition (or "Does Not Equal" exception) for "To" and "Cc" fields, may not result in any matches (or filter out messages). This is due to the server which is designed to match the full text in the "To" or "Cc" header of an e-mail, and not just the e-mail address of each recipient. When specifying rules for the "To" or "Cc" fields, it is recommended to use the "Contains" condition rather than the "Equals" condition or "Does Not Equal" exception. This is because the server looks for an exact match to the entire text in those fields. Typically, users only intend to search for (or filter out) a name or address that a specific field contains (or does not contain).
Further, since information contained in the "To" and "Cc" fields varies from one e-mail application to another, matches are less likely to occur. For example, some applications add the display name along with the e-mail address, while others omit the display name. Also, multiple recipients in the "To" or "Cc" field will not match if users set the "Equals" condition (or "Does Not Equal" exception) to just one of those addresses.
The Time Management Service does not currently support the ability to set reminders in CalDAV for events in a series–those that apply to all recurring events.
The Time Management Service does not currently support the ability to set reminders in CalDAV for day events. Additionally, reminders for holidays are not supported in events with floating times and in which time zone conversion is required in the database.
From the Beehive Central left menu, click Help to access any of the Beehive application Help pages depending on the Beehive products you use.
For information about Oracle's commitment to accessibility, visit the Oracle Accessibility Program website at http://www.oracle.com/pls/topic/lookup?ctx=acc&id=docacc.
Oracle customers have access to electronic support through My Oracle Support. For information, visit http://www.oracle.com/pls/topic/lookup?ctx=acc&id=info or visit http://www.oracle.com/pls/topic/lookup?ctx=acc&id=trs if you are hearing impaired.
Oracle Beehive Central Help, Release 2 (2.0.1.7)
E20268-01
Copyright © 2008, 2012 Oracle and/or its affiliates. All rights reserved.
This software and related documentation are provided under a license agreement containing restrictions on use and disclosure and are protected by intellectual property laws. Except as expressly permitted in your license agreement or allowed by law, you may not use, copy, reproduce, translate, broadcast, modify, license, transmit, distribute, exhibit, perform, publish, or display any part, in any form, or by any means. Reverse engineering, disassembly, or decompilation of this software, unless required by law for interoperability, is prohibited.
The information contained herein is subject to change without notice and is not warranted to be error-free. If you find any errors, please report them to us in writing.
If this is software or related documentation that is delivered to the U.S. Government or anyone licensing it on behalf of the U.S. Government, the following notice is applicable:
U.S. GOVERNMENT END USERS: Oracle programs, including any operating system, integrated software, any programs installed on the hardware, and/or documentation, delivered to U.S. Government end users are "commercial computer software" pursuant to the applicable Federal Acquisition Regulation and agency-specific supplemental regulations. As such, use, duplication, disclosure, modification, and adaptation of the programs, including any operating system, integrated software, any programs installed on the hardware, and/or documentation, shall be subject to license terms and license restrictions applicable to the programs. No other rights are granted to the U.S. Government.
This software or hardware is developed for general use in a variety of information management applications. It is not developed or intended for use in any inherently dangerous applications, including applications that may create a risk of personal injury. If you use this software or hardware in dangerous applications, then you shall be responsible to take all appropriate fail-safe, backup, redundancy, and other measures to ensure its safe use. Oracle Corporation and its affiliates disclaim any liability for any damages caused by use of this software or hardware in dangerous applications.
Oracle and Java are registered trademarks of Oracle and/or its affiliates. Other names may be trademarks of their respective owners.
Intel and Intel Xeon are trademarks or registered trademarks of Intel Corporation. All SPARC trademarks are used under license and are trademarks or registered trademarks of SPARC International, Inc. AMD, Opteron, the AMD logo, and the AMD Opteron logo are trademarks or registered trademarks of Advanced Micro Devices. UNIX is a registered trademark of The Open Group.
This software or hardware and documentation may provide access to or information on content, products, and services from third parties. Oracle Corporation and its affiliates are not responsible for and expressly disclaim all warranties of any kind with respect to third-party content, products, and services. Oracle Corporation and its affiliates will not be responsible for any loss, costs, or damages incurred due to your access to or use of third-party content, products, or services.
|
Copyright © 2008, 2012, Oracle and/or its affiliates. All rights reserved. Legal Notices |
|