19 Configuring a Branded Database
This chapter describes how to configure a Oracle Communications Billing and Revenue Management (BRM) database to use branding. The tasks described in this section are generally done by the host administrator.
You must have the Brand Manager component to create and use brands.
Overview of Setting Up a Branded Database
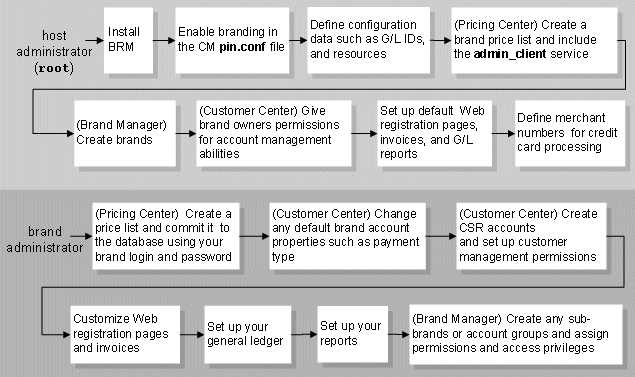
Figure 19-1 shows the steps needed to create a brand and the person who typically performs each step.
Before creating a brand, you must set up your BRM system to use branding, and you must create a brand plan list.
To create a top-level brand, you must have root access to BRM. To create a sub-brand, you must have access to the parent brand, either as a brand administrator or through access privileges.
Configuring BRM to Use Brands
The tasks described in this section are generally done by the host administrator before brands are created in the system.
About the Host Administrator
The host administrator is the person with root account access to the BRM system. You need root account access to create a brand at the top-level of a brand hierarchy.
The host administrator sets up and administers the BRM database, which includes performing the following system-wide tasks and brand-related tasks. The system-wide tasks are common to all BRM databases; the host administrator must complete them whether branding is enabled or not. The brand-related tasks must be completed before branded service providers can manage brands.
-
Starting and stopping all system processes and services.
-
Creating and changing BRM objects in the data dictionary. See "Creating Custom Fields and Storable Classes" in BRM Developer's Guide.
-
Defining resources, ratable usage metrics (RUMs), and other pricing components. See "About Creating a Price List" in BRM Setting Up Pricing and Rating.
-
Defining the default general ledger (G/L) ID account maps and G/L reports. See "Reporting by Brand" in BRM Reports.
-
Setting up invoicing. See "Designing and Generating Invoices" in BRM Designing and Generating Invoices.
-
Setting up Web registration for customers.
-
Setting up and maintaining the terminal server. See "Understanding RADIUS Manager" in BRM RADIUS Manager.
-
Running billing. See "Running Billing Utilities" in BRM Revenue Assurance Center Online Help.
Activating Branded Service Management
You activate branded service management in your BRM system by editing the Connection Manager (CM) configuration file.
Caution:
After you make branded service management active in your BRM system, do not try to change your system back to a non-brand system. You can corrupt data if you do this.To activate branded service management:
-
Open the CM configuration file (BRM_Home/sys/cm/pin.conf). BRM_Home is the directory in which you installed the BRM software.
-
Change the dm_attributes entry to include these parameters:
- cm dm_attributes database_number assign_account_obj, scoped, searchable
If your BRM system uses multiple database schemas, you need a dm_attributes entry for each schema.
See the configuration file for more information on this entry.
-
Change the enforce_scoping entry to activate branding:
- cm enforce_scoping 1
-
Save the file.
-
Stop and restart the CM.
Defining a Price List for Brand Creation
The host administrator must first create a default host price list and save it to the BRM database before creating top-level brands. This price list does not contain products and rates; it only provides the services necessary for administrators to create brands. Brand administrators then create brand-specific price lists to define the rating for their brands.
Note:
Only a brand administrator should commit a price list to BRM for a brand.To create a default price list:
-
Log in to Pricing Center as the root user.
-
Define the plans and add services to them.
Important:
The plan you use to create brands must contain the admin_client service; without it, the brand administrator cannot use BRM client tools such as Configuration Center. If the brand administrator will use BRM developer applications such as testnap, also include the pcm_client service in the plan. -
Create a plan list named brand; for the plan list type, click new.
-
Add the brand plans to the plan list.
-
Save the price list to the BRM database.
-
Create brands by using Brand Manager. See "Creating Brands".
For detailed instructions on creating a price list, see the Pricing Center Help.
Tip:
To configure each brand with a default price list, commit the same price list to BRM every time, but use the brand administrator logins specific to each brand.Establishing Unique Service Logins
To ensure that only one brand contains a particular login/service combination, the host administrator can modify the customer login policy to extract the brand's domain name from the brand account's URL field and append it to the customer's login. The domain used for the customer's login is the domain defined for the brand in Configuration Center. For example, if the URL for the brand ”East Coast Enterprises” is www.ecoastent.com, and a user has the login jmcgee, the login policy changes the login to jmcgee@ecoastent.com.
For an example of how to enforce unique email addresses for branded customers, see "Adding or Changing Login Options" in BRM Developer's Guide.
Tip:
If you do not want to modify policy code, you can create a separate instance of a service for each brand. For more information, see "About Duplicate Service Logins Across Brands".Controlling Access to the Data Dictionary
The data dictionary that contains the object schema for the BRM system is not brand aware. Host administrators can restrict brand administrators from changing the data dictionary by disabling write access in the Data Manager configuration file. Access is disabled by default, but if host administrators make any changes, they must reset the access permissions to disable any future changes. See the DM configuration file for more information.
In addition to restricting access to the data dictionary, host administrators can use Developer Workshop to set read/write permissions on specific BRM storable classes. See Developer Workshop for more information on object properties.
For a non-branded system, updates to the data dictionary are also enabled and disabled using the DM configuration file.
Creating Brands
Note:
After you create a brand, you cannot change the brand plan.For details on these steps, see the Brand Manager Help.
To create a brand:
-
Using Pricing Center, create a plan list named brand and commit it to the BRM database. See "Defining a Price List for Brand Creation".
-
Log in to Configuration Center as the root user.
-
Click the icon for Brand Manager shown in Figure 19-2:
-
Click New Brand and specify the following brand account information:
-
A unique brand name and the URL for the brand Web site.
Note:
Brand names must be unique within a brand hierarchy; each sub-brand under the same parent brand must have a different name. The brand URL is optional. -
The currency used by the brand accounts.
If you choose an EMU or the euro currency for the primary account currency, a Secondary Currency field displays. You must choose a second account currency for the brand.
-
(Optional) The brand status.
-
(Optional) The brand expiration date.
-
The brand plan.
-
The service login names and passwords for brand administrators.
After you define the basic account information, you must add a billing contact to the brand.
-
-
Enter the following information on the Contact tab:
Note:
The billing contact information is required, but you can also define additional contacts. For more information, see the Brand Manager Help.-
First and last name.
-
Email address.
-
Company name.
-
Mailing address.
-
(Optional) Phone number.
Tip:
Brands are identified in the Customer Center Account Navigator and in the Search Results lists by the account number and the billing contact's last name and first name, not by the brand name. To display accounts by brand name, enter the brand name in the billing contact's Last Name field.
-
-
Use Access Privileges, another Configuration Center application, to assign additional BRM users permission to work with a brand. For more information, see "Controlling Access to Top-Level Brands".
Example of Using Brand Manager
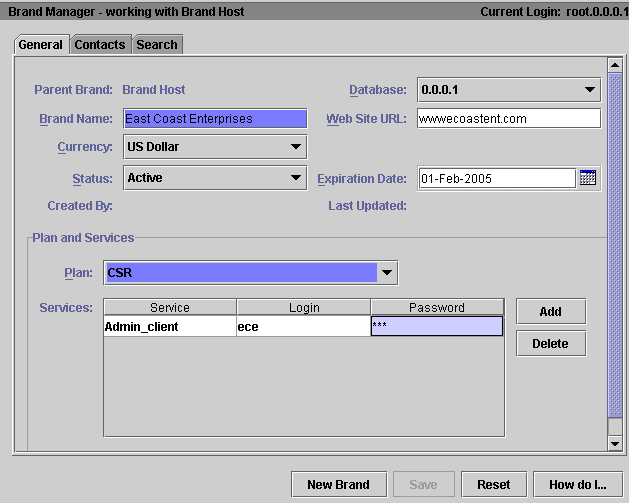
To create a new brand called East Coast Enterprises:
-
Click the Brand Manager icon on the Configuration Center toolbar.
Because this is the first brand created for this system, Brand Host (the BRM system) is the only item on the active brand list, and it is already selected.
-
Enter the information on the General tab:
-
Brand Name: East Coast Enterprises
-
Brand URL: www.ecoastent.com
-
(In a multischema environment) Database: 0.0.0.1
-
Currency: US Dollar
-
Status: Active. By default, all accounts you create in the brand will be created with this status.
-
Expiration Date: February 1, 2005
-
Plan. The brand plan is CSR in this example
-
Service: admin_client
-
Login: ece
-
Password: ece
Note:
The brand administrator can change the login name and password at a later date by using Customer Center.
Figure 19-3 shows the General tab for the host brand after you enter the data:
Note:
The Save button is inactive because billing contact information needs to be entered on the Contacts tab. You cannot save the brand until all required data is entered. -
-
Click the Contacts tab and enter information for the billing contact.
Note:
-
You can enter other contacts, but billing contact information is required.
-
These contacts are only for your information and are not used for billing purposes.
-
The phone numbers are optional.
-
Brands appear in Customer Center as regular accounts but are identified in the Customer Center Account Navigator and in the Search Results lists by the account number and the billing contact's last name and first name, not by the brand name. To display brand accounts by brand name, enter the brand name in the billing contact's Last Name field.
-
-
Click Save.
Setting Up Brands for Brand Administrators
The tasks in this section should be done by the host administrator before brand administrators customize brands and register customer accounts.
Preparing brands for brand administrators includes the following tasks:
Controlling Access to Top-Level Brands
When using certain BRM applications, such as Payment Tool and Configuration Center, you must select a brand before you create or modify any data. You must either be a brand administrator or have access privileges for a brand to be able to select that brand in an application.
Note:
-
This restriction is not true for Customer Center; you can open accounts from any brand that you have permission to access without having to select a specific brand.
-
As a host administrator, if you know the brands in your database will be mutually exclusive and maintained by specified CSRs or administrators, you do not need to create an access group for each brand because access across brands is not required. You only set access permissions when you have one customer service representative (CSR) who administers multiple brands.
Use Access Privileges, a component of Business Configuration Center, to give BRM users access to a given brand or account groups. For more information on permissions and access groups, see "About Granting Access to Brands".
To enable access to top-level brands:
-
Log in to Configuration Center as the root user.
Note:
If you are a brand administrator controlling access to a sub-brand in your brand, log in to Configuration Center by using your administrator login and password. -
Click the icon for Access Privileges shown in Figure 19-4:
-
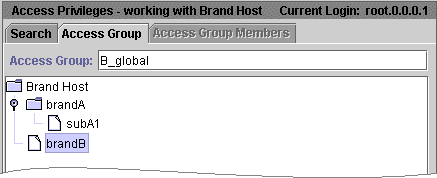
Click Access Group tab.
-
Enter a name and select one brand, sub-brand, or account group for the access group from the tree as shown in Figure 19-5. The following example creates the access group for the brand brandB:
-
Click Save.
-
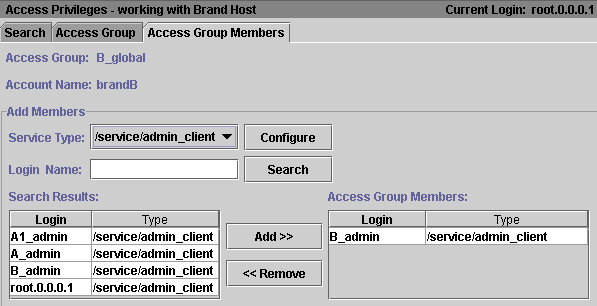
Click the Access Group Members tab.
-
Search for login names belonging to the admin_client service.
Figure 19-6 shows a search for all login names for the admin_client service.
Tip:
You typically add logins for the admin_client service to an access group, so this service is available by default. If you want to add logins from another service, such as pcm_client, use the Configure button to add that service to the list of available services. -
Select a login from the Search Results list to include in the access group, and then click Add.
In this example, the login name B_admin now has access privileges to brandB when logging in under the admin_client service. This login name can create and modify customer accounts for Brand1 in Customer Center.
You can add more login names now or later.
-
Click Save.
Giving Users Access to All Accounts in BRM
Members of the root access group have access to all accounts in the database, regardless of whether the accounts exist in brands or not.
To add users to the root access group:
-
Log in to Configuration Center.
-
Click the icon for Access Privileges as shown in Figure 19-7:
-
Perform a wildcard search for an access group by using the asterisk (*).
-
Select the access group ”ACL Group for Root Access.”
-
Add users as required. See "Controlling Access to Top-Level Brands".
To give users access only to root-level accounts and not to brand accounts, see "Limiting Users to Accessing Root-Level Accounts Only".
For more information on the root access group, see "About the Root Access Group".
Limiting Users to Accessing Root-Level Accounts Only
To give users access to root-level accounts and restrict them from accessing brand accounts, perform these steps:
-
Add the root accounts to an account group.
-
Create an access group for the account group.
-
Add the CSRs to the access group.
Giving Permissions to the Brand Administrator
For brand administrators to enable CSRs to create accounts, charge credit cards, and perform other customer-related operations, the host administrator must first give them permission to set the CSR permissions.
To enable brand administrator permissions by using Customer Center:
-
Log in to Customer Center as root and open the brand administrator account.
-
Choose Edit - Permission.
-
Select a permission string from the table in the dialog box.
-
Select /accounttool/permissions and select Read/Write.
-
Give the brand administrator other necessary permissions and save the account; for example, you might give the brand administrator permission to credit an account.
-
Click Change Entry.
-
Give the brand administrator other necessary permissions and save the account; for example, you might give the brand administrator permission to credit an account.
-
Click Save.
For more information on giving permissions, see Customer Center.
Setting Up a Customer Center Search Filter for Access Group Owners
You can enable a Customer Center search filter that restricts the account group owner search to only those accounts that are also access group owners, rather than querying and returning all account group owners in the entire brand. This improves performance of the BRM search operation.
To enable the search filter, set the infranet.billinggroup.search flag in the Customer Center Infranet.properties file to owner. When the search operation is performed, the PIN_FLD_FLAGS value in the PCM_OP_PERM_ACL_GET_SUBGROUPS opcode is set to 1.
To search the entire hierarchy for access group owners, regardless of whether the account is also an account group owner, set the infranet.billinggroup.search flag to 0.
Setting Up Invoicing to Support Brands
The BRM system contains a default invoice template that you can customize for each brand in a BRM system. Host administrators do not need to configure the default invoice functionality for branding; it is already brand aware. Brand administrators can access and modify invoice templates without any prerequisite configuration by the host administrator.
If a brand administrator does not customize the invoice template for a brand, BRM defaults to the parent brand template.
Important:
If you make any changes to the invoice template or the events displayed in the template, you must stop and restart the CM.See "Designing and Generating Invoices" in BRM Designing and Generating Invoices for more information on customizing templates.
Note:
If the brands in your system require customized templates that differ significantly, you can modify the PCM_OP_INV_POL_FORMAT_INVOICE_HTML policy opcode to load brand-specific data into the brand templates. For example, by adding a brand's company address information to the _CUSTADDR_ tag, you can generate a custom invoice with each brand's corporate address.Determining the Events to Display in an Invoice
By default, invoices display all events with currency balance impacts greater than zero; however, the host administrator can determine which events to display by adding them to an event file and loading the file into the /config/invoice_events object. The BRM system contains a default event file named event.file, which contains routine billing events.
To enable brands to display different events in their invoices, you must modify the PCM_OP_INV_POL_PREP_INVOICE policy opcode.
Setting Up the General Ledger to Support Brands
The pin_glid file is the configuration file that contains all your general ledger (G/L) ID definitions. It is loaded automatically when you install BRM.
To enable your brands to have their own private pricing structures and G/L accounts, you define a G/L segment name for each brand in the system in this file. Each brand in BRM is limited to the IDs defined in the pin_glid configuration file; however, brands are not required to use all of them or to use the same event mappings.
Note:
G/L IDs are stored in a text file, and brand permissions cannot be set on them. Therefore, brand administrators should set operating system access permissions on the G/L ID file to deny other brands from reading and changing the data.See "About Collecting General Ledger Data" in BRM Collecting General Ledger Data for more information on setting up G/L IDs.
Setting Up Reports to Support Brands
To enable the brands in your system to run BRM Reports, you must install and configure Oracle Business Intelligence Publisher. See the following documents in BRM Reports:
Setting Up Web Registration to Support Brands
To enable Web registration for multiple brands, you need to create a registration home page for each brand in your system. All other pages can be used for any brand.
After a customer logs in and creates an account, the BRM system knows which brand the customer belongs to when the customer logs in to the system again.
Note:
Before you create Web pages for multiple brands, you need to define access privileges. See "Controlling Access to Top-Level Brands".Setting Up Payment Methods for Brands
Online payment processors require a merchant ID and merchant number (store name) to deposit your BRM-initiated payments in the correct account. Merchant numbers identify an account with a credit card processor. Your online payment processor assigns your merchant numbers, and you set the default number for your BRM system in the CM configuration file.
To define a unique merchant number for each brand, you must customize the fm_cust_pol_prep_billinfo.c source file and then add an entry in the credit card DM configuration file for each brand.
See "About BRM-Initiated Payment Processing" in BRM Configuring and Collecting Payments for more information.
Note:
You must install, configure, and certify the BRM interface to a supported credit card service before you define the merchant numbers for brands. The interface to the credit card services is provided with the default BRM installation.Running Utilities with a Branded Database
Some BRM billing and configuration utilities can be used for managing separate brands. For example, you can run billing for a specific brand or run utilities to configure different default business policies for different brands.
Note:
Not all utilities support branding; many do not. For more information, see the documentation for the utility you are using.Caution:
The host administrator should run billing for the entire database at the same time. Running billing for a particular brand is not recommended because it is very resource intensive and slows system performance.To run a utility for a specific brand:
-
Open the configuration file for the utility. For example, to run billing for a specific brand, open the pin.conf file in BRM_Home/apps/pin_billd.
-
Replace the login name and password with the brand administrator's login name and password:
- nap login_name brand_administrator_login
- nap login_pw brand_administrator_password
-
Run the utility, or run the script that runs the utility.
-
When the utility has finished, repeat this procedure for each brand, or change the login name and password back to the default host login and password.
Important:
You can create brand-specific configuration files; for example, pin.conf.brand_a and pin.conf.brand_b.
Managing Permission by Using a Custom Application
You can limit which CSRs have access to branded customer accounts by using an Access Control List (ACL). For more information, see "About Granting Access to Brands" and "Setting Up Brands for Brand Administrators".
BRM stores information about each ACL in /group/acl objects in the BRM database. You manage or access data in /group/acl objects by using the Permissioning facilities module (FM) standard opcodes.
Managing /group/acl Objects
You create, modify, and delete /group/acl objects by using the PCM_OP_PERM_ACL* opcodes. These opcodes validate data in the input flist and then call Group FM standard opcodes to create, add, modify, or delete data in a /group/acl object. For example, the PCM_OP_PERM_ACL_GROUP_ADD_MEMBER opcode adds members to a /group/acl object by calling the PCM_OP_GROUP_ADD_MEMBER opcode. For more information on Group FM standard opcodes, see "Managing Hierarchical Account Groups by Using Your Custom Application" in BRM Managing Accounts Receivable.
To manage /group/acl objects, you use the following Permissioning FM standard opcodes:
-
To create a /group/acl object, use the PCM_OP_PERM_ACL_GROUP_CREATE opcode.
-
To add a member to a /group/acl object, use PCM_OP_PERM_ACL_GROUP_ADD_MEMBER.
-
To delete a member from a /group/acl object, use the PCM_OP_PERM_ACL_GROUP_DELETE_MEMBER opcode.
-
To modify the attributes in a /group/acl object, such as the ACL name, brand or group account, or list of authorized service types, use the PCM_OP_PERM_ACL_GROUP_MODIFY opcode.
Important:
PCM_OP_PERM_ACL_GROUP_MODIFY overwrites the list of authorized services in the /group/acl object. When the PIN_FLD_PERMITTEDS array is included in the input flist, PCM_OP_PERM_ACL_GROUP_MODIFY deletes all services from the /group/acl object and adds the services from the input flist. -
To delete an entire /group/acl object, use the PCM_OP_PERM_ACL_GROUP_DELETE opcode.
Note:
Deleting an ACL does not delete the brand account or affect services. It only removes the ACL.
Accessing /group/acl Data
Use the following opcodes to access data in /group/acl opcodes. Client applications typically use these opcodes to find all ACLs that a CSR belongs to or to determine which brand or account group to display.
-
To find all ACLs to which a CSR or member belongs, use the PCM_OP_PERM_FIND opcode. See "Finding CSR Membership".
-
To determine which brand or account group to display in a client application, use the PCM_OP_PERM_GET_CREDENTIALS opcode and the PCM_OP_PERM_SET_CREDENTIALS opcode. See "Displaying ACLs in Multi-Branded Applications".
Finding CSR Membership
Use PCM_OP_PERM_FIND to find all ACLs to which a CSR belongs. This opcode returns a list of all groups and brands that a CSR is authorized to access, along with specific information about each ACL.
Displaying ACLs in Multi-Branded Applications
When a CSR logs into a multi-branded application, the following occurs:
-
The application displays a list of available brands and bill units, along with the currently active brand or group.
-
The CSR selects one brand or bill unit to access.
-
The client application retrieves the connection scope for the selected brand or bill unit.
-
The client application displays only those accounts in the selected brand or bill unit.
For more information, see "Adding Branding to Your Application" in BRM Developer's Guide.
You use the following opcodes to determine which ACL to display in a client application:
-
Use PCM_OP_PERM_GET_CREDENTIALS to retrieve all ACLs that are authorized for a particular client application, along with the currently active ACL.
-
Use PCM_OP_PERM_SET_CREDENTIALS to set the connection scope for the specified ACL.


