4 Designing and Generating Invoices in Oracle Business Intelligence Publisher 10g
This chapter describes how to design, generate, and customize Oracle Communications Billing and Revenue Management (BRM) invoice documents using Oracle Business Intelligence (BI) Publisher 10g.
Before reading this document, you should be familiar with the following:
-
Basic database administration concepts. See your database documentation.
-
BI Publisher 10g functions. See your BI Publisher documentation.
Note:
For information on integrating BRM with Oracle BI Publisher 11g, see "Designing and Generating Invoices in Oracle Business Intelligence Publisher 11g".
About BRM Integration with BI Publisher for Invoicing
BRM comes with a pre-integrated invoicing framework. This framework uses BI Publisher as the publishing application, allowing users to create more stylized and detailed invoices in PDF format. BRM also includes sample RTF templates for individual customers and for corporate customers. In these templates, some of the core business functions are pre-built and can be customized. You can configure and extend these templates for your specific business needs.
The integration methodology is based on the J2EE framework and Web Services-based communication, enabling a complete open-ended, seamless and scalable solution. BI Publisher allows you to choose from a variety of desktop tools, such as Microsoft Word and Adobe Acrobat, to create document templates. It can also access multiple data sources, such as database and HTTP, and it provides multiple document output options, such as email and FTP.
The pre-integrated invoicing framework eliminates the need for any proprietary invoice design tools, resulting in lowered costs. BI Publisher leverages familiar desktop software, so using the software requires minimal learning.
To use this feature, you must install BI Publisher, BI Publisher Desktop, and a web services component.
Overview of BRM and BI Publisher Invoice Generation
BI Publisher is an enterprise reporting solution to author, manage, and deliver all types of formatted documents. You can customize the layout of the generated invoice document using the template builder capabilities of BI Publisher. A typical invoice document generated using BRM-BI Publisher integration is in "Understanding Invoice Layout".
When you use the BRM-BI Publisher integration:
-
BRM generates the invoicing data in XML format and then passes the data to BI Publisher.
-
BI Publisher formats the invoice and stores it in the BI Publisher database.
Figure 4-1 shows the BRM and BI Publisher invoice generation process:
Figure 4-1 BRM and BI Publisher Invoice Generation Process
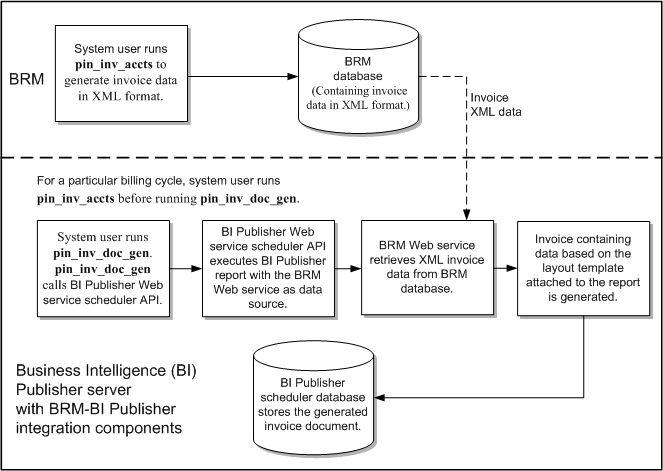
Description of ''Figure 4-1 BRM and BI Publisher Invoice Generation Process''
About the Invoicing Process
The BRM-BI Publisher integration generates invoice documents as follows:
Note:
The BRM-BI Publisher integration must be enabled. See "Enabling the BRM-BI Publisher Integration".-
BRM associates bill units with a BI Publisher invoice and report. When accounts are created, BRM associates each bill unit with a BI Publisher invoice report and layout template. See "About Associating Bill Units with a BI Publisher Invoice and Report".
-
Integrating BRM and BI Publisher for generating invoice documents. To generate invoice documents using BRM-BI Publisher integration framework, you must enable the integration between BRM and BI Publisher. See Enabling the BRM-BI Publisher Integration.
-
BRM generates a bill. BRM creates a bill for each account bill unit when it runs the pin_bill_accts utility as part of the daily billing script. BRM needs a bill before generating an invoice. See "Running Billing Utilities" in BRM Configuring and Running Billing.
-
BRM generates the invoice and stores it in the BRM database. When the pin_inv_accts utility is executed, it stores the invoice data in an /invoice object in the BRM database. See "Generating Invoices".
Note:
To generate invoice documents in BI Publisher, you must store the invoice data in XML format. See "About Formats for Storing Invoices". If the invoice data is stored in pin_flist format, you must perform additional steps when deploying the custom BRM Web service. See "Deploying the BRM Web Service". -
The pin_inv_doc_gen utility:
-
Executes BI Publisher reports. This utility, based on the input parameters, invokes and executes appropriate BI Publisher reports for invoice documents. It executes a BI Publisher invoicing report, with the BRM Web service as the data source, through a scheduled job. See "Generating BI Publisher Invoice Documents".
-
Calls PublicBRMfetchInvoiceXMLService to pull the XML data from the BRM database. The BRM Web service, PublicBRMfetchInvoiceXMLService, pulls the invoice data in XML format from the BRM database and returns the XML data necessary to generate invoice documents by the pin_inv_doc_gen utility.
-
Stores the invoice document in the BI Publisher database. The utility stores the generated invoice documents in the BI Publisher Scheduler database. See "Storing the Invoice Document".
-
About Associating Bill Units with a BI Publisher Invoice and Report
When the BRM-BI Publisher integration is enabled, BRM automatically associates bill units with a BI Publisher report name and invoice template name during the account creation process. When an account is created, BRM performs the following for each bill unit (/billinfo object) in the account:
-
Determines the BI Publisher invoice report and template that the bill unit qualifies for by reading the /config/business_profile object. This object defines your invoice types, the criteria a bill unit must meet for the invoice type, and the BI Publisher invoice report and template names associated with the invoice type. For example, a /config/business_profile might define the following in Table 4-1 for a regular bill:
Table 4-1 Business Profile Example
Invoice Type Criteria BI Publisher Invoice Report and Template Names Monthly billing
The /billinfo object's PIN_FLD_WHEN field is set to 1.
monthly_invoice_report and monthly_invoice
Quarterly billing
The /billinfo object's PIN_FLD_WHEN fields is set to 3.
quarter_invoice_report and quarter_invoice
-
Creates an /associated_bus_profile object for the bill unit. This object stores the following information associated with invoicing for the bill unit as an element in a template array called PIN_FLD_TEMPLATE_ARRAY.
-
PIN_FLD_TEMPLATE_NAME. The Template name configured in the pair key Template_Name of the corresponding invoicing /config/business_profile object.
-
PIN_FLD_REPORT_NAME. The Report name configured in the pair key Report_Name of the corresponding invoicing /config/business_profile object.
-
PIN_INV_TYPE. The type of invoice stored as PIN_INV_TYPE_REGULAR or PIN_INV_TYPE_CORRECTIVE.
-
-
Associates the bill unit with its /associated_bus_profile object by populating the /billinfo object's PIN_FLD_ASSOC_BUS_PROFILE_OBJ_LIST field.
BRM creates an /associated_bus_profile object for each bill unit in an account by calling the PCM_OP_CUST_CREATE_ASSOCIATED_BUS_PROFILE opcode. This opcode is called internally by the PCM_OP_CUST_CREATE_BILLINFO opcode during the account creation process.
Whenever invoice business profiles are modified in the /config/business_profile object, use the PCM_OP_CUST_SET_ASSOCIATED_BUS_PROFILE opcode to update all related /associated_bus_profile objects.
About BRM-Business Intelligence Publisher Invoicing Integration Package Components
The BRM-BI Publisher invoicing integration package contains:
-
The Java integration utility, pin_inv_doc_gen. See "Generating BI Publisher Invoice Documents".
-
Custom BRM Web service.
-
Six BI Publisher reports for generating invoice documents for consumer and corporate accounts. See "About BI Publisher Reports for Invoice Document Generation".
-
Six sample layout templates in rich text format (RTF) for consumer and corporate accounts. See "About Invoice Layout Templates for Invoice Document Generation".
Designing Invoices
You can use the following capabilities of BI Publisher to design invoice documents:
-
Customizing invoice format: You can format the sample invoice layout templates or create new invoice templates. See "Customizing Invoice Layout Templates".
-
Enriching invoice data: You can enrich the data that is displayed in the invoice by getting data from various sources. See "Enriching Invoice Data".
About Invoice Layout Templates for Invoice Document Generation
The BRM-BI Publisher invoicing integration package contains six layout templates in RTF for the consumer and corporate accounts. The layout templates have the XSL formatting code that is understood by the BI Publisher reporting engine that guides the look and feel of the invoice document.
Layout templates that are part of the BRM-BI Publisher invoicing integration package are based on the invoice document and whether the invoice is intended for a corporate or consumer customer. If the BRM-BI Publisher integration framework is enabled, when you create an account, the bill units (/billinfo objects) of the account are associated with an /associated_bus_profile object. The /associated_bus_profile object contains the report and template names that are used for generating invoice documents for this account on the BI Publisher server. See "Specifying BI Publisher Invoice Report and Template Names in BRM".
Default Templates for Regular Invoices
BRM provides the following default templates for regular invoices:
-
BRM_Corporate_Invoice.rtf
-
BRM_Consumer_Invoice.rtf
The report files that Oracle Business Intelligence Publisher associates with each of the default templates for regular invoices are:
-
BRM_Corporate_Invoice_Report.xdo
-
BRM_Consumer_Invoice_Report.xdo
Default Templates for Replacement Invoices
BRM provides the following default Replacement Invoice templates:
-
BRM_Corporate_Replacement_Invoice.rtf
-
BRM_Consumer_Replacement_Invoice.rtf
When you use the default template for a Replacement Invoice, the resulting document contains all the line items and information from the previous bill or invoice. In addition, it lists the previous bill number, the previous bill date, the previous bill totals and the corrections totals. The Item summary section shows the previous totals, the correction totals and the current totals for each item. The events details section lists the previous total, correction amount and current total for each event.
The report files that Oracle Business Intelligence Publisher associates with each of the Replacement Invoice templates are:
-
BRM_Corporate_Replacement_Invoice_Report.xdo
-
BRM_Consumer_Replacement_Invoice_Report.xdo
Default Templates for Invoice Correction Letters
BRM provides the following default Invoice Correction Letter templates:
-
BRM_Corporate_Correction_Invoice.rtf
-
BRM_Consumer_Correction_Invoice.rtf
As the name implies, an Invoice Correction Letter is in a letter format. When you use the default template for an Invoice Correction Letter, the resulting document contains a brief explanation of the correction, a bill summary section and the details of only the corrections made to the previous bill or invoice. The Invoice Correction Letter displays the previous bill number, the previous bill date, the previous bill total, the total correction amount and the current total.
The report files that Oracle Business Intelligence Publisher associates with each of the Invoice Correction Letter templates is:
-
BRM_Corporate_Correction_Invoice_Report.xdo
-
BRM_Consumer_Correction_Invoice_Report.xdo
About BI Publisher Reports for Invoice Document Generation
The BRM-BI Publisher invoicing integration package contains two reports for consumer and corporate accounts. Details of the construction of these reports are:
-
The data source of the sample BI Publisher reports is the PublicBRMfetchInvoiceXMLService Web service.
-
Each report has a layout template in RTF associated with it that decides the look and feel of the invoice document.
-
The output formats supported for the invoice document are PDF, HTML, and XML (data). The default output format specified in the reports is PDF.
Note:
For the invoice documents to support data from various data sources, you need to configure additional data sources in the sample reports and customize the sample layout template.
Reports that are part of the BRM-BI Publisher invoicing integration package:
-
BRM_Consumer_Invoice_Report.xdo
-
BRM_Corporate_Invoice_Report.xdo
Setting Up Your System to Generate Invoice Documents Using BI Publisher
To use the BRM-BI Publisher integration framework to generate invoice documents:
-
Install BI Publisher. To install BI Publisher, follow the instructions in the BI Publisher documentation.
-
In BRM, specify the BI Publisher invoice report and layout templates names. See "Specifying BI Publisher Invoice Report and Template Names in BRM".
-
In BRM, specify the events that you want included in your invoices by editing the events.file file and then loading it into the BRM database with the pin_load_invoice_events utility. See "Including Payment, A/R, and Taxation Details in Invoices".
-
Install the BRM-BI Publisher invoicing integration package on the BI Publisher server. See "Installing BRM-BI Publisher Invoicing Integration Package".
-
Configure the pin_inv_doc_gen utility. See "Configuring the pin_inv_doc_gen Utility".
-
Deploy the BRM Web service on your BI Publisher server. See "Deploying the BRM Web Service".
-
Connect the PublicBRMfetchInvoiceXML Web service to the BRM database. See "Configuring How PublicBRMfetchInvoiceXMLService Connects to the BRM Database".
Specifying BI Publisher Invoice Report and Template Names in BRM
When the BRM-BI Publisher integration is enabled, BRM automatically performs the following during the bill unit (/billinfo object) creation process:
-
Reads the invoicing configuration business profile (/config/business_profile object) to determine which BI Publisher invoice report and layout template the bill unit should be associated with.
-
Creates an /associated_bus_profile object for the bill unit. This object specifies the names of the BI Publisher invoice report and layout template to use.
-
Links the bill unit to the /associated_bus_profile object it created.
To create an invoicing configuration business profile:
-
Enable the BRM-BI Publisher integration. See "Enabling the BRM-BI Publisher Integration".
-
Specify the requirements for a bill unit to be associated with an invoicing configuration business profile by creating a validation template. See "Creating Bill Unit Validation Templates for Invoices".
-
Specify the validation template, invoice report, and layout template to be associated with the bill unit. See "Specifying the BI Publisher Report and Template".
-
Load the business profile information into the BRM database by using the load_pin_business_profile utility. See "Loading Invoicing Business Profiles into the Database".
-
If your system includes accounts that were created before you integrated BRM invoicing with BI Publisher, associate your existing /billinfo objects with /associated_bus_profile objects. See "Associating Pre-Existing Bill Units with Business Profiles".
Enabling the BRM-BI Publisher Integration
By default, BRM-BI Integration is disabled in BRM. You can enable this feature by modifying a field in the invoicing instance of the /config/business_params object.
You modify the /config/business_params object by using the pin_bus_params utility. For information on this utility, see "pin_bus_params" in BRM Developer's Guide.
To enable the BRM-BI Publisher integration for invoices:
-
Go to the BRM_Home/sys/data/config directory, where BRM_Home is the directory in which you installed BRM components.
-
Run the following command, which creates an editable XML file from the invoicing instance of the /config/business_params object.
pin_bus_params -r BusParamsInvoicing bus_params_Invoicing.xmlThis command creates the XML file named bus_params_Invoicing.xml.out in your working directory. To place this file in a different directory, specify the path as part of the file name.
-
Open the bus_params_Invoicing.xml.out file.
-
Search for the following line:
<EnableInvoicingIntegration>disabled</EnableInvoicingIntegration> -
Change disabled to enabled.
-
Save the file as bus_params_Invoicing.xml.
-
Go to the BRM_Home/sys/data/config directory, which includes support files used by the pin_bus_params utility.
-
Run the following command, which loads this change into the appropriate /config/business_params object:
pin_bus_params PathToWorkingDirectory/bus_params_Invoicing.xml
where PathToWorkingDirectory is the directory in which bus_params_Invoicing.xml resides.
Caution:
BRM uses the XML in this file to overwrite the existing invoicing instance of the /config/business_params object. If you delete or modify any other parameters in the file, these changes affect the associated aspects of the BRM invoicing configuration.Note:
To run this command from a different directory, see "pin_bus_params" in BRM Developer's Guide. -
Read the object with the testnap utility or Object Browser to verify that all fields are correct.
See "Using testnap" in BRM Developer's Guide for general instructions on using the testnap utility. See "Reading Objects by Using Object Browser" in BRM Developer's Guide for information on how to use Object Browser.
-
Stop and restart the Connection Manager (CM). For more information, see "Starting and Stopping the BRM System" in BRM System Administrator's Guide.
-
(Multischema systems only) Run the pin_multidb script with the -R CONFIG parameter. For more information, see "pin_multidb" in BRM System Administrator's Guide.
Creating Bill Unit Validation Templates for Invoices
You specify the criteria a bill unit must meet to be associated with an invoicing configuration business profile by creating a bill unit validation template (/config/template/billinfo). For more information about validation templates, see "About Validation Templates" in BRM Managing Customers.
To create a bill unit validation template for invoices, edit the BRM_Home/sys/data/config/pin_business_profile.xml file. The file specifies the following:
-
The valid business profiles for each invoice type
-
The criteria a bill unit must meet to qualify for each business profile
-
The templateID name.
Note:
Each type of invoice can have multiple business profiles, but they must all point to the same TemplateID name.
The default pin_business_profile.xml file includes entries for the consumer and corporate invoice documents. You can edit these entries or add entries for any other type of invoice document you want to generate.
For each type of invoice document you want to generate, edit the following entries:
-
Set the TemplateId name entry to InvoiceIntegration and the type entry to /billinfo, as shown below:
<TemplateId name="InvoiceIntegration" type="/billinfo">
-
Specify the criteria a bill unit must meet to be associated with an invoicing business profile in the Iscript section. Enter your conditions in the if and else if blocks and the name of the business profile in PIN_FLD_NAME.
Important:
The order in which criteria is written in the if and else if blocks defines the order in which a bill unit is evaluated against the criteria.If a particular condition is satisfied in the if and else if blocks, the business profile name associated with the condition is set with the OUT label as one of the Iscript return values.
For example:
<Iscript>

Long parentFlags = flistGetLong(IN,PIN_FLD_PARENT_FLAGS);

 if(parentFlags == 0)
 {
   flistSetEnum(OUT, PIN_FLD_RESULT, 1);
   flistSetStr(OUT, PIN_FLD_NAME, "ConsumerInvoice");
 }
 else if(parentFlags > 0)
 {
   flistSetEnum(OUT, PIN_FLD_RESULT, 1);
   flistSetStr(OUT, PIN_FLD_NAME, "CorporateInvoice");
 }
</Iscript>
Specifying the BI Publisher Report and Template
You specify the BI Publisher invoice reports and layout template names by editing the business profile configuration file (pin_business_profile.xml). The default XML file contains entries for generating a consumer invoice document. You can modify these entries and add entries for any other type of invoice document that you want to generate. For example, you can add entries to generate an invoice document for Internet customers or wireless telephony customers.
To specify the BI Publisher invoice report and layout template to use for generating an invoice document, edit the following entries in the BRM_Home/sys/data/config/pin_business_profile.xml file. Add a set of entries for each type of invoice document you want to generate:
-
Specify the name of the business profile in the BusinessProfile name entry. The name must match the PIN_FLD_NAME entry from the Iscript element.
Important:
The type attribute entry for the BusinessProfile tags must be set to Invoice.For example:
<BusinessProfile name="ConsumerInvoice" type="Invoice">
-
Make sure TemplateId name is set to InvoiceIntegration and the type is set to /billinfo. All invoice business profiles must use these values.
<TemplateId name="InvoiceIntegration" type="/billinfo"/>
-
Specify the name of the BI Publisher XDO report to use for generating invoice documents in the Report_Name value entry. For example:
NameValue key="Report_Name" value="BRM_Consumer_Invoice_Report"
-
Specify the name of the BI Publisher XDO report to use and the name of the layout template to use for each type of invoice, the regular invoice, the Replacement Invoice and the Invoice Correction Letter.
The following is a sample of the BusinessProfile tag entries for the default Corporate Invoice type in the pin_business_profile.xml file:
<BusinessProfile name="CorporateInvoice" type="Invoice">
  <Desc> Description of the business profile </Desc>
  <!-- List templates -->
  <TemplateId name="InvoiceIntegration" type="/billinfo" />
  <!-- List key values -->
  <NameValue key="Report_Name" value="BRM_Corporate_Invoice_Report"/>
  <NameValue key="Template_Name" value=" BRM_Corporate_Invoice"/>
  <NameValue key="Replacement_Report_Name" value="BRM_Corporate_Replacement_Invoice_Report"/>
  <NameValue key="Replacement_Template_Name" value=" BRM_Corporate_Replacement_Invoice"/>
  <NameValue key="Correction_Report_Name" value="BRM_Corporate_Correction_Invoice_Report"/>
  <NameValue key="Correction_Template_Name" value=" BRM__Corporate_Correction_Invoice"/>
</BusinessProfile>
Loading Invoicing Business Profiles into the Database
After editing the pin_business_profile.xml file, use the load_pin_business_profile utility to load the contents of the file into /config/business_profile objects in the BRM database. For more information, see "Managing Business Profiles" in BRM Managing Customers.
Associating Pre-Existing Bill Units with Business Profiles
All /billinfo objects that were created prior to your BRM-BI Publisher integration will not be linked with an /associated_business_profile object, which prevents you from creating BI Publisher invoices for those /billinfo objects. For example, this occurs if you upgraded to BRM 7.5 from a prior release.
To generate BI Publisher invoice documents for /billinfo objects created prior to the BRM-BI Publisher integration, you must run the pin_upd_assoc_bus_profile utility.
The pin_upd_assoc_bus_profile utility is a standalone multithreaded application (MTA) that performs the following operations:
-
Searches for /billinfo objects in the BRM database that have an empty PIN_FLD_ASSOC_BUS_PROFILE_OBJ_LIST field.
-
Creates an /associated_bus_profile object for each /billinfo object with an empty field.
-
Links the /billinfo object with its /associated_bus_profile object by populating the /billinfo object's PIN_FLD_ASSOC_BUS_PROFILE_OBJ_LIST field.
To associate pre-existing bill units with business profiles:
-
Make sure that the BRM-BI Publisher integration is enabled. See "Enabling the BRM-BI Publisher Integration".
Note:
The utility fails if you attempt to run it when the BRM-BI Publisher integration is disabled. -
(Optional) If you want to associate only a subset of your pre-existing bill units with business profiles, create a text file that specifies the /billinfo objects to update. The file must use the following format:
0 PIN_FLD_RESULTS     ARRAY [0] allocated 20, used 1
1    PIN_FLD_POID      POID [0] 0.0.0.1 /billinfo 37395 1
0 PIN_FLD_RESULTS     ARRAY [1] allocated 20, used 1
1    PIN_FLD_POID      POID [0] 0.0.0.1 /billinfo 37488 3
-
Go to the BRM_Home/apps/pin_billd directory.
Note:
pin_upd_assoc_bus_profile requires a configuration file in the directory from which you run the utility. The configuration file requires the standard CM connection and MTA entries. See "Configuring Your Multithreaded Application" in BRM Developer's Guide. -
Enter the following command:
pin_upd_assoc_bus_profile [-file filename]
where filename specifies the name and location of the file that lists the /billinfo objects to update.
If you run the utility without any parameters, the utility searches all /billinfo objects in the BRM database. If you run the utility with the -file parameter, the utility searches only those /billinfo objects specified in the file.
About the /associated_bus_profile Object
If you are using BRM-BI Publisher integration framework to generate invoice documents, at the time of customer account creation, the /associated_bus_profile object is created. See "Enabling the BRM-BI Publisher Integration". The /associated_bus_profile object stores the invoicing business profile information for a /billinfo object. The /associated_bus_profile object contains the layout template name in the PIN_FLD_TEMPLATE _NAME field and the report name in the PIN_FLD_REPORT_NAME field.
Creating /associated_bus_profile Objects
If the BRM-BI Publisher invoicing integration is enabled, during customer account creation, internally the PCM_OP_CUST_CREATE_BILLINFO opcode calls the PCM_OP_CUST_CREATE_ASSOCIATED_BUS_PROFILE opcode to create one /associated_bus_profile object for each bill unit in the account.
Creating /associated_bus_profile Objects for Accounts in a Branded Environment
To create /config/business_profile objects for accounts in a branded environment:
-
In BRM_Home/sys/data/config directory, create a new directory for the brand.
For example, BrandA.
-
Copy pin.conf, business_configuration.xsd, and pin_business_profile.xml files from BRM_Home/sys/data/config to BRM_Home/sys/data/config/BrandA.
-
Open pin.conf and add the following entries:
nap login_name brandloginname
nap login_pw brandpassword
where brandloginname is the login name for the brand and brandpassword is the password for the brand.
-
Save and close the file.
-
Open pin_business_profile.xml and replace the default values with the new values listed in Table 4-2:
Table 4-2 Default Values in pin_business_profile.xml File
Entry Default Value New Value BusinessProfile name
ConsumerInvoice
ConsumerInvoice_BrandA
TemplateId name
InvoiceIntegration
InvoiceIntegration_BrandA
NameValue value
BRM_Consumer_Invoice_Report
BRM_Consumer_Invoice_Report_BrandA
NameValue value
BRM_Consumer_Invoice
BRM_Consumer_Invoice_BrandA
BusinessProfile name
CorporateInvoice
CorporateInvoice_BrandA
TemplateId name
InvoiceIntegration
InvoiceIntegration_BrandA
NameValue value
BRM_Corporate_Invoice_Report
BRM_Corporate_Invoice_Report_BrandA
NameValue value
BRM_Corporate_Invoice
BRM_Corporate_Invoice_BrandA
Template name
InvoiceIntegration
InvoiceIntegration_BrandA
flistSetStr PIN_FLD_NAME
ConsumerInvoice
ConsumerInvoice_BrandA
flistSetStr PIN_FLD_NAME
CorporateInvoice
CorporateInvoice_BrandA
-
Save and close the file.
-
Go to the BRM_Home/sys/data/config/BrandA directory and enter the following command:
load_pin_business_profile pin_business_profile.xml -
Read the object with the testnap utility or Object Browser to verify that all fields are correct.
See "Using testnap" in BRM Developer's Guide for general instructions on using the testnap utility. See "Reading Objects by Using Object Browser" in BRM Developer's Guide for information on how to use Object Browser.
Creating Reports for Accounts in a Branded Environment in BI Publisher
-
In a Web browser, enter the following URL:
http://BI_Publisher_host:port/xmlpserver/
where:
-
BI_Publisher_host is the host name on which the BI Publisher server is installed.
-
port is the console port. The default port is 9704.
-
-
Log in to BI Publisher.
-
Create a new RTF template to associate it with the layout template specific for the accounts in a brand. See the discussion on creating an RTF template using the template builder for Word in the BI Publisher documentation.
Note:
The layout template name must be same as the template name specified in the updated pin_business_profile.xml file. For example, if you specify the layout template as BRM_Consumer_Invoice_BrandA, you must name the RTF template file as BRM_Consumer_Invoice_BrandA.rtf. -
In Shared Folders, click BRM_Invoices.
-
Click Create a new report link.
-
Enter the report name as BRM_Consumer_Invoice_Report_BrandA.
Note:
The report name must be same as the report name specified in the updated pin_business_profile.xml file. -
For the BRM_Consumer_Invoice_Report_BrandA report, click Edit. To specify report properties, see the discussion on creating the report entry and specify general properties in the BI Publisher documentation.
Note:
-
The configuration of BRM_Consumer_Invoice_Report_BrandA report must be same as the sample BRM_Consumer_Invoice_Report report in the BRM-BI Publisher invoicing integration package. For example, the BRM_Consumer_Invoice_Report_BrandA report must have the same WSDL URL as given in the BRM_Consumer_Invoice_Report report.
-
The layout template name must be BRM_Consumer_Invoice_BrandA.
-
-
Click Save.
Installing BRM-BI Publisher Invoicing Integration Package
This section describes how to install the BRM-BI Publisher invoicing integration package. This package is set up on the BI Publisher server.
Windows Installation
To install the BRM-BI Publisher invoicing integration package:
-
Follow the pre-installation requirements. See "Pre-Installation Requirements".
-
Set the BI Publisher environment variables. See "Setting the BI Publisher System Environment Variable".
-
Run the BRM-BI Publisher invoicing integration package. See "Installing the BRM-BI Publisher Invoicing Integration Package Application".
-
Set the LD_LIBRARY_PATH environment variable. See "Setting the LD_LIBRARY_PATH Environment Variable".
Pre-Installation Requirements
Before running the BRM-BI Publisher invoicing integration package application, do the following:
-
Install Java 1.5 (or higher version).
-
Set the BIP_HOME and JAVA_HOME environment variables. See "Setting the BI Publisher System Environment Variable".
Note:
After you install BI Publisher on your machine, the BIP_HOME environment variable is created. If the BIP_HOME environment variable is not set, the BRM-BIP invoicing integration package application will quit.
Setting the BI Publisher System Environment Variable
To set the BI Publisher home environment variable:
-
On the desktop, right-click My Computer, and select Properties from the shortcut menu.
-
Click the Advanced tab.
-
Click Environment Variable.
-
In System variables, click New.
-
In the Variable name field, enter BIP_HOME.
-
In the Variable value field, enter the path where the BI Publisher server is installed.
-
Click OK.
-
In Environment Variables dialog box, click OK.
-
In System Properties dialog box, click OK.
Installing the BRM-BI Publisher Invoicing Integration Package Application
To install the BRM-BI Publisher invoicing integration package application:
-
Go to the directory containing the BRM-BI Publisher invoicing integration package application, 7.5.0_BRM_BIP_Invoicing_Integration_nt_32_opt.exe.
-
Run 7.5.0_BRM_BIP_Invoicing_Integration_nt_32_opt.exe.
The installation wizard starts.
-
Read the instructions and enter the required details in the installation wizard screens.
-
After the installation completes, click Finish.
Setting the LD_LIBRARY_PATH Environment Variable
To set the LD_LIBRARY_PATH environment variable:
-
On the server on which the BRM-BI Publisher integration is deployed, set the LD_ LIBRARY_PATH environment variable to portal.dll.
-
Go to BIP_Home\oc4j_bi\j2ee\home\applications\pin_inv_doc_gen.
-
Run the following command:
BipEnv.bat
Linux Installation
To install the BRM-BI Publisher invoicing integration package:
-
Ensure that the pre-installation requirements are satisfied. See "Pre-Installation Requirements".
-
Run the BRM-BI Publisher invoicing integration package. See "Enabling the BRM-BI Publisher Invoicing Integration Package Application".
-
Set the LD_LIBRARY_PATH environment variable. See "Setting the LD_LIBRARY_PATH Environment Variable".
Pre-Installation Requirements
The following must be completed before you run the BRM-BI Publisher invoicing integration package application:
-
BI Publisher is installed on Linux.
-
BI Publisher home environment variable has been successfully set.
For more information on these requirements, see BRM Reports.
Enabling the BRM-BI Publisher Invoicing Integration Package Application
To enable the BRM-BI Publisher invoicing integration:
-
Download the 7.5.0_BRM_BIP_Invoicing_Integration_linux_32_opt.bin file to a temporary directory (temp_dir).
-
Go to the directory where you installed the Third-Party package and source the source.me file.
Caution:
You must source the source.me file to proceed with installation.If you fail to do so, ”suitable JVM not found” and other error messages appear.
For Bash shell:
source source.me.shFor C shell:
source source.me.csh -
Go to temp_dir and enter the following command:
7.5.0_BRM_BIP_Invoicing_Integration_linux_32_opt.bin -console
Setting the LD_LIBRARY_PATH Environment Variable
To set the LD_LIBRARY_PATH environment variable:
-
On the server on which the BRM-BI Publisher integration is deployed, set the LD_ LIBRARY_PATH environment variable in your shell startup script (for example, in .cshrc) to the directory that has the libportal.so shared library.
-
Go to BIP_Home/oc4j_bi/j2ee/home/applications/pin_inv_doc_gen.
-
Run the following command:
./BipEnv.sh
Installed Files
The BRM-BI Publisher invoicing integration program copies the following files listed in Table 4-3 to your computer during installation:
Table 4-3 BI Publisher Related Files Placed on Your Computer
| Filename | Install Path | Description |
|---|---|---|
|
BipEnv.bat |
BIP_Home\oc4j_bi\j2ee\home\applications\pin_inv_doc_gen |
Batch script for setting environment variables. Before running the BipEnv.bat file, ensure that JAVA_HOME environment variable is set. |
|
BIPExtension.jar |
BIP_Home\oc4j_bi\j2ee\home\applications\xmlpserver\xmlpserver\WEB-INF\lib |
JAR file used by RTF file for date conversions. |
|
BRM_Consumer_Correction_Invoice.rtf |
BIP_Home\xmlp\XMLP\Reports\BRM_Invoices\BRM_Consumer_Correction_Invoice_Report |
RTF file associated with layout template for consumer corrective invoice letter document. |
|
BRM_Consumer_Correction_Invoice_Report.xdo |
BIP_Home\xmlp\XMLP\Reports\BRM_Invoices\BRM_Consumer_Correction_Invoice_Report |
XDO file for consumer corrective invoice letter document. |
|
BRM_Consumer_Invoice.rtf |
BIP_Home\xmlp\XMLP\Reports\BRM_Invoices\BRM_Consumer_Invoice_Report |
RTF file associated with layout template for consumer invoice document. |
|
BRM_Consumer_Invoice_Report.xdo |
BIP_Home\xmlp\XMLP\Reports\BRM_Invoices\BRM_Consumer_Invoice_Report |
XDO file for consumer invoice document. |
|
BRM_Consumer_Replacement_Invoice.rtf |
BIP_Home\xmlp\XMLP\Reports\BRM_Invoices\BRM_Consumer_Replacement_Invoice_Report |
RTF file associated with layout template for consumer replacement invoice document. |
|
BRM_Consumer_Replacement_Invoice_Report.xdo |
BIP_Home\xmlp\XMLP\Reports\BRM_Invoices\BRM_Consumer_Replacement_Invoice_Report |
XDO file for consumer replacement invoice document. |
|
BRM_Corporate_Correction_Invoice.rtf |
BIP_Home\xmlp\XMLP\Reports\BRM_Invoices\BRM_Corporate_Correction_Invoice_Report |
RTF file associated with layout template for corporate corrective invoice letter document. |
|
BRM_Corporate_Correction_Invoice_Report.xdo |
BIP_Home\xmlp\XMLP\Reports\BRM_Invoices\BRM_Corporate_Correction_Invoice_Report |
XDO file for corporate corrective invoice letter document. |
|
BRM_Corporate_Invoice.rtf |
BIP_Home\xmlp\XMLP\Reports\BRM_Invoices\BRM_Corporate_Invoice_Report |
RTF file associated with layout template for corporate invoice. |
|
BRM_Corporate_Invoice_Report.xdo |
BIP_Home\xmlp\XMLP\Reports\BRM_Invoices\BRM_Corporate_Invoice_Report |
XDO file for corporate invoice document. |
|
BRM_Corporate_Replacement_Invoice.rtf |
BIP_Home\xmlp\XMLP\Reports\BRM_Invoices\BRM_Corporate_Replacement_Invoice_Report |
RTF file associated with layout template for corporate replacement invoice document. |
|
BRM_Corporate_Replacement_Invoice_Report.xdo |
BIP_Home\xmlp\XMLP\Reports\BRM_Invoices\BRM_Corporate_Replacement_Invoice_Report |
XDO file for corporate replacement invoice document. |
|
Create_Xmlp_Invoice_Job.sql |
BIP_Home\oc4j_bi\j2ee\home\applications\pin_inv_doc_gen |
Script for creating XMLP_INVOICE_JOB table in BI Publisher Scheduler database. |
|
Infranet.properties |
BIP_Home\oc4j_bi\j2ee\home\applications\pin_inv_doc_gen |
Infranet.properties file for pin_inv_doc_gen.jar. Contains the configuration entries for the pin_inv_doc_gen utility. |
|
InvoiceList.xml |
BIP_Home\oc4j_bi\j2ee\home\applications\pin_inv_doc_gen |
XML file containing the details of accounts and bill units. The InvoiceList.xml file is passed along with –accts_list as an input parameter to pin_inv_doc_gen. |
|
InvoiceList.xsd |
BIP_Home\oc4j_bi\j2ee\home\applications\pin_inv_doc_gen |
XSD file that validates the InvoiceList.xml. |
|
pin_inv_doc_gen.jar |
BIP_Home\oc4j_bi\j2ee\home\applications\pin_inv_doc_gen |
JAR file for pin_inv_doc_gen application. |
|
PublicBRMfetchInvoiceXMLService.war |
BIP_Home\oc4j_bi\j2ee\home\applications\pin_inv_doc_gen\WS-fetchInvoiceXML |
Application WAR file for the custom BRM Web service to be deployed on to the OC4J application server. |
Configuring the pin_inv_doc_gen Utility
Configuring pin_inv_doc_gen involves:
-
Configuring the Infranet.properties File for pin_inv_doc_gen
-
Creating the XMLP_INVOICE_JOB Table in the Scheduler Database
Configuring the Infranet.properties File for pin_inv_doc_gen
To configure the Infranet.properties file for pin_inv_doc_gen:
-
Go to BIP_Home/oc4j_bi/j2ee/home/applications/pin_inv_doc_gen.
-
Open the Infranet.properties file in a text editor and provide the required values for configuring pin_inv_doc_gen.
The Infranet.properties file for the pin_inv_doc_gen utility includes the standard configuration entries. See "Using Configuration Files to Connect and Configure Components" in BRM System Administrator's Guide.
Note:
The user must have read-write permissions to access the /invoice object. The BRM system administrator creates this user and grants the required permissions.Table 4-4 shows the entries for this utility in the Infranet.properties file.
Table 4-4 Infranet.properties File Entries
Entry Description infranet.bip.deliveryoption1
Specifies the first delivery option for the invoice document. See Setting Up Delivery Options in your BI Publisher documentation.
infranet.bip.deliveryoption2
Specifies the second delivery option for the invoice document.
infranet.bip.emailfromaddress
Specifies the email address of the sender who sends the Scheduler delivery request.
infranet.bip.ftpremotedirectory
Specifies the ftp remote directory for ftp delivery option.
infranet.bip.ftpsecureftp
Valid entries are:
-
false. (Default)
-
true.
infranet.bip.ftpservername
Specifies the ftp server name for ftp delivery option.
infranet.bip.ftpusername
Specifies the ftp user name for ftp delivery option.
infranet.bip.ftpuserpassword
Specifies the ftp user password for ftp delivery option.
infranet.bip.outputdocformat
Specifies the output format of the invoice document: PDF or HTML. See "Specifying the Utility Output Format".
infranet.bip.password
Specifies the password.
Note: BI Publisher does not encrypt or decrypt the password. Ensure that the password to connect to the BI Publisher server is valid.
infranet.bip.port
Specifies the BI Publisher port number.
infranet.bip.server
Specifies the name of the BI Publisher server.
infranet.bip.toemailaddress
Specifies the receiver's email address who receives the Scheduler delivery request. It also specifies the receiver's email address who receives the invoice document as an email attachment.
infranet.bip.username
Specifies the username.
infranet.log.file
Specifies the log file name for the PublicBRMfetchInvoiceXMLService Web service.
infranet.log.level
Specifies the level of log for the PublicBRMfetchInvoiceXMLService Web service.
infranet.dmsearchargs.size
Specifies the number of account and bill unit pairs the utility should process at one time.
The maximum value is 14.
infranet.dupinvdir.path
Specifies the directory path for storing duplicate invoice documents.
infranet.threadpool.fetchsize
Specifies the number of records that can be fetched by the thread. The default value is 5.
infranet.threadpool.maxsize
Specifies the maximum number of threads. The default value is 5.
infranet.threadpool.size
Specifies the number of threads. The default value is 3.
-
-
Save and close the file.
Specifying the Utility Output Format
You can generate the invoice document in PDF, HTML, and XML (data) formats.
To specify the output format for the invoice document:
-
Open the BIP_Home\oc4j_bi\j2ee\home\applications\pin_inv_doc_gen\Infranet.properties file in a text editor.
-
Set the infranet.bip.outputdocformat parameter to: PDF or HTML.
infranet.bip.outputdocformat=PDF
-
Save and close the file.
After generating an invoice document, if you want to change the output format, you need to update the Infranet.properties file for pin_inv_doc_gen with the desired format and regenerate the invoice document.
Configuring the BipEnv.bat File
To configure the BipEnv.bat file:
-
Go to BIP_Home\oc4j_bi\j2ee\home\applications\pin_inv_doc_gen.
-
Open the BipEnv.bat file.
-
Edit the default values available in the file to the values specific to your system environment.
-
Save and close the file.
Changing Command-Line Parameters for pin_inv_doc_gen
To change the command-line parameters for pin_inv_doc_gen utility, you update the BipEnv.bat file:
-
Go to BIP_Home\oc4j_bi\j2ee\home\applications\pin_inv_doc_gen.
-
Open the BipEnv.bat file in a text editor.
-
Search for the following line:
invoicedocgen.pin_inv_doc_gen -status pending
-
Add or replace the pin_inv_doc_gen command-line parameter with the required parameter. For syntax and parameter usage, see "pin_inv_doc_gen".
-
Save and close the file.
-
In the command prompt, navigate to the BIP_Home\oc4j_bi\j2ee\home\applications\pin_inv_doc_gen directory.
-
Enter the following command which runs the BipEnv.bat file:
BipEnv.batThe pin_inv_doc_gen utility runs with the updated command-line parameter.
Setting Scheduler Configuration
To set Scheduler configuration, see the discussion on setting scheduler configuration options in the BI Publisher documentation.
Configuring the Email Server
To configure the email server in BI Publisher, see the discussion of setting up delivery options in the BI Publisher documentation.
Creating the XMLP_INVOICE_JOB Table in the Scheduler Database
The XMLP_INVOICE_JOB table stores the mapping of job ID and the Invoice_POID for which an invoice document is generated.
To create XMLP_INVOICE_JOB table in the Scheduler database:
-
Go to BIP_Home\oc4j_bi\j2ee\home\applications\pin_inv_doc_gen.
-
Open Create_Xmlp_Invoice_Job.sql file.
-
Search for <tablespacename>.
-
Replace <tablespacename> with the tablespace name where all the BI Publisher Scheduler tables in the BI Publisher Scheduler database are created.
-
Save and close the file.
-
At the DOS command prompt, go to:
BIP_Home\oc4j_bi\j2ee\home\applications\pin_inv_doc_gen.
-
At the prompt, enter the following command to open SQL*Plus:
sqlplus user_name/password@Database_Name
where
-
user_name is the user name for the Scheduler database.
-
password is the password for the Scheduler database.
-
Database_Name is the SID of the Scheduler database.
-
-
At the SQL prompt of the Scheduler database connection, enter the following command:
SQL> @Create_Xmlp_Invoice_Job.sql
Deploying the BRM Web Service
Important:
If the invoice data is stored in pin_flist format instead of XML format, before deploying the BRM Web service, you must create a shared library in the OC4J server to overcome the issue of xmlparserv2.jar of OC4J server. See "Creating Shared Library in OC4J Server".To deploy the BRM Web service, PublicBRMfetchInvoiceXMLService:
-
In a Web browser, enter the following URL to log in to the Oracle Enterprise Manager Application Server Control console:
http://localhost:port/em
where:
-
localhost is the host on which Application Sever Control is installed.
-
port is the console port. The default port is 9704.
-
-
Click the Applications link.
-
Click Deploy.
-
In the Deploy: Select Archive page, click Browse to select the PublicBRMfetchInvoiceXMLService.war file.
Note:
After you install the BRM-BIP invoicing integration package application, the PublicBRMfetchInvoiceXMLService.war file is located at BIP_Home\oc4j_bi\j2ee\home\applications\pin_inv_doc_gen\WS-fetchInvoiceXML directory. -
Click Next.
-
In the Deploy: Application Attributes page, in the Application Name field, enter PublicBRMfetchInvoiceXMLService.
Note:
You must name the Web service as PublicBRMfetchInvoiceXMLService. -
Click Next.
-
In the Deploy: Deployment Settings page, click the Go to Task icon for Configure Class Loading.
The shared libraries currently defined in the server display.
-
Select the Import check box for the shared library that you created. See "Creating Shared Library in OC4J Server".
-
Click Next 10.
-
Clear the Import check box for oracle.xml shared library.
Note:
The oracle.xml shared library may appear on another page. If you do not see it, keep clicking the Next 10 link until you find it. -
Click OK at the top of the page.
-
Click Deploy.
The confirmation of successful deployment of the application appears.
-
Click Return.
-
Edit the Infranet.properties file to define your configuration entries.
Note:
After deploying the PublicBRMfetchInvoiceXMLService.war file, the Infranet.properties file is located at BIP_Home\oc4j_bi\j2ee\home\applications\PublicBRMfetchInvoiceXMLService\PublicBRMfetchInvoiceXMLService\WEB-INF\classes directory. -
Restart your BI Publisher server.
After deploying the Web service, you should test that the Web service is fetching the data correctly. See "Testing the Newly Deployed Web Service".
Note:
The sample XDO reports that are part of the BRM-BIP invoicing integration package have the default BRM Web service URL defined as:http://localhost:9704/PublicBRMfetchInvoiceXMLService/fetchInvoiceXMLPort?WSDL.
Replace the default URL with the URL that you get after deploying the Web service.
Creating Shared Library in OC4J Server
To create a shared library:
-
In a Web browser, enter the following URL to log in to the Oracle Enterprise Manager Application Server Control console:
http://localhost:port/em
where:
-
localhost is the host on which Application Sever Control is installed.
-
port is the console port. The default port is 9704.
-
-
Click the Administration link.
-
Click the Go to Task icon for Shared Libraries.
-
In the Shared Libraries page, click the Create button.
-
In the Create Shared Library: Attributes page, do the following:
-
In the Shared Library Name field, enter apachexerces.xml.
-
In the Shared Library Version field, enter 1.0.
-
Click Next.
-
-
In the Create Shared Library: Add Archives page, click the Add button.
-
Select the first option and browse for the xercesImpl.jar file.
This file is located at: BIP_Home\oc4j_bi\ant\lib\xercesImpl.jar.
-
Click Continue.
-
Click Next.
-
Click Finish.
The Shared Libraries page displays the newly added shared library.
Testing the Newly Deployed Web Service
-
In the Oracle Enterprise Manager Application Server Control console, click the Application link to access the newly deployed Web service.
-
Click the PublicBRMfetchInvoiceXMLService link.
-
Click the Web Services link and click fetchInvoiceXMLPort.
-
Click the Test Service link.
-
In the Discovered Websites page, click Test Web Service.
-
In the Invoice_POID field, enter an invoice POID for which you want to fetch the invoice data from the BRM database.
-
Click Invoke.
If the Web service is working correctly, you should be able to view the fetched invoice data in XML format.
Configuring How PublicBRMfetchInvoiceXMLService Connects to the BRM Database
The Infranet.properties file for the pin_inv_doc_gen utility includes the standard configuration entries. See "Using Configuration Files to Connect and Configure Components" in BRM System Administrator's Guide.
After you deploy the PublicBRMfetchInvoiceXMLService Web service, you can configure how it connects to the BRM database by using the Web service's Infranet.properties file.
You can access the Infranet.properties file from the BIP_Home\oc4j_bi\j2ee\home\applications\PublicBRMfetchInvoiceXMLService\PublicBRMfetchInvoiceXMLService\WEB-INF\classes directory. See "Deploying the BRM Web Service".
Table 4-4 lists the entries in the Infranet.properties file. Open the Infranet.properties file and enter the following required entries:
-
infranet.db.username
-
infranet.db.sid
-
infranet.db.log.file
-
infranet.db.log.level
Configuring the BRM-BI Publisher Invoicing Integration to Support Multischema Systems
To configure the BRM-BI Publisher invoicing integration to support multischema systems, do the following:
-
Configure the connection pool and the data source for BRM schemas. See "Configuring the Connection Pool and the Data Source".
-
Configure the connection pool and the data source for the BI Publisher Scheduler database. See "Configuring the Connection Pool and the Data Source".
-
Add Java Naming and Directory Interface (JNDI) entries for your BI Publisher administration server. See "Adding JNDI Entries in the Infranet.properties File of pin_inv_doc_gen".
Configuring the Connection Pool and the Data Source
To configure the connection pool and the data source for the BRM schema or the BI Publisher Scheduler database:
-
In a Web browser, enter the following URL to log in to the Oracle Enterprise Manager Application Server Control console:
http://localhost:port/em
where:
-
localhost is the host on which Application Sever Control is installed.
-
port is the console port. The default port is 9704.
-
-
Click the Administration link.
-
Click the Go to Task icon for JDBC Resources.
The JDBC Resources page appears.
-
In the Connection Pools section, click the Create button.
The Create Connection Pool - Application page opens.
-
Do the following:
-
From the Application list, select default.
-
From the Connection Pool Type section, select the New Connection Pool option.
-
Click Continue.
The Create Connection Pool page opens.
-
-
Do the following:
-
In the Name field, enter the name of the connection pool.
-
For the BRM schema, enter the BRM schema name. For example, enter 0.0.0.1.
-
For the BI Publisher Scheduler database, enter scheduler.
-
-
In the Connection Factory Class field, enter oracle.jdbc.pool.OracleDataSource.
-
In the JDBC URL field, enter the connection string.
-
For the BRM schema, enter the connection string to the BRM schema.
-
For the BI Publisher Scheduler database, enter the connection string to the BI Publisher Scheduler database.
-
-
(Optional) To verify the connectivity to the BRM schema or to the BI Publisher Scheduler database, click Test Connection.
-
Click Finish.
In the JDBC Resources page, the Connection Pools section displays the newly added connection pool.
-
-
(Optional for BRM schemas) In a multischema BRM system, to create connection pools for different BRM schemas, such as 0.0.0.2, 0.0.0.3, repeat step 4 through step 6.
-
In the Data Sources section, click the Create button.
The Create Data Source - Application & Type page appears.
-
Do the following:
-
From the Application list, select default.
-
From the Data Source Type section, select the Managed Data Source option.
-
Click Continue.
The Create Data Source - Managed Data Source page opens.
-
-
Do the following:
-
In the Name field, enter the name of the BRM schema or the BI Publisher Scheduler database for which you configured the connection pool.
For example:
-
For a BRM schema, enter 0.0.0.1.
-
For a BI Publisher Scheduler database, enter scheduler.
-
-
In the JNDI Location field, enter one of the following:
-
For a BRM schema, enter jdbc/OracleBRM/BRMSchema, where BRMSchema is the BRM schema for which the data source is being created. For example, if the BRM schema is 0.0.0.1, enter jdbc/OracleBRM/0.0.0.1.
-
For the BI Publisher Scheduler database, enter jdbc/OracleBIP/scheduler.
-
-
Click Finish.
In the JDBC Resources page, the Data Sources section displays the newly added data source.
-
-
(Optional for BRM schemas) In a multischema BRM system, to create data sources for connection pools belonging to different BRM schemas, such as 0.0.0.2, 0.0.0.3, repeat step 8 through step 10.
Adding JNDI Entries in the Infranet.properties File of pin_inv_doc_gen
To add JNDI entries for fetching data from the configured data sources:
-
Open the BIP_Home/oc4j_bi/j2ee/home/applications/pin_inv_doc_gen/Infranet.properties file in a text editor.
-
Add the entries shown in Table 4-5 to the end of the file:
Entry Description infranet.PROVIDER_URL
The environment property that specifies the BI Publisher provider URL in the following format:
ormi://localhost:port/xmlpserver
where localhost is the host on which the BI Publisher server is installed and port is the Oracle Remote Method Invocation port. The default port is 23791.
infranet.SECURITY_PRINCIPAL
The environment property that specifies the identity of the principal for authenticating the caller to the service.
infranet.SECURITY_CREDENTIALS
The environment property that specifies the credentials of the principal for authenticating the caller to the service.
infranet.INITIAL_CONTEXT_FACTORY
The environment property that specifies the initial context factory to use.
The default is com.evermind.server.ApplicationClientInitialContextFactory. Do not modify this value.
-
Save and close the file.
Generating BI Publisher Invoice Documents
You use the pin_inv_doc_gen utility to generate invoice documents by integrating the capabilities of BRM and BI Publisher. This utility takes a set of input parameters, generates the invoice document, and stores the instance of the invoice document generated in the BI Publisher Scheduler database. Based on the input parameters you pass to pin_inv_doc_gen, the utility fetches the corresponding invoice POID, BI Publisher report name, and layout template name of an /invoice object.
To configure pin_inv_doc_gen utility with the Infranet.properties file, see "Configuring the Infranet.properties File for pin_inv_doc_gen".
To run the pin_inv_doc_gen utility:
-
Configure the BipEnv.bat file to execute the appropriate pin_inv_doc_gen command. To view the utility's syntax and parameters, see "pin_inv_doc_gen".
-
In the command prompt, navigate to the BIP_Home\oc4j_bi\j2ee\home\applications\pin_inv_doc_gen directory.
-
Enter the following command which runs the BipEnv.bat file:
BipEnv.bat
Generating BI Publisher Invoice Documents for a List of Accounts
You can generate BI Publisher invoice documents for a list of accounts by using the pin_inv_doc_gen utility -accts_list InvoiceList.xml parameter. The number of data units (accounts and bill units) in the InvoiceList.xml file should be within the permissible range for the Data Manager (DM) to search the /invoice objects from the BRM database.
You can specify the number of account and bill unit pairs the pin_inv_doc_gen utility should process at one time using the infranet.dmsearchargs.size parameter in the Infranet.properties file. The maximum value is 14. For example, if the InvoiceList.xml file lists 20 account and bill unit pairs and the infranet.dmsearchargs.size value is set to 6, the pin_inv_doc_gen utility processes six account and bill unit pairs at a time.
In the InvoiceList.xml file, if you specify the account and bill unit pair of a corporate account, the invoice document is generated only for the specified account and bill unit. If the specified corporate account has subordinate accounts, the /invoice objects of the subordinate account are not selected for generating the invoice document.
To generate invoice documents for a list of accounts and their bill units:
-
Create an XML file that lists all of the accounts and bill units for which to create BI Publisher invoices. The XML file must be in the following format:
Note:
You can use the BIP_Home\oc4j_bi\j2ee\home\applications\pin_inv_doc_gen\InvoiceList.xml file as an example.<InvoiceDocGenConfig> <InvoicingList> <Account>101304</Account> <Billinfo>402678</Billinfo> </InvoicingList> <InvoicingList> <Account>405304</Account> <Billinfo>522678</Billinfo> </InvoicingList> <InvoiceDocGenConfig> -
Go to the BIP_Home\oc4j_bi\j2ee\home\applications\pin_inv_doc_gen directory.
-
Open the BipEnv.bat file in a text editor.
-
Search for the following line:
invoicedocgen.pin_inv_doc_gen -status pending
-
Replace with:
invoicedocgen.pin_inv_doc_gen -accts_list InvoiceList
where InvoiceList specifies the name and location of the file that includes a list of accounts and bill units for which to create invoice documents. This is the file you created in step 1.
-
Save and close the file.
-
In the command prompt, navigate to the BIP_Home\oc4j_bi\j2ee\home\applications\pin_inv_doc_gen directory.
-
Enter the following command to execute the BipEnv.bat file:
BipEnv.bat
Generating BI Publisher Invoice Documents Based on the Account Type
To generate invoices based on the account type:
-
Go to the BIP_Home\oc4j_bi\j2ee\home\applications\pin_inv_doc_gen directory.
-
Open the BipEnv.bat file in a text editor.
-
Search for the following line:
invoicedocgen.pin_inv_doc_gen -status pending
-
Do one of the following:
-
To generate invoice document for consumer account types, replace with:
invoicedocgen.pin_inv_doc_gen -type consumer -
To generate invoice document for corporate account types, replace with:
invoicedocgen.pin_inv_doc_gen -type corporate
-
-
Save and close the file.
-
In the command prompt, navigate to the BIP_Home\oc4j_bi\j2ee\home\applications\pin_inv_doc_gen directory.
-
Enter the following command to execute the BipEnv.bat file:
BipEnv.bat
Generating Duplicate BI Publisher Invoice Documents
You can generate duplicate BI Publisher invoice documents for invoices that you have already generated by using the pin_inv_doc_gen utility -status generated parameter.
To generate duplicate BI Publisher invoice documents:
-
Go to the BIP_Home\oc4j_bi\j2ee\home\applications\pin_inv_doc_gen directory.
-
Make sure the infranet.dupinvdir.path entry in the utility's Infranet.properties file specifies the directory in which to write the file. See "Configuring the Infranet.properties File for pin_inv_doc_gen".
-
Open the BipEnv.bat file in a text editor.
-
Search for the following line:
invoicedocgen.pin_inv_doc_gen -status pending
-
Replace with:
invoicedocgen.pin_inv_doc_gen -status generated -
Save and close the file.
-
In the command prompt, navigate to the BIP_Home\oc4j_bi\j2ee\home\applications\pin_inv_doc_gen directory.
-
Enter the following command to execute the BipEnv.bat file:
BipEnv.batImportant:
Oracle recommends DocMerger as the utility to generate a duplicate invoice with a DUPLICATE watermark. However, you can use this utility only for PDF documents. Hence, you can generate an invoice document with a DUPLICATE watermark only if the original invoice document was generated in PDF.
Regenerating BI Publisher Invoice Documents
If an /invoice object changes after you created a BI Publisher invoice document, you can generate a new BI Publisher invoice document by using the pin_inv_doc_gen utility -status regen parameter.
To regenerate BI Publisher invoice documents:
-
Go to the BIP_Home\oc4j_bi\j2ee\home\applications\pin_inv_doc_gen directory.
-
Open the BipEnv.bat file in a text editor.
-
Search for the following line:
invoicedocgen.pin_inv_doc_gen -status pending
-
Replace with:
invoicedocgen.pin_inv_doc_gen -status regen -
Save and close the file.
-
In the command prompt, navigate to the BIP_Home\oc4j_bi\j2ee\home\applications\pin_inv_doc_gen directory.
-
Enter the following command to execute the BipEnv.bat file:
BipEnv.bat
The utility generates a BI Publisher invoice document for all /invoice objects in the BRM database that have a status of PIN_INV_STATUS_GENERATED.
Storing the Invoice Document
You can store invoice documents in the BI Publisher Scheduler database. Oracle recommends configuring a separate database, other than the BRM database, to store invoice documents. See "Setting Scheduler Configuration".
Sending Invoice Documents to the Customers
After generating the invoice document, you can email it to the customers. To send the invoice document through email, you must:
-
Configure the Scheduler database in BI Publisher. See "Setting Scheduler Configuration".
-
Configure the Email server in BI Publisher. See "Configuring the Email Server".
-
Configure the invoice document delivery option in the Infranet.properties file of pin_inv_doc_gen utility. Email is configured as the default delivery option. See "Configuring the Infranet.properties File for pin_inv_doc_gen".
Customizing Invoices
Important:
To customize the invoice layout, you should have template-designing experience. See the BI Publisher documentation for instructions on how to create and design layout templates.You can customize the invoice documents by:
Customizing Invoice Layout Templates
You can customize the invoice layout template by:
-
Updating the existing layout template file
-
Adding a new layout template file
Updating the Invoice Layout Template File
You can update the existing layout template file by using BI Publisher Desktop (Template Builder) and Microsoft Word. For more information about updating the layout template in RTF, see the discussion of creating an RTF template in the BI Publisher documentation.
Adding a New Invoice Layout Template
To add a new layout template:
-
Create a new layout template in BI Publisher. For information on how to create a layout template, see the discussion on creating an RTF template in the BI Publisher documentation.
-
Create a new invoicing /config/business_profile object in BRM to reflect the addition of the new layout template. See "Specifying BI Publisher Invoice Report and Template Names in BRM" and "About Associating Bill Units with a BI Publisher Invoice and Report".
Enriching Invoice Data
After receiving invoice data from the BRM database, you might want to enrich the invoice data with marketing messages, customer information available in a customer relationship management (CRM) application, and special messages from the accounting department. BI Publisher provides this functionality by retrieving data from additional data sources.
Important:
The sample layout templates that are available with BRM-BIP invoicing integration package display data fetched from only the BRM database. If you want to enrich your invoice document with additional data sources, you need to customize the sample layout templates. See "Customizing Invoice Layout Templates".To enrich BRM invoice data:
-
The /invoice objects containing data in XML format should be present in the BRM database.
-
The additional data source must be configured in BI Publisher to enrich the invoice data. See the discussion of setting up data sources in the BI Publisher documentation.
-
BI Publisher reports should be configured with at least two data sources: Custom BRM Web service, PublicBRMfetchInvoiceXMLService, for retrieving invoice XML data from the BRM database, and the enriching data source. For information on data sources that BI Publisher supports, see the BI Publisher documentation.
For detailed instructions on creating or updating BI Publisher reports based on multiple data sources, see the discussion of creating BI Publisher reports based on various data sources in the BI Publisher documentation.
Example: Enriching Invoice Data
You can enrich the BRM invoice data with additional data from various data sources. In this example, you configure the consumer invoice report to display data from a file data source in addition to the data from BRM Web service. You use the XML demo file provided along with BI Publisher (BIP_Home/xmlp/XMLP/DemoFiles directory).
You must customize the BRM_Consumer_Invoice.rtf file to display data from additional source. See "Customizing Invoice Layout Templates".
To configure file data source in BRM_Consumer_Invoice_Report.xdo report:
-
In a Web browser, enter the following URL to log in to the Oracle Enterprise Manager Application Server Control console:
http://localhost:port/em
where:
-
localhost is the host on which Application Sever Control is installed.
-
port is the console port. The default port is 9704.
-
-
Log in to BI Publisher.
-
In Shared Folders, click BRM_Invoices.
-
For BRM_Consumer_Invoice_Report, click the Edit link.
-
In the Report pane, in Data Model, click BRM_Consumer_Invoice_Report data set.
The Data Set pane displays data set name as BRM_Consumer_Invoice_Report and type as Web Service.
-
In Layouts, click BRM_Consumer_Invoice_Report layout.
The Layout pane displays template as BRM_Consumer_Invoice.rtf and template type as RTF Template.
-
Click Data Model.
-
Click New.
The Data Model displays the newly added data set, New DataSet2.
-
In the Data Set pane, perform the following:
-
In the Name field, enter a name for the new data set.
-
From the Type list, select File option.
-
From the Data Source list, select demo files.
-
In the File Name field, enter the file name that you want to use to enrich the invoice data.
-
-
Click Layouts to associate the updated layout template file with the report.
-
Click Browse to browse the customized BRM_Consumer_Invoice.rtf file.
-
Click Upload.
-
Click Save.
-
Click View to open the report in View mode.
-
Select the BRM_Consumer_Invoice template from the Template list and select the output format as pdf.
-
Click View to view the report.
Note:
You can follow the similar steps to configure additional data sources to the existing invoicing consumer or corporate reports.
Specifying the Default Format in Which to Store Invoices in BRM
By default, BRM stores invoices in XML format. You can configure BRM to store invoices in flist format by modifying a field in the invoicing instance of the /config/business_params object.
You modify the /config/business_params object by using the pin_bus_params utility. For information on this utility, see "pin_bus_params" in BRM Developer's Guide.
To specify the default format in which to store invoices:
-
Go to the BRM_Home/sys/data/config directory.
-
Run the following command, which creates an editable XML file from the invoicing instance of the /config/business_params object:
pin_bus_params -r BusParamsInvoicing -bus_params_Invoicing.xmlThis command creates the XML file named bus_params_Invoicing.xml.out in your working directory. To place this file in a different directory, specify the path as part of the file name.
-
Open the bus_params_Invoicing.xml.out file.
-
Search for following line:
<InvoiceStorageType>1</InvoiceStorageType> -
Do one of the following:
-
To specify flist as the output format, set InvoiceStorageType to 0.
-
To specify XML as the output format, set InvoiceStorageType to 1.
-
-
Save this file as bus_params_Invoicing.xml.
-
Go to the BRM_Home/sys/data/config directory, which includes support files used by the pin_bus_params utility.
-
Run the following command, which loads this change into the appropriate /config/business_params object:
pin_bus_params PathToWorkingDirectory/bus_params_Invoicing.xml
where PathToWorkingDirectory is the directory in which bus_params_Invoicing.xml resides.
Caution:
BRM uses the XML in this file to overwrite the existing invoicing instance of the /config/business_params object. If you delete or modify any other parameters in the file, these changes affect the associated aspects of the BRM invoicing configuration.Note:
To run this command from a different directory, see "pin_bus_params" in BRM Developer's Guide. -
Read the object with the testnap utility or Object Browser to verify that all fields are correct.
See "Using testnap" in BRM Developer's Guide for general instructions on using the testnap utility. See "Reading Objects by Using Object Browser" in BRM Developer's Guide for information on how to use Object Browser.
-
Stop and restart the CM. For more information, see "Starting and Stopping the BRM System" in BRM System Administrator's Guide.
-
(Multischema systems only) Run the pin_multidb script with the -R CONFIG parameter. For more information, see "pin_multidb" in BRM System Administrator's Guide.