40 Enabling Security with Policies
This chapter describes how to manage policies during design-time in SOA composite applications.
This chapter includes the following sections:
40.1 Introduction to Policies
Oracle Fusion Middleware uses a policy-based model to manage and secure Web services across an organization. Policies apply security to the delivery of messages. Policies can be managed by both developers in a design-time environment and system administrators in a runtime environment.
Policies are comprised of one or more assertions. A policy assertion is the smallest unit of a policy that performs a specific action. Policy assertions are executed on the request message and the response message, and the same set of assertions is executed on both types of messages. The assertions are executed in the order in which they appear in the policy.
Table 40-1 describes the supported policy categories.
Table 40-1 Supported Policy Categories
| Category | Description |
|---|---|
|
Message Transmission Optimization Mechanism (MTOM) |
Ensures that attachments are in MTOM format. This format enables binary data to be sent to and from web services. This reduces the transmission size on the wire. |
|
Reliability |
Supports the WS-Reliable Messaging protocol. This guarantees the end-to-end delivery of messages. |
|
Addressing |
Verifies that simple object access protocol (SOAP) messages include WS-Addressing headers in conformance with the WS-Addressing specification. Transport-level data is included in the XML message rather than relying on the network-level transport to convey this information. |
|
Security |
Implements the WS-Security 1.0 and 1.1 standards. They enforce authentication and authorization of users. identity propagation, and message protection (message integrity and message confidentiality). |
|
Management |
Logs request, response, and fault messages to a message log. Management policies can also include custom policies. |
Within each category there are one or more policy types that you can attach. For example, if you select the reliability category, the following types are available for selection:
-
oracle/wsrm10_policy
Supports version 1.0 of the Web Services Reliable Messaging protocol
-
oracle/wsrm11_policy
Supports version 1.1 of the Web Services Reliable Messaging protocol
-
oracle/no_wsrm_policy
Supports the disabling of a globally attached Web Services Reliable Messaging policy
For more information about available policies, details about which ones to use in your environment, and global policies, see Oracle Fusion Middleware Security and Administrator's Guide for Web Services.
40.2 Attaching Policies to Binding Components and Service Components
You can attach or detach policies to and from service binding components, service components, and reference binding components in a SOA composite application. Use Oracle JDeveloper to attach policies for testing security in a design-time environment. When your application is ready for deployment to a production environment, you can attach or detach runtime policies in Oracle Enterprise Manager Fusion Middleware Control Console.
For more information about runtime management of policies, see Oracle Fusion Middleware Administrator's Guide for Oracle SOA Suite and Oracle BPM Suite.
40.2.1 How to Attach Policies to Binding Components and Service Components
To attach a policy to a service or reference binding component:
-
In the SOA Composite Editor, right-click a service binding component or reference binding component.
-
Select Configure WS-Policies.
Depending upon the interface definition of your SOA composite application, you may be prompted with an additional menu of options.
-
If the selected service or reference is interfacing with a synchronous BPEL process or Oracle Mediator service component, a single policy is used for both request and response messages. The Configure SOA WS Policies dialog immediately appears. Go to Step 4.
-
If the service or reference is interfacing with an asynchronous BPEL process or Oracle Mediator service component, the policies must be configured separately for request and response messages. The policy at the callback is used for the response sent from service to client. An additional menu is displayed. Go to Step 3.
-
-
Select the type of binding to use:
-
For Request:
Select the request binding for the service component with which to bind. You can only select a single request binding. This action enables communication between the binding component and the service component.
When request binding is configured for a service in the Exposed Services swimlane, the service acts as the server. When request binding is configured for a reference in the External References swimlane, the reference acts as the client.
-
For Callback: (only for interactions with asynchronous processes)
Select the callback binding for the service component with which to bind. This action enables message communication between the binding component and the service component. You can only select a single callback binding.
When callback binding is configured for a service in the Exposed Services swimlane, the service acts as the client. When callback binding is configured for a reference in the External References swimlane, the reference acts as the server.
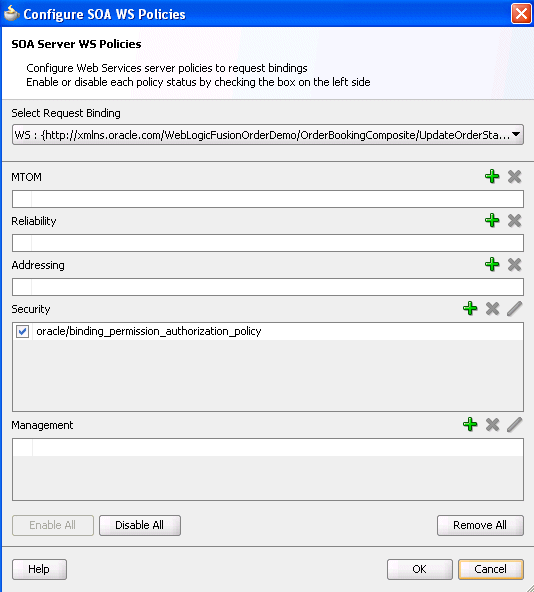
The Configure SOA WS Policies dialog shown in Figure 40-1 appears. For this example, the For Request option was selected for a service binding component. The same types of policy categories are also available if you select For Callback.
Figure 40-1 Configure SOA WS Policies Dialog
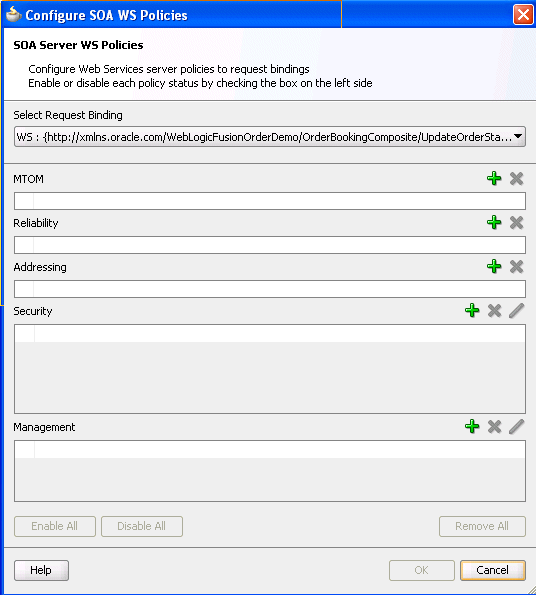
Description of "Figure 40-1 Configure SOA WS Policies Dialog"
-
-
Click the Add icon for the type of policy to attach:
-
MTOM
-
Reliability
-
Addressing
-
Security
-
Management
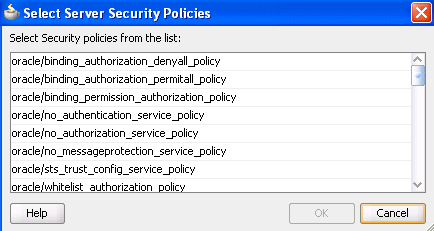
For this example, Security is selected. The dialog shown in Figure 40-2 is displayed.
-
-
Place your cursor over a policy name to display a description of policy capabilities.
-
Select the type of policy to attach.
-
Click OK.
You are returned to the Configure SOA WS Policies dialog shown in Figure 40-3. The attached security policy displays in the Security section.
-
If necessary, add additional policies.
You can temporarily disable a policy by deselecting the checkbox to the left of the name of the attached policy. This action does not detach the policy.
-
To detach a policy, click the Delete icon.
-
When complete, click OK in the Configure SOA WS Policies dialog.
You are returned to the SOA Composite Editor.
To attach a policy to a service component:
-
Right-click a service component.
-
Select Configure Component WS Policies.
The Configure SOA WS Policies dialog shown in Figure 40-4 appears.
Figure 40-4 Configure SOA WS Policies Dialog
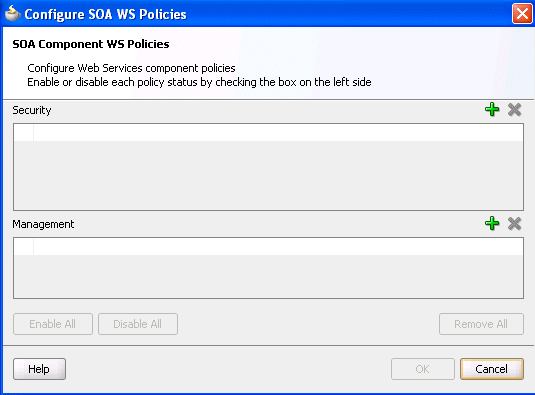
Description of "Figure 40-4 Configure SOA WS Policies Dialog"
-
Click the Add icon for the type of policy to attach.
-
Security
-
Management
The dialog for your selection appears.
-
-
Select the type of policy to attach.
-
Click OK.
-
If necessary, add additional policies.
-
When complete, click OK in the Configure SOA WS Policies dialog.
For information about attaching policies during runtime in Oracle Enterprise Manager Fusion Middleware Control Console, see Oracle Fusion Middleware Administrator's Guide for Oracle SOA Suite and Oracle BPM Suite.
40.2.2 How to Override Policy Configuration Property Values
Your environment may include multiple clients or servers with the same policies. However, each client or server may have their own specific policy requirements. You can override the policy property values based on your runtime requirements.
40.2.2.1 Overriding Client Configuration Property Values
You can override the default values of client policy configuration properties on a per client basis without creating new policies for each client. In this way, you can override client policies that define default configuration values and customize those values based on your runtime requirements.
-
Right-click one of the following binding components:
-
A service binding component in the Exposed Services swimlane, and select For Callback.
-
A reference binding component in the External References swimlane, and select For Request.
-
-
Go to the Security and Management sections. These instructions assume you previously attached policies in these sections.
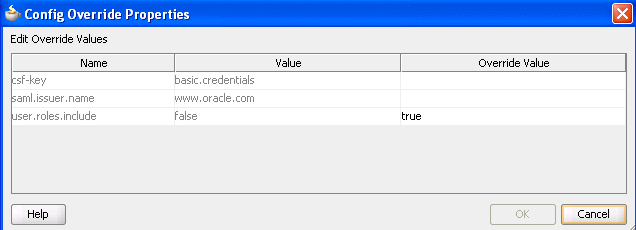
Note that the Edit icon is enabled for both sections. Figure 40-5 provides details.
-
Click the Edit icon. Note that regardless of which policies you select, the property names, values, and overridden values display for all of your attached client policies.
-
In the Override Value column, enter a value to override the default value shown in the Value column. Figure 40-6 provides details.
-
Click OK to exit the Config Override Properties dialog.
-
Click OK to exit the Configure SOA WS Policies dialog.
-
Click the Source button in the SOA Composite Editor.
The overriding value is reflected with the
property nameattribute in thecomposite.xmlfile, as shown in Example 40-1.Example 40-1 Client Policy Override Value in composite.xml File
<binding.ws port="http://xmlns.oracle.com/Application26_
jws/Project1/BPELProcess1#wsdl.endpoint(bpelprocess1_client_
ep/BPELProcess1Callback_pt)">
        <wsp:PolicyReference URI="oracle/wss_http_token_client_policy"
                             orawsp:category="security"
                             orawsp:status="enabled"/>
        <wsp:PolicyReference URI="oracle/wss_http_token_over_ssl_client_policy"
                             orawsp:category="security"
                             orawsp:status="enabled"/>
        <wsp:PolicyReference URI="oracle/wss_oam_token_client_policy"
                             orawsp:category="security"
                             orawsp:status="enabled"/>
        <wsp:PolicyReference URI="oracle/wss_saml_token_bearer_over_ssl_client_
policy"
                             orawsp:category="security"
                             orawsp:status="enabled"/>
        <wsp:PolicyReference URI="oracle/wss_saml_token_over_ssl_client_policy"
                             orawsp:category="security"
                             orawsp:status="enabled"/>
        <wsp:PolicyReference URI="oracle/log_policy"
                             orawsp:category="management"
                             orawsp:status="enabled"/>
<property name="user.roles.include" type="xs:string" many="false">true</property>
      </binding.ws>
For more information about overriding policy settings, see Oracle Fusion Middleware Security and Administrator's Guide for Web Services.
40.2.2.2 Overriding Server Configuration Property Values
You can override the default values of server policy configuration properties on a per server basis without creating new policies for each server. In this way, you can override server policies that define default configuration values and customize those values based on your runtime requirements.
-
Right-click one of the following binding components:
-
A service binding component in the Exposed Services swimlane, and select For Request.
-
A reference binding component in the External References swimlane, and select For Callback.
-
-
Go to the Security or Management section. These instructions assume you previously attached policies in these sections.
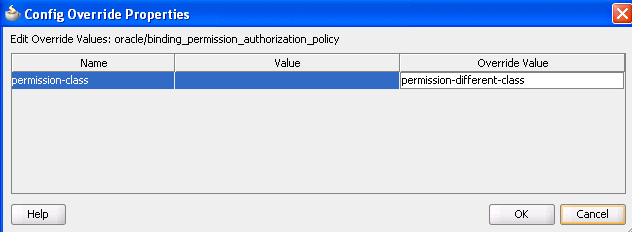
Note that the Edit icon is not enabled by default for both sections. You must explicitly select a policy to enable this icon. This is because you can override fewer property values for the server. Figure 40-7 provides details.
-
Select an attached policy that permits you to override its value, and click the Edit icon.
-
In the Override Value column, enter a value to override the default value shown in the Value column. Figure 40-8 provides details. If the policy store is unavailable, the words
nopropertystorefoundinthestoredisplay in red in the Value column. -
Click OK to exit the Config Override Properties dialog.
-
Click OK to exit the Configure SOA WS Policies dialog.
-
Click the Source button in the SOA Composite Editor.
The overriding value is reflected with the
OverridePropertyattribute in thecomposite.xmlfile, as shown in Example 40-2.Example 40-2 Server Policy Override Value in composite.xml File
<wsp:PolicyReference URI="oracle/binding_authorization_denyall_policy"
                           orawsp:category="security" orawsp:status="enabled"/>
      <wsp:PolicyReference URI="oracle/binding_authorization_permitall_policy"
                           orawsp:category="security" orawsp:status="enabled"/>
      <wsp:PolicyReference URI="oracle/binding_permission_authorization_policy"
                           orawsp:category="security" orawsp:status="enabled">
        <orawsp:OverrideProperty orawsp:name="permission-class"
                                 orawsp:value="permission-different-class"/>
      </wsp:PolicyReference>
For more information about overriding policy settings, see Oracle Fusion Middleware Security and Administrator's Guide for Web Services.
