7 Backing Up and Restoring Web Sites
7.1 About Backup and Restore
Site Studio offers a backup and restore feature on the Site Studio Administration page on the content server that you can use to create a backup of your site (as a single zip file) and restore the backup at any time. Creating a backup of your site is also a great way to transport the site from one location to another (especially where there is no network access).
The Site Studio backup feature creates a copy of your Web site and stores it in a compressed file that you can then copy from one location to another. In order to recognize the files that belong to your site, it performs a query for the following items and adds them to the import archive:
-
Project file (the dDocName of the project file)
-
Web site ID (where the xWebsites field contains the site ID of the site)
-
Web site sections (where the xWebsiteSection field contains the site ID of the site)
-
Fragment libraries (where the xWebsiteObjectType field contains the value "fragment")
It is important that the metadata values for xWebsites, xWebsiteSection, and xWebsiteObjectType be used correctly on your site in order for the contents of the site to be backed up and restored.
The backup feature uses the same archiving process that is used in site replication (see Chapter 6, "Managing Site Replication" for more details).
7.2 Backing Up Your Site
You back up your site using the Backup and Restore page, which is accessible from the Site Studio Administration page on the Oracle Content Server.
To back up your site, perform these steps:
-
Log in to the content server as an administrator.
-
In the Administration section, select Site Studio Administration.
The Site Studio Administration page is displayed (see "Site Studio Administration"). If you run Oracle Content Server in the Top Menus layout, you do not see this page. Instead, all administration options are then items in the Site Studio Administration menu.
-
Click Backup and Restore.
The Backup and Restore page is displayed (see "Backup and Restore Page").
-
Select the Web site to back up, and click Create Web Site Backup.
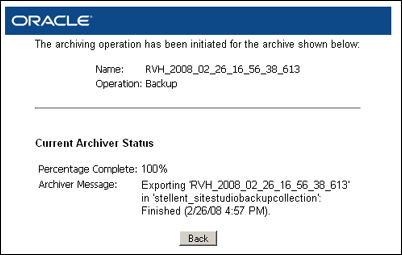
The progress of the backup is shown (Figure 7-1).
-
Click Back when the backup is done (that is, the completion percentage is 100%).
You can go back to the previous page at any time without affecting the current backup.
-
On the Backup and Restore page, click Manage Web Site Backups.
The Web Site Backup Archives page is displayed (see "Manage Archives Page").
-
This page shows a list of all Web site backups that are currently on the content server. To download the backup that you created, click the actions menu icon (Figure 7-2) next to it, and choose Download backup archive as ZIP.
Depending on the size of your site, you may have to wait several minutes for the zip file to be created.
-
Click Save in the file download dialog, choose a location for the zip file, and click Save to begin the download.
Note:
If your Web site exceeds the maximum file limit of 65,535 in a zip file, then the backup archive file is not created. Instead, you must open the backup archive directly from the file system and download it from there. Backup archives are stored in the [CS-Dir]\data\sitestudio\backuparchives directory on the content server.
You can delete a backed-up site at any time by clicking the actions menu or icon and then choosing Delete backup archive. You can do this on the Web Site Backup Archives page (see "Manage Archives Page") and the Backup Archive Information page (see "Backup Archive Information Page").
7.3 Restoring Your Site
You restore your site using the Backup and Restore page, which is accessible from the Site Studio Administration page on the content server.
Important:
To prevent clashes with existing content in the content server, it is recommended that you restore to a clean content server.To restore your site, perform these steps:
-
Log in to the content server as an administrator.
-
In the Administration section, select Site Studio Administration.
The Site Studio Administration page is displayed (see "Site Studio Administration"). If you run Oracle Content Server in the Top Menus layout, you do not see this page. Instead, all administration options are then items in the Site Studio Administration menu.
-
Click Backup and Restore.
The Backup and Restore page (see "Backup and Restore Page") is displayed.
-
Click Browse (in the Upload Backup Archive area) to locate the backed-up site (zip file).
A file selection dialog is displayed.
-
Select the archive zip file and close the file selection dialog.
-
Click Upload Backup Archive.
The Backup Archive Information page is displayed (see "Backup Archive Information Page"), where you see the details of the backup, including the archive name, description, Web site, and date of import.
If you have not configured the content server so that it matches the content server environment where the site originated, click Actions and choose Show server configuration details. Then re-create the settings that you see on that page (see "Viewing the Server Configuration Details").
-
In the Actions menu, choose Restore backup archive contents.
-
Click OK to the confirmation message.
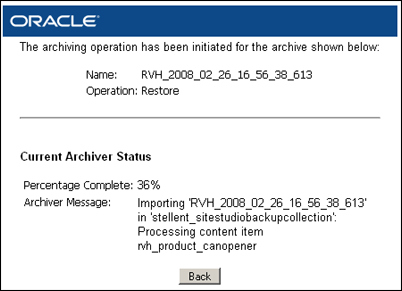
The progress of the restore operation is shown (Figure 7-3).
Depending on the size of your site, you may have to wait several minutes for the Web site to be restored and then indexed by the content server.
-
Click Back when the restore operation is done (that is, the completion percentage is 100%).
You can go back to the previous page at any time without affecting the current restore operation.
You can now use your site on the content server.
You can delete a backed-up site at any time by clicking the actions menu or icon and then choosing Delete backup archive. You can do this on the Web Site Backup Archives page (see "Manage Archives Page") and the Backup Archive Information page (see "Backup Archive Information Page").
7.4 Viewing the Server Configuration Details
You can view detailed configuration information for the content server that a backed-up Web site was located on at the time of the backup. This information includes the custom metadata fields, content types, security groups, configuration and environment settings, installed components, defined providers, and so on. This information is especially useful when you must restore a site and want to configure the content server so that it matches the server where the site originated.
To view the server configuration details of a backed-up site, perform these steps:
-
Log in to the content server as an administrator.
-
In the Administration section, select Site Studio Administration.
The Site Studio Administration page is displayed (see "Site Studio Administration"). If you run Oracle Content Server in the Top Menus layout, you do not see this page. Instead, all administration options are then items in the Site Studio Administration menu.
-
Click Backup and Restore.
The Backup and Restore page (see "Backup and Restore Page") is displayed.
-
Click Manage Web Site Backups.
-
Click the actions menu icon (Figure 7-4) next to the desired site, and choose Show server configuration details.
-
The Server Configuration Details page is displayed (see "Server Configuration Details Page"), where you can note the details of the server where the site originated.
Note:
You may want to use Oracle Content Server's Configuration Migration Utility to replicate the content server environment from one server to another.

