2 Configuring the Adapter
This section covers the following topics:
2.1 System Requirements
The Siebel Adapter for Oracle UCM requires the following:
-
Siebel SIA or SEA version 7.8.2.x, 8.0.0.x, or 8.1.1.x. The Siebel Web Client is also required.
-
If implementing scanning functionality, Oracle Distributed Document Capture Release 10.1.3.5 or higher.
In addition, the Oracle UCM 11g Commit Driver is required to commit documents from Capture to Oracle UCM. The commit driver is available at the following location, listed under Oracle Document Capture 10g Commit Drivers:
http://www.oracle.com/technology/software/products/content-management/index_dc.html -
Supported browser versions for the Siebel Adapter include Internet Explorer versions 7.x and 8.x.
-
The Siebel Adapter supports the following Content Server search engines. For more information, see "Configure the iFrame URL in the Siebel Web Client".
2.2 Configuring the Adapter for Oracle UCM
The Oracle UCM configuration procedures include the following:
2.2.1 Verify Required Oracle UCM Components
Follow these steps to verify that required Oracle UCM components are enabled on the Content Server.
-
Log in to Content Server as an administrator.
-
Click the Configuration for [Instance] link in the content server Administration tray.
-
In the Features And Components section, click Enabled Component Details.
-
From the details shown, verify that the following components are enabled. If a component is not listed, enable it.
-
CheckoutAndOpenInNative
-
ConfigMigrationUtility
-
CoreWebdav
-
YahooUserInterfaceLibrary
-
2.2.2 Upload and Import the Configuration Migration Utility Bundle
Follow these steps to upload and import the Siebel adapter bundle.
-
Log back in to Content Server as an administrator.
-
In Content Server, open the Config Migration Admin folder in the content server Administration tray, and click the Upload Bundle link.
-
On the Upload Configuration Bundle page, click Browse.
-
Select the SiebelAdapterCMUBundle.zip file, located in the following folder:
ECM_ORACLE_HOME/ucm/Distribution/SiebelEcmIntegration
-
Select the Force overwrite field.
-
Click Upload.
-
On the Configuration Bundles Page, select the SiebelIntegrationCmuBundle link. On the Configuration Migration Administration page, select the Overwrites Duplicates field. Select Preview from the item's Actions menu.
-
On the Import Preview page, select Import from the Actions field. (Note that you can ignore messages about skipped dependencies.)
-
Restart Content Server.
2.2.3 Enable the Siebel Adapter Oracle UCM Components
The following Oracle UCM components are provided with the adapter:
Table 2-1 Oracle UCM Components Provided in Siebel Adapter
| Oracle UCM Component | Required | Description |
|---|---|---|
|
Yes |
This component provides iFrame functionality. |
|
|
Yes |
This component provides searching and iFrame functionality. |
|
|
Optional |
This component determines whether documents not yet released are displayed in the attachments list.
Note: This feature is available only when Metadata Only Search is used on the Content Server. |
|
|
Optional |
This component enables passing Siebel metadata values to Oracle UCM through the New or Scan buttons. For instructions, see "Passing Extra Metadata Parameters From Siebel to Oracle UCM". Specify parameters to pass as configuration variables, as described in "Set the Configuration Variables". |
Follow these steps to enable the components using Component Manager.
-
Log in to Content Server as an administrator.
-
Select Admin Server from the Administration menu.
The Component Manager page is displayed.
-
Scroll to the Integration components section.
-
Select the SiebelEcmIntegration and SiebelIntegrationSearchDisplay components to enable them.
-
Optionally, select the SiebelSearchExtension and SiebelSearchExtraParams components. Note that you can disable these components at any time by deselecting them on this page.
-
Click Update.
-
Restart Content Server.
Note:
For information about restarting methods, see the section on starting, stopping, and restarting Content Server in the Oracle Fusion Middleware System Administrator's Guide for Universal Content Management.
2.2.4 Set the Configuration Variables
Follow these steps to configure the adapter configuration variables.
-
From the Administration tray in Content Server, click the Admin Server link.
-
In the side pane, click the General Configuration link.
-
Scroll to the Additional Configuration Variables section, and edit the following entries. (These entries were automatically created when you imported the Configuration Migration Utility Bundle.)
Note:
The default value for all true/false entries is TRUE, except for the AdapterAppDisplayLinks variable, whose default value is FALSE.Table 2-2 Configuration Variable Entries
Entry Description Use to identify the Cascading Style Sheet (CSS) file to use for the iFrame. This entry links the Siebel CSS file with the adapter so that changes to the Siebel CSS also affect the iFrame. This is optional but recommended; if not specified, the iFrame uses the default CSS file.
Example Siebel 7.8 URL:
http://siebelserver:port/files/main.cssExample Siebel 8.x URLs:
http://siebelserver:port/callcenter_enu/files/main.csshttp://siebelserver:port/sales_enu/files/main.cssUse to enable document attachment scanning and importing using Oracle Distributed Document Capture. For configuration instructions, see "Configuring Oracle Distributed Document Capture". This entry specifies the web address to Oracle Distributed Document Capture.
Example entry:
ODDCURLPath=http://xyz/webcapture.aspODDCScanAction=2Use to configure document attachment scanning and importing using Oracle Distributed Document Capture, as described in"Configuring Oracle Distributed Document Capture". In this entry, specify the scan action to be performed, where 1 = Scan and 2 = Import.
Specify if standard browser menu options are hidden in browser windows that open from the iFrame display (true) or displayed (false).
Specifies if the New button is displayed in the iFrame.
Specifies if the Detach button is displayed in the iFrame.
Specifies if the Search button is displayed in the iFrame.
Specifies if the Configure button is displayed in the iFrame.
Specifies if the Scan button is displayed in the iFrame.
Specifies if the Refresh button is displayed in the iFrame.
Specifies if full Content Server user interface and search access is available when users click the Advanced Search button in the iFrame.
If needed, use this variable to replace icons in the iFrame with links, by changing the variable's value to true.
Optionally specify additional parameters to be passed to the New button. See "Passing Extra Metadata Parameters From Siebel to Oracle UCM".
Example entry:
extraSiebelDocParams=dDocAccount,xsiebelOrderOptionally specify additional parameters to be passed to the Scan button. See "Passing Extra Metadata Parameters From Siebel to Oracle UCM".
Example entry:
extraSiebelScanParams=dDocAccountNote:
The entries that determine if the New, Detach, Search, Configure, Scan, and Refresh buttons are displayed can be overridden by specifying an alternate display mode, as described in "Dynamically Change the Display Mode".Note:
You can specify the default columns to be displayed to users in the iFrame. (When the user clicks Reset in the Configure Fields for Display screen, default columns are listed in the Main Information section of the screen.)Open the config.cfg file and set the value of the SiebelDefaultDisplayColumns configuration variable as a comma-delimited list containing the default fields.
The additional column defaults are title, author, size, and date. To override these additional columns, populate this variable with comma-delimited Oracle UCM metadata field names. For example, the list might include:
dDocTitle,dDocType,dDocAuthor,dInDate -
Restart Content Server.
2.3 Configuring the Adapter for Siebel
Follow the steps described in this section to configure the Siebel side of the adapter.
The Siebel configuration procedures include the following:
Keep the following points in mind during Siebel configuration:
-
Ensure that you are compiling to and testing on the same Siebel Repository file (.SRF).
-
A typical method is to import the SIF file into the local Siebel database and test it locally. When ready, you can check in the objects to the Siebel server, compile objects, and generate browser scripts.New browser scripts that are generated must reside in the appropriate production location (for example, local client/PUBLIC/ENU and/or server Web client (SWE)/PUBLIC/ENU folders).
-
Performing the Siebel configuration steps in this section automatically disables display of the corresponding Siebel File System Applets. This occurs when importing the SIF file, which deactivates specific File System attachment applets. If needed, reactivate these applets to display Siebel File System attachments, such as during a migration process. For information on activating and deactivating applets, see "Siebel Object Locking".
-
When the Siebel Adapter for Oracle UCM is configured, Siebel attachments that customers have migrated from Siebel File Systems to Oracle UCM and previously accessed with Siebel EAI or EIM Web services are no longer available. However, these migrated documents could now be accessed using Oracle UCM Web services.
2.3.1 Lock Siebel Objects
The SIF archive file contains changes to multiple Siebel objects, including Projects, Applets, Views, Business Components, and browser scripts. Before importing the SIF file, follow these steps to lock objects to be modified by the import.
-
Log in to Siebel Tools with User ID: SADMIN and Connect to: Local.
Note:
Ensure that you are modifying the correct .SRF repository file. -
In the Object Explorer of Siebel Tools, select Project.
-
From the Query menu, select New Query (Ctrl+Q).
-
Submit the first query by entering the following text into the Name field and pressing Enter.
Account OR Account ?SSE? OR Asset Management OR Contact OR Contact ?SSE? OR ERM Unified Help Desk OR FINS Call Reports OR FINS Call Reports ?SSE? OR FINS INS Claims OR FINS INS Claims Appraisals/Bills/Attachments OR Oppty OR Oppty ?SSE? OR Order Entry OR Quote OR Quote ?UI?Note:
If you choose to copy and paste the text string, be sure to first paste the copied text into an ascii editor (such as Notepad) and remove any carriage returns before pasting into the Name field. -
Select the Locked field for all objects.
-
Start another query by selecting New Query from the Query menu (Ctrl+Q). Enter the following text into the Name field and press Enter.
Service OR Service ?SSV? OR VERT CUT Common OR PS Project Management OR PS Project Management ?SSE? OR Activity OR Activity ?SSE? OR PUB Case OR PUB Evidence OR PUB HLS Incident OR PUB HLS Physical Terrorism OR PUB Lead OR FINS Call Reports2 -
Select the Locked field for all objects.
Note:
Appendix A provides information about which objects are locked. This can be useful if you encounter issues when locking Siebel projects.
2.3.2 Import the SIF File
Follow these steps to import Oracle UCM objects from a Siebel archive file using the Import Wizard.
Caution:
On certain custom Siebel configurations, importing the SIF file using the merge option (as described in this procedure) could result in fields, user properties, and joins from custom Siebel configurations being overwritten.-
From the Tools menu, choose Import From Archive.
-
In the Select Archive To Import dialog box, select the appropriate .sif archive file, and click Import. Available SIF files include:
-
The SIF file's contents are displayed in the Import Wizard - Preview screen. Ensure that the Merge option (middle option) from the Conflict Resolution options is selected, and click Next. (This option merges the SIF file changes to existing Siebel Objects.)
-
The wizard displays any conflicting objects found. Click Next.
-
A dialog box lists the changes to be made to the repository, and prompts you to proceed. Click Yes.
-
A summary is displayed. Click Finish.
2.3.3 Compile Locked Projects
Before testing the modified projects, follow these steps to compile them.
-
Select Options from the View menu.
-
In the Development Tools Options screen, select the Scripting tab.
-
In the Browser script compilation folder field, enter a path as follows:
Client Install Folder/PUBLIC/ENU
For example, on Windows Drive_letter:\Siebel_install_folder_path\client\PUBLIC\enu
-
Select Project in the Object Explorer, locate the Manage Attachments (UCM) project and lock it.
-
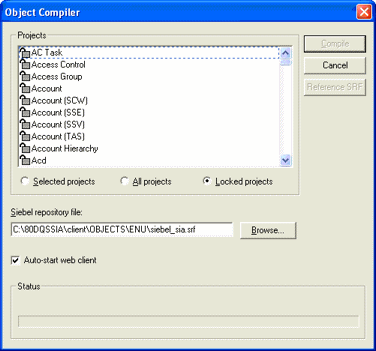
From the Tools menu, choose Compile Projects.
-
In the Object Compiler screen, select Locked projects.
-
Verify that the correct repository is selected in the Siebel repository file field. This repository file must exist in the Web Client installation folder.
-
Click Compile. (Note that compiling may take a while.)
2.3.4 Configure the iFrame URL in the Siebel Web Client
Follow the steps in this section to configure a symbolic URL in the Siebel Web client to the Managed Attachments iFrame. (A symbolic URL is a type of link that references the Oracle UCM search results page.)
-
Launch the Web client, logging in with the User ID: SADMIN.
-
Choose Sitemap from the Navigate menu. The site map of the Siebel Web Client Application is displayed.
-
From the list of screens, click the Administration- Integration link, then the Symbolic URL Administration link.
-
From the Host Administration field, select Symbolic URL Administration.
-
Create a new record by clicking the New button.
-
Complete the following fields for the URL. With the new URL selected in the Symbolic URL table, a Symbolic URL Arguments pane becomes displayed below.
Field Value to Enter Name UcmServUrlURL http://UCM_Server_URL/_p/cc-embedded(example:
http://ucm-server-name.domain:port-number/cs/idcplg/_p/cc-embedded)Fixup Name InsideAppletSSO Disposition IFrameNote:
In certain demonstration environments, enteringUcmServUrlin the Name field results in an error. If this occurs, enter the following:UcmServUrl_Demo -
In the Symbolic URL Arguments pane, create new argument records by entering the following values. To create a new record, click the New button, select the new record, and specify its values. Be sure to navigate away from the last record entered to ensure it is saved to the database.
An example Symbolic URL follows. (Note that this example URL is separated onto multiple lines for display purposes only, with argument names in bold for clarity.)
http://ucm-server-name.domain:port-number/cs/idcplg/_p/cc-embedded?
IdcService=GET_SEARCH_RESULTS_FORCELOGIN&
siebelEntityField=xsiebelContact&
siebelEntityValue=1LS-AF98&
QueryText=xsiebelContact+%3cmatches%3e+%601LS-AF98%60&
SearchQueryFormat=Universal&
ResultTemplate=SIEBEL_SEARCH&
coreContentOnly=1
SortField=dInDate&
SortOrder=Desc&
ResultCount=20&
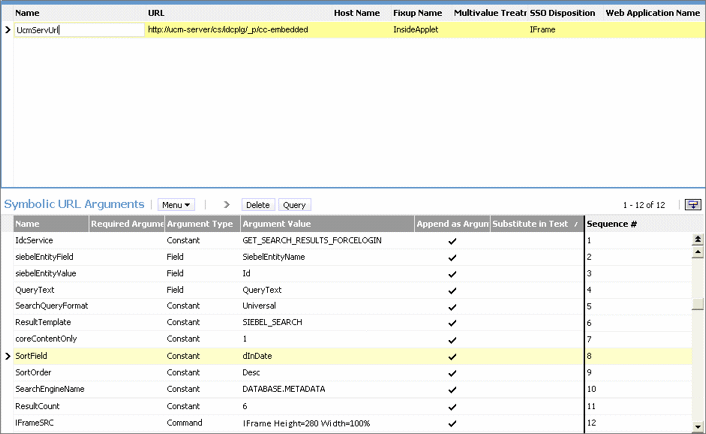
2.3.4.1 Configure the iFrame Height
The size of the iFrame is based on the ResultCount and IFrameSRC height settings defined in the Symbolic URL.
-
ResultCount determines the number of results that display on a results page before pagination controls are added at the bottom of the screen.
-
IFrameSRC height determines the height (in pixels) of the iFrame.
If the ResultCount setting causes the iFrame display to exceed the height, a vertical scroll bar is displayed. If users scroll to the bottom, the header information may become hidden.
For this reason, it is recommended that you adjust the ResultCount and IFrameSRC height settings in combination so that no scroll bar is displayed. Ensure that the iFrame height accommodates the result count. A recommended setting combination is an iFrame height setting of 280 and ResultCount setting of 6.
2.3.5 Test the Siebel Configuration
-
Log out of the Web client, then log in again to view the Managed Attachments iFrame embedded in the Attachments tab.
Tip:
To access Views, choose Sitemap from the Navigate menu in the Web client. This displays opportunities, orders, and other options with their child Views and attachment Views. -
Test the changes locally. After testing is successful, ensure that the objects, including generated browser scripts, are synchronized with the Siebel server.
Note:
If you encounter technical issues in configuring this adapter, on either the Oracle UCM side or the Siebel side, log a service request using My Oracle Support.2.4 Configuring Oracle Distributed Document Capture
This section covers the following topics:
-
"About Document Scanning Using Oracle Distributed Document Capture"
-
"Configure Oracle Distributed Document Capture For the Siebel Adapter"
-
"Configure Oracle UCM for Distributed Document Capture Via the Adapter"
-
"Test the Distributed Document Capture Via Siebel Adapter Configuration"
2.4.1 About Document Scanning Using Oracle Distributed Document Capture
The Oracle Distributed Document Capture application allows an application such as the Siebel Adapter to direct it to scan a document and pass in document index values. This allows users to scan documents or import scanned image files from the Managed Attachments iFrame and attach them to the selected Siebel record.
When configured for the Siebel Adapter, document scanning works like this:
-
A Scan button is added to the Managed Attachments iFrame. The user clicks the button, and selects a document classification, which is assigned to an Oracle Distributed Document Capture scan profile. For example, the user might select a classification of Identity Documents to scan a photocopy of a driver's license or passport. (An Oracle Distributed Document Capture scan profile specifies scanning, importing, and indexing settings.)
-
When the user clicks the Scan Document button, Oracle Distributed Document Capture's remote client launches in a new window, automatically authenticates and logs in the user, and passes in parameters such as the scan profile to be used and the Siebel entity value for later attachment.
-
Within the Oracle Distributed Document Capture client, the user reviews the document, makes changes as needed, completes any index fields configured in the scan profile, then sends the batch. Sending the batch commits the new document to Oracle UCM using an Oracle 11g UCM commit profile specified for the scan profile. (A Capture UCM commit profile specifies connection information and field mappings between Capture and Content Server metadata fields.)
-
Upon successful sending, the user returns to the Managed Attachments iFrame and refreshes the display to view the newly scanned document or imported scanned image file.
2.4.2 Configure Oracle Distributed Document Capture For the Siebel Adapter
Follow these steps to configure attachment scanning on the Oracle Distributed Document Capture side.
-
Ensure that Oracle Distributed Document Capture is set for automatic login (optional).
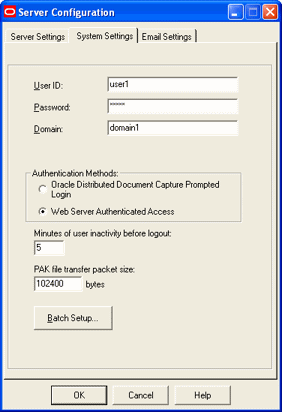
On the System Settings tab of the Distributed Document Capture Server Configuration application shown in Figure 2-1, select Web Server Authenticated Access from the Authentication Methods options. This allows the client to launch automatically without users needing to log in. For details, see the section on authentication in the Installation Guide for Oracle Distributed Document Capture.
-
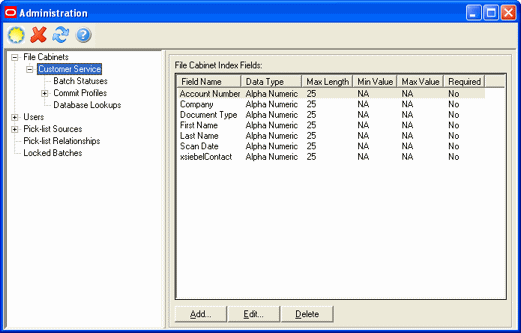
In Capture Administration, add index fields to a selected file cabinet for capturing values for new documents, as shown in Figure 2-2. For details, see the section on Capture Administration in the Administrator's Guide for Oracle Distributed Document Capture.
-
Create index fields for values you want saved with attached documents on the Content Server. For example, you might configure Doc Type and Security Group pick-list index fields for users to select from standard settings.
-
Create an index field to contain the Siebel entity value. Name the field based on the Siebel entity you are using, listed in Table 2-3:
Table 2-3 Siebel Entity Identifier
Identifier xsiebelAcct
xsiebelActivity
xsiebelArrest
xsiebelAsset
xsiebelCallRpt
xsiebelCase
xsiebelClaim
xsiebelContact
xsiebelEvidence
xsiebelGroup
xsiebelIncident
xsiebelLead
xsiebelOffense
xsiebelOpprnty
xsiebelOrder
xsiebelProject
xsiebelQuote
xsiebelSuspect
xsiebelSvcReq
-
-
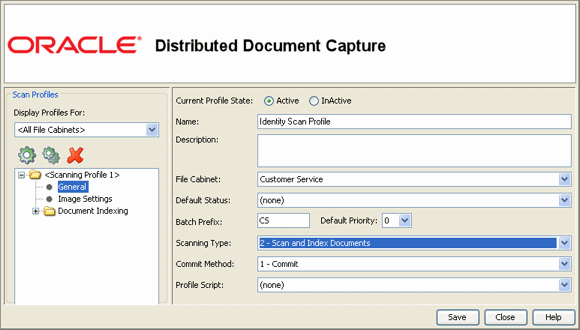
In Oracle Distributed Document Capture's Profile Administration, create a scan profile, as shown in Figure 2-3. Later, you associate this scan profile with one or more document classifications, so that when a user selects a classification, the associated scan profile's settings are used. For details, see the section on scan profiles in the Administrator's Guide for Oracle Distributed Document Capture.
-
On the General pane, select 2 - Scan and Index Documents in the Scanning Type field. This scanning type includes indexing, and scans or imports pages into a single document in a batch. Specify a file cabinet and batch prefix.
-
On the Document Indexing pane, move all fields you want displayed to users to the Selected Fields box.
Note:
Typically, you would not select the Siebel identifier field (xsiebelContact, for example) for display to users. If you choose to display it, lock it on the Field Properties pane to prevent users from changing the value. -
On the Field Properties, Auto Populate, and Database Lookup panes, configure any pick-lists, database lookups, or autopopulating needed for indexing. Save the scan profile.
-
-
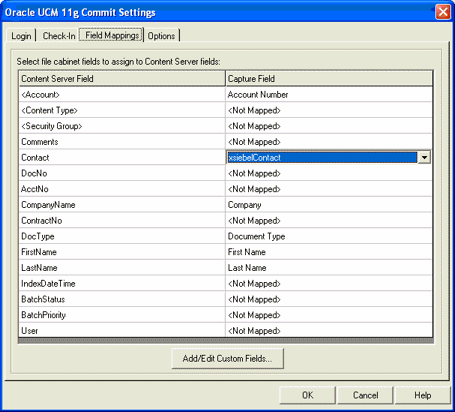
In Capture Administration, create an Oracle UCM 11g commit profile to commit the scanned or imported documents to Oracle UCM when users send a completed batch. See Figure 2-4.
Note:
for information about downloading the Oracle UCM 11g commit driver for Capture, see "System Requirements".This commit profile specifies how to connect to the Content Server, and how the Siebel and Capture values are passed to the Content Server. For information about creating Oracle UCM 11g commit profiles, see the section on committing profiles in the Administrator's Guide for Oracle Distributed Document Capture and the Oracle Distributed Document Capture/Oracle Document Capture Supplemental Administrator's Guide.
-
Select Oracle UCM 11g Commit Driver in the Commit Driver field. Click the Configure button adjacent to the Commit Driver field.
-
On the Login tab, specify settings for logging in to the Content Server instance. (The other tabs become active after you log in.)
-
On the Check-In tab, specify how to name documents and assign Type, Security Group, and Account values.
-
On the Field Mappings tab, map Capture fields to Content Server fields.
Note:
You must map the Siebel entity field you created in step 2, as it is required to attach the new Oracle UCM document to the Siebel record. -
Activate the Siebel-UCM commit profile.
-
2.4.3 Configure Oracle UCM for Distributed Document Capture Via the Adapter
Follow these steps to configure attachment scanning on the Content Server side.
-
On Content Server, edit the following configuration variables for Oracle Distributed Document Capture, if you have not done so. See "Set the Configuration Variables".
-
Restart Content Server.
-
On Content Server, configure document classification and scan types.
-
From the Administration tray in Content Server, click the Admin Applets link.
-
Select the Configuration Manager applet. The Configuration Manager is displayed.
-
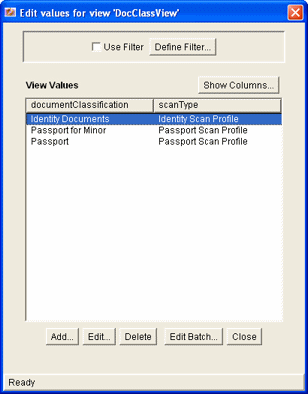
Click the Views tab, select DocClassView from the alphabetical list, and click Edit Values.
-
-
In the Edit Values screen, click Add and add document classifications and their corresponding scan profile. Note that documentClassifications entries must be unique, but a scan profile can be used multiple times. Click Close when done.
-
From the Options menu, select Publish schema to publish the data.
2.4.4 Test the Distributed Document Capture Via Siebel Adapter Configuration
Follow these steps to test the configuration as an end-user. For details about scanning using Oracle Distributed Document Capture as an end-user, see the Oracle Distributed Document Capture User's Guide.
-
Refresh the Managed Attachments iFrame results page. You should see a Scan button beside the New button.
-
Click the Scan button. In the Scan Document page, select a document classification and click Scan Document. The Oracle Distributed Document Capture client launches.
Notice that the URL reflects the settings you specified to run the client. It also passes the scan profile, scan action (1 = Scan and 2 = Import), and index data consisting of the Siebel entity and its value (for example, xsiebelContact=1LS-AF98).
-
Within the Oracle Distributed Document Capture client, review, index, and send the document's batch.
-
Return to the Managed Attachments iFrame and click Refresh Page. The newly scanned document or imported scanned image file should be displayed in the list. (It may take a few minutes to be displayed.)
2.5 Passing Extra Metadata Parameters From Siebel to Oracle UCM
As part of an adapter configuration, you can pass one or more metadata values from Siebel to Oracle UCM for populating New and Scan button URLs within the Siebel iFrame. For example, whenever a user checks in a new document using the New or Scan button, you might pass a Siebel account name for use in check-in.
Here's how it works:
-
To pass values, you need a Siebel field and an Oracle UCM metadata field.
-
Two configuration variables are provided: one for new documents and the other for scanning documents. You set these variables to the metadata field(s) to populate on the Oracle UCM side.
-
You add arguments to the symbolic URL (with the prefix extra added to the variable name) that link the Siebel and Oracle UCM fields, so that they are appended to the New or Scan button URL. When the iFrame is displayed, the application searches the URL for extra parameter variables and uses their assigned values to populate New or Scan button actions.
-
Depending on configuration, extra values being passed may be visible or hidden from users checking in or scanning documents. For example, you might hide an account number, but for another value, you might populate a dropdown field and allow users to change the value.
Configuring extra metadata parameters involves the following main steps:
2.5.1 Configure Oracle UCM for Extra Parameters
Follow these steps to configure extra parameters on the Oracle UCM side.
-
Ensure that the SiebelSearchExtraParams component is enabled. See "Enable the Siebel Adapter Oracle UCM Components".
-
Set the extraSiebelDocParams and extraSiebelScanParams configuration variables.
Specify the Oracle UCM field or fields to populate. Define extraSiebelDocParams to pass values using the New button, and extraSiebelScanParams to pass values using the Scan button. For information about configuration variables, see "Set the Configuration Variables".
For example, to populate the Oracle UCM Account metadata field for new and scanned documents, specify the following:
-
extraSiebelDocParams=dDocAccount
-
extraSiebelScanParams=dDocAccount
Note:
If specifying multiple Oracle UCM fields for a variable, separate them with a comma. For example:extraSiebelDocParams=dDocAccount,xsiebelOrder
eextraSiebelScanParams=dDocAccount,dDocType
-
-
Update profiles as needed to accommodate the passed values (without the extra prefix).
-
If passing values using the New button, update the Oracle UCM content profile to display the metadata field you specified, if needed.
-
If passing values using the Scan button, update the scan profile to display the index field, if desired. (The index field must exist for the file cabinet being used.) In the commit profile, map the index field to the appropriate Oracle UCM metadata field.
-
2.5.2 Configure Siebel for Extra Parameters
Follow these steps to configure extra parameters on the Siebel side.
-
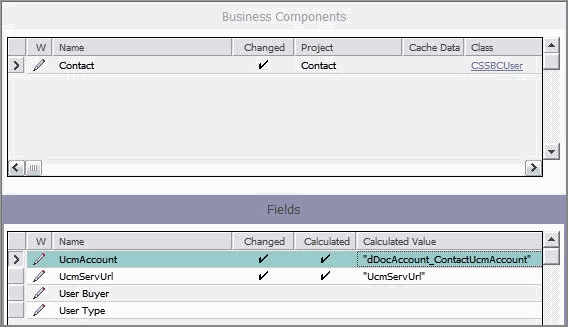
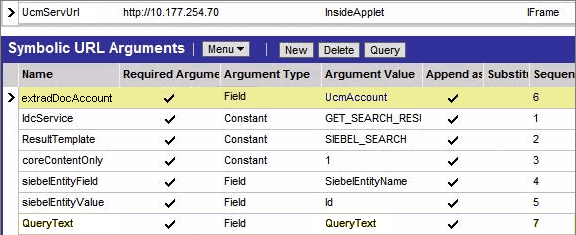
Add a Siebel field to hold the value to pass. For example, you might add a field called UcmAccount to the Contact business component, as shown below.
-
On the symbolic URL, add an argument for the field you created in step 1, including the extra prefix (extradDocAccount in the example below, which is the Oracle UCM metadata variable name of dDocAccount with the extra prefix).
-
Compile the business component.
2.6 Customizing the Siebel Adapter iFrame Display
You can customize the Siebel Adapter in the following ways:
2.6.1 Add Custom Buttons
Follow these steps to add a custom button to the iFrame to implement an additional function.
-
Using Component Manager, create a custom component. Create an include resource that overrides the following resource includes:
-
js_custom_siebel_functions
-
custom_configurable_btn_bar
-
js_custom_configurable_btn_bar
-
-
After applying these resource includes, enable the component in Oracle UCM.
The super.js_custom_siebel_functions must be included for the main button bar to display. This include adds a javascript listener attached to the custom button. The YAHOO.oracle.ucm.adapter.extension is the YUI namespace which helps in detecting and preventing name conflicts.
<@dynamichtml js_custom_siebel_functions@>
    <$include super.js_custom_siebel_functions$>

    <script type="text/javascript">
    //namespace definition
    YAHOO.namespace("YAHOO.oracle.ucm.adapter.extension");

       /**
         * Function for custom functionality added to the existing adapter.
         *
         */
        YAHOO.oracle.ucm.adapter.extension.customFunctionListener=function(){
            //custom code goes in here
            alert("You have your custom functionality running");
        };
        </script>
<@end@>
The super include must be present. This code makes the button appear in the user interface.
<@dynamichtml custom_configurable_btn_bar@>
<$include super.custom_configurable_btn_bar$>
<a id="customBtn"
href="http://aseng-wiki.us.oracle.com/asengwiki/pages/editpage.action#" >Custom Button</a>
<@end@>
js_custom_configurable_btn_bar
This code associates the listener function with the button code.
<@dynamichtml js_custom_configurable_btn_bar@>
    <$include super.js_custom_configurable_btn_bar$>

YAHOO.util.Event.addListener("customBtn","click",YAHOO.oracle.ucm.adapter.extension.customFunctionListener);
<@end@>
2.6.2 Dynamically Change the Display Mode
As an option, you can configure a special display mode that dynamically overrides the default display configuration settings, hiding one or more buttons and disabling one or more icons. For example, when users are viewing a specific Siebel record type, such as Orders, you might hide the New and Scan buttons to prevent them from adding new attachments to orders, and disable the Edit icon so they can view but not edit order related attachments.
Here's how it works:
-
By default, no dynamic display mode is configured. Under normal default settings, buttons in the iFrame are displayed according to their configuration variable settings (see "Set the Configuration Variables"). Columns are displayed according to the user's field configuration settings, and if columns are displayed, their icons are always functional.
-
A parameter called SiebelDisplayMode sets the alternate display mode's combination of disabled buttons and icons. When set, this parameter overrides the other configuration variables (for example, AdapterAppCheckinBtn=true). The SiebelDisplayMode parameter is an integer that you calculate. During display, the integer is translated to dynamically determine the button and icon status.
-
You activate the alternate dynamic display mode by configuring a secondary symbolic URL for the iFrame and specifying the SiebelDisplayMode parameter within it. Then, for business objects that require the alternate display mode, you change the symbolic URL to point to the secondary symbolic URL.
2.6.2.1 Calculate the SiebelDisplayMode Integer
Each button and icon is assigned an integer value, as shown in Figure 2-5 and listed in Table 2-4. Calculate the display mode integer by adding the integer value of each button and icon to be disabled.
For example, to disable the Edit and Properties icons and hide the New, Scan, Detach, and Configure buttons, calculate the SiebelDisplayMode value as follows:
21 + 22 + 23 + 24 + 25 + 28 = 318
Note:
Setting the SiebelDisplayMode value to 0 displays all buttons and enables all icons, overriding any specified values in the config.cfg file.Table 2-4 Integer Values for Calculating a Display Mode Integer
| Button or Icon | Integer Value |
|---|---|
|
Info Icon |
20 |
|
Edit Icon |
21 |
|
Properties Icon |
22 |
|
New Button |
23 |
|
Scan Button |
24 |
|
Detach Button |
25 |
|
Refresh Button |
26 |
|
Advanced Search Button |
27 |
|
Configure Button |
28 |
Note:
To hide custom buttons, see "Calculate Values for Custom Buttons".2.6.2.2 Configure Siebel for Special Display Mode
After calculating a display mode integer, as described in "Calculate the SiebelDisplayMode Integer", follow these steps to configure the alternate display mode.
-
In the Siebel Web Client, configure a secondary symbolic URL for the iFrame.
-
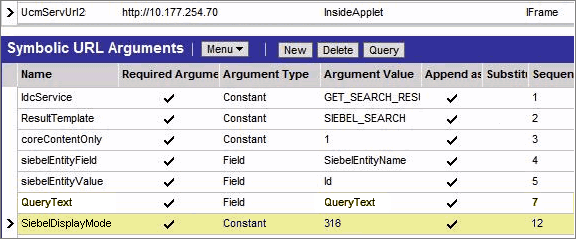
Enter a new name for the URL (for example, UcmServUrl2) and select the same settings as the original URL. For more information, see "Configure the iFrame URL in the Siebel Web Client".
-
Include an additional argument that specifies the SiebelDisplayMode parameter as shown below and in the illustration that follows:
Name Required Argument Argument Type Argument Value Append as Argument Substitute in Text Sequence # SiebelDisplayMode N Constant Integer corresponding to display mode Y N 12
-
-
For business objects that require the alternate display mode, change the symbolic URL to point to the secondary symbolic URL.
2.6.2.3 Calculate Values for Custom Buttons
If you have added custom buttons to the iFrame (as described in "Add Custom Buttons") and want to hide them in an alternate display mode, include their values in the integer calculation.
The following resource adds the buttons (custombtn1 and custombtn2) to the EnumObj javascript object and the framework calculates their values at run time:
js_custom_button_visibility_handler
<@dynamichtml js_custom_button_visibility_handler@>
    <$include super.js_custom_button_visibility_handler$>
          NAME_ENUM.CUSTOMBTN1="CUSTOMBTN1",
          NAME_ENUM.CUSTOMBTN2="CUSTOMBTN2",
          EnumObj.add(NAME_ENUM.CUSTOMBTN1,"customBtn1",IMG_ENUM.BUTTON);
          EnumObj.add(NAME_ENUM.CUSTOMBTN2,"customBtn2",IMG_ENUM.BUTTON);
<@end@>
The following illustration displays the custom buttons and their calculated values:

2.6.3 Change Display Colors
Follow these steps to change the following colors in the iFrame:
-
background
-
highlighted row
-
hover row
-
Create a component and override the following resource includes:
-
css_adapter_background_styling
-
css_adapter_row_styling
-
css_adapter_background_styling
In the lines below, specify another background color for the adapterBackgroundColor idoc variable (hexidecimal code recommended). The super include line must be present.
<@dynamichtml css_adapter_background_styling@>
    <$adapterBackgroundColor="#346a2a"$>
    <$include super.css_adapter_background_styling$>
<@end@>
In the lines below, change the row colors by specifying different colors for the selectedRowColor and highlightedRowColor idoc variables. The super include line must be present.
<@dynamichtml css_adapter_row_styling@>
    <$selectedRowColor="#eac5a6"$>
    <$highlightedRowColor="#bdc1a3"$>
    <$include super.css_adapter_row_styling$>
<@end@>
2.7 Uninstalling the Adapter
Follow the steps listed in these sections to uninstall the adapter:
2.7.1 Disable Adapter Components on Content Server
Follow these steps to disable the following adapter components on the Content Server.
-
Log in to Content Server as an administrator.
-
Select Admin Server from the Administration menu.
The Component Manager page is displayed.
-
Scroll to the Integration components section.
-
Deselect the Siebel adapter components to disable them.
-
SiebelEcmIntegration
-
SiebelIntegrationSearchDisplay
-
SiebelSearchExtension
-
SiebelSearchExtraParams
(For details about these components, see "Enable the Siebel Adapter Oracle UCM Components".)
-
-
Click Update.
-
Restart Content Server.
Note:
For information about restarting methods, see the section on starting, stopping, and restarting Content Server in the Oracle Fusion Middleware System Administrator's Guide for Universal Content Management.
2.7.2 Uninstall Siebel Components
Uninstalling Siebel adapter components includes activating the default Siebel File Attachment Applets that were disabled during adapter configuration, and deactivating the applets the SIF file added for the adapter configuration. See "Activating or Deactivating Siebel Objects".
