5 Oracle Application Adapter for J.D. Edwards OneWorld Upgrade Guidelines
This chapter lists and describes upgrade guidelines that are specific to the Oracle Application Adapter for SAP R/3. It contains the following topics:
Upgrading a 10.1.3.x ESB J2CA Outbound Process to 11g
Selecting a WSDL From the Local File System
This workaround must be performed for a J.D. Edwards outbound ESB process when migrating from 10.1.3.x to PS2 and 10.1.3.x to PS3. If you are migrating 10.1.3.x to PS1, then you can follow the same procedure in "Selecting a WSDL From the Local File System".
-
On the 10.1.3.4 system, create a new target for the Oracle Application Adapter for SAP R/3 using Application Explorer and connect to the target.
-
Browse to a specific business object and generate an outbound WSDL file for this object.
-
Restart the server.
-
Start Oracle JDeveloper 10.1.3.4 and create a JCA outbound ESB project.
-
In the Custom Adapter service, select the outbound WSDL file from the local file system.
-
Deploy the ESB project successfully and ensure that the registration of the ESB project is successful.
-
On the 11g system, create a target using the same name that was provided on the 10.1.3.4 system.
-
Copy the deployed ESB project into the 11g system
-
Open the 10.1.3.4 project and edit the associated WSDL file with the following changes:
Change 1
Add the following line in the
<definitions>section foriWayResponse:xmlns:iWayResponse="urn:iwaysoftware:jde/services/CALLBSFN/Addressbook/GetPhone.response"
For example:
<definitions name="GetPhone"targetNamespace="http://xmlns.oracle.com/pcbpel/iWay/wsdl/JDEdwards/jde9/GetPhone" xmlns:plt="http://schemas.xmlsoap.org/ws/2003/05/partner-link/"xmlns:GetPhone="http://xmlns.oracle.com/pcbpel/iWay/wsdl/JDEdwards/jde9/GetPhone"xmlns:jca="http://xmlns.oracle.com/pcbpel/wsdl/jca/"xmlns:iWay="http://xmlns.oracle.com/pcbpel/adapter/iWay/"xmlns:pc="http://xmlns.oracle.com/pcbpel/"xmlns:iWayRequest="urn:iwaysoftware:jde/services/CALLBSFN/Addressbook/GetPhone" xmlns:iWayResponse="urn:iwaysoftware:jde/services/CALLBSFN/Addressbook/GetPhone.response"xmlns="http://schemas.xmlsoap.org/wsdl/">Change 2
Add
.responseat the end oftargetNamespaceandnsdeclaration in the schema section above the<xsd:element name="jdeResponse">line. For example:Original
<xsd:schema xmlns:xsd="http://www.w3.org/2001/XMLSchema"targetNamespace="urn:iwaysoftware:jde/services/CALLBSFN/Addressbook/GetPhone"xmlns:ns="urn:iwaysoftware:jde/services/CALLBSFN/Addressbook/GetPhone" elementFormDefault="qualified"><xsd:element name="jdeResponse">
Modified
<xsd:schema xmlns:xsd="http://www.w3.org/2001/XMLSchema"targetNamespace="urn:iwaysoftware:jde/services/CALLBSFN/Addressbook/GetPhone.response"xmlns:ns="urn:iwaysoftware:jde/services/CALLBSFN/Addressbook/GetPhone.response" elementFormDefault="qualified"><xsd:element name="jdeResponse">
Change 3
Change
iWayRequesttoiWayResponsein the element field for the response message section. For example:Original
<message name="response"> <part name="output_GetPhone" element="iWayRequest:jdeResponse"/> </message>
Modified
<message name="response"> <part name="output_GetPhone" element="iWayResponse:jdeResponse"/> </message> -
Open and edit the
DefaultSystem_CustomAdapterServiceName.esbsvcfile (for example,DefaultSystem_jde9_getphone.esbsvc) in the reply validate section by adding.responsein thetnsnamespace. For example:Original
<reply validate="false" xmlns:tns="urn:iwaysoftware:jde/services/CALLBSFN/Addressbook/GetPhone" element="tns:jdeResponse" schemaLocation="esb:///ESB_Projects/Upgrade_testing_jde9_getphone_10134_jca_esb/JDE90_GetPhone_invoke.wsdl"/>
Modified
<reply validate="false" xmlns:tns="urn:iwaysoftware:jde/services/CALLBSFN/Addressbook/GetPhone.response" element="tns:jdeResponse" schemaLocation="esb:///ESB_Projects/Upgrade_testing_jde9_getphone_10134_jca_esb/JDE90_GetPhone_invoke.wsdl"/> -
Open and edit the
DefaultSystem_FileAdapterName.esbsvcfile created for the write operation (for example,DefaultSystem_write getphone.esbsvc) in the request validate section by adding.responsein thetnsnamespace. For example:Original
<request validate="false" xmlns:tns="urn:iwaysoftware:jde/services/CALLBSFN/Addressbook/GetPhone" element="tns:jdeResponse"/
Modified
<request validate="false" xmlns:tns="urn:iwaysoftware:jde/services/CALLBSFN/Addressbook/GetPhone.response" element="tns:jdeResponse"/> -
Open and edit the
FileAdapterName.wsdlfile created for write operation (for example,write_getphone.wsdl) by adding.response. For example:Original
<definitions name="write_getphone"targetNamespace="http://xmlns.oracle.com/pcbpel/adapter/file/write_getphone/"xmlns="http://schemas.xmlsoap.org/wsdl/"xmlns:tns="http://xmlns.oracle.com/pcbpel/adapter/file/write_getphone/"xmlns:plt="http://schemas.xmlsoap.org/ws/2003/05/partner-link/"xmlns:jca="http://xmlns.oracle.com/pcbpel/wsdl/jca/"xmlns:imp1="urn:iwaysoftware:jde/services/CALLBSFN/Addressbook/GetPhone"xmlns:hdr="http://xmlns.oracle.com/pcbpel/adapter/file/"><import namespace="urn:iwaysoftware:jde/services/CALLBSFN/Addressbook/GetPhone" location="JDE90_GetPhone_invoke.wsdl"/>
Modified
<definitions name="write_getphone"targetNamespace="http://xmlns.oracle.com/pcbpel/adapter/file/write_getphone/" xmlns="http://schemas.xmlsoap.org/wsdl/" xmlns:tns="http://xmlns.oracle.com/pcbpel/adapter/file/write_getphone/" xmlns:plt="http://schemas.xmlsoap.org/ws/2003/05/partner-link/" xmlns:jca="http://xmlns.oracle.com/pcbpel/wsdl/jca/"xmlns:imp1="urn:iwaysoftware:jde/services/CALLBSFN/Addressbook/GetPhone.response" xmlns:hdr="http://xmlns.oracle.com/pcbpel/adapter/file/"><import namespace="urn:iwaysoftware:jde/services/CALLBSFN/Addressbook/GetPhone.response" location="JDE90_GetPhone_invoke.wsdl"/>
-
Start Oracle JDeveloper 11g and migrate the 10.1.3.4 ESB project.
-
Once the project is migrated, a successful message is received in Oracle JDeveloper.
-
Expand the migrated project and double-click the
composite.xmlfile to ensure that the project opens without any errors.Since changes were made to the WSDL file for the response section, a new mapper file must be created for
jdeResponse. -
Double-click the mediator component and go to the Synchronous Reply area.
-
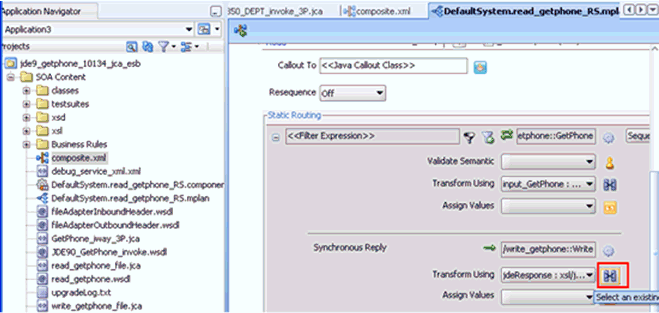
Click the Select an existing mapper file or create a new one button in the Transform Using field, as shown in Figure 5-1.
The Reply Transformation Map dialog is displayed, as shown in Figure 5-2.
Figure 5-2 Reply Transformation Map Dialog

Description of "Figure 5-2 Reply Transformation Map Dialog"
-
Click the Create New Mapper File option and click OK.
-
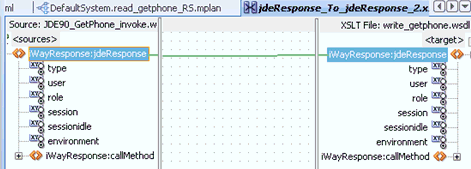
Automap the iWayResponse:jdeResponse in the source and iWayResponse:jdeResponse in the target, as shown in Figure 5-3.
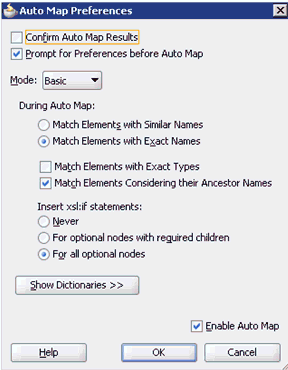
The Auto Map Preferences dialog is displayed, as shown in Figure 5-4.
-
Accept the default values and click OK.
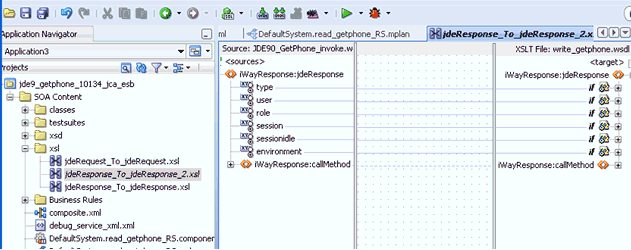
The automap is completed successfully, as shown in Figure 5-5.
-
Double click the composite.xml file.
-
Save and then deploy the migrated ESB project.
-
Ensure that there are no error or warning messages during the deployment process.
-
Once the deployment is successful, navigate to the input folder and paste the input XML file.
The successful response XML is received in the specified output folder.
Selecting a WSDL Using Service Explorer
This workaround must be performed for a J.D. Edwards outbound ESB process when migrating from 10.1.3.x to PS2 and 10.1.3.x to PS3. If you are migrating 10.1.3.x to PS1, then you can follow the same procedure in "Selecting a WSDL Using Service Explorer".
-
On the 10.1.3.4 system, create a new target for the Oracle Application Adapter for SAP R/3 using Application Explorer and connect to the target.
-
Browse to a specific business object and generate an outbound WSDL file for this object.
-
Restart the server.
-
Start Oracle JDeveloper 10.1.3.4 and create a JCA outbound ESB project.
-
In the Custom Adapter service, select the outbound WSDL using Service Explorer.
-
Deploy the ESB project successfully and ensure that the registration of the ESB project is successful.
-
Navigate to the location where the 10.1.3.4 WSDL file is generated and edit the WSDL file with the following changes:
Change 1
Add the following line in the
<definitions>section foriWayResponse:xmlns:iWayResponse="urn:iwaysoftware:jde/services/CALLBSFN/Addressbook/GetPhone.response"
For example:
<definitions name="GetPhone"targetNamespace="http://xmlns.oracle.com/pcbpel/iWay/wsdl/JDEdwards/jde9/GetPhone" xmlns:plt="http://schemas.xmlsoap.org/ws/2003/05/partner-link/"xmlns:GetPhone="http://xmlns.oracle.com/pcbpel/iWay/wsdl/JDEdwards/jde9/GetPhone"xmlns:jca="http://xmlns.oracle.com/pcbpel/wsdl/jca/"xmlns:iWay="http://xmlns.oracle.com/pcbpel/adapter/iWay/"xmlns:pc="http://xmlns.oracle.com/pcbpel/"xmlns:iWayRequest="urn:iwaysoftware:jde/services/CALLBSFN/Addressbook/GetPhone" xmlns:iWayResponse="urn:iwaysoftware:jde/services/CALLBSFN/Addressbook/GetPhone.response"xmlns="http://schemas.xmlsoap.org/wsdl/">Change 2
Add
.responseat the end of thetargetNamespaceandnsdeclaration in the schema section above the<xsd:element name="jdeResponse">line. For example:Original
<xsd:schema xmlns:xsd="http://www.w3.org/2001/XMLSchema"targetNamespace="urn:iwaysoftware:jde/services/CALLBSFN/Addressbook/GetPhone"xmlns:ns="urn:iwaysoftware:jde/services/CALLBSFN/Addressbook/GetPhone" elementFormDefault="qualified"><xsd:element name="jdeResponse">
Modified
<xsd:schema xmlns:xsd="http://www.w3.org/2001/XMLSchema"targetNamespace="urn:iwaysoftware:jde/services/CALLBSFN/Addressbook/GetPhone.response"xmlns:ns="urn:iwaysoftware:jde/services/CALLBSFN/Addressbook/GetPhone.response" elementFormDefault="qualified"><xsd:element name="jdeResponse">
Change 3
Change
iWayRequesttoiWayResponsein the element field for the response message section. For example:Original
<message name="response"> <part name="output_GetPhone" element="iWayRequest:jdeResponse"/> </message>
Modified
<message name="response"> <part name="output_GetPhone" element="iWayResponse:jdeResponse"/> </message> -
On the 11g system, create a target using the same name that was provided on the 10.1.3.4 system.
-
Copy the deployed ESB project into the 11g system
-
Open the project folder and edit the
DefaultSystem_CustomAdapterServiceName.esbsvcfile (for example,DefaultSystem_jde9_getphone.esbsvc) by providing the system IP address and port number (for example,192.168.128.122:80) of the 10.1.3.4 WSDL generated system in the<wsdlURL>section that is located within<serviceDefinition>. For example:Original
<serviceDefinition><wsdlURL>http://127.0.0.1:80/orainfra/wsil/adapters/applications/ JDE90_GetPhone_invoke.wsdl?wsdl</wsdlURL>----------------------</endpointDefinition></serviceDefinition>
Modified
<serviceDefinition><wsdlURL>http://192.168.128.122:80/orainfra/wsil/adapters/applications/ JDE90_GetPhone_invoke.wsdl?wsdl</wsdlURL>----------------------</endpointDefinition></serviceDefinition>
-
Open and edit the
DefaultSystem_ CustomAdapterServiceName.esbsvcfile (for example,DefaultSystem_jde9_getphone.esbsvc) in the reply validate section by adding.responsein thetnsnamespace. For example:Original
<reply validate="false" xmlns:tns="urn:iwaysoftware:jde/services/CALLBSFN/Addressbook/GetPhone" element="tns:jdeResponse" schemaLocation="esb:///ESB_Projects/Upgrade_testing_jde9_getphone_10134_jca_esb/JDE90_GetPhone_invoke.wsdl"/>
Modified
<reply validate="false" xmlns:tns="urn:iwaysoftware:jde/services/CALLBSFN/Addressbook/GetPhone.response" element="tns:jdeResponse" schemaLocation="esb:///ESB_Projects/Upgrade_testing_jde9_getphone_10134_jca_esb/JDE90_GetPhone_invoke.wsdl"/> -
Open and edit the
DefaultSystem_FileAdapterName.esbsvcfile created for the write operation (for example,DefaultSystem_write_getphone.esbsvc) in the request validate section by adding.responsein thetnsnamespace. For example:Original
<request validate="false" xmlns:tns="urn:iwaysoftware:jde/services/CALLBSFN/Addressbook/GetPhone" element="tns:jdeResponse"/>
Modified
<request validate="false" xmlns:tns="urn:iwaysoftware:jde/services/CALLBSFN/Addressbook/GetPhone.response" element="tns:jdeResponse"/> -
Open and edit the
FileAdapterName.wsdlfile created for the write operation (for example,write_getphone.wsdl) by adding.response. For example:Original
<definitions name="write_getphone"targetNamespace="http://xmlns.oracle.com/pcbpel/adapter/file/write_getphone/"xmlns="http://schemas.xmlsoap.org/wsdl/"xmlns:tns="http://xmlns.oracle.com/pcbpel/adapter/file/write_getphone/"xmlns:plt="http://schemas.xmlsoap.org/ws/2003/05/partner-link/"xmlns:jca="http://xmlns.oracle.com/pcbpel/wsdl/jca/"xmlns:imp1="urn:iwaysoftware:jde/services/CALLBSFN/Addressbook/GetPhone"xmlns:hdr="http://xmlns.oracle.com/pcbpel/adapter/file/"><import namespace="urn:iwaysoftware:jde/services/CALLBSFN/Addressbook/GetPhone" location="JDE90_GetPhone_invoke.wsdl"/>
Modified
<definitions name="write_getphone"targetNamespace="http://xmlns.oracle.com/pcbpel/adapter/file/write_getphone/" xmlns="http://schemas.xmlsoap.org/wsdl/" xmlns:tns="http://xmlns.oracle.com/pcbpel/adapter/file/write_getphone/" xmlns:plt="http://schemas.xmlsoap.org/ws/2003/05/partner-link/" xmlns:jca="http://xmlns.oracle.com/pcbpel/wsdl/jca/"xmlns:imp1="urn:iwaysoftware:jde/services/CALLBSFN/Addressbook/GetPhone.response" xmlns:hdr="http://xmlns.oracle.com/pcbpel/adapter/file/"><import namespace="urn:iwaysoftware:jde/services/CALLBSFN/Addressbook/GetPhone.response" location="JDE90_GetPhone_invoke.wsdl"/> -
Start Oracle JDeveloper 11g and migrate the 10.1.3.4 ESB project.
-
Once the project is migrated, a successful message is received in Oracle JDeveloper.
-
Expand the migrated project and double-click the
composite.xmlfile to ensure that the project opens without any errors.Since changes were made to the WSDL file for the response section, a new mapper file must be created for
jdeResponse. -
Double-click the mediator component and go to the Synchronous Reply area.
-
Click the Select an existing mapper file or create a new one button in the Transform Using field, as shown in Figure 5-6.
The Reply Transformation Map dialog is displayed, as shown in Figure 5-7.
Figure 5-7 Reply Transformation Map Dialog

Description of "Figure 5-7 Reply Transformation Map Dialog"
-
Click the Create New Mapper File option and click OK.
-
Automap the iWayResponse:jdeResponse in the source and iWayResponse:jdeResponse in the target, as shown in Figure 5-8.
The Auto Map Preferences dialog is displayed, as shown in Figure 5-9.
-
Accept the default values and click OK.
The automap is completed successfully, as shown in Figure 5-10.
-
Double click the composite.xml file.
-
Save and then deploy the migrated ESB project.
-
Ensure that there are no error or warning messages during the deployment process.
-
Once the deployment is successful, navigate to the input folder and paste the input XML file.
The successful response XML is received in the specified output folder.
Upgrading a 10.1.3.x ESB J2CA Inbound Process to 11g
Selecting a WSDL From the Local File System
-
On the 10.1.3.4 system, create a new target for Oracle Application Adapter for SAP R/3 using Application Explorer and connect to the target.
-
Browse to a specific business object.
-
Create a new port and TCP channel for Oracle Application Adapter for SAP R/3.
-
Trigger from the back-end and generate a schema with the response XML that was received in the port location using XMLSpy.
-
Copy the generated schema (.xsd file) in the following location:
<soadp1>\adapters\application\config\jca_sample\schemas\JDEdwards\target -
Generate an inbound WSDL manually using the generated schema.
-
Make the following changes to the generated WSDL, as shown in the following examples:
Change 1
Replace Schemas-jdedwards-com to iwaysoftware in the target namespace:
<xs:schematargetNamespace="urn:Schemas-jdedwards-com:trans.response.JDESOOUT" xmlns="urn:Schemas-jdedwards-com:trans.response.JDESOOUT" xmlns:xs=http://www.w3.org/2001/XMLSchema elementFormDefault="qualified">
to:
<xs:schema targetNamespace="urn:iwaysoftware:trans.response.JDESOOUT" xmlns="urn:iwaysoftware:trans.response.JDESOOUT"xmlns:xs=http://www.w3.org/2001/XMLSchema elementFormDefault="qualified">
Change 2
Cut and place the <xs:element name="jdeResponse"></xs:element> section before the <xs:element name="transaction"> section in the WSDL as shown in the following example:
<xs:element name="jdeResponse"> <xs:complexType> <xs:sequence> ----------------------------------</xs:element> <xs:element name="transaction"> -------------------------------
Change 3
Replace iWayEvent:transaction to iWayEvent:jdeResponse, which is located in the
<message name="event">section:<message name="event"> <part name="event_jde_inbound" element="iWayEvent:transaction"/></message>to:
<message name="event"> <part name="event_jde_inbound" element="iWayEvent:jdeResponse"/></message> -
Restart the server.
-
Start Oracle JDeveloper 10.1.3.4 and create a JCA inbound ESB Project.
-
In the Custom Adapter service, select the inbound WSDL from the local file system.
-
Deploy the ESB project successfully and ensure the registration of the ESB project is successful.
-
On the 11g system, ensure that the target and channel that are created use the same name as specified on the 10.1.3.4 system. Copy the 10.1.3.4 schema and modify the 10.1.3.4 schema (jdeschema.xsd) as described in step 7 (only change 1 and change 2), which is used for 10.1.3.4 inbound WSDL creation. While creating the channel on the 11g system, in the PreParser tab, provide the modified event schema location (for example, c:\jdeschema.xsd).
-
Copy the deployed ESB project into the 11g system.
-
Start the Oracle JDeveloper 11g and migrate the 10.1.3.4 ESB project.
-
Once the project is migrated, a successful message is received in Oracle JDeveloper.
-
Expand the migrated project and double-click the composite.xml file to ensure that the project opens without any errors.
-
Double-click the J2CA properties file under the migrated project in Oracle JDeveloper and remove the following line:
<record-converter className="com.iwaysoftware.afjca15.oracle.InboundXMLRecordConverterImpl"/>
For example:
<adapter-config name="jde90_schema_ori" adapter="iWay ERP Adapter" wsdlLocation="jde9_salesorder_tcp_Feb27.wsdl" xmlns="http://platform.integration.oracle/blocks/adapter/fw/metadata"><resource-adapter className="com.iwaysoftware.afjca15.IWAFOracleResourceAdapter"/> <record-converter className="com.iwaysoftware.afjca15.oracle.InboundXMLRecordConverterImpl"/> -
Save and then deploy the migrated ESB project.
-
Ensure that there are no error or warning messages during the deployment process.
-
Trigger the event messages from the J.D. Edwards OneWorld system and verify that successful response XML files are received in the specified output folder.
Selecting a WSDL Using Service Explorer
-
On the 10.1.3.4 system, create a new target for Oracle Application Adapter for SAP R/3 using Application Explorer and connect to the target.
-
Browse to a specific business object.
-
Create a new port and TCP channel for Oracle Application Adapter for SAP R/3.
-
Trigger from the back-end and generate a schema with the response XML that was received in the port location using XMLSpy.
-
Copy the generated schema (.xsd file) in the following location:
<soadp1>\adapters\application\config\jca_sample\schemas\JDEdwards\target -
Generate an inbound WSDL manually using the generated schema.
-
Make the following changes to the generated WSDL, as shown in the following examples:
Change 1
Replace Schemas-jdedwards-com to iwaysoftware in the target namespace:
<xs:schematargetNamespace="urn:Schemas-jdedwards-com:trans.response.JDESOOUT" xmlns="urn:Schemas-jdedwards-com:trans.response.JDESOOUT" xmlns:xs=http://www.w3.org/2001/XMLSchema elementFormDefault="qualified">
to:
<xs:schema targetNamespace="urn:iwaysoftware:trans.response.JDESOOUT" xmlns="urn:iwaysoftware:trans.response.JDESOOUT"xmlns:xs=http://www.w3.org/2001/XMLSchema elementFormDefault="qualified">
Change 2
Cut and place the <xs:element name="jdeResponse"></xs:element> section before the <xs:element name="transaction"> section in the WSDL as shown in the following example:
<xs:element name="jdeResponse"> <xs:complexType> <xs:sequence> ----------------------------------</xs:element> <xs:element name="transaction"> -------------------------------
Change 3
Replace iWayEvent:transaction to iWayEvent:jdeResponse, which is located in the
<message name="event">section:<message name="event"> <part name="event_jde_inbound" element="iWayEvent:transaction"/></message>to:
<message name="event"> <part name="event_jde_inbound" element="iWayEvent:jdeResponse"/></message> -
Restart the server.
-
Start Oracle JDeveloper 10.1.3.4 and create a JCA inbound ESB Project.
-
In the Custom Adapter service, select the inbound WSDL using Service Explorer.
-
Deploy the ESB project successfully and ensure the registration of the ESB project is successful.
-
On the 11g system, ensure that the target and channel that are created use the same name as specified on the 10.1.3.4 system. Copy the 10.1.3.4 schema and modify the 10.1.3.4 schema (jdeschema.xsd) as described in step 7 (only change 1 and change 2), which is used for 10.1.3.4 inbound WSDL creation. While creating the channel on the 11g system, in the PreParser tab, provide the modified event schema location (for example, c:\jdeschema.xsd).
-
Copy the deployed ESB project into the 11g system.
-
Open the project folder and edit the DefaultSystem_CustomAdapterServiceName.esbsvc file (for example, DefaultSystem_SalesOrder.esbsvc) and DefaultSystem_CustomAdapterServiceName_RS.esbsvc file (for example, DefaultSystem_SalesOrder_RS.esbsvc) by providing the system IP address and port number (for example, 192.168.128.122:80) of the 10.1.3.4 WSDL generated system in the
<wsdlURL>sections. For example:1. Original (DefaultSystem_SalesOrder.esbsvc)
<interface> <wsdlURL>http://127.0.0.1:80/orainfra/wsil/adapters/applications/jde90_SalesOrder_receive.wsdl?wsdl</wsdlURL>------------------</interface>Modified (DefaultSystem_SalesOrder.esbsvc)
<interface> <wsdlURL>http://192.168.128.122:80/orainfra/wsil/adapters/applications/jde90_SalesOrder_receive.wsdl?wsdl</wsdlURL>------------------</interface>2. Original (DefaultSystem_SalesOrder_RS.esbsvc)
<serviceDefinition><wsdlURL>http://127.0.0.1:80/orainfra/wsil/adapters/applications/ jde90_SalesOrder_receive.wsdl?wsdl</wsdlURL>--------------------------</endpointDefinition></serviceDefinition>Modified (DefaultSystem_SalesOrder_RS.esbsvc)
<serviceDefinition><wsdlURL>http://192.168.128.122:80/orainfra/wsil/adapters/applications/ jde90_SalesOrder_receive.wsdl?wsdl</wsdlURL>--------------------------</endpointDefinition></serviceDefinition> -
Start Oracle JDeveloper 11g and migrate the 10.1.3.4 ESB project.
-
Once the project is migrated, a successful message is received in Oracle JDeveloper.
-
Expand the migrated project and double-click the composite.xml file to ensure that the project opens without any errors.
-
Double-click the J2CA properties file under the migrated project in Oracle JDeveloper and remove the following line:
<record-converter className="com.iwaysoftware.afjca15.oracle.InboundXMLRecordConverterImpl"/>
For example:
<adapter-config name="jde90_schema_ori" adapter="iWay ERP Adapter" wsdlLocation="jde9_salesorder_tcp_Feb27.wsdl" xmlns="http://platform.integration.oracle/blocks/adapter/fw/metadata"><resource-adapter className="com.iwaysoftware.afjca15.IWAFOracleResourceAdapter"/> <record-converter className="com.iwaysoftware.afjca15.oracle.InboundXMLRecordConverterImpl"/> -
Save and then deploy the migrated ESB project.
-
Ensure that there are no error or warning messages during the deployment process.
-
Trigger the event messages from the J.D. Edwards OneWorld system and verify that successful response XML files are received in the specified output folder.
Upgrading a 10.1.3.x BPEL J2CA Outbound Process to 11g
Selecting a WSDL From the Local File System
You can follow the same procedure in "Selecting a WSDL From the Local File System".
Selecting a WSDL Using Service Explorer
You can follow the same procedure in "Selecting a WSDL Using Service Explorer".
Upgrading a 10.1.3.x BPEL J2CA Inbound Process to 11g
Selecting a WSDL From the Local File System
-
On the 10.1.3.4 system, create a new target for Oracle Application Adapter for SAP R/3 using Application Explorer and connect to the target.
-
Browse to a specific business object.
-
Create a new port and TCP channel for Oracle Application Adapter for SAP R/3.
-
Trigger from the back-end and generate a schema with the response XML that was received in the port location using XMLSpy.
-
Copy the generated schema (.xsd file) in the following location:
<soadp1>\adapters\application\config\jca_sample\schemas\JDEdwards\target -
Generate an inbound WSDL manually using the generated schema.
-
Make the following changes to the generated WSDL, as shown in the following examples:
Change 1
Replace Schemas-jdedwards-com to iwaysoftware in the target namespace:
<xs:schematargetNamespace="urn:Schemas-jdedwards-com:trans.response.JDESOOUT" xmlns="urn:Schemas-jdedwards-com:trans.response.JDESOOUT" xmlns:xs=http://www.w3.org/2001/XMLSchema elementFormDefault="qualified">
to:
<xs:schema targetNamespace="urn:iwaysoftware:trans.response.JDESOOUT" xmlns="urn:iwaysoftware:trans.response.JDESOOUT"xmlns:xs=http://www.w3.org/2001/XMLSchema elementFormDefault="qualified">
Change 2
Cut and place the <xs:element name="jdeResponse"></xs:element> section before the <xs:element name="transaction"> section in the WSDL as shown in the following example:
<xs:element name="jdeResponse"> <xs:complexType> <xs:sequence> ----------------------------------</xs:element> <xs:element name="transaction"> -------------------------------
Change 3
Replace iWayEvent:transaction to iWayEvent:jdeResponse, which is located in the
<message name="event">section:<message name="event"> <part name="event_jde_inbound" element="iWayEvent:transaction"/></message>to:
<message name="event"> <part name="event_jde_inbound" element="iWayEvent:jdeResponse"/></message> -
Restart the server.
-
Start Oracle JDeveloper 10.1.3.4 and create the inbound BPEL Process by selecting the inbound WSDL from the local file system in the Partner Link.
-
Deploy the BPEL process successfully and ensure there are no error or warning messages during deployment.
-
Trigger the event messages from the J.D. Edwards OneWorld system and ensure that successful instances are received in the BPEL Console.
-
On the 11g system, ensure that the target and channel that are created use the same name as specified on the 10.1.3.4 system. Copy the 10.1.3.4 schema and modify the 10.1.3.4 schema (jdeschema.xsd) as described in step 7 (only change 1 and change 2), which is used for 10.1.3.4 inbound WSDL creation. While creating the channel on the 11g system, in the PreParser tab, provide the modified event schema location (for example, c:\jdeschema.xsd).
-
Copy the deployed BPEL project into the 11g system.
-
Start Oracle JDeveloper 11g and migrate the 10.1.3.4 BPEL project.
-
Once the project is migrated, a successful message is received in Oracle JDeveloper.
-
Expand the migrated project and double-click the composite.xml file to ensure that the project opens without any errors.
-
Double-click the J2CA properties file under the migrated project in Oracle JDeveloper and remove the following line:
<record-converter className="com.iwaysoftware.afjca15.oracle.InboundXMLRecordConverterImpl"/>
For example:
<adapter-config name="jde90_schema_ori" adapter="iWay ERP Adapter" wsdlLocation="jde9_salesorder_tcp_Feb27.wsdl" xmlns="http://platform.integration.oracle/blocks/adapter/fw/metadata"><resource-adapter className="com.iwaysoftware.afjca15.IWAFOracleResourceAdapter"/> <record-converter className="com.iwaysoftware.afjca15.oracle.InboundXMLRecordConverterImpl"/> -
Save and then deploy the migrated BPEL project.
-
Ensure that there are no error or warning messages during the deployment process.
-
Trigger the event messages from the J.D. Edwards OneWorld system and ensure that successful instances are received in the Oracle Enterprise Manager console.
Selecting a WSDL Using Service Explorer
-
On the 10.1.3.4 system, create a new target for Oracle Application Adapter for SAP R/3 using Application Explorer and connect to the target.
-
Browse to a specific business object.
-
Create a new port and TCP channel for Oracle Application Adapter for SAP R/3.
-
Trigger from the back-end and generate a schema with the response XML that was received in the port location using XMLSpy.
-
Copy the generated schema (.xsd file) in the following location:
<soadp1>\adapters\application\config\jca_sample\schemas\JDEdwards\target -
Generate an inbound WSDL manually using the generated schema.
-
Make the following changes to the generated WSDL, as shown in the following examples:
Change 1
Replace Schemas-jdedwards-com to iwaysoftware in the target namespace:
<xs:schematargetNamespace="urn:Schemas-jdedwards-com:trans.response.JDESOOUT" xmlns="urn:Schemas-jdedwards-com:trans.response.JDESOOUT" xmlns:xs=http://www.w3.org/2001/XMLSchema elementFormDefault="qualified">
to:
<xs:schema targetNamespace="urn:iwaysoftware:trans.response.JDESOOUT" xmlns="urn:iwaysoftware:trans.response.JDESOOUT"xmlns:xs=http://www.w3.org/2001/XMLSchema elementFormDefault="qualified">
Change 2
Cut and place the <xs:element name="jdeResponse"></xs:element> section before the <xs:element name="transaction"> section in the WSDL as shown in the following example:
<xs:element name="jdeResponse"> <xs:complexType> <xs:sequence> ----------------------------------</xs:element> <xs:element name="transaction"> -------------------------------
Change 3
Replace iWayEvent:transaction to iWayEvent:jdeResponse, which is located in the
<message name="event">section:<message name="event"> <part name="event_jde_inbound" element="iWayEvent:transaction"/></message>to:
<message name="event"> <part name="event_jde_inbound" element="iWayEvent:jdeResponse"/></message> -
Restart the server.
-
Start Oracle JDeveloper 10.1.3.4 and create the inbound BPEL Process by selecting the inbound WSDL from the Service Explorer in the Partner Link.
-
Deploy the BPEL process successfully and ensure there are no error or warning messages during deployment.
-
Trigger the event messages from the J.D. Edwards OneWorld system and ensure that successful instances are received in the BPEL Console.
-
On the 11g system, ensure that the target and channel that are created use the same name as specified on the 10.1.3.4 system. Copy the 10.1.3.4 schema and modify the 10.1.3.4 schema (jdeschema.xsd) as described in step 7 (only change 1 and change 2), which is used for 10.1.3.4 inbound WSDL creation. While creating the channel on the 11g system, in the PreParser tab, provide the modified event schema location (for example, c:\jdeschema.xsd).
-
Copy the deployed BPEL project into the 11g system.
-
Edit the bpel.xml file for the WSDL location in the 10.1.3.4 project folder (Project_Name\bpel):
<partnerLinkBinding name=" jde90_schema_ori"><property name="wsdlLocation">http://192.168.128.125:80/orainfra/wsil/adapters/applications/ jde9_salesorder_tcp_Feb27.wsdl?wsdl</property></partnerLinkBinding>Where the IP address and port number refer to the 10.1.3.4 system where the WSDL was generated.
-
Ensure that the 10.1.3.4 server is up and running.
-
Start Oracle JDeveloper 11g and migrate the 10.1.3.4 BPEL project.
-
Once the project is migrated, a successful message is received in Oracle JDeveloper.
-
Expand the migrated project and double-click the composite.xml file to ensure that the project opens without any errors.
-
Double-click the J2CA properties file under the migrated project in Oracle JDeveloper and remove the following line:
<record-converter className="com.iwaysoftware.afjca15.oracle.InboundXMLRecordConverterImpl"/>
For example:
<adapter-config name="jde90_schema_ori" adapter="iWay ERP Adapter" wsdlLocation="jde9_salesorder_tcp_Feb27.wsdl" xmlns="http://platform.integration.oracle/blocks/adapter/fw/metadata"><resource-adapter className="com.iwaysoftware.afjca15.IWAFOracleResourceAdapter"/> <record-converter className="com.iwaysoftware.afjca15.oracle.InboundXMLRecordConverterImpl"/> -
Save and then deploy the migrated BPEL project.
-
Ensure that there are no error or warning messages during the deployment process.
-
Trigger the event messages from the J.D. Edwards OneWorld system and ensure that successful instances are received in the Oracle Enterprise Manager console.


