7 Managing Web Service Policies
This chapter includes the following sections:
Overview of Web Services Policy Management
For information about Web services policies and how Oracle Fusion Middleware uses policies to manage Quality of Service (QoS) for Web services, see "Understanding Oracle WSM Policy Framework"."
Viewing Available Web Services Policies
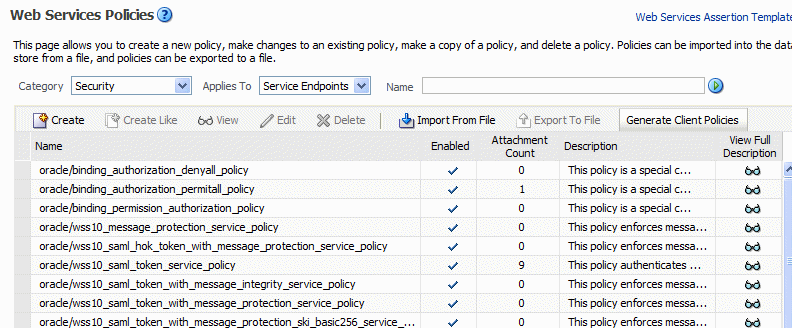
You can use both Fusion Middleware Control and the WebLogic Scripting Tool (WLST) to view the Web service polices in your domain. In Fusion Middleware Control, you view the policies using the Web Services Policies page.
Use the procedures in the following sections to view a list of the policies.
Navigating to the Web Services Policies Page in Fusion Middleware Control
You manage the Web services policies in your farm from the Web Services Policies page. From this page, you can view, create, edit, and delete Web services policies.
-
In the navigator pane, expand WebLogic Domain to show the domain for which you want to see the policies. Select the domain.
-
Using Fusion Middleware Control, click WebLogic Domain, then Web Services and then Policies.
The Web Services Policies page is displayed (Figure 7-1).
Displaying a List of the Available Policies Using WLST
To display a list of the available policies using WLST:
-
Connect to the running instance of WebLogic Server for which you want to view the Web services as described in "Accessing the Web Services Custom WLST Commands".
-
Use the
listAvailableWebServicePolicies()WLST command to display a list of the Web services.listAvailableWebServicePolicies([category],[subject])
For example:
wls:/base_domain/domainRuntime> listAvailableWebServicePolicies() List of available OWSM policy - total : 58 security : oracle/binding_authorization_denyall_policy security : oracle/binding_authorization_permitall_policy security : oracle/binding_permission_authorization_policy security : oracle/component_authorization_denyall_policy security : oracle/component_authorization_permitall_policy security : oracle/component_permission_authorization_policy management : oracle/log_policy addressing : oracle/wsaddr_policy mtom : oracle/wsmtom_policy wsrm : oracle/wsrm10_policy wsrm : oracle/wsrm11_policy -
Use the optional
categoryandsubjectarguments to specify the policy category, such as security or management, and the policy subject type, such as server or client.For example:
wls:/base_domain/domainRuntime> listAvailableWebServicePolicies("security","server")
List of available OWSM policy - total : 39
security : oracle/wss_saml_or_username_token_service_policy
security : oracle/wss10_username_token_with_message_protection_service_policy
security : oracle/wss10_x509_token_with_message_protection_service_policy
security : oracle/no_messageprotection_service_policy
security : oracle/wss_saml_or_username_token_over_ssl_service_policy
security : oracle/wss10_username_token_with_message_protection_ski_basic256_service_policy
security : oracle/wss11_saml20_token_with_message_protection_service_policy
security : oracle/wss_sts_issued_saml_bearer_token_over_ssl_service_policy
security : oracle/wss11_sts_issued_saml_hok_with_message_protection_service_policy
security : oracle/wss11_kerberos_token_service_policy
Viewing a Web Service Policy
Follow the procedure below to view the policy details in read-only mode.
-
Navigate to the Web Services Policy page, as described in "Navigating to the Web Services Policies Page in Fusion Middleware Control".
-
From the Web Services Policies page, select a policy from the Policies table and click View.
-
When you are done viewing the policy, click Return to Web Services Policies.
Searching for Web Service Policies
In the Web Services Policies page, you can narrow down the number of policies that are returned by specifying criteria in the Search Filter (Figure 7-2).
The wildcard character asterisk (*) in the Name field matches any characters.
The policies that are returned are those that match the criteria specified in the Category, Applies To, and Name fields (Table 7-1).
Table 7-1 Search Filter Criteria
| Field | Description |
|---|---|
|
Category |
Category to which the Web service policy belongs. The options are:
|
|
Applies To |
Policy subject to which the policy can be attached. The options are:
SOA Web services are categorized as Service Endpoints, and SOA references are categorized as Service Clients. |
|
Name |
Name of the policy. You can enter the complete name or part of policy name. For example, if you enter http, any policy with http in any part of its name is returned. |
For example, if Security is selected in the Category field, and Service Endpoints is selected in the Applies To field, and the Name field is left blank, then the policies returned are those security policies that can be attached to Web service endpoints.
Creating Web Service Policies
You can create a Web service policy in one of the following ways:
-
Creating a new policy using assertion templates
-
Creating a policy from an existing policy
-
Importing a policy from a file
-
Creating custom policies
The sections that follow describe how to create policies using each of these methods.
Creating a New Web Service Policy
Follow the procedure below to create a new policy using one or more assertion templates.
To create a new Web service policy
-
Navigate to the Web Services Policy page, as described in "Navigating to the Web Services Policies Page in Fusion Middleware Control".
-
From the Category menu, select the category to which this policy will belong and click Create.
Note:
The Create button is available only for the Security and Management categories. -
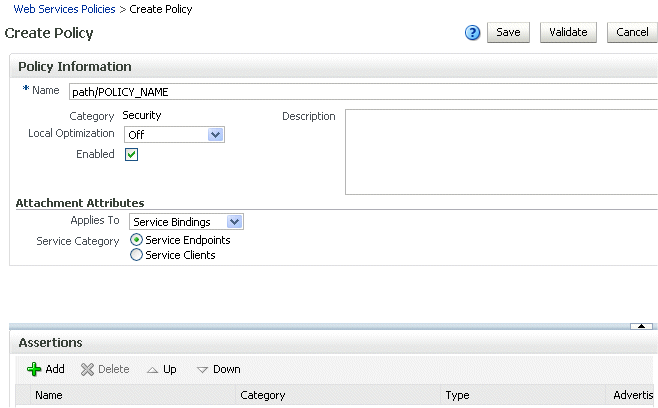
In the Create Policy page (Figure 7-3), enter the path, name, and brief description for your policy. All policies are identified by the directory in which the policy is located.
Oracle recommends that you follow the policy naming conventions described in "Recommended Naming Conventions for Policies".
Note:
You cannot edit the name of a policy once the policy is created. To change the policy name, you will need to copy the policy and assign it a different name. -
Set the Local Optimization control. See "Configuring Local Optimization for a Policy" for a description of the Local Optimization control.
-
By default, the policy is enabled. If you want to disable the policy, clear the Enabled box. A policy that is not enabled is not enforced at run time.
-
Specify the type of policy subjects the policy can be attached to by selecting from the Applies To menu. If you select Service Bindings, then specify whether the policy can be attached to Web service endpoints, Web service clients, or to both.
Of the predefined assertions, only assertions (which you add next) of type security/logging can be added under Service Category Both. If you plan to add other types of assertions, choose Service Endpoints or Service Clients.
-
To add a single assertion:
-
In the Assertions section, click Add.
-
In the Add Assertion box, enter a meaningful name for your assertion, and select an assertion template from the Assertion Template list.
See Appendix C, "Predefined Assertion Templates" for information on the Oracle Fusion Middleware Web Services policy assertion templates.
-
Click OK.
-
-
To add an OR group, click Add OR Group. For more details, see "Adding an OR Group to a Policy".
-
In the Assertions section, select the assertion you just added.
-
In the Assertion Details section, enter a description for the assertion.
-
If active for the assertion category, on the Settings tab specify the properties for the assertion. Click the Help icon for information on setting the properties.
-
If active for the assertion category, click the Configurations tab to set the configuration options. Click the Help icon for information on setting the properties.
-
Add additional assertions as needed.
-
When you have finished adding assertions, select the assertions and use the Up and Down controls to order them as needed. Assertions are invoked in the order in which they appear in the list.
-
Click Validate to verify that the policy does not contain errors. For more information on policy validation, see "Validating Web Services Policies".
If the policy is invalid, it is disabled as a precaution. After you correct the validation issues, you will have to enable the policy.
-
Click Save.
Creating a Web Service Policy from an Existing Policy
You can take a Web service policy and use it as a base for creating another policy. By default, Oracle Fusion Middleware 11g Release 1 (11.1.1) comes with predefined policies. You can create a copy of one of the predefined policies or you can create a copy of a policy that you have created. Once the policy is created, you can treat it like any other policy, adding or deleting assertions, and modifying existing assertions.
To make a copy of a Web service policy
-
Navigate to the Web Services Policy page, as described in "Navigating to the Web Services Policies Page in Fusion Middleware Control".
-
From the Web Services Policies page, select a policy from the Policies list and click Create Like.
-
In the Create Policy page, enter a name for the policy.
The word Copy is appended to the name of the copied policy and, by default, this is the name assigned to the new policy. For example, if the policy being copied is named oracle/wss10_username_token_service, then the default name of the copy is oracle/wss10_username_token_service_Copy.
It is recommended that you change the name of this new policy to be more meaningful in your environment.
-
Modify the policy as required, including the assertions.
-
Click Validate to verify that the policy does not contain errors. For more information on policy validation, see "Validating Web Services Policies".
-
Click Save.
Importing Web Service Policies
Follow the procedure in this section to import a policy to the Policy Store. Once the policy is imported, you can attach it to Web services and make changes to it.
Note:
The policy name you import must not already exist in the Policy Store.Be aware that "policy name" and "file name" are different. The policy name is specified by the name attribute of the policy content; the file name is the name of the policy file. You might find it convenient for the two names to match, but it is not required.
You cannot prefix the name of a policy with oracle_. Otherwise, you will receive exceptions when you try to use the policy.
To import a Web service policy
-
Navigate to the Web Services Policy page, as described in "Navigating to the Web Services Policies Page in Fusion Middleware Control".
-
From the Web Services Policies page, click Import From File.
-
In the Create Policy From File box, enter the file path of the file in the Select Policy File Box. Or, you can click on the Browse button and select the policy file.
-
Click OK.
Creating Custom Policies
For information about creating custom Web service policies, see "Creating Custom Assertions" in Extensibility Guide for Oracle Web Services Manager.
Managing Policy Assertion Templates
Your Fusion Middleware installation includes predefined assertion templates that you can use to construct your policies or copy to create new policies. For additional information, see "Building Policies Using Policy Assertions".
You can add one or more assertions to a policy. The predefined assertions are described in Appendix C, "Predefined Assertion Templates". Assertions are executed in the order in which they appear in the list. You can change the order of the assertions in the list by selecting the assertion and clicking the Up or Down arrow.
The following sections provide more information about working with assertions:
Navigating to the Web Services Assertion Templates Page
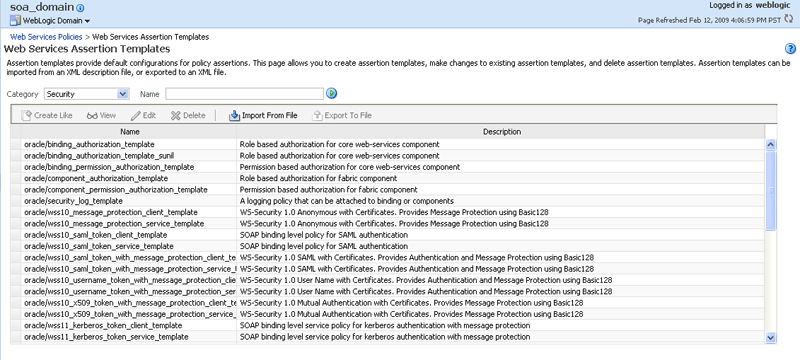
You can manage your assertion templates at the domain level from the Web Services Assertion Template page. From this page, you can copy, edit, and delete assertion templates.
To navigate to the Web Services Assertion Templates page:
-
In the Navigator pane, expand WebLogic Domain.
-
Click the domain for which you want to manage assertion templates.
-
From the WebLogic Domain menu select Web Services > Policies.
The Web Services Policies page is displayed.
-
Click Web Services Assertion Templates in the upper right corner of the page.
The Web Services Assertion Templates page is displayed, as shown in the following figure.
Figure 7-4 Web Services Assertion Templates Page
Description of "Figure 7-4 Web Services Assertion Templates Page"
Naming Conventions for Assertion Templates
The same naming conventions used to name predefined policies are used to name the assertion templates. Assertion templates begin with the directory name oracle/ and are identified with the suffix _template at the end; for example, oracle/wss10_message_protection_service_template. For more information on naming conventions for predefined policies, see "Recommended Naming Conventions for Policies".
Viewing an Assertion Template
Follow the steps in this section to view an assertion template.
-
Navigate to the Web Services Assertion Templates page, as described in "Navigating to the Web Services Assertion Templates Page".
-
From the table, select the assertion template that you want to view.
-
Click View.
-
In the View Template page, review the assertion.
-
When you are done, click Return to Web Services Assertion Templates.
Searching for an Assertion Template
You can search for a Web service assertion template by category, name, or both. To do so:
-
Navigate to the Web Services Assertion Templates page, as described in "Navigating to the Web Services Assertion Templates Page".
-
Perform one or more of the following steps:
-
To search for assertion templates in a specific category (or all categories), select a category from the Category list.
Valid categories include: All, Security, MTOM Attachments, Reliable Messaging, WS-Addressing, and Management.
-
To search for an assertion template that contains a specific string, enter a string in the Name field.
Specify any portion of the name of an assertion template to display all assertion templates that contain the string for the specified category.
-
-
Click the Search Assertion Templates icon next to the Name field.
The assertion templates list is refreshed to include only those assertion templates that match the specified search criteria.
Creating an Assertion Template
A new assertion template is created based on an existing assertion. Pick the assertion template that most closely matches the desired behavior, then make any changes required to get the new behavior.
To create an assertion template:
-
Navigate to the Web Services Assertion Templates page, as described in "Navigating to the Web Services Assertion Templates Page".
-
Select the assertion template from the Assertion Templates table that you want to copy.
-
Click Create Like.
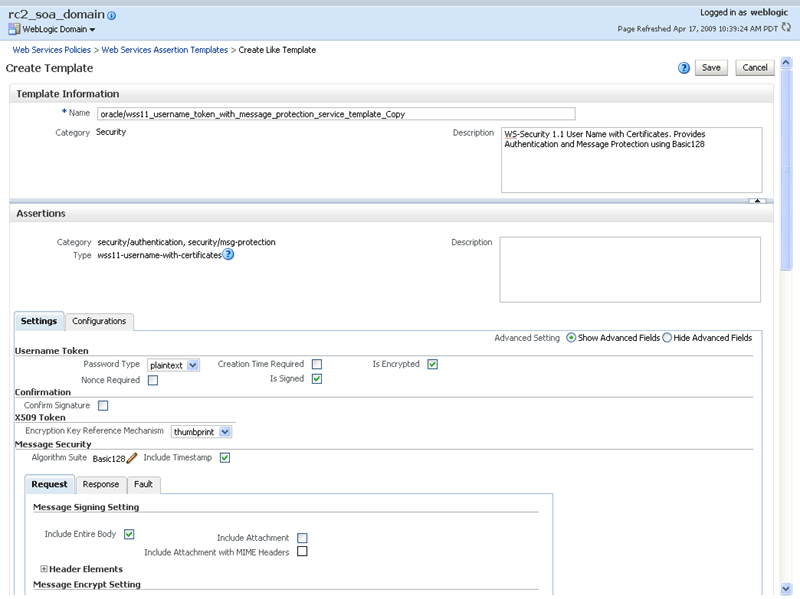
The following graphic shows the Create Template page.
-
In the Template Information section, edit the name of the assertion and, optionally, enter a brief description.
The word Copy is appended to the name of the copied assertion template and, by default, this is the name assigned to the new assertion template. For example, if the assertion template being copied is named oracle/wss10_username_token_service_template, then the default name of the copy is oracle/wss10_username_token_service_template_Copy.
It is recommended that you change the name of this new assertion template to be more meaningful in your environment.
-
Click Save.
The assertion is added to the Assertion Templates table. You can now select the new assertion and click Edit to configure the assertion.
Editing an Assertion Template
Note:
Oracle recommends that you do not edit the predefined assertion templates so that you will always have a known set of valid templates.Follow the steps in this section to edit an assertion template.
-
Navigate to the Web Services Assertions Templates page, as described in "Navigating to the Web Services Assertion Templates Page".
-
From the table, select the assertion template that you want to edit.
-
Click Edit.
-
Click the Settings or Configuration tabs and edit the assertion template as required.
The settings that can be edited for each template are described in Appendix C, "Predefined Assertion Templates.". For information about the properties that you can edit from the Configuration tab, see "Editing the Configuration Properties".
-
When you are finished editing the template, click Save.
Editing the Configuration Properties
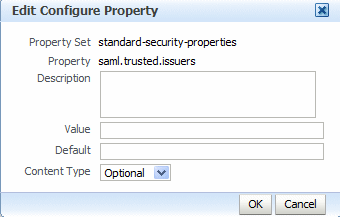
Predefined security assertion templates include configuration properties that you can configure to match your environment. For example, properties that are configurable in assertion templates include csf-key, saml.issuer.name, keystore.recipient.alias, and role, among others. When you edit an existing predefined assertion template or create an assertion template using the Create Like option in Fusion Middleware Control, you can configure the following settings for each property:
Note:
Oracle recommends that you do not edit the predefined assertion templates so that you will always have a known set of valid templates.-
Description—Description of the property.
-
Value—Current value.
-
Default—Default value. This value is used if the Value field is not set.
-
Content Type—Can be one of the following:
-
Constant—Property cannot be overridden.
-
Required—Property is required and can be overridden.
-
Optional—Property is optional and can be overridden.
-
To configure the properties:
-
Select the assertion template to be edited as described in "Editing an Assertion Template".
-
Click the Configurations tab.
The list of properties for the template are displayed.
-
Select the property from the list and click Edit.
The Edit Configure Property box is displayed, as shown in Figure 7-6.
Figure 7-6 Edit Configure Property Window Displayed When Creating an Assertion
Description of "Figure 7-6 Edit Configure Property Window Displayed When Creating an Assertion"
-
Enter the values for your configuration and click OK.
Note:
When you add an assertion to a policy, as described in "Adding Assertions to a Policy", you can configure the assertion identify store properties, specifically the Value, Default, and Description properties, to match your environment. The Content Type property setting defined in the assertion template cannot be changed, and is not displayed in the Edit Configure Property window.
Adding Assertions to a Policy
You can add assertions from the Create Policy page, the Copy Policy page, or the Edit Policy Detail page.
Each policy can contain only one assertion for each of the following categories: MTOM Attachments and Reliable Messaging. The policy can contain any number of assertions belonging to the Security category; however, the combination of assertions must be valid. For more information on valid assertions, see "Validating Web Services Policies".
To add an assertion to a policy:
-
Navigate to the Create Policy page, the Create Like page, or the Edit Policy Detail page.
-
In the Assertions section, click Add.
-
In the Add Assertion box, enter the name for your assertion, and select an assertion from the Assertion Template list.
-
Click OK.
-
To configure the assertion, click the Settings tab and edit the settings as required.
-
To edit the configuration properties, click the Configurations tab.
The list of configuration properties defined for the assertion are displayed.
-
Select the property to be edited and click Edit.
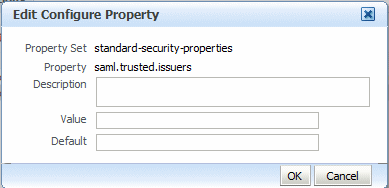
The Edit Configure Property window is displayed as shown in Figure 7-7.
Figure 7-7 Edit Configure Property Window Displayed When Displayed in a Policy
Description of "Figure 7-7 Edit Configure Property Window Displayed When Displayed in a Policy"
-
Edit the Configuration properties and click OK.
Note that you can edit only the Description, Value, and Default properties. The Content Type property setting defined in the assertion template cannot be changed, and is not displayed. For details about these properties, see "Editing the Configuration Properties".
-
When you are done, click Save to save the policy.
Adding an OR Group to a Policy
You can create an OR group, consisting of one or more assertions, enabling a single policy to accept multiple types of security tokens. A client can enforce any one of the policies that are defined in the OR group. For more information, see "Defining Multiple Policy Alternatives (OR Groups)".
You can add only one OR group to a policy. Once you have generated an OR Group, the Add OR Group button is greyed out.
You can add an OR group from the Create Policy page, the Copy Policy page, or the Edit Policy Detail page.
To add an OR group to a policy:
-
Navigate to the Create Policy page, the Create Like page, or the Edit Policy Detail page.
-
In the Assertion List section, click Add OR Group.
-
In the Add OR Group dialog, enter the name of the first assertion in the group, and select an assertion template from the Assertion Template list.
-
Click OK.
The assertion is added under the OR Group.
-
To add additional assertions to the OR group:
-
Ensure that an assertion within the OR group is currently selected.
-
Click Add.
-
In the Add Assertion dialog, enter the name of the assertion in the group, and select an assertion template from the Assertion Template list.
-
Click OK.
-
-
To configure the assertions, see "Configuring Assertions".
The policy attribute values for attachTo and category limit the assertions that are valid within the current policy. All assertions within an OR group must be compatible with the attachTo and category attribute values in order to be considered.
-
When you have finished adding assertions to the OR group, select the assertions and use the Up and Down controls to order them as needed. Assertions are considered for invocation in the order that they appear on the list.
-
To delete an assertion from the OR group, select the assertion and click Delete. To delete the entire OR group, select the OR group and click Delete.
Configuring Assertions
Once an assertion has been added to a policy, you can configure the assertion attributes. You can configure assertions from the Create Policy page, the Create Like page, or the Edit Policy Detail page.
-
Navigate to the Create Policy page, the Create Like page, or the Edit Policy Detail page.
-
In the Assertions section of the page, select the assertion to be configured in the assertion table.
-
Cick the Settings or Configurations tab.
-
Edit the Settings and Configuration properties, and click Save.
See Appendix C, "Predefined Assertion Templates" for more information about the Settings and Configuration assertion properties. For information about the configuration properties displayed on the Configurations tab, see "Editing the Configuration Properties".
Exporting an Assertion Template
You can export individual assertion templates from Oracle Enterprise Manager Fusion Middleware Control. You can then copy the assertion template to a directory or import the assertion template to move it to another repository. Once moved, you can import the assertion template, as described in "Importing an Assertion Template".
To export an assertion template:
-
Navigate to the Web Services Assertions Templates page, as described in "Navigating to the Web Services Assertion Templates Page".
-
Select the assertion template from the Assertion Templates table that you want to export to a file.
-
Click Export to File.
You are prompted to open or save the file.
-
Select Save File.
-
Click Ok.
-
Navigate to the location on your local directory to which you want to save the file and update the filename as desired.
-
Click Save.
Importing an Assertion Template
Follow the steps in this section to view an assertion template.
-
Navigate to the Web Services Assertions Templates page, as described in "Navigating to the Web Services Assertion Templates Page".
-
Click Import From File.
You are prompted to provide the assertion template file.
-
Click Browse to navigate to the directory where the assertion template file is located and select the assertion template to be imported.
-
Click OK.
The assertion template appears in the Assertion Templates table.
Deleting an Assertion Template
Follow the steps in this section to delete an assertion template.
-
Navigate to the Web Services Assertions Templates page, as described in "Navigating to the Web Services Assertion Templates Page".
-
Select the assertion template from the Assertion Templates table that you want to delete.
-
Click Delete.
You are prompted to confirm that you want to delete the assertion template.
-
Click OK.
Validating Web Services Policies
There are restrictions on the type and number of policy assertions that are permitted in a Web service policy. When you validate a policy, Enterprise Manager checks to see if the policy is consistent with these restrictions. A policy can contain only assertions that belong to a single category. Therefore, you cannot combine a Security assertion with an MTOM assertion in the same policy. The policy type is determined by the category of the assertion. Therefore, a policy containing a security assertion is a security policy, a policy containing a management assertion is a management policy, and so on. Security assertions are further categorized into subcategories: authentication, logging, message protection (msg-protection), and authorization.
There are restrictions on the number and type of assertions you can have in a policy. The restrictions are as follows:
-
MTOM and Reliable Messaging policies can contain only one assertion.
-
A security policy can contain multiple security assertions; however, there can be only one assertion from the following subcategories in a policy: encryption, signing, and authentication.
-
Some assertions contain both authentication and message protection. For example, if you view the oracle/wss11_username_token_with_message_protection_service_policy, you will see that the second assertion falls into two categories: security/authentication and security/msg-protection. See Figure 7-8.
Figure 7-8 Assertion Belonging to Two Categories

Description of "Figure 7-8 Assertion Belonging to Two Categories"
-
A security policy can contain any number of security_log_template assertions. For example, if you view any of the predefined security policies, you will see two logging assertions included.
Oracle recommends that you create one policy for authentication and message protection, and a second policy for authorization. If you create a policy that contains both an authentication and an authorization assertion, then the authentication assertion must precede the authorization assertion.
When you validate your policies, the validation process checks to see that your policies meet these requirements. If the validation fails during policy creation, the policy is created but is marked as disabled.
Validating a Policy
Policies can be validated from the Create Policy and Edit Policy pages.
-
From the Create Policy or Edit Policy page, make any changes to your policy.
-
Click Validate.
If successful, the Validation successful message appears.
If not successful, the resulting error message describes the problem.
Editing Web Service Policies
You can make changes to the policies you create or to the predefined policies that come with the product. However, Oracle recommends that you do not change the predefined policies so that you will always have a known set of valid policies to work with.
The changes take effect at the next polling interval for policy changes. If you are using a database-based metadata repository, each time you save a change to your policy, a new version is created, and the older versions are retained.
-
Navigate to the Web Services Policy page, as described in "Navigating to the Web Services Policies Page in Fusion Middleware Control".
-
From the Web Services Policies page, select a policy from the Policies table and click Edit.
-
On the Edit Policy page, make the changes to the policy.
-
Click Save.
Versioning Web Service Policies
Whenever a change to a policy is saved, this results in a new version of the policy being automatically created and the version number being incremented. The Policy Manager maintains the history of these changes, and you can go back to an earlier version.
For example, you might find it useful to create two different versions of a policy, perhaps one with logging and one without, and alternate between them. As another example, you might have an occasional need to use a policy such as oracle/binding_authorization_denyall_policy policy with selected roles to temporarily lock down access to a Web service.
By using the versioning feature, you can reuse multiple versions of a policy without having to recreate them every time you need them.
The following sections describe versioning in more detail:
Note:
The versioning feature described in this section requires that you use a database-based Oracle WSM Repository. If you are not using a database-based repository, versioning information is not maintained or displayed.Viewing the Version History of Web Services Policies
To view the Web services policy version history:
-
Navigate to the Web Services Policy page, as described in "Navigating to the Web Services Policies Page in Fusion Middleware Control".
-
From the Web Services Policies page, select a policy from the Policies table and click View.
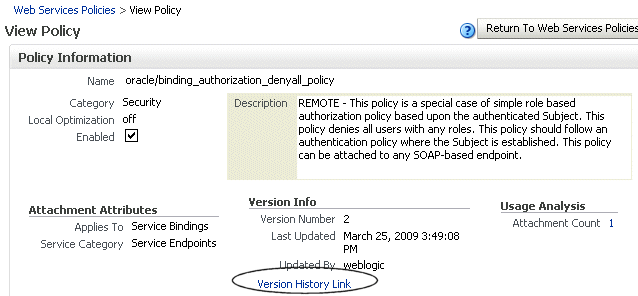
In the Policy Information section, you see the version information, including the Version Number of the active version and the date that the policy was last updated.
-
In the View Policy page, click Version History Link (Figure 7-9) to go to the View Policy Version History page.
Figure 7-9 Version History Link on the Edit Policy Page
Description of "Figure 7-9 Version History Link on the Edit Policy Page"
-
The policies appear in order in the Policy Version History table with the active policy shown first (Figure 7-10). The active policy has the highest version number, and is the only policy that can be attached to a subject. However, you can make an earlier version of a policy the active policy.
Figure 7-10 View Policy Version History Page

Description of "Figure 7-10 View Policy Version History Page"
About the Restore and Activate Policy Options
You can make an earlier version active by selecting a policy from the Policy Version History table (Figure 7-10), and clicking either the Restore or Activate Policy buttons. In both instances, the selected policy is made the current, active policy, and the policy version number is incremented. The following describes the difference between the Restore and Activate Policy options:
-
Clicking Restore, the earlier version of the policy is retained. You can make the earlier version the active version without deleting it. Use Restore if you are modifying your policy and want to keep earlier versions of the policy.
-
Clicking Activate Policy, the selected policy is now the current active policy. The earlier version of the policy is deleted, and the current version is incremented by 1. For example, assume that you have version 1 and version 3 of the policy. You select version 1 and click Activate Policy. The policy is activated as version 4, and version 1 is deleted.
The Activate Policy option can be used in situations where you need to switch between different versions, but you do not want to keep adding policy versions. For example, you may use one version of the policy during business hours and another version during non-business hours. You want to switch between the versions, but you do not want to accumulate multiple versions of the same policy. Therefore, you use Activate Policy to delete the earlier version.
You can also delete any version of the policy, except the active policy, from the Policy Version History table by selecting the policy and clicking Delete. You cannot edit the policy from the Policy Version History page. You must edit a policy from the Web Services Management page.
Creating a New Version of a Web Service Policy
You create a new version of an existing Web service policy by making any desired changes and saving the policy.
Note:
Save does an implicit validation. If the validation fails, the policy is persisted, but the status is set to Disabled.To create a new version of a Web service policy:
-
From the Edit Policy page, make a change to your policy.
-
Click Save.
In the Policy Information section of the page, the version number for the policy is incremented by 1.
Restoring an Earlier Version of a Web Service Policy
Follow the procedure below to return to an earlier version of a policy.
To restore an earlier version of a Web service policy
-
From the View Policy page, click Version History Link, as shown in Figure 7-11.
Figure 7-11 Version History Link on Edit Policy Page

Description of "Figure 7-11 Version History Link on Edit Policy Page"
-
In the Policy History table, select a policy and click Restore or click Activate Policy .
Note:
Restore saves the earlier version of the policy, and Activate Policy deletes the earlier version.If you click Restore, the selected policy is now the current active policy. The earlier version of the policy is retained, and the current version is incremented by 1.
If you click Activate Policy, the selected policy is now the current active policy. The earlier version of the policy is deleted, and the current version is incremented by 1.
Deleting Versions of a Web Service Policy
Follow the procedure below to permanently remove earlier versions of a policy. You can delete all versions except the active policy version. To delete all versions of the policy, including the active version, see "Deleting Web Service Policies".
To delete a Web service policy version
-
From the Copy Policy page or the Edit Policy Detail page, click Version History Link.
-
In the Policy History table, select the policy want to remove, and click Delete.
-
A dialog box appears with a message asking you to confirm the deletion. Click OK.
The selected policy is deleted from the Metadata Services Repository and the Policy History table.
Exporting Web Service Policies
You might want to export a policy to copy it from a development environment to a production environment, or to simply view the policy in another tool or application. Follow the procedure in this section to export a policy from the policy store. Once the policy is exported, you can import it to another policy store, attach it to Web services, make changes to it, and so forth.
To export a Web service policy
-
Navigate to the Web Services Policy page, as described in "Navigating to the Web Services Policies Page in Fusion Middleware Control".
-
Select the policy that you want to export from the list.
-
From the Web Services Policies page, click Export to File.
-
Save the policy in the filename of your choice. (Use only ASCII characters in the filename.)
Note:
You cannot prefix the name of a policy with oracle_. When you export a predefined policy file, the file is renamed from oracle/<policyname> to oracle_<policyname>. You should change this name. Otherwise, you will receive exceptions when trying to use the policy.
Deleting Web Service Policies
Before you delete a policy, Oracle recommends that you verify that the policy is not attached to any policy subjects. You can see the policy subjects that are attached to a policy by doing a policy dependency analysis. See "Analyzing Policy Usage" for more information. If you try to delete a policy that is attached to a subject, you will receive a warning. You will not be prevented from deleting an attached policy. However, the Web service request will fail the next time the subject to which the policy is attached is invoked.
When you delete a policy, the active policy and all previous versions of the policy are deleted. To retain the active policy version and delete only the previous versions of the policy, see "Versioning Web Service Policies".
To delete a Web service policy:
-
Navigate to the Web Services Policy page, as described in "Navigating to the Web Services Policies Page in Fusion Middleware Control".
-
From the Web Services Policies page, select a policy from the Policies table and click Delete.
-
A dialog box appears asking you to confirm the deletion. Click OK.
Generating Client Policies
Once you have created the service policy, you can use the Web service WSDL to generate an equivalent client policy with the parameters required to call that service.
You must use the Oracle WSDL instead of the standard WSDL to generate the client policy. The URL for the Web service must be appended with ?orawsdl, instead of ?wsdl. Generating the policy increases the likelihood that the client policy will work with the service policy.
Once a policy is generated, you can edit the policy. The policy is populated with the client assertion that is the matching pair to the service assertion. For example, if the service policy contained the assertion, wss_http_token_service_template, then the generated client policy is populated with its counterpart, wss_http_token_client_template.
However, the client security policies that are generated will not contain any configuration information. Therefore, once the policies are generated, use the client assertion template and import the configuration information into your client policy. In the example, you would import configuration information from the client assertion template, wss_http_token_client_template. After you have made the desired changes to the policy, you must save the policy. Once a policy is saved, you can access it from the Web Services Management page.
You can also delete any generated policies that you do not need. For example, you may want to delete duplicates of already existing MTOM or Reliable Messaging policies.
To generate a Web service client policy
-
Determine the WSDL for the Web service for which you want to generate a Web service client policy.
-
Navigate to the Web Services Policy page, as described in "Navigating to the Web Services Policies Page in Fusion Middleware Control".
-
From the Web Services Policies page, click Generate Client Policies, as shown in Figure 7-12.
Figure 7-12 Generate Client Policies on the Web Services Policies Page

Description of "Figure 7-12 Generate Client Policies on the Web Services Policies Page"
-
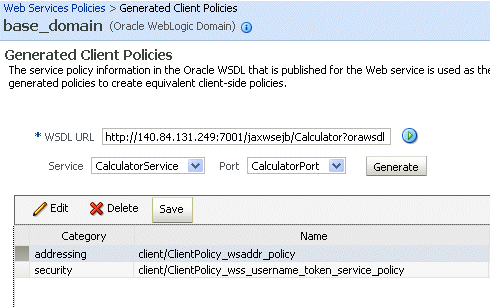
In the Generated Client Policies page, enter the URL to the Web service WSDL using the following format: Web_service_endpoint?orawsdl, and click the control to access the Web service and ports, as shown in Figure 7-13.
Note:
You must use ?orawsdl, instead of ?wsdl, to get the WSDL that is used to generate the corresponding client policy. Prepend ora to wsdl to accomplish this.The Web_service_endpoint is the URL to the Web service. The service policy information in the Oracle WSDL published for the Web service is used as the basis for generating the initial client policies.
Figure 7-13 Getting the Web Service and Ports

Description of "Figure 7-13 Getting the Web Service and Ports"
-
In the Generated Client Policies page (Figure 7-14), click Generate to generate the client policies, as shown in Figure 7-14.
Figure 7-14 Generated Client Policies Page
Description of "Figure 7-14 Generated Client Policies Page"
-
Select a generated policy from the table and click Edit.
-
In the Edit Policy page, edit the policy as necessary.
-
Click Validate to validate your changes.
-
You are returned to the Generated Client Policies page. Edit the other policies as needed.
Once the policy is saved, you can navigate to the Web Services Management page and find the policy in the Policies table.
Enabling or Disabling a Policy for a Single Policy Subject
When a policy is attached to a Web service, it is enabled by default. You may temporarily disable a policy for a single endpoint without disassociating it from the Web service. When the policy is disabled for an endpoint, it is not enforced for that endpoint.
Using Fusion Middleware Control
Policies must be individually enabled or disabled for the endpoint; you cannot enable or disable multiple policies at the same time.
To enable or disable a policy attachment:
-
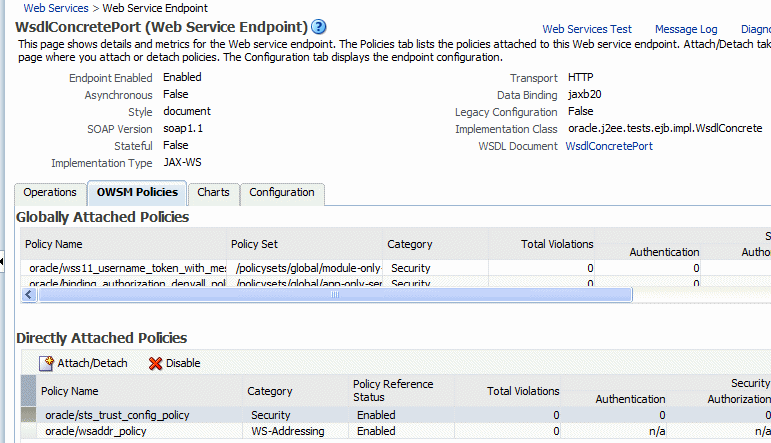
From the Web Service Endpoint page, click the OWSM Policies tab.
-
Select the policy you want to enable or disable.
For Oracle Infrastructure Web services, select a policy from the Directly Attached Policies table.
-
Select Enable or Disable to enable or disable the policy, respectively, and confirm your selection. (See Figure 7-15.)
Figure 7-15 Enabling or Disabling a Policy Attachment
Description of "Figure 7-15 Enabling or Disabling a Policy Attachment"
Using WLST
Note:
The procedure described in this section applies to Oracle Infrastructure Web services only.To enable or disable a policy or multiple policies attached to an endpoint (port):
-
Connect to the running instance of WebLogic Server for which you want to view the Web services as described in "Accessing the Web Services Custom WLST Commands".
-
Use the
listWebServicePoliciesWLST command to display a list of the Web service policies attached to the desired port.listWebServicePolicies(application,moduleOrCompName,moduleType,serviceName, subjectName)
For example, to see a list of the policies attached to the
WsdlConcretePort, use the following command:wls:/base_domain/domainRuntime> listWebServicePolicies('/base_domain/soa_server1/jaxwsejb30ws', 'jaxwsejb','web','WsdlConcreteService','WsdlConcretePort') WsdlConcretePort : security : oracle/binding_authorization_denyall_policy , enabled=true security : oracle/wss_username_token_service_policy , enabled=true
-
Enable or disable a single policy using the
enableWebServicePolicycommand and setting theenableargument totrueorfalse, respectively.enableWebServicePolicy(application, moduleOrCompName, moduleType, serviceName, subjectName, policyURI,[enable], [subjectType=None] ))
For example, to disable the
oracle/binding_authorization_denyall_policy, enter the following command:wls:/base_domain/domainRuntime> enableWebServicePolicy('/base_domain/soa_server1/jaxwsejb30ws', 'jaxwsejb','web','WsdlConcreteService','WsdlConcretePort','oracle/binding_authorization_denyall_policy',false)
-
Enable or disable multiple policies attached to a port using the
enableWebServicePoliciescommand and setting theenableargument totrueorfalse, respectively.enableWebServicePolicies(application, moduleOrCompName, moduleType, serviceName, subjectName, policyURIs,[enable],[subjectType=None] ))
For example:
wls:/base_domain/domainRuntime> enableWebServicePolicies('/base_domain/soa_server1/jaxwsejb30ws',
'jaxwsejb','web','WsdlConcreteService','WsdlConcretePort',
['oracle/binding_authorization_denyall_policy',oracle/wss_username_token_service_policy],false)
-
For ADF and WebCenter applications, restart the Web service application. You do not need to restart a SOA composite.
For more information about these WLST commands and their arguments, see "Web Services Custom WLST Commands" in WebLogic Scripting Tool Command Reference.
Enabling or Disabling a Policy for All Subjects
When a policy is created, it is enabled by default unless it has validation errors. A policy can be globally enabled or disabled from the Edit Policy page. You can enable or disable the policy from one central location, and it will be enabled or disabled for any policy subject to which it is attached.
When you disable a policy from the Edit Policy page, the policy continues to be attached to the policy subjects, but the policy is not enforced. You may want to temporarily disable a policy if you discover that there is a problem with the policy that is causing all requests to a Web service to fail. Once the problem is corrected, you can globally enable the policy.
Before disabling a policy, you may want to click Usage Analysis Link (see "Analyzing Policy Usage") to see the policy subjects to which the policy is attached. The change to the policy takes effect at the next polling interval for policy changes.
You may also selectively enable or disable a policy for a specific policy subject rather than for all policy subjects. See "Enabling or Disabling a Policy for a Single Policy Subject" for more information.
To enable or disable a Web service policy for all policy subjects:
-
Navigate to the Web Services Policy page, as described in "Navigating to the Web Services Policies Page in Fusion Middleware Control".
-
Select a policy from the Policies table and click Edit.
-
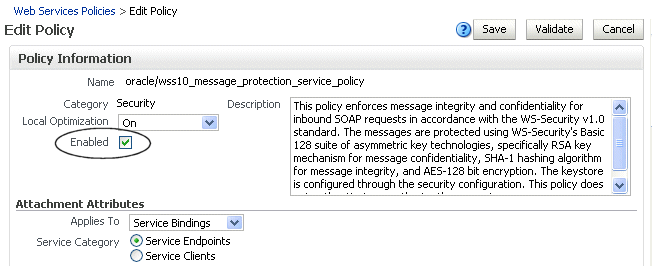
In the Policy Information section of the Edit Policy page, select or deselect the Enabled box to enable or disable the policy, respectively (see Figure 7-16).
Figure 7-16 Enabled Box on the Edit Policy Page
Description of "Figure 7-16 Enabled Box on the Edit Policy Page"
-
Click Save.
Enabling or Disabling Assertions Within a Policy
Rather than enable or disable an entire policy, you may wish to enable or disable one or more of the assertions that are contained within a policy. This provides a more fine-grained level of control over the assertions that are executed.
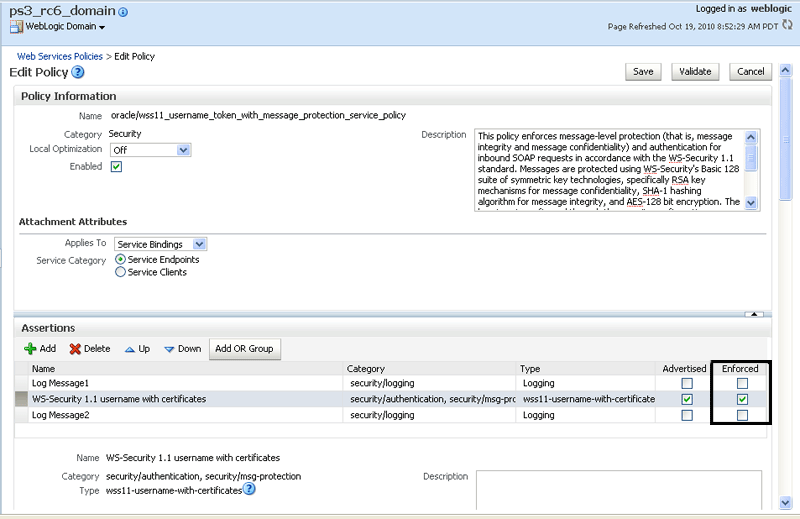
For example, all predefined Web service security policies contain an instance of the logging assertion template, oracle/security_log_template, to capture the entire SOAP message before and after the primary security assertion is executed. By default, the log assertion is not enforced. You must enable it in order for the SOAP message to be logged in message logs. (It is recommended that the logging assertion be enabled for debugging and auditing purposes only. For more information about logging, see "Diagnosing Problems Using Logs".)
To enable or disable one or more assertions within a policy:
-
Navigate to the Web Services Policy page, as described in "Navigating to the Web Services Policies Page in Fusion Middleware Control".
-
Select a policy from the Policies table and click Edit.
-
In the Assertions section of the Edit Policy page, select or deselect the Enforced box to enable or disable the assertion within the policy, respectively (see Figure 7-17).
Figure 7-17 Enable or Disable an Assertion Within a Policy
Description of "Figure 7-17 Enable or Disable an Assertion Within a Policy"
-
Click Save.
Analyzing Policy Usage
Note:
The policy usage feature described in this section requires that you use a database-based Oacle WSM Repository. If you are not using a database-based repository, policy usage information is not available.Policies are created and managed at the domain level. The central management of policies gives you the ability to reuse policies and attach them to multiple policy subjects. Any change to a policy (for example, editing a policy or deleting a policy) affects all policy subjects to which the policy is attached. Therefore, before making any changes to your policies, Oracle recommends you do a usage analysis to see which subjects are using a particular policy.
Note:
The usage analysis simply identifies which policy subjects will be affected; it does not define the effect of the change. You need to evaluate the change on each of the policy subjects and determine if you should proceed.-
Navigate to the Web Services Policies page as described in "Navigating to the Web Services Policies Page in Fusion Middleware Control".
The Attachment Count column of the Policies table shows the number of subjects to which a policy is attached.
-
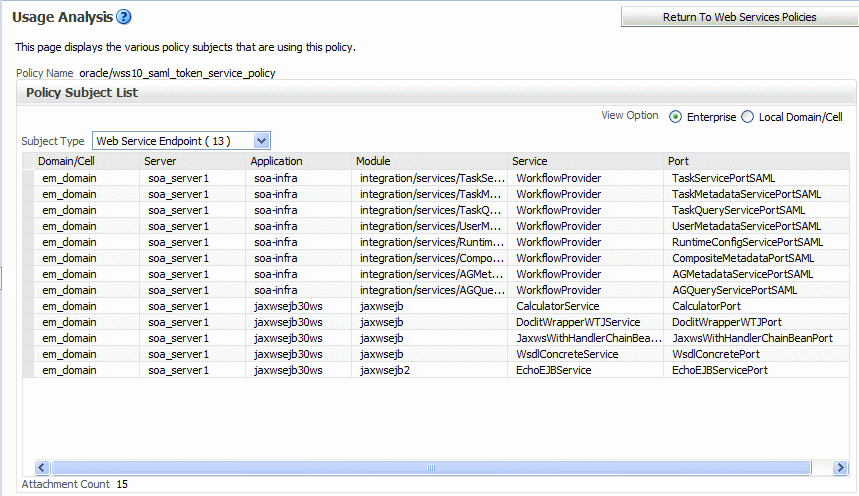
Click the number in the Attachment Count column for the selected policy to display the Usage Analysis page (Figure 7-18).
Alternatively, you can select the policy from the Policies table and click View. In the Policy Information region of the page, click the Attachment Count number in the Usage Analysis field to display the Usage Analysis page.
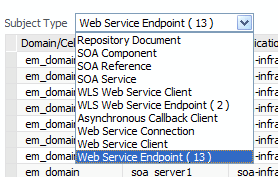
The Policy Subject List is filtered by subject type. The table displays a list of the policy subjects, of the selected type, to which the policy is attached. Subjects are organized using the following subject types: Repository Document, SOA Component, SOA Reference, SOA Service, WLS Web Service Client, WLS Web Service Endpoint, Asynchronous Callback Client, Web Service Connection, Web Service Client, and Web Service Endpoint. Note that the Policy Subject List summary table displays fields that are relevant to the selected policy subject type only.
The total number of policy subjects to which the policy is attached is shown at the bottom of the page in the Attachment Count field.
-
To view the other policy subjects to which the policy is attached, select the subject type from the Subject Type menu.
The Subject Type menu provides an attachment count for each subject type to which the policy is attached.
Figure 7-19 Subject Type Menu on Usage Analysis Page
Description of "Figure 7-19 Subject Type Menu on Usage Analysis Page"
-
In cases where multiple domains share the same Oracle WSM Repository to store Oracle WSM metadata, you can specify whether you want to view policy subjects in the Local Domain or in all domains in the enterprise. To view the policy subjects for all domains in the enterprise, select Enterprise in the View Option field.
Figure 7-20 View Option Field on Usage Analysis Page

Description of "Figure 7-20 View Option Field on Usage Analysis Page"
Please note:
-
Both enabled and disabled policy references are included in the policy usage count. For information about disabling a policy reference, see "Enabling or Disabling a Policy for a Single Policy Subject" and "Enabling or Disabling a Policy for All Subjects".
-
After attaching a policy to an Oracle Infrastructure Web Service endpoint, you need to restart the Web service application to display an accurate policy usage count. You do not need to restart a SOA composite or a WebLogic Java EE Web service application.
-
You must invoke an ADF DC client to display an accurate policy usage count.
Policy Advertisement
For a standard WSDL (?wsdl), you can publish different version combinations for WS-Policy and WS-SecurityPolicy. For example, http://localhost:8080/abc?wsdl&wsp=1.5&wssp=1.2 returns a WSDL with the following policy versions published: WS-Policy 1.5 and WS-SecurityPolicy 1.2.
Note:
For an Oracle WSDL (?orawsdl), you cannot advertise different version combinations for WS-Policy and WS-SecurityPolicy. For ?orawsdl, the policy is advertised with the following versions only: WS-Policy 1.2 and WS-SecurityPolicy 1.1 with Oracle extensions.Table 7-2 lists the valid version combinations.
Table 7-2 Policy Advertisement
| Version Combination | Description |
|---|---|
|
?wsdl |
WS-Policy 1.2 and WS-SecurityPolicy 1.1 |
|
?wsdl&wsp=1.5 |
WS-Policy version 1.5 and WS-SecurityPolicy 1.3 |
|
?wsdl&wssp=1.2 |
WS-Policy versions 1.5 and WS-SecurityPolicy 1.2 |
|
?wsdl&wssp=1.3 |
WS-Policy versions 1.5 and WS-SecurityPolicy 1.3 |
|
?wsdl&wsp=1.5&wssp=1.2 |
WS-Policy 1.5 and WS-SecurityPolicy 1.2 |
|
?wsdl&wsp=1.5&wssp=1.3 |
WS-Policy 1.5 and WS-SecurityPolicy 1.3 |
|
?wsdl&wsp=1.2&wssp=1.2 |
WS-Policy 1.2 and WS-SecurityPolicy 1.2 |
