46 Working with Microsoft Office and Explorer Integration
WebCenter Spaces integrates with Microsoft Office and Windows Explorer to provide you with flexibility in managing certain types of content in a Space when the content repository is Oracle Content Server.
Note:
The Documents service is exposed on the Documents page and administration settings in a Space only with Oracle Content Server 11g. If the connected content repository is Oracle Content Server 10g, the Documents page is not shown in a Space, and the Documents service is not available in the Space administration settings (Services and Roles). To use the Documents service functionality in 10g, you can create a page in a Space and add Documents service task flows to the page.The differences in Microsoft Office 2003, 2007, and 2010 mean that each version may support a particular feature in a different way, and one or more versions may not support some of the tasks described in this chapter. Each section in this chapter provides information about which Microsoft Office version supports the task described, and how that support is implemented, where there are differences.
This chapter includes the following sections:
-
Section 46.1, "What You Should Know About Microsoft Office and Explorer Integration"
-
Section 46.2, "Configuring Microsoft Office Integration with WebCenter Spaces"
-
Section 46.3, "Working with Microsoft Office Word, PowerPoint, and Excel Integration"
-
Section 46.4, "Working with Microsoft Windows Explorer Integration"
This chapter is intended for WebCenter Spaces users interested in using Microsoft Office applications and Windows Explorer to manage information in a Space. Much of this information applies to any WebCenter Portal application, though it is written with WebCenter Spaces users in mind.
46.1 What You Should Know About Microsoft Office and Explorer Integration
This following sections provide an overview of the added functionality that integration with Microsoft Office and Windows Explorer offers:
-
Section 46.1.1, "Understanding WebCenter Spaces Word, PowerPoint, and Excel Integration"
-
Section 46.1.2, "Understanding Microsoft Windows Explorer Integration"
46.1.1 Understanding WebCenter Spaces Word, PowerPoint, and Excel Integration
WebCenter Spaces integrates with the Microsoft Office shared document management functionality for working with WebCenter Spaces Word, PowerPoint, or Excel files in a Space (the Home Space or a group Space). This functionality is available in Microsoft Office 2003 and later, and the backend content repository must be Oracle Content Server.
Note:
The differences in Microsoft Office 2003, 2007, and 2010 means that each version may support a particular feature in a different way, and one or more versions may not support some of the tasks described in this chapter. Each section provides information about which version supports the task described, and how that support is implemented, where there are differences.Microsoft Office shared document management functionality offers alternate ways to perform tasks that can also be performed within WebCenter Spaces, as shown in Table 46-1.
Table 46-1 File Management Tasks
46.1.2 Understanding Microsoft Windows Explorer Integration
WebCenter Spaces integrates with Microsoft Windows Explorer to manage the folders and files in a Space when the backend content repository is Oracle Content Server. To use this functionality, you create a network place in Windows Explorer for the Space documents. See Section 46.4, "Working with Microsoft Windows Explorer Integration."
46.2 Configuring Microsoft Office Integration with WebCenter Spaces
Desktop integration of Microsoft Office with WebCenter Spaces requires the following configuration:
-
Modify system properties and server configuration files to allow for full integration of Microsoft Office with WebCenter Spaces. Refer to "Configuring Microsoft Clients" in Oracle Fusion Middleware Administrator's Guide for Oracle WebCenter.
-
If you are using Microsoft Office 2010, integration with WebCenter Spaces requires no additional configuration if WebCenter is using Windows Integrated authentication. If WebCenter is not configured to use Windows Integrated authentication, you need to modify the registry as described in
http://support.microsoft.com/kb/2123563. -
If you access the WebCenter Spaces application through Oracle HTTP Server (OHS), set up a virtual host for the WebCenter application, as described in "Configuring SSO with Virtual Hosts" in Oracle Fusion Middleware Administrator's Guide for Oracle WebCenter.
46.3 Working with Microsoft Office Word, PowerPoint, and Excel Integration
WebCenter Spaces integrates with the Microsoft Office shared document management functionality for working with WebCenter Spaces Word, Excel, or PowerPoint files that belong to a Space. This functionality is available in Microsoft Office 2003 and later, and the backend content repository must be Oracle Content Server. For more information, see Section 46.1.1, "Understanding WebCenter Spaces Word, PowerPoint, and Excel Integration."
Many of the tasks you can perform using the Microsoft Office shared document management functionality can also be performed in WebCenter Spaces, as shown in Table 46-1, and described in Chapter 41, "Working with the Documents Service Task Flows and Document Components."
This section provides steps to perform the following tasks using Microsoft Office shared document management:
-
Section 46.3.1, "Creating a Space from a Microsoft Office Document"
-
Section 46.3.3, "Displaying and Hiding the Microsoft Office Task Pane"
-
Section 46.3.4, "Working with the Microsoft Office Task Pane"
Note:
Oracle WebCenter does not implement administrative features of the Microsoft Office shared document management functionality, such as creating a workspace using the task pane, deleting a workspace, or changing a workspace title.46.3.1 Creating a Space from a Microsoft Office Document
Note:
This feature is available only in Microsoft Office 2007. It is not available in Microsoft Office 2003 or 2010.With Microsoft Office 2007, you can create a Space from a Microsoft Office document, as long as your permissions on the document are the same as your permissions in WebCenter Spaces.
To create a Space from a Microsoft Office document:
-
If you are using Internet Explorer as a browser, add WebCenter to your list of trusted sites in the browser settings.
-
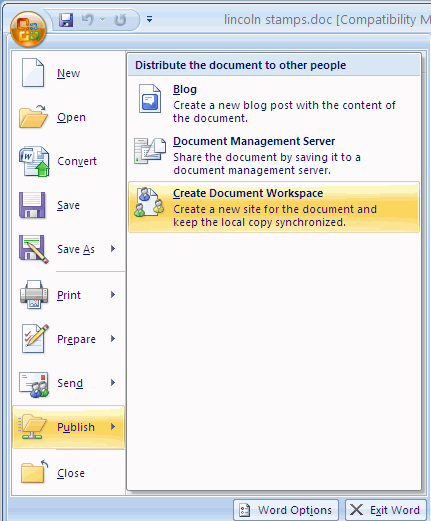
In the Microsoft Office document, click the Office Button (Figure 46-9) in the top left corner of the Microsoft Office application.
-
From the Publish menu, choose Create Document Workspace (Figure 46-2).
-
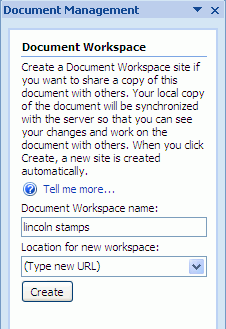
The Microsoft Office application displays the Document Management task pane, displaying the file name as the default workspace name.
Note:
If the pane does not display, see Section 46.3.3, "Displaying and Hiding the Microsoft Office Task Pane." -
In the Document Workspace name field, type a name for the Space if you want to change the default name.
-
In the Location for new workspace field, type the Explorer URL for the WebCenter Spaces instance. For example:
http://myserver.oracle.com:8888/wcsdocs/conn/myserver-ucm11g/spaces
/WebCenter/
You can find this URL in the About Space dialog for an existing Space, as described in Section 49.5, "Viewing Information About a Space."
-
Click Create.
-
At the prompt, enter your WebCenter Spaces login credentials.
WebCenter Spaces creates the new Space in WebCenter Spaces.
In Microsoft Office, the Status section of the Microsoft Office task pane (see Table 46-2) displays one of the following status messages:
This document is up to date.  If you have unsaved changes, you must save the document before you can update the workspace copy.

A copy of this document is stored in a Document Workspace.  Changes made to your document have not been udpated in the workspace copy.
If you update the document in Microsoft Office, you can simply click the Update Workspace Copy link to synchronize the document with the version in the Space (on the server).
46.3.2 Opening a File
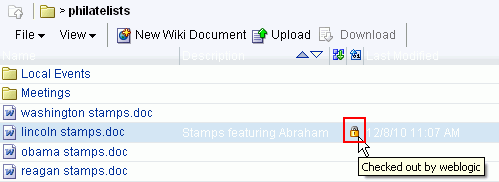
When you open a file from WebCenter Spaces using Microsoft Office shared document management functionality, the file is automatically checked out of the Oracle Content Server repository. When you refresh the page in WebCenter Spaces, the Status column for the file shows a Checked Out icon. To make your changes available to other users, you can check the file in using the Microsoft Office task pane.
Note:
To open any file using the WebCenter Spaces application, see Section 41.8, "Opening a File."To open a Microsoft Office Word, Excel, or PowerPoint file to use the Microsoft Office shared document management functionality:
-
On the Documents page, or in a Documents service task flow on a page, click in the row containing the file, but not on the file name.
-
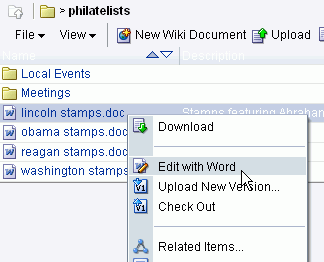
From the File menu or the context (right-click) menu, select the action that opens the file in Microsoft Office:
-
For Microsoft Word files, choose Edit with Word (Figure 46-4).
-
For Microsoft Excel files, choose Edit with Excel.
-
For Microsoft PowerPoint files, choose Edit with PowerPoint.
-
-
If prompted, enter login credentials as required to open the file in Microsoft Office.
Note:
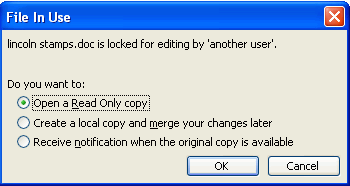
If the file is already checked out by another user, the File in Use dialog opens. See Section 46.3.2.1, "Opening a File Already Checked Out By Another User."-
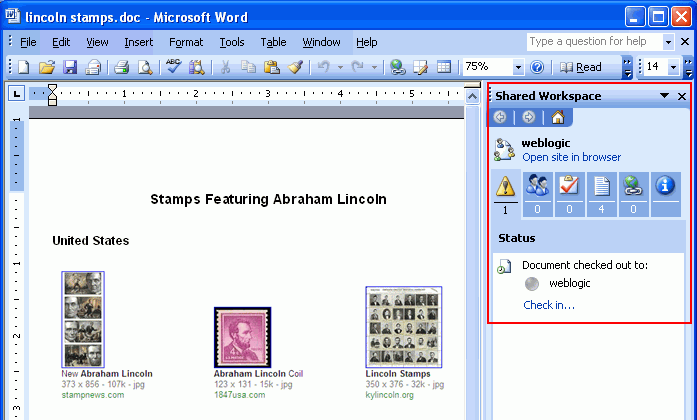
In Microsoft Office 2003. The Microsoft Office application displays a Shared Workspace task pane by default (Figure 46-5).
-
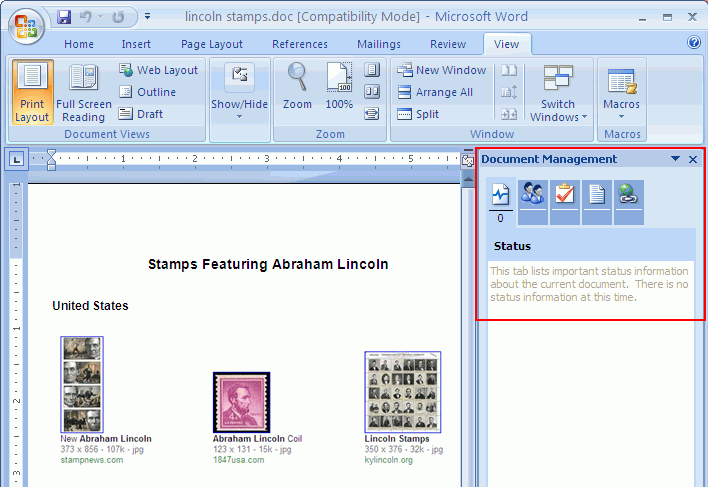
In Microsoft Office 2007. The Microsoft Office application displays no task pane by default. To display the Document Management task pane, see Section 46.3.3, "Displaying and Hiding the Microsoft Office Task Pane."
-
When the file opens, it is automatically checked out. In WebCenter Spaces, click the Refresh icon to show the Checked Out icon for the selected file (Figure 46-6).
You can use the Microsoft Office task pane to open other files in the Space directly from Microsoft Office, instead of from WebCenter Spaces. See Section 46.3.4.6, "Managing Other Files in the Current Space."
46.3.2.1 Opening a File Already Checked Out By Another User
If the file that you attempt to open is already checked out by another user, the File In Use dialog opens (Figure 46-7).
In the File In Use dialog, select the desired option:
-
Open a Read Only copy to open the file in its default application to view it.
-
Create a local copy and merge your changes later is not supported.
-
Receive notification when the original copy is available to open a read-only copy of the file until it is available for editing. When the file is available, the File Now Available dialog (Figure 46-8) notifies you; in the dialog, click Read-Write to change the read-only state to editable.
46.3.3 Displaying and Hiding the Microsoft Office Task Pane
Note:
The Microsoft Office task pane is available only in Microsoft Office 2003 and 2007. Microsoft Office 2010 does not include a task pane.In Microsoft Office 2003, the task pane displays by default when you open a file, whereas in Microsoft Office 2007, the task pane does not display by default.
You can manage the display of the Microsoft Office task pane as described in the following sections:
-
Section 46.3.3.1, "Displaying or Hiding the Task Pane Manually"
-
Section 46.3.3.2, "Displaying or Hiding the Task Pane By Default"
46.3.3.1 Displaying or Hiding the Task Pane Manually
To display or hide the Microsoft Office task pane manually:
In Microsoft Office 2003:
-
From the Tools menu, choose Shared Workspace to toggle between displaying and hiding the task pane.
In Microsoft Office 2007:
-
Click the Office Button (Figure 46-9) in the top left corner of the Microsoft Office application.
-
From the Server menu, choose Document Management Information to toggle between displaying and hiding the Document Management task pane (Figure 46-10).
46.3.3.2 Displaying or Hiding the Task Pane By Default
To display or hide the Microsoft Office task pane automatically by default every time you open a Microsoft Word, Excel, or PowerPoint file:
In Microsoft Office 2003:
-
From the Tools menu, choose Options.
-
In the Options dialog, on the General tab, click Service Options.
-
In the Shared Workspace category, select or clear the checkbox The document is part of a workspace or SharePoint site to respectively display or hide the task pane by default.
In Microsoft Office 2007:
-
At the bottom of the Microsoft Office task pane, click Options (Figure 46-11).
-
In the Service Options dialog, select or clear the checkbox The document is part of a workspace or SharePoint site to respectively display or hide the task pane by default.
46.3.4 Working with the Microsoft Office Task Pane
Note:
The Microsoft Office task pane is available only in Microsoft Office 2003 and 2007. Microsoft Office 2010 does not include a task pane.The Microsoft Office task pane provides information pertaining to the currently open file and access to tasks for all folders and files in the current Space, as described in Table 46-2.
Table 46-2 Microsoft Office Task Pane for Files in a Space
| Task Pane Area | Description |
|---|---|
|
Top section in Microsoft Office 2003: 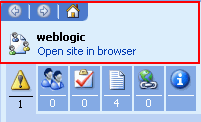
Top section in Microsoft Office 2007: 
Dropdown menu: 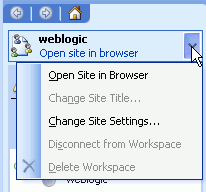 |
For a file in the Home Space:
For a file in a Space:
Additionally, the top section provides a dropdown menu of actions available for the user or Space: |
|
Status section in Microsoft Office 2003: 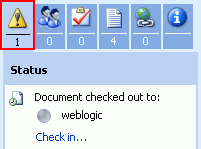
Status section in Microsoft Office 2007: 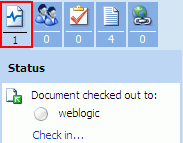
Dropdown menu: 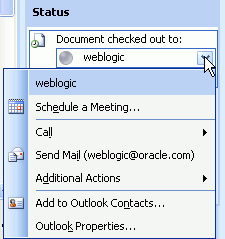 |
Displays information only if the file is checked out. Shows the following information:
Additionally, the Status section provides a dropdown menu of actions available for the user:
|
|
Members section: 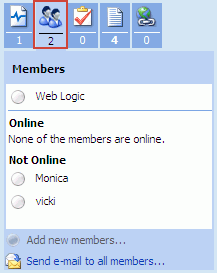
Dropdown menu: 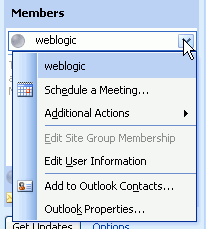 |
For a file in the Home Space:
For a file in a Space:
Additionally, the Members section provides a dropdown menu of actions available for the listed member(s). The actions in this menu are not supported. To send a message to any member, simply click the member's user name to open a Microsoft Outlook window with the To field populated with the mail address that is specified for the member in WebCenter Spaces. |
|
Tasks section: 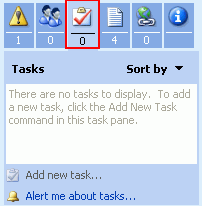 |
Not supported. |
|
Documents section: 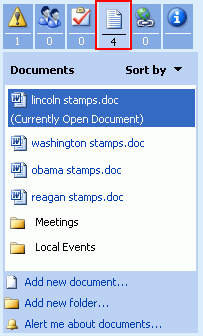 |
Provides access to other files in the current Space directly from Microsoft Office. Sort by. Choose from the menu to sort the list of documents by Creation Date, Modified Date, File Name, File Type, Ascending, or Descending.
|
|
Links section: 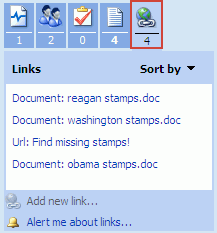 |
The Links section shows all document and URL links defined in WebCenter Spaces to the currently open file. Sort by. Choose from the menu to sort the list of links by Creation Date, Modified Date, URL, Ascending, or Descending.
|
|
Document Information section (Microsoft Office 2003 only): 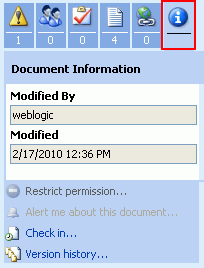 |
Provides information about the currently open document:
|
|
Bottom section:  |
Includes: |
The following sections describe the tasks you can perform using the Microsoft Office task pane:
46.3.4.1 Adding a File
Using the Microsoft Office shared document management functionality, you can add a new file to the Oracle Content Server repository, exposing the file in a Space, as described in the following sections:
-
Section 46.3.4.1.1, "Saving a File As a New File in a Space" (Microsoft Word, Excel, or PowerPoint file only)
-
Section 46.3.4.1.2, "Adding a New File Using the Task Pane" (files of any type)
Note:
Other methods to add a file to the connected content repository are:-
Create a network place to a Space, then use Windows Explorer to add files of any type when the backend content repository is Oracle Content Server, as described in Section 46.4, "Working with Microsoft Windows Explorer Integration."
-
In WebCenter Spaces, copy and paste, upload, or create a file using the Rich Text Editor (RTE), as described in Section 41.14, "Copying and Pasting Folders and Files," Section 41.11.1, "Uploading New Files," and Section 41.12, "Editing and Updating a File."
46.3.4.1.1 Saving a File As a New File in a Space
To save a local Microsoft Word, Excel, or PowerPoint file to a Space:
Note:
This feature is supported in Microsoft Office 2003 and 2007 only.-
Add the Space as a new network place in Windows Explorer, as described in Section 46.4, "Working with Microsoft Windows Explorer Integration."
-
Open the file in its Microsoft Office application.
-
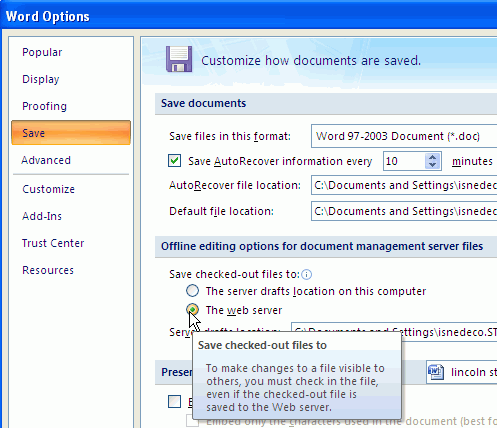
(In Microsoft Office 2007 only) Set Save options for shared documents:
-
Click the Office Button in the top left corner of the Microsoft Office application, then click Word Options (Figure 46-12) at the bottom of the menu.
-
In the Word Options dialog, select Save in the left pane.
-
Under Offline editing options for document management server files, select The web server (Figure 46-13).
-
-
Publish the file to the Space:
In Microsoft Office 2003. From the File menu, choose Save As.
In Microsoft Office 2007. Click the Office Button, then choose either:
-
Publish, then Document Management Server.
-
Or, Save As, then Application Document.
-
-
In the Save As dialog, select the Space network place, then click Save. For more information about Space network place URLs, see Section 46.4.1, "Adding a Space as a Network Place."
-
Enter login credentials for WebCenter Spaces, then click OK.
-
In WebCenter Spaces, on the Documents page of the Space, click the Refresh icon to confirm that the file was added.
Note:
To make the file visible to others, you must check the file in. See Section 46.3.4.4, "Checking a File In." -
To display the Microsoft Office task pane in the open file, see Section 46.3.3, "Displaying and Hiding the Microsoft Office Task Pane."
46.3.4.1.2 Adding a New File Using the Task Pane
To add a new file to a Space using the Microsoft Office task pane:
Note:
This feature is available with Microsoft Office 2003 and 2007. Microsoft Office 2010 does not include a task pane.-
Open a Microsoft Office Word, Excel, or PowerPoint file to use the Microsoft Office shared document management functionality (see Section 46.3.2, "Opening a File").
-
At the bottom of the Documents section of the task pane, click Add new document (Figure 46-14).
The Add New Document dialog opens (Figure 46-15).
-
Browse to the file that you want to add to the current Space.
Note:
WebCenter Spaces supports files up to 2GB in size.The checkbox Make workspace updates available when I open my copy is not supported.
-
Click OK.
The new file displays at the top of the document list in the Documents section of the Microsoft Office task pane. When you refresh the Documents page of the Space in WebCenter Spaces, the file appears in the document list in alphabetical order.
46.3.4.2 Adding a New Folder
Using the Microsoft Office shared document management functionality, you can add a new folder to the Oracle Content Server repository, exposing the folder in a Space.
Note:
Other methods to add a new folder to a Space are:-
Create a network place to a Space, then use Windows Explorer to add a folder, as described in Section 46.4, "Working with Microsoft Windows Explorer Integration."
-
Use the WebCenter Spaces application to add a folder to any connected content repository, as described in Section 41.9, "Creating a Folder."
To add a new folder to a Space using the Microsoft Office task pane:
-
Open a Microsoft Office Word, Excel, or PowerPoint file in the Space to use the Microsoft Office shared document management functionality (see Section 46.3.2, "Opening a File").
-
At the bottom of the Documents section of the task pane, click Add new folder (Figure 46-16).
The Add New Folder dialog opens (Figure 46-17).
-
Enter a name for the new folder, then click OK.
Note:
The rules for folder names follow the Windows Explorer standards.The new folder displays at the top of the document list in the Documents section of the Microsoft Office task pane. When you refresh the Documents page of the Space in WebCenter Spaces, the folder appears in the folder list in alphabetical order.
46.3.4.3 Checking a File Out
Note:
To check any file out using the WebCenter Spaces application, see Section 41.12.1, "Checking a File Out."When you open a Microsoft Office Word, Excel, or PowerPoint file in a Space using the Microsoft Office shared document management functionality, the file is automatically checked out from the Oracle Content Server repository. If you have been granted the appropriate permissions, you can open and check a file out in two environments:
-
From WebCenter Spaces. Open a file using the Microsoft Office shared document management functionality (see Section 46.3.2, "Opening a File") to automatically check out the file.
-
(Microsoft Office 2003 and 2007) From the Microsoft Office task pane. In the Documents section of the task pane, click a file name to automatically check out the file and open it in its default Microsoft Office application.
46.3.4.3.1 Checking the Currently Open File Out Again After Checking It In
After you check a file in (see Section 46.3.4.4, "Checking a File In"), the file remains displayed in Microsoft Office until you close it (see Section 46.3.5, "Closing a File"). If you want to check in further changes to the file, it must be checked out again:
-
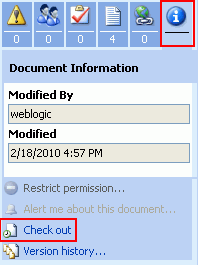
In Microsoft Office 2003. In the Document Information section of the Microsoft Office task pane, you can optionally click Check out to check the file out again (Figure 46-18). However, even if you do not explicitly check out the file, you can continue to edit the file, then save it, and the Status and Document Information sections of the task pane automatically provide a Check in link to check the changed file back in to the repository.
-
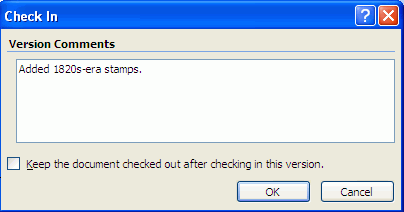
In Microsoft Office 2007 and 2010. When you check a file in, the Check In dialog (Figure 46-21) provides a checkbox labeled Keep the document checked out after checking in this version:
-
Select the checkbox to keep the file checked out after checking in the current version. This allows you to refresh the version of the file available to other users, yet still retain the checked out status to make further changes.
-
Clear the checkbox to check the file in and cancel the checked out status.
If you clear the checkbox, you can optionally check the file out again:
-
Click Edit Document in the area below the toolbar (Figure 46-19).
After you check a file in, Microsoft Office 2007 locks editing that file until you click Edit Document.
-
46.3.4.4 Checking a File In
When you open a file using the Microsoft Office shared document management functionality, you can check it back in to the repository, whether or not you have made changes to it.
Note:
This feature is available with Microsoft Office 2003 and 2007. Microsoft Office 2010 does not include a task pane.In Microsoft Office 2010, you can find file checkin and checkout information on the Info tab (from the File menu, choose Info). When a file is opened in Microsoft Office 2010, it is automatically checked out, changes are (temporarily) applied when saved, and the file is automatically checked in when the file is closed, with a default checkin comment. There is no explicit Check in option in Microsoft Office 2010.
Note:
Intermittently saving the file saves it on the server, but changes are not visible to others until you check the file in. To update the file stored in the WebCenter Spaces repository, you must explicitly check it in. If you close the Microsoft Office application and do not check the file in when prompted, your changes are lost.To check a file in:
-
In the Status section of the Microsoft Office task pane, click Check in.
Note:
In Microsoft Office 2003, you can also find Check in in the Document Information section of the task pane. -
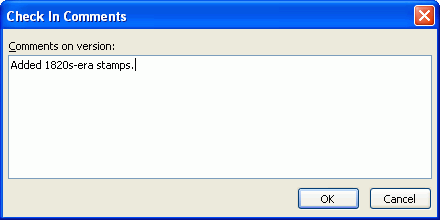
In Microsoft Office 2003. In the Check In Comments dialog (Figure 46-20), optionally enter comments about the changes made to the file since it was last checked out.
In Microsoft Office 2007. In the Check In dialog (Figure 46-21), optionally enter comments about the changes made to the file since it was last checked out, and select the state in which to leave the file:
-
Select the checkbox to keep the file checked out after checking in the current version. This allows you to refresh the version of the file available to other users, yet still retain the checked out status to make further changes.
-
Clear the checkbox to check the file in and cancel the checked out status. To check the file out again, see Section 46.3.4.3.1, "Checking the Currently Open File Out Again After Checking It In."
-
-
Click OK.
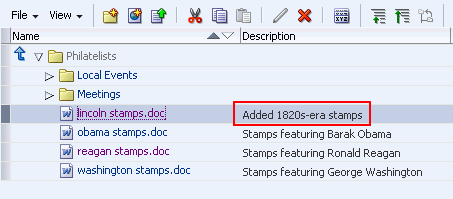
If the file was modified since its prior version, it is automatically saved and checked in to WebCenter Spaces as a new version. If check in comments were entered in the Check In dialog, a new file revision is created with the new comments, which display as the file description in WebCenter Spaces (Figure 46-22).
-
After checking a file in, the file remains displayed in Microsoft Office until you close it (see Section 46.3.5, "Closing a File"). If you wish to make further changes to the file, see Section 46.3.4.3.1, "Checking the Currently Open File Out Again After Checking It In.":
-
When you have finished making changes and checking in the file, close the Microsoft Office application (see Section 46.3.5, "Closing a File").
46.3.4.5 Managing the Currently Open File
Note:
This feature is available with Microsoft Office 2003 and 2007. Microsoft Office 2010 does not include a task pane.To manage the currently open file using the Microsoft Office task pane:
-
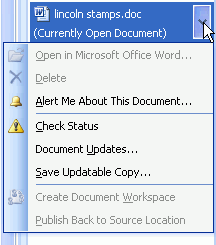
In the Documents section of the task pane, click the dropdown menu icon to the right of the file name (Figure 46-23).
-
Select an available action, as described in Table 46-3:
Table 46-3 Dropdown Menu Actions for Currently Open File
Menu Action Description Open in Microsoft Office
ApplicationNot applicable.
Delete
Not supported. To delete a file in a Space, you must use the WebCenter Spaces application (see Section 41.16, "Deleting Folders and Files") or Windows Explorer (see Section 46.4, "Working with Microsoft Windows Explorer Integration").
Alert Me About This Document
Not supported. Opens the home page of the Space in WebCenter Spaces.
Check Status
Displays the Status section of the task pane.
Document Updates
Not supported.
Save Updatable Copy
Not supported.
Create Document Workspace
Not supported.
Publish Back to Source Location
Not supported.
46.3.4.6 Managing Other Files in the Current Space
Note:
This feature is available with Microsoft Office 2003 and 2007. Microsoft Office 2010 does not include a task pane.To manage a file other than the currently open file in the current Space using the Microsoft Office task pane:
-
In the Documents section of the task pane, navigate to the file.
Note:
Navigating upward in the folder hierarchy from the current document is not supported; you can drill down and then back up to the current level. -
To open the file, click its name.
Depending on the file type, the file opens as described in Section 46.3.2, "Opening a File" for Microsoft Word, Excel, and PowerPoint files, or Section 41.8, "Opening a File" for other file types (such as HTML files or images).
Note:
If you have OpenOffice installed, an error may occur when attempting to open a file from the task pane. To resolve the error, uninstall OpenOffice. -
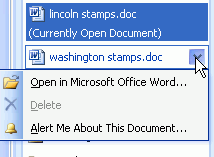
To perform other actions, click the dropdown menu icon to the right of a file name (Figure 46-24):
-
Select an available action, as described in Table 46-4:
Table 46-4 Dropdown Menu Actions for Other Files
Menu Action Description Open in Microsoft Office
ApplicationAttempts to check out the file: if checked out by another user, opens read-only; if not checked out, opens the file in its Microsoft Office application for editing. For more information, see Section 46.3.2, "Opening a File."
Delete
Not supported. To delete a file in a Space, you must use the WebCenter Spaces application (see Section 41.16, "Deleting Folders and Files") or Windows Explorer (see Section 46.4, "Working with Microsoft Windows Explorer Integration").
Alert Me About This Document
Not supported. Opens the home page of the Space in WebCenter Spaces.
46.3.4.7 Managing Folders
Note:
This feature is available with Microsoft Office 2003 and 2007. Microsoft Office 2010 does not include a task pane.To manage a folder under the current folder using the Microsoft Office task pane:
-
In the Documents section of the task pane, navigate to the folder.
Note:
Navigating upward in the folder hierarchy from the current document is not supported; you can drill down and then back up to the current level. -
To open the folder, click its name.
-
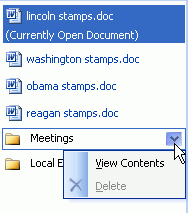
To perform other actions, click the dropdown menu icon to the right of the folder name (Figure 46-25):
-
Select an available action, as described in Table 46-5:
Table 46-5 Dropdown Menu Actions for a Folder
Menu Action Description View Contents
Refreshes the list of files with the contents of the folder only (same effect as clicking the folder name). Click the folder name to refresh to the original list.
Delete
Not supported. To delete a folder in a Space, you must use the WebCenter Spaces application (see Section 41.16, "Deleting Folders and Files") or Windows Explorer (see Section 46.4, "Working with Microsoft Windows Explorer Integration").
46.3.4.8 Viewing Link Targets
Note:
This feature is available with Microsoft Office 2003 and 2007. Microsoft Office 2010 does not include a task pane.The Links section of the Microsoft Office task pane lists the links defined in WebCenter Spaces that are associated with the currently open file (Figure 46-26). Files can have links to related documents, discussions, announcements, events, notes, and URLs; the Links section in the task pane shows the links to associated documents and URLs.
Links are prefixed with the name of the service with which they are associated. For example, a link to another document is prefixed Document, a link to a note is prefixed URL, and so on.
To display the target of a link, simply click the link:
-
Document links open in the same way as files in the Document section, namely Microsoft Word, Excel, and PowerPoint files open in Microsoft Office with a task pane, and other file types open in their default viewer or a browser.
-
URL links open a browser window displaying the link target.
46.3.4.9 Viewing Document Information
Note:
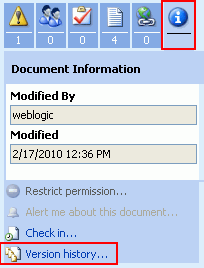
This feature is available with Microsoft Office 2003 and 2007. Microsoft Office 2010 does not include a task pane.In Microsoft Office 2003: The Document Information section of the Microsoft Office task pane shows the user who last modified the file and the modified date (Figure 46-27).
In Microsoft Office 2007. Information about the user who last modified the file and the modified date is shown in the Version History. See Section 46.3.4.10, "Working with File Version History."
46.3.4.10 Working with File Version History
Whenever you check in a file or upload a file into a folder that already contains a file of the same name, WebCenter Spaces creates a new version of the file. When a file has multiple versions, it has a version history.
Note:
To use the WebCenter Spaces application to work with the version history of a file in any connected content repository, see Section 41.21, "Viewing and Deleting File Version History."In Microsoft Office 2003: To view the version history of the currently open file using the Microsoft Office task pane:
-
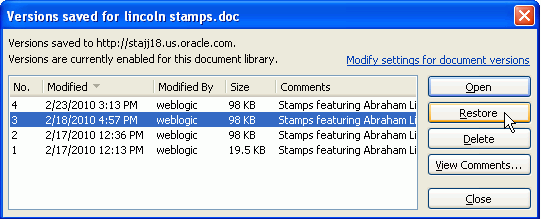
In the Document Information section of the task pane, click Version history (Figure 46-28).
The version history dialog for the file opens (Figure 46-29):
In the version history dialog, select a file version, then select the desired action:
-
Open to open the selected file version read-only.
-
Restore is not supported.
-
Delete to delete the selected file version (inactive for the most recent version).
-
View Comments to display the comments entered for the selected file version (most useful when the comments are especially long).
-
-
To open the Documents page in the current Space, click Modify settings for document versions.
In Microsoft Office 2007: To view the version history of the currently open file:
-
Click the Office Button (Figure 46-30) in the top left corner of the Microsoft Office application.
-
From the Server menu, choose View Version History.
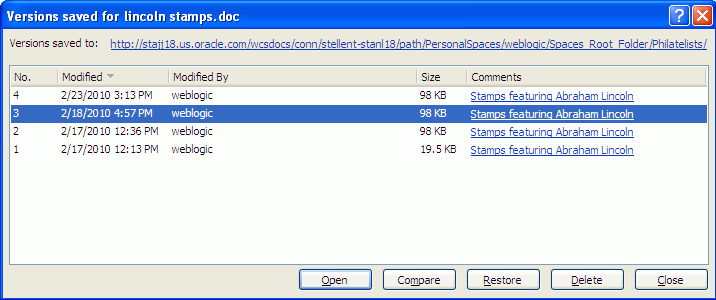
The version history dialog for the file opens (Figure 46-31):
-
In the version history dialog, select a file version, then select the desired action:
-
Open to open the selected file version read-only.
-
Compare to compare the selected file version with the currently open file.
-
Restore is not supported.
-
Delete to delete the selected file version (inactive for the most recent version).
-
-
To view the check in comments for a file version, click the link under Comments.
-
To open the Documents page in the Space, click the link next to Versions saved to.
In Microsoft Office 2010: To view the version history of the currently open file:
-
From the File menu, choose Info.
The Info tab shows version history information on the Info tab in the Versions section. Refer to the Microsoft Office online help for more information.
46.3.4.11 Adding Members to a Space
Note:
To add members to a Space using the WebCenter Spaces application, see Section 51.14.4, "Granting WebCenter Spaces Users Access to a Space."If you are granted the moderator role, you can add new members to a Space using the Microsoft Office task pane. The currently open file must be a Space document.
Note:
This feature is available with Microsoft Office 2003 and 2007. Microsoft Office 2010 does not include a task pane.To add members to a Space when the currently open file is a Space document:
-
In the Members section of the task pane, click Add new members.
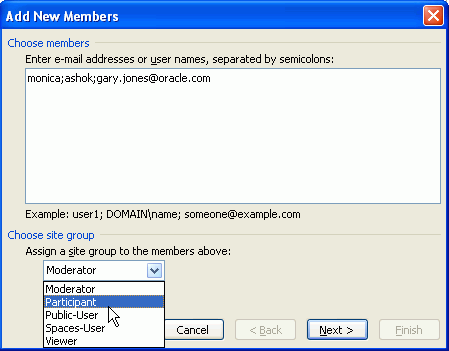
The Add New Members dialog opens (Figure 46-32).
-
Enter the login names or mail addresses of the users you want to add to the Space, separated by semicolons.
Note:
Users who are already members of the Space cannot be added again. The user names that you enter must have an associated mail address defined in WebCenter Spaces. -
From the site group dropdown list, select the role to be given to the listed users. The listed roles are those defined for the current Space. The permissions granted to each role are defined by the WebCenter Spaces administrator or Space moderator. For more information about Space roles, see Section 52.2, "Managing Roles and Permissions for a Space."
Note:
To define different roles to different users, limit the list of users to those who should be assigned the same role, finish this assignment, then click Add new members again to assign a different role to one or more different users. -
Click Next.
-
Confirm or modify the member information, then click Finish.
-
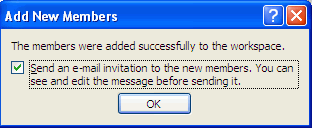
In the Add New Members dialog (Figure 46-33), select or clear the checkbox to send an invitation to the new members to join the Space, then click OK
46.3.4.12 Sending a Message
From the Microsoft Office task pane, you can send a message to any user who has a mail address defined in WebCenter Spaces:
-
Section 46.3.4.12.1, "Sending a Message to the Current User"
-
Section 46.3.4.12.2, "Sending a Message to Your Connections"
-
Section 46.3.4.12.3, "Sending a Message to All Members of a Space"
Note:
This feature is available with Microsoft Office 2003 and 2007. Microsoft Office 2010 does not include a task pane.Note:
To send messages using the WebCenter Spaces application, see Section 41.24.2, "Mailing the URL for File", Section 65.1, "What You Should Know About the Send Mail Feature", and Section 65.4.6, "Composing and Sending Mail Messages."46.3.4.12.1 Sending a Message to the Current User
To send a message to the user who has the currently open document checked out:
-
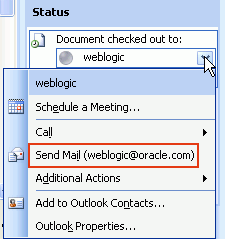
In the Status section of the Microsoft Office task pane, click the dropdown menu icon next to the user name, and choose Send Mail (Figure 46-34).
A Microsoft Outlook message composition window open with the To field populated with the mail address that is specified for the user in WebCenter Spaces.
46.3.4.12.2 Sending a Message to Your Connections
To send a message to your connections when you are working with a document in the Home Space:
-
In the Members section of the Microsoft Office task pane:
-
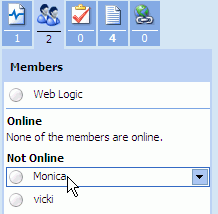
To send a message to an individual who is one of your connections, click the user name in the Members list (Figure 46-35):
-
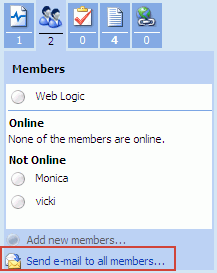
To send a message to all of your connections, click Send e-mail to all members (Figure 46-36).
A Microsoft Outlook message composition window opens, where the Home Space name is the subject, and the To field is populated with the mail address(es) specified for the people connection(s) in WebCenter Spaces.
-
-
Modify the addresses and content of the message as desired, then click Send.
46.3.4.12.3 Sending a Message to All Members of a Space
To send a message to the members of a Space when you are working with a document in a Space:
-
In the Members section of the Microsoft Office task pane:
-
To send a message to an individual who is a member of the Space, click the user name in the Members list (Figure 46-37):
-
To send a message to all members of the Space, click Send e-mail to all members.
A Microsoft Outlook message composition window opens, where the Space name is the subject, and To field is populated with the mail address(es) specified for the Space member(s) in WebCenter Spaces
-
-
Modify the addresses and content of the message as desired, then click Send.
46.3.5 Closing a File
You can close a file opened in a Microsoft Office application with or without checking it in, as described in the following sections:
46.3.5.1 Closing a File After Checking It In
After checking a file in, the file remains open in the Microsoft Office application until you close it.
To close a file after you have checked it in (see Section 46.3.4.4, "Checking a File In"):
-
From the File menu, choose Close.
46.3.5.2 Closing a File Before Checking It In
If you attempt to close a file or the Microsoft Office application before you have checked the file in, the Check In dialog provides the opportunity to check it in or cancel the check out and discard changes to the file. The selections in the Check In dialog are dependent on whether or not the file has been modified since the last time it was checked in.
46.3.5.2.1 Closing an Unchanged File
In Microsoft Office 2003: To close a file that has not been modified since the last time it was checked in:
-
From the File menu, choose Close.
-
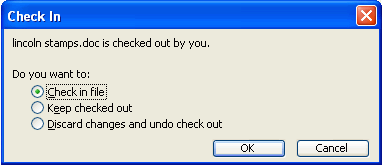
In the Check In dialog (Figure 46-39), select one of the following actions:
-
Check in file to check the file in with no changes. In the Check In Comments dialog (Figure 46-20), optionally enter new comments, then click OK.
-
Keep checked out to close the file, but keep it in a checked out and locked to changes by other users. To later cancel the checked out status, see Section 41.12.1, "Checking a File Out."
-
Discard changes and undo check out to cancel the checked out status.
-
-
Click OK.
In Microsoft Office 2007: To close a file that has not been modified since the last time it was checked in:
-
Click the Office Button (Figure 46-30) in the top left corner of the Microsoft Office application, then choose Close.
Microsoft Office 2007 does not prompt you to first check the file back in again, so the file remains in a checked out state and locked to changes by other users. To later cancel the checked out status, see
46.3.5.2.2 Closing an Updated File
In Microsoft Office 2003: To close a file that has been modified since the last time it was checked in:
-
From the File menu, select Close.
-
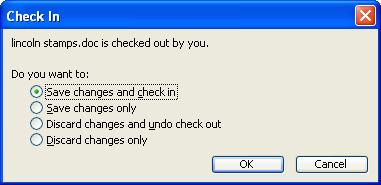
In the Check In dialog (Figure 46-40), select one of the following actions:
-
Save changes and check in to save the changes since the last check in and check the file in.
-
Save changes only to save changes since the last check in, but keep the file checked out and locked to changes by other users. To later cancel the checked out status, see Section 41.12.1, "Checking a File Out."
-
Discard changes and undo check out to retain the prior saved version of the file and cancel the checked out status.
-
Discard changes only to retain the prior saved version of the file and keep the file checked out.
-
-
Click OK.
In Microsoft Office 2007: To close a file that has been modified since the last time it was checked in:
-
Click the Office Button (Figure 46-30) in the top left corner of the Microsoft Office application, then choose Close.
-
If you have not already saved the changes, respond to the confirmation prompt to save or discard your changes.
-
In the confirmation dialog (Figure 46-41), respond to the prompt:
-
Yes to display the Check In dialog where you can enter version comments and select whether or not you want the file to remain checkout out. See Section 46.3.4.4, "Checking a File In." If you choose to keep the file checked out and locked to changes by other users, see Section 41.12.1, "Checking a File Out" to later cancel the checked out status.
-
No to keep the file checked out and locked to changes by other users. To later cancel the checked out status, see Section 41.12.1, "Checking a File Out."
-
46.4 Working with Microsoft Windows Explorer Integration
WebCenter Spaces integrates with Microsoft Windows Explorer to manage the folders and files in the Home Space or a group Space when the backend content repository is Oracle Content Server.
In WebCenter Spaces, the most useful feature of Windows Explorer integration is the ability to add multiple files at once to a Space, rather than uploading each file individually. It is important to be aware that Windows Explorer is not designed as a content repository, so if you try to open, delete, or rename a file that is checked out by another user, an error message displays to notify you that the operation failed, but the error message will not be specific as to the cause of the failure.
To expose the folders and files in a Space in Windows Explorer, you create a new Windows network place, as described in the following sections:
46.4.1 Adding a Space as a Network Place
To expose the folders and files in a Space using Windows Explorer, you can add the Space as a Windows network place.
To add a Space as a Windows network place:
-
In Microsoft Windows, open My Network Places and click Add Network Place. Refer to the Microsoft Windows online help for more information.
-
In the Add Network Place wizard, enter the network address using the following format:
-
To access all Spaces in your WebCenter Spaces application through Windows Explorer:
http://hostname:port/wcsdocs/conn/repository_server/spaces/For example:
http://myserver:8888/wcsdocs/conn/myserver-ucm/spaces/ -
To access the Home Space through Windows Explorer:
http://hostname:port/wcsdocs/conn/repository_server/spaces/PersonalSpaces/usernameFor example:
http://myserver:8888/wcsdocs/conn/myserver-ucm/spaces/PersonalSpaces/wcsadmin -
To access a specific Space through Windows Explorer, open the About Space dialog, and copy the Explorer URL. See Section 49.5, "Viewing Information About a Space."
http://hostname:port/wcsdocs/conn/repository_server/spaces/instance/spacenameFor example:
http://myserver:8888/wcsdocs/conn/myserver-ucm/spaces/WebCenter/philatelists
Tip:
The host name and port is shown in the browser URL for your WebCenter Spaces application.To find the name of the repository server, view the information for any Space in the WebCenter Spaces application, and note the name of the content repository specified by the Explorer URL. See Section 49.5, "Viewing Information About a Space."
-
-
At the prompt, enter your WebCenter Spaces login credentials.
-
Optionally enter a name for the Space network place, then click Finish.
Windows Explorer displays a drive for all Spaces or the folders and files of Space, depending on the URL you entered.
46.4.2 Working with Files Using Windows Explorer
Once you have created a Windows network place to a Space (see Section 46.4.1, "Adding a Space as a Network Place"), you can manage the folders and files using Windows Explorer.
Note:
If you change the internal name of a Space (see Section 51.14.2, "Changing a Space URL"), the original network place to that individual Space is no longer accessible. You will need to add the Space as a Windows network place again using the new Space internal name. Changing the internal name of a Space has no effect if you create a network place to the parent URL for all Spaces (http://hostname:port/wcsdocs/conn/repository_server/spaces/).In Windows Explorer, navigate to the network place for the Space to:
-
Copy and paste folders and files from your local file system.
-
Create folders and files.
-
Delete folders and files if not checked out by another user.
-
Open Microsoft Word, Excel, and PowerPoint files using the Microsoft Office shared document functionality. See Section 46.3, "Working with Microsoft Office Word, PowerPoint, and Excel Integration."
-
Open other file types in their default applications.
When you open a file, an attempt is made to check the file out. If it is checked out by another user, or you do not have permissions to update the file, it will be opened read-only. A file remains checked out until you check it back in (see Section 46.3.4.4, "Checking a File In").
The changes you make in Windows Explorer are reflected in WebCenter Spaces, and vice versa.
Note:
To use the WebCenter Spaces application to manage folders and files in a Space in any connected content repository, see Chapter 41, "Working with the Documents Service Task Flows and Document Components."
