54 Working with a Space Hierarchy
This chapter provides information about working with a Space hierarchy consisting of a parent Space and its Subspaces. It contains the following sections:
-
Section 54.1, "What You Should Know About Space Hierarchies"
-
Section 54.2, "Understanding Inheritance in Space Hierarchies"
-
Section 54.5, "Creating a Custom Space Hierarchy Navigation"
This chapter is intended for WebCenter Spaces users assigned the Moderator role or a custom role that includes the Spaces-Manage Configuration permission who want to work with the Subspaces in a Space hierarchy.
Note:
For information about Space roles, see Section 52.2.1.1, "Understanding the Default Roles for a Space".54.1 What You Should Know About Space Hierarchies
A Space hierarchy consists of a parent Space and one or more Subspaces. A Subspace is simply a child Space created in an existing Space. A Space hierarchy provides several benefits:
-
Organization: Spaces with related content can be grouped together under a parent Space. For example, in a software development environment, Subspaces can be dedicated to primary features under the parent product Space. Or, each department can maintain a Subspace under a company's parent Space. Other hierarchical structures may be specific to your company, such as the unique requirements of a WebCenter Spaces applications that are provided to your customers.
-
Navigation. The hierarchical organization provides for logical navigation and drilling down into required areas for more information. For example, users can navigate through a product hierarchy from product family to products to demos, or into different departments and functions in a company.
-
Delegated administration: A Subspace can be managed by a user who does not necessarily have access to the parent Space. In this way, an administrator can maintain control of a parent Space, and assign individual owners to any number of Subspaces, who in turn can delegate administration to others.
-
Inherited membership: A Subspace can optionally inherit the membership defined for the parent Space as a starting point. Subsequently, membership can be modified to suit the purposes of the Subspace.
-
Security. Content may be generally accessible, where a limited number of users have administrative permissions, or security may be identical to the parent Space, or completely overridden by the administrator of the Subspace.
For information about creating a Subspace, see Section 54.3, "Creating a Subspace."
54.2 Understanding Inheritance in Space Hierarchies
A newly created Subspace inherits all services enabled for the parent Space, along with the security (members, roles, and permissions) defined in the parent Space.
54.2.1 Inheriting Security
When you create a Subspace, the initial security (members, roles, and permissions) is inherited from the parent Space.
To change the security settings of members, roles, and permissions in a Subspace, see Section 54.7.1, "Modifying Security Settings for a Subspace."
Any roles that are defined in the template that is used to create the Subspace are ignored.
54.2.2 Inheriting Services
If security inheritance is enabled (see Section 54.7.1, "Modifying Security Settings for a Subspace."), the Subspace initially inherits all services enabled for the Space template on which it is based. You can further limit services available to the Subspace, but cannot provision new services in the Subspace that are not enabled in the parent Space.If the Space template used to create the Subspace has additional services enabled that are not enabled in the parent Space, those additional services will not be available in the Subspace. Conversely, if the template has fewer services enabled than the parent Space, the Subspace will inherit only the subset of services that are enabled in the template.
For example:
-
If a template used to create a Subspace has the Discussions, Lists, and Documents services enabled, and the parent Space has only Discussion and Lists enabled, then the Subspace will have only Discussion and Lists enabled, not Documents.
-
If a template used to create a Subspace has the Discussions and Lists services enabled, and the parent Space has Discussions, Lists, and Documents enabled, then the Subspace will have only Discussions and Lists enabled, not Documents.
If security inheritance is not enabled, then the Subspace inherits all services that are enabled in the Space template.
54.3 Creating a Subspace
You can create one or more Subspaces (child Spaces) in any Space. From a parent Space, you can navigate to its Subspaces.
Note:
If you create a new resource (page template, skin, Resource Catalog, or navigation) for a parent Space, the custom resource is not shown for selection in the administration settings for Subspaces of the Space. To set a resource for a Subspace to the same custom resource used by its parent Space, you must use an EL expression (see Section 51.4, "Managing General Administration Settings for a Space"). To make a custom resource available for selection in all Spaces and Subspaces, it must be created at the application-level (see Section 16.2, "Creating Resource Catalogs").To create a Subspace of the current Space:
-
Do either of the following, depending on the permissions you have been granted:
-
On the Home page of the Space, click the link to create a Subspace
Tip:
The location of the Create Subspace link depends on the page template in use by the Space. For example, in a side navigation template, you may access it through a Subspaces menu, or an Actions menu. -
In the Space administration settings, display the Subspaces page, then click the Create icon.
Tip:
The way you access this page depends on the page template in use. For example, in a side navigation template, you may access it through a Manage menu.You can also navigate to this page using the direct URL provided in Section A.3, "User Interface URLs for Space Pages."
If you do not see these options, ask your WebCenter Spaces administrator to grant you
Create Spacespermission.The Create a Subspace dialog opens.
-
-
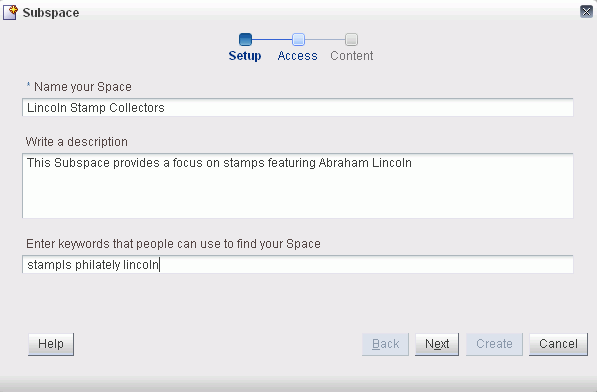
In the Setup step (Figure 54-1), specify a Subspace name and, optionally, a description and keywords for the Subspace. Enter any keywords related to the content of the Subspace to make it more easily discoverable in search results. Separate keywords with a space or comma.
The name that you enter here displays at the top of the Subspace and other places where Spaces are available for selection, such as the Spaces Switcher menu and the Spaces page. Subspace names can contain alphanumeric characters, underscores, spaces, multi-byte characters, and special characters such as
&and#. The maximum allowable length is 200 characters. The following reserved keywords are not allowed as the full Subspace name either in upper or lowercase, or a combination of both—webcenter,pages,page,spaces,space,group,groups,Space,Spaces,webcenter space,webcenter spaces,webcenter administration,my Spaces,admin,last. These reserved words are allowable as part of a longer name (for example,Sales Group). -
Click Next.
-
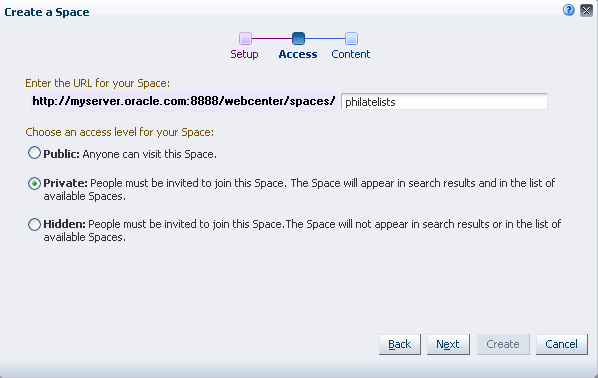
In the Access step (Figure 54-2), enter the last value of the URL for the Subspace. This value can be same as the Subspace name.
Note:
The initial security (members, roles, and permissions) is inherited from the parent Space. To change the security settings of members, roles, and permissions in a Subspace, see Section 54.7.1, "Modifying Security Settings for a Subspace." -
Click Next.
-
In the Content step, select a template to use as the basis for your new Subspace. Use the Filter field to search for templates by name.
See Also:
For more information, see Section 50.1, "What You Should Know About Space Templates".Note:
A custom Space template may include seeded data, such as folders and files, discussion forums, wikis, lists, announcements, or links. When you select such a template, the new Subspace includes all the seeded data.Any roles that are defined in the template that is used to create the Subspace are ignored.
-
Click Create.
The new Subspace opens, displaying its Home page. As the Subspace creator, you are automatically granted the
Moderatorrole for this Subspace, and can begin to populate, customize, and manage the Subspace as required.
54.4 Viewing a Space Hierarchy
The extent to which you can see Subspaces and parent Spaces depends on your role and permissions, as described in the following sections:
54.4.1 Viewing Subspaces of a Parent Space
To view the Subspaces of a Space, do any of the following, depending on the permissions you have been granted:
-
On the Home page of the parent Space, click Subspaces to expose a list of the Subspaces for the Space.
Tip:
The location of the Subspaces link depends on the page template in use by the Space. For example, it may be available through a Subspaces menu in a side navigation, or through a Subspaces link at the top of the application in top tabbed navigation. -
In the Space administration settings, display the Subspaces page.
Tip:
The way you access this page depends on the page template in use. For example, in a side navigation template, you may access it through a Manage menu.You can also navigate to this page using the direct URL provided in Section A.3, "User Interface URLs for Space Pages."
-
(WebCenter Spaces administrator only) Open WebCenter Spaces Administration (see Chapter 4, "Accessing WebCenter Spaces Administration Pages"), and on the Spaces page, click a link under the Subspaces column that shows the number of Subspaces belonging directly to a parent Space. The Spaces page refreshes with a list of Subspaces for the parent Space, which may in turn show another level of Subspaces.
For more information about application-level Space administration, see Chapter 53, "Administering Spaces and Templates."
54.4.2 Viewing Parent Spaces of a Subspace
Navigating from a Subspace to a parent Space can be accomplished by adding a link to the page template for the Subspace. This is a design decision made by the page template developer, and may be exposed depending on whether or not the security of the parent Space allows direct access from the Subspace.
54.5 Creating a Custom Space Hierarchy Navigation
WebCenter application designers can build custom navigation models, which can be added to the s for a Space to allow end users to easily navigate the Space hierarchy. For more information, see Section 11.2.2.1.5, "Adding a List of Subspaces to a Navigation Model."
54.6 Moving Subspaces
With appropriate permissions, you can move Subspaces from their current parent Space. All of the metadata (such as pages, navigation, security, and so on) and data is maintained when a Subspace is moved.
To move one or more Subspaces from their current parent Space:
-
In the Space administration settings, display the Subspaces page.
Tip:
The way you access this page depends on the page template in use. For example, in a side navigation template, you may access it through a Manage menu.You can also navigate to this page using the direct URL provided in Section A.3, "User Interface URLs for Space Pages."
-
On the Subspaces page, click in the row of the Subspace that you want to move. Ctrl-click to select multiple Subspaces.
-
From the Edit menu, choose Change Parent for Space(s).
-
In the Select New Parent dialog, choose the new parent Space, or select the No Parent Space checkbox to move the Subspace to the root Space of the Space hierarchy.
Note:
All Spaces and Subspaces in the WebCenter Spaces application are listed, which means you can move the selected Subspace lower in the Space hierarchy, under another Subspace. -
Click OK.
-
In the confirmation prompt, click OK.
54.7 Managing a Subspace
Within a Subspace, management tasks are the same as within any top-level Space, as described in the following chapters:
Additionally, Subspaces include the following administrative tasks that are not applicable to parent Spaces:
54.7.1 Modifying Security Settings for a Subspace
On creation, a Subspace inherits its initial security (members, roles, and permissions) from the parent Space. If you set custom security for the Subspace, you cannot revert back to inheriting security from the parent Space.
To modify the members, roles, and permissions of a Subspace:
-
In the Subspace administration settings, display the General page.
Tip:
The way you access this page depends on the page template in use. For example, in a side navigation template, you may access it through a Manage menu.You can also navigate to this page using the direct URL provided in Section A.3, "User Interface URLs for Space Pages."
-
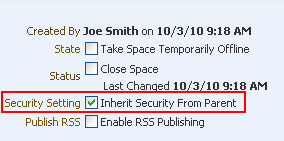
On the General page, under Space Options, clear the Security Setting checkbox to specify that the Subspace should not inherit security settings from the parent Space (Figure 54-3).
Once this checkbox has been cleared, it becomes inactive and you cannot revert back to inheriting security from the parent Space.
-
Click Apply to save.
Note that the administration settings now expose the Roles and Members pages, and the Access section displays on the General page.
54.7.2 Importing Subspaces
You can import Subspaces into your WebCenter Spaces application, as described inSection 53.5.2, "Importing Spaces." When importing Subspaces, note the following:
-
When you import a parent Space, any Subspaces are also imported as child Spaces of the parent Space.
-
If you begin the import process on the Subspaces page of a parent Space, the imported Space will not automatically become a child space (Subspace) and display on the Subspaces page. Instead, it is imported as a root-level Space. You can then move the Space to its appropriate position in the Space hierarchy, as described in Section 54.6, "Moving Subspaces."


