4 Working with JDeveloper
This chapter contains the following topics:
-
Section 4.3, "Installing JD Edwards EnterpriseOne Code Templates"
-
Section 4.4, "Viewing JD Edwards EnterpriseOne Code Templates in JDeveloper"
4.1 Understanding JDeveloper
Oracle's JDeveloper provides an integrated development environment for creating JD Edwards EnterpriseOne business services. Your JD Edwards EnterpriseOne package includes a JDeveloper extension, which is automatically installed when you launch JDeveloper from JD Edwards EnterpriseOne Object Management Workbench (OMW). The extension package contains JD Edwards EnterpriseOne code features that help you create business services. Among these code features are wizards that generate a structure for creating a Java class. Wizards for generating code to call a business function or a data base operation are included in the extension package. The extension package also provides code templates specifically designed to help you develop and test business services. The wizards and code templates help you by enforcing coding conventions so that your business service classes can be exposed as web services.
If you use an HTTP Proxy Server, you must configure JDeveloper with the HTTP Proxy Server host name, port number and exceptions. If you use an HTTPS Proxy Server, you must configure JDeveloper with both the HTTP and HTTPS proxy server host names, port numbers and exceptions.
For JDeveloper to successfully be installed to your development client, you should verify that your system meets the Minimum Technical Requirements (MTRs) for the hardware and software that is required to install JDeveloper.
If you use non-English characters or data in your business services, you can configure JDeveloper to support UTF-8.
See Also:
-
Oracle JDeveloper Guide,
http://www.oracle.com/technology/index.html.
4.2 Configuring Embedded OC4J
If your business services server is on an Oracle Application Server, you must configure the Oracle containers for Java EE (OC4J).
On your development client, run JDeveloper:
-
From the JDeveloper Tools menu, select Embedded OC4J Server Preferences.
-
On Embedded OC4J Server preferences, change the Application Directory and the Deployment Directory values from relative paths to direct paths, and then click OK.
Keep your root directory name short. For example, the root directory for the Application Directory field could be c:/jdev/applications or the root directory could be c:/applications. The deployment directory could be c:/jdev/application-deployments.
4.3 Installing JD Edwards EnterpriseOne Code Templates
JDeveloper provides code templates for generating frequently used Java code such as data iterator, BC4J calls, and so on. JD Edwards EnterpriseOne provides code templates that specifically support business services development. The code templates are JDeveloper extensions that you must copy onto JDeveloper after JDeveloper is installed on your development client.
To install JD Edwards EnterpriseOne code templates on JDeveloper:
-
Access JDeveloper on your development client.
-
Configure JDeveloper by running jdeveloper.exe from your JDeveloper installation directory (<JDEV_INSTALL_DIR>.)
-
Close JDeveloper.
-
Copy the java.tpl file from your EnterpriseOne installation directory (<EOne Install>\system\classes).
-
Paste the java.tpl file to your JDeveloper installation directory (<JDEV_INSTALL_DIR>\jdev\system\ oracle.jdeveloper.10.1.3.*.*.)
For example, oracle.jdeveloper.10.1.3.39.84.
-
Run jdeveloper.exe from your <JDEV_INSTALL_DIR> directory.
The JD Edwards EnterpriseOne code templates are now part of the JDeveloper templates.
-
View code templates by selecting the expand template option from the JDeveloper source menu.
4.4 Viewing JD Edwards EnterpriseOne Code Templates in JDeveloper
The JD Edwards EnterpriseOne code templates are preconfigured in JDeveloper11g. All of the templates you need to generate code and to support business services are provided, though you can add and create new templates if you want to.
To view the code templates, select Tools, Preferences, Code Editor, and then Code Templates.
4.5 Configuring HTTP and HTTPS Proxy Servers
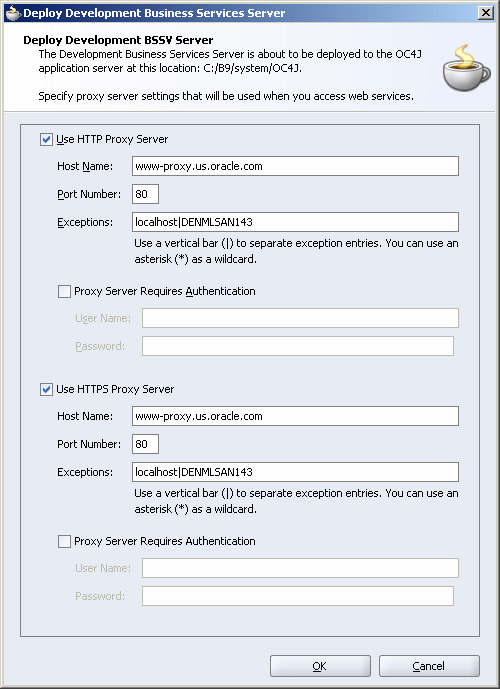
If you use JD Edwards EnterpriseOne business services to consume third-party web services over an HTTP connection, you must configure JDeveloper with the HTTP Proxy Server host name, port number, and exceptions. If authentication is required, a valid user name and password is also required. The values that you configure in JDeveloper should be the same as your Internet proxy.
If you use an HTTP secure connection, you must configure JDeveloper with both the HTTP Proxy Server and the HTTPS Proxy Server host names, port numbers, and exceptions. If authentication is required for the HTTPS Proxy Server, you must provide a valid user name and password.
To configure HTTP and HTTPS Proxy Servers:
On your development client, run JDeveloper:
-
In the Applications Navigation pane, right-click the business service workspace.
-
From the context menu, click Deploy Development BSSV Server
Figure 4-1 Deploy Development Business Services Server form

Description of "Figure 4-1 Deploy Development Business Services Server form"
JDeveloper displays the HTTP and HTTPS proxy server values that you previously set in the jde.ini configuration file. You can change any of these values. If you change a value in JDeveloper, when you click OK on the Deploy Development Business Services form, the system writes the new values to the configuration file and deploys the BSSV server to OH4A, which restarts the business server. If you manually change the parameters in the configuration file, you must restart the business services server for the new parameters to take effect.
Deployment time varies based on the various parameters. If you are using WebSphere and deploying for the first time, profile creation could take several minutes. The deploy status is visible in the JDeveloper status window with the title Apache Ant - Log. You can continue with other work while deployment is in progress. You must not stop the JD Edwards EnterpriseOne Solution Explorer (which also stops the OC4J or WebSphere Express application) while deployment is in progress.
If the development business services server is already installed on the business services server, the previous version is automatically undeployed before the system continues the deployment process. When the deployment is finished, the Apache Ant - Log window displays a message indicating that the build and deploy was successful. The development business services server is now started and ready to accept requests.
See Also:
-
JD Edwards EnterpriseOne Tools Release 8.98 Business Services Server Reference Guide, Chapter 2: Configuring Business Services Server, Configuring an HTTP Proxy Server.