9 Understanding Header Detail Forms
This chapter contains the following topics:
9.1 Header Detail Forms
A header detail form is used when a relationship exists between the information in the header (the fields above the grid) and the information in the detail area (the grid itself). The header portion uses one business view (BV), and the detail portion of the form can use another BV. This form type (as well as the headerless detail form type) is referred to as a transaction form.
9.2 Header Detail Design-Time Considerations
These property values are particularly significant in the design of the header detail form:
The fetch properties are important because of their effect in data display during runtime. You must select Fetch on Form Businessview to populate the controls in the header portion of the form. Likewise, you must select Fetch on Grid Businessview to populate the grid.
Similarly, select Update on Form Businessview if you intend to permit users to commit their modifications to records in the header controls to the database. Select Update on Grid Businessview to enable the commitment of modified grid records.
9.3 Header Detail Events
These events can occur on the header detail form during runtime:
-
Dialog is Initialized
-
Post Dialog is Initialized
-
Grid Record is Fetched
-
Last Grid Record Has Been Read
-
Clear Screen Before Add
-
Clear Screen After Add
-
Write Grid Line-Before
-
Write Grid Line-After
-
Add Record to DB - Before
-
Add Record to DB - After
-
Update Record to DB - Before
-
Update Record to DB - After
-
Post Commit
-
End Dialog
-
XAPI Subscribe Event
9.4 Header Detail Runtime Processing
This section discusses how runtime processes header detail forms. This section discusses form-level runtime processing only. Much of the runtime processing for the header detail "form" actually occurs on the level of the grid control, however.
See Grid Control Runtime Processing.
9.4.1 Dialog Initialization
When a header detail form is called, runtime initializes these items in this order:
-
Thread handling
-
Error handling process
-
BV columns
-
Form controls
-
Grid fields
-
Static text
-
Helps
-
Event rules (ER) structures
This flowchart illustrates the tasks that runtime performs after initializing these objects to complete dialog initialization:
Figure 9-1 Header detail form initialization
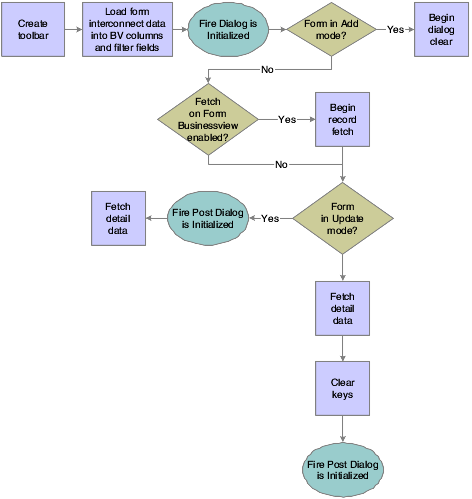
Description of "Figure 9-1 Header detail form initialization"
9.4.2 Dialog Clear
This list discusses how runtime clears the form in preparation to display retrieved data:
-
If the form was called in Copy mode, clear the key (primary index) controls for which the Do not clear after add option was enabled.
-
If the form was not called in Copy mode, clear all form controls for which the Do not clear after add option has been disabled.
-
Fire the Clear Screen Before Add event.
-
Fire the Post Dialog is Initialized event.
9.4.3 Data Retrieval
After dialog initialization, runtime populates the form only if it is in Update mode. Then, it seeks to populate the header if the Fetch on Form Businessview option is enabled. If enabled, runtime fetches the header record and populates the controls in the header.
Next, runtime performs a fetch and populates the grid if the Automatically Find on Entryand the Fetch on Grid Businessview options are both enabled. The fetch an populate process used is standard for grid controls.
9.4.4 OK Button
OK is a standard button on header detail forms that appears by default. It causes runtime to validate the information on the form and update or add it to the database through JDEKRNL function calls.
This flowchart illustrates the initial tasks that constitute runtime processing for the OK button:
Figure 9-2 Header detail OK button processing, part 1 of 4
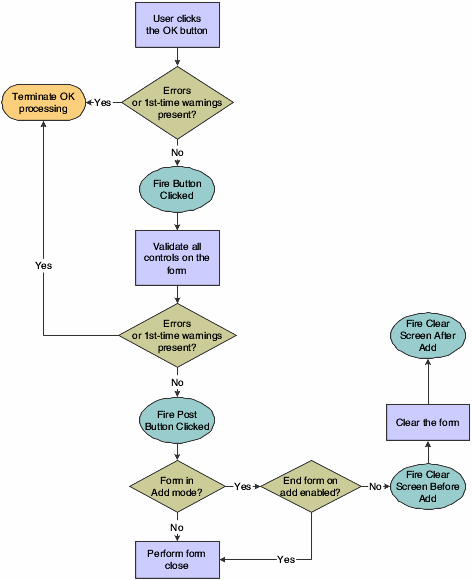
Description of "Figure 9-2 Header detail OK button processing, part 1 of 4"
This flowchart expands on how runtime populates the grid during OK button processing:
Figure 9-3 Header detail OK button processing, part 2 of 4
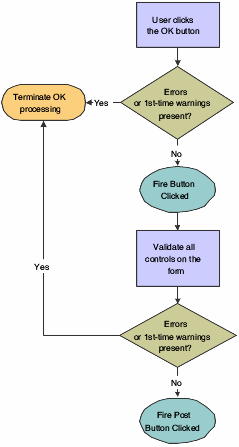
Description of "Figure 9-3 Header detail OK button processing, part 2 of 4"
This flowchart illustrates how runtime processes any mode changes during OK button processing:
Figure 9-4 Header detail OK button processing, part 3 of 4
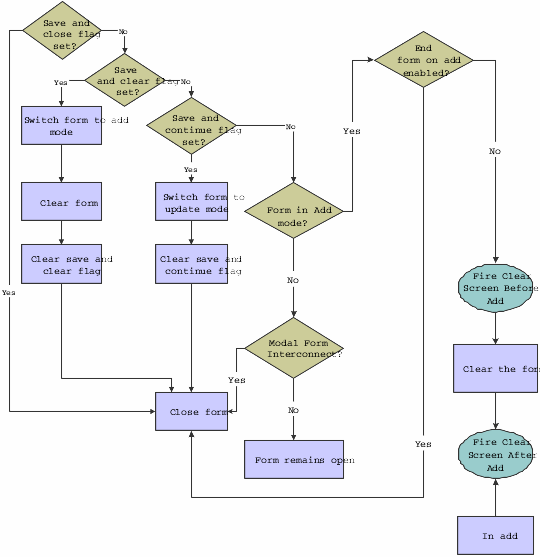
Description of "Figure 9-4 Header detail OK button processing, part 3 of 4"
This flowchart illustrates how runtime completes the form close process during OK button processing:
Figure 9-5 Header detail OK button processing, part 4 of 4
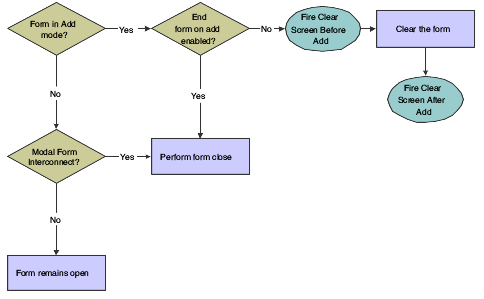
Description of "Figure 9-5 Header detail OK button processing, part 4 of 4"
9.4.5 Cancel Button
The Cancel button is a standard button on header detail forms that appears by default. When the user clicks it, runtime fires the Button Clicked and Post Button Clicked events in immediate succession. If no errors occur, runtime cancels any media objects that might be open. Also, if a manual transaction is in process, runtime attempts to cancel it as well. Then, runtime fires the End Dialog event and initiates the dialog close process.
9.4.6 Dialog Close
Header detail can be closed either by the user (typically by clicking the OK or Cancel buttons) or by the system. After performing any control-level close processing that might need to occur, runtime closes the form. If the event has not already occurred, runtime fires the End Dialog event. Then it performs these tasks in this order:
-
Load form interconnect data from BV columns for database commit.
-
Terminate error and thread handling.
-
Terminate helps.
-
Free all form structures.
-
Destroy the window.