6 Building Packages
This chapter contains the following topics:
Understanding the Package Build Process
After you assemble a package, you must define the package build before you can build and deploy it to the workstations and servers. The build process reads the central objects data source for the path code that you defined in the package. This information is then converted from a relational database format to replicated objects, which are put in the package itself.
This section discusses:
-
Directory structure for packages.
-
Package build tasks.
-
JD Edwards EnterpriseOne Package Build Definition Director.
-
Business function builds during package build.
-
Package compression.
-
Verification of a package build.
Directory Structure for Packages
When a package is built, a directory structure with the name of the package is created within the appropriate path code directory. This directory contains the package information.
Example: JD Edwards EnterpriseOne E900 Directory Structure
The E900 (release name) directory structure looks similar to this example.
This is an example of the directory structure for PD900 (path code name):
Package
PackageA (package name)
bin32
include
java
lib32
make
obj
res
source
spec
work
mobilespec
mobiledb
pkgspec
bin32
include
java
lib32
make
obj
res
source
work
When you build a package, the directories under the package name are populated. Files for the source and include directories are copied from the path code check in location on the deployment server to the corresponding package folder. Information for all other directories comes from central objects. The bin32, lib32, and obj directories are populated with the output of the business function build process.
Package Build Tasks
The process that you perform to build a package might take several hours. For this reason, it is recommended that you initiate the actual package build at the end of the working day, if possible. Complete these tasks when you build a package:
-
Transfer objects.
Ensure that all of the objects that you want to include in the build have been transferred to the appropriate path code.
-
Ensure that the database for the package has the most current replicated data.
-
Build a package.
Build a package using the path code to which objects were transferred.
-
(Optional) Perform a cross-reference build.
Perform a cross-reference build to verify that the cross-reference information reflects the changed objects. This process takes up to 15 hours to complete. You can deploy the package before the cross-reference build has finished.
-
Deploy the software to these machines:
-
Workstations and servers
-
Tiered deployment locations
-
Caution:
If the jdeproperties.log in the \system\classes folder is set to perform logging, the package build process will take even longer to complete. Logging should be turned off during package builds to improve performance.Package Build Definition Director
Like the Package Assembly Director, the Package Build Definition Director simplifies and expedites the build definition process by displaying a series of forms that guide you through the process. As with the Package Assembly Director, you can either click Next to continue to the next form or Previous to go back to the previous form. You can cancel the build definition process by clicking Cancel.
Like Oracle's JD Edwards EnterpriseOne Package Assembly application, Oracle's JD Edwards EnterpriseOne Package Build application defaults to Express mode. You can use a processing option to switch the JD Edwards EnterpriseOne Package Build application to Director mode.
This table summarizes the function of each form in the Package Build Definition Director:
| Form | Description |
|---|---|
| Package Build Definition Director | Use this form to review introductory information about the Package Build Definition Director. |
| Package Selection | Use this form to select the defined package that you want to build. The status of the package must be Assembly-Definition Complete. |
| Package Build Location | Use this form to specify whether you want to build the package for the client workstation, one or more servers, or both clients and servers. For server packages, also specify the shared specifications data source. |
| Server Selection | Use this form to specify the server location. (The server location is required when you build a package for a server.) |
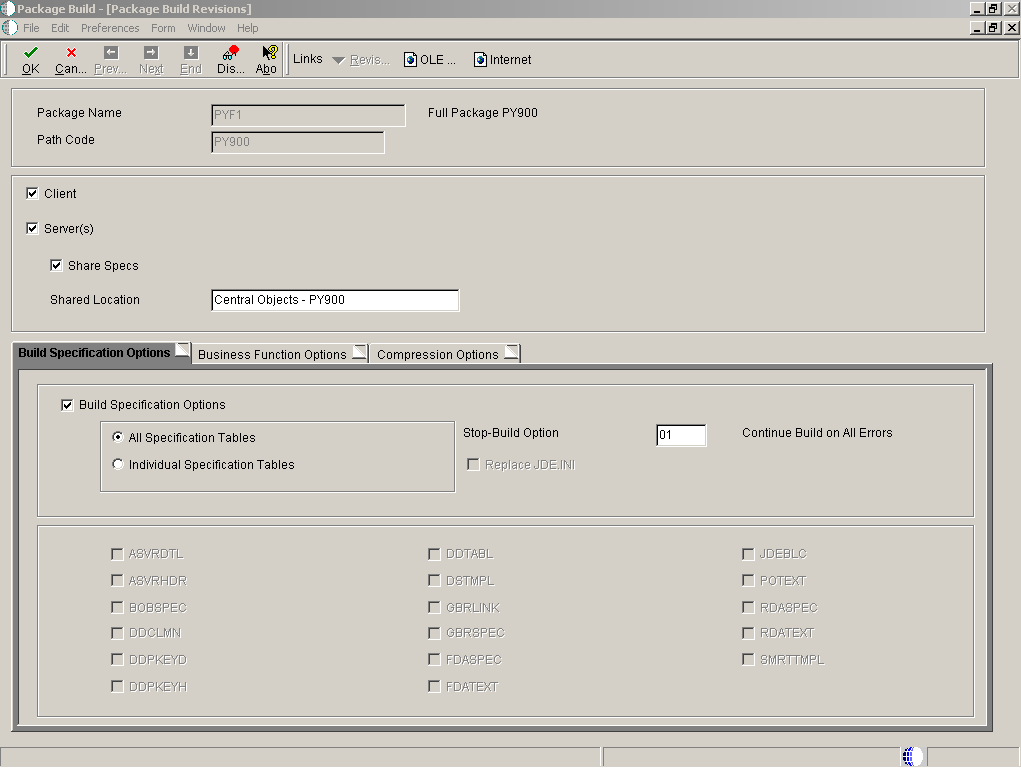
| Build Specification Options | Use this form to specify whether you want to include all specification tables or only selected tables in the package. The option to build individual specifications is useful if a build fails and the package error log indicates that an individual specification file needs to be rebuilt. |
| Individual Specification Selection | Use this form to include only selected specifications in the package. |
| Business Function Options | Use this form to build business functions. You can also specify the build mode, the severity level at which to interrupt the build process, whether to build business function documentation, and whether to clear the output destination before building. |
| Compression Options | Use this form to specify package compression and to specify whether to compress directories (all or individual), data, and foundation. |
| Individual Directory Selection | Use this form to select the individual directories that you want to compress. |
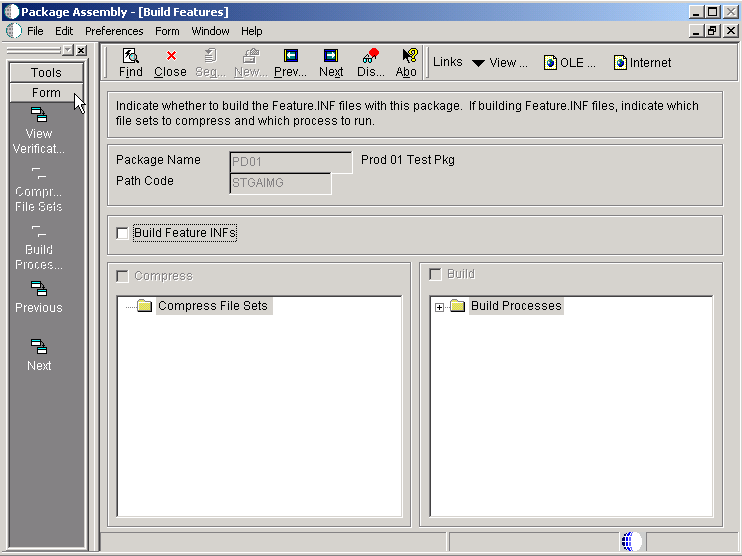
| Build Features | Use this form to enter file set and compression information for features that you added to the package. A feature is a set of files or configuration options, such as registry settings, that must be copied to a workstation or server to support an application or other function. |
| Package Build Revisions | Use this form to review or change any of the options that you have specified for the package. |
You can access the Package Build Definition Director (Director) from either the Package Assembly menu selection or the Package Build menu selection. The advantage of accessing the Director from the Package Assembly menu selection is that the system automatically enters the package name and other information. If you access the Director from the Work With Package Build Definition form, you must manually specify the name of the package that you want to build.
Before you launch the Package Build Definition Director, you can use the Work with Package Build Definition form to review information about any previously designed packages. For example, you can review the properties, build options, business function options, and compression options for the package. As on any other parent/child form, you can click the plus (+) symbol to view more information about the package or click the minus (-) symbol to view less information about the package.
Viewing Package Build History and Resubmitting Builds
After you submit the package build, you can track the build status using Oracle's JD Edwards EnterpriseOne Package Build History program (P9622). This application also enables you to view logs that are associated with the build process to determine if any errors occurred during the build process.
If the build did not complete successfully, you can resubmit the package and resume building from the point where the build stopped. Alternatively, you can reset the status of the specifications and objects and then build the package again.
See Also:
Business Function Builds During Package Build
When you build business functions as part of the package build, the system performs the same process as if you had manually run Oracle's JD Edwards EnterpriseOne BusBuild program (selected Build from the Global Build menu) after you built the package.
The system retrieves source and header information from the package (from the source and include directories), compiles it, and stores it in the bin32, obj, and lib32 directories. The system builds business functions in the package, not on the workstation. If you select the Compress Package option, the system compresses the business functions after it builds them.
These guidelines apply to the path code, foundation, and destination for the business function build:
-
When building business functions, use the path code that you defined in the package.
-
The foundation is either the same as the foundation that is included in the package or, for an update package, it is the foundation for the parent package.
-
Build output is directed to the bin32, obj, and lib32 directories of the package itself.
-
When building a full package, or when building an update package that includes a business function, always build business functions; otherwise, the consolidated DLLs included in the package will not be current.
For update packages, the system builds each business function individually. After it builds an individual business function, the system performs a global link for that object and all other objects that are in the same consolidated DLL. The global link affects all objects in the check-in location for the path code of that package.
Package Compression
You can compress a server package or client package.
Compressing Server Packages
To compress packages that you build on the server, add the [BSFN BUILD] section to the jde.ini file on the client/deployment workstation and create this entry:
DoCompression=1
This setting compresses packages that you built on the server and deploys them to other servers of the same type, such as all AIX UNIX servers or NT servers. If you plan to deploy a package to an enterprise server, you must build the package on the same type of server, with compression selected. The directories are compressed into file types that are compatible with the type of enterprise server that you are using. For NT servers, the file extension is .cab, for UNIX the file extension is .z, and for IBM i, the file has no extension.
When the server builds a compressed package, it stores the compressed files in subdirectories, such as \bin32, that are subordinate to this path on the deployment server: \package\package name\server type\, where package name is the name of the package and server type is the type of server for which the package is compressed. The program also creates .cab files in the package name directory, although these files are not used when you deploy to a client workstation.
The compression process creates a new file called compressed.inf in the server type directory. This file includes the information that the system needs to deploy the compressed files. This table shows the type of compressed file that the process creates for each type of server:
| NT | UNIX | iSeries |
|---|---|---|
| .cab | .z | SAVF |
When you deploy the package to another enterprise server, the system reads the compress.inf file and uses this information to copy the compressed files from the package directory on the deployment server to the enterprise server.
Specs are no longer compressed. They are deployed either by being copied directly from the database on the deployment server or by setting the spec.ini file setting.
Compressing Server Update Packages
To compress an update package for a server and deploy it to other servers of the same type, enter 1 for processing option number 2 on the JD Edwards EnterpriseOne Package Build Director application (P9621).
This option displays a field to compress an update package when defining that package. When you select this option and build the package, the program creates a compressed file in the package name\server type\bin32 directory. Specifications are not compressed. They are copied directly from the deployment server to the specification database data source during package deployment.
Compressing Client Packages
When you compress directories, the application objects that are included in the package are automatically compressed. The system also creates an entry in the package INF file that indicates whether the foundation, data, and application objects are compressed.
Verification of a Package Build
After you assemble a package or define a package build, you can verify whether the package can be built successfully. You can use this verification to test the package before you submit the build, or troubleshoot problems with the build process if the package build fails.
During the verification process, the program verifies that:
-
Disk space is adequate.
-
Central objects and package build tables are accessible.
-
User has permissions to create directories on the deployment server and enterprise server.
-
Required service pack is installed.
-
Required Microsoft Data Access Components (MDAC) are installed.
-
Machine tables are set up.
-
Required compiler version is installed.
-
Server port is accessible.
-
Debug levels of the jde.ini files are adequate for the client and enterprise server.
Note:
You cannot verify the specification database data source. Only enterprise servers and clients can be verified.Building a Package
This section lists prerequisites and discusses how to:
-
Set processing options for the Package Build Definition Director.
-
Define a package build.
-
Review package build selections.
-
Build a package.
Prerequisites
Before you complete the tasks in this section:
-
Verify that the User ID that is used to perform the package build has drop table and create table rights.
If you are using a Oracle, SQL, or IBM DB2 for LUW (Linux, UNIX, Windows), and you are running with security server turned on, you must add a security override so that the package build process can create the metadata repository table in central objects.
-
For customers adopting Microsoft Visual C++ 2005:
All JD Edwards EnterpriseOne Windows machines receiving application foundation packages built with Microsoft Visual C++ 2005 require the runtime libraries to be installed.
See.
-
Assemble the package and verify that the status of the assembled package is Assembly-Definition Complete.
-
Verify that Oracle's JD Edwards EnterpriseOne Object Configuration Manager (OCM) mappings are correctly set for the JD Edwards EnterpriseOne Package Build (R9621) and Server Package Build (R9622) programs, which the system generates as part of the package build process.
For example, if you want the programs to run locally, ensure that the OCM mappings point to Local for the environment in which the package build is running.
-
Verify that logging is turned off during the package build.
When the jdeproperties.log file is set for logging in the \system\classes folder and a package build is submitted, the build process is slowed down.
Forms Used to Build a Package
| Form Name | FormID | Navigation | Usage |
|---|---|---|---|
| Package Selection | W9621C | Package and Deployment Tools (GH9083), Package Build.
Click Add, and then click Next. |
Select a package to define a build. |
| Package Build Revisions | W9621B | Package and Deployment Tools menu (GH9083), Package Build.
Select a package, and deactivate it by selecting Active/Inactive from the Row menu. Select Build Revisions from the Row menu. |
Review and change package build options. |
| Work With Package Build Definition | W9621L | Package and Deployment Tools (GH9083), Package Build | Add a package build definition.
Build a defined package. |
Setting Processing Options for the Package Build Definition Director (P9621)
Processing options enable you to specify the default processing for programs and reports.
For programs, you can specify options such as the default values for specific transactions, whether fields appear on a form, and the version of the program that you want to run.
For reports, processing options enable you to specify the information that appears on reports. For example, you set a processing option to include the fiscal year or the number of aging days on a report.
Do not modify JD Edwards EnterpriseOne demo versions, which are identified by ZJDE or XJDE prefixes. Copy these versions or create new versions to change any values, including the version number, version title, prompting options, security, and processing options.
Processing Tab
Although processing options are set up during JD Edwards EnterpriseOne implementation, you can change processing options each time you run a program.
- 1. Changes
-
Enter a value to determine how changes will occur.
<Blank> means that changes will only be allowed at the package level and will apply to all servers selected.
Enter 1 to enable changes to the build definitions by individual server.
- 2. Mastering
-
Mark this processing option with a 1 if this process is for Mastering purposes. If the process is for all users, mark this processing option with <Blank>.
- 3. Build Verification
-
Mark this processing option with a 1 if the Build Verification UBE is to be run prior to building all packages. If the build verification fails, the package build UBE will not be run. Leave this processing option <Blank> if you do not want to run Build Verification.
- 4. Director or Express Mode
-
Use this processing option to switch between Director and Express modes.
Defining a Package Build
Access the Package Selection form.

-
Find and select the defined package that you want to build.
-
If the package definition has a status of In Definition, you must change the status to Assembly-Definition Complete before you build the package. To change the status, select the package and select Activate from the Row menu.
-
On the Package Selection form, in the Express Option pane, select one of these options:
Option Description Director Select this option if you want to configure the package build. Director enables you to navigate the package build definition forms. Express Select this option if you want to accept the default build parameters. Express enables you to accept the default options for the package build and skip the package build definition forms. -
If you selected the Express option, skip to the Reviewing Package Selections task. If you selected the Director option, continue with the next task.
-
On the Package Build Location form, select one or both of these options:
Option Description Client Select to indicate that the package is being built for installation on client workstations. If the package includes a build for a mobile client, the Client option is automatically selected. Server(s) Select to indicate that the package is being built for installation on one or more servers. -
If you are building a package for client workstations only, click Next and proceed to step 10.
-
If you are building a server package, you can specify the Shared Location for the shared spec database and click Next.
Note:
The default shared spec database is always the central objects data source for the package path code. -
To select a server on the Server Selection form, and then double-click the row header for the server.
A check mark indicates your selection. You can select multiple servers.
Note:
Servers are automatically selected for an update package. They are selected based on the server selection of the parent package. -
Click Next.
-
On the Build Specification Options form, select Build Options to take the package definition and copy and convert objects from the central data source to the replicated format used by workstations.
-
Complete these fields and click Next:
Field Description All Specification Tables Select this option if you want to build all specification tables into the package. Individual Specification Tables Select this option if you would like to select individual tables to include in the package. All of the tables listed on the Individual Specifications Selection form will be included in the package. Stop Build Option Indicate the point at which the system should stop the build. You can continue building on all errors, stop building on specification errors, stop building on business function errors, or avoid compressing when errors exist. Replace jde.ini For update packages, indicate if you want a new jde.ini file delivered with the package. Leave this unchecked unless the jde.ini file has changed. For example, the jde.ini may change when you perform upgrades or when you re-configure in release master. -
If you chose to build individual specification tables, the Individual Specification Selection form appears.
-
To indicate that you do not want to build a specification table, clear its option.
You can clear multiple options.
-
Click Next.
For a full package or for an update package that includes business functions or tables with table event rules, the Business Function Options form appears.
-
Complete these fields and click Next:
Field Description Build Mode Specify the build mode, such as debug or optimize. Stop-Build Option Specify what action to take if errors occur while building business functions. Build BSFN Documentation Specify whether you want to build the documentation for the functions. Clear Output Destination First Indicate if you want the destination directory for the functions to be cleared before the build. -
On the Compression Options form, select the Compress Package option.
-
Select this option to compress the applications included in the package, and to specify options for the compression process.
If the package that you are building will be deployed to a server, you should select Compress Options only under these circumstances:
-
You are building the same package for both the workstation and server, and you want to create compressed files for the workstation package.
-
You plan to build the package on one enterprise server and deploy it to another enterprise server.
-
-
If you are compressing the package, select from these options:
Option Description All Directories Select to compress all of the directories listed on the Individual Directory Selection form. Individual Directories Select to compress only certain directories which you specify. Compress Data Indicate whether to compress the data in a package after the package is created. Compress Data compresses the Supported Local Database that is associated with this package. Compress Foundation Indicate whether to compress the foundation files in the package after the package is created. Compress Foundation compresses the foundation that is associated with the package. Note:
Verify that the DoCompression setting is set to 1 to enable compression. If this setting is not set to 1, the system does not compress the server package. -
To compress a package, click Compress Options and select All Directories.
This selection compresses the client and server packages. The system compresses the client package to the deployment server. It compresses the server package on the enterprise servers and copies the files to the deployment server.
-
Click Next.
If you chose to compress individual directories, the Individual Directory Selection form appears.
-
On the Individual Directory Selection form, indicate that you want to compress a directory by clicking its option to select it and click Next.
You can select multiple options.
-
If the package does not include features, skip to the next task.
-
On the Build Features form, if you want to build a feature.inf file with the package, select the Build Feature INFs option.
When you select this option, the Compress and Build options become available.
See Configuring Features During the Package Build Definition.
-
Click Next.
-
Review the package build selections and click End.
Reviewing Package Build Selections
Access the Package Build Revisions form.
-
Review current build options, business function options, compression options, and feature options that you specified for the package.
-
Click the tab for the type of option that you want to change, and make any changes.
Only tabs for options that you selected appear on this form.
-
When you are finished reviewing or changing the build options, click End to exit the Package Build Definition Director, or click OK to accept changes to an existing package.
-
On Work With Package Build Definition, activate the package by choosing Active/Inactive from the Row menu.
After you enter the build options for a package, you can easily revise any of those options using the Package Build Revision form. You do not need to go through all of the forms in the Package Build Definition Director to revise build options.
Building a Package
Access the Work With Package Build Definition form.
-
Select Active/Inactive from the Row menu to activate the package.
-
Select Submit Build from the Row menu when you are ready to initiate the package build.
-
Select one of these options and click OK.
-
On Screen
-
To Printer
The form closes and the system begins building the package. Build time varies, depending on the number and size of the items in the package. A build could take five minutes for a small package, or several hours for a full package that contains all applications. When the build finishes, the report either appears on the screen or prints, depending on the destination that you specified.
-
-
Review the report to make sure that all components in the package were built successfully.
If the report indicates any errors, review the error logs for more detail.
If the package build finishes successfully, you can schedule the package for deployment.
Incorporating Features into Packages
This section provides overviews of the feature build and deployment process and the JD Edwards EnterpriseOne Feature Based Deployment Director and discusses how to:
-
Create a feature.
-
Define a file set.
-
Define a registry setting.
-
Define a shortcut.
-
Define additional package build processes.
-
Define additional install processes.
-
Define an initialization file.
-
Define a new open database connectivity (ODBC) data source.
-
Import an existing ODBC data source.
-
Review feature components.
-
Copy features.
-
Add a feature to a package.
-
Configure features during the package build definition.
-
Configure features for an existing package build definition.
Understanding the Feature Build and Deployment Process
A feature is a set of files or configuration options, such as registry settings, that is copied to a workstation or server to support an application or other functions. Like objects, features are built into a package and deployed to the workstations and servers that require the feature components.
Note:
Oracle's JD Edwards EnterpriseOne web development clients require a specific feature component to develop web-based objects. This feature is also required for mobile packages, because mobile clients require a Web Development client in order to operate.See JD Edwards EnterpriseOne Tools 8.98 Web Development Client Installation Guide.
Note:
Oracle's JD Edwards EnterpriseOne development clients require a specific feature component to develop integration points. This feature is the Web Services Gateway Development feature.See JD Edwards EnterpriseOne 8.98 Web Services Gateway Installation and Setup Guide.
Note:
Oracle's JD Edwards EnterpriseOne machines that run Microsoft Windows, use business functions built with a Microsoft Visual C++ 2005 or higher level compiler, and do not have the same level Microsoft Visual C++ complier installed locally, require a specific feature that installs the appropriate Microsoft Visual C++ compiler runtime libraries.You might also want to include any of these features when you build a package:
-
ActiveX controls.
The Application Design Aid tool enables you to include ActiveX controls in applications. If ActiveX controls are delivered with the software, you need a way to copy these controls to the workstation.
-
Open Data Access (ODA) data sources.
ODA requires that additional ODBC data sources be created on any workstation or server that uses ODA.
-
Sales Force Automation databases.
The Sales Force Automation feature requires that you install a separate Supported Local Database on the workstation so that it can be disconnected from the network during offline operation. You must also write a registry setting that indicates that the machine is used offline.
-
BMC Patrol, GenCorba, GenCom, and other third-party interfaces or products.
Each of these products and interfaces requires additional components on the workstation and server in order to function. As functionality expands to support additional third-party products and interfaces, these products will each have their own set of supporting files.
For software releases prior to JD Edwards EnterpriseOne 8.10, custom programming was required to add feature components to the workstation and server. You can now use familiar tools such as the JD Edwards EnterpriseOne Package Assembly Director and Package Build Definition Director to create a package that contains the feature, and then you can deploy it using the JD Edwards EnterpriseOne Package Deployment Director or multitier deployment.
Because feature components are not objects, the process for incorporating feature components into a package is slightly different from the normal package build process. Specifically, you must first define the feature before you can add it to a package.
Feature Definition
Before adding the feature to a package, you must first define it using Oracle's JD Edwards EnterpriseOne Feature Based Deployment Director. During feature definition, you specify the feature name and type, enter a brief description, and specify installation parameters.
The forms in the JD Edwards EnterpriseOne Feature Based Deployment Director enable you to:
-
Create a file set.
-
Define registry settings.
-
Define a Microsoft Windows shortcut.
-
Enter initialization file information.
-
Add ODBC data sources.
-
Specify the feature build sequence.
-
Enter information for third-party products.
Feature Selection During Package Assembly
After you have defined the feature, it is ready to be included in a package. Use the Package Assembly Director to assemble the package as you would any other package. When you assemble the package, feature-specific forms enable you to specify the features that you want to include.
Feature Configuration During Package Build Definition
After you have assembled the package that contains the features, you can use the Package Build Definition Director to define the build for the package. Forms in this director enable you to select the file sets that will be compressed within the package, and to specify the processes that will be run before and after the feature is built.
Package Deployment
After you have built the package, you are ready to schedule it for deployment by using Oracle's JD Edwards EnterpriseOne Package Deployment Director. The procedure is the same as the procedure that you use to schedule packages that do not include features.
Workstation Installation and Deployment Server Installation
After you have deployed the package to workstations and deployment servers, use Oracle's JD Edwards EnterpriseOne Workstation Installation and Deployment Server Installation applications to install the package.
Feature Entries in the Package.inf File
When a package contains a feature, the package.inf file [Features] section provides the feature name and the location of the feature.inf file that the system creates for each feature. The feature.inf file contains information pertaining to the feature, such as shortcut information, registry settings, initialization file settings, and environment information.
Installation of Packages Containing Features
You install packages containing features on workstations and servers in the same way in which you install any other package: through the JD Edwards EnterpriseOne Workstation Installation and Deployment Server Installation applications.
When you launch either of these installations, you can select the Custom option to select the features that you want to install.
See Also:
-
JD Edwards EnterpriseOne Application Release 9.0 Installation Guide.
Understanding the Feature Based Deployment Director
The JD Edwards EnterpriseOne Feature Based Deployment Director enables you to define the feature so that it can be included in a package and then deployed to workstations and servers. The forms in the director enable you to specify the name and type of the feature, as well as the different feature components. The Feature Information form enables you to select the types of components to include in the feature, and determines the subsequent forms that appear in the JD Edwards EnterpriseOne Feature Based Deployment Director.
For this release, the Platform value must always be 80 for CLIENT. Future releases will enable you to select alternative platforms.
Throughout the feature definition process, you can always proceed to the next or previous form by clicking Next or Previous. Also, regardless of where you are in the process, you can always cancel the feature definition by clicking Cancel.
Copying a Feature Definition
The JD Edwards EnterpriseOne Feature Based Deployment Director includes a copy function that enables you to copy an existing feature and rename it as a new feature. This feature is especially useful if you want to create a feature definition that closely matches an existing feature definition.
Forms Used to Incorporate Features into Packages
| Form Name | FormID | Navigation | Usage |
|---|---|---|---|
| Feature Information | W9326C | Package and Deployment Tools (GH9083), Package Assembly
Select Features from the Form menu. Click Add. Click Next. |
Define a feature and add one or more components to the feature. |
| File Set Definition | W9326J | From the Feature Information form, select File Set and click Next. | Enter information about any file sets that must be installed on the workstation or server for the feature to function properly.
A file set is a collection of files that must be installed on the workstation or deployment server for the feature to function correctly. |
| Registry Definition | W9326D | From the Feature Information form, select Registry and click Next until the Registry Definition form appears. | Enter information that should be added to the Microsoft Windows registry as part of the feature installation. Registry information that you enter on this form will be delivered in the package that contains the feature. |
| Shortcut Definition | W9326G | From the Feature Information form, select Shortcut and click Next until the Shortcut Definition form appears. | Use this form to add a shortcut for the feature to the Windows desktop. The system creates a shortcut on the desktop after the feature is installed. |
| Shortcut Advanced Options | W9326P | From the Shortcut Definition form, select Advanced from the Form menu. | Enter advanced shortcut options. |
| Additional Package Build Processes | W9326H | From the Feature Information form, select Additional Package Build Processes and click Next until the Additional Package Build Processes form appears. | Specify a batch application or executable program to run either before or after the package that contains the feature is installed. |
| Additional Install Processes | W9326K | From the Feature Information form, select Additional Install Processes and click Next until the Additional Install Processes form appears. | Enter information about third-party applications that should be run when the package is installed. |
| Initialization File (INI) Definition | W9326I | From the Feature Information form, select Initialization Files (INI) and click Next until the Initialization File (INI) Definition form appears. | Enter information that should be written to an initialization file (such as jde.ini) as part of the feature installation. The INI file is automatically updated when the package is installed. |
| ODBC Data Source Definition | W9326N | From the Feature Information form, select ODBC Data Sources and click Next until the ODBC Data Source Definition form appears. | Enter information for any ODBC data sources that must be added to support the feature. |
| Local Data Sources | W9326O | On ODBC Data Source Definition, select Import from the Form menu. | Select previously created data sources that reside locally on your machine. |
| Features Summary | W9326L | From the Feature Information form, click Next and add the each feature component.
After you add all the components, the wizard displays the Features Summary form. |
Review and modify information that you entered on any of the Feature Based Deployments forms. |
| Feature Copy | W9326M | Package and Deployment Tools (GH9083), Package Assembly
Select Features from the Form menu. Select the feature from which to copy the definition, and click Copy. |
Copy an existing feature and rename it as a new feature. This function is useful if you want to create a feature definition that closely matches an existing feature definition. |
| Feature Component Selection | W9601AB | Package and Deployment Tools (GH9083), Package Assembly
Click Add to create a new package. Enter the forms in the Package Assembly Directory until the Features Component form appears. Click Browse. Package and Deployment Tools (GH9083), Package Assembly Select a package and then select Package Revisions from the Row menu. On Package Component Revisions, click the Features button. To add a feature, click Browse. |
Add defined features to a new package.
Add defined features to an existing package that is open for revision. |
| Build Features | W9621B | Package and Deployment Tools (GH9083), Package Build
Click Add to launch the Package Build Definition Director. Click Next and complete the screens until you come to the Build Features form. Package and Deployment Tools menu (GH9083), Package Build Find and select the package that contains features. Select Build Revisions from the Row menu. Click the Build Features tab. |
Enables you to specify whether the system builds feature INF files for the features in the package. If you defined a fileset component in the feature, you can select to compress it. If any additional package build processes are included in the feature, you must click Build Processes and select them before they will run during package build. |
Creating a Feature
Access the Feature Information form.

- Feature
-
Enter a name for the feature.
- Feature Type
-
Enter the feature type, if applicable.
- Description
-
Enter a description of the feature.
- Required
-
Select this option if the installation of this feature is mandatory for both Compact/Production and Typical/Development installs. Inclusion of this feature cannot be overridden when the package is installed.
- Not Required
-
Select this option if the installation of this feature is optional. Whether the feature is installed depends on the options that you select (Compact/Production and Typical/Development). Inclusion of the feature can be overridden when the package is installed.
- Compact/Production
-
Select this option if this feature is to be included in a Compact/Production install by default. This option can be overridden when the package is installed if Not Required is also selected.
- Typical/Development
-
Select this option if this feature is to be included in a Typical/Development install by default. This option can be overridden when the package is installed if Not Required is also selected.
- File Set
-
Select this option if the feature is a file set.
- Registry
-
Select this option if the feature is a registry setting.
- Shortcut
-
Select this option if the feature is a shortcut.
- ODBC Data Sources
-
Select this option if the feature is an ODBC Data Source.
- Additional Package Build Processes
-
Select this option if the feature is an additional process to be performed during the package build.
- Additional Install Processes
-
Select this option if the feature is an additional process to be performed during the install process.
- Initialization Files (INI)
-
Select this option if the feature is an initialization file.
Defining a File Set
Access the File Set Definition form.
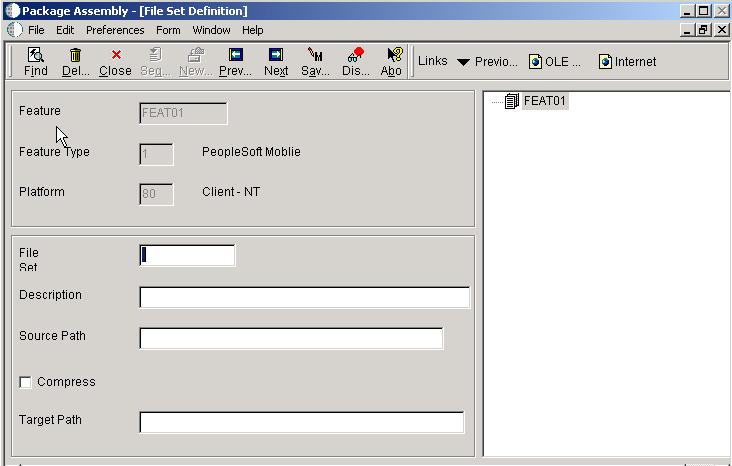
- File Set
-
Enter comments or memoranda in this free-form text field.
- File Set Description
-
Enter a description for the group of files.
- Source Path
-
Enter the path that identifies the source location of the file set.
- Compress
-
Select this option to compress the file.
- Target Path
-
Enter a path to identify the target location of the file set.
The source path tells the system where to find the file set to be copied into the package, and the target path indicates the location to which the file set should be copied when the package is installed. Although a feature can have an unlimited number of file sets, each file set can have only one target path.
Note:
You can also use this form to modify or delete any previously defined file sets. Existing file sets appear in the tree structure on the right side of the form. To modify a file set, select the file set on the tree structure and modify any of the fields for the file set. To delete a file set, select the file set and click Delete.Always select Save Node from the Form menu when you are finished adding file set information.
Defining a Registry Setting
Access the Registry Definition form.
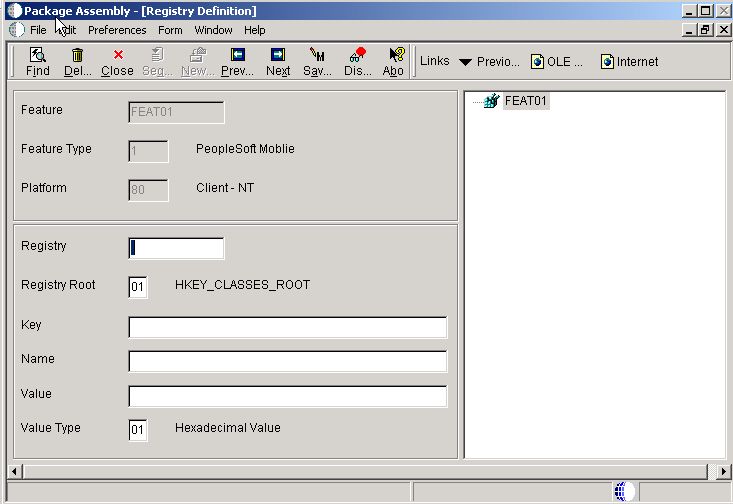
- Registry
-
Enter an identifier for the registry modification.
- Registry Root
-
Enter the root key in the registry.
- Key
-
Enter the key for a registry value.
- Name
-
Enter the registry value name.
- Value
-
Enter the registry value.
- Value Type
-
Enter the data type in which the value is stored in the registry.
Note:
You can also use this form to modify or delete any previous registry definitions. Existing registry definitions appear in the tree structure on the right side of the form. To modify a registry definition, select the item on the tree structure and modify any of the fields for the registry definition. To delete a registry definition, select the item and click Delete.Always select Save Node from the Form menu when you are finished entering registry information.
Defining a Shortcut
To define a shortcut component, you enter a shortcut definition, and then you can enter advanced shortcut options.
Entering a Simple Shortcut Definition
Access the Shortcut Definition form.

- Shortcut
-
Enter a name that identifies a unique shortcut to a user's computer.
- Name
-
Enter the name of the shortcut.
- Target
-
Enter the path and file name of a target file.
Entering Advanced Shortcut Options
Access the Shortcut Advanced Options form.
Figure 6-7 Shortcut Advanced Options form
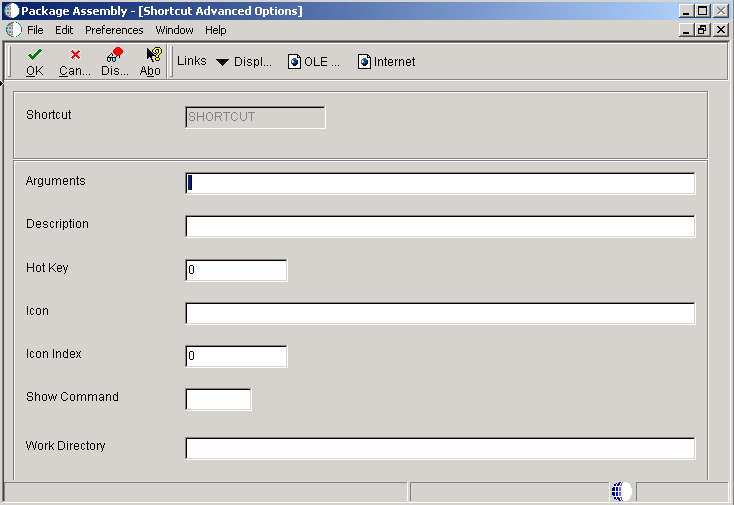
Description of "Figure 6-7 Shortcut Advanced Options form"
- Arguments
-
Enter the parameters that are entered at the command line for the shortcut.
- Description
-
Enter a description of the shortcut.
- Hot Key
-
Enter a key sequence that, when pressed, automatically launches the shortcut.
- Icon
-
Enter the path and name of the icon file, based on a relative target path.
- Icon Index
-
Enter the icon index for a shortcut.
- Show Command
-
Specify the size of the window after the shortcut is launched. For example, the window might be minimized or maximized.
- Work Directory
-
Enter the identifier of the directory path or the working directory of a shortcut.
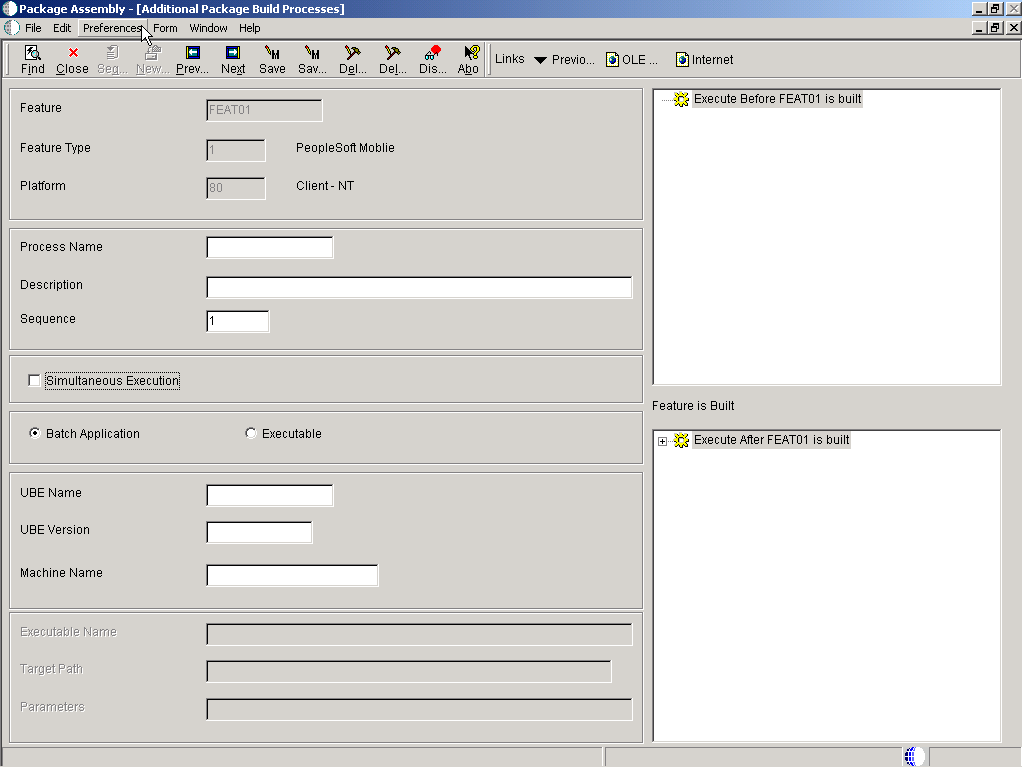
Defining Additional Package Build Processes
Access the Additional Package Build Processes form.
Figure 6-8 Additional Package Build Processes form
Description of "Figure 6-8 Additional Package Build Processes form"
- Process Name
-
Enter the name of the build process.
- Description
-
Enter a description of the build process.
- Sequence
-
Enter a number to identify the order in which the process will be run relative to the other processes that run during the package build.
- Synchronous Execution
-
Select this option to indicate whether the package build job waits for the process to finish before it continues.
- Batch Application or Executable
-
Specify whether the process is an application or an executable.
- UBE Name
-
Enter the name of the batch application. Only applies if batch application was selected.
- UBE Version
-
Enter the version of the batch application. Only applies if batch application was selected.
- Machine Name
-
Enter the name of the server or workstation on which the batch application will run. Only applies if batch application was selected.
- Executable Name
-
Enter the name of the executable program that the system launches to install the third-party software. Only applies if executable program was selected.
- Target Path
-
Enter the path and file name of a target file. Only applies if executable program was selected.
- Parameters
-
Enter the executable parameters that the setup program uses to install the third-party software. Only applies if executable program was selected.
Note:
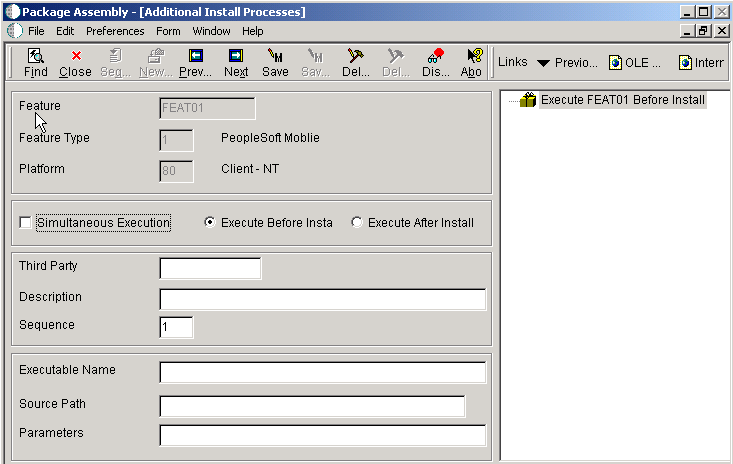
You can also use this form to modify or delete any previously defined processes. Existing processes appear in the tree structure on the right side of the form. To modify a process definition, select the item on the tree structure and modify any of the fields for the definition. To delete a process definition, select the item and then select Delete or Delete Node After from the Form menu, depending on whether you want to delete a process that is executed before or after the feature is installed. You can run the process either before or after the feature is built. When you are finished adding process information, select either Save or Save Node After from the Form menu, depending on when you want the process to run.Defining Additional Install Processes
Access the Additional Install Processes form.
Figure 6-9 Additional Install Processes form
Description of "Figure 6-9 Additional Install Processes form"
- Third Party
-
Enter the name of the third-party component.
- Description
-
Enter a description of third-party software.
- Sequence
-
Enter a number to identify the order in which this process will run relative to the other additional install processes.
- Synchronous and Execute After Install
-
Clear the Simultaneous Execution option and select the Execute After Install option. The third-party process waits for the JD Edwards EnterpriseOne client install to finish before running.
- Synchronous and Execute Before Install
-
Clear the Simultaneous Execution option and select the Execute Before Install option. The JD Edwards EnterpriseOne client install will run the third-party process and wait until it finishes before installing the client.
- Asynchronous and Execute After Install
-
Select the Simultaneous Execution option and the Execute After Install option. The JD Edwards EnterpriseOne client install finishes, and then starts the third-party process. Neither process waits for the other to finish before proceeding.
- Asynchronous and Execute Before Install
-
Select the Simultaneous Execution option and the Execute Before Install option. The JD Edwards EnterpriseOne client install begins, and then immediately starts the third-party process and resumes the client install without waiting for the third-party process to finish.
- Executable Name
-
Enter the name of the program that launches the third-party software.
- Target Path
-
Enter the path to the executable file. Do not include the name of the file.
- Parameters
-
Enter the executable parameters that the system passes to the third-party program.
Note:
Select Save from the Form menu when you finish adding third-party product information.Defining an Initialization File
Access the Initialization File (INI) Definition form.
Figure 6-10 Initialization File (INI) Definition form
Description of "Figure 6-10 Initialization File (INI) Definition form"
- Initialization INI
-
Enter the identifier of an initialization file component.
- File Name
-
Enter the name of the initialization file.
- Target Path
-
Enter the path of the INI file.
- Section Name
-
Enter the name of the application section in an initialization file.
- Key Name
-
Enter a key in the initialization file that is to be added, modified, or removed.
- String
-
Enter the value of the key in an initialization file.
- Option
-
Enter the option that identifies the action associated with the key in the initialization file.
Note:
You can use this form to modify or delete any previous initialization file definitions. Existing definitions appear in the tree structure on the right side of the form. To modify an initialization file definition, select the item in the tree structure and modify any of the fields for the definition. To delete an initialization file definition, select the item and click Delete.When you finish adding initialization information, select Save Node from the Form menu.
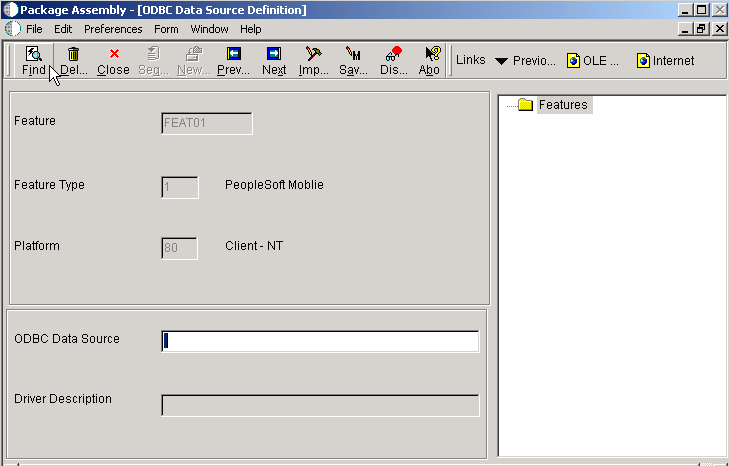
Defining a New ODBC Data Source
Access the ODBC Data Source Definition form.
Figure 6-11 ODBC Data Source Definition form
Description of "Figure 6-11 ODBC Data Source Definition form"
- ODBC Data Source
-
Enter the name of the data source.
Note:
When you select Save Node from the Form menu, the system activates the Microsoft Windows control panel applet that displays the ODBC Data Source forms where you can enter the data source information.Importing an Existing ODBC Data Source
Access the Local Data Sources form.
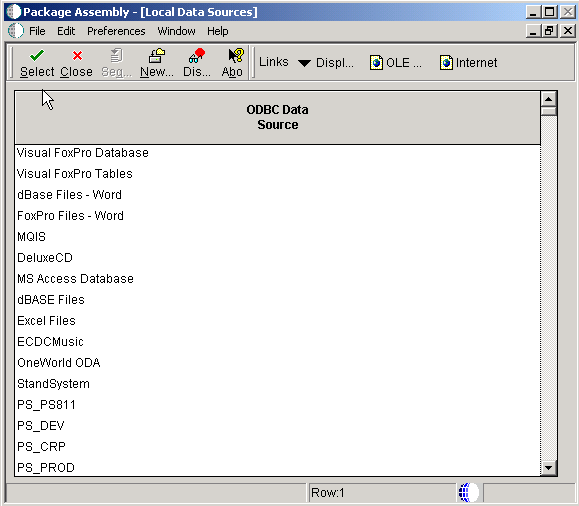
-
Press the Ctrl or Shift key to select one or several data sources, and click Select to add the data sources to the feature.
The ODBC Data Source Definition form reappears.
-
When you are finished adding data source information, select Save Node from the Form menu.
-
Click Next.
-
To modify existing data sources, enter the data source name and then select Modify from the Form menu. The ODBC Data Source Revisions form appears. Use this form to make changes to the data source.
-
When you are finished, click OK to return to the ODBC Data Source Definition form.
Reviewing Feature Components
Access the Features Summary form.
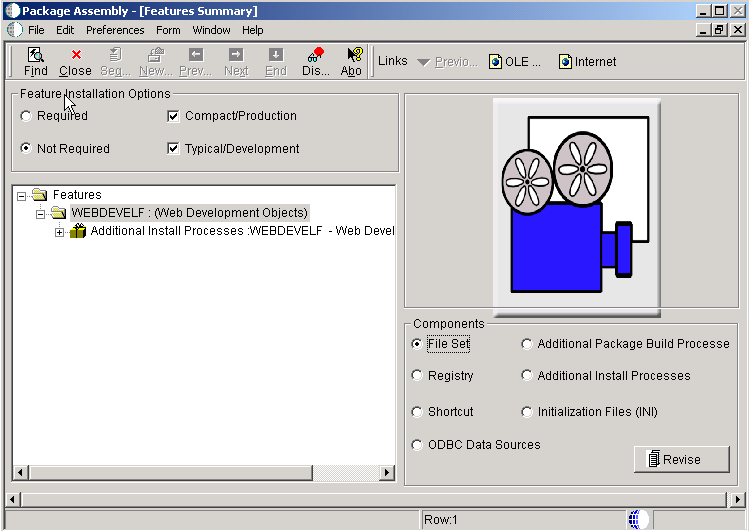
-
Select a component in the right pane and click the Revise button to review the information for that component.
-
If needed, change the field values for the selected component and click Save.
-
Repeat the previous steps to modify other components.
-
When you are finished defining the feature, click End.
See Also:
Copying Features
Access the Feature Copy form.
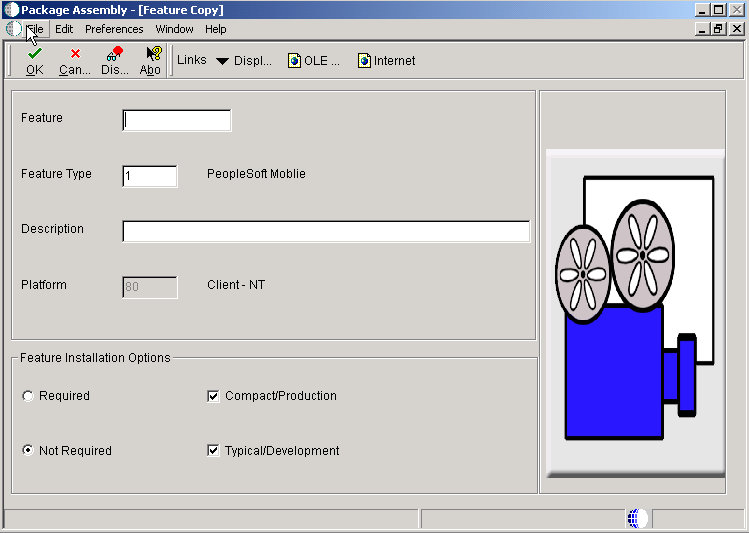
-
Complete these fields:
-
Feature
-
Feature Type
-
Description
-
-
Select one of these options:
Option Description Required The installation of this feature is mandatory for both Compact/Production and Typical/Development installs. Inclusion of this feature cannot be overridden when the package is installed. Not Required The installation of this feature is optional. Whether the feature is installed depends on the options that you select (Compact/Production and Typical/Development). Inclusion of the feature can be overridden when the package is installed. -
Select one or both of the options that follow.
If you chose Required, both of these options are automatically selected.
-
Compact/Production
When selected, this feature is included in a Compact/Production install by default. This option can be overridden when the package is installed if Not Required is also selected.
-
Typical/Development
When selected, this feature is included in a Typical/Development install by default. This option can be overridden when the package is installed if Not Required is also selected.
-
-
Click OK.
-
To revise the new feature definition, select the feature and select Revise Feature from the Form menu.
Adding a Feature to a Package
Access the Feature Component Selection form.
Figure 6-15 Feature Component Selection form
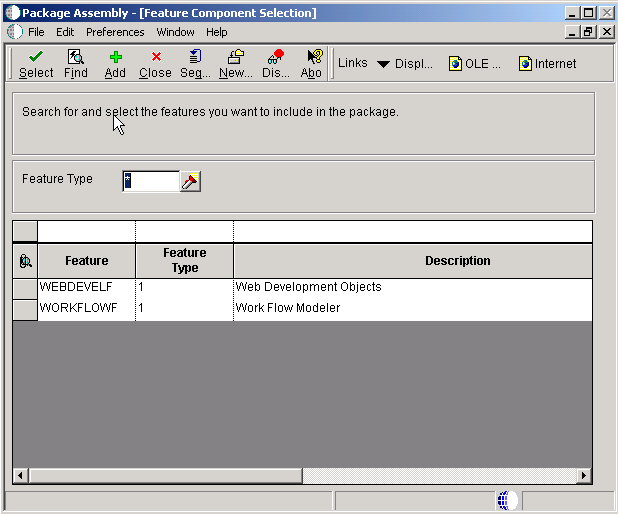
Description of "Figure 6-15 Feature Component Selection form"
-
Click Find to display the list of available features.
Note:
Before a feature is available for inclusion in the package, you must first define the feature. -
Use one of these methods to select one or more features to include in the package:
-
Select a feature and click the Select button.
(Press the Ctrl or Shift key to select multiple features.)
-
Double-click each feature.
-
-
When you are finished adding features, click Close to return to the Features Component form. The selected features appear.
-
Click Next and complete the remaining forms to finish assembling the package.
Note:
To delete a feature that was previously included in the package, on the Features Component form select the feature and then click Delete.
Configuring Features During the Package Build Definition
Access the Build Features form.
-
If you want to build a feature.inf file with the package, select Build Feature INFs.
When you select this option, the Compress and Build fields become available if file sets or additional package build process components are included in the package.
-
Continue with one or both of these tasks:
-
To compress file sets
-
To build processes
-
-
Select Compress, and then select Compress File Sets from the Form menu.
-
On the File Set Selection form, select each feature that you want to include by choosing a file set and clicking Select.
-
When you are finished selecting file sets, click Close.
-
Continue either by performing the next steps, or by clicking Next and completing the remaining forms to finish defining the package build.
-
To build processes, select Build, and then click Select Build Processes.
-
On the Build Processes Selection form, select each process that you want to build by choosing a process and clicking Select.
-
When you are finished selecting processes to build, click Close.
-
From the Form menu, select Build Processes and manually select each process to run during the package build.
You must complete this step or none of the processes will run, even though they are included in the feature.
-
Click Next and complete the remaining forms to finish defining the package build.
Configuring Features for an Existing Package Build Definition
Access the Build Features form.
-
Modify or add to any of these existing build feature settings:
-
Build Feature INFs
-
Compress
-
Build
-
-
If you select Compress, select Revise File Sets from the Form menu to modify file sets.
-
When you are finished modifying file sets, click Close.
-
If you chose Build, click Revise Processes to modify processes.
-
When you are finished modifying processes, click Close.
-
If you selected Build, from the Form menu, select Build Processes and manually select each process to run during package build.
You must complete this step or none of the processes will run, even though they are included in the feature.
-
Click OK to complete the package build definition.
Viewing Package Build Records and Resubmitting Builds
This section provides overviews of package build history and the build status and discusses how to:
-
View the package build history.
-
View log files.
-
Resubmit a package build.
-
Change the build status.
-
Reset the specification build and package build statuses.
Understanding Package Build History
The JD Edwards EnterpriseOne Package Build History program (P9622) enables you to view information pertaining to the build process, including the options and objects that you specified when you created the build definition. This program provides this build information:
-
Package name.
-
Path code.
-
Date and time built.
-
Name of the server for which the package was built.
-
Current build status and status description.
-
Current status of selected specification tables.
-
Number of specifications written.
-
Package records written and read.
The View Logs option on the Form menu enables you to view four logs that contain additional information about the build process. Refer to these logs in the event that the build does not finish successfully and you need to review the errors that occurred during the build.
If a build does not finish successfully, you can use the Resubmit Build option to resume the build from the point at which the process stopped. Only the business functions and objects that did not build successfully will be built; the entire package will not be rebuilt.
In some cases, if a build is interrupted or otherwise unable to finish, you might need to reset the build status from Build Started to Build Definition Complete. Unlike the Resume Build feature, which continues the build from the point at which it failed, resetting the status enables you to start the build process from the beginning.
F96225 Table
The system maintains a history of the package build in the F96225 table. This table contains details about the package build statuses of any package components.
If you encountered errors during the build process and the package failed to build successfully, you can resubmit the package and continue building from the point at which the build failed. In this situation, the system reviews the F96225 table and rebuilds only the business functions or other package components that have a status of Not Built or Error. It does not build the entire package. This feature can save you a tremendous amount of time, especially if only a few package components failed to build successfully.
If you originally specified package compression, when you resubmit the package to resume building, the system automatically compresses the directories after it successfully builds the package.
Logs
After you build the package, you can view logs that list any errors that occurred during the build process. In particular, you can view these logs:
-
Package statistics log.
-
Package build log.
-
Business function errors log.
-
Missing business function source errors log.
Each log contains a header, which includes the package name, date, build machine, and path code.
Where to Find the Error Logs
To review error logs without using Oracle's JD Edwards EnterpriseOne Package Build History program (P9622), locate the desired log in the correct directory. Error logs are stored on the deployment server in directories that are subordinate to the directory for the package itself. The package build log is stored in the package directory. The package statistics log, business function source errors log, and missing business function source errors log are stored in the work directory for the package.
You can view the error logs by accessing the appropriate directory and opening the log with Microsoft Notepad or a similar application that enables you to display text files.
In these examples, PD900FA is used as the package name. To determine the actual directory, substitute the package name for PD900FA.
-
Package statistics: \PD900FA\work\buildreport.log
-
Client package build log: \PD900FA\clientpkgbuild.log
-
Server package build log: \PD900FA\svrpkgbuild.log
-
Mobile object list log: \PD900FA\work\mobileobjectlist.txt
-
Business function errors log: \PD900FA\work\buildlog.txt
-
Missing business function source log: \PD900FA\work\NoSource.txt
Package Statistics Log
The package statistics log summarizes the outcome of the package build, showing statistics for the directories in the package, including the size and file count of each directory. This log displays a complete build that you can use to review the build directories. The report shows a breakdown of the files in the specifications directory and the size of each spec file, as well as the total count and size. You can use this log to verify that the package built successfully.
Client Package Build Log
The client package build log lists the steps completed in building the client package, as well as any errors that occurred during the process. The first page of the build log will identify the compiler version used by the package (for example, "Microsoft Visual Studio Version being used: 8"). The final page tells you whether the package was built successfully. This log file is created for a client-only or client/server package.
Server Package Build Log
The server package build log lists the steps completed in building the server package, as well as any errors that occurred during the process. The final page tells you whether the package was successfully built and deployed. This log is created for a server-only or client/server package.
Mobile Object List Log
The mobile object list log lists all the mobile objects whose specifications are included as part of the mobilespec database. It lists all mobile applications, client-only named event rules (NERs), and mobile Universal Batch Engines (UBEs) that are part of the mobilespec repository.
Business Functions Errors Log
The business functions errors log enables you to view any errors that occur while business functions are being built. The final page of the log describes whether the business functions were successfully built or were built with errors. Business functions that appear on this report might be business functions that are still in development and have not yet been checked in. Business functions that have never been checked in do not have source, and therefore, are listed in the missing business function source errors log.
Missing Business Function Source Errors Log
The missing business function source errors log describes any business functions in the package that are defined in the Object Librarian and have a record, but could not be built because no source existed.
Server Logs
All compile logs for the enterprise server are located on the server itself in the source directory of the DLL in which the object belongs. For example, suppose that you want to see the log for the Sales Order Entry Master Business Function (B4200310) in the package PACKAGE1 on an HP 9000 for which the BuildArea is /u02/jdedwards/packages. The system creates a file called /u02/jdedwards/packages/PACKAGE1/CompileLogs/CDIST/b4200310.log (or b4200310.err if there are errors) because B4200310 is in the CDIST.DLL.
If the system could not link the CDIST.DLL (shared library) on the HP 9000, it would create a file called /u02/jdedwards/packages/PACKAGE1/obj/CDIST/CDIST.log.
On the iSeries, logs for business functions that failed to compile are members in a file called FAILED in the package library. Using the previous example, you would review member B4200310 of the FAILED file in library PACKAGE1.
Understanding the Build Status
In some cases, you might need to rebuild the package rather than resume the build from the point at which the build failed. Before you can do so, you must change the status of the package build from Build Started to Build Definition Complete.
When you reset the status of the package build, you can reset the status for the server only or for all servers and client workstations for which you want to build the package.
Forms Used to View Package Build History and Logs
| Form Name | FormID | Navigation | Usage |
|---|---|---|---|
| Work With Package Build History | W9622A | Package and Deployment Tools (GH9083), Package Build History | Display information about the current build status and build options for selected computers. |
| View Logs | W9622B | Package and Deployment Tools (GH9083), Package Build History
Select View Logs from the Form menu. |
Check logs for errors that occurred during the build process. |
| Work with Package Build Definition | W9621L | Package and Deployment Tools (GH9083), Package Build
W9621L |
Change the package build status. |
| Reset Build Status | W9622C | From Work with Package Build History, find the package for which you want to reset the statuses, expand the package, and select an individual item.
Select Reset Status from the Row menu. |
Reset the spec status and pack status for a package to the statuses that you specify. |
Viewing the Package Build History
Access the Work With Package Build History form.
Figure 6-17 Work with Package Build History form
Description of "Figure 6-17 Work with Package Build History form"
-
Select CLIENT or the server or the spec data source to display information about the current build status for those computers.
You can also expand the tree to view this information:
-
Build specification options
-
Compression options
-
Business function options
-
Objects
These options and objects are those that you specified when you created the build definition for the package. For example, if you chose to build only selected specifications, you can determine the status for each specification, as well as other pertinent information.
Note:
Only specification options are built in the spec data source.
-
-
When you are finished viewing build history information, click Close.
Viewing Log Files

- Package Statistics
-
Select this option to be able to view count and size statistics for the package directories that were built.
- Package Build Log
-
Select this option to be able to view errors that may have occurred during a package build. These errors could have occurred while building the specification files or the objects for the package.
- Business Function Errors
-
Select this option to be able to view the results of the business function build for this package. Both errors and warnings display in this report. A summary appears at the end of the report that indicates how many errors and warnings occurred for each dll. Use this information to determine if a rebuild is necessary.
- Missing Business Function Source
-
Select this option to see a list of all source members that were not available when the business function was created. The program attempted to find these members because each had a record in the F9860 table. However, a matching source could not be found in the source directory. To resolve these errors, either delete the Object Librarian record or provide a source member.
- Business Services Build Log
-
Select this option to be able to view the results of the business services build for this package.
Resubmitting a Package Build
Access the Work With Package Build History form.
-
Select one of these options to find the package you want to resubmit:
-
Select a specific server to resubmit only the builds for that server.
-
Select the CLIENT heading to resubmit only the workstation builds.
-
-
Select Resubmit Build from the Row menu.
If you generated NERs when you initially submitted the build, the system displays a window that asks whether you want to regenerate the NERs.
-
Click OK to regenerate NERs, or click Cancel to skip this process.
Note:
If you do not want to regenerate NERs, you can prevent this window from appearing by entering 2 in the Generate NER processing option for the Package Build History program. -
Select one of these destinations for the build report, and click OK:
-
On Screen
-
To Printer
The form closes, and the system begins to build the package. Build time varies, depending on the number and size of the items in the package. When the build is finished, the report either appears on the screen or prints, depending on the destination you specified.
-
-
Review the report to verify that the system successfully generated all components in the package.
If the report indicates any errors, review the error logs for more detail.
See Also:
Changing the Build Status
Access the Work with Package Build Definition form.
-
Find the package for which you want to reset the status.
Below the package name, select the server or servers and client workstation for which you want to build the package.
-
From the Row menu, select Advanced.
-
On the Advanced Revisions form, click Reset to change the status of the package build from Build Started to Build Definition Complete.
-
Click OK.
-
If desired, select the package name and select Submit Build from the Row menu.
-
The program asks whether you want to delete the current build or to continue without deleting it; select one.
Resetting the Specification Build and Package Build Statuses
Access the Reset Build Status form.
-
Enter the desired statuses in the Spec Build Status and Pack Build Status fields.
Both of these fields have a visual assist feature to help you determine the available statuses.
Note:
The values of these two fields are dependent on each other. If you change one value, be sure you understand the dependency on the other value. -
Click Reset.
-
Click OK.