4 Administering the Windows Server
This chapter contains the following topics:
-
Section 4.1, "Understanding Server Administration for Windows"
-
Section 4.6, "Running Multiple Instances of JD Edwards EnterpriseOne on Windows"
4.1 Understanding Server Administration for Windows
The JD Edwards company supports Oracle's JD Edwards EnterpriseOne enterprise servers that run the Microsoft Windows Server. You can operate the enterprise server for Microsoft Windows in a logic or database server environment. You need to perform certain administration procedures on the enterprise server to ensure that the software runs properly.
This section discusses:
-
JD Edwards EnterpriseOne directory structure for Microsoft Windows.
-
JD Edwards EnterpriseOne architecture and process flow for Microsoft Windows.
-
JD Edwards EnterpriseOne Initialization for Microsoft Windows.
-
JDE.INI settings for starting batch queues on Microsoft Windows.
-
Active Directory.
4.1.1 JD Edwards EnterpriseOne Directory Structure for Windows
This table lists the directories that are copied to the Windows enterprise server when Oracle's JD Edwards EnterpriseOne is installed. They should be installed under the JD Edwards EnterpriseOne base directory (such as z:\JDEdwards\E900\ddp). Indented names indicate subdirectories of the directories.
| Directory | Description |
|---|---|
| pathcode | The main directory for the business function shared libraries, C header files, object files, source files, and specification (spec or TAM) files. Upon installation, this directory will be copied to the correct path codes, such as PD900 and DV900. These subdirectories are included:
|
| system | The main directory for the system-level executables, shared libraries, C header files, libraries, and localization files. These subdirectories are included:
|
| PrintQueue | The directory to which all .PDF file output for reports is written. |
| log | The directory to which jde_xxx.log and jdedbug_ xxx.log files are written. |
| packages | The server package installation base directory. Directories exist here only if a package has been installed. Under the package directory are subdirectories named for each package that has been installed. Located under each package are these subdirectories:
|
4.1.2 JD Edwards EnterpriseOne Architecture and Process Flow for Windows
These host server processes perform the indicated actions:
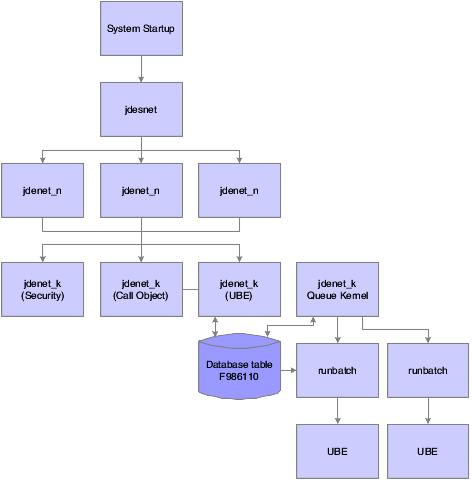
All communications between the client and the host server occur using sockets. The communications between jdenet_n and jdenet_k occur with shared memory. jdenet_n and queue kernel communicate using the Job Control Status Master database table (F986110).
This text explains the process flow:
-
During Windows system startup, jdesnet runs automatically, provided that it is installed to start automatically. Otherwise, it must be started manually.
-
This information applies to the JD Edwards network service:
-
The program is system\bin32\jdesnet.exe.
-
Each time that a new server or workstation connects to this server, jdesnet might start another jdenet_n until the number of jdesnet and jdenet_n jobs equals the value in the maxNetProcesses field in the [JDENET] section of the JDE.INI file.
-
-
Each time that a new request, such as a batch application or CallObj is submitted, jdesnet (and any jdenet_n processes) might start another jdenet_k process until the number of jdenet_k jobs equals value in the maxKernelProcesses field in the [JDENET] section of the JDE.INI file.
-
Jdenet_n can be run manually by running system\bin32\jdenet_n.
-
This information applies to the JD Edwards queue service:
-
The program is system\bin32\jdesque.exe.
-
The service runs the number of instances of queue kernels specified in the UBEQueues, PackageQueues, and SpecInstallQueues fields in the [NETWORK QUEUE SETTINGS] section of the JDE.INI.
-
-
When a user submits a batch application, jdesnet or jdenet_n (as part of the host server) communicates with the client as follows:
-
The host server programs are system\bin32\jdesnet.exe and system\bin32\jdenet_n.exe.
-
The client environment is initialized.
-
The client tells the host server (using a socket) to initialize its environment.
-
The host server (for example, jdenet_n) initializes its environment and gets environment and user handles.
-
The host server passes the environment and user handles to the client (using a socket).
-
The client launches the batch application and then sends data to the host server (using a socket).
-
If the maximum number of kernel (for example, jdenet_k; the k stands for kernel) processes has not been met, jdesnet or jdenet_n might start a new jdenet_k process.
-
If the maximum number of jdenet_k processes has been met, jdesnet or jdenet_n puts the message in a queue for a jdenet_k process.
-
The client frees the user environment.
-
The client tells the host server (using a socket) to free the user environment for the server.
-
The host server frees its user environment.
-
The client tells the host server (using a socket) to free the environment for the server.
-
The host server frees its environment.
-
-
When the UBE Jdenet_k (the kernel) writes to the database (batch application only), this occurs:
-
The program is system\bin32\jdenet_k.exe.
-
Jdenet_k adds a record in the F986110 database table. The record has a status of W (Waiting).
-
-
The Queue Kernel periodically checks the contents of table F986110 and launches a runbatch process.
-
When runbatch processes the batch application, this occurs:
-
The program is system\bin32\runbatch.exe.
-
The system changes the status stored in table F986110 to P (Processing).
-
The system starts the batch application.
-
If the batch application completes successfully, it changes the status in table F986110 to D (Done).
-
If the batch application does not complete successfully, it changes the status in table F986110 to E (Error).
-
-
Unlike the many processes that execute when a batch application is submitted, jdenet_k performs the processing when a user submits a CallObject and these actions occur:
-
Cannot start the service name service on the enterprise server.
-
Error 1069: The service did not start due to a logon failure.
-
4.1.3 JD Edwards EnterpriseOne Initialization for Windows
This initialization occurs when you start JD Edwards EnterpriseOne programs such as queue kernel, runbatch, and so on:
-
The environment is passed as a command line argument to the program (such as porttest, queue kernel) or retrieved by jdenet_k from the QEnv key in the [NETWORK QUEUE SETTINGS] section of the JDE.INI file.
-
This environment might be translated to a different environment, based on the settings in the [SERVER ENVIRONMENT MAP] section of the JDE.INI file.
-
The environment that is used must be a valid entry in the Library ListMaster File table (F0094) and must have a valid corresponding path code in the Environment Detail - OneWorld table (F00941).
-
These JDE.INI settings in the [DB SYSTEM SETTINGS] section specify where the JD Edwards EnterpriseOne server startup tables, such as the Data Source Master (F98611) and Object Configuration Master (F986101) tables, are located:
-
Base Datasource
-
Object Owner
-
Server
-
Database
-
Load Library
-
Type
-
-
Using this information, the F986101 table opens in the specified database on the server.
-
When an override exists for a given table, BSFN, or the current user, that data source (OMDATP field in the F986101 table) is used for the given object or user and environment. Otherwise, the data source in which OMOBNM=DEFAULT for the given environment is used. Ignore any inactive records (that is, OMSTSO=NA). We strongly recommend that you do not have any default records (OMOBNM=DEFAULT) for batch applications (OMFUNO=UBE). These records might prevent report interconnections (such as one report calling another report) from starting correctly.
-
Each unique data source in the F986101 table should correspond to one entry in the F98611 table.
-
The corresponding information in the F98611 table must be correct. In particular, the OMDLLNAME field must display the correct DLL for the database to which the data source points.
-
For an Oracle database, the OMDATB field from the F98611 table maps to an entry in the tnsnames.ora file. This tnsnames.ora file must be set up correctly (check with an Oracle database administrator).
-
For an IBM DB2 for LUW (Linux, UNIX, Windows) database, the OMDATB field from the F98611 table maps to an entry in the ODBC data source. This datasource must be set up correctly (check with a IBM DB2 for LUW (Linux, UNIX, Windows) database administrator).
-
For a Microsoft SQL Server, Microsoft Access, or Client Access database, the OMDATB field from the F98611 table maps to a data source specified in the ODBC Data Source Administrator applet in the Windows Control Panel. This data source must be set up correctly. If multiple users plan to sign on to this Windows platform and run JD Edwards EnterpriseOne or PORTTEST, the data sources must be defined on the System DSN tab. Otherwise, User Data Sources can be used.
If you are using Microsoft Windows 2000 to open the ODBC Data Source Administrator, from the Start menu, select Programs, then Administrative Tools, and then Data Sources (ODBC).
-
This information pertains to the setup of SQL Server ODBC drivers, using the ODBC Data Source Administrator applet:
-
The data source name must match the name in the F98611 table.
-
The description can be anything that you want.
-
The server is the name of the database server.
-
The network address includes the database server name, a comma, and a port in which the database user listens.
-
Network Library should be set to Default.
-
Click the Options button for more settings.
-
The database name is usually set to JDE. You can set it to Default.
-
The language name should be set to Default.
-
The Generate Stored Procedure for Prepared Statement option should be turned off.
-
The Use ANSI Quoted Identifiers option should be turned on.
-
The Use ANSI Nulls, Padding and Warnings option should be turned on.
-
The Convert OEM to ANSI characters option should be turned off.
-
-
This information pertains to the setup of Client Access ODBC drivers, using the ODBC Data Source Administrator applet:
-
On the General tab the data source name must match the name in the F98611 table. The system is the name of the database server.
-
On the Server tab, the default libraries should be the IBM i library, and the commit mode should be Commit immediate (*NONE).
-
On the Format tab, the naming convention should be System naming convention (*SYS).
-
On the Other tab, if the data that you are transferring using this data source contains a Binary Large Object (BLOB), translation should be set to Do not translate CCSID 65535. If the data that you are transferring using this data source does not contain a BLOB, translation should be set to Translate CCSID 65535.
-
4.1.4 JDE.INI Settings for Starting Batch Queues on Windows
These JDE.INI settings are used to start batch queues on the Windows enterprise server:
[NETWORK QUEUE SETTINGS]
UBEQueues=number of batch queues
UBEQueue1=batch queue name
UBEQueue2=batch queue name
PackageQueues=number of package queues
PkgQueue1=package queue name
PkgQueue2=package queue name
SpecInstallQueues=number of spec install queues
SpcQueue1=spec install queue name
QEnv=queue environment
QUser=queue user
QPassword=queue user password
This table describes each setting:
| Setting | Description |
|---|---|
| number of batch queues | Identifies the number of batch queues available. If you do not specify a number of batch queues that matches the number specified here, JD Edwards EnterpriseOne uses QBATCH when a missing queue is called. |
| batch queue name | Identifies the name of the batch queue. For example, for UBEQueue2, you might specify the queue as QBATCH2. You should specify a number of batch queue names that is equal to the value that you specify for the number of batch queues. |
| number of package queues | Identifies the number of package queues that are available. If you do not specify a number of package queues that matches the number specified here, JD Edwards EnterpriseOne uses QBATCH when a missing queue is called. |
| package queue name | Identifies the name of the package queue. For example, for PkgQueue2, you might specify the queue as XBATCH2. You should specify a number of package queue names that is equal to the value that you specify for the number of package queues. |
| number of spec install queues | Identifies the number of specification install queues available. If you do not specify a number of specification install queues that matches the number specified here, JD Edwards EnterpriseOne uses QBATCH when a missing queue is called. |
| spec install queue name | Identifies the name of the specification install queue. For example, for PkgQueue2, you might specify the queue as XBATCH2. You should specify a number of specification install queue names equal to the value that you specify for the number of specification install queues. |
| queue environment | Identifies the JD Edwards EnterpriseOne environment under which the Windows operating system starts the queues. |
| queue user | Identifies a valid JD Edwards EnterpriseOne user. |
| queue user password | Identifies the password for the queue user. |
4.1.5 Active Directory
Windows Active Directory is Microsoft's implementation of a hierarchical, object-based directory service for managing system resources, including developers, end users, and groups. If you publish JD Edwards EnterpriseOne server information in Active Directory, client workstations use this information to locate and connect to the server dynamically. If JD Edwards EnterpriseOne service changes from one server to another, workstations can still connect to the server by referencing published server information in Active Directory.
Note:
Active Directory is a Windows feature, and its use with JD Edwards EnterpriseOne is platform-specific and optional. If you are running JD Edwards EnterpriseOne enterprise servers on Unix or IBM i platforms, client workstations still reference their jde.ini files to connect to the server.4.1.5.1 SCP Object in Active Directory
JD Edwards EnterpriseOne NT service installation creates a Service Connection Point (SCP) object in Active Directory. The SCP object specifies the server name and port number.
Starting JD Edwards EnterpriseOne service on a server automatically updates the SCP object with the server name and port number, and establishes the SCP object status as Running. When service stops, the status of the SCP object automatically changes to Stopped.
Note:
JD Edwards EnterpriseOne Windows service installation creates the SCP object in Active Directory only if you have added an [Active Directory] section to the jde.ini file on the server before installation.When a user signs on to JD Edwards EnterpriseOne, JD Edwards EnterpriseOne searches Active Directory for an SCP object with a service name that matches the parameter value in the [Active Directory] section of the workstation jde.ini file. JD Edwards EnterpriseOne selects an SCP object that has a status of Running and retrieves the server name and port number, which enables the workstation to make a connection to the server.
4.1.5.2 Additions to the Server JDE.INI file
For each server that you publish in Active Directory, you must add an [Active Directory] section in the JDE.INI file on the server. In the [Active Directory] section, you include the SCPToPublish entry, which identifies the SCP object in the Active Directory.
The value of the SCPToPublish parameter should be unique for each object, and you should consistently adhere to a naming convention for ease of administration. For example, the value of each SCPToPublish parameter might represent a version of JD Edwards EnterpriseOne.
This is a sample entry in the [Active Directory] section of the server JDE.INI file.
SCPToPublish JDEDWARDS_ENTERPRISEONE_900_SP1
If you move JD Edwards EnterpriseOne service from one server to another or change the service port number, no changes to the workstation JDE.INI file are needed, so long as the name of the SCP object in Active Directory and the parameter values of the [Active Directory] section of the workstation JDE.INI file match.
Note:
Although users can automatically connect to a new server when a change in service is made, batch processes and business functions are not automatically mapped to the new server. Therefore, you typically need to change OCM mappings for the users so that they use the new data source.4.1.5.3 Additions to the Workstation JDE.INI File
You also add an [Active Directory] section to the workstation JDE.INI file that specifies the name of the SCP object that contains port number and server name information.
These parameters are included in the [ActiveDirectory] section of the workstation JDE.INI file:
-
JdenetSCP (the connection port).
-
SecurityServerSCP (the security server).
-
LockManagerSCP (the Lock Manager).
-
UnifiedLogonServerSCP (unified logon server).
For each of these parameters, you assign as the value the name of the SCP object in the Active Directory file. For example, enter JDEDWARDS_ ENTERPRISEONE_900_SP1.
This table presents an example of the parameters that you add to the [Active Directory] section of the workstation JDE.INI file. The value of each parameter is the SCP object name in Active Directory.
| Parameter of [Active Directory] Section of Workstation JDE.INI File | Meaning | Parameter Value: name of SCP Object in Active Directory |
|---|---|---|
| JdenetSCP | Connection port | JDEDWARDS_ ENTERPRISEONE_900_SP1 |
| SecurityServerSCP | Security server | JDEDWARDS_ ENTERPRISEONE_900_SP1 |
| LockManagerSCP | Lock manager | JDEDWARDS_ ENTERPRISEONE_900_SP1 |
| UnifiedLogonServerSCP | Unified logon server | JDEDWARDS_ ENTERPRISEONE_900_SP1 |
4.2 Setting Up a Printer for Windows
This section provides an overview of Printer Setup for Windows and Windows Services, Accounts, and Permissions and discusses how to:
-
Add a printer.
-
Determine or change printer ownership.
-
Set up user accounts on an enterprise server.
-
Change the domain.
-
Add a local account.
-
Add a user to the administrators group.
4.2.1 Understanding Printer Setup for Windows
Setting up a printer for a Microsoft Windows enterprise server involves setting up accounts under which JD Edwards EnterpriseOne runs, establishing printer ownership, and defining the printer. The default printer used for printing reports will be the system default printer.
4.2.2 Understanding Windows Services, Accounts, and Permissions
Before you can successfully set up a printer for Windows, you should understand the relationship of JD Edwards EnterpriseOne to Windows services, accounts, and permissions, which involves these:
-
Assigning permissions to the accounts under which JD Edwards EnterpriseOne services run.
-
Making printers accessible from the service programs.
-
Assigning ownership for accounts to enable access to printers.
Every Windows printer is associated with one network account called the printer's owner. When JD Edwards EnterpriseOne runs a batch report, service programs must be able to access a printer. You can define this printer to be locally accessible only by the enterprise server or remotely accessible by other network resources (for example, it might be attached to a print server). You can specify a printer that is connected directly to an enterprise server as a local or network printer, depending on how you added the printer from the Control Panel.
When you create a Windows user account, you must associate that account with one of these two domains:
-
Local. This domain is associated with a particular Windows machine. For example, each Windows machine has a local administrator account. Local accounts cannot access network resources, such as network printers. Any account names that do not begin with a domain name are considered to belong to the local domain.
-
Network. This domain is spread across a Windows network. Users in the network domain can access network resources, such as printers and disk drives, on other servers. Account names that are assigned to the network domain must begin with a domain name, such as domain1\john_doe.
In this table, you must define two types of service accounts and printer ownerships for the two types of printers:
| Printer Type | Account and Owner |
|---|---|
| Local | The service account type can be local or network. The printer owner account can be local or network. |
| Network | The service account type must be network. The printer owner account must be network. |
Windows services enable programs to run on a Windows platform even when no user is signed on to the machine. For the JD Edwards EnterpriseOne enterprise server, you must run these two service programs:
-
Network: This program provides the network connection between the JD Edwards EnterpriseOne workstation and the JD Edwards EnterpriseOne enterprise server.
-
Queue: This program starts jobs (either batch reports or server package installations) on the enterprise server.
The accounts under which Windows services run must have permissions to start and stop services on the local machine. You must specify permissions for one of these:
-
Individual users, such as administrator and guest accounts.
-
Groups of users, such as administrators (note the plural; administrators are different than an individual administrator).
The accounts that automatically have permissions to start and stop services include:
-
The Administrator user.
-
Users specifically designated by the Administrator user.
-
Users who belong to the Administrators group (which is different from an individual administrator).
-
Users that belong to the Power Users group.
Note:
We strongly recommend that you use an account for a user who belongs to the local Administrators group.
You must add a printer in Microsoft Windows before you can use it in JD Edwards EnterpriseOne.
4.2.3 Adding a Printer
-
Click the Windows Start button.
-
Select Settings, and then select Printers.
-
Select Add Printer.
-
On Add Printer Wizard, follow the system-guided steps.
For a local printer, these steps include selecting the port to which the printer is attached, specifying the type of printer that you are installing, specifying a name for the printer, and indicating where the drivers are located, if needed.
For a network printer, these steps involve selecting a print server and printer and indicating whether the printer is the default printer for the enterprise server.
Note:
When you are defining a printer, do not use a space character in the name. If you do, JD Edwards EnterpriseOne will not be able to correctly read or access the physical printer.
4.2.4 Determining or Changing Printer Ownership
To determine or change printer ownership:
-
From Control Panel, select Printers.
-
Select a printer, right-click, and select Properties.
-
Click the Security tab.
-
Click the Ownership button.
The Owner dialog box displays the current owner of the printer.
-
On owner, to make the account that you are currently signed onto the owner of the printer, select Take Ownership, and then click OK.
4.2.5 Setting Up User Accounts on an Enterprise Server
You can set up local users to add local and network accounts to groups.
To set up user accounts on an enterprise server:
-
On the enterprise server, under Windows, select Start,Settings,Control Panel,Administrative Tools, then Computer Management.
-
On the Tree tab, select Local Users and Groups, and then click the Users folder.
4.2.6 Changing the Domain
To change the domain:
-
From the main menu of User Manager, select User.
-
Select User Domain.
The Select Domain form displays all domains. The local domain is named the same as the enterprise server and does not appear in the list. However, you can still type the name of the enterprise server in the Domain field.
In this example, the name of the local machine is the same as the domain: DEVS5. That name is appears in the title bar as \\DEVS5. Although that syntax might typically indicate a network machine, in this case it represents a local machine name because the name of the machine and the domain are the same.
-
Click OK.
The User Manager form displays all of the accounts for the domain that you chose. If you select a network domain, all listed names represent network accounts. Likewise, if you select the local domain, all listed names represent local accounts.
4.2.7 Adding a Local Account
If you are using a local printer, you can use either a local or network account to run the JD Edwards EnterpriseOne services.
-
Sign onto Windows as a user with administrative privileges in the local domain.
-
From Computer Management, select System Tools, and then select Local User and Groups.
-
From the Action menu, select New User.
-
On New User, complete these fields:
-
User name
-
Full Name
-
Description
-
Password
-
Confirm Password
-
-
Complete these options, as appropriate for the installation:
-
User must change password at next logon.
-
User cannot change password.
-
Password never expires.
-
Account disabled.
-
-
Click Create.
-
Click Cancel.
4.2.8 Adding a User to the Administrators Group
To add an existing account (either local or network), you must use the local domain.
-
From the User Manager main window, double-click the Administrators group.
The user Administrator belongs to the Administrators group. Local accounts are not preceded by a domain name, and network accounts are preceded by a domain name. For example, the domain member with a name JDE is a local account, and a member with the name JDEMD1\AY5600427 is a network account.
-
On Administrators Properties, click Add.
A list displays all users in the selected domain.
-
On Select Users or Groups, select the domain of the user whom you want to add to the Administrators group.
-
Select the user whom you want to add to the Administrators group.
-
Click Add to add the user to the group, and then click OK.
4.3 Working with Network Services
This section provides an overview of network services and discusses how to:
-
Set up the network service.
-
Start the network service.
-
Stop the network services.
-
Clean up the enterpriser server for Windows.
-
Uninstall the network service.
-
Start the enterprise server for Windows manually.
-
Verify the JD Edwards EnterpriseOne installation.
4.3.1 Understanding Network Services
JD Edwards EnterpriseOne uses the Network service on the enterprise server. This service is installed during the installation process using the jdesnet -i service from the system\bin32 directory.
When you install this service, the system adds these entries to the Windows registry:
-
The name of the service that appears on the Services form (used when controlling the services).
-
The location of the JD Edwards EnterpriseOne executable files.
During a new installation, or after you have renamed or moved the directory tree for an existing installation, you should reinstall the services.
After the initial installation, you will need to reinstall the Network service only when it has been uninstalled. You will need to uninstall this service only when the JD Edwards EnterpriseOne directory tree is renamed, moved, or deleted. The process to uninstall this service removes these entries from the Windows registry:
-
The names that appear for the service on the Services form.
-
The location of the JD Edwards EnterpriseOne executable files.
After the Network service is installed, you must set up the service under a network account, if you are using a network printer, or a local account, if you are using a local printer. If you are using a network account, it must be in either the Administrators or Power Users group.
Note:
We strongly recommend that you use a user who belongs to the local Administrators group.After you have installed and set up the Network service, you must start the service before JD Edwards EnterpriseOne can use it. Later, if you need to stop services, you must do so in the proper order.
After JD Edwards EnterpriseOne is shut down, you can determine whether any processes completed abnormally. If so, you need to clean up the enterprise server. Unforeseen circumstances can cause JD Edwards EnterpriseOne processes to terminate abnormally. Processes that terminate abnormally are called runaway processes. After shutting down JD Edwards EnterpriseOne, look for any runaway processes and, if any exist, manually terminate them.
4.3.2 Setting Up the Network Service
To set up the network service:
-
From the Start menu, select Programs, Administrative Tools, and then Services.
-
Select the JD Edwards EnterpriseOne Network service.
The name of the service is in the form JDE release Network, where release is the current JD Edwards EnterpriseOne release. For example, the Network services name for Release E900 is JDE 900 Network.
-
Click Action, then click Properties.
-
On the General tab, if you want JD Edwards EnterpriseOne to start automatically when the enterprise server boots, click the Automatic option under Startup Type.
-
On the Log On tab, click the This Account option.
-
Enter the account name under which the JD Edwards EnterpriseOne Network service will run.
-
Enter the password for the account and a confirmation of the password.
-
Click OK.
4.3.3 Starting the Network Service
-
From the Services window, select the JD Edwards EnterpriseOne Network service.
The name of the service is in the form JDE release Network, where release is the current JD Edwards EnterpriseOne release. For example, the Network services name for E900 is JDE 900 Network.
-
From the Action menu, click Start.
-
Use the Windows Task Manager to ensure that these processes are running:
-
jdesnet.exe.
-
jdenet_k.exe processes. (None, one, or more might exist.)
-
4.3.4 Stopping the Network Services
When you stop the Network service, follow the steps in the proper sequence.
To stop the Network service:
-
From the Services window, select the Network service.
The name of the JD Edwards EnterpriseOne Network service is in the form JDE release Network. For example, the Network services name for JD Edwards EnterpriseOne 8.10 is JDE 812 Network.
-
Use the Windows Task Manager to ensure that all JD Edwards EnterpriseOne processes are terminated.
This might take several minutes. These processes should be terminated and, therefore, should not appear in the list of processes in Task Manager:
-
jdesnet.exe
-
jdenet_n.exe
-
jdenet_k.exe
-
runbatch.exe
-
ipcsrv.exe
-
4.3.5 Cleaning Up the Enterprise Server for Windows
To clean up the enterprise server for Windows:
-
In the Processes tab of Task Manager, search for any JD Edwards EnterpriseOne Host Server processes, such as jdesnet, jdenet_n, jdenet_k, and runbatch.
Wait until all the JD Edwards EnterpriseOne Host Server processes are terminated. If all processes terminate, you do not need to perform the remaining steps in this task. Otherwise, continue with the next step.
-
Select a process in Task Manager.
-
Click End Process.
-
If the runaway process does not terminate, continue with the next step.
-
In Task Manager, right-click the process and select debug.
-
When the Visual C++ main window appears, select the Stop debugging option from the Debug menu.
-
Exit from Visual C++, and then repeat these steps for each runaway process.
-
If none of the previous steps stops the runaway process, reboot the enterprise server.
4.3.6 Uninstalling the Network Service
To uninstall the Network services:
Run this program from the \system\bin32 directory:
jdesnet -u
4.3.7 Starting the Enterprise Server for Windows Manually
If JD Edwards EnterpriseOne does not run through the Control Panel Services applet, you can run Network manually.
Note:
If you start JD Edwards EnterpriseOne manually, you must stop the JD Edwards EnterpriseOne processes using the Windows Task Manager.To start the enterprise server for Windows manually:
-
On the enterprise server for Windows, sign on with administrator privileges.
If you used the user ID that we recommend, the value is PSFT.
-
On the Windows toolbar, from the Start menu, select Run, and then enter these commands:
drive: installpath\system\bin32\jdenet_n
Where installpath is the path to the JD Edwards EnterpriseOne installation.
This command launches an executable program that starts the JD Edwards EnterpriseOne network (JDENet) internal processes.
If you run jdenet_n from a command prompt, ensure that the working directory is the subdirectory \system\bin32.
4.3.8 Verifying the JD Edwards EnterpriseOne Installation
You can verify the JD Edwards EnterpriseOne installation with the PORTTEST program.
Note:
When you run PORTTEST, make sure that one of this is true:If the network service, such as jdesnet.exe, is running, make sure that you are signed on to Windows under the same user account as the net service is running. You can then run PORTTEST from a command prompt.
If the network process, such as jdenet_n.exe, is run from the command prompt, you can run PORTTEST from the command prompt.
To verify the JD Edwards EnterpriseOne installation:
In the command line, enter these commands:
cd \JDEdwards\E900\ddp\system\bin32
porttest <userid> <password> <environment>
The program initializes an environment, initializes a user, opens the Account Balances table (F0902), and displays up to 99 rows of data. The number of rows of data that the program displays depends on the data in the table. If you run the program before anyone enters data into the table, you will not see any data on the screen. In this case, the lack of data does not indicate an error. Review the messages on the form and the corresponding jde.log file to determine the results of the program.
4.4 Administering Batch Processes for Windows
This section provides an overview of batch process administration for Windows and discusses how to:
-
Monitor batch processes.
-
Review batch output files.
-
Run reports from the command line for Windows.
-
Schedule reports from the command line for Windows.
4.4.1 Understanding Batch Process Administration for Windows
Administering batch processes involves knowing the processes that run when JD Edwards EnterpriseOne starts, where files are placed before and after printing, and how to watch those processes.
The user who started the JD Edwards EnterpriseOne software owns the processes that are running for JD Edwards EnterpriseOne; Windows Task Manager cannot track this information. When the software starts, a number of processes start and run under the environment and security of the user who started them. These processes are as follows:
| Process | Description |
|---|---|
| jdesnet.exe | The network listener that listens for connection requests. |
| jdenet_n.exe | A network listener that listens for connection requests. Depending on the jde.ini setting, zero, one, or more of these processes can run simultaneously. |
| jdenet_k.exe | The job responsible for coordination between the net and queues. It is not started until the first batch job is submitted to the server. |
| runbatch.exe | The job responsible for executing the submitted reports. |
| ipcsrv.exe | The process responsible for passing Binary Large Objects (BLOBs) between other processes. |
4.4.2 Monitoring Batch Processes
You can use the Task Manager to continuously monitor the performance of each job, the amount of CPU time it is consuming, and the amount of memory it is using. By default, the display refreshes every second.
4.4.3 Reviewing Batch Output Files
All output from each report, regardless of whether it is a preview, is placed in the PrintQueue directory under the JD Edwards EnterpriseOne installation directory before it is printed. Depending on the JDE.INI settings of the workstation that submitted the job, the job might or might not be deleted after being printed. Unless the submitter identified a printer, jobs are printed to the default printer that you specified for the enterprise server.
Two settings, based upon the workstation's JDE.INI file, tell the server whether to print the report immediately upon completion and whether to save the output from the report or delete it. Here are examples of both of these workstation settings:
[NETWORK QUEUE SETTINGS]
SaveOutput=TRUE
PrintImmediate=TRUE
Setting SaveOutput to TRUE causes the enterprise server to hold the jobs within the PrintQueue directory until the user explicitly deletes them. Setting PrintImmediate to TRUE tells the enterprise server to print the job immediately after completion of the report.
Users should be strongly encouraged to use the SaveOutput=FALSE entry in their JDE.INI file. When users decide to save their output, they should periodically delete the entries through JD Edwards EnterpriseOne. Deleting the output files from the operating system will not delete the corresponding JD Edwards EnterpriseOne print job entries (for example, entries might still exist in the database). These print job entries still have to be deleted manually.
To list all files in the PrintQueue directory, use Windows Explorer to change the working directory to the PrintQueue directory.
These file names are the actual reports that were generated when the job was executed. The file names follow these conventions:
| Segment | Description |
|---|---|
| S_ | Identifies the first part of a file name. Indicates that a specification installation was performed by the workstation. The system omits this prefix when no specification installation was performed. |
| R0006P | Identifies the report name. |
| XJDE0001 | Identifies the report version. |
| UBE | Identifies the type of request. |
| 216 | Identifies the request number assigned by JD Edwards EnterpriseOne. |
| PS | Indicates a PostScript file. |
| Indicates a PDF (Portable Document Format) file. This file can be viewed on the workstation using Adobe Acrobat. |
4.4.4 Running Reports from the Command Line for Windows
If you are a user with the proper authority and path (equal to that described in the installation instructions), you can run batch report processes from the server command line by first changing to the JD Edwards EnterpriseOne system directory (system\bin32) and then entering these commands:
runube  <[-p|-P] [-f|-F|-d|-D passfile] [user password]>
   <Environment>
   <Role>
   <ReportName>
   <VersionName>
   <JobQueue>
   <"Interactive"|"Batch">
   <"Print"|"Hold">
   <"Save"|"Delete">
    [Printer]
The format for the passfile parameter is:
[enterpriseoneusername
 password]
Note:
The [user password] parameter has been deprecated.For the command parameters, only the first character of the parameter name is required. The vertical bar symbol (|) indicates that you must specify one of the parameters on either side of the vertical bar. The brackets indicate an optional parameter. These options apply to the runube command:
| Parameter | Description |
|---|---|
| –p | Prompts for user/password information. |
| –P | Prompts for user/password information. |
| –f | Reads user/password information from the plain text file that is specified in passfile (FilePath). |
| –F | Reads user/password information from the plain text file that is specified in passfile (FilePath). |
| –d | Reads user/password information from the plain text file and indicates the automatic removal of the file after the job has read the credentials from it. |
| –D | Reads user/password information from the plain text file and indicates the automatic removal of the file after the job has read the credentials from it. |
| Interactive | The system holds the current terminal session until the entire report is processed. |
| Batch | The runube command the job to a UBE kernel, which in turn will send the job submission to Queue kernel, and then returns control of the terminal to the user. |
| After the batch process completes generating its output, the output is printed to the specified printer queue. If you do not specify a printer on the runube command line, the system uses the EnterpriseOne user's default printer specified in the Printers program (P98616). | |
| Hold | The batch output is not printed immediately after the job completes, but may be printed later from 'Work with Submitted jobs' |
| Save | The system retains the report's output and all records of its execution. |
| Delete | The system removes any output from the PrintQueue directory, from Report definition output, and also removes the records of the jobs execution from F986110 after the report prints. |
| OutQ | Optional. This is the printer name on which the given report is printed. If this option is not specified, the report will be printed on the enterprise server default printer. |
4.4.4.1 Example: Running Reports from the Command Line for Windows
This example lists commands for executing a batch process report:
cd \JDEdwards\E900\ddp\system\bin32
runube KL5595218 KL5595218 PROD R0006P XJDE0001 QBATCH Interactive
Print Delete printer_1
4.4.5 Scheduling Reports from the Command Line for Windows
You can schedule a report from the command line for processing on a future date, daily, or even on a recurring day of the week. To schedule one-time only reports, use the at command.
When you issue jobs with the at command, they run in the background. However, the at command enables you to schedule a future time of execution. You can use this command to run a batch job during off-peak hours.
Note:
Use of the at command depends on how security is configured on the Windows enterprise server. You should limit the amount of access that users have to submit jobs on the server. If possible, only an administrator should do this type of scheduling.The command format for the at command is as follows:
at [\\computername\ time [/INTERACTIVE] [/EVERY:date[,...] |
/NEXT:date[,...]] command
Where these options apply:
| Parameter | Description |
|---|---|
| \\computername | Identifies the computer on which to run the program. If you do not specify a value, the default is the local machine. |
| time | Specifies the time to run the job, such as 08:00. |
| /Windows INTERACTIVE | enables the program to interact with the Windows operating system desktop. |
| /EVERY:date | Specifies the days on which to run the job. Values are M, T, W, Th, F, S, and Su. |
| /NEXT:date | Specifies the next date for the first execution. If you do not specify a value, the default value is today's date. |
| command | Specifies the command to run. To run batch jobs here, use the runube command with any of its parameters. |
4.4.5.1 Example: Scheduling Reports from the Command Line for Windows
This example lists a sample command that you can use to schedule a JD Edwards EnterpriseOne batch report to run on the DEPLOY machine at 06:00 every Sunday:
at \\DEPLOY 06:00 /EVERY:Su z:\b731\system\bin32\runube KL5595218 KL5595218
PROD R0006P XJDE0001 QBATCH Interactive Print Delete printer_1
4.5 Maintaining File Security for Windows
You should be aware of the security that is set up for the files on a JD Edwards EnterpriseOne enterprise server. System-wide, only these two accounts will ever need operating system access to the JD Edwards EnterpriseOne environment files and version executables:
-
The account that starts and stops JD Edwards EnterpriseOne.
-
The account that builds the environment specification (SPEC) and business function (BSFN) files (if this account is separate from the startup and shutdown account).
Note:
The Server Manager managed home agent service must operate using the same account that is used to start and stop JD Edwards EnterpriseOne.4.5.1 Specification File Security
Specification files are the first part of the environment files. You access these files using the JD Edwards EnterpriseOne kernel processes. These files should never be accessed directly by an operating system user; therefore, security for these files should be read/write for the user and group. These files are not executables, so you do not need to set the executable option for any user, group, or other.
4.5.2 Business Function File Security
You should keep business functions secure. In an environment in which development takes place, you must have a strict form of version control on source and object files. If the business function files change without the knowledge of the JD Edwards EnterpriseOne administrators, rebuilding them might produce unknown or undesired results. Most likely, a developer is working to correct a problem, but the problem could become worse.
You should set a high level of security on the source, include, and object files.
4.5.3 JD Edwards EnterpriseOne Executables Security
You should prevent access to JD Edwards EnterpriseOne executable files to prevent other users from attempting to start up JD Edwards EnterpriseOne. Running the same version of JD Edwards EnterpriseOne on the same system, using the same JDE.INI settings, can cause unpredictable results. In most cases, the second startup will fail, but giving users access to the shutdown procedures enables them to shut down JD Edwards EnterpriseOne.
4.5.4 JDE.INI File (Enterprise Server) Security
Warning: Implementing JDE.INI file security will prevent Server Manager from modifying configuration settings.
You must keep the JDE.INI file on the Windows enterprise server as secure as possible. This file contains a database user name and password that enables JD Edwards EnterpriseOne security to function. This database account is given read authority to the OneWorld Security table (F98OWSEC), which controls JD Edwards EnterpriseOne access.
Note:
The F98OWSEC table contains privileged database user names and passwords, which could give a user the ability to manipulate any data in the database, regardless of its sensitivity or security. Therefore, access to the enterprise server JDE.INI file should be minimized.Denying written access to JD Edwards EnterpriseOne is not necessary, but prevents accidental modification of JDE.INI settings that could adversely affect the operation of JD Edwards EnterpriseOne.
Because of the importance of limiting access to the JDE.INI file for security reasons, you also should limit access to the JD Edwards EnterpriseOne account (or the user account that starts and stops JD Edwards EnterpriseOne). Users with access to this account can easily obtain the F98OWSEC user names and passwords, and gain privileged access to the database.
4.6 Running Multiple Instances of JD Edwards EnterpriseOne on Windows
This section provides an overview of running multiple instances of JD Edwards EnterpriseOne on Windows and discusses how to:
-
Run Multiple Instances of JD Edwards EnterpriseOne on Windows.
-
Generate a unique identifier.
-
Modify the server jde.ini files.
-
Modify the workstation jde.ini file.
-
Uninstall JD Edwards EnterpriseOne services.
-
Move or change a JD Edwards EnterpriseOne directory tree.
Server Manager fully supports multiple foundations. This includes the installation and management of multiple instances of JD Edwards EnterpriseOne on a single server.
See Also:
-
8.98 Server Manager Guide on My Oracle Support, sections: Register/Install on JD Edwards Enterprise Server for EnterpriseOne..
4.6.1 Prerequisites
Before you complete the tasks in this section:
-
Verify that you have enough disk space to create copies of the current JD Edwards EnterpriseOne system directory and at least one path code directory.
-
Verify that you install each new instance of JD Edwards EnterpriseOne in a separate directory tree and that the version-level directories are different. For example, JD Edwards EnterpriseOne version 1 might be installed in the z:\JDEdwards\b9 directory tree, while JD Edwards EnterpriseOne version 2 might be installed in the z:\JDEdwards\E900 directory tree.
4.6.2 Running Multiple Instances of JD Edwards EnterpriseOne on Windows
You can run multiple instances of JD Edwards EnterpriseOne on a Windows 2000 server. You might do so to test a new service or to upgrade to a new version of JD Edwards EnterpriseOne. You do not need to install a separate machine to run multiple instances of JD Edwards EnterpriseOne, so long as you follow a series of recommended steps.
Each instance of JD Edwards EnterpriseOne must have a unique identifier. You set the value of this identifier in the CLSID parameter of the server JDE.INI file. To generate the identifier, you run the uuidgen program.
For each new instance of JD Edwards EnterpriseOne, you modify the values of parameters in the JDE.INI file on the server. Each value for each JD Edwards EnterpriseOne instance must be unique. This table presents the server jde.ini file parameters that require modification, the purpose of each, and example values for each:
| Section of server JDE.INI file | Parameter | Purpose | Example Value |
|---|---|---|---|
| [DEBUG] | DebugFile= | Name of the log file that contains debugging data. | z:\JDEdwards\E900_2\log\jdedebug.log |
| [DEBUG] | JobFile= | Name of the log file that contains log data. | z:\JDEdwards\E900_2\log\jde.log |
| [INSTALL] | StartServicePrefix= | Prefix that is used for names of the JD Edwards EnterpriseOne network and queue services. | Instance 2 |
| [INSTALL] | B9= | Base directory of the JD Edwards EnterpriseOne installation. | z:\JDEdwards\E900_2 |
| [JDEIPC] | StartIPCKeyValue= | Integer that indicates an arbitrary starting point in memory for interprocess communications. For multiple instances of JD Edwards EnterpriseOne, differences between the values of the parameter must be at least 1000. | 6000 |
| [JDEIPC] | CLSID= | Unique string generated by the NT guidgen program. The string identifies each instance of JD Edwards EnterpriseOne. | 1E0CF350-AF81-11D0-BD7B-0000F6540786 |
| [JDENET] | serviceNameListen= | The TCP/IP port number used by the server to receive communication packets from workstations. | 6005 |
| [JDENET] | serviceNameConnect= | The TCP/IP port number used by the server to send communications packets to servers. | 6005 |
You are not required to install network and queue services for an existing JD Edwards EnterpriseOne instance unless you change the location of the system\bin32 directory for the new instance. For example, you might decide to put the directory on a new disk.
To move or rename a directory for EnterpriseOne instance after you install its services, you must uninstall the network service and uninstall the IPC Automation Server (ipcserv.exe). You can then move or rename the JD Edwards EnterpriseOne directory and reinstall the network service. The IPC Automation Server automatically reinstalls itself when it is first used.
After you have installed services for each JD Edwards EnterpriseOne installation, you must modify the workstation JDE.INI file so that the values of these parameters match those that you set up in the server JDE.INI file:
-
serviceNameListen=
-
serviceNameConnect=
See Also:
4.6.3 Generating a Unique Identifier
To generate a unique identifier:
-
From the Start menu on the Windows taskbar, select Run, and then enter this command:
uuidgen-oFILENAME
Where FILENAME is the name of the file that will contain the new identifier.
Note:
For help about the options for the uuidgen program, run the uuidgent-? command:The uuidgen program creates a unique identifier and stores it in the file that you specified.
-
Copy the identifier.
-
Open the server JDE.INI file and paste the identifier into the CSLID parameter under the [JDEIPC] section of the file.
4.6.4 Modifying the Server JDE.INI Files
To modify the server JDE.INI file:
-
In the system\bin32 subdirectory for each new JD Edwards EnterpriseOne instance, open the server JDE.INI file.
-
In the [DEBUG] section of the JDE.INI file, in the DebugFile= parameter, type the name of the log file that will contain debugging information.
-
In the [DEBUG] section, in the JobFile= parameter, type the name of the file that will contain log information.
-
In the [INSTALL] section, in the StartServicePrefix= parameter, type the value to be used for the names of the JD Edwards EnterpriseOne network and queue services. The names are listed in the Services window under Control Panel.
The default value is JDE followed by the current version number, such as 900. The default value produces the service names JDE 900 Network and JDE 900 Queue.
-
In the [INSTALL] section, in the B9= parameter, type the name of the base directory of the JD Edwards EnterpriseOne installation. The JD Edwards EnterpriseOne server uses this value to determine the location of the executables and DLLs used to run JD Edwards EnterpriseOne programs.
-
In the [JDEIPC] section of the JDE.INI file, modify the values of these parameters:
Parameter Value StartIPCKeyValue Type a number for the starting point in memory for interprocess communications. For multiple instances of JD Edwards EnterpriseOne, verify that the difference between starting point values for each instance is at least 1000. The default value is 5000. Note: To ensure that the difference between starting point values is at least 1000, review the maxNumberofResources parameter in the [JDEIPC] section of the JDE.INI file. If the parameter value is less than 1000, change the value.
CLSID= Type the unique string that is generated by the NT guidgen program. -
In the [JDENET] section of the JDE.INI file, modify the values of these parameters:
Parameter Value serviceNameListen= Type the port number for the TCP/IP port used by the server to receive communications packets from the workstations. Each instance of JD Edwards EnterpriseOne must communicate with workstations through a different port. The default value is jde_server.
serviceNameConnect= Type the port number for the TCP/IP port used by the server to send communications packets to the workstations. Each instance of JD Edwards EnterpriseOne must communicate with workstations through a different port. The default value is jde_server.
4.6.5 Modifying the Workstation JDE.INI File
To modify the workstation JDE.INI file:
-
In the Windows directory on the workstation, locate and open the jde.ini file.
Examples of the windows directory include c:\winnt and c:\windows.
-
Modify the values of these parameters to match the values in the server jde.ini file:
-
serviceNameListen=
-
serviceNameConnect=
-
4.6.6 Uninstalling JD Edwards EnterpriseOne Services
To delete an instance of JD Edwards EnterpriseOne after you install its services, you must uninstall the services for that instance before you delete the JD Edwards EnterpriseOne directory tree.
To uninstall JD Edwards EnterpriseOne services:
-
From a command line prompt, change directories to the system\bin32 directory of the JD Edwards EnterpriseOne instance.
-
For example, enter this command:
C:\> d:\E900\system\bin32
-
To uninstall network services, enter this command:
jdesnet -u
This command removes some settings in the Windows registry that were created when you installed JD Edwards EnterpriseOne services.
4.6.7 Moving or Changing a JD Edwards EnterpriseOne Directory Tree
To move or change a JD Edwards EnterpriseOne directory tree:
-
From a command line prompt, change directories to the system\bin32 directory of the JD Edwards EnterpriseOne instance.
For example, enter this command:
C: \> d:\E900\system\bin32
-
To uninstall network services, enter this command:
jdesnet -u
Note:
You do not need to reregister ipcsrv.exe in the new directory because the executable is automatically registered when a binary large object is first transferred using interprocess communications. -
Move or change the directory tree.
-
Reinstall JD Edwards EnterpriseOne Services.