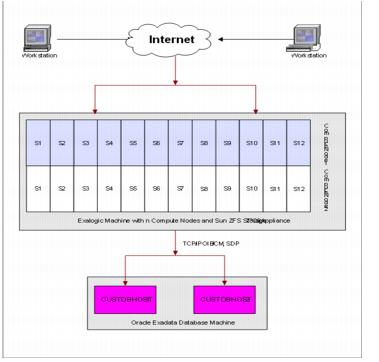
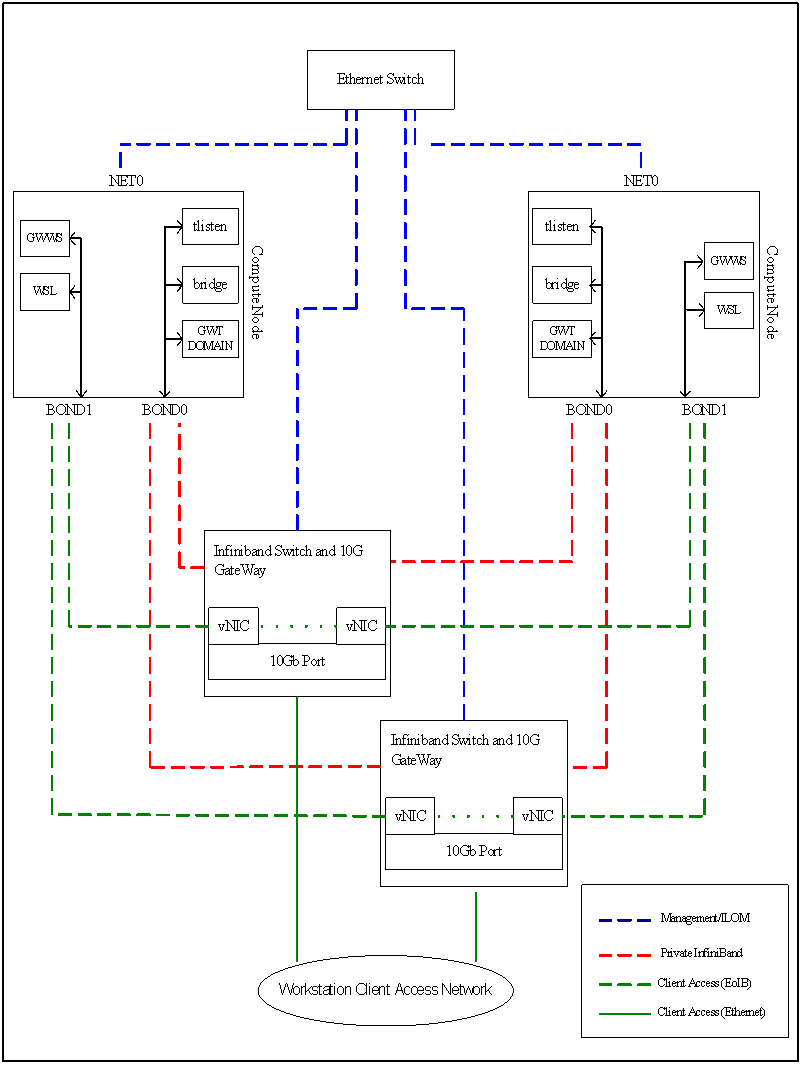
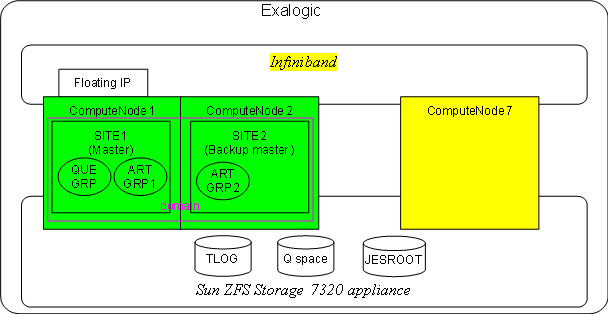
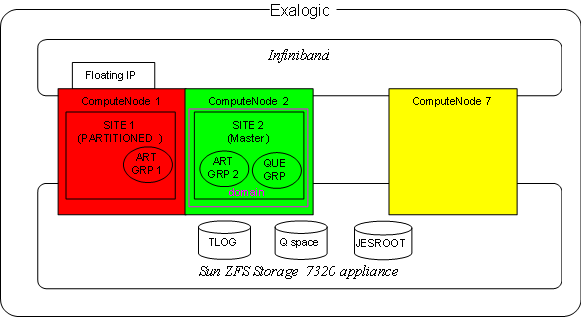
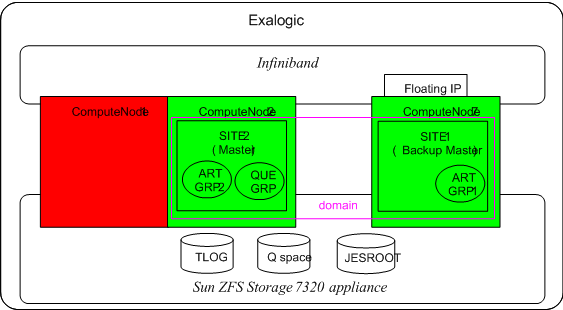
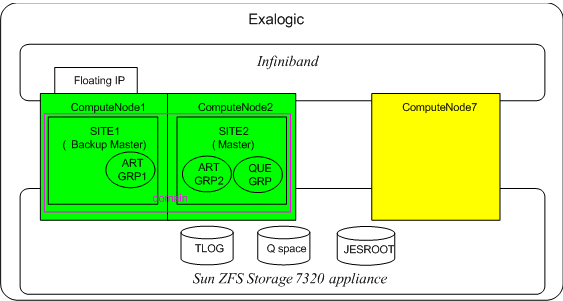
Setup and commissioning of an Oracle Exalogic machine, including initial storage and networking configuration, as described in the Oracle Exalogic Machine Owner's Guide.For more information, see Achieving High Availability with Oracle Tuxedo at http://www.oracle.com/technetwork/middleware/tuxedo/overview/index.html.It is assumed that you have completed all tasks described in the Oracle Exalogic Machine Owner's Guide, which discusses your data center site preparation, Oracle Exalogic machine commissioning, initial networking configuration including IP address assignments, and initial setup of the Sun ZFS Storage 7320 appliance.
• Before you start configuring the enterprise deployment topology, you must run the Oracle OneCommand tool to complete the following tasks (as described in "Initial Configuration of an Exalogic Machine Using Oracle OneCommand" in the Oracle Exalogic Machine Owner's Guide):
• The initial configuration of the Sun ZFS Storage 7320 appliance on your Oracle Exalogic machine is completed at the time of manufacturing. For more information about default shares (Exported File Systems), see the “Default Storage Configuration" section in the Oracle Exalogic Machine Owner's Guide.
• Figure 2 Oracle Tuxedo Enterprise Deployment Reference Topology with Oracle Exadata Database MachineFigure 3 illustrates horizontal slicing of the Oracle Tuxedo enterprise deployment reference topology within an Oracle Exalogic machine full rack.
• Two Tuxedo domains: Domain1 and Domain2. Each domain is in MP mode which spanning across two compute nodes.
• ComputeNode1 is the master node for Domain1; ComputeNode2 is the slave node. Accordingly, ComputeNode29 is the master node for Domain2; ComputeNode30 is the slave node.
• One of the call paths from a remote /WS client is: Workstation client request -> WSL on Domain1 -> Domain1 server -> Domain2 server.
• The network traffic from remote workstation clients comes in via the 10 Gb Ethernet over InfiniBand network of Exalogic Machine (EoIB). The internal network traffic is through IP over InfiniBand (IPoIB). So the WSL and GWWS are configured listening on BOND1 interface for EoIB; and all the other Tuxedo components which are used for internal communication, like tlisten, bridge, GWTDOMAIN, are configured on BOND0 interface for IPoIB.
•
• You must run the Oracle Tuxedo installer on ComputeNode1, as follows:
1.
2. Log in to ComputeNode1 as the Oracle Tuxedo administrator.The Oracle Installation program uses a temporary directory in which it extracts the files from the archive that are needed to install Oracle Tuxedo on the target system. By default, the temporary directory is /tmp. Enter the following command at the shell prompt:The Choose Locale screen is displayed.
3. The Introduction screen is displayed.
4. The Choose Install Set screen is displayed.
5. The Choose Oracle Home screen is displayed.
6. The Specify a new Oracle Home directory screen is prompted.The Choose Product Directory screen is displayed.
8. The Install Samples (Y/N) is prompted.
9. Enter Y to install the samples.The Pre- Installation Summary screen is displayed.
10. The Ready To Install screen is displayed.
11. The Installing screen is displayed.When it finishes, the Configure tlisten Service screen is displayed.
13. In the Configure tlisten Service screen, enter a tlisten password of your choice. Your password must be a string of alphanumeric characters in clear-text format that is no more than 80 characters in length. Then Verify your password.The SSL Installation Choice screen is displayed.
14. In the SSL Installation Choice screen, you can choose to enter 1, which is associated with YES (This is not mandatory for the installation).The Enter Your LDAP Settings for SSL Support screen is displayed.
15. In the Enter Your LDAP Settings for SSL Support screen, input your LDAP Service Name, LDAP PortID, LDAP BaseObject and LDAP Filter File Location (This is not mandatory for the installation).The Installation Complete screen is displayed.
16. Space outside the OS file system is usually referred to as raw disk space. Not only is I/O faster when done by system calls reading directly from and writing directly to device special files on raw disks, but a physical write() occurs right away. When using an OS file system, Oracle Tuxedo cannot predict or control the precise moment at which a write() is done. When using raw disk space, however, Oracle Tuxedo has accurate control of the write operation, which is particularly important for entries in the Oracle Tuxedo transaction log. Also, when multiple users are accessing the system, being able to control the write operation is important for assuring database consistency.If you decide to use raw disk space for your Oracle Tuxedo application, you may find that the hard disk devices on your system are fully allocated to file systems such as /(root) and /usr. If that is the case, you must repartition your hard disk device in order to set aside some partitions for use as non-OS file systems. For repartitioning instructions, refer to the system administration documentation for your platform.This section shows how to configure the Oracle Tuxedo System for two domains, as illustrated in Figure 4. There are two domains (domain1 and domain2), each of them are configured across two compute nodes in MP mode. They provide different services and communicate with each other. The relationship between the two domains is illustrated in Figure 5. Besides this, domain1 has /WS and SALT configured, that means the remote request from outside of the Exalogic machine can access the services provided by domain1.Figure 4 Oracle Tuxedo Configuration
• Every domain is in MP mode which spans across two compute nodes. Domain1 is configured across ComputeNode1 and ComputeNode2. Domain2 is configured across ComputeNode29 and ComputeNode30.
• ComputeNode1 is the master node for Domain1 , and ComputeNode2 is the slave node. Accordingly ComputeNode29 is the Domain2 master node, and ComputeNode30 is the slave node.
• The service provided by Domain1 is TOUPPER1 and Domain2 provides the TOUPPER2. When a client sends a request to TOUPPER1, within it, TOUPPER2 is invoked accordingly.
• Every node of the domain is configured with GWTDOMAIN gateway. So the gateway from one domain establishes connections with all the gateways in another domain. The advantage is that when the application running on one compute node has problem, the client can still access the service through another gateway. For example, when a client sends a request to TOUPPER1, in TOUPPER1, it invokes TOUPPER2 in Domain2. But now the GWTDOMAIN and application servers on ComputeNode29 are not responding for some reason, then the request from TOUPPER1 to TOUPPER2 is picked up by the GWTDOMAIN and ComputeNode30 application servers. The client can still get the correct response. This ensures the high availability of the services.In this enterprise deployment topology, the request from remote workstation clients comes in via the 10 GB Ethernet over InfiniBand network of Exalogic Machine (EoIB). The internal network traffic is through IP over InfiniBand (IPoIB). So the WSL and GWWS are configured listening on BOND1 interface for EoIB; and all the other Tuxedo components which are used for internal communication, like tlisten, bridge, GWTDOMAIN, are configured on BOND0 interface for IPoIB as shown in Figure 6.Figure 6 Exalogic Machine Network Overview
• Default BOND0 interface, which is the private InfiniBand fabric including the compute nodes connected via Sun Network QDR InfiniBand Gateway Switches
• Default BOND1 interface, which is the Ethernet over InfiniBand (EoIB) link
• NET0 interface, which is associated with the host Ethernet port 0 IP address for every compute node and storage server head
• The configuration example used in this section describes how to configure the environment for Domain1 and Domain2 that cross two compute nodes in MP mode.The following are the prerequisites for configuring Oracle Tuxedo 11g Release 1 PS 1 products for Oracle Exalogic:Setting Up Oracle Tuxedo System Build and Runtime EnvironmentsYou need to set several environment variables before using Oracle Tuxedo to build and run Oracle Tuxedo applications. Table 1 lists those environment variables.
Absolute pathname of the device or system file where the binary TUXCONFIG file is found on this server machine. The TUXCONFIG file is created by running the tmloadcf command on the UBBCONFIG configuration file.Besides the Tuxedo Core Environment Variables listed above, you also need to set and export the following environment Variables as shown in Table 2
Table 2 Environment Variables
1. On ComputeNode1 and ComputeNode2, open the terminal window. At the command prompt, export all the environment variables (or you can set these environments variables in a file and source it like tux.env which is generated by Tuxedo installation):Because the application servers on ComputeNode1/ComputeNode2 need to access the Oracle Database, so you also need to export the environment variables for it.The TUXDIR, APPDIR, and TUXCONFIG environment variables must match the values of the TUXDIR, APPDIR, and TUXCONFIG parameters in the MACHINES section of the UBBCONFIG file.
2. Please refer to Section 5 File Formats, Data Description, MIBs, and System Processes Reference UBBCONFIG in Oracle Tuxedo 11g Release 1 (11.1.1.2.0) documentation.
Notes: Remember to set the tlisten and bridge address to the IP addresses which are bound to BOND0 interface.Please refer to Section 5 File Formats, Data Description, MIBs, and System Processes Reference DMCONFIG in Oracle Tuxedo 11g Release 1 (11.1.1.2.0) documentation.
Note: Before creating the UDL and defining UDL entries for TLOG, you must set the TLOGDEVICE, TLOGNAME and TLOGSIZE parameters in the MACHINES section of the UBBCONFIG file for each machine in your application that will use global transactions.You must manually create a UDL entry for the TLOGDEVICE on each machine where a TLOG is needed. You may create these entries either before or after you have loaded TUXCONFIG, but you must create these entries before booting the application. In this configuration example, you only need to create a UDL entry on ComputeNode1.To access the create device list command, crdl, you invoke tmadmin -c with the application inactive. The -c option invokes tmadmin in configuration mode.Here -z config specifies the full pathname of the device on which the UDL should be created (that is, where the TLOG will reside), and -b blocks specifies the number of blocks to be allocated on the device. The value of config should match the value of the TLOGDEVICE parameter in the MACHINES section of the UBBCONFIG file. The blocks must be larger than the value of TLOGSIZE.You must start a tlisten process on each compute node of a networked Oracle Tuxedo application before the application is booted. The tlisten process enables you and the Oracle Tuxedo software running on the MASTER node to start, shut down, and administer Oracle Tuxedo processes running on the non-MASTER nodes.Manually starting a tlisten process from a command-line shell:
• The –l option must match the value of the NLSADDR parameter in the *NETWORK section of the UBBCONFIG file.Do the same for Domain2.For Oracle Tuxedo applications that use distributed transactions and XA-compliant resource managers, you must use the buildtms command to construct a transaction manager server load module.Oracle_XA is the published name of the Oracle XA interface. ORATMS is the Transaction Manager name defined in your UBBCONFIG file.Do the similar steps for Domain2.You need to use buildserver to build the Oracle Tuxedo applications servers.Assume your application source code for simpserv1 is named simpserv1.pc, the following is an example about how to build your application servers.On ComputeNode1/ComputeNode2, type the command:You need to use the command tmboot to boot all the Tuxedo Applications.On the master node ComputeNode1/ComputeNode29, type the following command:Please configure the database to support InfiniBand, as described in the "Configuring SDP Protocol Support for Infiniband Network Communication to the Database Server" topic in the Oracle Database Net Services Administrator's Guide.
• Ensure that application specific directories and files are propagated into all of Exalogic machine nodes for your networked applications. They include the APPDIR environment variable, executables, FML/FML32 field tables, VIEW/VIEW32 tables.The detail description can refer to the Tuxedo document of Administering an Oracle Tuxedo Application at Run Time.The Oracle TSAM agent enables collection of various application performance metrics (including call path, transactions, service, system servers). The Oracle TSAM Manager provides graphical user interface that correlates and aggregrate performance metrics collected from one or more Tuxedo domains. Below, several typical monitoring metrics are listed to demonstrate the monitoring function of Oracle TSAM, more Oracle TSAM features and functions can be found in the Oracle TSAM documentation.You can access Oracle TSAM by navigating to http://<hostname>:<port>/tsam.The TSAM home page show in Figure 7 gives you an at-a-glance view of the overall status of your monitored environment.Figure 7 Oracle TSAM Manager Home PageOracle TSAM provides a comprehensive policy monitoring mechanism. You can define specific monitoring policy for any monitoring point in each Tuxedo domain that deployed in Exalogic machine. Figure 8 shows a sample page demonstrating how to define a policy.Figure 8 Oracle TSAM Policy DefinitionOracle TSAM provides a capability named Call Path Monitoring used for end user or administrator to penetrate the service propagation path and to see what happens "behind the scene". Figure 9 shows a sample page demonstrating the Call Path Monitoring.Figure 9 Call Path Monitoring PageOracle TSAM provides rich graphical presentation to show service activity statistic information. Figure 10 shows a sample page demonstrating Service Monitoring.Figure 10 Service Monitoring PageOracle TSAM also provides the capability to monitor current system servers deployed in an Exalogic machine node. Figure 11 shows a sample page demonstrating the /TDomain gateway server monitoring.Figure 11 GWTDOAM Server MonitoringAs an administrator, you must ensure that once an application is up and running, it continues to meet the performance, availability, and security requirements set by your company. The Oracle Tuxedo system allows you to make changes to your configuration without shutting it down. To help you dynamically modify your application, the Oracle Tuxedo system provides the following three methods: the Oracle Administration Console, command-line utilities (tmadmin, tmconfig), and the Management Information Base (MIB) API. By these three methods, you can add, change and remove an application including adding a new Exalogic machine node, new server group, new server and activating this server.To add a new node in MP configuration using MIB, create a file named addnode.dat as shown in Listing 1.Listing 1 addnode.dat File$ ud32 < addnode.datThe LMID simple3 node is added. You can also do the same to add GROUPS, SERVERS to this new node using T_GROUP or T_SERVER classes.To add a new MP configuration node using tmconfig, do the following steps:
1. Meanwhile, you can use the similar ways to dynamically remove an Oracle Tuxedo node, server group, server via MIB or tmconfig command.For more information, see Dynamic Modifying an Application in Administering an Oracle Tuxedo Application at Run Time.
1. Download the BIN file from the Oracle Tuxedo OTN Web site at: http://www.oracle.com/technetwork/middleware/tuxedo/downloads/index.html
2.
2. Log in to ComputeNode1 as the Oracle Tuxedo administrator.The Oracle Installation program uses a temporary directory in which it extracts the files from the archive that are needed to install Oracle Tuxedo on the target system. By default, the temporary directory is /tmp, you can enter the following command at the shell prompt:
3. The Choose Oracle Home screen is displayed.
4. The Specify a new Oracle Home directory screen is prompted.The Install Samples screen is displayed.
6. Enter Y to install the samples.The Pre- Installation Summary screen is displayed.
7. The Installing screen is displayed.
8. In the Installing screen, no user input is required.The Installation Complete screen is displayed.
9.
• Before configuring an ART CICS application, certain environment variables and paths must be defined in order to create the ART CICS Runtime environment as listed in Table 1.
Mandatory. Full path name of the Tuxedo tuxconfig file
• The Terminal Connection servers (TCP servers: ARTTCPH and ARTTCPL servers): manage user connections and sessions to ART CICS applications through 3270 terminals or emulators.
• The Connection Server ARTCNX: manages the user session and some system transactions relative to security (CSGM: Good Morning Screen, CESN: Sign On, CESF: Sign off).
• The Synchronous Transaction server ARTSTRN: manages standard synchronous CICS transactions that can run simultaneously.
• The Synchronous Transaction servers ARTSTR1: manages CICS synchronous transaction applications that can not run simultaneously but only sequentially.
• The Asynchronous Transaction servers ARTATRN and ARTATR1: are similar to the ARTSTRN and ARTSTR1 but for asynchronous transactions started by EXEC CICS START TRANSID statements.
• TS Queue servers ARTTSQ: manage the use of CICS Temporary Storage Queues.
• TD Queue servers ARTTDQ: centralizes the TD Queue operations management requested by applications It publishes one service per declared queue in the configuration file, and affects all CICS TD operations offering TD QUEUE services for each queue.
• Tranclasses (transclasses.desc file)
• Transactions (transactions.desc file)
• Programs (programs.desc file)
• TS Queue Model (tsqmodel.desc file)
• Mapsets (mapsets.desc file)
• Typeterms (typeterms.desc file)This section will help you to understand ART Batch Runtime configuration requirements and how to user Tuxedo Job Enqueueing Service (TuxJES) to submit and manage batch jobs. For more information, see Oracle Tuxedo ART Runtime documentation.Table 2 lists the environment variables called in the KSH scripts and must be defined before using the software.
Table 2 KSH Script Environment Variables Table 3 lists the environment variables used by the ART Batch Runtime and must be defined before using the software.
For a complete description of the EJR launcher, see the Oracle Tuxedo Application Runtime for Batch Reference Guide.TuxJES is an Oracle Tuxedo application. Most of the TuxJES components are Oracle Tuxedo client or Oracle Tuxedo servers. You must first configure TuxJES as an Oracle Tuxedo application. The environment variable JESDIR must be configured correctly which points to the directory where TuxJES installed.The following TuxJES servers should be included in the Oracle Tuxedo configuration file (UBBCONFIG):TSAM ART CICS Transaction monitoring provides an overview for each CICS region which is monitored by TSAM as shown in Figure 12. The information includes CICS region components, status, and overall statistics metrics.Figure 12 TSAM ART CICS Transaction MonitoringOracle TSAM can also be used to manage ART TuxJES system as shown in Figure 12. From the Oracle TSAM console, you can display job information, cancel a job, or purge a job.Figure 13 Batch Runtime MonitoringThis section provides a configuration scenario including two machines ComputeNode1 and ComputeNode2, as well as ComputeNode7 as a standby machine, which supports failover and failback of ART Batch environment, as shown in Figure 14.
• Oracle Tuxedo and Oracle ART Batch are installed on ComputeNode1, ComputerNode2 and ComputeNode7 respectively.
• An Oracle Tuxedo domain comprises a master node on ComputeNode1 and a slave (backup master) node on ComputeNode2. ComputeNode7 is a standby node.
Note: All three nodes have their own end point (BOND0 IP addresses of the machines as the host addresses). In this example:ComputeNode1 BOND0 IP =192.168.10.1.
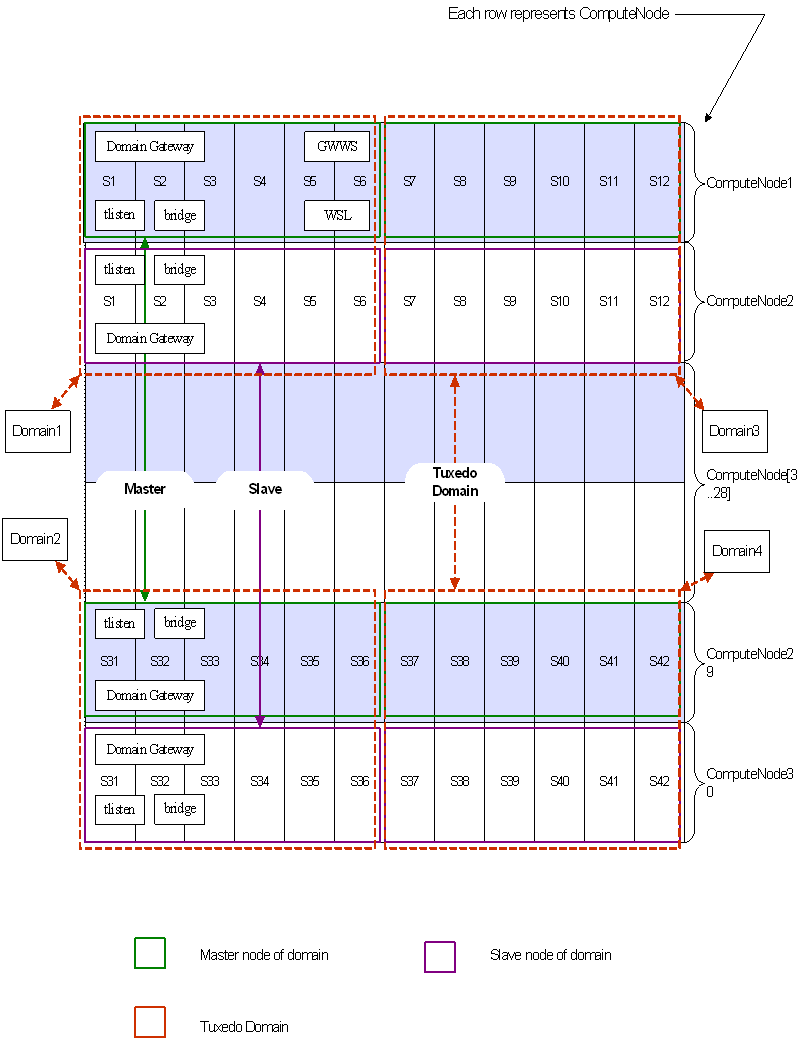
ComputeNode2 BOND0 IP=192.168.10.2
ComputeNode7 BOND0 IP=192.168.10.7
• The configuration example used in this guide describes how to configure the environment using three compute nodes (Dept_1 using ComputeNode1, ComputeNode2 and ComputeNode7). In this example, an ART JES Batch environment runs on ComputeNode1 and ComputeNode2, ComputeNode1 runs a master Oracle Tuxedo node SITE1, and ComputeNode2 runs a slave oracle Tuxedo node SITE2. ComputeNode7 is a standby machine.
• An Oracle Home directory must be created on a Sun ZFS Storage 7320 appliance shared file system and accessible by ComputeNode1, ComputeNode2 and ComputeNode7.You are associating ComputerNode1 with a virtual hostname (virtualhost1). This Virtual Host Name must be mapped to the appropriate floating IP (e.g., 10.0.0.17) by a custom /etc/hosts entry. Check that the floating IP is available per your name resolution system, (/etc/hosts), in the required nodes in your enterprise deployment reference topology. The floating IP (10.0.0.17) that is associated with this Virtual Host Name (virtualhost1) must be enabled on ComputeNode1. On ComputeNode2 and ComputeNode7, hostname virtualhost1 also have to be associated into this floating I address.To enable the floating IP on ComputeNode1, complete the following steps:
1. Listing 1 Netmask Value
2. On ComputeNode1, bind the floating IP Address to the network interface card using ifconfig command as the root user. Use a netmask value that was obtained in Step 1.In this example, bond0:1 is the virtual network interface created for internal, fabric-level InfiniBand traffic.
3. Run the arping command as the root user to update the routing table:
/sbin/arping -q -U -c 3 -I networkCardInterface Floating_IP_AddressFor example: /sbin/arping -q -U -c 3 -I bond0 10.0.0.17For example: /bin/ping 10.0.0.17
Note: In this enterprise deployment topology, example IP addresses are used. You must replace them with your own IP addresses that you reconfigured using Oracle OneCommand. Even if the master Tuxedo node does not require a floating IP, it is recommended that you assign a floating IP if you want to migrate the Tuxedo node SITE1 manually from ComputeNode1 to ComputeNode7.To configure an ART Batch application on an Oracle Tuxedo Domain (comprised of ComputeNode1 and ComputerNode2), you must do the following steps:
1. Specify an Oracle Home on Sun ZFS Storage 7320 appliance, for instance, in our sample environment /u01/app/Oracle. Then install Oracle Tuxedo and Oracle Tuxedo Application Runtime for CICS and Batch under the Oracle Home directory.When you finish installation, two child directories under oracle: tuxedo11gR1 and art11gR1 are created (which contain Tuxedo and ART installation respectively).
2. Create a directory as the JES root directory: /u01/app/simpjob/jesroot
3.
4. On ComputerNode1, create a directory as the working directory for ART Batch application: /u01/app/simpjob/site1
5. On ComputerNode2, create a directory as the working directory for ART Batch application: /u01/app/simpjob/site2
6. Set environment variables as listed in Table 1on ComputeNode1, ComputeNode2 and ComputeNode7 respectively:
Table 1 Environment Variables pdksh executable absolute path
7. Listing 2 UBBCONFIG File on Master Node
• In order to leverage Tuxedo ART failover and failback capabilities on an Exalogic machine, we use the virtual machine name ComputeNode1 in the configuration file, which is parsed into the floating IP address "10.0.0.17" in the Art Batch environment at run time.
• ART Batch servers on the master node and the slave node should share the same copy of Batch resources on the Sun ZFS Storage 7320 appliance, including jesconfig file, jesroot directory, spooling device and logging facility.
8.
9.
10.
11. On ComputeNode1, create /Q queue space device using script file jesinint shipped with ART Batch samples. Before executing this script, please modify the beginning of lines as below:
12. On the ComputeNode1, start tlisten using the command:
13. On the ComputeNode2, start tlisten using the command:
14. After the ART batch application starts on the ComputeNode1 and ComputeNode2, you can execute jobs with artjesadmin for verifications.You can run artjesadmin on either the master node or the slave node. No matter where you issue the submit job command, the job may be executed either on the master node or on the slave node depending on its class and the configuration of the initiators. In order to make sure the ART Batch related servers on each Tuxedo node are able to access the job script files correctly, it is strongly recommended that you do the following:For example: /u01/app/jobs.You can submit a number of jobs and execute system utility ps on the master node and the slave node respectively to observe "EJR" processes executing jobs on each node.You can also see the status of the jobs using Oracle TSAM (as described in Managing ART Batch Runtime).In case the compute node (ComputeNode1) hosting the master node fails, users can migrate master node into the backup master node, using tmadmin command pclean to clean partitioned SITE1 and reboot the /Q related group on the SITE2 as shown in Listing 3.
1. Migrate the master node into the backup master node, on ComputeNode2:Listing 3 Master Node/backup Node Migration
2. Listing 4 /Q Related Group into ComputeNode2After successfully booting the QUEGRP group on the ComputeNode2, all "WAITING" jobs are processed successively.Listing 15 illustrates the application deployment after failing over the master node and group QUEGRP to ComputerNode2.After the master node was migrated into ComputeNode2, the ART Batch application can go on executing jobs, but SITE2 is the only active node. In order to guarantee high availability and high scalability, users may intend to fail over SITE1 into ComputeNode7.
• tlisten and bridge on the ComputeNode1 are configured to listen on 10.0.0.17. This address is the floating IP assigned to the node on the ComputeNode1 using the BOND0 interface.
•
• -0.0.0.17: This is the floating IP where Oracle Tuxedo node SITE1 is running, assigned to bond0:Y.
• The working directory of ComputeNode1 where the Tuxedo node SITE1 is running is on shared storage. In the sample configuration, the directory /u01/app/simpjob/site1 is used.The following procedure shows how to fail over the Tuxedo node SITE1 to a different machine (ComputeNode7), meanwhile the SITE1 node will still use the same Oracle Tuxedo machine (which is a logical machine, not a physical machine).
a. Run the following command as root on ComputeNode1 (where bond0:Y is the current interface used by ADMINVHN1):
Note: this step can be omitted if ComputeNode1 has experienced a hardware crash.
b. Run the following command as root on ComputeNode7:
Note:
2.
3.
a. On ComputeNode7, add hostname virtualhost1 into file /etc/host and point it to floating IP address 10.0.0.17
b.
d. b. Start ARTGRP1After fixing ComputeNode1, you may (optionally) failover SITE1 back to ComputeNode1; do the following steps:
1.
2. Disable the floating IP on ComputeNode7.
3.
4.
5. For more information about Tuxedo high availability, see Achieving High Availability with Oracle Tuxedo at http://www.oracle.com/technocrats/middle ware/tuxedo/overview/index.html.
• All ART CICS runtime servers are listed in Server Configuration of the ART CICS Runtime. For functions that require high availability, the corresponding server should be replicated on different nodes in the MP domain. MP domain configuration for ART CICS runtime on Exalogic should follow common rules for Tuxedo MP application as described in Configuring Tuxedo Applications, as well as the rules for ART CICS runtime MP application as following,
• Tuxedo tlisten and BRIDGE processes are for internal communication between different nodes of an MP domain, so they should listen on the network address which is bound to IP over InfiniBand (IPoIB) interface. The network address used by tlisten and BRIDGE processes are specified by the NLSADDR and NADDR parameters respectively in NETWORK section of UBBCONFIG file.
• ART CICS TSQ (Temporary Storage Queue) server ARTTSQ should be replicated on different nodes of an MP domain using active/passive configuration. For a particular TS queue model only one ARTTSQ server can be booted within an Oracle Tuxedo domain. In order to achieve high availability, the alternate server for this TS queue model on the backup node should be configured and automatically started to take over the server on the failing node. Simultaneously, the directory holding the TS queue files (specified by KIX_TS_DIR environment variable), should be on the shared file system which is accessible to all nodes where the primary and alternate ARTTSQ servers reside.All ART CICS runtime resource definition files are listed in Resource Configuration of the ART CICS Runtime. You can share these resource definition files among different nodes of the MP domain, or have these files propagated from MP master node to non-master nodes automatically by the ARTADM server. To achieve high availability, all resources, including converted VSAM files and Tuxedo /Q should be on the shared file system which is accessible to all nodes.
• ART CICS resource definition files are stored under the ${KIXCONFIG}directory. To share resource definition files among different nodes of an MP domain, use common ${KIXCONFIG} directory on the shared file system which is accessible to all nodes. If the resource definition directory ${KIXCONFIG} is not shared, configure ART administration server ARTADM on all nodes to propagate resource definition files from MP master node to non-master nodes.Listing 1 shows an ART CICS runtime MP domain deployment UBBCONFIG file example.As with other Tuxedo applications, to meet the requirement of performance, availability and security, ART CICS deployment can be changed without shutting it down. To help you dynamically modify your application, Tuxedo provides the following three methods: Administration Console, command-line utilities (tmadmin, tmconfig), and Management Information Base (MIB) API. Using any one of these three methods, you can add, change and remove an application including adding a new machine node, new server group, or new server and activating the server, etc.Listing 2 addserver.dat File
3. Add new ARTTCPL server using the ud32 utility
4. Boot the server using the tmboot command