2 Proxy Controller Administration
The Proxy Controller carries out commands from the Enterprise Controller. All Oracle Enterprise Manager Ops Center deployments have at least one Proxy Controller.
A Proxy Controller is automatically installed on the Enterprise Controller system. It can be enabled and used for small deployments. For larger deployments, remote Proxy Controllers can be installed on separate systems.
About Proxy Controller Administration
Proxy Controllers are the middle tier of Oracle Enterprise Manager Ops Center. Proxy Controllers carry out most jobs, store data such as OS images, and interact directly with managed assets.
The Administration options for the Proxy Controller let you manage it directly.
Updating a Proxy Controller
Updates for the software are released periodically. You can apply these updates to your Proxy Controllers to make use of new and updated features.
When an update is released, you must download it and apply it to the Enterprise Controller before applying it to the Proxy Controllers.
Viewing and Changing Proxy Controller Status
Knowing the current status of a Proxy Controller is necessary for some processes. You can check the status of a Proxy Controller, and stop or start it, from the command line.
Setting a Proxy Controller's Default Status
You can set a Proxy Controller as the default. Normally, jobs are routed to the Proxy Controller that manages the affected assets, or to whatever Proxy Controller is available. If a Proxy Controller is the default, jobs are routed to it wherever possible.
Updating a Proxy Controller
You can remotely update Proxy Controllers to the latest available version.
Proxy Controller files are stored in the /var/opt/sun/xvm/images/productUpdate directory. If you are using Connected Mode, use the Ops Center Downloads action to download Proxy Controller files. If you are using Disconnected Mode, Proxy Controller files must be added to the /var/opt/sun/xvm/images/productUpdate directory before they can be used.
To update a Proxy Controller through the UI, the Enterprise Controller must be able to reach the Proxy Controller with an SSH connection using port 22 during the update process. This connection is used to transfer Proxy Controller bundles and execute commands on the Proxy Controller system. If your security restrictions do not allow this connection, update the Proxy Controller from the command line.
Perform the following tasks before you update the Proxy Controller:
-
Update the Enterprise Controller.
-
Download the Proxy Controller update.
See Ops Center Downloads for more information about downloading updates.
-
Click the Enterprise Controller in the Administration section of the Navigation pane.
-
Click the Proxy Controllers tab. Proxy Controller information is displayed.
-
Select one or more Proxy Controllers.
-
Click the Update to Latest Available Version icon in the center pane. The Update Proxy(s) wizard is displayed.
-
Select a method for providing SSH credentials for the Proxy Controller or Proxy Controllers.
-
Re-use the SSH credentials used during discovery
-
Apply the same SSH credentials to all
-
Enter SSH credentials for each
-
-
Click Finish. A job is launched to update the Proxy Controller.
Manually Updating a Proxy Controller
You can manually update Proxy Controllers to the latest available version to gain access to new and updated features.
Proxy Controller files are stored in the /var/opt/sun/xvm/images/productUpdate directory on the Enterprise Controller. If you are using Connected Mode, use the Ops Center Downloads action to download Proxy Controller files, then move them to the Proxy Controller system. If you are using Disconnected Mode, Proxy Controller files must be downloaded outside of Ops Center and moved to the Proxy Controller system.
-
As root, log in to the Proxy Controller system.
-
Change to the directory containing the proxyadm command.
-
On Oracle Solaris systems, this directory is
/opt/SUNWxvmoc/bin/. -
On Linux systems, this directory is
/opt/sun/xvmoc/bin/.
-
-
Run the proxyadm status command to verify that the Proxy Controller is online. If the Proxy Controller is offline, start it using the proxyadm start command.
# ./proxyadm status
online
-
Change to the directory containing the update bundle.
-
Uncompress and un-tar the installation archive, then list the contents of the temporary directory.
-
For example, on a Linux Proxy Controller:
# gunzip proxy-controller.Linux.i686.2.5.0.1186.tar.gz
# tar xf proxy-controller.Linux.i686.2.5.0.1186.tar
# ls
xvmoc_full_bundle
proxy-controller.Linux.i686.2.5.0.1186.tar
#
-
On an Oracle Solaris Proxy Controller:
# gzcat proxy-controller.SunOS.i386.2.5.0.1186.tar.gz | tar xf -
# ls
xvmoc_full_bundle
proxy-controller.SunOS.i386.2.5.0.1186.tar.gz
-
-
Change to the
xvmoc_full_bundledirectory. -
Run the install script.
# ./install
The update is installed on the Proxy Controller.
Configuring a Local Agent on a Proxy Controller
A Local Agent is Agent software installed on the Proxy Controller system. Configuring the Local Agent lets you monitor the system that supports the Proxy Controller and launch jobs that target it.
-
Click a Proxy Controller in the Administration section of the Navigation pane.
-
Click Configure Local Agent in the Actions pane. A confirmation window is displayed.
-
Click Ok. A job is launched to configure the local Agent.
Unconfiguring a Local Agent on a Proxy Controller
The Local Agent is the Agent software installed on a Proxy Controller system. You can unconfigure the Local Agent to halt monitoring of the Proxy Controller system.
-
Click a Proxy Controller in the Administration section of the Navigation pane.
-
Click Unconfigure Local Agent in the Actions pane. A confirmation window is displayed.
-
Click Ok. A job is launched to unconfigure the local Agent.
Checking the Status of a Proxy Controller
You can check the status of a Proxy Controller using the proxyadm command.
To Check the Status of a Proxy Controller
-
As root, log in to the Proxy Controller system.
-
Run the
proxyadm statuscommand.-
On Oracle Solaris systems, this command is in the
/opt/SUNWxvmoc/bin/directory. -
On Linux systems, this command is in the
/opt/sun/xvmoc/bin/directory. The following options may be used: -
-h | --help – Displays the usage synopsis for the subcommand.
# ./proxyadm status
The status of the Proxy Controller is displayed.
-
Starting a Proxy Controller
You can start a Proxy Controller using the proxyadm command.
-
As root, log in to the Proxy Controller system.
-
Run the
proxyadm startcommand.-
On Oracle Solaris systems, this command is in the
/opt/SUNWxvmoc/bin/directory. -
On Linux systems, this command is in the
/opt/sun/xvmoc/bin/ directory. The following options may be used: -
-h | --help – Displays the usage synopsis for the subcommand.
-
-w | --wait – proxyadm does not exit until all services have been started.
-
-t | --temporary – The state change is made temporary until next reboot.
-
-v | --verbose – Displays verbose error and informational messages.
-
-l | --logfile <logfile> – Captures any output from proxyadm in the <logfile>.
# ./proxyadm start -vw
The Proxy Controller is started.
-
Stopping a Proxy Controller
You can stop a Proxy Controller using the proxyadm command.
-
As root, log in to the Proxy Controller system.
-
Run the
proxyadm stopcommand.-
On Oracle Solaris systems, this command is in the
/opt/SUNWxvmoc/bin/directory. -
On Linux systems, this command is in the
/opt/sun/xvmoc/bin/directory. The following options may be used: -
-h | --help – Displays the usage synopsis for the subcommand.
-
-w | --wait – proxyadm does not exit until all services have been started.
-
-t | --temporary – The state change is made temporary until next reboot.
-
-v | --verbose – Displays verbose error and informational messages.
-
-l | --logfile <logfile> – Captures any output from
proxyadmin the <logfile>.# ./proxyadm stop -vw
The Proxy Controller is stopped.
-
Setting a Proxy Controller as Default
You can set a Proxy Controller as the default. Jobs will be completed by the default Proxy Controller wherever possible.
To Set a Proxy Controller as Default
-
Click a Proxy Controller in the Administration section of the Navigation pane.
-
Click Set as Default in the Actions pane. A popup appears, confirming that the Proxy Controller has been set as the default.
-
Click OK.
Clearing a Proxy Controller's Default Status
You can remove the default status from a Proxy Controller. Jobs will be completed by the Proxy Controller on the appropriate subnet.
To Clear a Proxy Controller's Default Status
-
Click the default Proxy Controller in the Administration section of the Navigation pane.
-
Click Clear Default in the Actions pane. A popup appears, confirming that the Proxy Controller is no longer the default.
-
Click OK.
Configuring DHCP
You can configure and enable DHCP services on a Proxy Controller. DHCP configuration configures and enables basic DHCP services on the Proxy Controller to support OS provisioning operations. The Proxy Controller must be in the same subnet as the target hosts for OS provisioning to work.
The DHCP Config action configures and enables either a Solaris DHCP server, or an Internet Standards Consortium (ISC) DHCP server, on the Proxy Controller that you select.
The DHCP Config action requires that you specify the Ethernet interface through which the Proxy Controller will provide DHCP services, for example bge0. Currently you may establish DHCP services on all the Ethernet interfaces in the proxy controller. The Proxy Controller's Ethernet interface that you specify must be connected to the network where the target systems for OS provisioning are connected.
Similarly, the Ethernet interface that you select in the Boot Network Device field of the Provision OS wizard must be connected to the network where the Proxy Controller is providing DHCP services.
The DHCP Config and External DHCP Servers actions are mutually exclusive. Use only one of these two actions to configure DHCP services to support OS provisioning operations. The DHCP Config action is more commonly used, and is simpler to implement.
The following diagram illustrates the basic DHCP configuration.
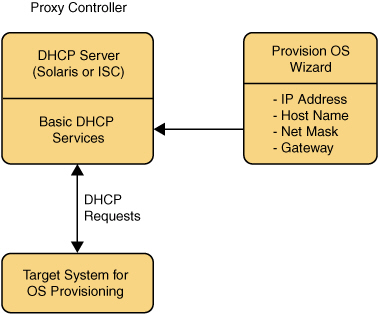
The Provision OS wizard supplies the specific identity information that the target system requests, using the basic DHCP services that you establish on the Proxy Controller.
-
In the Administration pane, select the Proxy Controller where you want to configure DHCP services. The Actions list shows the available actions, including the DHCP Config action.
-
Select DHCP Config in the Actions pane. The DHCP Configuration dialog box is displayed.
-
In the DHCP Configuration dialog box, provide the following information:
-
DHCP Server – Select either ISC or Solaris to implement either the Internet Standards Consortium (ISC) reference DHCP server, or the Solaris native DHCP server. The ISC server is generally preferred.
-
Interface – Enter the Ethernet interface on the Proxy Controller where you want to provide DHCP services, for example, qfe0. DHCP configuration is possible for multiple Ethernet interfaces in the Proxy Controller.
-
Enable DHCP – Select this option to enable the DHCP server that you selected.
-
-
Click Save Config to save the DHCP configuration that you specified.
-
A warning indicates that any existing subnets in the DHCP configuration will be removed. Click Yes to accept that action and continue.
-
A message indicates that the DHCP configuration job has been submitted. Click OK to dismiss the message. When the job is complete, DHCP services become available.
Note:
You can configure DHCP server on the Proxy Controller to listen to multiple Ethernet interfaces. For example, consider the following network configuration for the Proxy Controller:e1000g0 10.0.0.2 e1000g1 192.168.1.2 e1000g2 172.16.12.2
If you configure the DHCP server to listen to e1000g1 and e1000g2, then the target system must have the IP address in the range of 192.168.1.0/24 or 172.16.12.0/24.
Configuring Subnets
You can configure subnets to use the DHCP server on a Proxy Controller for purposes in addition to OS provisioning, or to define subnets that are used with external DHCP servers.
Configuring subnets is not required to establish the basic DHCP services that are required for OS provisioning, unless you are using an external DHCP server.
Typically you would configure subnets for the following reasons:
-
To configure a subnet to provide IP address, DNS server, and router information to systems that may request them on the same network where the Proxy Controller is providing basic DHCP services for OS provisioning;
-
If you choose to configure an external DHCP server instead of configuring a DHCP server on a Proxy Controller, you must configure a subnet for each network from which you might receive relayed DHCP requests.
The Subnets action allows you to specify an IP address range that the DHCP server will assign to systems that request them. The IP addresses that you specify in the Low IP Address and High IP Address fields for the subnet define the low and high boundaries of the IP address range.
The IP addresses that are within the range that you specify may not be used for OS provisioning operations. If, for example, you specify 192.168.0.64 and 192.168.0.128 as the low and high IP addresses, you could not use any of the IP addresses within that range, including the low and high addresses, as values for the IP Address or IP Address Ranges fields in the Provision OS wizard.
-
In the Administration pane, select the Proxy Controller where you want to configure a DHCP subnet. The Actions list shows the available actions, including the Subnets action.
-
Select Subnets in the Actions pane. The DHCP Subnets Configuration dialog box is displayed.
-
In the DHCP Subnets Configuration dialog box, provide the following information:
-
Subnet – To create a new subnet on the selected Proxy Controller, select Create New Subnet. Select an existing subnet from the pull-down list to modify its configuration. The Refresh button updates the list of subnets.
-
Subnet Name – Enter the name of the subnet where you want to establish or modify DHCP services.
-
Network – Enter the network address.
-
Netmask – Enter the netmask for the network.
-
Router IP Address – Enter the IP address of the router that systems that on this subnet will use.
-
Low IP Address – Enter the IP address to use as the lower limit of the IP address range that systems on this subnet will use.
-
High IP Address – Enter the IP address to use as the upper limit of the IP address range that systems on this subnet will use.
-
Name Server – Enter the IP addresses of the DNS servers that systems will use.
-
Domain – Enter the names of the DNS domains that systems will use to resolve host names.
-
-
Click Create Subnet to create the subnet configuration that you specified. A message indicates that a job to create the subnet was submitted. Click OK to dismiss the message.
Configuring External DHCP Servers
Oracle Enterprise Manager Ops Center enables you to use DHCP servers that are external to Proxy Controllers to provide the DHCP services that OS provisioning operations require.
The DHCP Config and External DHCP Servers actions are mutually exclusive. Use only one of these two actions to configure DHCP services to support OS provisioning operations. The DHCP Config action is more commonly used, and is simpler to implement.
The following diagram illustrates DHCP configuration using External DHCP servers.
Figure 2-2 DHCP Configuration Using External DHCP Servers

Description of "Figure 2-2 DHCP Configuration Using External DHCP Servers"
You run the scinstall_ext_dhcp.pl script on the External DHCP server to establish communication between the Proxy Controller and the External DHCP server. The Subnets pane allows you to define subnets where DHCP relay traffic is expected. The External DHCP Servers pane configures the Proxy Controller to relay DHCP configuration information that the Provision OS wizard supplies. The Provision OS wizard supplies the specific identity information that the target system requests. The target system makes its DHCP requests, which are relayed to the External DHCP server. The routers or other network asset that connects the External DHCP server to the Proxy Controller must have DHCP relay capabilities enabled.
External DHCP Server Requirements
The External DHCP Servers action is only compatible with Solaris DHCP server and not with ISC DHCP server.
Configuring External DHCP servers requires the following prerequisite work:
-
You must establish DHCP relay or forwarding services on the network routers, switches, or systems that comprise your network. Refer to the documentation for those components for the required procedures.
-
You must use the scninstall_ext_dhcp.pl script to establish the communication channel between a Proxy Controller and the External DHCP server. The scninstall_ext_dhcp.pl script enables ssh access to the DHCP server without requiring passwords.
To Install the scninstall_ext_dhcp.pl Script on the External DHCP Server
You need to use wget to get the scninstall_ext_dhcp.pl script from the Proxy Controller to the External DHCP server.
-
On the external DHCP server, execute the following command to get the scninstall_ext_dhcp.pl script from the Proxy Controller.
# wget http://proxy_ip:8004/pub/scninstall_ext_dhcp.pl
Where proxy_ip is the IP address of the Proxy Controller.
-
Grant execute permissions for the script.
# chmod +x scninstall_ext_dhcp.pl
-
Install the script as root user.
# ./scninstall_ext_dhcp.pl install
This will perform the following actions:
-
Sets up scnospadmin user.
-
Downloads the SUNWscnosp-extdhcp package from the proxy directory.
-
Sets up the configuration file for limited commands to run from scnospadmin user.
-
Sets up ssh keys to allow ssh/scp commands from the Proxy Controller to the external DHCP server without requiring passwords.
Note:
Ensure that you use wget to copy the scninstall_ext_dhcp.pl script from the Proxy Controller to another external DHCP server.To Configure External DHCP Servers
-
In the Administration pane, select the Proxy Controller where you want to configure an external DHCP server. The Actions list shows the available actions, including the External DHCP Servers action.
-
Select External DHCP Servers in the Actions pane. The External DHCP Servers Configuration dialog box is displayed.
-
In the External DHCP Servers Configuration dialog box, provide the following information:
-
DHCP Server – To create a new DHCP server on the selected Proxy Controller, select Create New DHCP Server. Select an existing DHCP server from the pull-down list to modify its configuration. The Refresh button updates the list of DHCP servers.
-
Subnet Name – Enter the name of the subnet where you want to establish or modify DHCP services.
-
DHCP Server – Select Solaris to implement the Solaris native DHCP server.
-
DHCP Server IP – Enter the IP address of the DHCP server.
-
Network – Enter the network address where you want to establish or modify DHCP services.
-
Netmask – Enter the netmask for the network where you want to establish or modify DHCP services.
-
Router IP Address – Enter the IP address of the router that the DHCP server will assign to systems.
-
Low IP Address – Enter the IP address to use as the lower limit of the IP address range that the DHCP server will allocate to systems.
-
High IP Address – Enter the IP address to use as the upper limit of the IP address range that the DHCP server will allocate to systems.
-
Name Server – Enter the IP addresses of the DNS servers that systems will use.
-
Domain – Enter the names of the DNS domains that systems will use to resolve host names.
-
-
Click Create DHCP Server to create the DHCP server configuration that you specified. A message indicates that a job to create the external DHCP server was submitted. Click OK to dismiss the message.
Viewing a Proxy Controller's Configuration
You can view the configuration of a Proxy Controller, including:
-
IP Address
-
Registration Date
-
Status (Online or Offline)
-
Whether or not the Proxy Controller is the default
To View a Proxy Controller's Configuration
-
Click the Proxy Controller in the Administration section of the Navigation pane.
-
Click the Configuration tab in the Center pane. The Proxy Controller's configuration is displayed.