A Learn More
This section provides sample reports that can be created using Enterprise Manager Ops Center.
Example - Baseline Analysis Report
A Solaris baseline is a dated collection of Solaris patches, patch metadata, and tools. Oracle releases Solaris baselines on a monthly basis. When you install the patches of a baseline on a managed system, it is considered to be compliant with that baseline.
Each dated baseline contains these patch sets:
-
Full – Includes all Solaris patches
-
Recommended – Includes Solaris recommended patches and security patches
-
Security – Includes only Solaris security patches
The Baseline Analysis Report (BAR) enables you to determine whether your managed system is compliant with recently released Oracle Solaris baselines.
In this example, a BAR is generated for a Solaris 10 x86 OS and the compliance is checked with the latest released recommended baselines. Ensure that the Oracle Solaris 10 OS is managed using Enterprise Manager Ops Center and the Enterprise Controller is in connected mode. If the Enterprise Controller is in disconnected mode, you must download the baselines using the harvester script.
See Creating a Baseline Analysis Report for information about how to generate a baseline analysis report. In the report wizard, select to run the agent based report to view the actual status of the OS compliance for the selected baseline.
A sample report result is displayed as shown in the figure.
Figure A-1 Sample Baseline Analysis Report
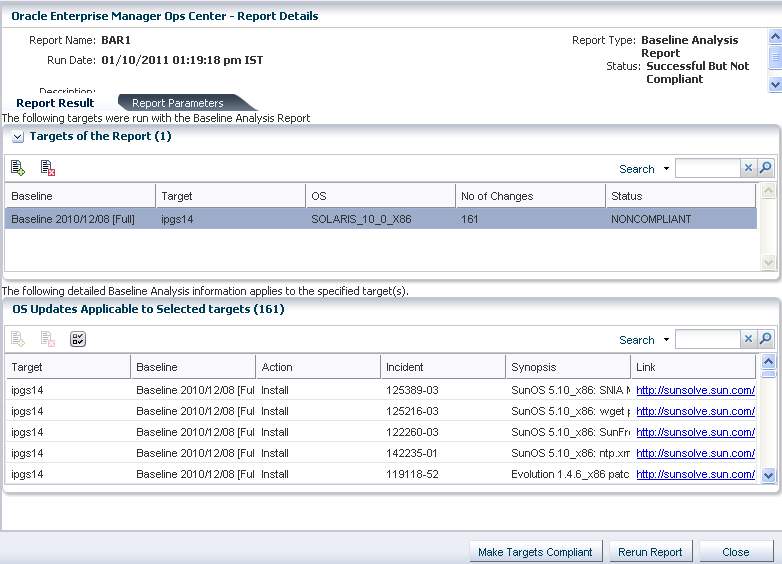
Description of "Figure A-1 Sample Baseline Analysis Report"
Report Result
In the report result, the status of the report is displayed as Success But Not Compliant. This means that the report generation was success but the Solaris OS is not updated with the patches for the selected baselines. The report lists the patches that must be applied or removed from the OS to make it compliant with the selected baseline.
The report provides the number of changes that must be made on the OS for making it compliant with the selected baseline. The report lists out the patch number, patch information, and the download point from My Oracle Support.
To make the OS compliant, click the Make Targets Compliant button to launch the job wizard to download and install the patches.
If you do not want to install some patches from the list, you can always select those and black list using the Add detail row to black list option.
Example - Change History Report
The change history report provides the installs and uninstalls done using Enterprise Manager Ops Center on the managed systems. This report shows which user made the deployments, enabling you to track a team of operators.
Refer to Creating a Change History Report (Solaris) for a detailed procedure to generate a report.
When you generate the report, you can also specify the time frame in which you want to know the changes that have been made to a system. A sample report result of change history report is displayed as follows.
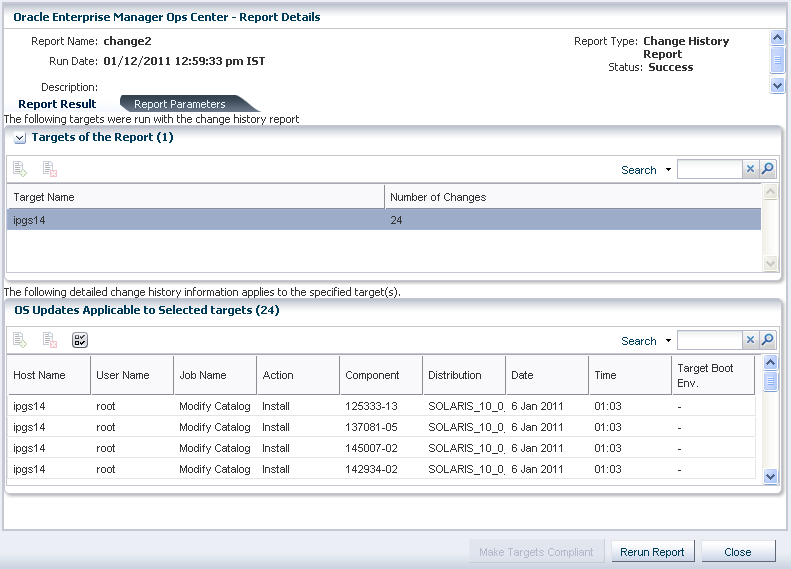
In the sample report, a modify catalog job was executed on the OS which resulted in installing some patches on the target OS. This could be derived from the report result which lists what action was taken on the target, the job that called for the action, and the component on which the action was performed. It also provides the user who initiated the job, and the date and time of the action.
The change history report can be used for auditing purposes as it provides the detailed information about the job executed on the systems by different operators, if any.
Example - CVE Report
Generate CVE reports to find the incidents related to specific CVE IDs and the managed systems that should have these incidents installed. You can choose to get a report that lists hosts that are compliant; or a report of those that must be fixed for the selected CVE IDs.
Select a target OS to create a CVE report. Refer to Creating a CVE Report (Solaris) for a detailed procedure to generate a CVE report.
In this example a CVE report is generated for a Solaris 10 5/09 OS for the following CVE IDs:
-
CVE-2010-1624
-
CVE-2010-1797
-
CVE-2010-2065
-
CVE-2010-2227
-
CVE-2010-2249
-
CVE-2010-2443
-
CVE-2010-2528
-
CVE-2010-3069
-
CVE-2010-3170
-
CVE-2010-3654
For a compliant CVE report, the report result shows the incident-packages that are installed on the OS to be compliant with the selected CVE IDs. The report result of compliant CVE report is displayed as follows:
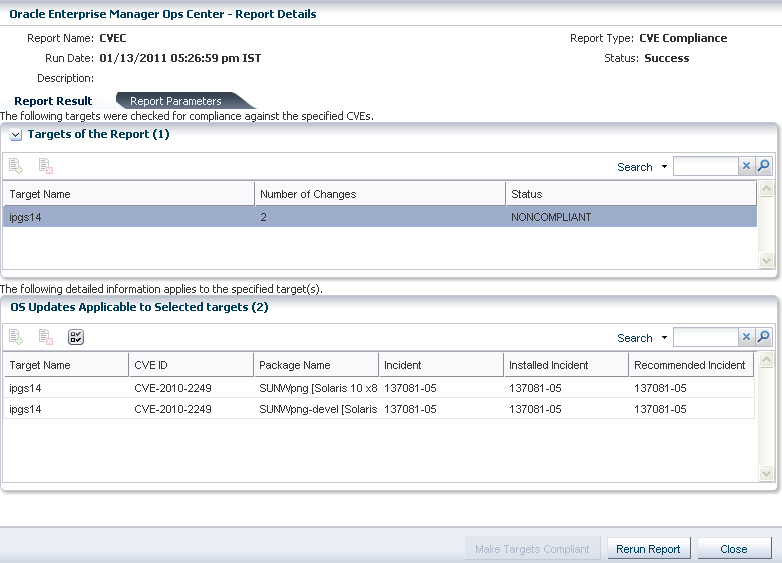
The report result shows the CVE IDs you selected and the number of incident-packages with the compliance status. The report shows how many incidents have been installed on the hosts to be compliant with the selected CVE IDs. In this example, the incident 137081-05 is installed to be compliant with the CVE ID CVE-2010-2249.
For a not compliant report, the report result shows the incident-packages that must be installed on the target for the selected CVE IDs. The report result of not compliant CVE report is displayed as follows:
Figure A-4 Not Compliant CVE Report Result
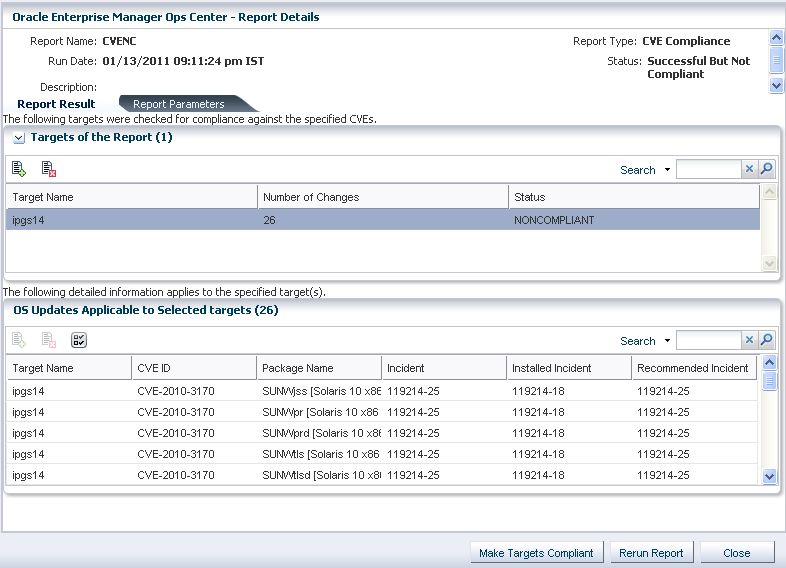
Description of "Figure A-4 Not Compliant CVE Report Result"
The report result shows the incident-packages that must be installed on the target OS to make it compliant for the selected CVE IDs. The sample report lists the CVE IDs and its recommended incidents that must be installed for making the OS compliant.
Use the option Make Targets Compliant to initiate the compliance job to install the recommended incidents.
Example - Host Compliance Report
Host Compliance reports helps to discover systems that should be updated for security fixes. You can choose to get a report that lists hosts that are compliant; or a report of those that must be fixed. The security issues could be of those incidents that are security; or it could include both security and bug fixes.
Select an target OS to generate a host compliance report. Refer to Creating a Host Compliance Report (Solaris) for a detailed procedure for generating a host compliance report.
In this example, a host compliance report is generated to list both security and bug fixes. For a compliant report, the report results shows how many incidents have been installed on the target OS. A sample compliant report result is displayed as follows:
Figure A-5 Compliant Host Compliance Report Result
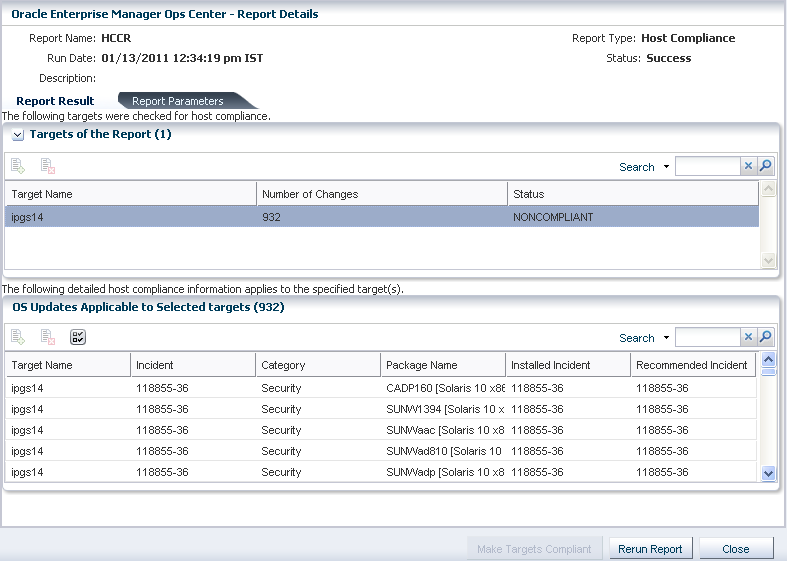
Description of "Figure A-5 Compliant Host Compliance Report Result"
The report result shows the recommended incidents that have been installed on the system for the required security and bug fixes. The status of the target is displayed as NONCOMPLIANT which means that the target OS still require management to be compliant.
If you have selected to create a noncompliant report, the report result shows how many incidents have to be installed on the target OS. A sample compliant report result is displayed as follows:
Figure A-6 Not Compliant Host Compliance Report Result
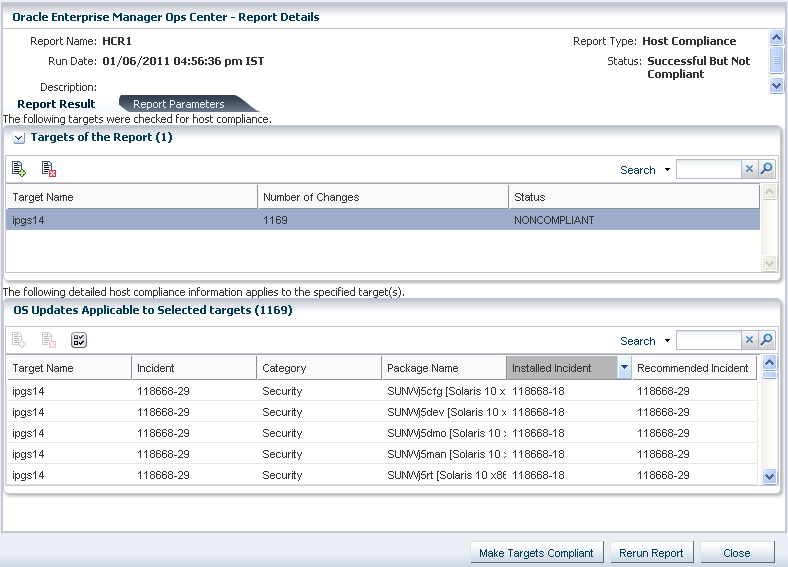
Description of "Figure A-6 Not Compliant Host Compliance Report Result"
The report results shows the list of installed incidents that are not compliant with the recommended incidents. The report result provides option to run a compliant job to install the recommended incidents. Click Make Targets Compliant to initiate the compliance job.
You can use the search functionality to find out the packages from the list. You can use the search function based on the columns that are displayed for the report result.
Scenario - Setting the Number of Zones for Parallel Patching
The Solaris 10 utilities patch 119254-66 (SPARC) and 119255-66 (x86) are now installed during agent installation in Enterprise Manager Ops Center. You can now set the maximum number of non-global zones to be patched in parallel in the configuration file /etc/patch/pdo.conf.
When you patch non-global zones in Enterprise Manager Ops Center, the zones are patched in parallel. At present, the number of zones that can be patched in parallel is set to 1 by default. You can modify the number of zones that must be patched in parallel.
You must set the maximum number of zones that must be patched in parallel in the pdo.conf configuration file. This file is present in the /etc/patch directory of the Enterprise Controller. Edit this file and change the value for num_proc. For example, you can edit the value of num_proc=8, which means that at a time 8 non-global zones can be patched in parallel.
Refer to the patch 119254 README for more information about the factors that affect the parallel patching in zones.
You can use the Local Content and View Catalog option to initiate this change before applying a patch on the zones. The typical steps that are required in Enterprise Manager Ops Center are as follows:
-
Upload the local configuration file
pdo.conf -
View the catalog and mark the uploaded configuration file as Required
-
Launch a modification job to install the component
Uploading the Configuration File pdo.conf
-
From the Navigation pane, select Libraries section.
-
Expand Solaris/Linux OS Updates and select Local Contents. The OS Update Components are displayed in the center pane.
-
From the Actions pane, select Upload Local Configuration File. The Upload Local Configuration File window is displayed.
-
Enter the target path on the server. The target path is
/etc/patch. -
In Version, type a character string to identify this version of the file.
The version is appended to the file name when it is displayed in the Components list. For example, the version can be named as "patch 8 zones".
Figure A-7 Uploading Local Configuration File
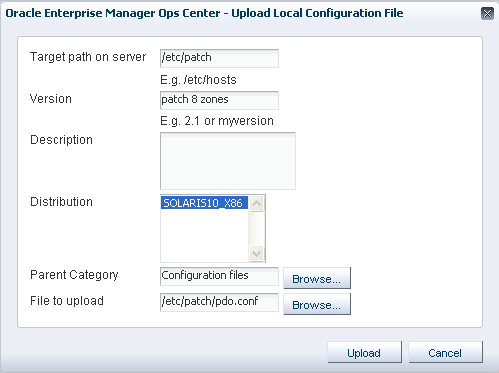
Description of "Figure A-7 Uploading Local Configuration File"
-
Enter a brief description of the configuration file.
-
Select the distribution for which the configuration file is applicable. You can select multiple distributions.
-
In Parent, accept the Configuration Files category.
-
Enter the directory in which the configuration file is saved. For example, in this case the file is saved in the
/etc/patchdirectory. -
Click Upload to upload the configuration file. A job is submitted to upload the configuration file to the selected distributions.
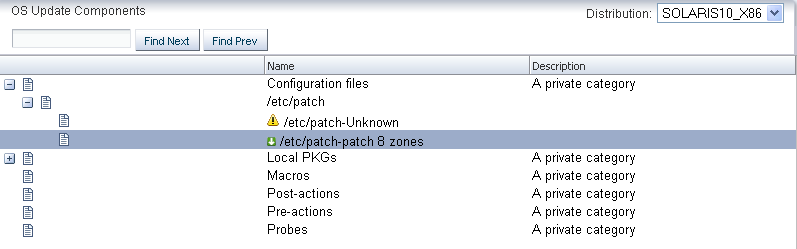
The uploaded configuration file will be displayed in the OS update components list as shown in the figure.
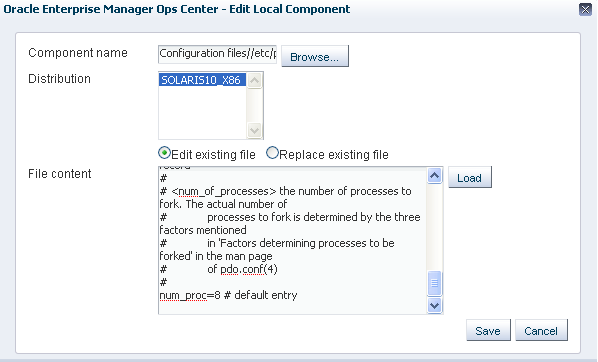
You can edit the configuration file pdo.conf to change the number of zones. Use the Edit Local Component File to modify the pdo.conf file.
Editing the Configuration File
-
From the Navigation pane, select Libraries section.
-
Expand Solaris/Linux OS Updates and select Local Contents. The OS Update Components are displayed in the center pane.
-
From the Actions pane, select Edit Local Component File option. The Edit Local Component window is displayed.
-
Either specify the name of the file as
pdo.confor click Browse to select the file under the parent category. -
Select Edit Existing File option.
-
Click Load to load the file. The pdo.conf file will be displayed in the box.
-
Edit the configuration to change the value of num_proc.
Figure A-9 Editing the Local Configuration File
Description of "Figure A-9 Editing the Local Configuration File"
-
Click Save to save the changes made to the pdo.conf file.
You must apply this configuration file to the selected global zone managed in Enterprise Manager Ops Center. You must install this component using the catalog option of an OS.
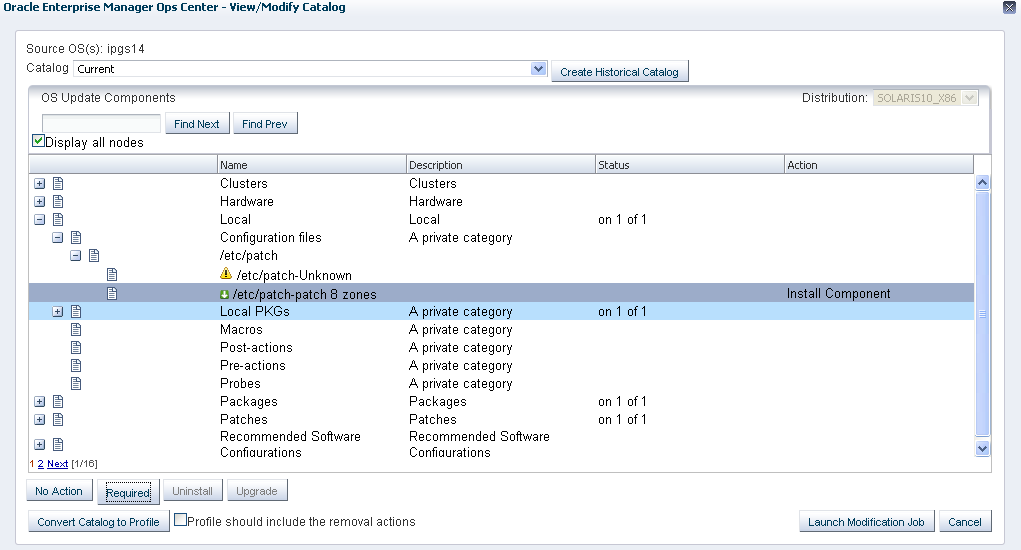
Viewing or Modifying Catalog of an OS
-
From the Navigation pane, select Assets section.
-
Select the global zone OS in the Assets tree. The global zone OS details are displayed in the center pane.
-
From the Actions pane, select View/Modify Catalog. The OS Update Components that are installed on the global zone are listed.
-
Expand the Configuration files component. The uploaded configuration file pdo.conf with the version "patch 8 zones" attached to it is displayed. You can see that this component is not installed on the OS.
-
Select the configuration file with "patch 8 zones" and click the Required button.
The action for the component is set to Install Component.
-
Click Launch Modification Job to install the component. A job is submitted to install the component on the OS.