8 Deploying a Sample Web Application to an Oracle WebLogic Cluster
In this example, you can deploy a sample application named dizzyworld.ear to the Managed Servers in the Dept1_Cluster1 cluster.
Note:
This chapter discusses how to deploy the sample application to a single cluster (Dept1_Cluster1). You can choose to deploy the whole application in a single cluster or its different tiers in multiple clusters. In addition, you can deploy a separate application to a separate cluster within the same domain, based on your specific deployment and management requirements.
This chapter discusses the following topics:
8.1 Downloading the dizzyworld.ear Application
To download and extract the sample application, do the following:
-
Download the
dizzyworld.earfile from the following URL:Note:
If this file is downloaded as
dizzyworld.zipin your web browser, manually rename its file name todizzyworld.ear. -
Copy the dizzyworld.ear file to a local directory in
/u01/common/general.Note:
If you are deploying this sample application for testing purposes, you do not need to perform server migration.
8.2 Configuring WAR-Scoped Coherence Clusters
With this configuration, or if you want only one application to use Coherence caches, each deployed Web application becomes its own Coherence cluster. Caches will be visible to the individual modules only. For example, this could be a recommended deployment for a stand-alone WAR deployment or stand-alone EJB deployment.
If you are deploying multiple WAR files, note that this configuration produces the largest number of Coherence nodes in the cluster—one for each deployed WAR file that uses coherence.jar. It also results in the largest resource utilization of the three configurations—one copy of the Coherence classes are loaded for each deployed WAR. On the other hand, since each deployed Web application is its own cluster, Web applications are completely isolated from other potentially misbehaving Web applications.
Note:
A Web module within an EAR can have a module-scoped Coherence node but an EJB module within an EAR can only have an application-scoped Coherence node.
To Use Coherence Caches with WAR-Scoped Clusters
-
Use the WebLogic Server Administration Console to deploy
coherence.jarandactive-cache.jaras shared libraries to all of the target servers where the application will be deployed. See "Install a Java EE Library" in the Oracle Fusion Middleware Oracle WebLogic Server Administration Console Help.As an alternative to the Administration Console, you can also deploy the JAR files on the command line. The following are sample deployment commands:
java weblogic.Deployer -username <> -password <> -adminurl <> -deploy coherence.jar -name coherence -library -targets <>

java weblogic.Deployer -username <> -password <> -adminurl <> -deploy active-cache.jar -name active-cache -library -targets <>
-
Import
coherence.jarandactive-cache.jaras optional packages in themanifest.mffile of each module that will be using Coherence.As an alternative to using the manifest file, copy
coherence.jarandactive-cache.jarto each WAR file'sWEB-INF/libdirectory.Example 8-1 illustrates the contents of a sample
manifest.mffile. -
(Optional) If you want to configure Coherence cluster properties, create a
CoherenceClusterSystemResourceMBeanand reference it as acoherence-cluster-refelement inweblogic.xmlorweblogic-ejb-jar.xmlfile.Example 8-2 illustrates a sample configuration for WAR-scoped clusters in the
weblogic.xmlfile. ThemyCoherenceClusterMBean is of typeCoherenceClusterSystemResourceMBean.
8.3 Installing and Deploying an Enterprise Application
For this enterprise deployment topology, you must install and deploy the dizzyworld.ear web application to Managed Servers in Dept1_Cluster1. To do so, compete the following steps:
-
Extract the dizzyworld.ear file to a local directory in
/u01/common/general. -
Open the
weblogic-application.xml(located at/u01/app/FMW_Product1/Oracle/Middleware/wlserver_10.3/server/lib/consoleapp/META-INF) in a text editor and enter your Oracle Coherence cluster name, as shown in the following example:<wls:coherence-cluster-ref> <wls:coherence-cluster-name>CoherenceCluster1</wls:coherence-cluster-name>Save the file after making changes.
-
Rebuild the
dizzyworld.earapplication. -
Log in to the WebLogic Administration Console.
-
If you have not already done so, in the Change Center of the Administration Console, click Lock & Edit.
-
In the left pane of the console, select Deployments.
The Summary of Deployments page is displayed.
-
In the right pane, click Install.
The Install Application Assistant page is displayed.
-
Specify the path, where your
dizzyworld.earfile is located, and click Next. -
Select Install this deployment as an application and click Next.
-
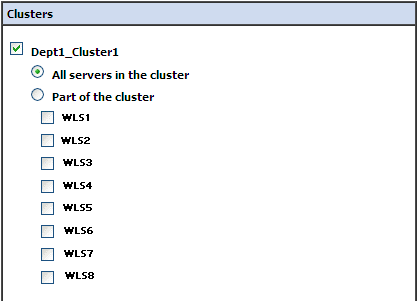
Select Dept1_Cluster1, and then All servers in the cluster (Figure 8-1).
-
Click Next.
-
In the Optional Settings page, accept the default values, and Click Next.
-
Review the configuration settings you have chosen, and select No, I will review the configuration later to immediately update the application's configuration after you install it. Then click Finish to complete the installation.
8.4 Starting the Web Application
To start the Web application:
-
In the left pane of the Administration Console, select Deployments.
-
In the right pane, select the check boxes next to dizzyworld.ear.
-
Click Start and choose Servicing all requests to the Web application.
-
Click Yes to confirm that you want to start the selected Web application.
8.5 Testing the Application
After starting the web application, test the application as follows:
-
Add a few items to the shopping cart using the
go shoppinglink. -
Verify that your shopping cart includes the items you selected. If the items are in your shopping cart, the application is working fine.
