Managing the Screen
This chapter covers the following topics:
- Managing Multiple Worksheets
- Managing Worksheet Views
- Managing View Elements
- Managing Empty Rows
- Worksheet, Layout, and Data
- Worksheet Definition, Layout, and Local Adjustments
Managing Multiple Worksheets
Within Oracle Demantra, you can open multiple worksheets and display them in tab mode or window mode. In window mode, you can re-size, position, minimize, maximize, and tile each window as in other software.
To specify how to display worksheets
-
Select Options > Tabs View/Windows View.
-
Click the Tabs/Windows toggle button (Display worksheets as windows or Display worksheets as tabs).
A worksheet contains views, and these views can be displayed as windows or tabs within the worksheet itself. The Tabs/Windows setting discussed here has no effect on the views.
To view a worksheet that has already been opened
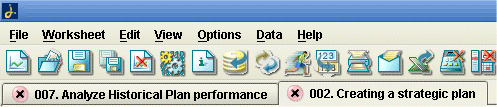
In windows view, select the worksheet from the Windows menu.
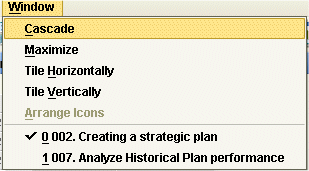
In tabs view, click the tab corresponding to the worksheet.
To close a worksheet
Do one of the following:
-
In windows view, click close (X) in the top right corner of the worksheet window.
-
In tabs view, click the close symbol (X) on the tab.
See also:
-
Managing Worksheet Views
-
Managing View Elements
-
Adding and managing Worksheet Views
Managing Worksheet Views
A worksheet can include multiple views, which are displayed as tabs or as windows within the worksheet window itself.
Each view can have a different set of series and a different layout. Within any given worksheet, you can display the views as tabs or as child windows that you can resize and reposition.
Depending on the worksheet definition, the views may or may not be synchronized with each other. If they are synchronized, when you edit in one view, that change automatically appears in the other views.
Note: In a given worksheet, if some of the views show data at a higher aggregation level, the data is not editable in those views.
To manage worksheet views
Within any given worksheet, you can display the worksheet views as tabs or as child windows that you can resize and reposition.
-
To create, modify, or delete worksheet views, see Adding and Managing Worksheet Views.
-
To change how views are shown within the current worksheet, click Options > Tabs Multiview or Options > MDI Multiview, whichever option is displayed. Or click the corresponding toggle button on the toolbar (Display view as child window or Display view as task).
-
If you are currently displaying views as tabs, you can view one tab at a time. Click the tab of the view you want to view.
-
When you are displaying views as subwindows, you can resize, reposition, maximize, and minimize each of these subwindows. Also, the Options menu provides options for tiling and cascading the subwindows.
See also:
-
Managing Multiple Worksheets
-
Managing View Elements
Managing View Elements
To hide or re-display elements of a worksheet view
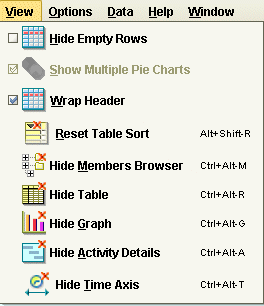
You can hide elements of a worksheet. To do so, use the Options menu. For example, to hide the graph, click View > Show/Hide Graph.
Note: This menu includes an option to hide the time axis. You typically use this option only if the worksheet also contains time levels. In such a case, it is desirable to hide the time axis, because it is redundant and takes up space on the screen.
Each of these menu items acts as a toggle. To redisplay what you have hidden, click the same menu item again.
To re-size an area in a worksheet view
Drag a divider to the required position.
To expand or contract an area in a worksheet view
There are two snap buttons in the upper left of each worksheet area, one with an up arrow and one with a down arrow. Click the snap button pointing in the required direction.
![]()
To resize a data column
Click the vertical divider between two column headers, and drag it horizontally to the required position.
The text of the series header can wrap. If it does not, you can instruct it to by going to View > Wrap Header and selecting the checkbox. The wrapping applies to every crosstab view in a worksheet.
See also:
-
Managing Multiple Worksheets
-
Managing Worksheet Views
-
Adding and Managing Worksheet Views
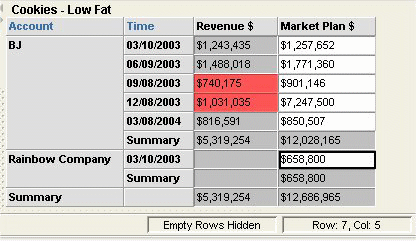
Managing Empty Rows
To hide or display empty rows in the worksheet table
Click View > Hide Empty Rows. This option is a toggle. If you click it again, you redisplay the empty rows.
Note: This option does not affect any graphs in the worksheet.
Note: If a worksheet contains a time level or a general level (GL), or it contains a series that is based on a time level or a general level, then empty rows will not appear in the worksheet, even if Hide Empty Rows setting is not selected.
Examples
In some cases, some of the rows of a worksheet table might not contain data, for example:
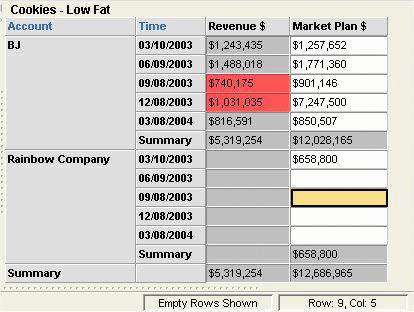
Note that the status bar at the bottom of worksheet indicates that empty rows are currently being displayed.
When you hide empty rows, the result is as follows:
Worksheet, Layout, and Data
As you work within Oracle Demantra , it is important to remember that worksheets exist independently from the data that they display. For example, the definition of a worksheet specifies which series to display and how to aggregate those series for that worksheet. But the worksheet definition does not specify the values that the series contain.
Accordingly, the worksheets and their layouts are saved separately from changes to the data.
To save changes that you have made to the data in the worksheet, including changes to notes, click Data > Save Data. Or click the Save Data button.
To save changes that you have made to the worksheet definition or to the local layout, click File > Save Worksheet. Or click the Save Worksheet button.
-
If you own the worksheet, this option saves the basic worksheet definition and its initial layout. This affects any users of this worksheet who have not yet saved their own layout for it.
-
If you do not own the worksheet, this option saves only your own layout of the worksheet. This has no effect on any other users.
See also:
-
Worksheet Definition, Layout, and Local Adjustments
-
Saving and Viewing Changes
Worksheet Definition, Layout, and Local Adjustments
As you work in a worksheet, you often sort columns, hide or display features, and make various other changes. It is useful to understand how these settings are saved.
The autorun option (Options menu) is saved separately for each user, but applies to all worksheets that the user sees.