Managing Items and Locations
This chapter covers the following topics:
- About Managing Items and Locations
- Viewing the Attributes of an Item or Location
- Creating an Item or Location
- Making a New Member Visible
- Modifying an Item or Location
- Deleting an Item or Location
- Overview of New Product Introduction
- Removing Lifecycle Definitions
- Opening an Item or Location in Another Worksheet
- Using Other Right-Click Menu Options
About Managing Items and Locations
Depending on your authorization, you have access to options on the right-click menu that enable you to do the following:
-
To view the attributes of an item, location, or other objects (known generically as members)
-
To create, edit, and delete items, locations, or other objects
-
To perform additional operations on members, as defined within your implementation
Permissions are set separately for each level and potentially for each user.
Where to Work with Items and Locations
The right-click menu is available in different areas of a worksheet:
-
In the Members Browser
-
In the worksheet table
Visibility of New Items or Locations
Oracle Demantra display only the items and locations for which it has data. Specifically, this means two things:
-
A worksheet can display only items and locations that exist in combinations in the database. If an item has not been linked to at least one location, for example, that item cannot be seen in a worksheet. This rule results from the fact that, fundamentally, worksheets select and display combinations.
-
A worksheet can display only combinations that have data (even zero-value data). For each combination in a worksheet, the system selects records from the database; if there are no records, the combination cannot be shown.
After you create a new item or location, you must use an additional tool (Member Management, which is a desktop tool) to create one or more combinations for it and to insert placeholder data (consisting of zero sales). See Making a New Member Visible.
Interaction with Corporate Systems
If you change or add items or locations, you should be aware of how Oracle Demantra interacts with your corporate systems. Oracle Demantra periodically imports data about sales, items, and locations from your other systems. Each time data is imported into your system, the changes you have made to the levels are overwritten, depending on the kind of change.
-
You should edit or delete existing members only if you are expecting the same change to occur in the imported data, and you need to see the change right away within Oracle Demantra for some reason.
-
If you add members, they will be kept when data is imported.
Viewing the Attributes of an Item or Location
To view the attributes of an item or location
-
In your worksheet, find an area that is currently displaying the type of object you want to work with; see Where to Work with Items and Locations.
-
Right-click an object and click View (for example, View Ship to).
Oracle Demantra displays a dialog box like the following:
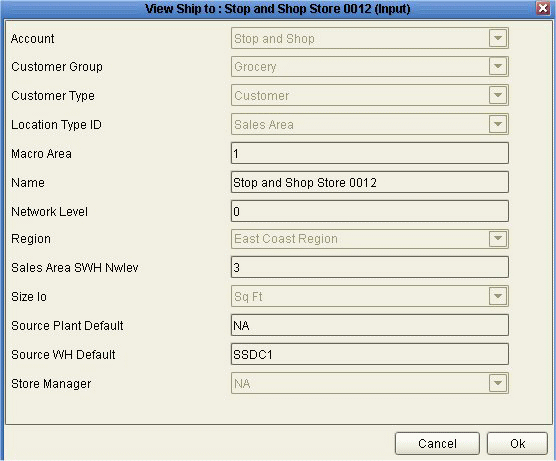
The attributes shown in red are required. These include the Name attribute and all immediate parents of this member. Depending on your implementation, not all attributes are editable.
Creating an Item or Location
-
In your worksheet, find an area that is currently displaying the type of object you want to work with; see Where to Work with Items and Locations.
-
Right-click an object and then select New (for example, New SKU).
Oracle Demantra displays a window where you specify the name of the new member, as well as its parent levels and other attributes.
-
For Name, specify a unique name.
-
The rest of the fields prompt you for values of attributes associated with this level; the fields shown in red are required. The specific attributes you see depend upon your configuration.
-
Click Create.
-
Click Data > Update to save your changes.
Note: You cannot see the new member in the worksheet, because the worksheet displays only item-location combinations that exist and that have sales.
Making a New Member Visible
You cannot see the new member in the worksheet, because the worksheet displays only item-location combinations that exist and that have sales. So, after you create a new item or location, you must use an additional tool to create one or more combinations for it and to insert placeholder data (consisting of zero sales).
To make a new item or location visible in worksheets
-
Start Member Management, as described in Starting Member Management. This is a desktop utility; you may or may not have access to it.
-
Display members of the item or location level, as described in Displaying Level Members. You can start with either dimension. In this example, you have added a new SKU. So here you display members of the SKU level.
-
Select the member that you are using as the starting point. For this example, click your new SKU.
-
Click the Link to Location or Link to Item button, whichever button is displayed. For this example, click Link to Location.
Now Member Management displays the levels of the other dimension (in this case, the locations).
Note: To return to the previous screen, click Back.
-
Display members of the desired level. For example, display members of the Ship To level.
-
Click the member that you want to combine with previously selected member. For example, click a Ship To location.
-
Now click Insert Values. Oracle Demantra prompts you to confirm the action. Click Yes. Oracle Demantra creates the combination and inserts placeholder historical data (0 values) into the database. You will then be able to see your new item or location in any worksheet that includes this combination.
Note: This option has no effect on existing combinations.
Note: The change is immediate and cannot be canceled.
See also:
-
Member Management
-
Chaining Management
Modifying an Item or Location
You can modify a member by changing its name, the parent members to which it belongs, and any visible attributes.
To modify an item or location
-
In your worksheet, find an area that is currently displaying the type of object you want to work with; see Where to Work with Items and Locations.
-
Right-click an object and then select Edit (for example, Edit SKU). Then make changes as needed; see Creating and Item or Location for details.
-
Click Finish.
-
Click Data > Update to save your changes.
-
Click Data > Rerun to display the changes.
See also About Managing Items and Locations.
Deleting an Item or Location
To delete an item or location
-
In your worksheet, find an area that is currently displaying the type of object you want to work with; see Where to Work with Items and Locations. Note that you cannot delete objects from within the worksheet table.
-
Right-click an object and click Delete (for example, Delete SKU).
-
Oracle Demantra prompts you to confirm the action. Click Yes or No.
See also About Managing Items and Locations.
Overview of New Product Introduction
Demand Planners occasionally need to add new products to the product assortment, and are responsible for ensuring these items are populated in Demantra as well as receive a statistical forecast. New product introductions have defined lifecycle phases, which includes:
-
Product introduction
-
Product maturity
-
Product phase-out
In many cases, newly created items replace one (or more) existing items. During the introduction period, sales are expected to increase while sales for items being replaced are expected to decline. For a product no forecast is desired before the introduction period or after the phase-out period.
Depending on the type of product being introduced, generating a useful forecast for items and locations with little or no history can be challenging. Traditionally, Demand Planners used manual forecasting and “best guess” methods to determine a demand plan. However, this method can be time consuming and unsuitable for large scale day-to-day planning processes.
Another method of generating a forecast for items lacking history is to use information from other sources. In contrast with user-derived forecasts, which rely on user expertise and judgment, this process attempts to use reliable analytical forecasting methods. In this approach, additional historical information is retrieved and used as pseudo-history for the combinations lacking real history. When selecting pseudo history for an item one or more data streams are copied from an item deemed similar. User expertise is used when defining the data sources from which history is copied. The pseudo history is used for predicting future behavior of the combination until combination specific information is available.
For example, a sports drinks manufacturer wants to introduce a new flavor, Grape. Even though this product is new, it will have very similar demand to other flavors of sports drink. By associating the new flavor with an old one, Demantra can use the existing forecast to predict sales for the new product.
Creating Similar Products
Use the Create New Product method to add a new product to the available product assortment. The product will be based on an existing product and use the existing product’s configuration and context. The new item will be created using the same hierarchal definitions as existing item and be linked to the same locations for which the existing item is sold. Historical data from the existing product can be copied to the new product and serve as a basis in generating a forecast using pseudo history.
Create similar product process can be used to create new items or modify existing items, with no historical data.
Items created using Create Similar Product will be linked to the same location for which the source product is created. The creation process can be configured to respect worksheet filters when creating the location link. For example, source product is linked to ten retailers, without any filters the new product will be linked to the same ten retailers. If the worksheet from which the method is called is filtered to only include three of these retailers when the method is called then the new product will only be linked to three retailers.
To create a similar product:
-
From any Demand Management worksheet, select the item from which you want to create a similar product.
-
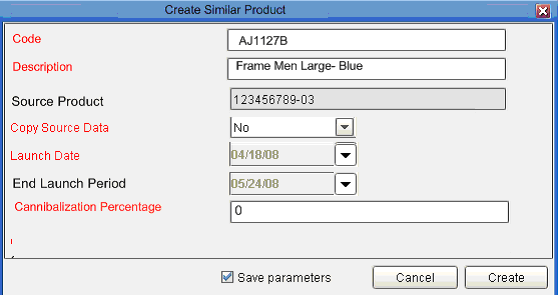
Right click the item and then select Create Similar Product.
The Create Similar Product dialog box appears.
-
In the Code field, enter an item code. A pre-existing item code without historical data may be chosen or new item code entered.
-
In the Description field, give the new item a descriptive name. For example, “500 ml Grape Sport Drink”.
-
From the Copy Source Data drop-down list box, indicate whether data from source member should automatically be copied to the member.
-
In the Launch Date field, select the date when the item is being introduced. This date corresponds to when the item will first begin to sell, no forecast will be generated before this period.
-
In the End Launch Period field, select the date when the item has completed the launch phase. This field is optional and should only be populated if new item is to cannibalize sales from source item.
The period during which cannibalization is expected is between the Launch Date and End of Launch Period.
-
In the Cannibalization field, enter the percentage of sales that Demantra should take from the original item.
This input controls both whether cannibalization of source product will occur during launch time frame as well as the rate of cannibalization. A 0 value will result in no cannibalization of the source product.
Note: If you specify a value for the Cannibalization field, then you must enter a value for End Launch Period.
-
Click the Create button.
Demantra creates the new item, links it to locations and copies historical data from source to item if instructed to do so.
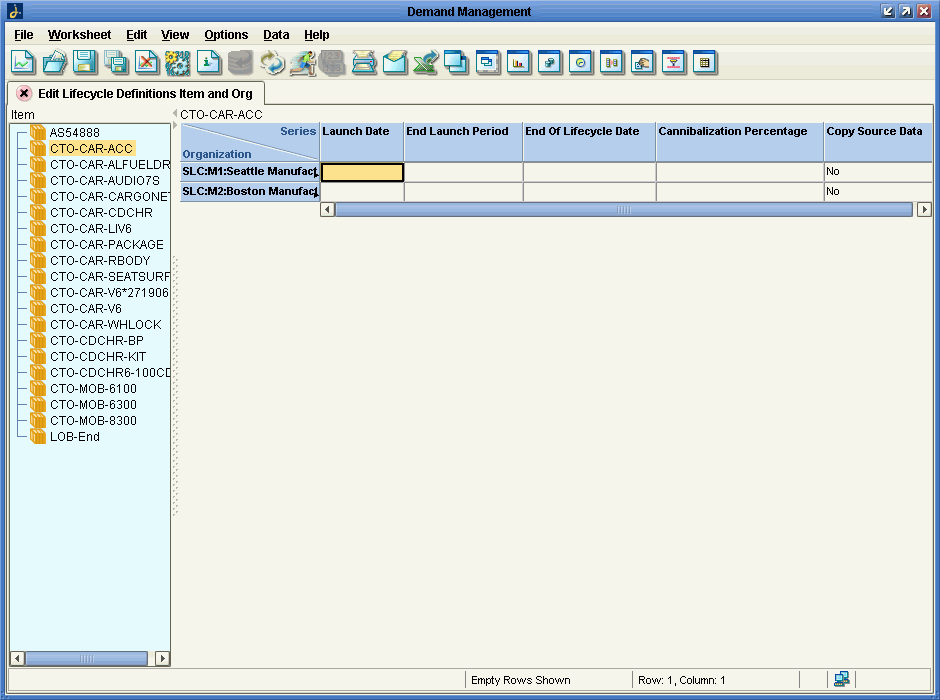
Updating Product Lifecycle Definitions
Once a similar product has been defined, you can later edit the product details for some (or all) locations from the Edit Lifecycle Definitions Item and Org worksheet.
To update a product lifecycle definition:
-
From the Collaborator Workbench, open any worksheet.
The Worksheet Designer appears.
-
From the File menu, choose Open.
From the Open Worksheet dialog box, choose Edit Combination Definition Item & Org.
-
From the Open Worksheet dialog box, choose Edit Combination Definition Item & Org.
Edit Combination Definition Item & Org worksheet appears.
-
Double-click a worksheet cell to edit the current value.
-
From the Data menu, choose Save Data.
-
Initiate the Update Lifecycle Definitions method to propagate changes in lifecycle definition and affect all relevant areas.
Removing Lifecycle Definitions
A change in the business environment or plan may result in large amount of undesired combinations and data rows existing in the system. This may result from a variety of causes including product assortment changes, erroneous data collection or use of create similar product.
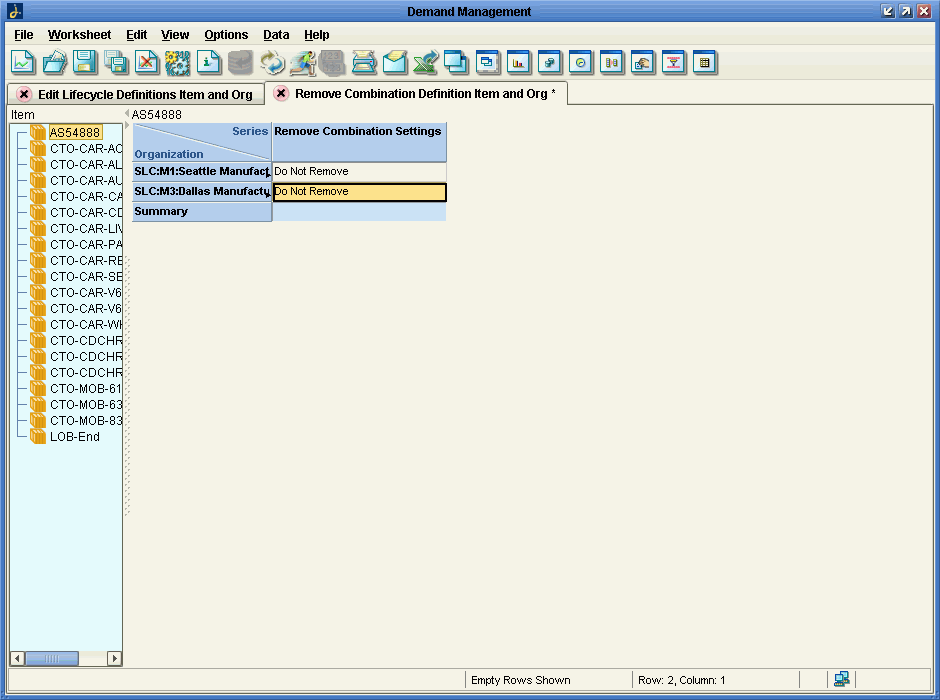
Use the Remove Lifecycle Definitions Item and Org worksheet to remove items and locations links. All data for deleted combinations is also deleted.
To remove lifecycle definitions:
-
From the Collaborator Workbench, open any worksheet.
-
From the File menu, choose Open.
-
From the Open Worksheet dialog box, choose Remove Combination Definition Item & Org.
The Remove Combination Definition Item & Org worksheet appears.
-
From the Remove Combination Setting drop-down list box, indicate whether or not you want to delete a combination.
-
From the File menu, choose Save Worksheet.
-
Execute the Remove Combinations method.
The Remove Combinations dialog box appears.
-
To confirm the deletion, choose Yes from the Remove Combinations drop-down list box, and then click the Remove button.
Note: Removing a combination that is set to cannibalize another item will update the cannibalization percentage for the remaining items.
Note: If all combinations for an item are removed the item itself will be deleted.
Opening an Item or Location in Another Worksheet
Depending on how your system has been configured, you may be able to open a worksheet that is filtered to show only data relevant to the member from which you started.
The specific options are usually different for each aggregation level in your system.
To open an item or location in another worksheet
-
In your worksheet, find an area that is currently displaying the type of object you want to work with; see Where to Work with Items and Locations.
-
Then do one of the following:
-
Right-click the item or location and then select Open. In this case, you are using the default worksheet associated with this item or location.
-
Right-click the member and then select Open With and then select a worksheet.
The worksheet appears in a new window or tab, depending on how you are currently viewing the worksheets.
Note: Depending on how this worksheet is defined, it is filtered in one of two ways:
-
- Filtered by member, that is, filtered to show the item or location from which it was launched, aggregating across all combinations. In this case, the name of the worksheet is preceded by the name of the member by which you are filtering it.
-
- Filtered by combination, that is filtered to show the specific combination from which it was launched. In this case, the name of the worksheet is preceded by the word “Filtered”.
-
Using Other Right-Click Menu Options
Depending on your implementation, the right-click menu may include a Methods submenu that includes additional options created by your implementors:
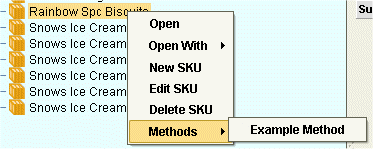
When you click one of these options, Oracle Demantra displays a dialog box like the following:
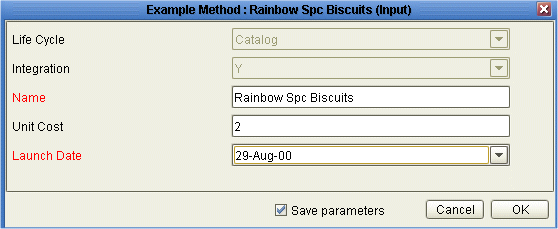
Select the Save parameters check box if you want to save the attribute changes to the database when the method is run.
For information on any such menu items, please contact your implementors or your designated Oracle Demantra system administrator.