Member Management
This chapter covers the following topics:
- Introduction to Member Management
- Starting Member Management
- Introduction to the Member Management Tool
- Creating a Member
- Creating a Combination
- Creating Placeholder Data
- Managing the Lowest-Level Combinations
- Moving a Member
- Copying a Member
- Renaming a Member
- Deleting a Member
Introduction to Member Management
Most members and combinations in Oracle Demantra are imported and have historical data. When you are planning new products or new sales locations, however, you do not have any imported data to work with. In this case, you can create members and combinations directly in Oracle Demantra, and you can initialize the new combinations with data copied from combinations that you expect to be similar. Then the Analytical Engine can include the planned combinations in the forecast.
This overall process consists of the following steps:
-
Create a new member at any aggregation level, if the member you need does not yet exist. For example, you can create a new SKU or a new distribution center.
-
Create new combinations that include the new member. For example, if you have created a new SKU, then create combinations of that SKU with various stores that will sell the SKU. Or if you are introducing an existing product to a store where it has not been sold, create a combination of that product and store.
-
Identify some combination that you believe will have a similar sales pattern to the new combinations. Copy data for specified series from those combinations to your new combinations, optionally multiplying by an overall factor.
Note: This step is known as chaining, and is described in Chaining Management.
Default Members
Oracle Demantra provides a default member within each level, as a placeholder, for example:
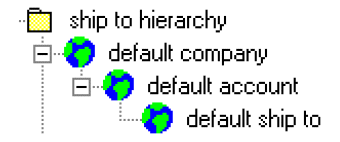
These placeholders may or may not be displayed in the worksheets, depending on how those worksheets are filtered.
Member Status
Member Management displays the status of each member, as follows:
In a typical system, most members are real.
Starting Member Management
Do one of the following:
-
Within Oracle Demantra, click Tools > Member Management.
-
Within Collaborator Workbench, click Planning Applications > Member Management.
If this tool is not installed on your desktop or there is a newer version available, Oracle Demantra installs or updates the tools on your desktop. You must have the correct permissions. See Oracle Demantra Implementation Guide.
Introduction to the Member Management Tool
Before you start to use Member Management, it is useful to become familiar with the user interface, which looks like this.
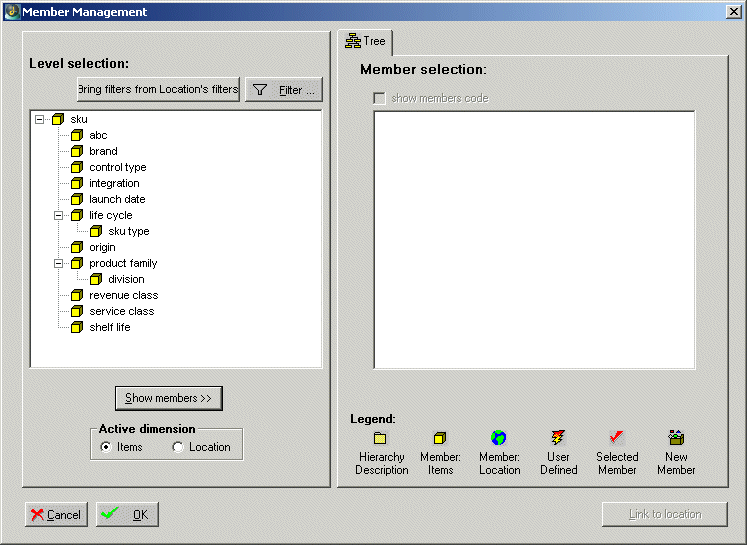
Displaying Level Members
To display the members of a level
-
In Active Dimension, click either Items or Locations.
The left window of Member Management displays all the levels of that dimension.
-
In the left window, click the level.
-
Optionally filter the display for performance; see Filtering the Members.
-
Click Show Members.
-
The Member Selection pane displays the members of that level and all submembers.
-
In the Member Selection pane, expand the hierarchy as needed.
For performance reasons, the maximum number of members displayed is preconfigured for your system. To display more members, click the More Members symbol.
By default, Member Management displays the descriptions of the members. To see the codes instead, select the Show Members Code check box.
Note: If you switch from the item dimension to the location dimension and then switch back (or vice versa), Member Management does not remember your selections. It does, however, remember any filters you applied in either window.
Filtering the Members
You can filter the members that Member Management displays, which can make the Member Selection pane display more quickly, and which can make it easier to find a particular member.
Note: If the list of members is currently filtered in any way, the Filter button is colored red as a reminder.
If you switch from the item dimension to the location dimension and then switch back (or vice versa), Member Management remembers any filters you applied in either window.
You can filter by members of any level of any dimension, no matter whether you are view item members or location members.
For example, suppose you are displaying members of an item level. If your filter includes only the Rainbow brand, then at any item level, you will see only items that belong to the Rainbow brand. If your filter includes only the Northeast region, then you will see only items that are sold in that region.
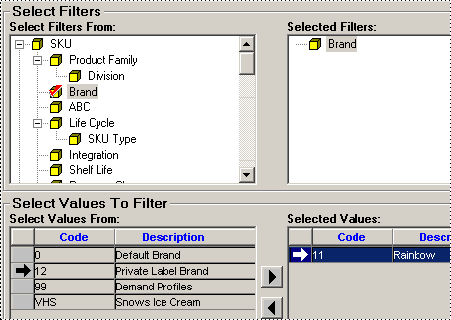
To filter the displayed members, method 1
-
Click Filter.
The Filter dialog box appears.
-
In the Select Filters From pane, select a level to be filtered.
The list of members for that level is displayed in the Select Values From pane.
-
Click the members to be included in the Select Values From pane and click the arrow to move them to the Selected Values pane, for example:
-
Click OK to return to Member Management.
-
Click Show Members.
To filter the displayed members, method 2
If you previously applied a filter to the other dimension (which is not currently displayed), you can copy that filter to this dimension. To do so:
-
Click Bring filters from Location's filters or Bring filters from Item's filters, whichever button is currently shown.
When you do this, Member Management finds the information about the filter you had applied in the other window and copies it to this window. Then Member Management grays out the Bring filters from Location's filters or Bring filters from Item's filters button and displays the Filter button in red to remind you that a filter has been applied. You can click the Filter button and make changes as usual.
-
Click Show Members.
Creating a Member
You can create a member at any level to which you have access.
Note: At the lowest level, you can also create a member by copying an existing member; see Copying a Member.
To create a member
-
Start Member Management, as described in Starting Member Management.
-
Display members of any level that is directly above the level to which you want to add a member. See Displaying Level Members.
-
In the Member Selection pane, right-click a member to which you want to add a child member.
-
Click Add Member. This option is not available for members at the lowest level.
The Add Member dialog box appears. This dialog box prompts you for information about all parent levels of the new member, as well as any attributes of the member. The following example does not include attributes.
The parent member that you chose is shown but is grayed out. Other parent members might also be preselected and grayed out, depending on the filters you applied to the display.
-
If you are creating a new SKU, this window also prompts you for unit data, as follows:
These numbers tell Oracle Demantra how to scale worksheet data when you switch a worksheet to a different unit of measure. The units displayed depend upon your implementation. For each unit of measure, do the following:
-
For this new SKU, consider the item count per unit of measure. For example, if a case contains eight items, the item count is eight. If a truck contains 2000 items, the item count is 2000.
-
Divide one by the item count: 1/8 or 1/2000, for example.
-
Enter that number: 0.125 or 0.0005.
Oracle Demantra uses this information to scale worksheet values when you choose to display a worksheet in different units. For example, a worksheet displays numbers in terms of item count and you then switch to truckloads, the displayed numbers should be smaller.
Note: If you are not sure what values to use, find a similar item, note the values it uses, and use the same values here.
-
-
Click OK to continue.
Note: This change is immediate and cannot be canceled.
Creating a Combination
Before you create a combination, you should know which item member and which location member will be in the combination. These members can be at any aggregation level; higher levels generally correspond to a greater number of lowest-level combinations. You will have a chance to see the corresponding lowest-level combinations.
To create a combination
-
Start Member Management, as described in Starting Member Management.
-
Display members of the item or location level, as described in Displaying Level members. You can start with either dimension. For example, display members of the Brand level.
-
Select the member that you are using as the starting point. For this example, click the Rainbow member to select it.
-
If there are other hierarchies within this dimension, select a member within each of them. For example, suppose that the Member selection list includes two hierarchies of locations, as follows (shown collapsed to save space).
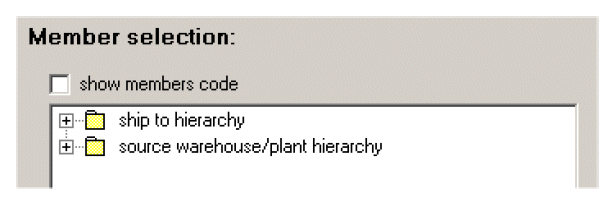
In this case, you need to select a member within the ship to hierarchy and a member within the source warehouse/plant hierarchy.
You do this so that the new combination can be found within both these hierarchies.
-
Click the Link to Location or Link to Item button, whichever button is displayed. For this example, click Link to Location.
Now Member Management displays the levels of the other dimension (in this case, the locations).
Note: To return to the previous screen, click Back.
-
Display members of the desired level. For example, display members of the Customer Type level.
-
Click the member that you want to combine with previously selected member. For example, click Customer-dc.
-
If there are other hierarchies within this dimension, select a member within each of them, as described earlier in this procedure.
-
Do either of the following:
-
Click Create Combinations. Oracle Demantra prompts you to confirm the action. Click Yes.
-
Click Insert Values. Oracle Demantra prompts you to confirm the action. Click Yes. In this case, Oracle Demantra creates the combinations (if necessary) and inserts placeholder historical data (0 values) into the database. You will then be able to see this combination in worksheets.
Note: Neither option has any effect on existing combinations.
Note: In either case, the change is immediate and cannot be canceled.
-
-
Continue as follows:
-
To view the lowest-level combinations, click Combination List. See Managing the Lowest-Level Combinations.
-
To go directly to Chaining Management, click Chaining Management. See Chaining Management.
-
Creating Placeholder Data
After you create a combination, you can create placeholder data for it so that the combination can be displayed in worksheets (with empty rows). Specifically, the demand and the forecast are set equal to zero for all dates.
This option has no effect if the combination already exists.
To create a placeholder (zero) data for a combination
-
Start Member Management, as described in Starting Member Management.
-
Select a combination in the same way that you create a combination; see Creating a Combination.
-
Click the Insert Values button at the bottom of the screen.
Note: This change is immediate and cannot be canceled.
Managing the Lowest-Level Combinations
To manage the lowest-level combinations
-
Start Member Management, as described in Starting Member Management.
-
Click the Combination List button at the bottom of the screen.
This button is activated only when both the item and location members to be linked have been selected.
-
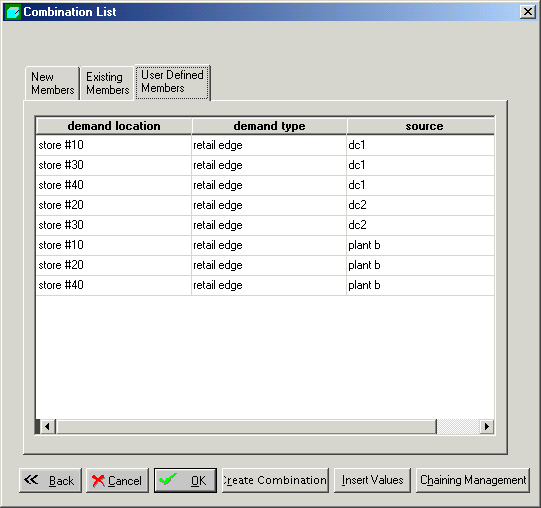
In the Combination List, all possible hierarchy links are displayed in three tab windows: New Members; Existing Members, and User Defined Members:
-
Do one or more of the following:
-
To create combinations, select one or more combinations and click Create Combinations.
-
To add the combinations to the database and create zero histories for them, select one or more combinations and click Insert Values.
Tip: To select more than one member combination, press Shift+Click or Ctrl+Click.
-
To go directly to Chaining Management, click Chaining Management.
-
To save changes and close Member Management, click OK.
-
To close Member Management without saving changes, click Cancel.
-
To filter the displayed combinations
-
Right-click in the Combination List and then select Filter.
A Filter dialog box appears.
-
From the respective dropdown lists, select the expressions by which members will be filtered. To add multiple expressions, click Add and then repeat the process.
-
Click OK.
To sort the displayed combinations
-
Right-click in the Combination List and then select Sort.
The Sort dialog box appears.
-
Click the required boxes in Columns Available for Sorting, and drag them to Sort Columns. Or double-click the required box in Columns Available for Sorting.
Note: This process can be reversed by dragging the boxes in the opposite direction. Or double-click in the Sort Columns list.
To sort in ascending order, make sure Ascending is checked. To sort in descending order, clear the box.
-
Click OK.
To delete a user-defined combination
You can delete a combination only if it is user-defined.
-
Click one or more user-defined combinations.
-
Right-click and then select Click Delete.
To search the combination list
-
Right-click in the Combination List and then select Find.
The Find dialog box appears.
-
Click the dimension to search from the Find Where dropdown list.
-
Enter text to search in the Find What field.
-
Select up or down in the Search dropdown box.
-
Click one or more from the following, if required:
-
Whole Word
-
Match Case
-
Online Search
-
-
Click Find Next.
Moving a Member
You can move a member within to a different parent member at the same level; for example, you can move a SKU to a different brand than the original brand. Remember that the next time data is imported, however, the member may be moved back to its original parent. Generally you should move a member only if you anticipate a change in the enterprise systems with which Oracle Demantra is integrated.
To move a member
-
Start Member Management, as described in Starting Member Management.
-
Display members of the level of interest. See Displaying Level Members.
-
Do either of the following:
-
In the Member Selection pane, drag the member to a new parent member.
-
In the Member Selection pane, right-click the member and select Cut Member. Then right-click the desired parent and select Paste Member.
-
-
Oracle Demantra prompts you to confirm the change. Click OK.
-
Click OK to save the change and close Member Management. Or click Cancel to discard the change and exit Member Management.
See also Copying a Member.
Copying a Member
You can copy and paste a member at the lowest level. This creates a user-defined member.
To cut or copy and paste a member
-
Start Member Management, as described in Starting Member Management.
-
Display members of the level of interest. See Displaying Level Members.
-
In the Member Selection pane, right-click the member of interest and then select Copy Member.
-
Right-click the member that should be the parent of the copy and then select Paste Member.
A confirmation message appears.
-
Click Yes to continue.
Oracle Demantra prompts you for a unique code and description for the new member. If this level has attributes, you can specify values for those as well.
-
Complete the fields and click OK.
Note: This change is immediate and cannot be canceled.
See also Moving a Member.
Renaming a Member
You can rename any member. Remember that the next time data is imported, however, the member name will be overwritten. Generally you should rename a member only if you anticipate a change in the enterprise systems with which Oracle Demantra is integrated.
To rename a member
-
Start Member Management, as described in Starting Member Management.
-
Display members of the level of interest. See Displaying Level Members.
-
Do one of the following in the Member Selection pane:
-
Right-click the member and then select Rename. Then type a new name for the member and click Enter.
Note: This change is immediate and cannot be canceled.
-
Right-click the member and then select Modify Member. Oracle Demantra displays the dialog box where you can change both the description (the name) and the code for this member. Make changes and then click OK.
Then click OK to save the change and close Member Management. Or click Cancel to discard the change and exit Member Management.
-
See also:
-
Moving a Member
-
Copying a Member
Deleting a Member
To delete a member
-
Start Member Management, as described in Starting Member Management.
-
Display members of the level of interest. See Displaying Level Members.
-
In the Member Selection pane, right-click the member of interest and then select Delete. This option is available only for user-defined members.
-
A confirmation dialog box appears.
-
-
Click Yes.
-
Click OK to save the change and close Member Management. Or click Cancel to discard the change and exit Member Management.
See also Member Status.