Database Tools
The Business Modeler provides a simple user interface for creating and modifying database tables that is useful during implementation.
This chapter covers the following topics:
- Creating a Table
- Modifying a Table
- Recompiling the Database Functions and Procedures
- Viewing the Procedure Error Log
- Wrapping Database Procedures
- Cleaning Up Temporary Tables
- Monitoring Oracle Sessions
- Index Adviser
Creating a Table
-
Log onto the Business Modeler as described in “Logging onto the Business Modeler”.
-
Click Tools > Database > Create Table.
-
In the Table Name field, type a name for the new table.
-
In the Column Name field, enter the name of a column in the new table.
-
In the Column Type field, enter the column type (one of the standard data types supported by the database).
-
If the selected column type contains a string of characters, select a width in the Width field.
-
In the Decimal field (if field is numeric), specify the number of positions that should appear after the decimal point.
-
In the Nulls field, specify whether this field is allowed to contain a null value.
-
If this field should be a primary key for this table, select the Primary Key check box.
-
When you have completed creating the field, click Add or press Tab to move to the next field. Repeat this process for any field you want to create for the table.
Note: To delete a field, select it and then click Delete. The field cannot be deleted after the table has been created.
-
When you have completed creating all the fields for the new table, click Create to create the table, and then click Close.
Modifying a Table
-
Click Tools > Database > Alter Table.
The Select Table dialog box appears
-
Double-click the name of the table you want to modify.
The Alter Table dialog box appears. Here, each row displays information about a field (column) of the table.
You can modify the white columns: Width; Dec (number of decimal points), and Primary Key.
-
To add a column, click Add and enter the required information, as described in “To create a table”.
-
To save modifications to the table, click Alter.
-
To close the dialog box, click Close.
To delete a column
-
Select the column.
-
Click Delete.
Note: A column cannot be deleted if you have modified it.
Recompiling the Database Functions and Procedures
To recompile the database functions and procedures
-
Log onto the Business Modeler as described in “Logging onto the Business Modeler.”
-
Click Tools > Recompile.
The database procedures and functions compilation dialog box appears.
-
(Optional) Click Show Error to view possible expression errors. Click Print to print the errors.
-
Click Close to close the dialog box.
Viewing the Procedure Error Log
The procedure error log enables you to see error messages produced by procedures. For each error message, it displays the date and time of the message, the procedure name, and the text content of the message.
To display the procedure error log
-
Log onto the Business Modeler as described in “Logging onto the Business Modeler.”
-
Click Tools > Procedure Error Log.
The Procedure Error Log screen appears. The most recent errors are displayed first.
To display an error message
-
Select an error from the procedure name and date list.
The error message appears in the error message pane.
To sort the list
-
Right-click the list and then select Sort.
The sort screen appears.
-
To determine how the items will be sorted, click one or more required boxes in Columns Available for Sorting, and drag them to Sort Columns, or double-click the required boxes in Columns Available for Sorting.
To reverse this process drag a box in the opposite direction, or double-click a box in Sort Columns.
-
To specify an ascending sort order, make sure Ascending is checked. For a descending order, clear the box.
-
Click OK.
To find an item in the list
-
Right-click the list and then select Find.
-
In the Find where box, select the type of element to find.
-
In the Find what box, type the text you want to find.
-
In the Search box, select Up or Down to specify the direction of the search.
-
(Optional) Select one or more of the check boxes:
-
Whole Word: Search for the exact match of a word.
-
Match Case: Search for the exact match of a word (case sensitive).
-
On Line Search: For immediate search results (even if only part of a word has been entered in the Find what box).
-
-
Click Find Next to begin (or continue) searching.
To filter the list
-
Right-click the list and then select Filter.
The filter screen appears.
-
Select the required Column, Operator and Value.
-
(Optional) To add additional criteria, select the required Logical operator and click Add.
-
Click OK.
To copy the error message to the clipboard
-
Click Copy.
To clear (truncate) the list
-
Click Truncate.
A warning message appears.
Caution: The truncate action cannot be reversed.
-
Click Yes to confirm the action.
To refresh the list from the database
-
Click Refresh.
To close the Procedure Error Log screen
-
Click Close.
Wrapping Database Procedures
So that you can more easily locate and resolve problems, the database procedures are provided in unwrapped form. When you go live, it is required that you wrap the procedures and compile them in wrap mode into the database.
To wrap the database procedures
-
Search the Demantra installation directory for a file called wrap30.bat. The location depends on which database you are using.
-
Create a directory, for example, wrap.
-
Inside this folder, create two subdirectories called, for example, source and target.
-
Copy this file into the folder:
-
Copy the database procedures into the source folder.
-
From the command line, execute the following command:
wrap30 source_dir target_dir
For example: wrap30 source target
After the execution is finished, the wrapped file will be in the target folder.
-
In the database, replace the unwrapped procedures with the new wrapped ones.
Cleaning Up Temporary Tables
Demantra provides an option for deleting its temporary tables.
To clean up tables
-
Log onto the Business Modeler as described in “Logging onto the Business Modeler.”
-
Click Tools > Maintain > Tables Cleanup.
The Tables Clean Up dialog box appears, listing the Demantra temporary tables.
-
Click the appropriate check boxes for the tables you want to delete, and then click Delete.
Monitoring Oracle Sessions
The Oracle Sessions Monitor enables you to monitor Oracle sessions and their status.
To monitor the Oracle sessions
-
Log into the Business Modeler.
-
Click Tools > Oracle Sessions Monitor.
The Oracle Sessions Monitor window appears.
-
Here, do any of the following:
-
To sort or filter sessions, right-click and then select the appropriate command from the pop-up menu.
-
To select all sessions, right-click and then click Select All.
-
To delete a session, right-click the session and then click Delete.
-
To terminate a session, select a session, and then click Kill a Session.
-
Index Adviser
The Index Adviser is a tool that automatically analyzes a Demantra database schema and recommends what indexes should be added in order to optimize the performance of the Worksheets Run and Filter Executions (in the Worksheet wizard).
The following procedure shows an example of how the tool could be used.
-
Access the program in your browser from the following url:
http://localhost:8081/demantra/admin/indexAdvisor.jsp
-
Log in (e.g. as dm/dm)
-
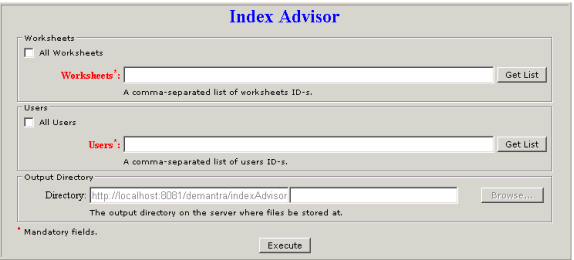
The Index Adviser screen appears:
-
Click ‘Get List’ in the ‘Worksheets’ section to display all worksheets.

-
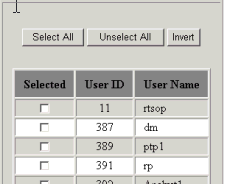
From the Index Adviser screen, click ‘Get List’ in the ‘Users’ section to display all users below the Index Advisor screen.
-
Select one or more users and worksheets.
-
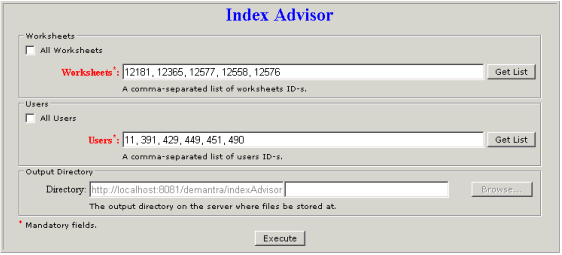
7. After selecting a set of Users and Worksheets, their corresponding UserIDs and WorksheetIDs appear in the Index Advisor screen, as shown below.
-
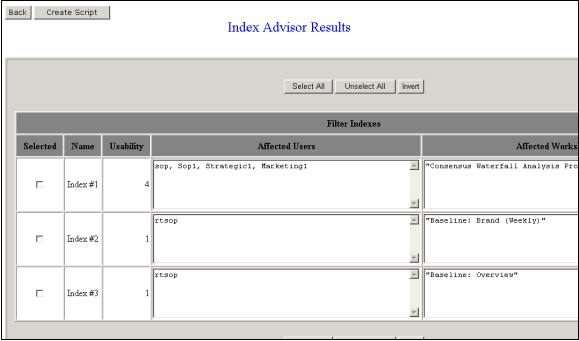
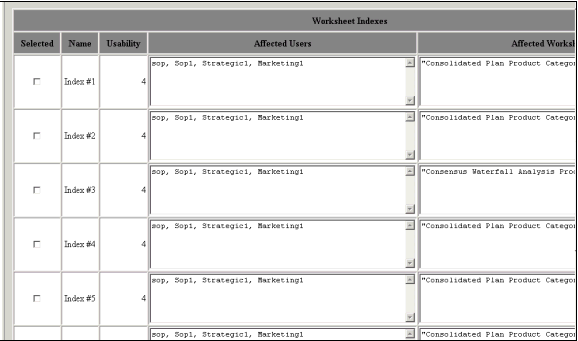
Click Execute. The schema is analyzed and the following Results page is displayed. This page shows Filter Indexes and Worksheet Indexes.
-
Check at least one index from the Filters (Users) or Worksheet Indexes, and click Create Script. An SQL script is generated for adding indexes to the schema. From this page click Open/Download to save the result to a file or to open an editor for viewing and modifying the script.
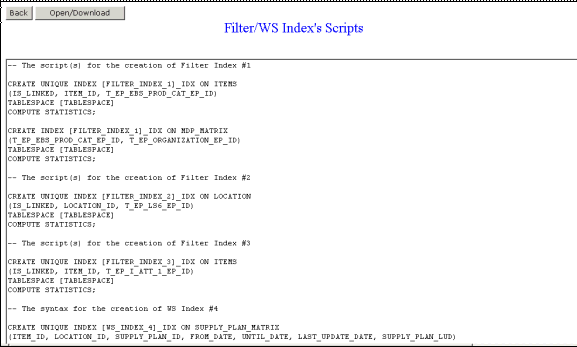
The DBA can refer to the report to manually create all or a sub-set of the recommended indexes in the database.