Managing Workflows
This chapter describes how to use the Workflow Manager to start, stop, and view workflow instances and to manage schema groups.
This chapter covers the following topics:
- Viewing Workflow Status
- Starting Workflow Instances
- Scheduling Workflow Instances
- Stopping Workflow Instances
- Creating or Editing a Schema Group
- Deleting a Schema Group
- Viewing the Workflow Process Log
- Recovery and the Workflow Engine
- Web Services for Demantra Workflows
Viewing Workflow Status
You can view all the status of all public workflow schemas and all private workflow schemas that you created. This means that you can see how many instances of those schemas are running, as well as the status of each instance.
To view overall status of the workflows
The Workflow Manager displays the overall status information for the workflows, for the currently selected schema group (All in this case).
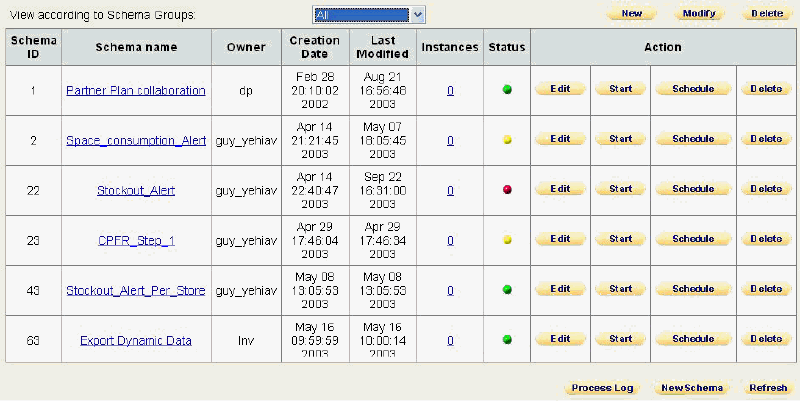
Each row corresponds to a workflow schema. The Instances column indicates how many instances of this workflow schema are currently running, if any. The Status column uses the following color codes:
| Green | The workflow schema is live and you may execute it, creating a workflow instance. |
| Red | The workflow schema is archived and cannot be executed. |
| Yellow | There is a data error or other fault within this schema. |
To specify which workflow schemas to display
-
To see all workflow schemas, select All in the Schema Groups drop-down list. Then click View.
-
To see a subset of the schemas, select a group in the Schema Groups drop-down list. Then click View.
To refresh the display
-
Click Refresh.
To view the currently running instances of a schema
-
If the workflow schema is not visible, use the drop-down menu and select the name of a schema group to which it belongs. Or select All.
-
Click the Instances link in the row corresponding to that workflow.
The Workflow Manager lists all the instances of that schema that are currently running.

-
When you are done, click Back.
See also
“Logging into the Workflow Manager”
“Viewing the Workflow Process Log”
Starting Workflow Instances
You can start an instance of any public workflow schema or any private workflow schema that you created.
To start a workflow instance
-
If the workflow schema is not visible, use the drop-down menu and select the name of a schema group to which it belongs. Or select All.
-
Click Start next to the schema that you want to start.
The Workflow Engine starts an instance of the workflow and increments the number of instances in the Instances column by one.
Note: Although you can generally run as many instances of a workflow as you want at the same time, be careful not to activate conflicting processes and tasks.
See also
“Logging into the Workflow Manager”
“Stopping Workflow Instances”
“Creating Workflows”
Scheduling Workflow Instances
If you are the owner of a workflow, you can schedule an instance to start at a specific time or times. If you are not the owner, you cannot schedule it, although you can start it manually, as described in “Starting Workflow Instances”.
To schedule a workflow instance
-
If the workflow schema is not visible, use the drop-down menu and select the name of a schema group to which it belongs. Or select All.
-
Click Schedule in the row corresponding to that workflow.
The system displays the Schema Scheduler page, which lists all the times when Workflow Engine will start an instance of this schema.
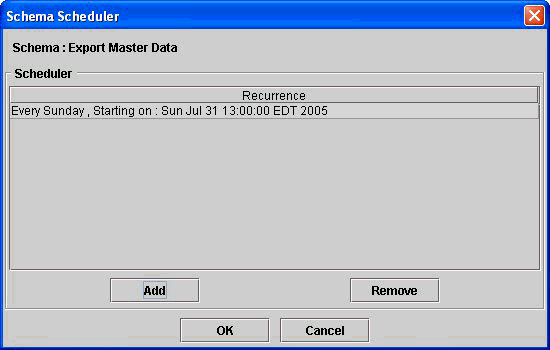
-
Click Add.
The system displays the following page.
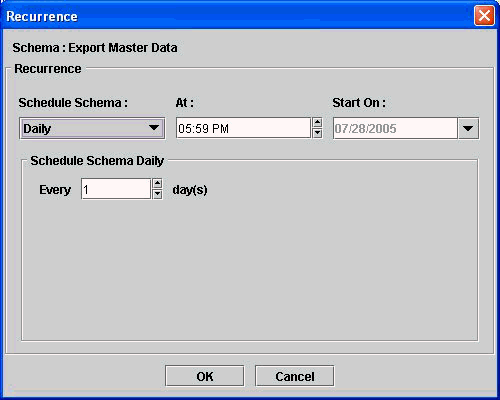
-
In the Schedule Schema drop-down list, select the option that specifies how often to start an instance of this workflow:
-
Daily
-
Weekly
-
Monthly
-
Once
-
At Startup (This option launches the workflow whenever the Web server is started.)
-
Periodic (in this option, you can start a workflow at periodic intervals (measured in seconds, minutes, hours, days, weeks, months, or years. Note that you cannot choose the starting time.)
Depending on the choice you make here, the system displays additional scheduling options in the bottom part of the page.
-
-
In the rest of the page, finish specifying the schedule.
-
Click OK.
To unschedule a workflow instance
-
On the Workflow Management page, click Schedule in the row corresponding to that workflow.
The system displays the Schema Scheduler page. This page displays one row for each scheduling entry for this workflow.
-
Click the row corresponding to the scheduling entry you want to remove.
-
Click Remove.
See also
“Starting Workflow Instances”
“Stopping Workflow Instances”
Stopping Workflow Instances
You can stop any workflow instance that you started. You cannot stop a workflow instance started by another user.
To stop a workflow instance
-
If the workflow schema is not visible, use the drop-down menu and select the name of a schema group to which it belongs. Or select All.
-
Click the number in the Instances column that corresponds to that workflow.
The system lists all the instances of that schema.
Note: Instances that show in red are instances of Fail-To-Execute Step steps. For more information, see “Fail-To-Execute Step”.
-
Click Terminate next to the instance that you want to stop.
-
Click OK.
The instance is stopped and is removed from the list of instances.
Note: Terminate stops only the workflow instance itself. It does not cancel any work that the instance may have initiated (such as tasks that were sent or requests placed in the Simulation Engine or Business Logic Engine queues). These items must be cancelled manually.
See also
“Creating Workflows” “Starting Workflow Instances”
“Scheduling Workflow Instances”
Creating or Editing a Schema Group
Schema groups affect only the display within the Workflow Manager. A schema can belong to multiple groups. Also, a schema group can be public (viewable by all users who log into Workflow Manager) or private (viewable only by you).
You can edit any schema group that you created; this has no effect on the workflow schemas themselves. You cannot edit schema groups created by other users.
To create or edit a schema group
-
On the Workflow Management page, do one of the following:
-
To create a new schema group, click New at the top of this page.
-
To edit a schema group, select the group from the drop-down list at the top of this page. Then click Modify.
The Workflow Manager displays the following page:
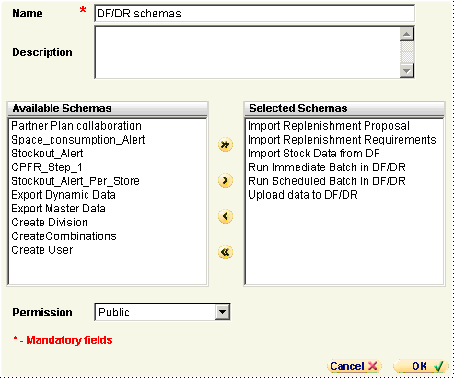
-
-
For Name, type a unique name for this schema group.
-
For Description, type an optional description.
-
Specify the workflow schemas to include in this group. To do so, move schemas from the left list to the right list.
-
For Permission, click Public or Private, depending on whether you want other users to be able to see this schema group.
-
Click .
See also
“Creating Workflows”
Deleting a Schema Group
You can delete any schema group that you created; this has no effect on the workflow schemas themselves. You cannot delete schema groups created by other users.
To create or edit a schema group
-
On the Workflow Management page, select the group from the drop-down list at the top of this page.
-
Click Delete.
-
Click OK to confirm the deletion.
Viewing the Workflow Process Log
The workflow process log displays information on all the workflow instances that have run or that are running.
To view the process log
-
On the bottom of the Workflow Management page, click Process Log.
The Process Log page appears.
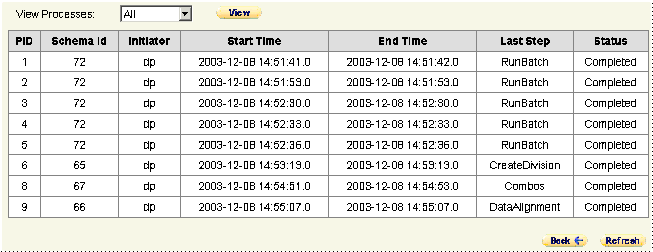
To filter process log entries
-
Select the required filter from the View Processes drop-down menu.
-
Click View.
The filtered processes are shown.
See also:
“Viewing Workflow Status”
Recovery and the Workflow Engine
Each time it starts up, the Workflow Engine checks to see if there are any workflow instances that are running, that is, an instance whose status is not completed or terminated. For each instance that is currently running, the engine performs a recovery procedure.
An instance is considered to be in mid-step and therefore running, even when it is between steps. The current step is the last step that was running when the crash happened.
For information on standard workflow messages, see “Tips and Troubleshooting”.
Web Services for Demantra Workflows
A Demantra workflow can be called as a web service. There are four methods available (see Web Service Methods below for detailed explanations of each):
-
GetWFProcessStatus
-
RunWFProcess
-
RunWFProcessWithContext
-
TerminateWFProcess
Note: The workflow web service runs only on the Oracle Application Server and WebLogic.
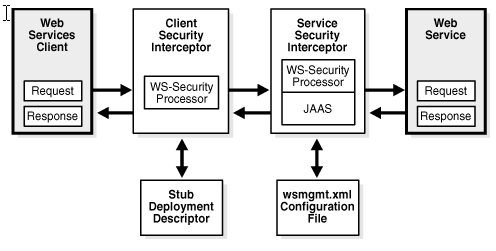
Web Service Architecture
Demantra's Web Service is developed to align with the Oracle Application Server WS architecture. The following diagram illustrates the overall architecture of WS-Security architecture for the Oracle Web service stack.
Web Services Library Overview
The following tables identify the methods and parameter types for calling Demantra web services.
| Name: | Demantra Workflow Web Service name=”MSC_WS_DEMANTRA_WORKFLOW” |
| Description: | Provides web services interface for the activation/termination and monitoring of Workflow processes. |
| WSDL: | http://localhost/demantra/MSC_WS_DEMANTRA_WORKFLOWSoapHttpPort |
| Last Modified: | January 2008 |
Class Descriptions
| Dictionary | Description: | This class contains an implementation of a Dictionary, which hold an array of Entries. Each Entry contains Key, Value, and Type. This Dictionary will be used for the WF Process, and will be a part of a Web Service implementation. |
| Type: | Complex Type | |
| Required: | No | |
| Default: | No | |
| Entry | Description: | This class represents an Entry object that contains a Key that points to a specific Value. This object will be used in the WF Process as part of the Web Service implementation, and will hold Attributes, Levels, Members, Population, Dates, etc. Always assume case sensitivity. |
| Type: | Complex Type | |
| Required: | No | |
| Default: | No | |
| key | Description: | The key is a member attribute of the Entry it is a unique identifier (hash). |
| Type: | string | |
| Required: | Yes | |
| Default: | No | |
| numericValue | Description: | A numeric value variable that may be contained in the Entry; will usually hold level attribute values. |
| Type: | Double | |
| Required: | No | |
| Occurrence: | Minimum 0 Maximum 1 | |
| populationValue | Description: | A population descriptor that may be contained in the Entry. |
| Type: | Population | |
| Required: | No | |
| Occurrence: | Minimum 0 Maximum 1 | |
| dateValue | Description: | A date value that may be contained in the Entry; will usually hold level attribute values. |
| Type: | dateTime | |
| Required: | No | |
| Occurrence: | Minimum 0 Maximum 1 | |
| stringValue | Description: | A string value that may be contained in the Entry; will usually hold level attribute values. |
| Type: | String | |
| Required: | No | |
| Occurrence: | Minimum 0 Maximum 1 | |
| booleanValue | Description: | Boolean value used for the internal parameter in our application which needed inside the process (e.g. - a flag that indicates whether we need to create new combinations, in new member step) |
| Type: | Boolean | |
| Required: | No | |
| Occurrence: | Minimum 0 Maximum 1 | |
| Population | Description: | This class holds a Population object that will be used for the Web Service implementation. The Population contains Dates (range from-until) and Filters (level-members). |
| Type: | Complex Type | |
| Required: | No | |
| Default: | No | |
| fromDate | Description: | This element is the start date of the population date range. |
| Type: | dateTime | |
| Required: | Yes | |
| Default: | No | |
| untilDate | Description: | This element is the end date of the population date range. |
| Type: | dateTime | |
| Required: | Yes | |
| Default: | No | |
| levelIds | Description: | This element represents the array of level ids that define the dimensions of the population. Each element in this array corresponds to LevelMembers held in memberIds. |
| Type: | int | |
| Required: | Yes | |
| Occurrence: | 1 to unbound | |
| memberIds | Description: | In this complex object we finally hold the members of the population related to selected population dimensionality. |
| Type: | LevelMembers | |
| Required: | Yes | |
| Occurrence: | 1 to unbound | |
| LevelMembers | Description: | This class holds an array of Member Ids that will be used for the Web Service implementation - these Members related to a Level and are part of a Population Object. |
| Type: | Complex Type | |
| Required: | No | |
| Default: | No | |
| members | Description: | Array of Member Ids that will be used for the Web Service implementation - these Members related to a Level and are part of a Population Object. |
| Type: | int | |
| Required: | Yes | |
| Occurrence: | 1 to unbound |
Method Details
RunWFProcess
| Description: | Run a Workflow Schema. This will be the same like Starting a WF Process via the Workflow Page. WF Schema Name is Case Sensitive. | ||||||||||||||||
| Access: | remote | ||||||||||||||||
| Return Type: | long | ||||||||||||||||
| Output: | None | ||||||||||||||||
| Implemented In: | com.demantra.common.webServices.workflow.WorkfloServices | ||||||||||||||||
| Arguments: |
|
RunWFProcessWithContext
| Description: | Retrieve a query object of the posts to blogs specified. Maximum of 50 records returned. WF Schema Name is Case Sensitive. | ||||||||||||||||||||||||
| Access: | remote | ||||||||||||||||||||||||
| Return Type: | long | ||||||||||||||||||||||||
| Output: | false | ||||||||||||||||||||||||
| Implemented In: | com.demantra.common.webServices.workflow.WorkfloServices | ||||||||||||||||||||||||
| Arguments: |
|
GetWFProcessStatus
| Description: | Returns the current Status and Step Name of the WF Process. e.g. - 1. Process Active [ImportSKU]. 2. Process Terminated [RunWS]. 3. Process Completed [ExportSKU]. | ||||||||
| Access: | remote | ||||||||
| Return Type: | String | ||||||||
| Output: | false | ||||||||
| Implemented In: | com.demantra.common.webServices.workflow.WorkfloServices | ||||||||
| Arguments: |
|
TerminateWFProcess
| Description: | Terminate the current (identified by process ID) Active WF Process.. | ||||||||
| Access: | remote | ||||||||
| Return Type: | No | ||||||||
| Output: | false | ||||||||
| Implemented In: | com.demantra.common.webServices.workflow.WorkfloServices | ||||||||
| Arguments: |
|
Integration with JAAS
OracleAS Web Services provides an implementation of Java Authentication and Authorization Service (JAAS) for J2EE applications that is fully integrated with J2EE declarative security. This allows Demantra to take advantage of the JAAS constructs such as principal-based security and pluggable login modules. OracleAS Web Services Security provides out-of-the-box JASS authentication login modules that allow J2EE applications running on OracleAS Web Services to leverage the central security services of Oracle Identity Management.
The JAAS Provider ensures secure access to and execution of Java applications, and integration of Java-based applications with Oracle Application Server Single Sign-On.
Demantra has implemented a custom login module that is deployed in the OracleAS.
Configuring the Security Provider of the Application Server
Demantra has implemented a custom login module that is deployed in the OracleAS. The following procedure configures the application server to use this login module:
-
Connect to Oracle Enterprise Manager.
-
Deploy Demantra
-
Define Security Provider as follows:
-
Select – 'Administration' -> 'Security Providers' (by Go to Task) -> 'demantra' application -> edit (demantra) -> 'Change Security Provider'.
-
In the Drop Down of 'Security Provider Type', select 'Custom Security Provider'.
-
In the 'JAAS Login Module Class' field, set 'com.demantra.common.authentication.DemantraLoginModule'.
-
Click OK.
Note: This step can be done only through a deployment of the Demantra application
-
-
Return to the Home Page and select 'Web Service'.
-
If no web services are found, open the link of the WF Web Service: http://(ROOT)/demantra/MSC_WS_DEMANTRA_WORKFLOWSoapHttpPort
-
Then refresh the Enterprise Manager page.
-
Click on the link: MSC_WS_DEMANTRA_WORKFLOWSoapHttpPort.
-
Select 'Administration' -> 'Enable/Disable Features'
-
Move 'Security' to the 'Enabled Features' box and then click OK.
-
Make sure that the 'Security' Feature is marked as Enabled.
-
-
On the same page, select the 'Edit Configuration' icon of the 'Security' Feature, Press the 'Inbound Policies' button, and in the 'Authentication' tab, mark the checkbox 'Use Username/Password Authentication' and select 'Password Type' = 'Plain Text'. Click OK.
-
Test the Workflow Web Service by providing User Name & Password in the WS-Security section.
Details of the Demantra custom login module
Location: package com.demantra.common.authentication;
DemantraLoginModule.java
Methods
-
public void initialize(Subject subject, CallbackHandler callbackHandler, Map sharedState, Map options)
Initialize this LoginModule.
Parameters:
subject the Subject to be authenticated.
callbackHandler a CallbackHandler for communicating with the end
user (prompting for usernames and passwords, for example).
sharedState shared LoginModule state.
options options specified in the login Configuration for this particular LoginModule.
-
public boolean login() throws LoginException
Authenticate the user by prompting for a username and password.
Returns: true if the authentication succeeded, or false if this LoginModule should be ignored. Throws:
FailedLoginException if the authentication fails.
LoginException if this LoginModule is unable to perform the authentication.
-
public boolean commit() throws LoginException
This method is called if the LoginContext's overall authentication succeeded (the relevant REQUIRED, REQUISITE, SUFFICIENT and OPTIONAL LoginModules succeeded).
If this LoginModule's own authentication attempt succeeded (checked by retrieving the private state saved by the login method), then this method associates a Principal with the Subject located in the LoginModule. If this LoginModule's own authentication attempted failed, then this method removes any state that was originally saved.
Returns: true if this LoginModule's own login and commit attempts succeeded, or false otherwise.
Throws: LoginException if the commit fails.
-
public boolean abort() throws LoginException
This method is called if the LoginContext's overall authentication failed. (the relevant REQUIRED, REQUISITE, SUFFICIENT and OPTIONAL LoginModules did not succeed).
If this LoginModule's own authentication attempt succeeded (checked by retrieving the private state saved by the login and commit methods), then this method cleans up any state that was originally saved.
Returns: false if this LoginModule's own login and/or commit attempts failed, and true otherwise.
Throws: LoginException if the abort fails.
-
public boolean logout() throws LoginException
Logout the user.
This method removes the Principal that was added by the commit method.
Returns: true in all cases since this LoginModule should not be ignored.
Throws: LoginException if the logout fails.