Using the Data Model Wizard
This chapter describes how to use the Data Model Wizard.
This chapter covers the following topics:
- About the Data Model Wizard
- Before Using the Data Model Wizard
- Getting Started with the Data Model Wizard
- Describing the Staging Tables
- Specifying the Structure of the Staging Tables
- Joining Multiple Source Files or Tables
- Defining the Minimal Required Data Model
- Declaring the Sales Date
- Declaring the Sales Quantity
- Defining an Item Level and a Location Level
- Saving the Data Model
- Defining Additional Elements
- Declaring the Unit Price
- Defining a Unit of Measure
- Adding Higher Levels
- Adding Level Attributes
- Defining Other Values
- Impacts of Changing Levels, Series, and Units
- Navigating the Data Model
- Building the Data Model
- Loading the Data into the Data Model
- Manipulating Existing Data Models
About the Data Model Wizard
The Data Model Wizard helps you perform the following related tasks:
-
Describe the lowest item level and lowest location level in the system
-
Specify which data fields to use as the sales date and quantity
-
Specify the base time bucket in the system
-
Define additional levels of type item, location, or combination
-
Define series
-
Define units of measure and other elements of the data model
-
Create the EP_LOAD_MAIN procedure, which loads data into the data model from staging tables or from files, according to your choice.
Note: Some of these tasks can be performed elsewhere in the Business Modeler. The Data Model Wizard, however, is the only tool that lets you specify certain basics such as the sales date, and quantity, and base time bucket.
Before Using the Data Model Wizard
Before you use the Data Model Wizard, be sure to do the following:
-
Read the “Levels” Chapter and make sure you understand the basic data requirements of Demantra.
-
Obtain some sample data for items, locations, and sales. Make sure that this data contains all the codes needed to define the desired item and location levels. This data can be in the form of either text files or database tables:
-
If you use text files, the files must be either comma-delimited or tab-delimited.
-
If you use database tables, create these tables before you start the wizard. These tables must be in the same database user as the Oracle database.
-
-
Carefully plan the levels you will configure.
Caution: Because the Data Model Wizard automatically removes any levels that are not defined within the wizard, you generally use the wizard only at the start of the implementation process.
In some cases, you use database setup scripts instead of the Business Modeler. See “Configuring Promotion Effectiveness”, “Configuring DSM”, and “Configuring Promotion Optimization for PTP”.
Getting Started with the Data Model Wizard
A new data model can be based on an existing template or on an empty template. Note that a data model cannot be converted into a template.
To start to build the data model
-
Click Data Model > New Data Model.
The Create Data Model/Template screen appears.
-
Click the Data Model or Template button radio button.
-
Click OK.
-
Click Next.
The wizard prompts you for basic information about this data model.
-
Specify a unique name and an optional description.
-
Click Next.
The wizard prompts you to specify the time unit for this data model.
-
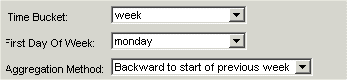
For Time Bucket, select one of the following base time units: Day, Week, or Month.
-
If you selected Weekly, fill in the other fields as follows:
Note: The settings you choose here also apply to integration. See “Series and Level Integration”. Note that the Data Model Wizard is the only place where you can specify these settings.
-
Click Next.
The wizard next prompts you for information about the source data. See “Describing the Staging Tables”.
Describing the Staging Tables
If your sources are text files, the Data Model Wizard helps you map them into staging tables. If your sources are database tables, your tables are the staging tables. In either case, the wizard helps you describe the contents of the staging tables so that you can build a model on them.
To describe the staging tables
-
In the Select Source Combination dialog box, you specify the number of source tables or files that you will use, as follows:
Single Table Contains sales, items, and locations in a single file. Two Tables Contains sales and locations in the first file and items in the second file. Three Tables Contains sales, locations, and items in three separate files. -
Click Next.
The Data Model Wizard now displays the Tables or Text Files as Sources dialog box.
-
Specify whether the source data is in tables or text files:
Oracle Tables Click if the data is in database tables. Text Files Click if the data is in text files. -
Click Next.
-
The next step depends on whether the data is in the database or in text files:
-
If the source data is in the database, the wizard now displays the Choose User Defined Source Tables dialog box. This dialog box varies, depending on the number of source tables you specified. The tables shown in drop-down lists depend on what you have previously loaded into the Demantra database.
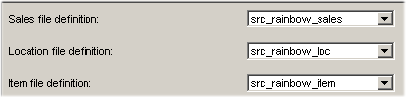
For example, if your source is in three tables, fill in the fields as follows and then click Next:
Sales file definition Select the file where the sales history data is stored. Location file definition Select the file where the location data is stored. Item file name Select the table where the item data is stored. -
If the source data is in files, the wizard now prompts you for information about the format of those files, and how to map the data into database staging tables. See “Specifying the Structure of the Staging Tables”.
-
-
The next step depends on whether you specified multiple sources:
-
If you specified multiple tables or files, you must specify how to join them. See “Joining Multiple Source Files or Tables”.
-
If you specified only a single table or file, you are ready to define the data model. See “Defining the Minimal Required Data Model”.
-
Specifying the Structure of the Staging Tables
If you specified two or three tables or files, the wizard displays the Text File dialog box. Here, you describe each text file you are going to import, as well as the staging table that corresponds to that file. If you are using multiple source files, the wizard prompts you for information for each one, in a specific order.
To specify the structure of the staging tables
-
Read the title bar of the dialog box to make sure you know which data you are mapping. For example, if the wizard is expecting item data, the title includes “item.”
-
In the upper part of the dialog box, describe the source file that you are using for this data, as follows:
-
In the lower part of the screen, define the table structure of the table you are defining in the staging area. To add a new entry to this information, right-click and then click Add. Fill in the details of the table structure as follows:
Name Field name Type Data type for this field; specify one of the data types supported by the database. Width Maximum width of field Dec Decimal point Default The default value of the field if it is null in the source data. Null Click yes to allow field value to be null. From Position Use if Fixed was selected as the Delimiter Type. This is the position in the source text file where the field starts. To Position Use if Fixed was selected as the Delimiter Type. This is the position in the source text file where the field ends. Const Constant column width. If selected, the From Position and To Position fields are disabled for editing. -
When you are done describing this source file and its corresponding staging table, click Next. If you are using multiple source files, Business Modeler displays a similar dialog box where you specify the next source file.
-
The next step depends on whether you specified multiple sources:
-
If you specified multiple tables or files, you must specify how to join them. See “Joining Multiple Source Files or Tables”.
-
If you specified only a single table or file, you are ready to define the data model. See “Defining the Minimal Required Data Model”.
Note: This dialog box provides the following additional options:
-
The Create Load Batch button creates a batch file that will load the table. This button is only present in certain installations of the Business Modeler.
-
The Table Syntax button displays the SQL syntax used by the database and the Business Modeler to create the table in the staging area. Only experienced consultants should use this feature.
-
If you are using an Oracle database, Demantra uses the SQL*Loader tool (from Oracle) to load data. The Click CTL Syntax button displays the control file used by SQL*Loader. Only experienced consultants should use this feature.
-
Joining Multiple Source Files or Tables
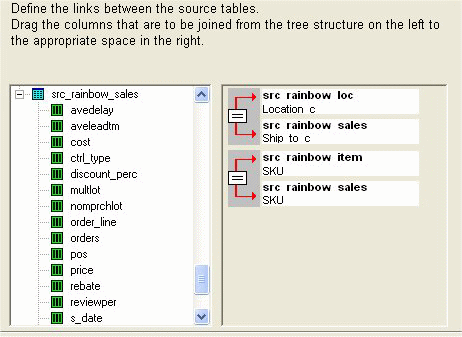
If you specified two or three tables or files, the wizard displays the Join Sources dialog box. By defining the joins, you implicitly specify the primary keys in the data.
-
For the first table or file to be joined, drag a field name from that table or file (on the left) to a blank space in the empty join structure on the right.
-
For the other field or file to be joined, drag a field name from the other table or file (on the left) to the remaining blank space in the join structure.
-
If you specified three tables or files as the source, you must create an additional join. To do so, right-click the right side of the dialog box and click New.
A new, empty join appears in the right side.
In the same way that you defined the previous join, create a join between the sales table and the remaining, non joined table.
Note: While you are defining these joins, it may be helpful to toggle between the table descriptions and the table names. To do so, click the toggle button Show Table Description or Show Table Name.
The result might look like this:
-
Click Next. The wizard now helps you define the data model. See “Defining the Minimal Required Data Model”.
Defining the Minimal Required Data Model
This section describes how to define enough of the data model so that you can save it for future work. Here you will declare the sales date and actual quantity, and you will define an item level and a location level; you can define these four things in any order. The following shows an example.

In this stage, you specify how to use the fields in the staging tables, generally using each field in a level definition or in a series definition.
Note: Demantra imports only the fields that you specify how to use.
Declaring the Sales Date
To declare the sales date
-
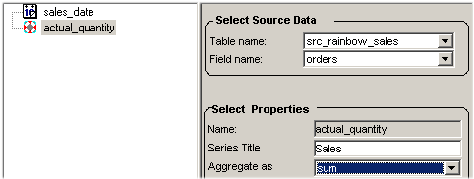
In the left box, right-click and then click Create Sales Date.
-
Select the table and field that contains the sales date for any given sale.
For example, in src_rainbow_sales, the s_date field might contain the sales date for each sales record.

Declaring the Sales Quantity
To declare the sales quantity
-
In the left box, right-click and then click Create Sales Quantity.
-
Select the table and field that contains the item quantity for any given sale. For example, in src_rainbow_sales, the orders field might contain the sales quantity for each sales record.
-
In Series Title, specify a user-friendly name for this series.
-
For Aggregate as, select the function to use when aggregating multiple records.
Defining an Item Level and a Location Level
The data model must include at least one item level and one location level. The first levels you define should be at the lowest desired level of aggregation. The lowest item level usually corresponds to specific SKUs, and the lowest location level usually corresponds to specific stores or ship-to locations.
To define an item or location level
-
In the left box, right-click and then click Create Location Dimension or Create Item Dimension.
-
Then specify the level as follows:
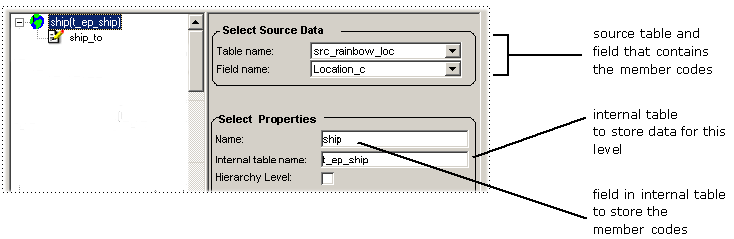
-
In the Table Name field, click a source table from the drop-down list.
-
In the Field Name field, click the field within that source table that stores the unique codes that distinguish the members of this level.
-
In the Name field (in the Select Properties area), type a unique name of this level, for internal use.
Demantra automatically uses this as the basis for the Internal table name, which is the table in which Demantra will store information for each member of this level. Within this table, the member codes will be stored in a field whose name is the Name that you specified.
-
-
In the left box, right click the level and then click Create Description.
-
Specify the level description as follows:
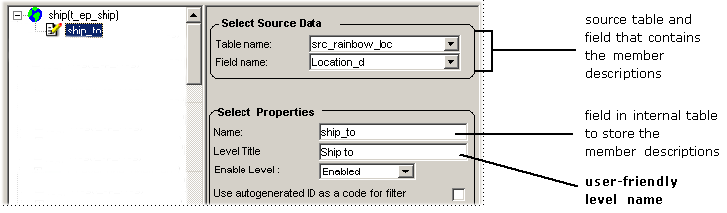
-
For Table Name, select the same table.
-
In Field Name, select the field that stores the descriptions of the members of this level.
If the source data does not include a specific field that you can use as the member descriptions, then just use the field that stores the member identifiers.
-
In Level Title, type the name of this level, as it should be shown in the user interfaces.
-
In Enabled Level, specify whether you want the level to be disabled. If the level is disabled, it is effectively removed from the data model. However, it can be reactivated if required later.
-
To use the internal, autogenerated ID as the code display field, click the check box Use auto generated ID as code for filter. Otherwise, Demantra uses the code field as the code display field.au
-
Saving the Data Model
After defining the minimum required data model, you can save all the work that you have done within the Data Model Wizard. You can return and continue work later.
To save the data model
-
Click Save.
-
To exit the Data Model Wizard now, click OK. You can return later and continue your work.
Defining Additional Elements
This section describes how to define additional elements of the data model.
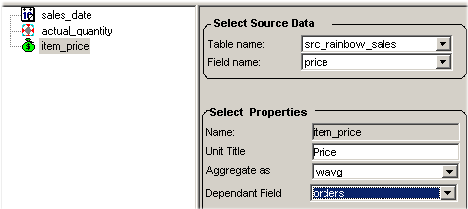
Declaring the Unit Price
The price per item is generally different at different locations and over time.
To declare the unit price
-
In the left box, right-click and then click Create Item Price.
-
For Table Name and Field name, select the table and field that contains the unit price for an item, at a given location and time. For example, in src_rainbow_sales, the orders field might contain the sales quantity for each sales record.
-
For Unit Title, optionally modify the title, whose default is Price.
-
For Aggregate as, select the function to use when aggregating the price of multiple items.
-
If you selected wavg (weighted average), then specify a weight to use. For Dependent Field, select a field within the same table that Demantra should use as the weights.
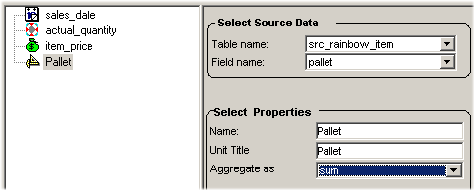
Defining a Unit of Measure
When you define a unit, you specify a set of conversion factors for that unit. The conversion factors can be different for different items.
Note: There must be a one-to-one relationship between the unit values and the members in the level where the unit is configured.
To define a unit
-
In the left box, right-click and then click Create Unit.
-
For Table Name and Field name, select the table and field that contains the conversion factor for this unit, for each item. For example, in src_rainbow_item, the pallet field might contain the conversion factor for each item.
The conversion factor for a unit X should give the number of Xs per base unit. For example, for a given SKU if a pallet consists of 100 items, then src_rainbow_item.pallet should be 0.01 for that SKU.
-
For Aggregate as, select the function to use when aggregating the unit count of multiple sales. You usually use Sum.
See also
“Configuring Units”
Adding Higher Levels
Note: As you define levels, it is important to consider what sort of forecast tree you will need, as described in “Configuring the Forecast Tree”
To create a higher level
-
Right-click the level to which you want to add a higher level. Note that any level can have multiple parent levels.
-
Click Create Relation.
-
Specify the following items:
Table Name Select a source table from the drop-down list Field Name Select the field within that source table that stores the unique identifiers for members of this level. Name Specify a unique name of this level, for internal use. As before, Demantra automatically creates a name for the internal table associated with this level.
-
Create a description for this dimension.
See also
“Creating a Level”
Adding Level Attributes
You can store additional level-specific information as attributes. Any number of attributes can be added to a level. Each attribute name must be unique within a given level. To view attributes of a member, the user can right-click the member within the Members Browser of a worksheet or in the Collaborator Workbench.
To create level attributes
-
In the left box, right-click a level and select Create Attributes.
-
Complete the fields as follows:
Table name Table in which attribute data is stored. This should be the source table for this level. Field name Field in table that stores this attribute. Name Unique internal name for this attribute. Attribute Title User-friendly name for this attribute. See also
Adding Attributes to a Level
Defining Other Values
A value can be a causal factor or a data series.
To define a value
-
In the left box, right-click and then click Create Value.
-
Select the value item, and then give the value a field name, a name, and a series title.
Impacts of Changing Levels, Series, and Units
This section describes the impact of adding, removing, or modifying levels, series, and units.
For more information about building or updating a model, see Building the Data Model.
Adding a Level
Consultants can add a 'Parentless' level only, in other words, they can add a parent level to an existing level or new branch only. Adding mid-tier levels is not an explicitly supported scenario. Levels can be renamed accordingly to reflect the insertion of a new level between existing levels. See "Creating a New Intermediate Level".
When a new level is created, the upgrade process:
-
Creates default methods for this level including New, Edit, Delete, View
-
Add this level to loading procedures
-
Adds a line to the upgrade log file: 'Level XXX added to model'.
For more information about upgrading a model by adding parent levels, see Creating a New Top Level.
Removing a Level
When a level is removed, any parent levels are also removed. The upgrade script:
-
Adds a line to the upgrade log file: 'Level XXX removed from model'
-
Regarding series on a removed level:
-
If the upgrade mechanism leaves the series in the model, in other words, the series is not deleted, the series is listed in the log file as needing reconfiguration. The upgrade log states:
Series YYY refers to level XXX. Please reconfigure.
This message appears after and indented from the ‘Level XXX removed from model’ message.
All worksheets, workflows, integration profiles, and methods referring to this series on the removed level remain intact. Any worksheet that refers to this series will open with all other data intact. The series on the removed level shows no data.
-
If the current upgrade mechanism deletes this series, the upgrade log states:
Series YYY referred to level XXX and was deleted.
This message appears after and indented from the ‘Level XXX removed from model’ message. References to this series on the removed level are deleted for all worksheets, workflows, integration profiles, and methods that refer to the series.
-
-
All worksheets, workflows, integration profiles, user-created methods, ‘Open With’ and Embedded worksheets that contain this level remain intact. Users may need to manually reconfigure these objects. For example, a worksheet may need to refer to a different level. Worksheets open for editing purposes.
The level reference is replaced by the child level. For example, if we have an Item > Brand hierarchy and remove the Brand level, worksheet references to ‘Brand’ are replaced with references to the ‘Item’ level. The upgrade log lists all objects affected by removing this level.
-
Log entries:
Worksheet ZZZ referred to level XXX. It now refers to child level YYY.
Please reconfigure as necessary.
Integration interface ZZZ referred to level XXX. It now refers to child level YYY.
Please reconfigure as necessary.
-
All methods on this level are deleted, including default methods such as 'New' and 'Edit', and user-created methods. Any underlying workflows referenced in these methods are not deleted.
-
Level table:
-
If the upgrade mechanism deletes the table for the level, the Upgrade log states:
Table XXX for level YYY has been deleted.
-
If the current upgrade mechanism does not delete the table for the level, the Upgrade log states:
Table XXX for level YYY has not been deleted. Please delete manually if not required.
-
-
If the level was referenced in the forecast tree, a user warning appears in the Upgrade log file at the end of the upgrade:
Level XXX was referenced in the forecast tree. Please reconfigure forecast tree.
User security references to that level are removed and logged:
User/Group XXX reference to level YYY has been removed.
Modifying a Level
When a level is modified, the upgrade script:
-
When adding an attribute – loading scripts are updated to include the new attribute. An attribute column is added to the level table. The consultant or user is responsible for manually modifying the source table to include the attribute column and values.
-
When Deleting an attribute – loading scripts are updated to remove this attribute. An attribute column is deleted from the level table.
-
Table references – specify what source column the level pulls data from. This has no impact on the existing model. The loading scripts are updated to reflect the new source column.
Adding a Series
All series that need to be part of the loading mechanism must be defined in the data model first in order to be reflected in the loading scripts. They can then be configured more fully by the consultant or user in ‘Configure Series.’
Consultants can add a series to the data model. The series should be added to the loading procedure and related internal tables (sales_data, or mdp_matrix).
Removing a Series
The upgrade process does not remove an existing series from tables, for example, the computed_fields, table. Upgrade only removes the series from the data model, and then removes the series from the loading procedure. Therefore, removing a series will not invalidate objects because the series is still present. However, no data will be loaded to the removed series, so it becomes meaningless over time. Removing a series from the data model accomplishes the following:
-
Add a message to the upgrade log:
Series XXX was removed from model. Please delete this series from the series list using the ‘Configure Series’ option.
Oracle provides a reference list of objects affected by this deletion, such as worksheets, dependent series, and integration profiles that reference the series. Providing this output allows the user to go back and manually fix issues such as server expression references.
-
Remove the series from the loading procedures.
The series is removed from internal tables, such as sales_data, computed_fields, and mdp_matrix, when the user deletes the series using the ‘Configure Series’ option. Deleting the series in this way removes references to the series in worksheets, workflows, integration profiles, and rolling profiles but does not remove or invalidate these objects. Some of these objects, such as worksheets, may require user re-configuration, but the worksheets will still open.
-
If this series is a causal factor, display a warning message in the upgrade log:
Series XXX was a causal factor. Please reconfigure causal factors.
-
Remove user security references to this series.
-
Add the log message:
Series XXX is used in components A, B, C. Please reconfigure these components.
Modifying a Series
If a series is modified, the upgrade process does the following:
-
Modifications of the source field are reflected in the loading procedure.
-
If the series aggregation has been modified, the loading procedure is updated. The new aggregation is not updated in computed fields, in case a custom client expression was configured.
-
Add a log entry:
Series XXX has been modified. Please review its configuration in ‘Configure Series’ after completing the upgrade.
Adding a Unit
Adding a unit has the following impacts:
-
Create reference in the level table
-
Log message to state the need to add the Unit to the component and link the Unit to the desired level.
Removing a Unit
Removing a unit has the following impacts:
-
Remove the Unit from the model
-
Delete the Unit from the model and the loading procedures
-
Log message to state the need to delete the Unit in the Business Modeler
Modifying Time Aggregation
If the time aggregation is modified, this process typically occurs early in an implementation, prior to loading substantial data.
Caution: Any modification to the granularity of the model , whether more granular or less granular, will clear out all data. Reset all worksheets to the new model granularity.
See Setting and Modifying the Base Time Unit.
If a time granularity is modified, the upgrade process reflects the following changes:
-
Modify loading procedure to respect new time aggregation
-
Modify inputs table to respect new time buckets
-
Add log message:
Time aggregation has changed. Please review all worksheets and modify time definitions appropriately.
-
Set Integration profiles and worksheets to new model granularity, and leave start and end date time range as is.
Note: Consultant needs to review and re-configure worksheets, workflows, and integration profiles to fully respect the new granularity. The default settings are intended to ensure the worksheets open after the upgrade.
Modifying the First Day of Week
If the First Day of Week is modified, this process typically occurs early in an implementation, prior to loading substantial data.
Caution: Any modification to the First Day of the Week for a model will clear out all data.
-
Loading procedures change to reflect new start of week
-
Inputs table changes to reflect new start of week
-
Leave start and end dates of the worksheet and integration profiles.
Note: The default settings are intended to ensure the worksheets open after the upgrade.
Moving Weekly Bucket Aggregation Forward or Backward
-
Loading process changes to reflect new start of week
-
Change parameter in sys_params table
-
Data in the database is not cleared.
Navigating the Data Model
To navigate the data model
-
Right-click the white background and then select one of the following options:
Expand All Open the branches of a data model structure. Collapse All Collapse the branches of data model structure to its root level. Refresh Tree Update the tree display, with changes since previous refresh. See also
“Configuring Levels”
Building the Data Model
In the Finish Wizard dialog box, you build (or upgrade) the model itself. Here the Data Model Wizard creates all the internal structures that it needs for the data model you have specified.
To build the data model
-
To Remove Illegal Characters, click Yes to check the source data and remove unwanted characters.
-
Click Finish or click Build Model.
If you click Finish, the Data Model Wizard closes.
If you click Build Model, the Build/Upgrade dialog box appears.
-
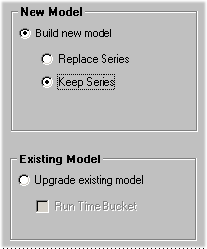
Now you can select whether to completely replace the existing data model or just modify it:
-
If you want to completely replace the existing data model, select one of the following options:
Replace Series Click this to completely replace the existing series definitions. Keep Series Click this if you do not want to make any changes to the existing series. This option is suitable if you are in the process of working on the data model but do not want to spend the time updating the series definitions right now. Caution: In either case, any previously existing levels are completely removed, and the new levels are initialized.
-
Alternatively, if you are just modifying an existing data model, select Upgrade Existing Model. In this case, if you have made changes to the base time unit, select Run Time Bucket.
Upgrade Model does not modify the source tables in any way. Any additions, modifications and deletions to these tables would be done manually by consultants. Any level extensions that must be reflected in the loading procedures are managed by the Data Model. Changes made in Series and Level configuration screens are not supported or synchronized.
Note: There should be no conflicts with the data model definitions (file structures, file locations, and so on). Make sure that the customer's files include all the series and levels that you have configured.
If there are series or levels that appear in the Business Modeler but that are not included in the components structure, a warning will recommend that you manually remove these objects. A log file is created with a list of the objects. Otherwise, the system will automatically identify the series and levels of the selected components and truncate (make empty) the objects that do not participate in the selected components. Only then can the Upgrade Model work.
-
-
Click OK.
The process of building the data model begins. This may take a few minutes.
Business Modeler also creates the file load_data.bat. See Loading the Data into the Data Model.
Loading the Data into the Data Model
After completing the data model, you must load the data into it.
To load the data
-
Run the file load_data.bat, which is in the Demantra/Desktop directory.
When the file is run, the script imports data from the source files into the staging area, and from there into the Demantra data model.
The load_data.bat file contains several procedures to help you to load data into the data model. The prepare_data procedure is empty by default, and can be edited to carry out procedures which precede the data loading
Caution: This should only be carried out by an experienced consultant. It is not recommended to edit the other procedures.
To check for errors
-
After loading the files, check the following files for error messages:
-
For a single source table (Item+Location+Sales): SRC_sales_err
-
For two source tables (Item, Location + Sales): SRC_loc_err
-
For three source tables (Item, Location, Sales): SRC_item_err
-
Manipulating Existing Data Models
To open an existing data model or template
-
Click Data Model > Open Data Model.
The Open Existing Data Model/Template screen appears.
-
Select Data Model or Template.
-
Select the button corresponding to the data model or template you want to modify and click OK.
The Start Wizard window appears. See “Getting Started with the Data Model Wizard”.
To save a data model or template under a different name
-
Click Save As (on the Data Model/Template window).
The Save As dialog box appears.
-
Type in the name of the data model or template.
-
Type in an optional description.
-
Click OK.
To delete a data model or template
-
Select the Data Model/Template button.
-
Click Delete.
A warning window appears.
-
Click Yes to confirm the action.
To import or export a data model or template
The import and export functions enable you to store a data model or template and share it with other users. Data models and templates are saved as database files with the suffix .dmw.
-
Select the Data Model/Template radio button.
-
Click Export.
A database file is saved in the current directory.
To import a data model or template
-
Click Import.
A browser window appears.
-
Navigate to the required .dmw file, and then click OK.