Setting Up Time Dimension Hierarchies
This chapter covers the following topics:
- Time Dimension Hierarchies Overview
- Defining the Manufacturing Operations Center Calendar
- Graveyard Shift Option
- Populating the Workday Shift Calendar
- Performing Entity Shift Setup
- Editing Shifts for Exceptions
- Changing the Shift Boundary
- Changing a Shift Name
- Adding a New Shift
- Catch All Shift
- Time Dimension Hierarchy Maintenance
Time Dimension Hierarchies Overview
Manufacturing Operations Center can analyze data by five different hierarchies for time dimension roll-up out of the box. Any number of hierarchies can be built and analyzed. The following diagram illustrates the process flow for the time dimension hierarchy setup:
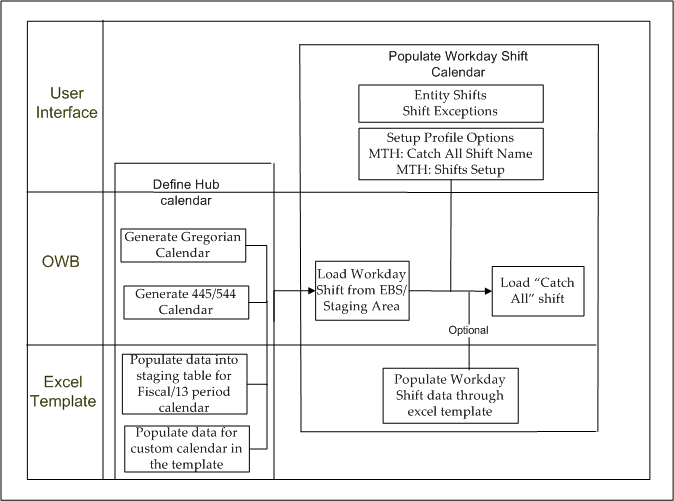
Complete the following tasks to set up the Manufacturing Operations Center time hierarchy:
-
Define the MOC Calendar roll-up from Day to Year, irrespective of site.
-
Populate the Workday Shift Calendar with shift information for the site and roll-up.
Defining the Manufacturing Operations Center Calendar
You can define any or all of the following calendars:
-
Gregorian (OWB generated)
-
445/544 (OWB generated)
-
Fiscal (custom generated)
-
13 Period (custom generated)
-
Custom Calendar (custom levels)
Gregorian Calendar
To generate a Gregorian calendar:
-
Run MTH_GREGORIAN_CALENDAR_MAP in the MTH project of the OWB Mappings.
-
Specify the following parameters:
-
Number Years; the number of years in the calendar.
-
Year Start Date
-
445/544 Calendar
To generate a 445/544 calendar:
-
Run MTH_445_PERIOD_CALENDAR_MAP in the OWB Mappings.
-
Specify the following parameters:
-
Day of Fiscal Week. This value can be any number between 1 and 7.
-
Fiscal_Year_Start_Date
-
Fiscal_type. This value can be 445 or 544.
-
Number_Years; the number of years for the calendar.
-
Fiscal and 13 Period Calendars
To generate a fiscal and 13 period calendar:
-
In the Microsoft Excel template, update the MTH_TIME_DIMENSION.csv with the Fiscal and 13 Period calendar hierarchy.
-
Update the Hierarchy relationship for all Day, Week, Period, Quarter, and Year relationships.
-
Load the calendar into MOC by running MTH_TIME_DIMENSION_XS_MAP in OWB Mappings in the MTH Utilities project.
Custom Calendar
To generate a custom calendar:
-
In the Microsoft Excel template, update the MTH_TIME_DIMENSION.csv with the custom calendar hierarchy.
-
Update the Hierarchy relationship for all Day, Week, Period, Quarter, and Year relationships.
-
Load the calendar into MOC by running MTH_TIME_DIMENSION_XS_MAP in OWB Mappings in the MTH Utilities project.
Graveyard Shift Option
You must set the Graveyard Shift option for shifts that span different dates. You can set this option to:
-
0: Shift Start Date
-
1: Shift End Date
For example, Shift C spans 8 PM 08/06/2008 to 6 AM 08/07/2008. You can stamp Shift C as 08/06/2008 or 08/07/2008. If you want to stamp Shift C on 08/06/2008, then you must select the Shift Start Date option. If you want to stamp Shift C on 08/07/2008, then you must select the Shift End Date option.
Populating the Workday Shift Calendar
You can use either of the following methods to populate the Workday Shift calendar:
-
From EBS (if the organization selected for the plant already has a Bill of Materials calendar attached)
-
From Microsoft Excel
-
From the Entity Shift Setup page. This page is enabled only when the profile option MTH: Shifts Setup value is set to MOC. Refer to the Profile Options chapter for more information on the MTH: Shifts Setup profile option.
When you create shifts using any one of the above options, ensure that you create shifts that do not overlap and are separated by a minimum time duration of one second.
To populate the Workday Shift calendar from EBS:
-
Load the Workday Shift from EBS by running one of the following process flows:
-
MTH_WORKDAY_SHIFTS_EBS_INIT_PF in the MTH Utilities project under the MTHEBIIP module, for an initial data collection
-
MTH_WORKDAY_SHIFTS_EBS_INCR_PF in the MTH Utilities project under the MTHEBICP module, for an incremental data collection
In the prompt for incremental data collection, enter the Run_Start_Date parameter. This is the date from which the workday shift changes are applied. The default value is Sys date.
-
-
Correct errors using SQL Developer or Oracle APEX. All errors in MTH_WORKDAY_SHIFTS_ERR must be fixed and the reprocess ready flag set to Y.
Rows that are ready for reprocessing will be picked up in the next incremental run.
To populate the Workday Shift calendar from Microsoft Excel:
-
In the Microsoft Excel Template, update MTH_WORKDAY_SHIFTS.csv with the custom calendar hierarchy.
-
Load the Workday Shift calendar into the MOC staging table by running the MTH_WORKDAY_SHIFTS_XS_ALL_MAP OWB Mapping in the MTH Utilities project.
-
Load the Workday Shift calendar into the MOC fact table by running one of the following processes:
-
MTH_WORKDAY_SHIFTS_EXT_INIT_PF in the MTH Utilities project under the MTHEXIIP module, for an initial data collection
-
MTH_WORKDAY_SHIFTS_EXT_INCR_PF in the MTH Utilities project under the MTHEXICP module, for an incremental data collection
-
-
In the prompt for incremental data collection, enter the Run_Start_Date parameter. This is the date from which the workday shift changes are applied. The default value is Sys date.
-
Correct errors using SQL Developer or Oracle APEX. All errors in MTH_WORKDAY_SHIFTS_ERR must be fixed and the reprocess ready flag set to Y.
Rows that are ready for reprocessing will be picked up in the next incremental run.
Workday Shift: Microsoft Excel Template
This table displays the structure of the Microsoft Excel template used for the workday shift setup:
| Shift Workday PK | Shift Date | Source_org_code | System Code | From Date | To Date | Shift Num | Shift Name |
| 1-1/1/2007-p1 | 01/01/2007 | p1 | s1 | 1/1/07 0:00 | 1/1/07 9:00 | 1 | morning shift |
Performing Entity Shift Setup
You can set up entity shifts using the Entity Shift Setup page.
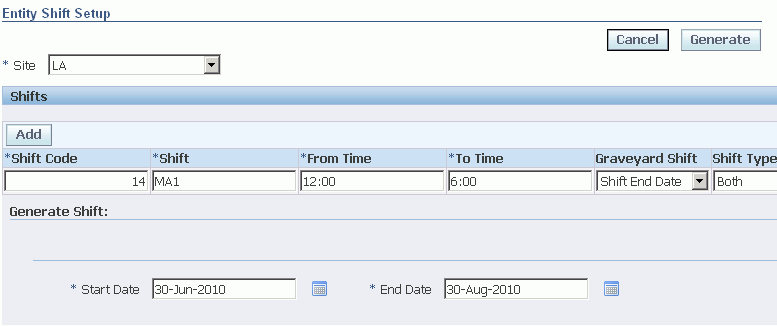
To perform entity shift setup using the Entity Shift Setup page
-
Using the Manufacturing Operations Center Administrator responsibility, click Site Home.
-
Select the Entity Shift Setup tab.
-
Select the site for which you want to perform shift setup.
-
In the Shifts region, enter the Shift Code and Shift.
-
Enter the From Time and To Time for the shift.
-
Select the Graveyard Shift as Shift Start Date or Shift End Date.
-
Select the Shift Type as:
-
Production to inherit the shift to all production entities and organizations attached to the site
-
Non- Production to inherit the shift to all non-production entities and organizations attached to the site
-
Both to inherit the shift to all production and non-production entities and organizations attached to the site
-
-
In the Generate Shift region, enter the Start Date and End Date for the shift.
-
Click Generate. A message displays that the shift is created.
-
Click Ok.
Note: When you click the Generate button, the shift is generated in initial mode and shifts are overwritten for the period between Shift Start Date and Shift End Date.
To view entity shifts
-
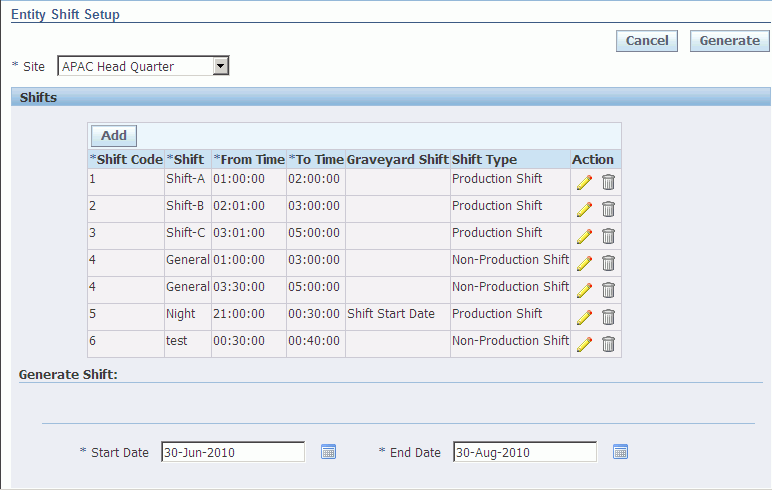
Navigate to the Entity Shift Setup page.
-
Select the Site for which you want to view the shifts. The Shifts region displays the shifts for the site.
To add a shift
-
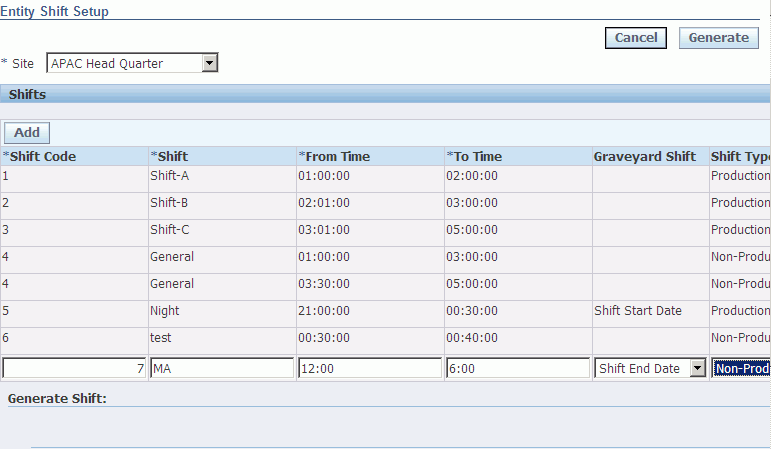
In the Generate Shift region, enter the Start Date and End Date for the new shift.
-
Click Add. A row in the Shifts region is enabled.
-
Enter the details for the shift.
-
Click Generate. A message displays that the shift is created.
-
Click Ok.
Note: When you click the Generate button, the shift is generated in initial mode and shifts are overwritten for the period between Shift Start Date and Shift End Date.
Editing Shifts for Exceptions
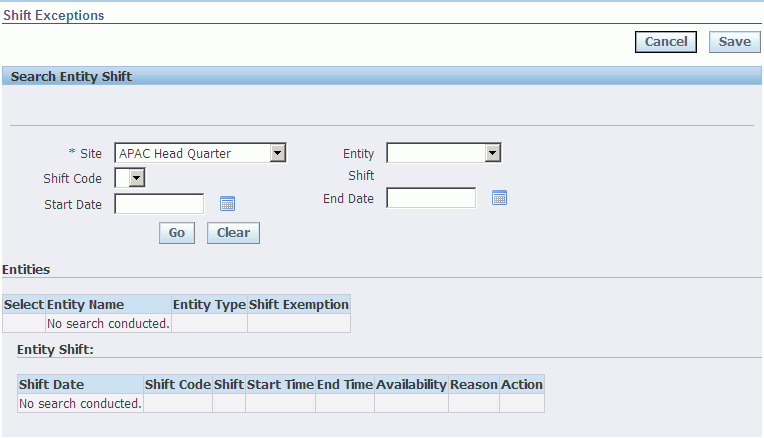
You can edit shifts for exceptions by using the Shift Exceptions page.
To edit shifts
-
Using the Manufacturing Operations Center User responsibility, navigate to the Shift Exceptions page.
-
Enter any of the following search criteria to in the Search Entity Shift region to view entity shifts:
-
Site. Required.
-
Entity
-
Shift Code. If you select Shift Code, then the value in the Shift field displays by default.
-
Start Date
-
End Date
-
-
Click Go. If you search by Site, the Entities region displays all the entities of the site
-
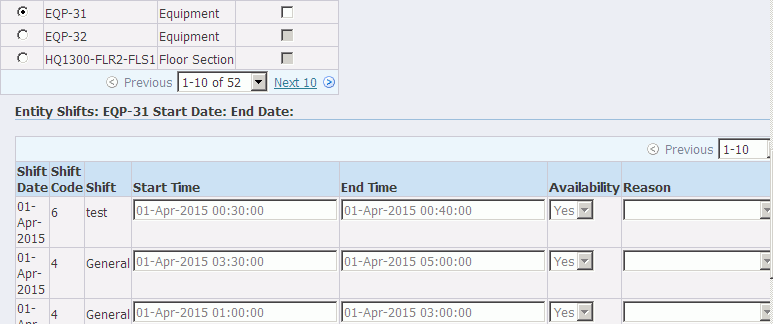
To view the shifts of an entity, select an entity. The Entity Shifts region displays the shifts of the selected entity and their Availability.
-
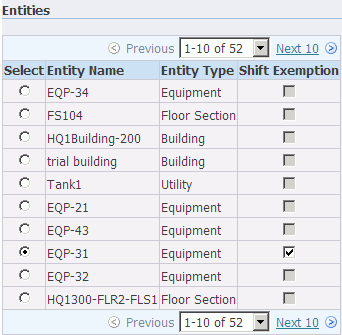
To exempt a shift, select an Entity Name in the Entities region.
-
Select the Shift Exemption check box to delete the shifts for the entity for the selected date range.
-
Click Save.
Changing the Shift Boundary
The following example shows a changed shift boundary:
| Shift | Shift Name | From Time | To Time |
| Initial Shift Definition | Shift A | 8:00 AM | 1:00 PM |
| Initial Shift Definition | Shift A | 2:00 PM | 5:00 PM |
| Redefined Shift Definition | Shift A | 9:00 AM | 5:00 PM |
When the EBS Bill of Materials Workday Calendar to Interface mapping is run after a shift is redefined, you can specify a Change Effective Date parameter.
-
If the selected Change Effective Date is in the past, the shift definitions for the past data are changed.
-
If the Change Effective Date is in the future, dates specified in the initial shift definition apply.
Data Classification
These items apply to data classification:
-
Data on or after the change effective date will be bucketed based on the Redefined Shift definition.
-
Data before the change effective date will be bucketed on the Initial Shift definition
-
The value Shift in the OBIEE list of values
-
Only one set of Shift A appears with back-end definition for the span calculated based on the Change Effective Date.
Changing a Shift Name
The following example shows a changed shift name:
| Shift | Shift Name | From Time | To Time |
| Initial Shift Definition | Shift A | 8:00 AM | 1:00 PM |
| Initial Shift | Shift A | 2:00 PM | 5:00 PM |
| Redefined Shift Definition | Morning Shift | 8:00 AM | 1:00 PM |
| Redefined Shift | Morning Shift | 2:00 PM | 5:00 PM |
When the EBS Bill of Materials Workday Calendar to Interface mapping is run after the shift is redefined, you can specify a parameter to change the effective date. Based on the date provided, the changed definition will be applied from that date to the future.
OBIEE List of Values - Shift
Both the old and new definition appears in the list of values for the plant once the mappings EBS Bill of Materials Workday Calendar to Interface is run, irrespective of the Change Effective Date.
Adding a New Shift
The following example shows the addition of a new shift:
| Shift | Shift Name | From Time | To Time |
| Initial Shift Definition | Shift A | 7:00 AM | 3:00 PM |
| Initial Shift | Shift B | 3:00 PM | 11:00 PM |
| Redefined Shift Definition | Shift A | 7:00 AM | 3:00 PM |
| Redefined Shift | Shift B | 3:00 PM | 11:00 PM |
| Redefined Shift | Shift C | 11:00 PM | 7:00 AM |
When the EBS Bill of Materials Workday Calendar to Interface mapping is run after a shift is redefined, you can specify a parameter for change effective date. The changed definition is applied from that date to the future, based on the date provided.
OBIEE List of Values - Shift
The newly added shift will appear in the list of values for the plant once the mapping EBS Bill of Materials Workday Calendar to Interface is run, irrespective of the Change Effective Date.
Catch All Shift
In the workday calendar, a Catch All Shift can be used for a shift that spans a length of time that is not covered by the shift in a workday. In the following example, the Catch All Shift spans from 12:00 AM to 7:00 AM and from 11:00 PM to 12:00 AM for the current workday:
| Shift | Shift Name | From Time | To Time |
| Initial Shift Definition | Shift A | 7:00 AM | 3:00 PM |
| Initial Shift | Shift B | 3:00 PM | 11:00 PM |
Time Dimension Hierarchy Maintenance
The Hub Workday Shift calendar can be loaded incrementally.
Reprocessing of Error Rows for Workday Shifts
Rows are moved to the error table because of dangling key issues for the following reasons:
-
Shift Date was not provided.
-
System reference was not provided.