Setting Up Equipment Dimensions
This chapter covers the following topics:
- Overview of Equipment Dimension
- Equipment Hierarchy Setup Process
- Equipment Hierarchy: Microsoft Excel Templates
- Adding Equipment
- Viewing Equipment Details
- Updating Equipment
- Adding a Resource
- Viewing Resource Details
- Updating a Resource
- Viewing Entities
- Adding a User Defined Entity
- Updating a User Defined Entity
- Overview of Entity Hierarchy
- Defining a Hierarchy
- Defining Levels
- Building Hierarchies
- Moving Entities
Overview of Equipment Dimension
You can build multiple hierarchies for equipment, and these can be rolled up using different hierarchies for reporting. Manufacturing Operations Center provides four hierarchies, as described in this table:
| Equipment Dimension Component | Design Component | Scope |
| Equipment Hierarchy | Resource Group Hierarchy | Hierarchy Relationship: Seeded Back-end Data: EBS or Microsoft Excel template provided. |
| Equipment Hierarchy | Department Hierarchy | Hierarchy Relationship: Seeded Back-end Data: EBS or Microsoft Excel template provided. |
| Equipment Hierarchy | Equipment Hierarchy 01 & 02 | Hierarchy Relationship: Seeded Back-end Data: Microsoft Excel template provided. |
Equipment Hierarchy dimension supports 10 levels. Four hierarchies are pre-seeded. Equipment hierarchy is divided into two parts:
-
Defining equipment
-
Building hierarchy on top of equipment (and resource)
-
Resource (for Resource Group and Department hierarchy)
-
Equipment (for Equipment hierarchy)
-
Note: You must collect equipment from the source system in which it is defined.
Equipment Hierarchy Setup Process
Complete the following steps for the equipment hierarchy setup process:
-
Define hierarchy master and level lookups
-
Load equipment
-
Load equipment entities
-
Load resources
-
Load equipment hierarchy
Hierarchy Master and Level Lookup Definition
You can load seed data for the metadata.
Load Equipment
Equipment is loaded into Manufacturing Operations Center through a Microsoft Excel template.
-
Update MTH_EQUIP_MASTER.csv
-
Load the equipment by running the MTH_EQUIP_XS_ALL_MAP mappings in the MTH Utilities project.
Microsoft Excel Template: Equipment Master
The Equipment Master table is as follows:
| Equipment Code | Source Org Code | Entity Name | Entity Type | System Code | Fixed Asset Value | Entity Description |
| MIXER1 | MTH | MIXER1 | EQUIPMENT | SCMC2MQ0 | Equipment | |
| BLOWER1 | MTH | BLOWER1 | EQUIPMENT | SCMC2MQ0 | Equipment |
All date columns are in the format of MM/DD/YYYY.
Load Equipment Entities
Equipment hierarchy entities such as Resource Group, Department, Organization, Line, Cell, and any entity other than Resources are loaded into MOC. Equipment entities can be loaded from EBS or Microsoft Excel.
To load equipment entities from EBS, run one of the following process flows:
-
MTH_EQUIP_ENT_EBS_INIT_PF for an initial data collection
-
MTH_EQUIP_ENT_EBS_INCR_PF
To load equipment entities from Microsoft Excel:
-
Update the MTH_ENTITY_MASTER.csv
-
Run the MTH_EQUIP_ENT_XS_ALL_MAP process flow.
-
Load the equipment entities into MOC staging tables by running one of the following process flows:
-
MTH_EQUIP_ENT_EXT_INIT_PF for an initial data collection
-
MTH_EQUIP_ENT_EXT_INCR_PF for an incremental data collection
-
Microsoft Excel Template: Entity Master
The Entity Master table is as follows:
| Entity pk | Entity Name | Entity Type | System Code |
| LINE1 | LINE1 | LINE | -1 |
| LINE2 | LINE2 | LINE | -1 |
| LINE3 | LINE3 | LINE | -1 |
| AREA1 | AREA1 | AREA | -1 |
| AREA2 | AREA2 | AREA | -1 |
| AREA3 | AREA3 | AREA | -1 |
| SITE1 | SITE1 | SITE | -1 |
| SITE2 | SITE2 | SITE | -1 |
| SITE3 | SITE3 | SITE | -1 |
Load Resources
Load resources either from the Microsoft Excel utility or from EBS. To load resources from EBS:
-
Run one of the following processes:
-
MTH_RES_HRCHY_EBS_INIT_PF for an initial data collection
-
MTH_RES_HRCHY_EBS_INCR_PF for an incremental data collection
-
-
Correct errors using SQL Developer or Oracle APEX. All errors in MTH_RESOURCES_ERR must be fixed and the reprocess ready flag set to Y.
Rows that are ready for reprocessing will be picked up in the next incremental run.
To load resources from Microsoft Excel:
-
Update MTH_RESOURCES.csv.
-
Run the MTH_RESOURCE_XS_ALL_MAP mappings.
-
Run one of the following processes:
-
MTH_RES_DIM_EXT_INIT_PF for an initial data collection
-
MTH_RES_DIM_EXT_INCR_PF for an incremental data collection
-
-
Correct errors using SQL Developer or Oracle APEX. All errors in MTH_RESOURCES_ERR must be fixed and the reprocess ready flag set to Y.
Rows that are ready for reprocessing will be picked up in the next incremental run.
Microsoft Excel Template: Resource Master
The Resource Master table is as follows:
| Resource Code | Resource Type | UOM | Capacity Units | Available 24 Hour Flag | Plant Code | System Code | Disable Date | Resource Name |
| 500-1-M1 | 1 | Ea | 10 | PLANT1 | SCMC2MQ0 | 21/09/2006 | Machine1 | |
| 5269-2772-M1 | 1 | Ea | 11 | PLANT1 | SCMC2MQ0 | Machine2 | ||
| 500-1-M2 | 1 | Ea | 12 | PLANT1 | SCMC2MQ0 | Machine3 | ||
| 5269-2772-M2 | 1 | Ea | 13 | PLANT1 | SCMC2MQ0 | Machine4 |
Load Equipment Hierarchy
Equipment hierarchies can be loaded from the Microsoft Excel utility or from EBS. To load resources from EBS:
-
Run one of the following processes:
-
MTH_EQUIP_HRCHY_EBS_INIT_PF for an initial data collection
-
MTH_EQUIP_HRCHY_EBS_INCR_PF for an incremental data collection
-
-
Correct errors using SQL Developer or Oracle APEX. All errors in MTH_EQUIP_ERR must be fixed and the reprocess ready flag set to Y.
Rows that are ready for reprocessing will be picked up in the next incremental run.
-
For OBIEE reporting, run one of the following denorm process flows:
-
MTH_EQUIP_FD_EBS_INIT_PF for an initial data collection
-
MTH_EQUIP_FD_EBS_INCR_PF for an incremental data collection
-
To load resources from Microsoft Excel:
-
Update MTH_EQUIP_HRCHY_DEF.csv.
-
Run the MTH_EQUIP_HRCHY_XS_ALL_MAP mappings.
-
Run one of the following processes:
-
MTH_EQUIP_HRCHY_EXT_INIT_PF for an initial data collection
-
MTH_EQUIP_HRCHY_EXT_INCR_PF for an incremental data collection
-
-
Correct errors using SQL Developer or Oracle APEX. All errors in MTH_EQUIP_HIERARCHY_ERR must be fixed and the reprocess ready flag set to Y.
Rows that are ready for reprocessing will be picked up in the next incremental run.
-
For OBIEE reporting, run one of the following denorm process flows:
-
MTH_EQUIP_FD_EXT_INIT_PF for an initial data collection
-
MTH_EQUIP_FD_EXT_INCR_PF for an incremental data collection
-
Important: In the initial denorm setup, you must first run the MTH_EQUIP_FD_EXT_INIT_PF process flow.
Equipment Hierarchy: Microsoft Excel Templates
Equipment Hierarchy
The Equipment Hierarchy table is as follows:
| User Defined Hierarchy Name | Level Entity | Parent Entity | Level Num | Effective Date | System Code |
| Resource Group Hierarchy | MIXER1 | 7266-2772-MTHHUB1 | 10 | 01/01/2008 | SCMC2MQ0 |
| Resource Group Hierarchy | BLOWER1 | 7266-2772-MTHHUB1 | 10 | 01/01/2008 | SCMC2MQ0 |
| Department Hierarchy | MIXER1 | 7266-2772-MTHHUB1 | 10 | 01/01/2008 | SCMC2MQ0 |
| Department Hierarchy | BLOWER1 | 7266-2772-MTHHUB1 | 10 | 01/01/2008 | SCMC2MQ0 |
| Equipment Hierarchy 01 | SITE1 | SITE1 | 7 | 01/01/2008 | SCMC2MQ0 |
| Equipment Hierarchy 01 | LINE1 | SITE11 | 8 | 01/01/2008 | SCMC2MQ0 |
| Equipment Hierarchy 01 | CELL1 | LINE1 | 9 | 01/01/2008 | SCMC2MQ0 |
| Equipment Hierarchy 01 | CELL1 | LINE1 | 9 | 01/01/2008 | SCMC2MQ0 |
| Equipment Hierarchy 01 | MIXER1 | CELL1 | 10 | 01/01/2008 | SCMC2MQ0 |
| Equipment Hierarchy 01 | BLOWER1 | CELL2 | 10 | 01/01/2008 | SCMC2MQ0 |
Adding Equipment
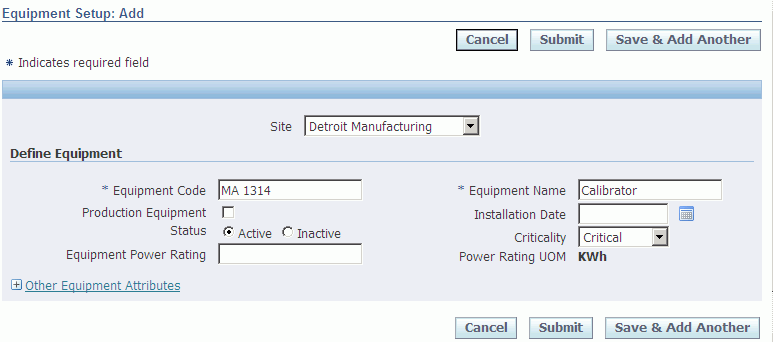
Use the Equipment Setup: Add page to add equipment to a site.
To add equipment to a site
-
Using the Manufacturing Operations Center Administrator responsibility, navigate to the Entity Hierarchy home page.
-
Select the Equipment Details tab. The Equipment Setup: Search page appears.
-
Enter the Site for which you want to add equipment.
-
Click Go. The Results section displays all the equipments for the site.
-
Click Add. The Equipment Setup: Add page appears.
-
Enter the Equipment Code and Equipment Name. Required.
-
Select the Production Equipment check box if the equipment is used in a production process.
-
Enter the Installation Date to specify the equipment installation date.
-
Select equipment Status as Active or Inactive.
-
Select the Criticality of the equipment as Critical or Non-Critical.
-
Enter the Equipment Power Rating. Power Rating UOM is the unit of measure in which the Equipment Power Rating is expressed.
-
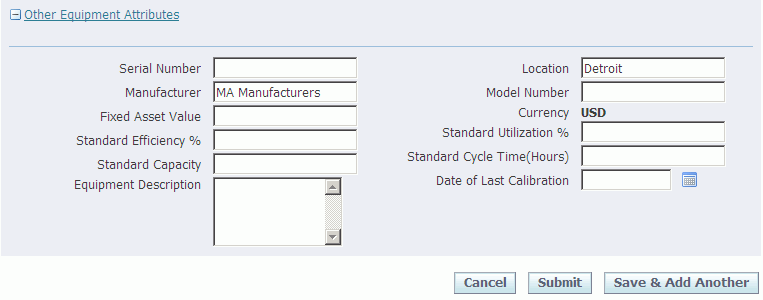
Optionally enter detailed equipment information in the Other Equipment Attributes region.
-
Click Save or Click Save & Add Another to add another equipment.
Viewing Equipment Details
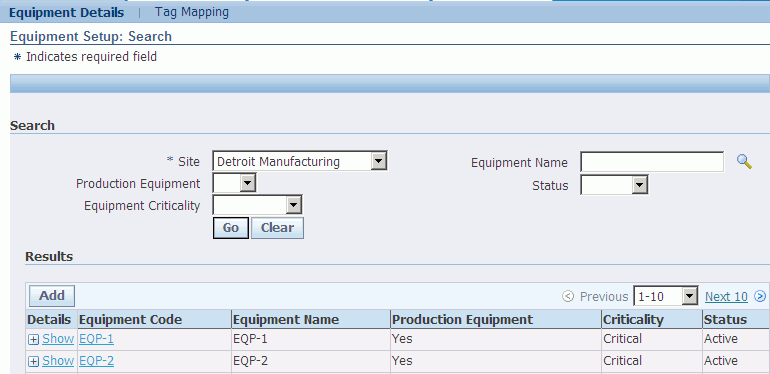
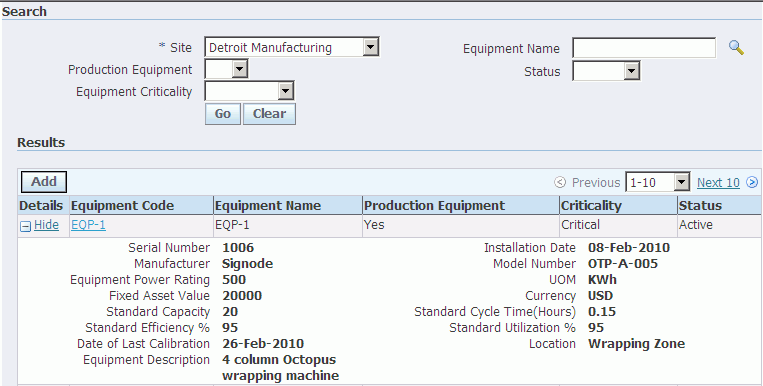
Use the Equipment Setup Search page to view equipment details.
To view equipment details
-
Navigate to the Equipment Setup Search page.
-
Enter all or any one of the following fields to refine your search for equipment:
-
Site. Required. If you search by site, then all the equipments for the site display.
-
Select Production Equipment as Yes, to search for production equipment.
-
Select Equipment Criticality as Critical or non-critical.
-
Enter Equipment Name to view the details of specific equipment.
-
Select the Status as Active or Non-Active to search for an equipment based on Status
-
-
Click Go.
-
View the search results in the Results region.
-
Click Show in the Details column to view the equipment details.
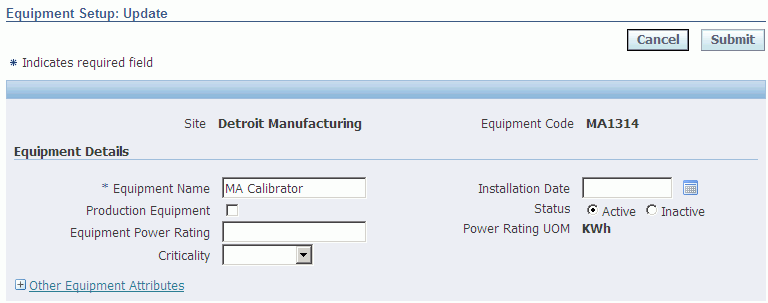
Updating Equipment
Use the Equipment Setup Update page to update equipment information.
To update equipment
-
Navigate to the Equipment Setup: Search page.
-
Enter the Site for which you want to update equipment.
-
Click Go. The Results section displays all the equipments for the site.
-
Click the Equipment Code for the equipment that you want to update. The Equipment Setup Update page appears.
-
Update the information in the Equipment Details and Other Equipment Attributes.
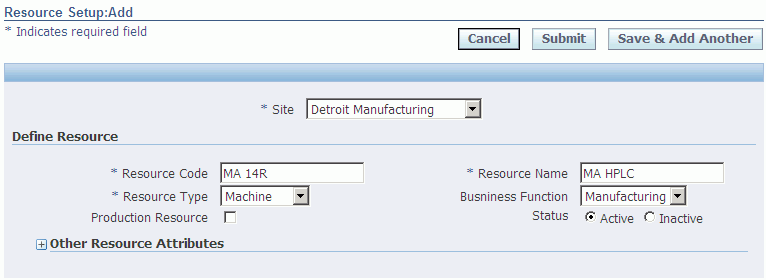
Adding a Resource
Use the Resource Setup: Add page to add a resource to a site.
To add a resource
-
Using the Manufacturing Operations Center Administrator responsibility, navigate to the Entity Hierarchy home page.
-
Select the Resource Setup tab. The Resource Setup: Search page appears.
-
Enter the Site for which you want to add resources.
-
Click Add. The Resource Setup: Add page appears.
-
Enter the Resource Code and Resource Name. Required.
-
Select the Resource Type.
-
Select the Business Function of the resource. Options are Administration, Maintenance, Manufacturing, Planning, Purchasing, Sales, and Stores.
-
Select the Criticality of the resource as Critical or Non-Critical.
-
Select the Production Resource check box if the resource is used in a production process.
-
Select resource Status as Active or Inactive.
-
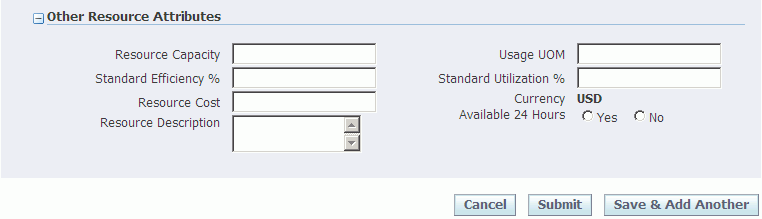
Optionally, enter detailed resource information in the Other Resource Attributes region.
-
Click Submit or Click Save & Add Another to add another resource.
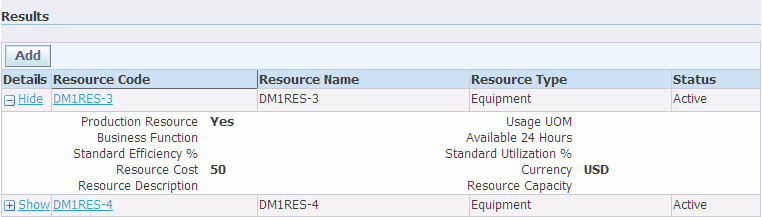
Viewing Resource Details
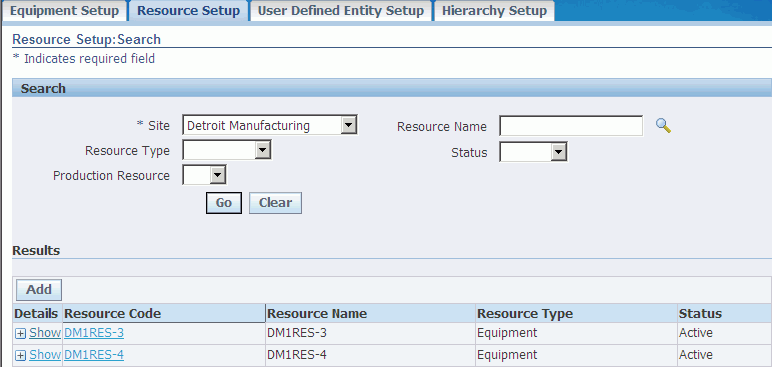
Use the Resource Setup: Search page to view resource details.
To view resource details
-
Navigate to the Resource Setup: Search page.
-
Enter all or any one of the following fields to refine your search for a resource:
-
Site. Required. If you search by site, then all the resources for the site display.
-
Enter Resource Name to view the details of a specific resource.
-
Select Resource Type as Equipment, Machine, Person, or Unassigned.
-
Select the Status as Active or Non-Active to search for a resource based on Status.
-
Select Production Resource as Yes or No to indicate if the resource is used in production processes.
-
-
Click Go.
-
View the search results in the Results region.
-
Click Show in the Details column to view the resource details.
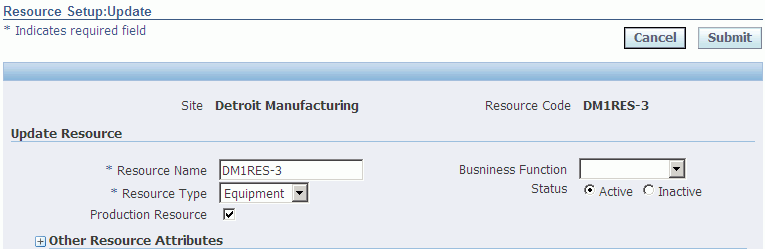
Updating a Resource
Use the Resource Setup Update page to update resource information.
To update a resource
-
Navigate to the Resource Setup: Search page.
-
Enter the Site for which you want to update resources.
-
Click Go. The Results section displays all the resources for the site.
-
Click the Resource Code of the resource that you want to update. The Resource Setup Update page appears.
-
Update the information in the Update Resource and Other Resource Attributes regions.
-
Click Submit.
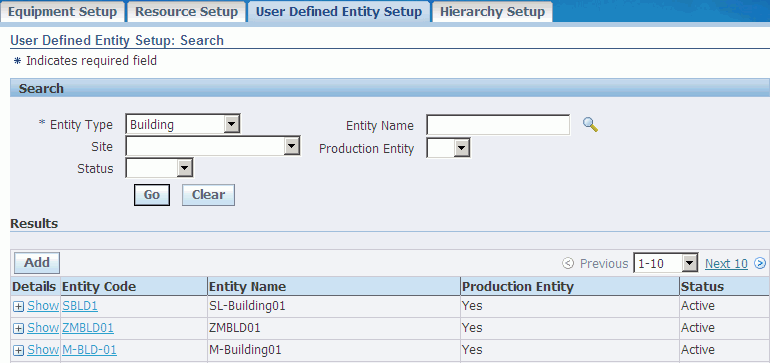
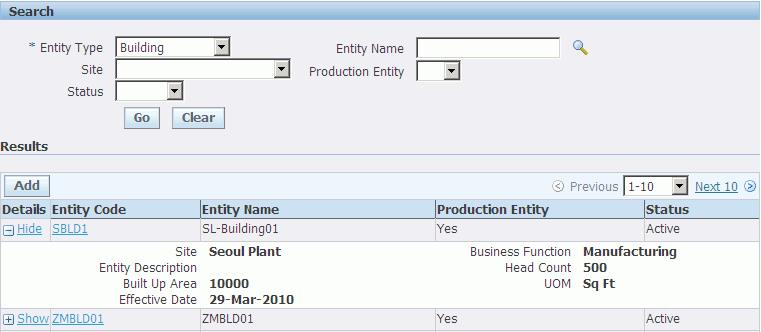
Viewing Entities
You can view the entities of a specific type or belonging to a specific site using the User Defined Entity Setup: Search page.
To view entities
-
Using the Manufacturing Operations Center Administrator responsibility, navigate to the Entity Hierarchy home page.
-
Select the User Defined Entity Setup tab. The User Defined Entity Setup: Search page appears.
-
Enter all or any one of the following fields to refine your search for a user-defined entity resource:
-
Entity Type to search for an entity based on entity type. Options are Building, Department, Floor, Floor Section, Production Area, Production Cell, Production Line, Production Unit, Resource Group, Utility, and Yard. Required.
-
Entity Name to search for a specific entity.
-
Site. If you search by site, then all the entities of a specific type in a site display.
-
Select Production Entity as Yes or No to indicate if the entity is used for production processes.
-
Select the Status as Active or Non-Active to search for entities based on Status.
-
-
Click Go.
-
View the search results in the Results region.
-
Click Show in the Details column to view the entity details.
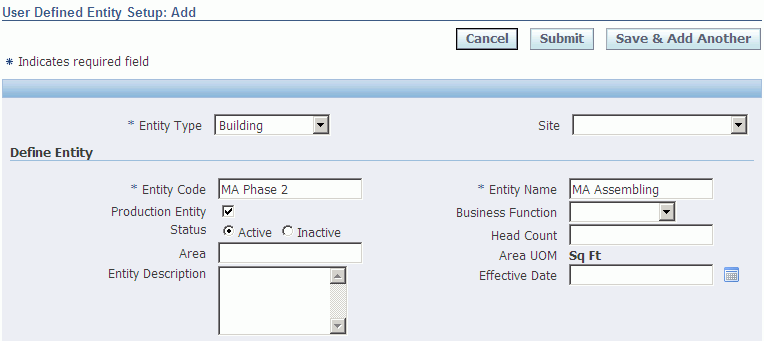
Adding a User Defined Entity
Use the User Defined Entity Setup: Add page to add an entity.
-
Navigate to the User Defined Entity Setup page.
-
Select the Entity Type that you want to add.
-
Click Go. Results section displays all the entities of the selected entity type.
-
Click Add. The User Defined Entity Setup: Add page appears
-
Enter the Entity Code and Entity Name for the entity that you want to add. Required.
-
Select the Production Entity check box if the entity is used in a production processes.
-
Select the Business Function of the entity. Options are: Administration, Maintenance, Manufacturing, Planning, Purchasing, Sales, and Stores.
-
Select Entity Status as Active or Inactive. Active displays by default.
-
Enter the Headcount and Area of the entity.
-
Enter a brief description of the entity in the Entity Description field.
-
Enter the entity Effective Date.
-
Click Submit or Click Save & Add Another to add another entity.
Updating a User Defined Entity
Use the User Defined Entity Setup: Update page to update entity information.
To update a user defined entity
-
Navigate to the User Defined Entity Setup: Search page.
-
Enter the Entity Type that you want to update.
-
Click Go. The Results section displays all the entities of the selected type.
-
Click the Entity Code to update. The User Defined Entity Setup: Update page appears.
-
Update the information in the Update Entity region.
-
Click Save and then Submit.
Overview of Entity Hierarchy
Oracle Manufacturing Operations Center enables you to define equipment, entities, and also build the entity hierarchies. Site is an entity and it can have many child entities as follows:
-
Building
-
Floor
-
Floor Section
-
Production Area
-
Production Unit
-
Production Cell
-
Production Line
-
Department
-
Resource Group
Seeded entity hierarchies like, Department Hierarchy, Facility Hierarchy, Resource Group Hierarchy, Equipment Hierarchy 01 and Equipment Hierarchy 02 are provided. You can create entity hierarchies for both production and non-production facilities. You can build a hierarchy using Active and Inactive sites, entities, resources, and equipments, and for data contextualization, the entities must be Active.
There are no separate hierarchies for production and non-production facilities. For example, a production entity can hold child entities that can be either Production or Non-Production type.
Each Hierarchy supports a maximum of 10 levels. A Child entity can be linked to only one Parent entity. By default, an unassigned entity rolls up to the unassigned parent entity.
The following diagram depicts the process flow for setting up entity hierarchies and describes that before you can set up an Entity Hierarchy, you must set up Sites, Equipments, Resources, and Entities:
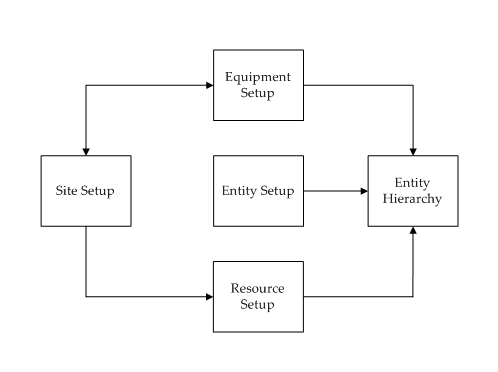
Using the Entity Hierarchy pages you can set up entity hierarchies in the following sequence:
You must create a balanced entity hierarchy to be able to view in OBIEE. A balanced hierarchy implies that each level within the hierarchy includes logical relationships between each entity. An unbalanced hierarchy lacks relationship entities for each level within the hierarchy, or the relationships are illogical.
The following example and diagrams describe how you can balance an unbalanced hierarchy using the Oracle Manufacturing Operations Center application:
Consider a site named MOC HQ with two buildings 100 and 200. Building 100 has two floors 1 and 2 and Building 200 has one floor, Floor 3. Floor 1 has floor section A with a lighting equipment 1, and floor section B. Floor 2 has no floor sections but has lighting equipment 2. Building 200 has air- conditioning equipment as the lowest hierarchy level. The equipment Fountain is linked to MOC HQ. The diagram Unbalanced Entity Hierarchy is a graphical representation of MOC HQ hierarchy and shows how the present hierarchy is Unbalanced.
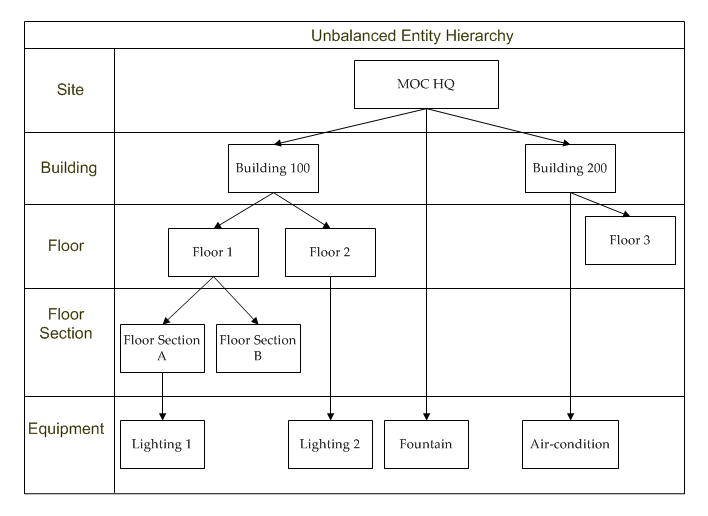
In this example, the following relationships cause imbalance in the hierarchy:
-
Fountain equipment is directly attached to the MOC HQ Site.
-
Air-conditioning equipment is directly attached to Building 200.
-
Lighting 2 equipment is attached to Floor 2.
-
Building 200 has only Floor 3 and no Floor Section and Equipment.
-
Floor Section B has no Equipment.
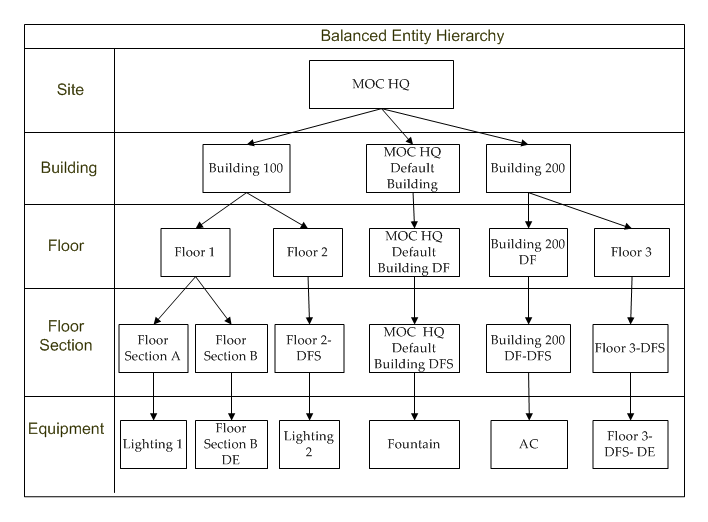
Using the Entity Hierarchy pages of the Oracle Manufacturing Operations Center application you can balance the MOC HQ hierarchy by adding default entities at the relevant levels in the hierarchy:
-
Fountain equipment is directly attached to the MOC HQ Site: Add Default Building, Floor and Floor Section
-
Air-conditioning equipment is directly attached to Building 200: Add Default Floor and Floor Section
-
Lighting 2 equipment is attached to Floor 2: Add Default Floor Section
-
Building 200 has only Floor 3 and no Floor Section and Equipment: Add Default Floor Section and Default Equipment
-
Floor Section B has no Equipment: Add Default Equipment.
The Balanced Entity Hierarchy diagram depicts the new MOC HQ hierarchy after balancing:
After you build a hierarchy you cannot:
-
Change the number of levels
-
Add entities to levels
-
Modify existing entities within each level
You can update only the current version of a hierarchy. You can move entities from one entity hierarchy to another.
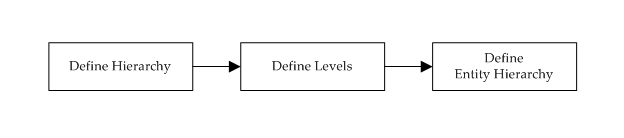
Defining a Hierarchy
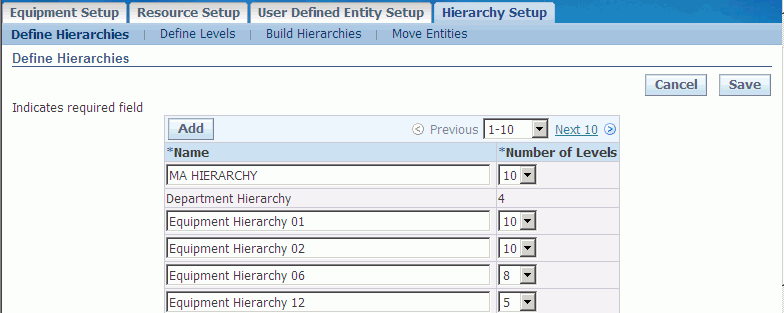
You can define a hierarchy using the Define Hierarchies page.
To define a Hierarchy
-
Using the Manufacturing Operations Center Administrator responsibility, navigate to the Entity Hierarchy home page.
-
Select the Hierarchy Setup tab. Define Hierarchy page appears that displays a list of seeded hierarchies.
-
Click Add. A row in Name column is enabled.
-
Enter the name of the hierarchy that you want to define.
-
Select the Number of Levels for the hierarchy.
-
Click Save.
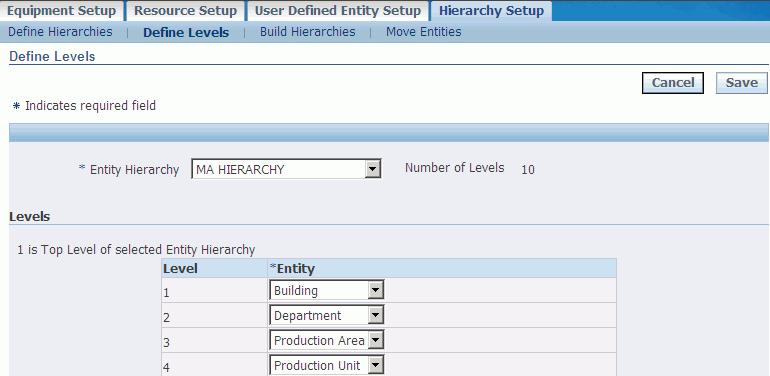
Defining Levels
You can define levels in a hierarchy using the Define Levels page.
To define levels
-
Using the Manufacturing Operations Center Administrator responsibility, navigate to the Entity Hierarchy home page and select the Hierarchy Setup tab.
-
Select the Define Levels tab. The Define Levels page appears.
-
Select the Entity Hierarchy for which you want to define levels.
-
In the Levels region select the Entity for each level. If there are no levels defined for an Entity Hierarchy, then the Levels region is not enabled.
-
Click Submit.
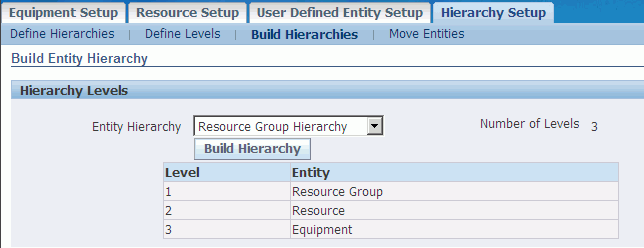
Building Hierarchies
You can build hierarchies using the Build Hierarchy page.
To build a hierarchy
-
Using the Manufacturing Operations Center Administrator responsibility, navigate to the Entity Hierarchy home page and select the Hierarchy Setup tab.
-
Select the Build Hierarchies tab. The Build Entity Hierarchy page appears.
-
Select the Entity Hierarchy for which you want to build a hierarchy. The levels and entities available to the selected entity hierarchy display.
-
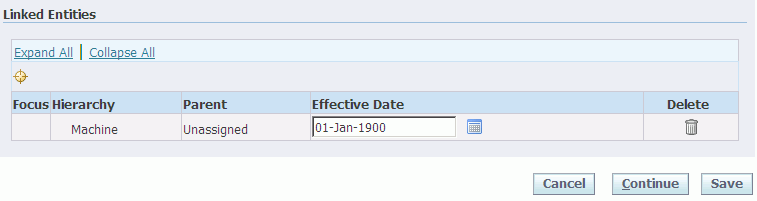
Click Build Hierarchy. The Select Entities region displays a list of entities and parent entities. Linked Entities region displays the entities that are already linked in the hierarchy.
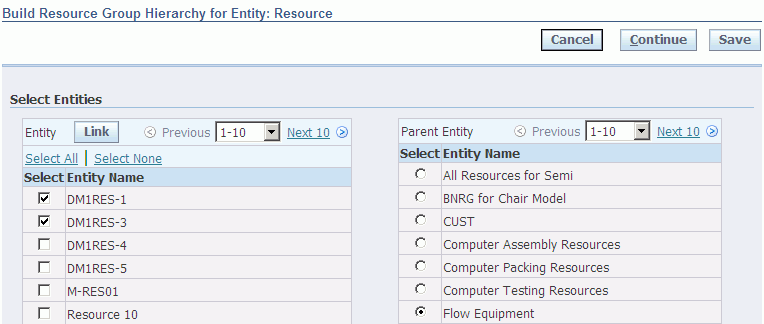
-
In the Select Entities region, select the entities to add to the Hierarchy.
-
Select the Parent Entity to which you want to add the entities.
-
Click Link.
-
Click Save to save the changes or click Next to link entities to the next levels in the hierarchy.
-
Click Submit after linking entities to the last level in the hierarchy, click Submit.
-
Run the MTH_EQUIP_HRCHY_EXT_INCR_PF process flow in OWB.
-
Run the MTH_EQUIP_FD_EXT_INIT_PF process flow to populate the MTH_EQUIP_DENORM_D table. This is required when you are populating the MTH_EQUIP_DENORM_D table for the first time.
-
Run the MTH_EQUIP_FD_EXT_INCR_PF process flow.
Moving Entities
Use the Move Entities page to move entities from one parent entity to another.
To move entities
-
Using the Manufacturing Operations Center Administrator responsibility, navigate to the Entity Hierarchy home page and select the Hierarchy Setup tab.
-
Select the Move Entities tab. The Move Entities page appears.
-
Select the Entity Hierarchy for which you want to move entities. The Entity Hierarchy region displays the Hierarchy, Effective Date, and Parent Entity.
-
Select the Move check box to select the hierarchy to move. The Parent Entity field is enabled.
-
Select a new Parent Entity.
-
Enter a new Effective Date.
-
Click Submit.
