Managing Scenarios
This chapter covers the following topics:
- Understanding Scenario Planning
- Using Scenario Planning
- Working with Scenarios
- Working with Scenario Sets
- Working with Activities
- Working with Planning Processes
Understanding Scenario Planning
The purpose of Scenario Planning is to model business scenarios that use different parts of the supply chain using planning scenarios. A planning scenario represents a what-if business situation that you use to forecast, analyze, and compare to another scenario. Scenario planning enables you to view and analyze your global organization, which provides a holistic view of the problem and improves decision-making processes.
An integrated planning process requires that planners not only effectively model the individual parts of the supply chain but also model the end-to-end business process so that they can monitor and control the process in a structured and methodical way.
Scenario Planning enables you to model your end-to-end business processes and planning scenarios by combining individual planning processes. This enables users to automate, view, monitor, and react to the entire planning flow from one central location.
Using Scenario Planning
Scenario planning uses these components:
-
Planning scenarios.
-
Planning scenario sets.
-
Planning processes.
-
Activities.
Users can create a new scenario and include plans in the scenario. Users can group scenarios into scenario sets. The user can then run the plans manually in the individual application. After running the plans, the user can use the scenario to analyze and compare in the Planning Dashboards.
As an alternative, users can create a planning process using an existing process definition or template. The user copies the process definition or template, links the plans to the process, and then enables the process to automatically launch the plans in the specified sequence.
See Oracle Advanced Planning Command Center, Understanding Service-Enablement Planning Processes.
This diagram illustrates how a scenario set can be used by various roles to orchestrate the overall planning process:
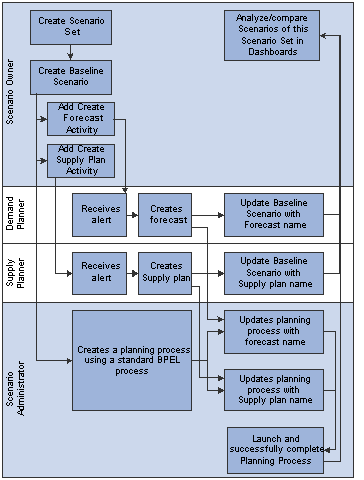
Example 1 - Typical Flow of Scenario Planning
A typical user flow of Scenario Planning includes these roles:
-
Scenario owner.
-
Demand planner.
-
Supply planner.
In this example, the scenario owner creates a scenario, which represents a set of business conditions. The baseline scenario is a scenario that subsequent what-if scenarios can be compared to. And a set of related scenarios can be grouped into a scenario set.
The business conditions are embedded in a scenario set, which models a specific business cycle or situation. The scenario owner creates scenario sets.
The scenario owner then creates user-defined activities for the scenario:
-
One activity for the demand planner to create a forecast that takes care of the business conditions that this scenario represents.
-
One activity for the supply planner to create a supply plan.
The activities are assigned to specific owners with a due date.
The demand planners and the supply planners are immediately notified through a workflow notification message of their open tasks. The demand planner creates and publishes a named forecast (in the demand management application) and the supply planner creates and launches a supply plan (in the supply management application). The planners then update the scenario with the name of the forecast and supply plan.
The scenario is now ready for review or for comparison with other scenarios in the Advanced Planning Command Center dashboards.
Example 2 - Optional Flow of Scenario Planning
An optional user flow of Scenario Planning includes the scenario administrator role.
In this example, it is important to coordinate multiple manual steps such as Collections, Forecasting, Review, Supply Planning, and so on, in a specific sequence. The scenario administrator automates this flow using predefined process flow templates in the Advanced Planning Command Center application.
When a new process is created by means of one of the predefined process flow templates, the system generates a set of activities that represent individual process steps. These individual process steps are called Business Process Execution Language (BPEL) scope nodes. The scenario administrator specifies the inputs for each activity, including the names of the forecasts, plans, and the necessary launch parameters.
The scenario administrator either launches the process or schedules it to start at a specified time in future. This launches each of the process steps in an automated sequence with the appropriate alerts, such as workflow notification messages, to the owners of the activities. The Advanced Planning Command Center provides the administrator with a summary of all the processes and the completion status at any point in time.
When the process completes, the scenario that uses these plans is ready for analysis.
Working with Scenarios
This section provides an overview of the Scenarios page and the scenario states, and discusses how to:
-
Access the scenarios page.
-
Search for scenarios.
-
Create new scenarios.
-
Copy scenarios.
-
Edit scenarios.
-
Archive scenarios.
-
Purge scenarios.
-
Purge plan facts.
Understanding the Scenarios Page
The Scenarios page is the primary work area used by a scenario manager or a planner. The user can perform these tasks:
-
Manage scenarios, which includes creating, copying, editing, archiving, and purging scenarios.
-
Associate or link plans to scenarios.
-
Navigate from a scenario to a planning dashboard.
-
Query and view scenarios.
Understanding Scenario States
Scenarios and scenario activities are assigned a status while they are processed.
This diagram illustrates the states that a scenario goes through in its life cycle. This is also applicable for all system activities for a scenario.
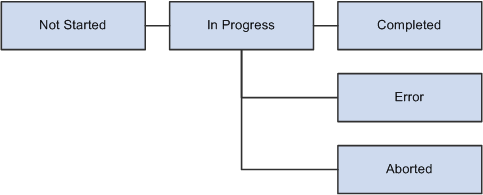
This table describes each state that a scenario or activity can have:
| Status | Description |
|---|---|
| Not Started | When all activities (user and system) are not started. |
| In Progress | When at least one activity (user or system) is in progress. |
| Complete | When all activities (user and system) are complete. |
| Error | When at least one activity (user or system) is in an error state. |
| Warning | When at least one activity (user or system) is in a warning state. |
| Aborted | When at least one activity has terminated. |
Accessing the Scenarios Page
The purpose of the Scenarios page is to provide you with a summary view of the selected scenarios. You can also view the plans that are attached to a selected scenario.
Use the Scenarios page to view, query, create, edit, copy, archive, and purge scenarios. Users can also remove and add plans to scenarios.
To access the Scenarios page:
-
Select the Advanced Planning Scenario Manager responsibility.
-
Select Scenarios.
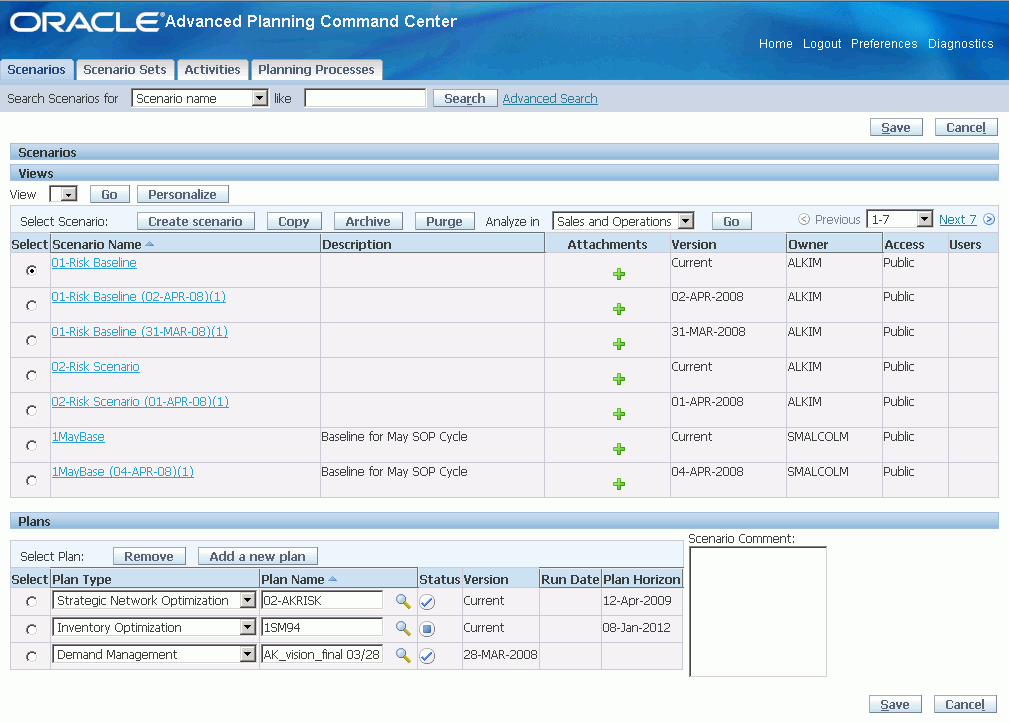
The fields and definitions for the Scenarios table are:
| Field Name | Definition |
|---|---|
| Search Scenarios for | Select from the list of options when performing a simple search such as: scenario name, scenario description, scenario owner, and so on. |
| Like | Enter a value that represents the field selected in the Search Scenarios for field. For example, if you select Scenario Owner in the Search Scenarios for field, enter an owner name in the Like field. The search criteria can be a partial value. |
| Search | Click to execute a search and refresh the tables below. This search is not case-sensitive. |
| Advanced Search | Click to access the Advanced Search page. |
| Save | Click to save the page. You can continue editing. |
| Cancel | Click to discard changes and return to the page. |
| View | Select an option to view scenarios. Options include all personalized views for the user. |
| Go | Click to execute the option selected in the View field. |
| Personalize | Select to personalize the columns in the view. You can create multiple personalized views. |
| Create scenario | Click to access the Create Scenario page. |
| Copy | Click to access the Copy Scenario page. You must select a scenario before clicking the Copy button. |
| Archive | Click to archive the selected scenario and all of its plans. You must select a scenario before clicking the Archive button. |
| Purge | Click to access the Purge Scenario page. You must select a scenario before clicking the Purge button. |
| Analyze in | Select a dashboard to analyze the selected scenario. The options that are available are determined by user setup. Click the Go button to access the selected option. |
| Select | Select a radio button to select a scenario before clicking the Copy button, the Purge button, or the Archive button, or selecting an option in the Analyze in field. |
| Scenario Name | Click the scenario name to access the Edit Scenario page for the selected scenario. Results can be sorted on this field. |
| Description | Displays the scenario description. Results can be sorted on this field. |
| Attachments | Click an icon to view or add attachments. |
| Version | Displays the specific version of the scenario if it is an archived version. Or displays Current as a default, which is the latest version.
See Understanding the Advanced Planning Analytical Framework, Archiving plans and scenarios. |
| Owner | Displays the owner of this scenario. Results can be sorted on this field. |
| Access | Displays the access, Public or Private, for this scenario. |
| Users | Displays the users who have access to the scenario if the Access value is Private. |
The Plan table displays the details of the selected scenario. The fields and definitions for the Plans table are:
| Field Name | Definition |
|---|---|
| Remove | Select to remove the selected plan from the scenario. |
| Add a new plan | Select to create a new editable row in the Plans table. |
| Select | Select a radio button to select a plan before clicking the Remove button. |
| Plan type | Select the type of plan. Options include: Demand Management, Strategic Network Optimization, Advanced Supply Chain Planning, Inventory Optimization, Distribution Planning, and Service Planning. Results can be sorted on this field.
Note: Scenarios with Service Planning type are currently not supported for viewing in the seeded dashboards or reports. |
| Plan name | Select the plan that is displayed in the list that you want. The list contains all plans for the selected plan type. Results can be sorted on this field. |
| Status | Displays the status of the plan. Results can be sorted on this field. |
| Version | Displays the version of the plan if it is an archived version. Or displays Current as a default, which is the latest version.
See Understanding the Advanced Planning Analytical Framework, Archiving plans and scenarios. |
| Run date | Displays the last run date for the plan. Results can be sorted on this field. |
| Plan Horizon | Displays the plan horizon. Results can be sorted on this field. |
Searching for Scenarios
Two types of searches can be performed on the Scenarios page:
-
Simple search.
-
Advanced search.
To perform a simple search:
-
Select an option in the Search Scenarios for field.
-
Enter a value in the Like field.
-
Click the Search button.
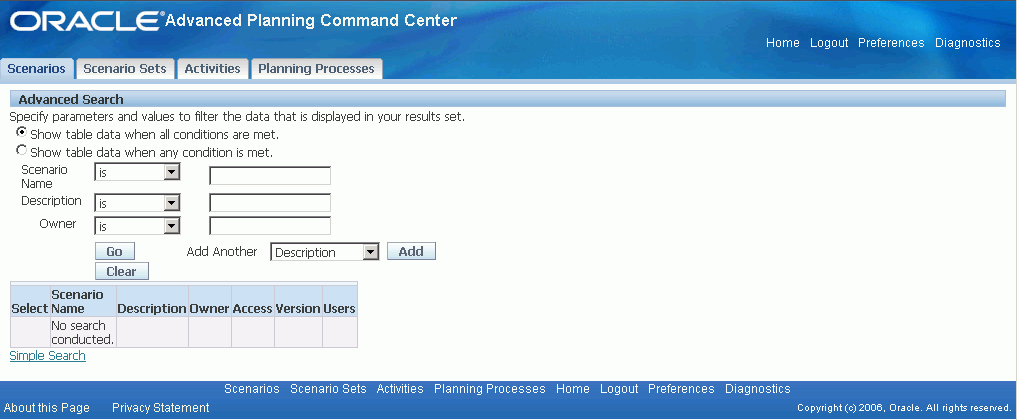
To perform an advanced search:
-
Click the Advanced Search link.
-
Enter all criteria for the search.
Remember that the more fields you enter the smaller the search result.
-
Click the Search button.
Creating New Scenarios
-
Select the Advanced Planning Scenario Manager responsibility.
-
Select Scenarios.
-
Click the Create Scenario button.
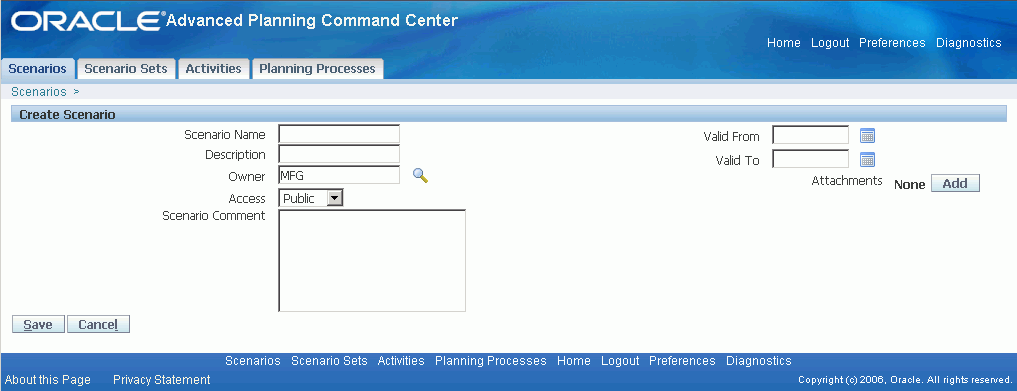
The fields and definitions for the Create Scenario page are:
| Field Name | Definition |
|---|---|
| Scenario Name | Enter a name that uniquely identifies the scenario. |
| Description | Enter a description of the scenario. |
| Owner | Select the owner of the scenario. The current user automatically defaults into the field. |
| Access | Select Public to enable the scenario to be editable and accessible to all users. Private to enable only the users listed in the Users field to edit and access the scenario. |
| Users | Select the users who are currently authorized to access the scenario when the Access field is Private. This field is not accessible when the Access field is Public. |
| Scenario comment | Enter comments for this scenario. |
| Attachments | Click the Add button to open the standard attachments table. |
| Valid from | Enter or select a date that determines the beginning of the scenario. |
| to | Enter or select a date that determines the end of the scenario. |
| Save | Click to save the new scenario and return to the previous page. |
| Cancel | Click to cancel the entries and return. |
Copying Scenarios
-
Select the Advanced Planning Scenario Manager responsibility.
-
Select Scenarios.
-
Select the scenario to copy.
-
Click the Copy button.
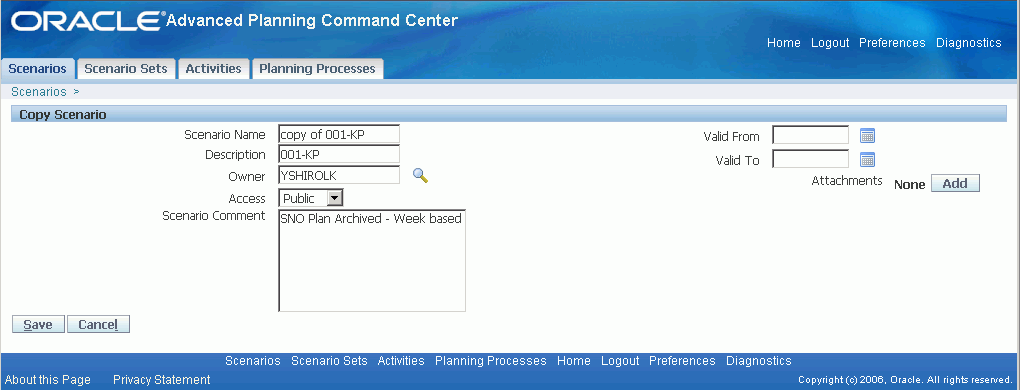
The fields and definitions for the Copy Scenario page are the same as those on the Create Scenario page.
See Managing Scenarios, Working with Scenarios, Creating Scenarios.
Editing Scenarios
-
Select the Advanced Planning Scenario Manager responsibility.
-
Select Scenarios.
-
Click the Scenario Name link.
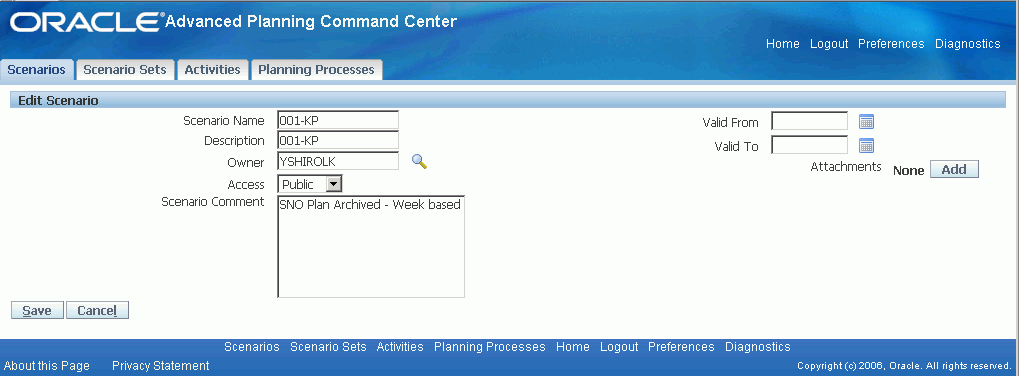
The fields and definitions for the Edit Scenario page are the same as those on the Create Scenario page.
Archiving Scenarios
-
Select the Advanced Planning Scenario Manager responsibility.
-
Select Scenarios.
-
Select the scenario to archive.
-
Click the Archive button.
All plans for the scenario are automatically selected.

Purging Scenarios
Purging scenarios deletes all fact data and related summary aggregates of the scenario by deleting the fact data associated with the underling plans.
However, it does not delete the actual plan or forecast data that is used in respective applications such as Advanced Supply Chain Planning (ASCP), Strategic Network Optimization (SNO), and so on. For example, the Purge Scenario is different from the Purge Plan program in ASCP. The Purge Plan in ASCP deletes the plan data.
Plans that are shared by more than one scenario cannot be selected on this page. Instead, use the Purge plan facts page to purge individual plans.
To purge scenarios:
-
Select the Advanced Planning Scenario Manager responsibility.
-
Select Scenarios.
-
Select the scenario to purge plan facts.
-
Click the Purge button.
-
Select the plan to be purged.
If a plan is part of another scenario, the Select check box is not available.

If no plans are selected, the scenario definition is deleted. All plan data, fact, and summary information remains intact.
If some plans are selected, the scenario definition is deleted as well as the facts and summaries of the selected plans.
Purging Plan Facts
Use the Purge Plan Facts page to purge plan facts and summary data for an individual plan. All scenarios that use the plan are listed on the Purge Plan Facts page.
Use caution when purging plan facts. When plan facts are purged they are not available for analysis in any scenario. Plan facts cannot be recovered unless the plan is rerun or the facts are recalculated.
However, purging plan facts does not delete the actual plan or forecast data that is used in respective applications such as ASCP, SNO, and so on. For example, the Purge Plan Facts is different from the Purge Plan program in ASCP. The Purge Plan in ASCP deletes the plan data.
To purge plan facts:
-
Select the Advanced Planning Administrator responsibility.
-
Select Purge Plan Facts under the Admin heading.
-
Enter or select the plan in the Plan field.
All scenarios for the plan are listed.
Working with Scenario Sets
This section provides an overview of the Scenario Sets page and discusses how to:
-
Access the Scenario Sets - Scenarios page.
-
Access the Scenario Sets - Activities page.
-
Create scenario sets.
-
Edit scenario sets.
Understanding the Scenario Sets Page
The Scenario Sets page is a primary work area used by a scenario manager or a planner.
The user can:
-
Manage scenario sets, which includes editing and creating scenario sets.
-
Associate multiple scenarios with a scenario set.
-
Manage activities within a scenario set, which includes creating activities, deleting activities, changing the status of an activity, and changing the owner of an activity.
-
Query and view scenario sets.
Accessing the Scenario Sets - Scenarios Page
Use the Scenario Sets – Scenarios page to edit and create scenario sets.
To access the Scenario Sets – Scenarios page:
-
Select the Advanced Planning Scenario Manager responsibility.
-
Select Scenarios.
Alternatively, you can select Scenario Sets.
-
Select the Scenario Sets tab.
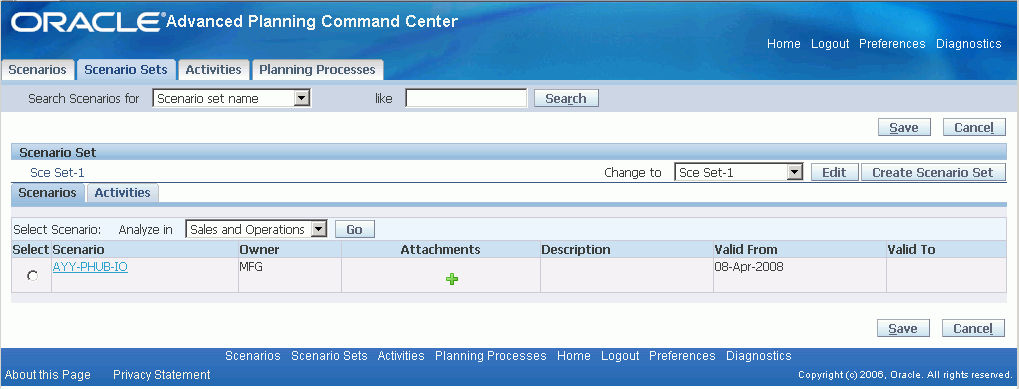
The fields and definitions for the Scenario Sets – Scenarios page are:
| Field Name | Definition |
|---|---|
| Search Scenarios for | Select an option to search scenarios. |
| Like | Enter a value to help reduce the results of the search. If the search results in multiple scenario sets, the tables display the first scenario set. Users can cycle through the remaining scenario sets using the Change to field. |
| Search | Click to execute the search and refresh the tables. |
| Save | Click to save changes and return to the current page. |
| Cancel | Click to discard changes and return to the previous page. |
| Change to | Select to view another scenario set. All scenario sets that match the search criteria are listed. |
| Edit | Click to edit the selected scenario set. |
| Create scenario set | Click to create a new scenario set. |
| Analyze in | Select a dashboard to analyze the selected scenario. The options that are available are determined by user setup. Click the Go button to access the selected option. |
| Select | Select a radio button to select a scenario before clicking the Go button. |
| Scenario | Click the scenario name to view the selected scenario details on the Scenarios page. Results can be sorted on this field. |
| Owner | Click to access the Activities tab for the owner name. All activities that are associated with this owner are displayed. Results can be sorted on this field. |
| Attachments | Click to view attachments. |
| Description | Displays the scenario description. |
| Valid from | Displays the valid from date. |
| Valid to | Displays the valid to date. |
Accessing the Scenario Sets - Activities Page
Use the Scenario Sets – Activities page to create, delete, change the status of, or change the owner of an activity.
To access the Scenario Sets – Activities page:
-
Select the Advanced Planning Scenario Manager responsibility.
-
Select Scenarios.
Alternatively, you can select Scenario Sets.
-
Select the Scenario Sets tab.
-
Click the Activities tab.
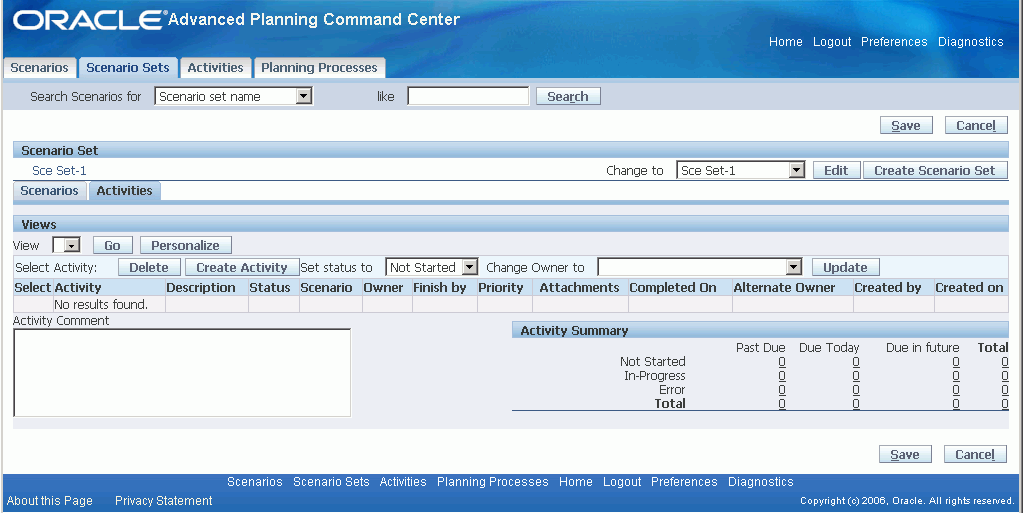
The fields and definitions for the Scenario Sets – Activities page are:
| Field Name | Definition |
|---|---|
| View | Select an option to view activities for the selected scenario set. Options include all personalized views for the user. |
| Go | Click to execute the option selected in the View field. |
| Personalize | Click to create personalized views for the user. |
| Create activity | Click to access the Create Activity page. |
| Delete | Click to delete the selected activity. |
| Set status to | Select an option to change the status of an activity. Options include:
|
| Change owner to | Select an option to change the owner of an activity. |
| Update | Click to carry out an option selected in the Set status to or Change owner to fields. |
| Select | Select a radio button to select an activity before clicking the delete button, selecting an option in the Set status to field, selecting an option in the Change owner to field, or clicking the Update button. |
| Activity | Click to access the Activity tab for the activity. |
| Description | Displays the activity description. |
| Status | Displays the activity status. To change this value, select the radio button for the activity, select an option in the Set status to field, and click the Update button. |
| Scenario | Click to access the Scenario page for the scenario. |
| Owner | Click to access the Activities tab for the owner. All activities for the owner are displayed. |
| Finish by | Displays the finish by date for the activity. |
| Priority | Displays the priority for the activity |
| Attachments | Click to view attachments. |
| Completed on | Displays the date that an activity was completed. |
| Alternate Owner | Displays the alternate owner name. |
| Created by | Displays the name of the person who created the activity. |
| Created on | Displays the date that the activity was created. |
| Activity Comment | Enter comments for this activity. |
| Activities Summary | Displays a summary of all activities queried for the scenario set. |
Creating Scenario Sets
Use the Create Scenario Set page to create a scenario set.
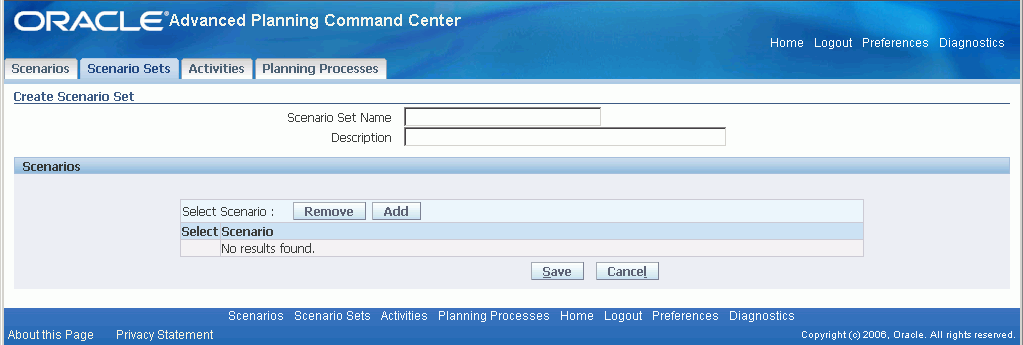
To create a scenario set:
-
Select the Advanced Planning Scenario Manager responsibility.
-
Select Scenarios.
Alternatively, you can select Scenario Sets.
-
Select the Scenario Sets tab.
-
Click the Create Scenario Set button.
-
Enter a name in the Scenario Set Name field.
-
Enter a description in the Description field.
-
Click the Add button to add a row in the Select Scenario table.
-
Click the Search for Scenario button.
-
Search and select a scenario to add to the scenario set.
-
Click the Save button.
To remove scenarios from a scenario set:
-
Select the scenario using the Select radio button.
-
Click the Remove button.
Editing Scenario Sets
Use the Edit Scenario Set page to edit scenario sets.
To edit a scenario set:
-
Select the Advanced Planning Scenario Manager responsibility.
-
Select Scenarios.
Alternatively, you can select Scenario Sets.
-
Select the Scenario Sets tab.
-
Select the scenario set in the Change to field.
-
Click the Edit button.
The fields and definitions on the Edit Scenario Set page are the same as those on the Create Scenario Set page.
Working with Activities
This section provides an overview of the Activities page and discusses how to:
-
Access the Activities page.
-
Create activities.
-
Edit activities.
Understanding the Activities Page
Use the Activities page to query, view, and create all activities including manually entered activities and system activities.
-
Manual activities are created in the context of a scenario or scenario set.
-
A planning process generates system activities.
Accessing the Activities Page
To access the Activities page:
-
Select the Advanced Planning Scenario Manager responsibility.
-
Select Scenarios.
Alternatively, you can select Activities.
-
Select the Activities tab.
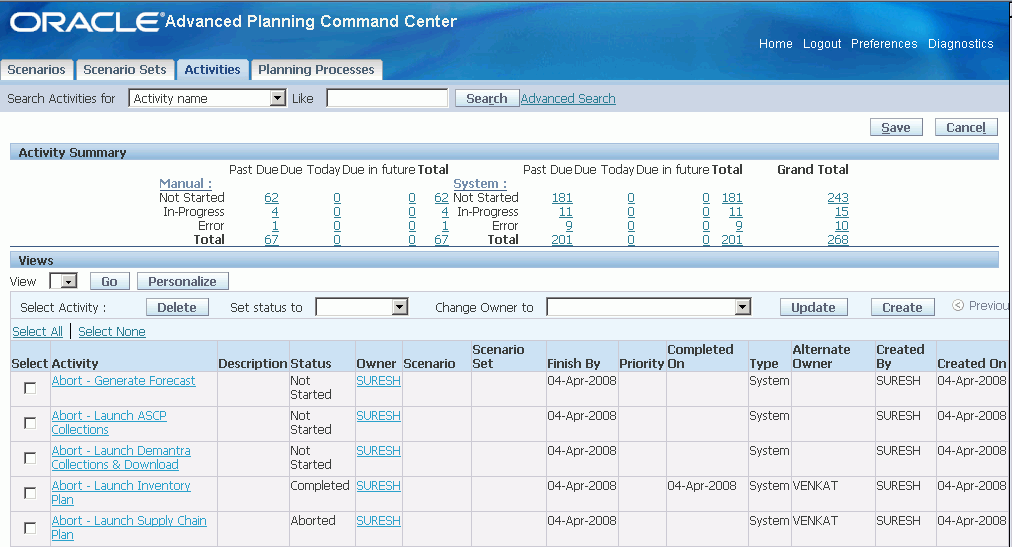
The fields and definitions for the Activities page are:
| Field Name | Definition |
|---|---|
| Search Activities for | Select from the list of options when performing a simple search. Options include: Activity Name, Activity Description, Activity Status, Owner, and so on. |
| Like | Enter a value that represents the field selected in the Search Activities for field. For example, if you select Owner in the Search Activities for field, enter an owner name in the Like field. |
| Search | Click to execute a search and refresh the tables below. |
| Advanced Search | Click to access the Advanced Search page. |
| Save | Click to save the page and enable the user to continue editing. |
| Cancel | Click to discard changes and return to the previous page. |
| Activities Summary | Displays a high-level summary of all manual and system activities by activity type. Columns display activities that are past due, due today, due in the future, and the total for each status. Click the links within the table to refresh the page and display only those activities. |
| View | Select an option to view activities. Options include a default view and all personalized views for the user. |
| Go | Click to execute the option selected in the View field. |
| Personalize | Select to create personalized views. |
| Create activity | Click to access the Create Activity page. |
| Delete | Click to delete the selected activity from the system. The activity is also deleted from the relevant scenario and scenario set. |
| Set status to | Select an option to change the status of an activity. Options include:
|
| Change owner to | Select an option to change the owner of an activity. |
| Update | Click to execute an option selected in the Set status to and Change owner to fields. |
| Select | Select a check box to select one or more activities before:
If a manual activity is selected, the user receives this error message: Cannot update or delete system activities. |
| Activity | Select to access one of these pages:
|
| Description | Displays the activity description. |
| Status | Displays the activity status. |
| Owner | Click this link to refresh the Activities tab with all activities for which this user is the owner. |
| Scenario | Click this link to open the Scenario page for the specific scenario. |
| Scenario Set | Click this link to open the Scenario Set page for the specific scenario set. |
| Finish by | Displays the Finish by date. |
| Priority | Displays the priority that is assigned by the user. |
| Completed on | Displays the completed date for activities that have a Completed status. |
| Type | Displays the type of activity. Options include Manual and System Generated. |
| Alternate Owner | Displays the alternate owner. |
| Created by | Displays the name of the person who created the activity |
| Created on | Displays the date that the activity was created. |
| Comments | Displays comments. |
| Attachments | Click the icon to view or add attachments. |
Creating Activities
Use the Create Activity page to create activities. You can access this page from the Scenarios page, the Scenario Sets page, or the Activities page.
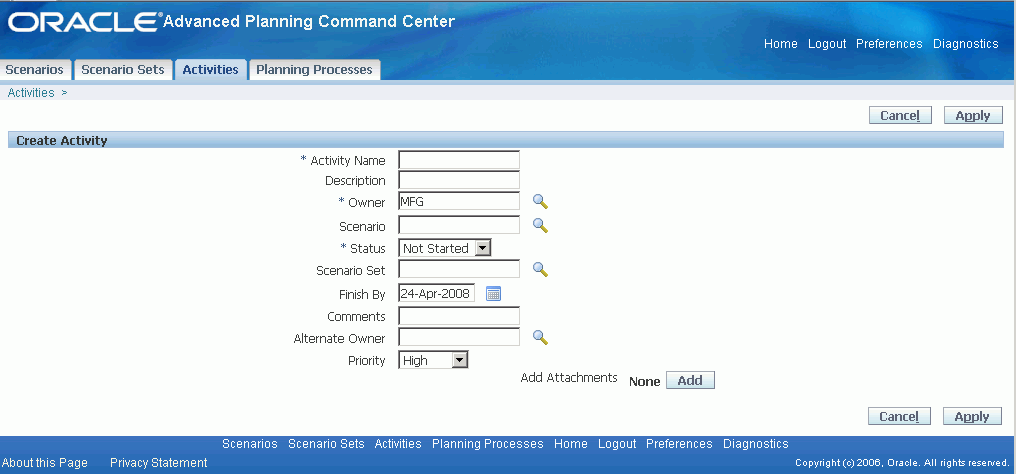
To create activities from the Activities page:
-
Select the Advanced Planning Scenario Manager responsibility.
-
Select Scenarios.
Alternatively, you can select Activities.
-
Select the Activities tab.
-
Click the Create activity button.
-
Complete all required fields.
-
Click the Save button.
The fields and definitions for the Activities page are:
| Field Name | Definition |
|---|---|
| Activity Name | Enter a name that uniquely identifies the activity. |
| Owner | Select an owner of the activity. The system automatically selects the current user name. When you update the Owner field, or create a new activity for an owner, a workflow notification is sent to the owner who has the activity information. |
| Status | Select a status for the activity. The system automatically selects Not Started as the activity status. Other options include:
|
| Finish by | Enter or select the date that the activity is to be finished. If the finish by date arrives and the activity does not have a Completed status, a workflow notification is sent to the alternate owner. |
| Alternate owner | Select an alternate owner. |
| Priority | Select a priority. Options include High, Medium, and Low. |
| Description | Enter a description of the activity. |
| Scenario | Select a valid scenario. |
| Scenario Set | Select a valid scenario set. |
| Comments | Enter comments for the activity. |
| Attachments - Add | Click to add attachments for the activity. |
Editing Activities
Use the Edit Activities page to edit activities.
To edit an activity:
-
Select the Advanced Planning Scenario Manager responsibility.
-
Select Scenarios.
Alternatively, you can select Activities.
-
Select the Activities tab.
-
Select the link with the name of a manual activity.
All fields on the Edit Activity page are the same as those on the Create Activity page.
Working with Planning Processes
This section provides an overview of the Planning Processes page and discusses how to:
-
Access the Planning Processes page.
-
Enter parameters.
-
Start planning processes.
-
Schedule planning processes.
-
Terminate planning processes.
Understanding the Planning Processes Page
Use the Planning Processes page to create, query, and view planning processes.
Accessing the Planning Processes Page
To access the Planning Processes page:
-
Select the Advanced Planning Scenario Manager responsibility.
-
Select Scenarios.
Alternatively, you can select Planning Processes.
-
Select the Planning Processes tab.
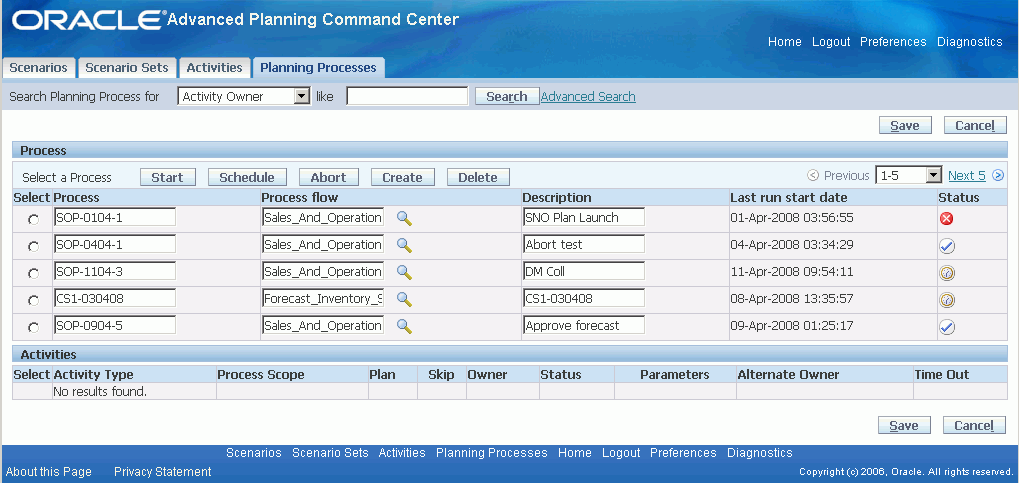
The fields and definitions for the Planning Processes page are:
| Field Name | Definition |
|---|---|
| Search Planning Processes for | Select from the list of options when performing a simple search. Options are: Process Name, Process Description, Process Status, Process Flow, and so on. |
| Like | Enter a value that represents the field selected in the Search Planning Processes for field. |
| Search | Click to execute a simple search and refresh the tables below. |
| Advanced Search | Click to access the Advanced Search page. |
| Save | Click to save the page and enable the user to continue editing. |
| Cancel | Click to discard changes and return to the previous page. |
| Start | Click to access the Start Process page. This starts the underlying BPEL process for the selected process. |
| Schedule | Click to access the Schedule Process page. This enables you to schedule the underlying BPEL process for the selected process. |
| Abort | Click to access the Abort Process page for the selected process. |
| Create | Click to add a new row in the table and create a new process using a predefined process flow templates. |
| Select | Select a radio button to select a process before clicking the Start, Schedule, or Abort button. |
| Process | Enter a name that uniquely identifies a process. |
| Process flow | Select a process flow. The list of values includes all predefined BPEL process flows that are delivered for the Advanced Planning Suite. The system populates the Activities table with the activities of the selected process flow. |
| Description | Enter a description of the process. |
| Last run start date | Displays the last time and date that the process ran. |
| Status | Displays a derived status of the process from the statuses of all its activities. |
Fields and definitions for the Activities table on the Planning Processes page are:
| Field Name | Definition |
|---|---|
| Select | Select a radio button to select an activity before taking an action such as Schedule, Abort, Delete, and so on. |
| Activity type | Displays the activity type of all activities in the BPEL process flow. This field displays the name of the activity that corresponds to a specific step in the BPEL process flow. |
| Process Scope | Displays the process scope node that is associated with the activity type. This field displays the internal name of the BPEL scope node for the activity. |
| Plan | Select the plan for which the activity runs |
| Skip | Select to have the system bypass the activity. |
| Owner | Select the owner of the activity. |
| Status | Displays the status of the activity. The status is derived from the run status of the plan. Values are:
|
| Parameters | Click to access the Parameters page for the activity. |
| Alternate Owner | Select an alternate owner. |
| Timeout (hrs) | Enter a number of hours that must pass before activity is considered timed-out. The BPEL process uses this value to send a notification to the alternate owner. The timeout starts at the beginning of the activity. |
Entering Parameters
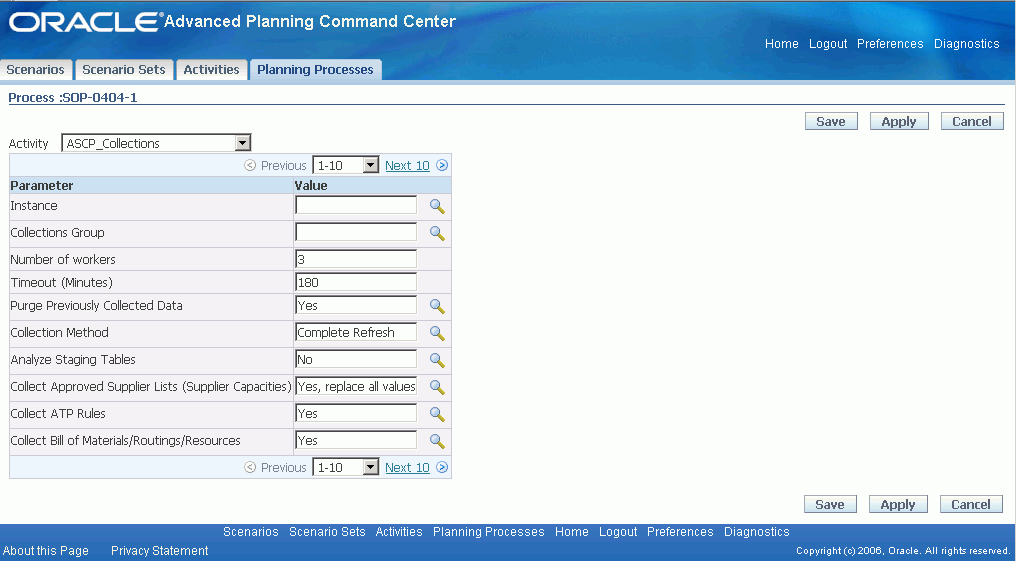
The parameters table is populated with the list of parameters that are relevant for each BPEL activity with the corresponding list of valid values for each parameter.
To enter parameters:
-
Select the Advanced Planning Scenario Manager responsibility.
-
Select Scenarios.
Alternatively, you can select Planning Processes.
-
Select the Planning Processes tab.
-
Search for a process.
-
Select a process.
The Activities table lists all activities for the process.
-
Select an activity.
-
Click the Parameters icon.
-
Select an activity in the Activity field.
-
Select or enter a valid value for each parameter.
-
Click the Save button.
Starting Planning Processes
-
Select the Advanced Planning Scenario Manager responsibility.
-
Select Scenarios.
Alternatively, you can select Planning Processes.
-
Select the Planning Processes tab.
-
Select the radio button for the process.
-
Click the Start button.
-
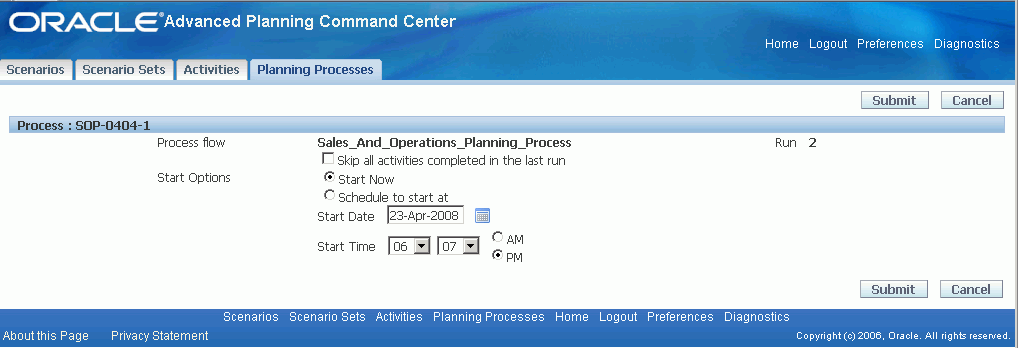
Select Skip all activities completed in the last run to rerun only the activities that do not have a Completed status from the previous run.
Do not select Skip all activities completed in the last run to rerun the process from start to end.
-
Select Start Now as the Start Option.
-
Click the Submit button.
Scheduling Planning Processes
To schedule a planning process:
-
Select the Advanced Planning Scenario Manager responsibility.
-
Select Scenarios. Alternatively, you can select Planning Processes.
-
Select the Planning Processes tab.
-
Select the radio button for the process.
-
Click the Schedule button.
-
Select Skip all activities completed in the last run to rerun only the activities that do not have a Completed status from the previous run.
Do not select Skip all activities completed in the last run to rerun the process from start to end.
-
Select Schedule to start the Start option.
-
Enter or select a value in the Start Date and Start Time fields.
-
Click the Submit button.
Terminating Planning Processes
To terminate a planning process:
-
Select the Advanced Planning Scenario Manager responsibility.
-
Select Scenarios.
Alternatively, you can select Planning Processes.
-
Select the Planning Processes tab.
-
Select the radio button for the process.
-
Click the Abort button.
An Abort Process page appears.
-
Click the OK button.