Site Management
This chapter covers the following topics:
- Overview of Site Management
- Searching for Information
- Viewing Site Information
- Creating Sites
- Updating Site Records
- Copying Attribute Groups
- Comparing Sites
- Viewing and Creating Site Clusters
- Viewing and Creating Site Templates
- Creating Site Assets
- Creating Property Locations for Sites
- Creating and Assigning Inventory Organizations to Sites
Overview of Site Management
Oracle Site Hub provides a central place to store and maintain all information about sites in organizations. Sites can include stores, warehouses, manufacturing plants, distribution centers, retail locations, and executive offices. Once you create your sites, you can then create attributes and assignments.
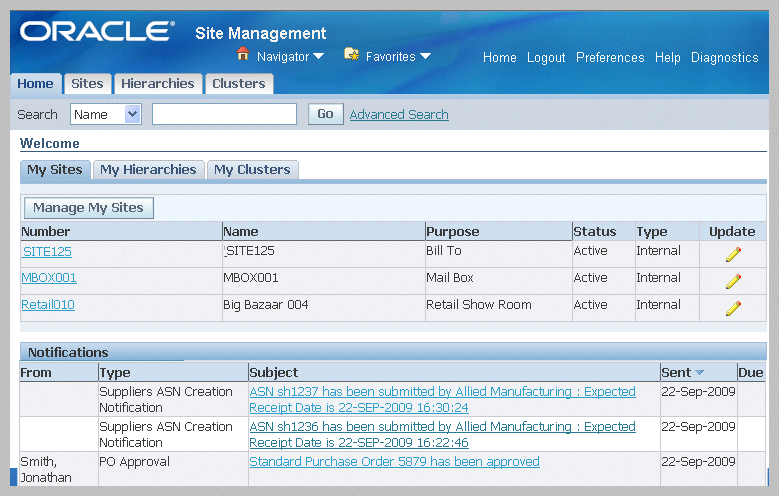
The Site Management User Home page provides access to sites, and associated hierarchies and cluster records. Records appear when selected in the Manage My Sites, Manage My Clusters, or Manage My Hierarchies pages according to your preferences and requirements. You can then navigate to view and transaction pages for individual records. Each page displays a Notifications region for message information.
The selected records also appear when you enable the My Hierarchies or My Clusters check boxes on appropriate pages.
Managing Favorites
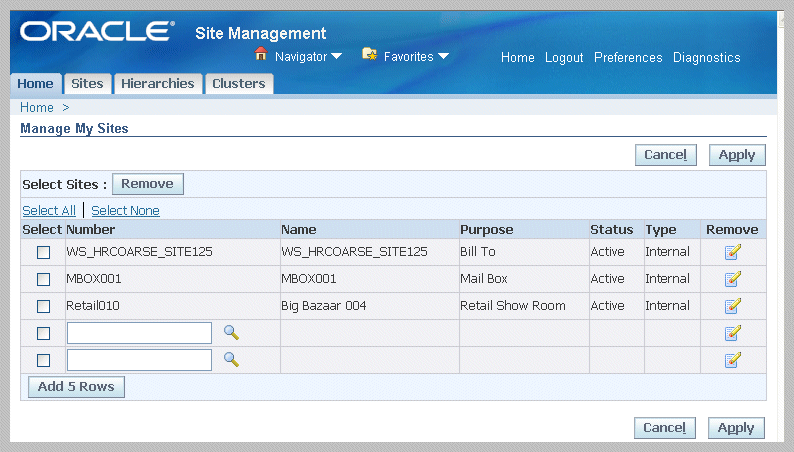
You can create a default display for sites, hierarchies, and clusters by selecting your preferred record display. On the Site Management User Home page—when Manage My Sites, Manage My Hierarchies, and Manage My Clusters is selected, you can choose the records you regularly access. These records appear according to individual login information.
Note: If role based access security is implemented, users must have view privilege in order to add sites and hierarchies to their favorites records.
To select favorites records
-
Navigate to the Site Management User Home page.
-
Select the applicable entity type tabbed region, that is: My Sites, My Hierarchies, or My Clusters.
-
Select the applicable page:
-
Sites: Manage My Sites
-
Hierarchies: Manage My Hierarchies
-
Clusters: Manage My Clusters
-
-
Select Add Rows to search for an appropriate record.
-
Save your work.
Related Topics
Searching for Information
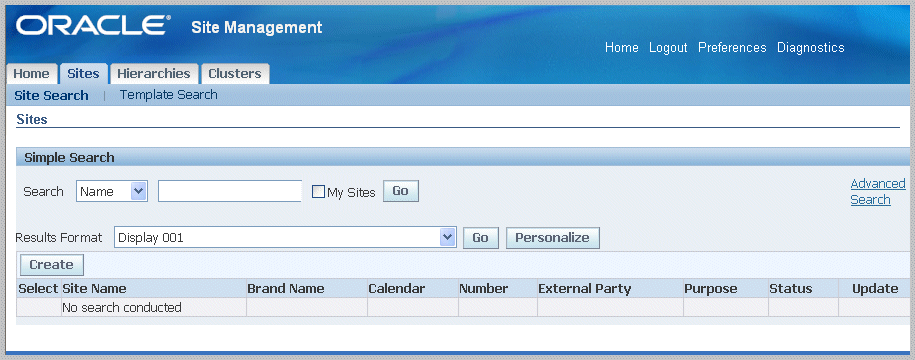
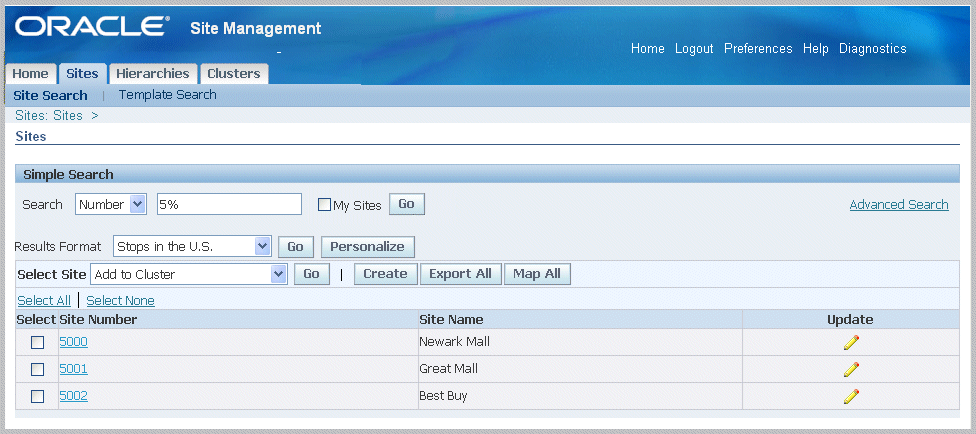
Search capability for finding existing records is available in Site Hub in two modes—Simple Search and Advanced Search. The search functionality uses attributes, keywords, and conditions to find records; and enables you to navigate to records, and view and update information:
-
Simple Search enables searching when looking for a small number of sites, where you know some specific information such as name or record number. You can also select the My Sites, My Cluster, My Hierarchies, or My Templates check boxes to display the records you included in your Favorites list.
-
Advanced Search provides searching using multiple search criteria and conditional qualifiers. This enables you to enter keywords or values, using qualifiers. This method is used when looking for very specific values.
-
For complex searches performed on a regular basis, you can predefine and save search criteria You can also define the search results format displayed.
-
You have the ability to sort search results and specify if the attributes should be sorted alphabetically or numerically, and in ascending or descending order.
-
Site comparisons can be performed after results have been displayed. This enables you to select sites from the search results and compare data.
To search using the Simple Search page
-
Navigate to the Simple Search page for either sites, hierarchies, clusters, or templates.
-
Enter search criteria, depending on the entity you are searching:
-
Sites
Choices are Name, Number, or Status values. You can enable the My Sites check box to display the sites you included in your My Sites list.
-
Clusters
Choices are Name or Description values. You can enable the My Clusters check box to display the records you included in your My Clusters list.
-
Hierarchies
Choices are Name, Description, or Purpose values. You can enable the My Hierarchies check box to display the records you included in your My Hierarchies list. See: Viewing Site Hierarchies
-
Templates
Choices are Name or Number values. You can enable the My Templates check box to display the sites created using your login information.
-
-
Select Go to display the results of your search.
-
To create a new record, select Create. See:
To configure and access other pages in site searches
-
For Site searches, you can use other formats for the results display: Select a value in the Results Format field
-
Select Go to re-configure the display with another format.
-
To customize search formats, select Personalize
-
To navigate to other pages to perform transactions, select a record and in the Select Site box, and choose one of the options.
Choices include:
-
Add to Cluster, see: Viewing and Creating Site Clusters
-
Add to Hierarchy, see: Viewing Site Hierarchies
-
Add to My Sites
-
Compare, see: Comparing Sites
-
Create Asset, see: Creating Site Assets
-
Create Cluster, see: Viewing and Creating Site Clusters
-
Create Inventory Organization, see: Creating and Assigning Inventory Organizations to Sites
-
Create Property Location, see: Creating Property Locations for Sites
-
Export, see: Creating Sites Using the Export and Import Function
-
Map Sites, see: Viewing Site Information
-
Select Export All to export records to a spreadsheet.
-
Select records to insert on a map, and select Map All, see: Defining Site Map Preferences
-
Select a record Number link in the table to navigate to see details of the site, see: Viewing Site Information
-
Choose a record and select Update to navigate to the Edit Site page.
-
-
Select Go to display the appropriate page.
The Advanced Search function enables you to search for specific attribute values. For example—you can search sites in a particular location, with specific facilities, and specific operating hours. In this case the simple search capability is not sufficient. The advanced search using parameters and conditional qualifiers can return a focused search result set.
To search for records using the Advanced Search page
-
In the Context region, select a Purpose value. For site advanced searches you can also select values in the Country, Trade Area Group, and Trade Area fields.
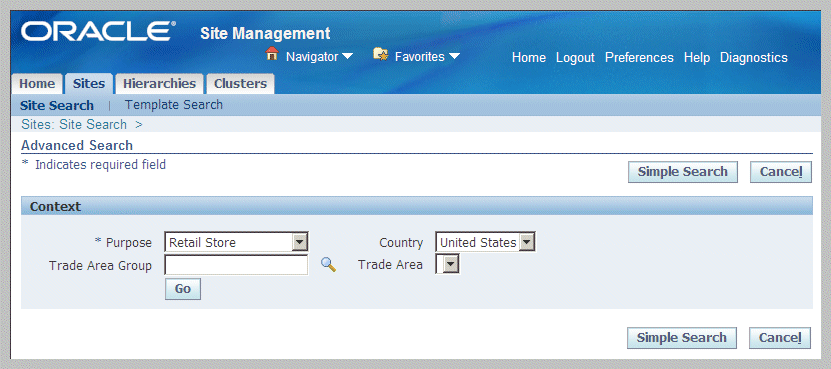
-
Select Go to display Search Criteria and Display Format regions to select other search criteria.
-
In the Search Criteria box, choose a record and select Go to display the Attribute Group and Attribute values.
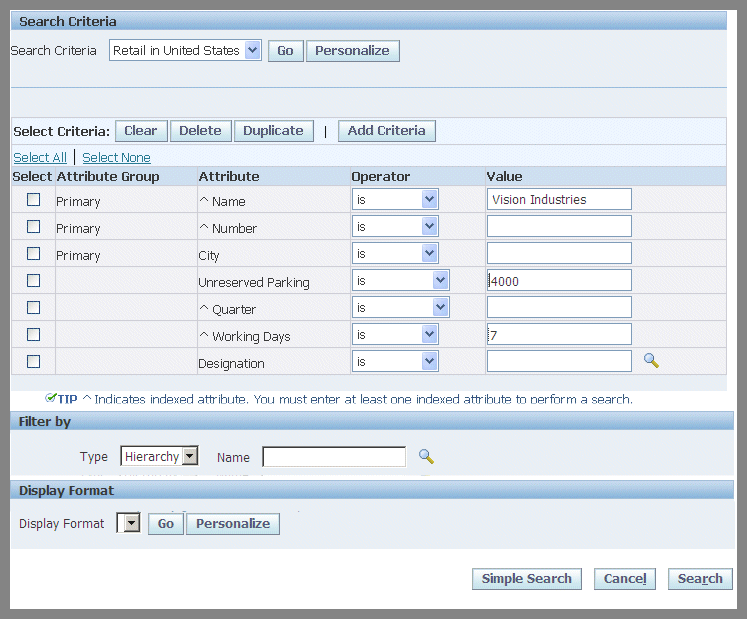
-
Select an Attribute Group value, and enter values in the Operator and Value fields:
-
Operator—qualifiers include the following:
-
is
-
is not
-
contains
-
starts with
-
ends with
-
-
Value—any user-defined value
-
-
To duplicate a value on the list and use other search criteria value, choose an Attribute Group value and select Duplicate.
-
Select Add Criteria to display the Add Criteria page. This page is used to add more attribute values to the search criteria list. See: Managing Search Criteria, Oracle Product Information Management Implementation Guide
-
In the Filter by region, you can filter search results to sites contained within a hierarchy or cluster. Select either Cluster or Hierarchy. You can also enter a Name value.
If you select Hierarchy, the default ordering of the search results is based on the hierarchy structure depth first, and then the sequence of sites within the hierarchy as seen in the Hierarchy Workbench. This ordering can be preserved when exporting the results to an Excel spreadsheet.
-
Optionally, if you have created other search formats, you can select a value in the Display Format field.
To personalize search formats, select Personalize
-
Select Search to display the results of your query.
-
The results page enables you to navigate to other pages to perform the following:
-
To personalize search formats, select Personalize
-
Select records, and in the Select Site box, choose one of the options. Select Go.
Your choices include:
-
Add to Cluster, see: Viewing and Creating Site Clusters
-
Add to Hierarchy, see: Viewing Site Hierarchies
-
Add to My Sites
-
Compare, see: Comparing Sites
-
Create Asset, see: Creating Site Assets
-
Create Cluster, see: Viewing and Creating Site Clusters
-
Create Inventory Organization, see: Creating and Assigning Inventory Organizations to Sites
-
Create Property Location, see Creating Property Locations for Sites
-
Export, see: Creating Sites Using the Export and Import Function
-
Map Sites, see: Viewing Site Information
-
-
To add new sites, select Create. See: Creating Sites
-
Select Export All to export records to a spreadsheet.
-
Select records to insert on a map, and select Map All.
-
Select a record Number link in the table to navigate to see details of the site, see Viewing Site Information
-
Select Update for a record to navigate to the Edit Site page.
-
Viewing Site Information
All information about a site is visible in the View Site page. This page consists of tabbed regions and offers the ability to view the geographic location of a site on a map.
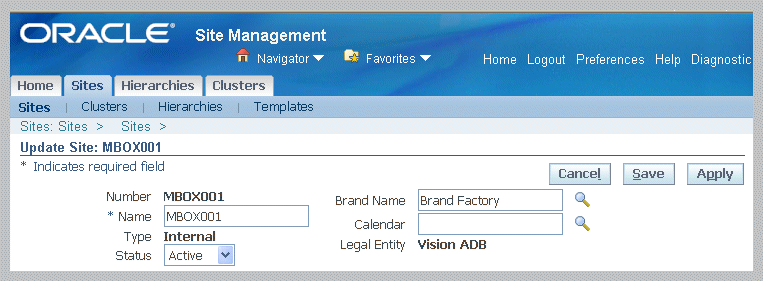
When you navigate to the View Site page, the page displays information in fields for Number, Name, Type, Status, Brand Name, Calendar, and Legal Entity.
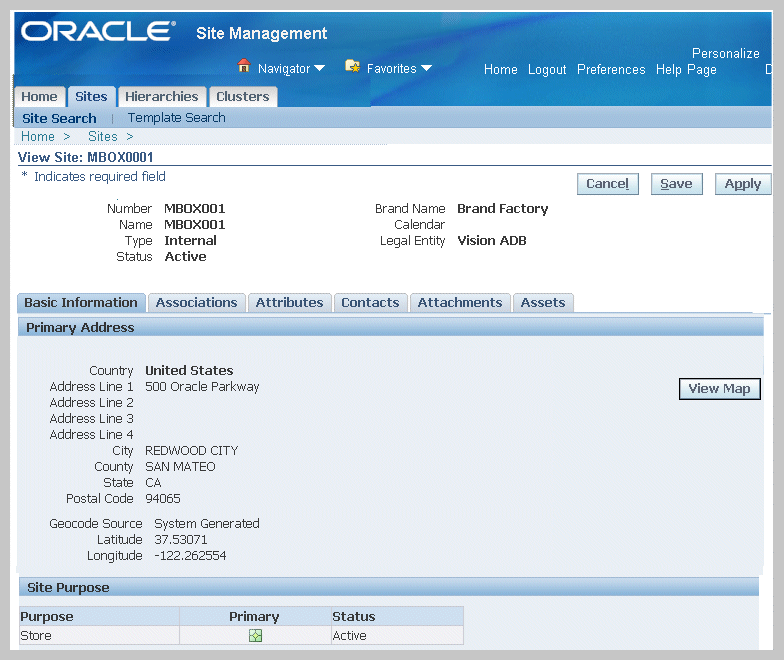
Several different tabbed regions display depending on the field values entered for the site record and integration with other applications:
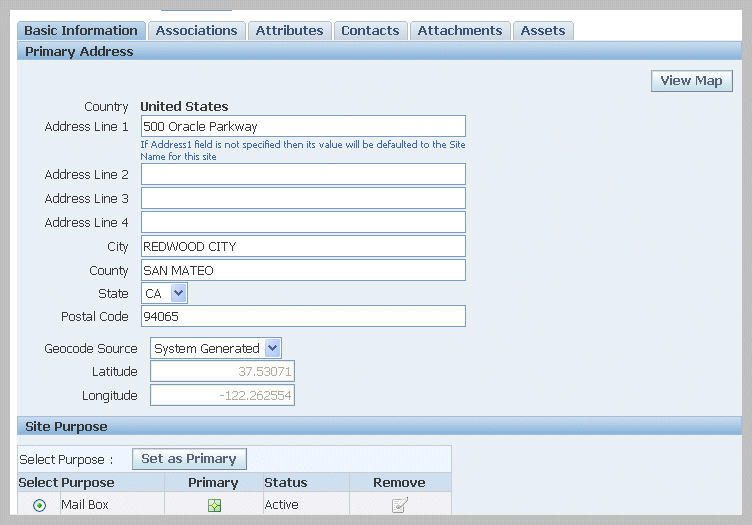
-
Basic Information—primary address, longitude and latitude, and site purpose data
-
Associations—associated entities, property locations, trade area groups, clusters, hierarchies, and customers
-
Attributes—three categories of attribute pages
-
Contacts—data captured from Trading Community Architecture for parties, party sites, party relationships, and contacts
-
Attachments—document attachments for this site
-
Assets—assets associated with this site for maintenance organizations, including quantities and serial numbers
For detailed descriptions of these tabbed regions, see: Updating Site Records
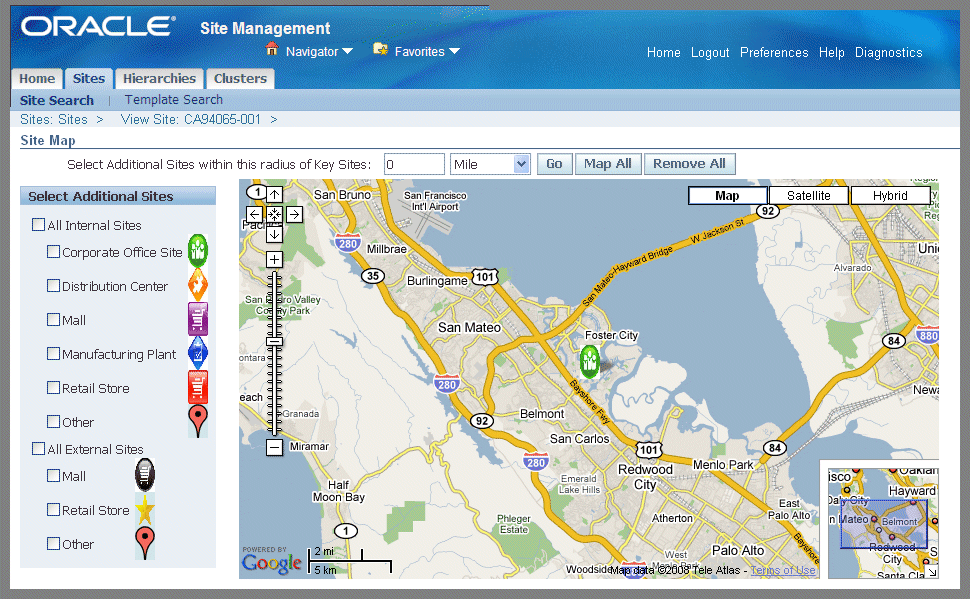
Viewing Site Map Details
You can see the location and other data of a site as viewed on a map. The map enables you to select criteria for the type of site information you want displayed. For example, you can select all external sites within a specific radius. The page view consists of a Site Map and Mapped Details regions for the sites selected. The Mapped Details region displays the site summary details in a tabular format. Features of the site map include:
-
Site Icons
Icons are defined for internal and external sites. External sites are sites not owned by your organization such as competitor sites.
-
Key Sites
The site you use to access the map is designated as the key site. Key sites are the focal point for comparisons (internal, external, trade regions) with other sites on the map. This designation can be changed, or you can define other sites as key sites in the Actions in the Mapped Sites region.
-
Sites Not Mapped
Sites unable to be mapped are listed in the Key Sites Not Mapped region. Sites are listed in this area when there is missing or invalid geographical or purpose data.
-
Attribute Pages
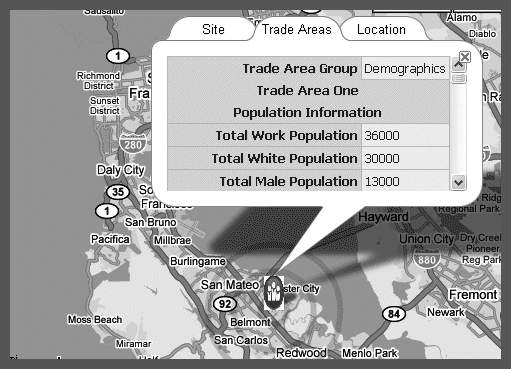
If attribute pages are associated with a site, when you click the site icon on the map, a dialog box displays with the page information setup.
-
Trade Area Groups
Trade area groups are represented by concentric circles defined for trade area group regions.
Note: For information on the basics of Google Maps viewing—access the Google Maps Help Center at http://maps.google.com/support/?hl=en.
To view site map details
-
On the View Site page, select View Map.
The Site Map is also accessed by selecting multiple records on the Sites page, and choosing Map All.
-
In the Select Additional Sites column, select site purpose icons for your sites to display on the map.
All icons uploaded in the Site Map Preferences window, the Icons tab, are displayed. Default icons display if there is no icon uploaded and associated with a site purpose. See: Defining Site Map Preferences
-
In the Select Additional Sites within this radius of Key Sites box, select a distance and unit of measure for the display of the sites.
-
Select Go to display the results of your search.
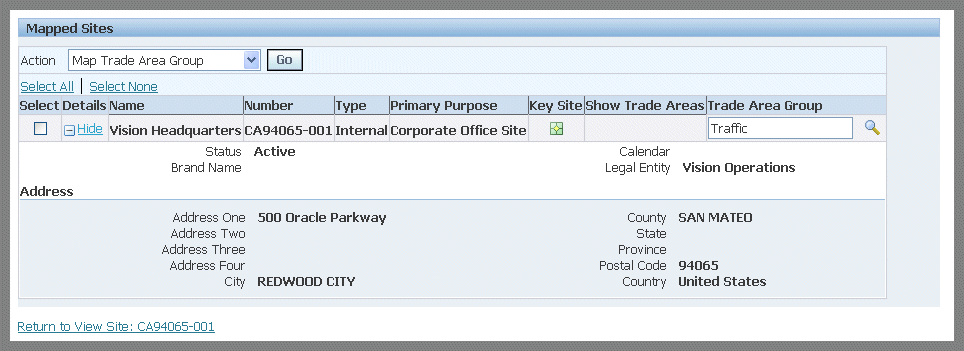
The additional sites appear in the Mapped Sites detail table. Site summary details are displayed for Name, Number, Type, Primary Purpose, Key Site, Trade Areas, and Trade Area Group fields.
Select Show to display the information for Status, Brand Name, Calendar, Legal Entity, and Address details.
-
You can add or remove the sites on the map display by selecting Map All or Remove All.
When your select Remove All, the site defined as the Key Site, remains on the map display.
-
If attribute pages are associated with a site, when you click the site icon on the map, a dialog box displays with the page information setup.
-
You can select site records in the table, and select one of the choices In the Action box:
-
Map Trade Area Group
Displays the concentric circles around the regions setup for the site representing the trade area group region. These areas are defined on the Create Trade Area Group page. See: Viewing and Creating Trade Area Groups
-
Remove Trade Area Group
Removes the displayed concentric circular trade area group region.
-
Remove Site
Clears the site icon from the map.
-
Compare Up To 5 Sites
Accesses the View Comparisons page to compare sites and entity attributes for comparison of data. See: Comparing Sites
-
Designate Key Site
Enables you to specify other sites as key sites for data comparison.
-
Remove Key Site Designate
Clears the key site designation for selected sites.
-
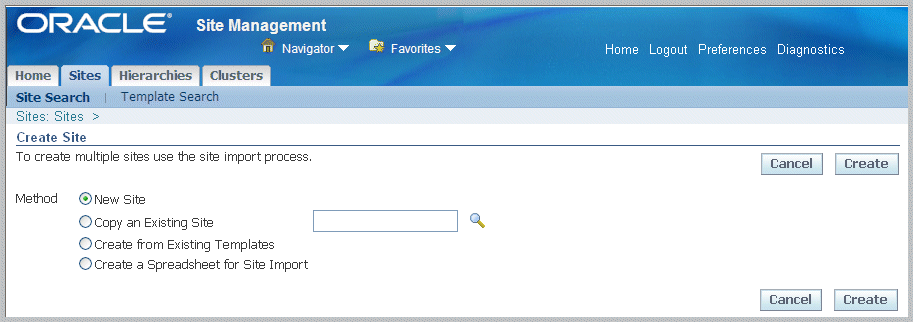
Creating Sites
There are several methods for creating new sites. You can create a new record manually—or create a record from copying a record, using a template, or using the import and export process:
-
Manual Site Creation
For organizations with a smaller number of sites, you can create a site using manual entry of data.
-
Copying an Existing Site
You can create new sites with similar attributes by copying an existing site and renaming the site record.
-
Templates
For organizations that have sites with similar attributes—such as a collection of stores or branches that are similar in size, merchandise, or services offered—you can create sites using configured templates. See: Viewing and Creating Site Templates
-
File Import
You have the ability to import multiple site records using a batch file import process. Mass import of sites is done through Excel upload. Web Services can also be used for create and update.
-
Import Interface
The bulk import interface provides the ability to carry out high speed data import for large amounts of data, including site records. See: Using the Import Interface
-
Web Service
You can create sites with a web service. Web service applications dynamically interact with other web applications using open standards that include XML, Universal Description, Discovery and Integration (UDDI), and Simple Object Access Protocol (SOAP). Oracle Integration Repository uses Web Services Description Language (WSDL) code. See:
-
Oracle Integration Repository Overview, Oracle E-Business Suite Integrated SOA Gateway User's Guide
-
Understanding Web Services, Oracle E-Business Suite Integrated SOA Gateway User's Guide
-
Oracle Integration Repository Overview, Oracle E-Business Suite Integrated SOA Gateway User's Guide
-
Understanding Web Services, Oracle E-Business Suite Integrated SOA Gateway User's Guide
-
To manually create a new site
-
Navigate to the Create Site page.
-
Select the New Site method, and select Create.
The Create Site: Basic Information page displays.
-
Enter values in the Name and Number fields.
If profile option RRS: Auto Default Site Number is set to Yes, the next number in the sequence appears. You can change the defaulted value to any unique value.
-
Optionally you can enter values in the following fields:
-
Type—identifies if the site is an Internal or External site
-
Status—Active or Inactive
-
Brand Name—company's identifying name, specified in the Site Hub Lookups
-
Calendar—BOM Calendar for the inventory organization associated with the site
-
Legal Entity—defined legal name

-
-
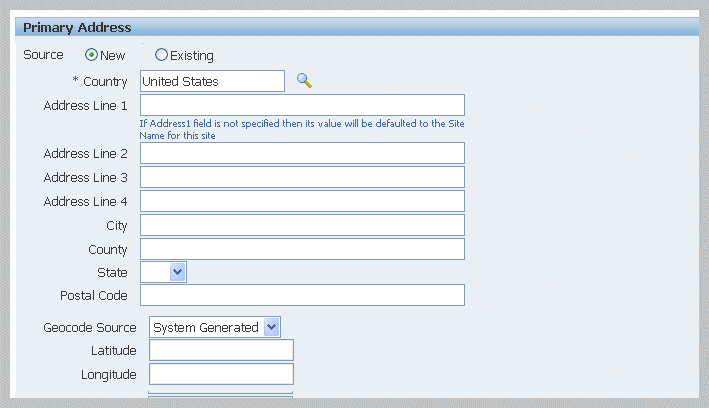
In the Primary Address region, select a value for address Source:
-
New: Displays the fields for entering an address.
-
Existing: Displays a search box to select an existing address in the Site Hub data.
-
-
If you choose Existing, enter a search value to display existing records to select.
Your selection appears in the Primary Address region.

-
If you choose New, select a value in the Country field.
For new addresses, you have the option to enter values in either the address lines or in the Geocode Source fields.
-
For address lines, enter data in the following fields:
-
Address Line 1- 4
-
City
-
County
-
State
-
Postal Code
-
-
Optionally, you can use values in the Geocode Source fields to generate the geodetic coordinates for the site, instead of the address values. The default for this field is set in the profile option: RRS: Default Geocoding Preference:
-
System Generated: The Geocoder program is automatically launched when the site record is saved, and uses the address fields to find geodetic coordinates.
-
User Entered: Geocoder program uses the longitude and latitude values entered in the site record to find geodetic coordinates, and the program is manually launched to find the geodetic coordinates.
-
-
If you select User Entered in the Geocode Source field, enter values in the Longitude and Latitude fields.
These fields are disabled if you selected the System Generated Geocode Source. Enter the values in decimal format.
Note: Use the same values for multiple sites at the same address.
-
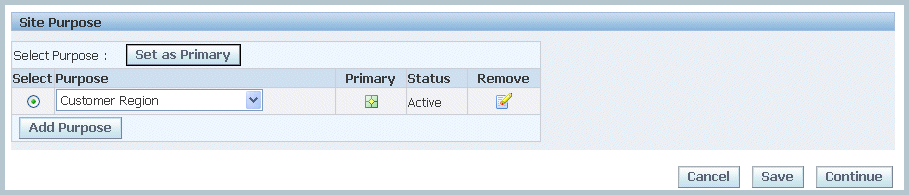
In the Site Purpose region, choose Add Purpose to set a purpose for this site and select a record from the list of values.
Purposes specify the function used for the site and must have an active status in Trading Community Architecture (TCA).
-
If you select more than one purpose, designate one record as your primary purpose by selecting Set as Primary.
-
Select Save to save your record; or select Continue to add detail information.
In the Create Site: Detail Information page—you can add attribute and attachment information to the site record.
-
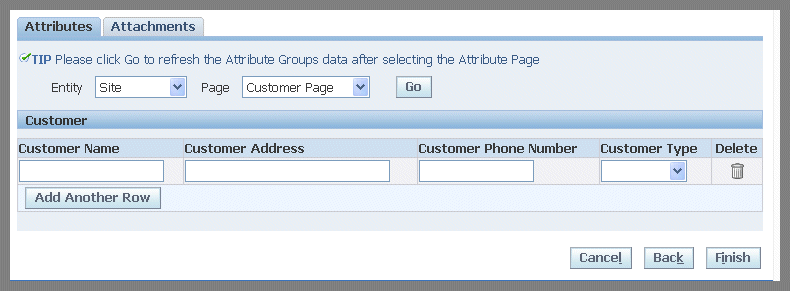
In the Attributes tab—if attribute pages have been created—you can add details to those pages for this site. Select an entity type in the Entity box, and the page name in the Page box.
See: Site, Location, and Trade Area Attributes
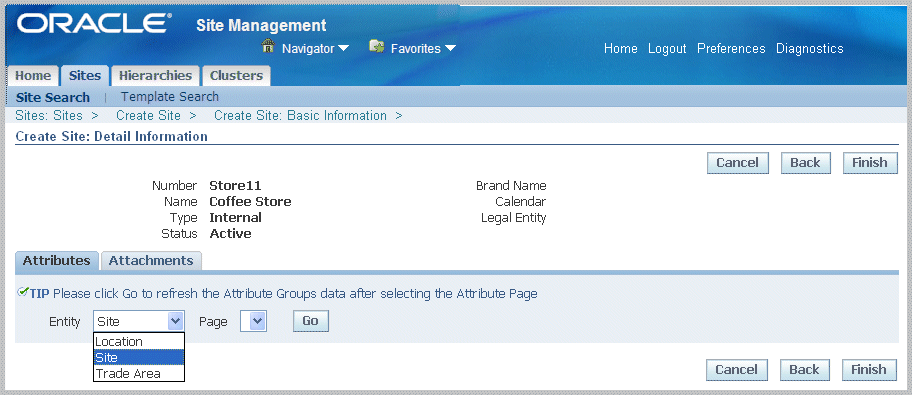
-
Choose Go to display the attribute page, and enter the appropriate information.
-
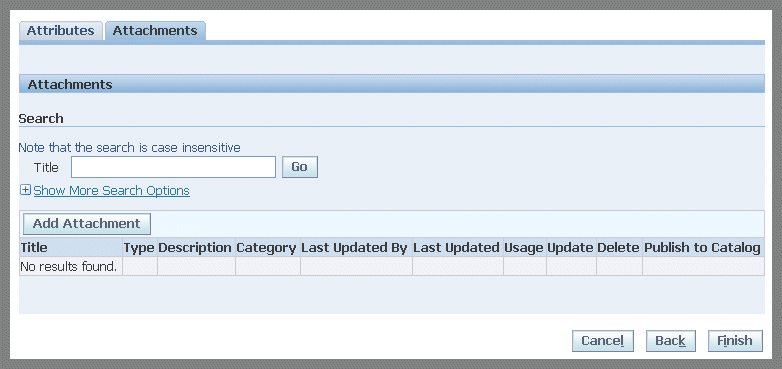
Select the Attachments tab to add documents, URLs, text, and other attachments pertaining to this site.
Search for records by selecting a value in the Title field. You can also use search criteria for values in the following fields: Description, Last Updated By, Last Update Date, Type, and Usage.
-
Select Add Attachment to navigate to the Add Attachment page to add files, URLs, or text. See: Using Attachments, Oracle E-Business Suite User's Guide
-
Select Finish to save your record.
To create a new site by copying an existing site
-
Select the Copy an Existing Site method, and select the site name in the list of values box.
-
Select Create to display the Create Site: Basic Information page.
If profile option RRS: Auto Default Site Number is set to Yes, the next number in the sequence appears. You can change the defaulted value to any unique value.
-
Values from the original site appear on this page. You must enter a unique value in the Name field.
You can use the default values or change information in the following fields: Type, Status, Brand Name, Calendar, and Legal Entity.
-
In the Primary Address region, select a value for address Source:
-
New: Displays the fields for entering an address.
-
Existing: Displays a search box to select an existing address in the Site Hub data.
-
-
If you choose Existing, enter a search value to display existing records to select.
Your selection appears in the Primary Address region.
-
If you choose New, select a value in the Country field.
For new addresses, you have the option to enter values in either the address lines or in the Geocode Source fields.
-
For address lines, enter data in the following fields:
-
Address Line 1- 4
-
City
-
County
-
State
-
Postal Code
-
-
Optionally, you can use values in the Geocode Source fields to generate the geodetic coordinates for the site, instead of the address values. The default for this field is set in the profile option: RRS: Default Geocoding Preference:
-
System Generated: The Geocoder program is automatically launched when the site record is saved, and uses the address fields to find geodetic coordinates.
-
User Entered: Geocoder program uses the longitude and latitude values entered in the site record to find geodetic coordinates, and the program is manually launched to find the geodetic coordinates.
-
-
If you select User Entered in the Geocode Source field, enter values in the Longitude and Latitude fields.
These fields are disabled if you selected the System Generated Geocode Source. Enter the values in decimal format.
Note: Use the same values for multiple sites at the same address.
-
Use or change the defaulted values in the Site Purpose region. Select Add Purpose to select a new record.
Purposes specify the function used for the site and must have an active status in Trading Community Architecture (TCA).
If you select more than one purpose, designate one record as your primary purpose by selecting Set as Primary.
-
You have the option to Select Attributes Groups for Copy. This enables you to copy available attribute groups based the purpose and country specified.
-
Select Save to save your record; or select Continue to add detail information.
In the Create Site: Detail Information page— you can add attribute and attachment information to the site record.
-
In the Attributes tab—if attribute pages have been created—you can add details to those pages for this site. Select an entity type in the Entity box, and the page name in the Page box.
-
Choose Go to display the attribute page, and enter the appropriate information.
-
Select the Attachments tab to add documents, URLs, text, and other items pertaining to this site.
Search for records by selecting a value in the Title field or entering criteria for Description, Last Updated By, Last Update Date, Type, and Usage.
-
Select Add Attachment to navigate to the Add Attachment page to add files, URLs, or text. See: Using Attachments, Oracle E-Business Suite User's Guide
-
Select Finish to save your record.
To create a new site using a template
-
Select the Create from Existing Templates method.
-
Select Create to display the Create Template: Template Selection page.
-
Select a Country value for the primary address of the template. The functionality for templates is limited to the country selected.
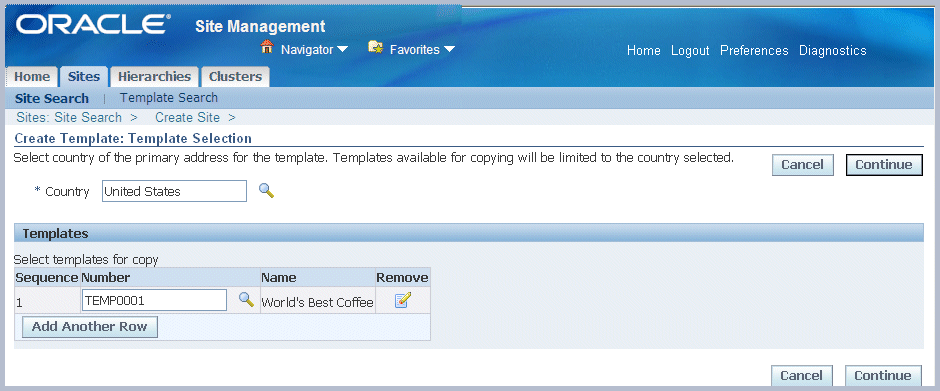
-
In the Templates region, select Add Another Row, and the search the list of values in the Number field for template records.
-
Select Continue to display the Create Site: Basic Information page.
-
The template values appear on this page. Enter values in the Name and Number fields.
If profile option RRS: Auto Default Site Number is set to Yes, the next number in the sequence appears. You can change the defaulted value to any unique value.
You can use the default values or change information in the following fields: Type, Status, Brand Name, Calendar, and Legal Entity.
-
In the Primary Address region, select a value for address Source:
-
New: Displays the fields for entering an address.
-
Existing: Displays a search box to select an existing address in the Site Hub data.
-
-
If you choose Existing, enter a search value to display existing records to select.
Your selection appears in the Primary Address region.
-
If you choose New, you can change the value in the Country field.
For new addresses, you have the option to enter values in either the address lines or in the Geocode Source fields.
-
For address lines, enter data in the following fields:
-
Address Line 1- 4
-
City
-
County
-
State
-
Postal Code
-
-
Optionally, you can use values in the Geocode Source fields to generate the geodetic coordinates for the site, instead of the address values. The default for this field is set in the profile option: RRS: Default Geocoding Preference:
-
System Generated: The Geocoder program is automatically launched when the site record is saved, and uses the address fields to find geodetic coordinates.
-
User Entered: Geocoder program uses the longitude and latitude values entered in the site record to find geodetic coordinates, and the program is manually launched to find the geodetic coordinates.
-
-
If you select User Entered in the Geocode Source field, enter values in the Longitude and Latitude fields.
These fields are disabled if you selected the System Generated Geocode Source. Enter the values in decimal format.
Note: Use the same values for multiple sites at the same address.
-
In the Site Purpose region, use the defaulted value or select Add Purpose to set a purpose for this site.
If you select more than one purpose, designate one record as your primary purpose by selecting Set as Primary.
-
You have the option to Select Attributes Groups for Copy. This enables you to copy available attribute groups based the purpose and country specified.
-
Select Save to save your record; or select Continue to add detail information.
In the Create Site: Detail Information page— you can add attribute and attachment information to the site record.
-
In the Attributes tab—if attribute pages have been created—you can add details to those pages for this site. Select an entity type in the Entity box, and the page name in the Page box.
-
Choose Go to display the attribute page, and enter the appropriate information.
-
Select the Attachments tab to add documents, URLs, text, and other attachments pertaining to this site.
Search for records by selecting a value in the Title field or entering criteria for Description, Last Updated By, Last Update Date, Type, and Usage.
-
Select Add Attachment to navigate to the Add Attachment page to add files, URLs, or text. See: Using Attachments, Oracle E-Business Suite User's Guide
-
Select Finish to save your record.
Creating Sites Using Export and Import Function
Web Applications Desktop Integrator (Web ADI) is a self-service Oracle Application. Web ADI generates Microsoft Excel or Word documents on your desktop, and downloads the data you have selected from the application to be viewed, or modified and uploaded. It can be used to load legacy data.
Export and Import Setup
-
Set profile option BNE_ALLOW_NO_SECURITY_RULE to Yes at the User level.
-
Set profile option EGO: Enable exporting to Excel to use the export and import functionality.
-
If you are using Microsoft Excel 2003 or higher, you may need to change security settings to render the spreadsheet, see: Changing Security Settings
-
If the RRS: Auto Default Site Number profile is enabled, for records with identical values in the Site Name field, the following occurs for site creation using the import function:
-
Only one Site Number is assigned to all records with identical Site Names using Single-Row attribute groups.
-
Multiple Site Numbers are assigned to records with identical Site Names using Multi-Row attribute groups.
-
To create new sites by using the export and import function for a spreadsheet
-
Select the Create a Spreadsheet for Site Import method.
-
Select Create to display the Create Template: Template Selection page.
-
In the Context region, select a site Purpose value. Optionally, you can further define your search by selecting values in the Country and Trade Area Group fields.
Tip: It is good practice to have a value in the Country field because import formats require addresses for sites.
-
Select Go to display available import formats for exporting records to a spreadsheet.
The import format identifies the specific site purpose imported records inherit, and the attribute groups defined for that purpose. See: Setting Import Formats
-
Choose a record in the table, and select Export to display the Viewer page.
-
In the View box, select a Microsoft Excel spreadsheet version for exporting your records.
If you enable the Reporting check box, the document created cannot be uploaded back to the Site Hub application.
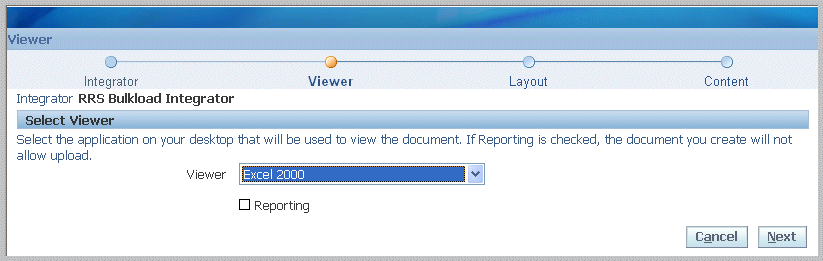
-
Select Next.
An informational message appears about downloading the file. The File Download dialog box appears prompting you to open or download the file to your desktop.
-
Select Open.
A processing message appears as the file is downloaded, and then a confirmation message when the download is successful.
-
Enter new records or update records in the Microsoft Excel spreadsheet.
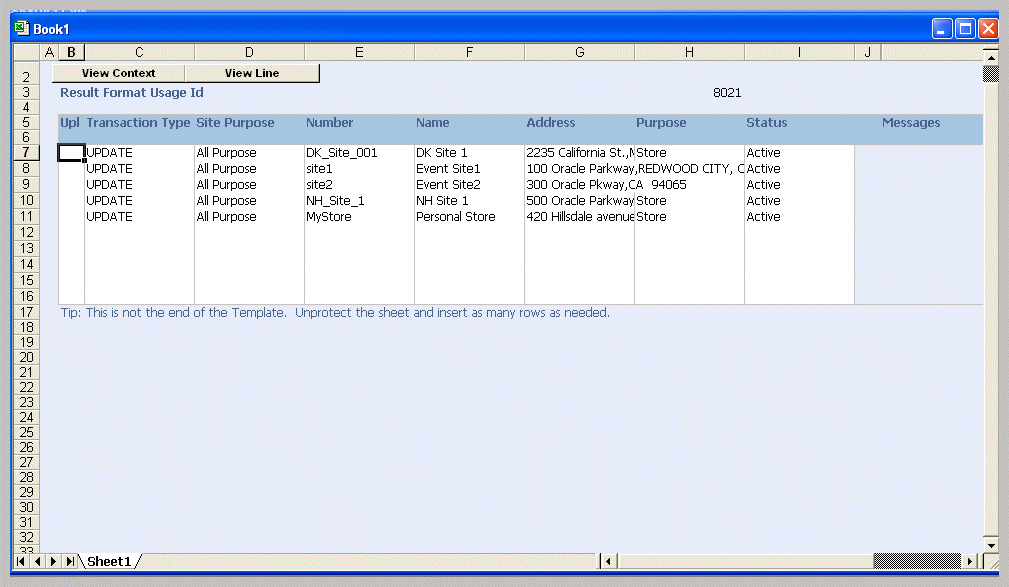
-
To upload the records into Site Hub when your data entry is complete, select the Oracle menu option and choose the Upload option.
-
Enter the Result Format Usage Id value appearing on the spreadsheet into the Upload Parameters dialog box field.
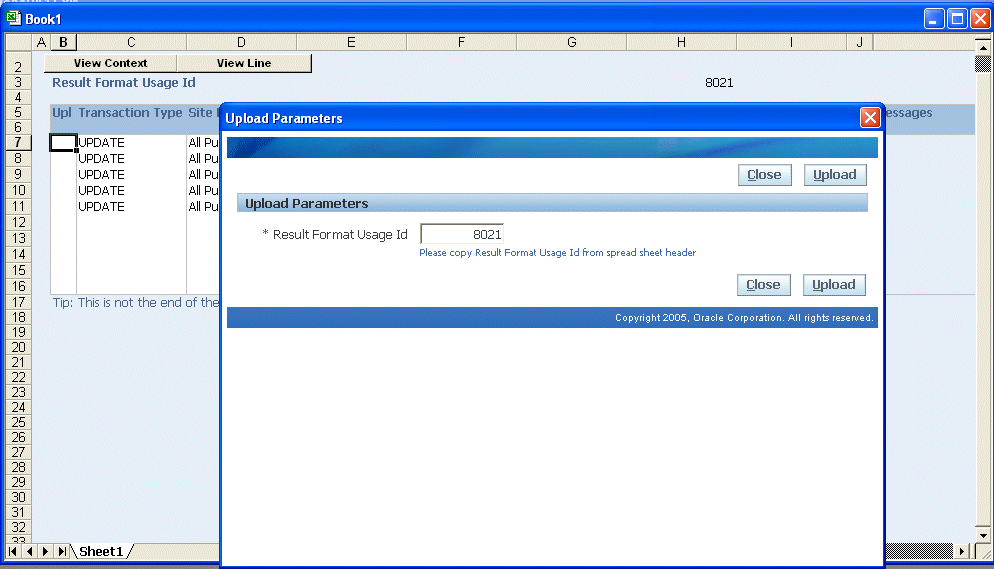
-
Select Upload.
A confirmation message appears with the number of rows successfully uploaded and the concurrent request number. The spreadsheet denotes the uploaded information in the Messages column with an icon.
Changing Security Settings
You may need to change the security settings to render Microsoft Excel 2003 or a higher spreadsheet versions.
Change your settings if the Microsoft Excel spreadsheet does not appear, or you receive the following message: Method VBProject of object_Workbook failed.
To change security settings
-
In Microsoft Excel, navigate to the Options dialog box by selecting the Tools menu and choosing Options.
-
In the Options dialog box select the Security tabbed region, and choose Macro Security.
-
In the Security dialog box, select the Trusted Publishers tabbed region.
-
Enable the Trust access to Visual Basic Project check box.
-
Choose OK to save your settings on the Security dialog box.
-
Choose OK on the Options dialog box.
Updating Site Records
As your business evolves, site properties can change. Site Hub enables changes to existing sites to reflect business changes for basic information, site purposes, attributes, attachments, associations, contacts, and assets. Some of the regions only appear if there is an association with other applications such as Oracle Property Manager, Oracle Trading Community Architecture (TCA), and Oracle Enterprise Asset Management (eAM).
To update an existing site record
-
Navigate to the Update Site page.
-
Select applicable information to change in the Name, Status, Brand Name, and Calendar fields
Note: You cannot change values in the Number, Type, or Legal Entity fields on an existing record.
-
Select the Basic Information tabbed region to modify details in the Address region.
Note: You cannot change the Country field value entered on the original record.
Select View Map to view site details on a map, see: Viewing Site Information
-
Select the Site Purpose region to:
-
Add new purposes to this site.
-
Change a record to primary purpose.
-
Change the status for any of the purpose records.
Existing purposes assigned to the original site record cannot be deleted but can be set to the Inactive status.
-
-
Select Apply to save your work.
-
Select the Associations tabbed region to edit information in the follow areas: Entities, Trade Areas, Cluster, Hierarchies, and Relationships. Some regions appear depending on the values entered when the record was created.
-
The Entities and Relationship sections appear if a legal entity is specified.
-
Location information appears if a location is associated with Oracle Property Manager records.
-
If Oracle Trading Community Architecture is used to capture customer relationships, you can select values in the Relationships section.
-
-
In the Entities region you can:
-
Associate existing property location values to your site by selecting a value in the Location field.
When a location is associated to the site, you can select the Property link to navigate to the Locations Inquiry window in Oracle Property Manager to view location information.
-
Associate an Inventory Organization value to the site.
When an Oracle Inventory Organization is associated to the site, you can select the Organization Name link to navigate to the Organization Parameters window, see: Defining Default Inventory Parameters, Oracle Inventory User's Guide

-
-
Select the Trade Areas region to modify trade area group details including:
-
Adding new trade area groups to this site
-
Changing the primary position for the records
-
Changing the status for any of the trade area groups
Note: Existing trade areas assigned to the original site record cannot be deleted, but can be set to the Inactive status.
-
-
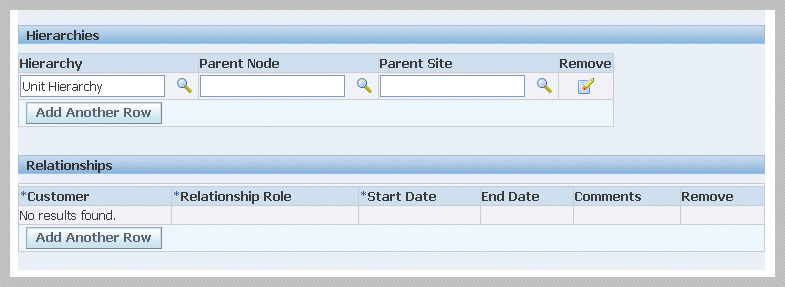
In the Clusters and Hierarchies regions, you can add new records by selecting Add Another Row.
-
In the Cluster region, add a valid value in the Cluster field.
-
In the Hierarchies region, add valid values in the Hierarchy, Parent Node, and Parent Site fields.
Note: You cannot delete existing clusters and hierarchies, but can inactivate the dates on the records. See: Viewing Site Hierarchies, and Viewing and Creating Site Clusters
-
-
The Relationships region displays customer and relationship information for the site. Select or remove values in the fields for:
-
Customer
-
Relationship Role (such as affiliate or competitor)
-
Start and End Dates
-
Comments
For more information see: Party Relationship Management Process, Oracle Trading Community Architecture User Guide
-
-
Select Apply to save your work.
-
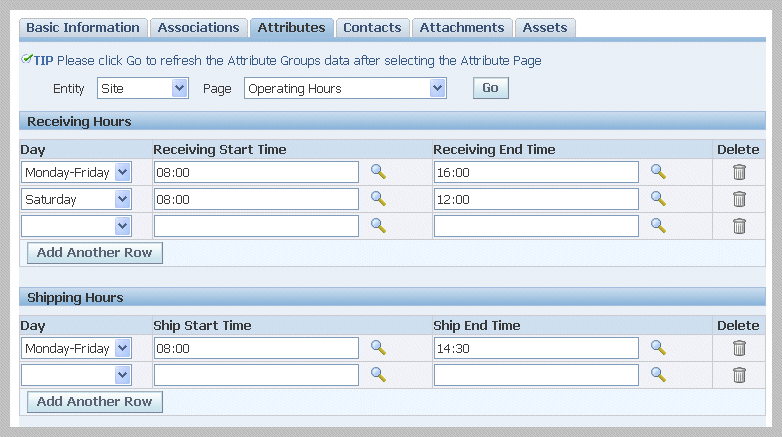
Select the Attributes tabbed region to modify details for attribute pages. Select a value in the Entity box—choices are Site, Location, or Trade Area.
-
Choose a value in the Page box.
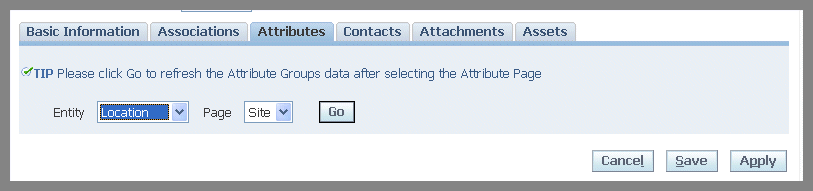
-
Select Go to display the page as defined in the attribute groups and attribute pages.
-
Enter the appropriate information for the Attribute Page.
See: Site, Location, and Trade Area Attributes
Select the Contacts tabbed region to add or modify street addresses, E-mail addresses, and other personal contact information.
This tabbed region appears if a legal entity is specified. Trading Community Architecture is used to capture the definitions of parties, party sites, party relationships, and contacts for Site Hub records. See: Party Relationship Management Process, Oracle Trading Community Architecture User Guide
-
Select the Address region to modify site address details.
The values in the Address, Country, and Purpose fields appear from the data entered on the Basic Information page. If this address is used a the default address for search criteria as set up in TCA, an Identifying icon appears. You can perform the following actions in the section by choosing:
-
View Removed to navigate to the Contacts: View Removed Addresses page. This page displays old addresses that were associated with the site in the past, but have been removed.
-
Create to navigate to the Contacts: Create Address page to create another address.
-
Map to view the Site Map page for this site, see: Viewing Site Information
-
Update to navigate to the Contacts: Update Address to modify the address.
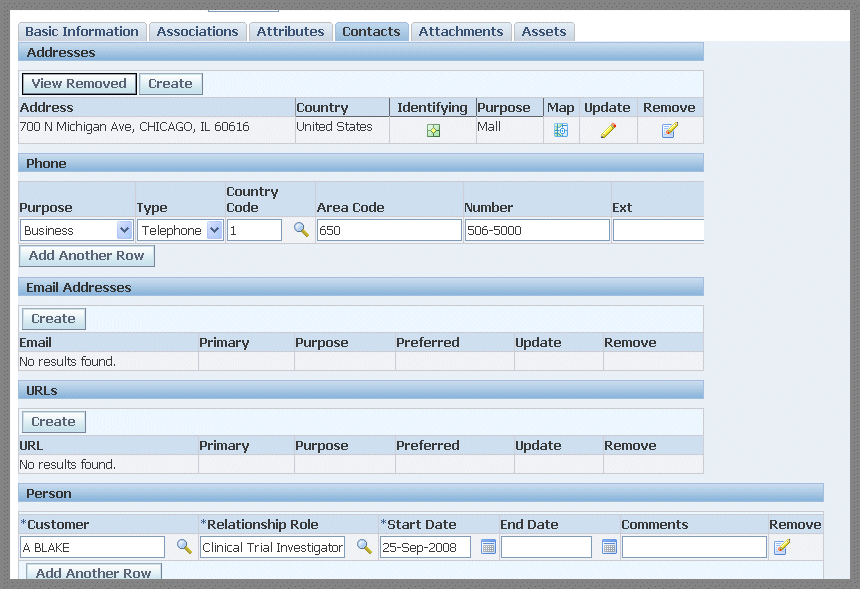
-
-
Select the Phone region to add, update, or remove phone number details including:
-
Purpose—such as business, home, or emergency
-
Type—such as telephone, mobile, or fax machine
-
Country Code
-
Area Code
-
Number
-
Extension
-
Select the Email Addresses region to add, update, or remove e-mail addresses. Details display in fields for Email, Primary, Purpose, and Preferred.
-
Select Create to navigate to the Contacts: Create Email Address page to add new e-mail records. Select information in the following fields:
-
Purpose—such as business, emergency, or personal
-
Format—choices are HTML mail, Plain text mail, and Text mail with HTML attachment
-
Email—the unique e-mail address
-
Status—choices are Active or Inactive
-
Primary—flag indicating if this is the primary e-mail address
-
Select the URL region to add, update, or remove website addresses. Details display in fields for URL, Primary, Purpose, and Preferred.
-
Select Create to navigate to the Contacts: Create Website page to add new website address records. Select information in the following fields:
-
Purpose—such as Homepage or Support
-
Format—such as Hypertext Transfer Protocol or E-mail
-
URL—Uniform Resource Locator specifying identified resource and the protocol for retrieving it
-
Status—choices are Active or Inactive
-
Primary—flag indicating if this is the primary website address
-
-
Select the Person region to add, update, or remove customer contact information that is stored in your TCA application. The following fields display and can be modified:
-
Customer
-
Relationship Role
-
Start and End Dates
-
-
Select Apply to save your work.
-
Select the Attachments tabbed region to add or modify attachment records for this site.
This region provides the ability to display attached documents, URLs, text, and other items pertaining to this site—and enables you to select:
-
Criteria in the Search region to filter the list of attachments
-
Add Attachment to navigate to the Add Attachment to add more records, see: Using Attachments, Oracle Applications User's Guide
-
The record in the Title field to open the attachment
-
Update to navigate to the Update Attachment: page to modify details
-
Delete to remove the record
-
Publish to Catalog icons to publish to the document catalog as a standard type document
-
-
Select Apply to save your work.
-
Select the Assets tabbed region to view asset records for this site.
This region is visible for internal sites, with an assigned legal entity, and if you are using eAM Asset instances. Details display in the following fields: Item Description. Item, Item Instance, Serial Number, Status, Quantity, and Start Date.
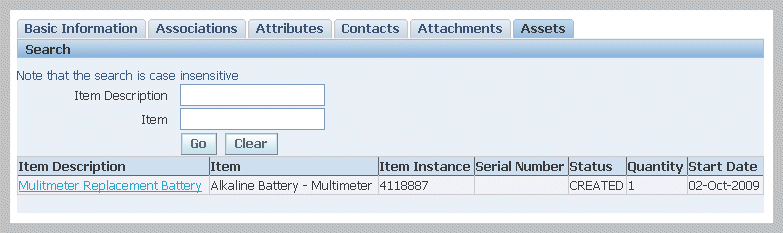
To update values in this region, see: Creating Site Assets
Copying Attribute Groups
When you are creating new sites from existing sites (copying, templates, or importing), you can copy attribute groups by choosing Select Attribute Groups for Copy from the Site Creation: Basic Information page. All available attributes groups from the selected templates, based on the purpose and country specified, are listed on this page.
To copy attribute groups
-
Navigate to the Basic Information: Copy Attributes page.
You must first enter the required fields on the Site Creation: Basic Information page to display this page.
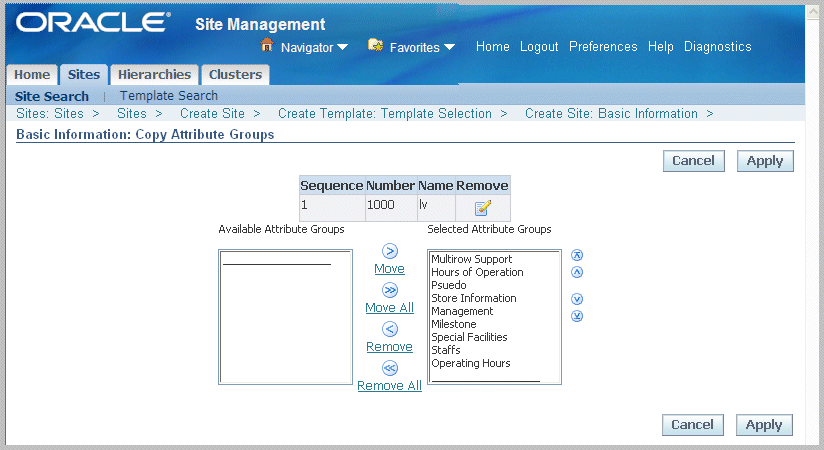
-
By default, all available attribute groups are enabled for copying in the Selected Attribute Groups box. Use the Arrow tools to move or remove records between the Available and Selected boxes.
-
Select Apply to save your work. The Site Creation: Basic Information page is refreshed.
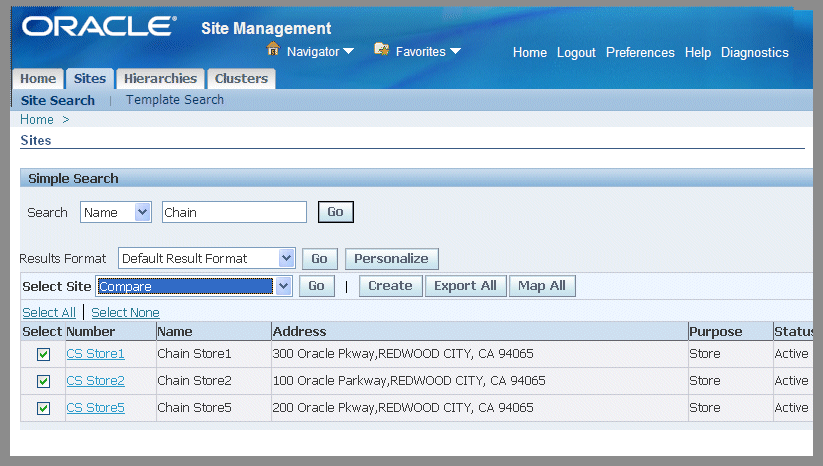
Comparing Sites
Site Hub enables you to analyze multiple sites side by side—comparing attribute pages for site, location, or trade area group entities. The information displayed can aid in examining and comparing site productivity and competitor data.
To compare two or more sites
-
Navigate to the Search page, and set your search criteria.
You can select records from either the Simple Search or Advanced Search pages, see: Searching for Information
-
Select the appropriate records from the results of your search, and select Compare in the Select Site box.
You must select at least two records, and can select up to 5 site records.
-
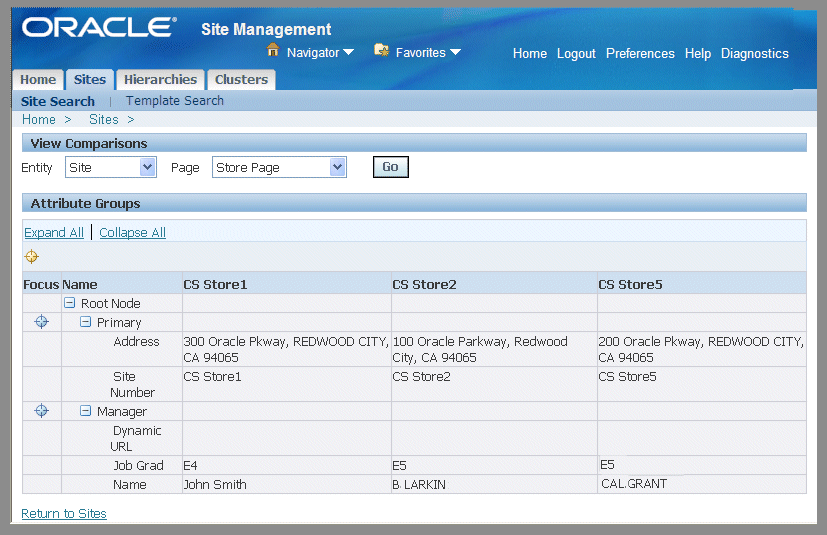
Select Go to display the View Comparisons page.
-
In the View Comparisons region, select a value in the Entity field. Your choices are Site, Location, and Trade Area.
-
Select a record in the Page field for the pages created for the entities.
-
Select Go to display the attribute values for each site record. The attributes are displayed in a table on this page.
Viewing and Creating Site Clusters
Site Hub provides the ability to group sites with shared characteristics into clusters, in a grouping at one level only. For example, you can create a cluster of sites with a specific annual revenue range and size. You have the ability to add site records as you create and modify a cluster record. You can also access the Add to Cluster page to add sites directly from the Simple Search and Advanced Search pages.
Note: If role based access security is implemented, users must have view privilege in order to view and add sites to cluster records.
To view existing site clusters
-
Navigate to the Clusters page.
-
In the Simple Search region, you have the choice to search for records using Name and Description criteria. You can also enable the My Clusters check box to display records selected in the Manage My Clusters page under your login information.
-
Select Go to display the results in the table.
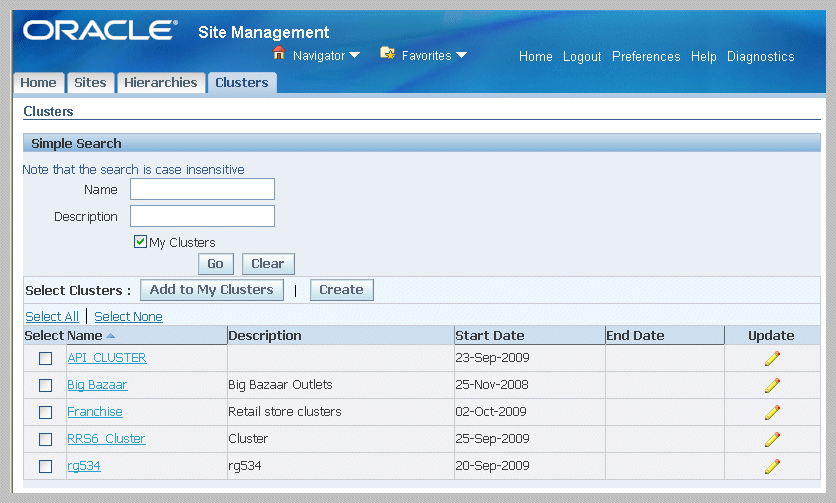
This page enables you to select:
-
Add to My Clusters to select records to add to your favorites list
-
Create to navigate to the Create Cluster page to create a new record
-
A name record to navigate to the View Cluster page
-
Update to navigate to the Update Cluster page
-
-
Select a record in the Name column to display the View Cluster page.
This page displays information in fields for Name, Description, and Start and End Dates.
Summary information for the sites attached to this cluster appear in the table in fields for Site Number, Name, Address, Status, Primary Use, and Creation Date.

-
Inclusive for all site records displaying in the table, you can select the following actions:
-
Export to export records to a spreadsheet, see: Creating Sites Using the Export and Import Function
-
Map All to display all sites on the Site Map page, see: Viewing Site Information
-
-
Select one or more records in the table to perform the following actions:
-
Compare, see: Comparing Sites
-
Create Asset, see: Creating Site Assets
-
Create Inventory Organization, see: Creating and Assigning Inventory Organizations to Sites
-
Create Property Location, see: Creating Property Locations for Sites
-
Map Sites, see: Viewing Site Information
-
To create site clusters
-
Enter a value in the Name field. Optionally; you can enter a value in the Description field.
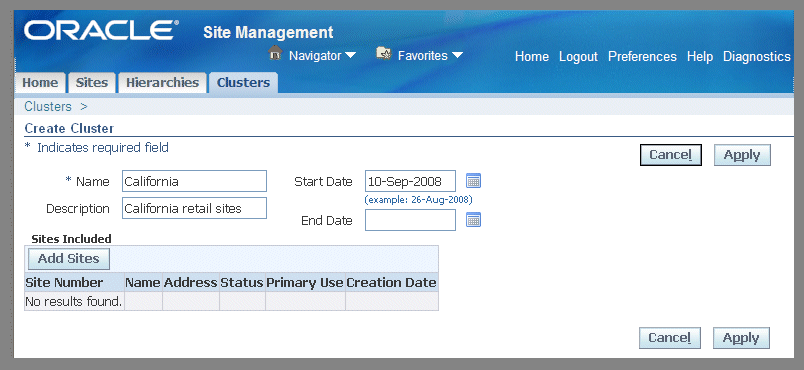
-
In the Start and End Date fields, you have the option to select dates to activate or inactivate this record.
-
Select Add Sites to access the Sites Search page to add site records to this cluster. Choose the sites you want in this cluster, and select Add.
They appear in the Sites Included region.
-
Select Apply to save your work.
To update site cluster records
-
Navigate to the Update Cluster page for the cluster record selected.
This page displays cluster name and description values; summary information for associated sites appears in a table.
-
You can modify the site cluster values in any of the following fields:
-
Name
-
Description
-
Start and End Dates
-
-
If there are sites associated with the cluster record, you can remove sites by selecting records in the table, and select Remove from Cluster.
-
Select Add Sites to access the Sites Search page to add site records to this cluster. Choose the sites you want in this cluster, and select Add.
They appear in the Sites Included region.
-
Select Apply to save your work.
To add sites to a cluster
-
Navigate to the Simple Search or Advance Search page, and search for applicable records.
-
Select site records, and choose Add to Cluster in the Actions box.
-
Select Go to display the Add to Cluster page.
The records selected appear on the page in the Selected Sites region.
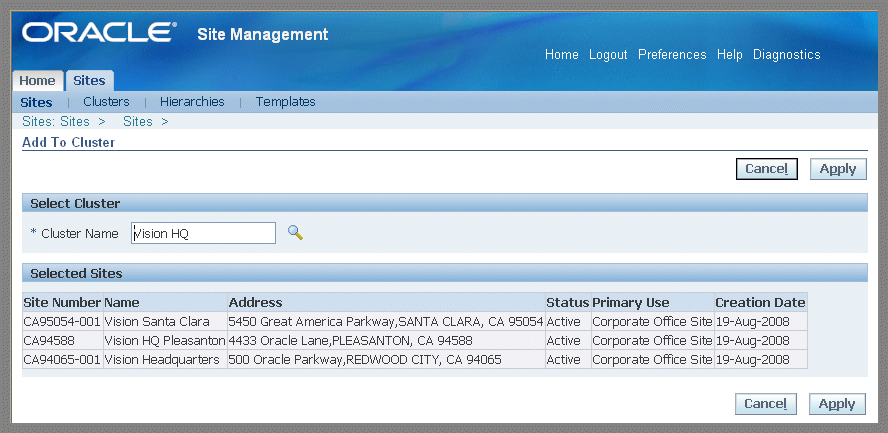
-
Select the cluster in the Cluster Name field.
-
Select Apply to save your work.
Viewing and Creating Site Templates
Site templates enable you to create models representing a range of possible site configurations used in site creation. Once created, you can update and modify these templates.
To view site templates
-
Navigate to the Templates page.
-
In the Simple Search region, you can search for records using criteria in the Name and Number fields.

-
Select Go.
The results of your search appear in a table with the following information summary information for each record: Number, Name, Country, Created By, Creation Date, Start and End Dates
This page enable you to select a record to view, update, or delete the template.
-
Select a record in the Number field to navigate to the View Template page.
The template information displays in tabbed regions for Basic Information, Attribute Groups, and Attribute pages.
-
You can modify template data by selecting Update for a record.
Update Template page appears with the template information displaying in the tabbed regions for Basic Information, Attribute Groups, and Attribute pages. Change the appropriate information.
-
Select Apply to save your work.
To create a site template
-
Navigate to the Templates page.
-
Select Create to display the Create Template page.
Three methods are provided to create templates: New Template, Copy an Existing Site, and Create from Existing Templates.
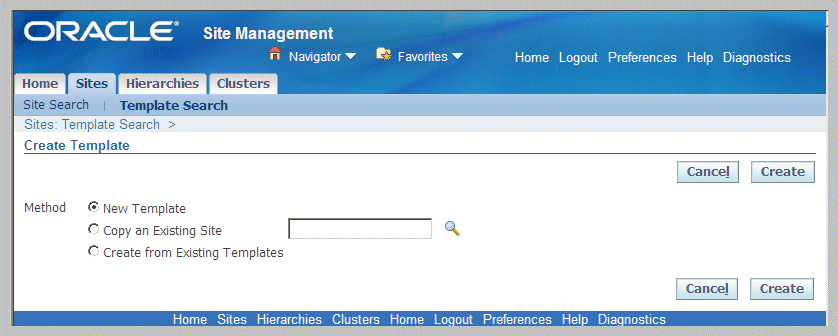
-
Select a method to enter new site details for your template:
-
New Template—displays the Create Template: Basic Information page for entering site details for your template.
-
Copy an Existing Site—displays the Create Template: Basic Information page with details from the site you selected to copy.
-
Create from Existing Templates—displays the create Template: Template Selection page to choose a template for copying information.
-
-
If you choose either the New Template or Copying an Existing Site methods, select Create.
The Create Template: Basic Information page appears.
-
If you choose the Create from Existing Templates method, select Create do display the Template: Template Selection page.
Select a value in the Country field, and Add Another Row in the Templates region. Select a template record from the list values.
Select Continue to display the Create Template: Basic Information page.
-
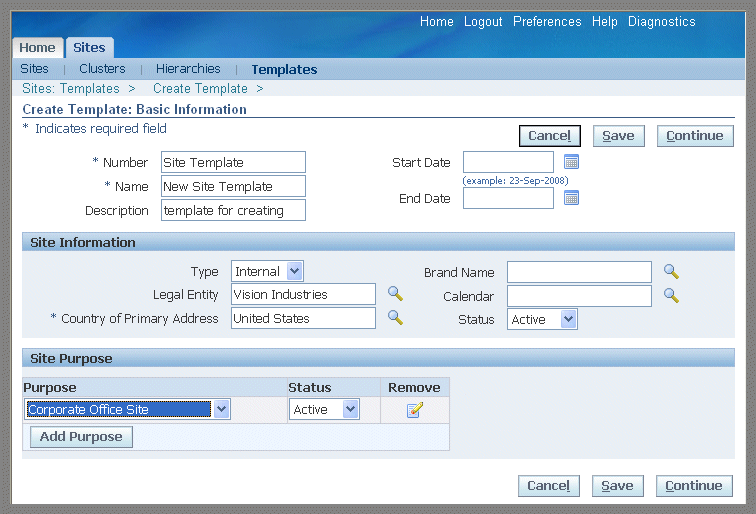
Enter unique values for the Name and Number fields, optionally enter data in the Descriptions and Start and End Date fields.
-
In the Site Information region, you must enter or use the defaulted value in the Country of Primary Residence, and optionally you can select details in the following fields:
-
Type
-
Legal Entity
-
Brand Name
-
Calendar
-
Country of Primary Address
-
Status
Note: For more information about the fields on this page, see: Creating Sites
-
-
In the Site Purpose region, you can select a purpose for this site to specify the function used for the site. Purposes are required for creating attribute pages.
-
Select Save to save your record; or select Continue to add detail information on the Create Template: Detail Information page.
-
If you selected Continue, the Create Template: Detail Information page appears. In the Attributes Group tab, if you added site purpose records and attributes are assigned to those records, they appear in the Available Attributes box.
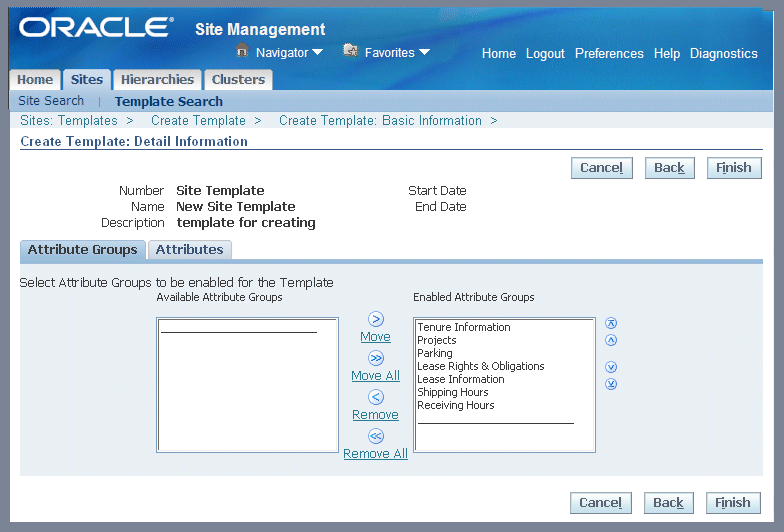
Use the Arrow tools to move or remove records between the Available and Selected boxes. See: Site, Location, and Trade Area Attributes
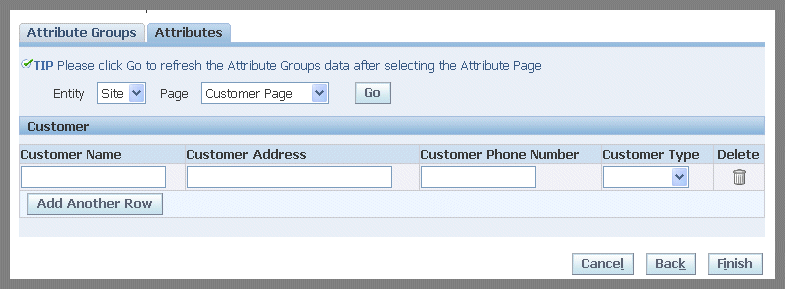
-
In the Attributes tab—if attribute pages have been created—you can add details to those pages. Select an entity type in the Entity box, and the page name in the Page box.
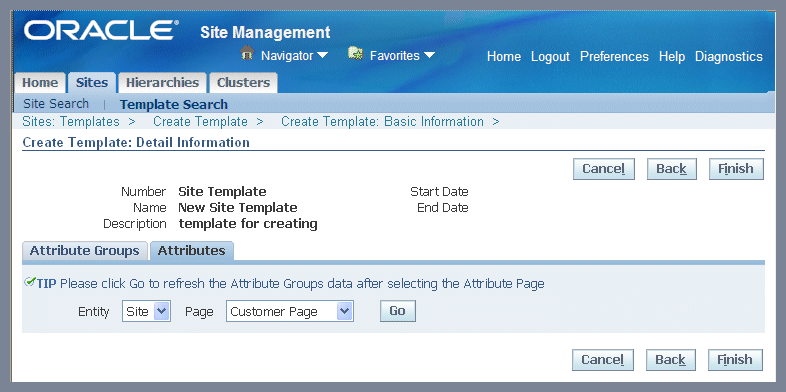
-
Choose Go to display the attribute page, and enter the appropriate information.
-
Select Finish to save your work.
Creating Site Assets
Site Hub provides the ability to associate sites with Oracle Enterprise Asset Management (eAM) assets and equipment. For internal sites with an assigned legal entity—you have the ability to track maintenance, performance, costs, and work history for your site assets. Asset groups enable you to define eAM assets and their characteristics that are inherited by the assets belonging to that group. Assets are visible in the View Site and Update Site pages.
To add asset instances to your site
-
On the Sites page, select one or more site records and navigate to the Create Asset Instances page.
-
Select a value in the Maintenance Organization field.
This field identifies the eAM maintenance organization associated with the production organization.
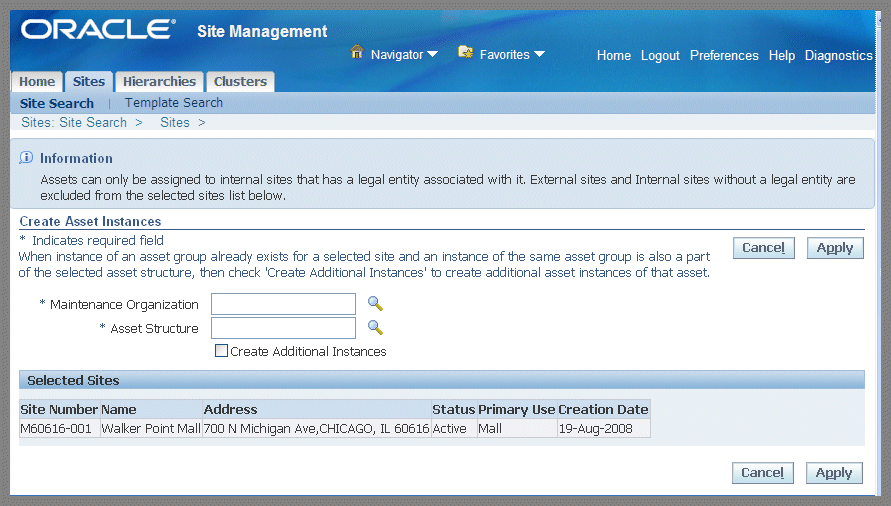
-
Select a value in the Asset Structure field.
An asset structure is a hierarchy of the parent asset and its component child assets.
-
Enable the Create Additional Instances check box to create additional asset instances if the specified site has existing assets from the same asset group.
-
Select Apply to save your work.
Related Topics
Defining Asset Groups, Oracle Enterprise Asset Management User's Guide
Creating Property Locations for Sites
You have the ability to set up property location information for your sites if you have installed Oracle Property Manager, and the site has a legal entity specified. This information appears in the Associations tabbed region of the site record, the Entities section. Location information appears if a site location is associated with Oracle Property Manager records.
To create property locations for your site records
-
On the Sites page, select site records and navigate to the Create Property Locations page.
-
Enter a valid record in the Operating Unit field associated to this property.
-
Select a value in the Tenure field for this property. Your choices can include Leased, Managed, Mixed, or Owned.
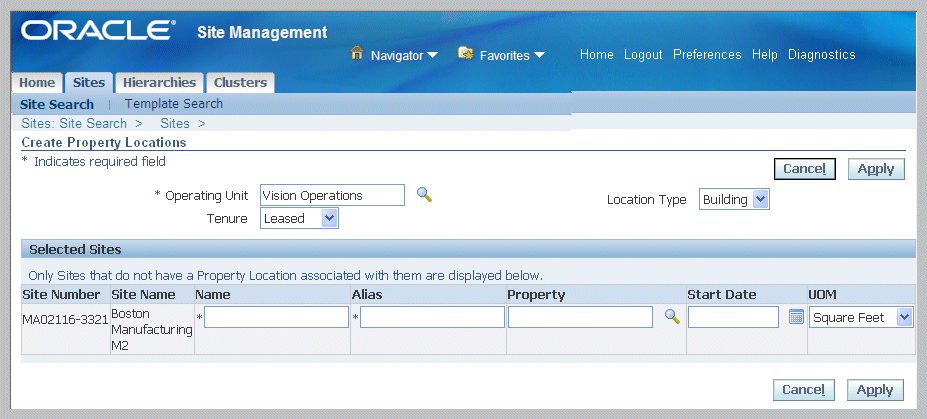
-
Select a Location Type value. Choices are Building, Floor, Office, Land, Parcel, and Section.
-
Enter values in the Name and Alias fields.
-
Optionally, you can select a Property record and Start Date values.
-
Select a unit of measure for valuating this property, such as square feet or monetary units.
-
Select Apply to save your work.
Creating and Assigning Inventory Organizations to Sites
You have the ability to create inventory organizations for the sites by copying the organization definition from a model or existing inventory organization. Existing organization data serves as a template. This also enables you to copy other organization specific data such as shipping networks, hierarchy assignments, bills of material, routings, items and item attributes from the model organization.
To create an inventory organization for a site
-
Select site records and navigate to the Create Inventory Organizations page.
Only selected sites that do not already have an associated inventory organization display in the Selected Site region.
-
Select a valid organization in the Model Organization field.

-
You have the option to copy or modify the following definition elements from the existing organization. Enable or disable the check boxes for the following definitions:
-
Copy Items
-
Copy BOM
-
Copy Routing
-
Validate Items
-
Copy Shipping Network
-
Assign to Existing Hierarchies
-
Purge
-
-
For the select sites, enter values in the Organization Code and Organization Name fields.
-
Select Submit to generate new records.
Related Topics
Copying Inventory Organizations, Oracle Inventory User's Guide