Customizing Dashboard Views for Oracle Mobile Field Service Store and Forward - Laptop
This chapter discusses how to customize the Dashboard views used in the Oracle Mobile Field Service Store and Forward - Laptop application.
This chapter covers the following topics:
- Understanding Dashboard Customized Views
- Customizing Dashboard Views
- Changing View Element Sequence
- Causing Personalization Changes to go into Effect
Understanding Dashboard Customized Views
Field technicians and administrators can arrange the information on their dashboards to meet their specific needs. The Field Service Technician Dashboard and Field Service Administrator Dashboard are delivered with four seeded views (Today's Tasks, Unassigned Tasks, Service Requests without tasks, and Open Tasks), which contain a preselected sequence of display columns. The number of tasks that display per page is set as well. Technicians and administrators can duplicate, and then modify the seeded views to personalize them, or they can create an entirely new view in which the task search criteria are determined by the technician or administrator.
Important: Dashboard customizing functionality is available only from the Mobile Field Service Developer responsibility.
See Customizing Dashboard Views.
Customizing Dashboard Views
Use this procedure to personalize views.
Steps
-
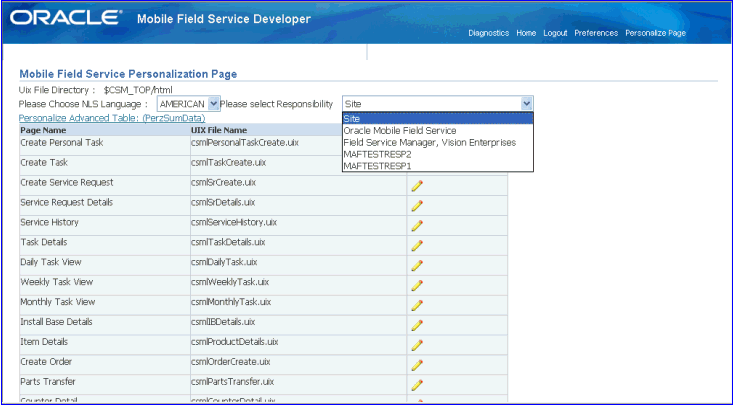
From the Mobile Field Service Developer responsibility, navigate to the Mobile Field Service Personalization Page.
-
The personalization feature is limited to the Site and Responsibility level. Select the level of personalization along with the language from the drop down menus in the header portion of the Mobile Field Service Personalization page.
-
Click the Personalize icon in the row for the Dashboard page name, UIX Filename csm|Dashboard.uix.
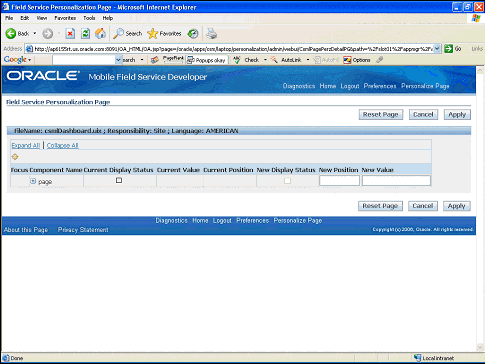
The personalization icon launches the Field Service Personalization Page.
-
Click Expand All.
-
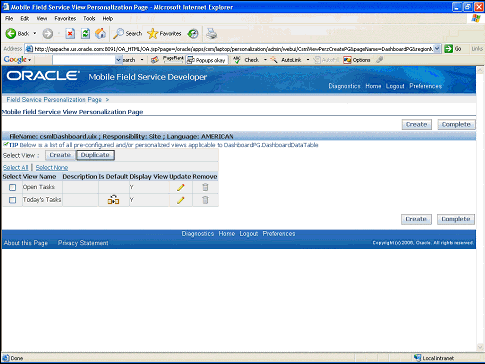
Click the Include Dashboard Table link.
This launches the mobile Field Service Personalization page.
-
From this page you can modify an existing view, duplicate an existing view, or create a new view.
-
To modify an existing view, select the view, and then click the Update icon in the row for the selected view.
-
You can personalize any of the views in the dashboard by duplicating the view under a different name, and then changing the parameters for the duplicated view to fit your needs. To duplicate an existing view, select the view, and then click Duplicate.
-
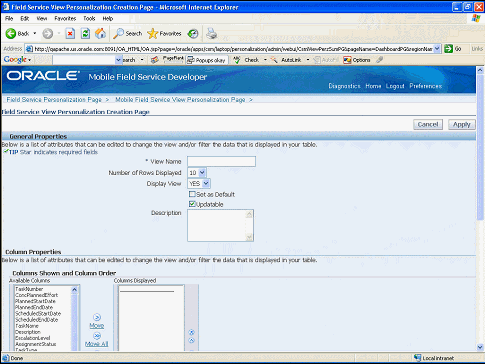
To create a new view, click Create.
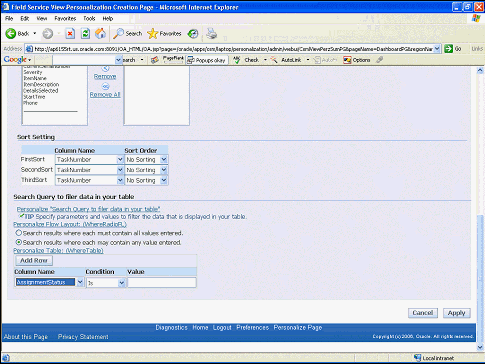
This screen capture displays the result of clicking Create, to create a new view. The Field Service View Personalization Creation Page appears.
-
-
On this page you:
-
Enter the View Name.
-
Enter the View Description.
-
Specify the number of rows to display per page.
-
Select the Set as Default check box if you want this view to open when the Dashboard is launched.
-
Select the Updateable check box if you want to enable this view to be modified in the future.
-
-
In the Column Properties region, select the columns of information that you want to have appear in the view by moving the column labels from the Available Columns dialog box to the Columns Displayed dialog box. To remove a column, move it from the Columns Displayed dialog box to the Available Columns dialog box.
-
The left-to-right sequence that columns appear in the view depend on the top-to-bottom sequence of column labels in the Displayed Columns dialog box. Select the column labels in the Displayed Columns dialog box, and the use the arrows to adjust the sequence as desired.
-
In the Sort Setting region, you can define the primary, secondary, and tertiary sort column names, and whether the sort order is ascending, descending, or no sorting.
-
The view spread table is populated based on the Search Query criteria that you specify in the Search Query to filter data in your table region.
-
Begin by choosing one of the following radio buttons:
-
Search results where each must contain all values entered. The search behaves like the "and" logic condition. The tasks retrieved to the table will match all the defined search criteria.
-
Search results where each may contain any values entered. The search behaves like the "or" logic condition. The tasks retrieved to the table will match one or more of the defined search criteria.
-
-
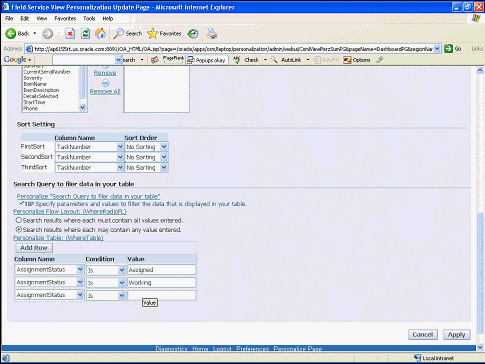
Next, add one or more task search criteria to the view. Specify Column name, condition (is, is not, greater than, and so on), and value.
-
If you need more rows to specify more criteria, click Add Row.
-
When you have finished creating the view, click Apply.
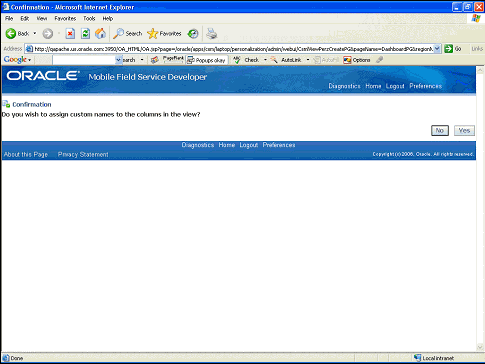
The Confirmation page appears.
-
If you want to assign custom names to the columns in this view, click Yes.
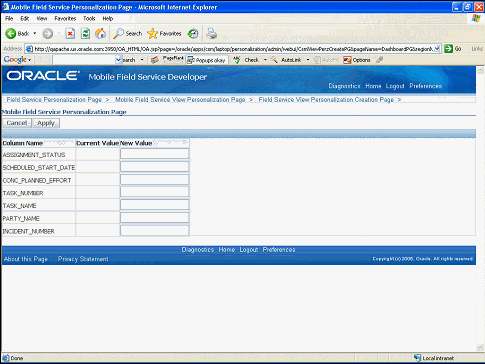
A page that lists the column names in this view appears.
-
Change the column names as desired by entering the new name in the New Value column.
-
Click Apply to return to the Mobile Field Service View Personalization Page.
The new view is listed in the table.
-
Click Complete.
Changing View Element Sequence
You can change the sequence that elements appear in Views.
For example, in the Main View, the default sequence of Quick Links is:
-
Create Parts Order
-
Parts Transfer
-
Calendar
-
Create Personal Tasks
-
Create Service Request
Use this procedure to change the sequence of view elements.
Steps
-
From the Mobile Field Service Developer responsibility, navigate to the Field Service Personalization Page.
-
Click the Personalize icon in the row for the Dashboard page name, UIX Filename csm|Dashboard.uix.

-
Click Expand All. Alternatively, click the "+" sign to expand the page.
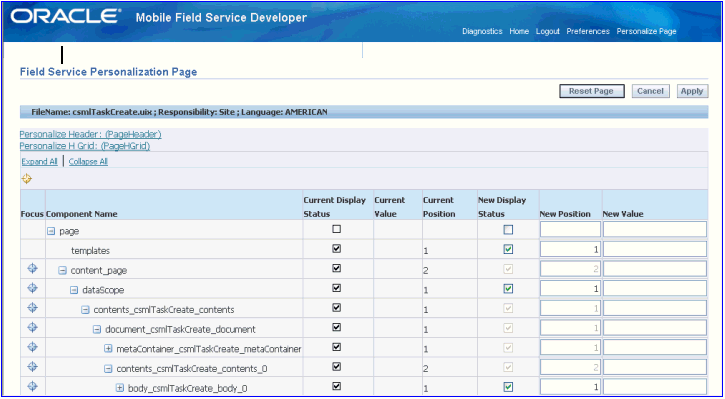
Each row in the table represents an element of the Dashboard page. Notice that some elements are nested within others. The Current Display Status check box indicates whether the element displays on the page. The Current Position indicates the sequence of the element with respect to its nested siblings.
For example, the screen capture shows that nested within the document_document element, the "Metacontainer csm|TaskCreate_meta_container" is at Current Position 1, and the "contents_csm|TaskCreate_contents_0 is at Current Position 2.
Note: The Current Position column and Current Display column are display only.
-
For example, scroll to the row that represents the Quick Links region.
The field that represents the Create Parts Order link is in Current Position 1. The field that represents Transfer Parts link is in Current Position 2.
-
To switch the sequence of these links, switch the New Position numbers.
Change the Create Parts Order link to New Position 2, and the Transfer Parts link to New Position 1.
-
To hide an element, such as the Create Personal Tasks link, clear the Current Display Status check box.
-
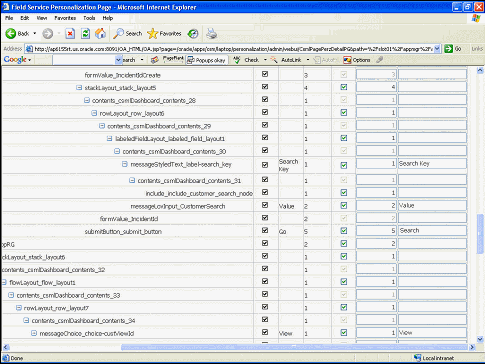
To change the label of an element, scroll to the labeled element, such as the search "Go" button (submission_submit_button). The Current Value is set to "Go". To change the label, enter a new value in the New Value field located at the far right of the table. For example, to change "Go" to "Search" change the label to "Search" in the New Value field.
-
Click Apply.
Causing Personalization Changes to go into Effect
For the personalization changes to take effect in the Oracle Mobile Field Service Store and Forward - Laptop application the JTM Master Concurrent Program with Lookup category needs to be executed.
Use this procedure to cause personalization changes to go into effect.
Steps
-
Navigate to the Submit Request window (Field Service Manager: Other > View Requests).
The Find Requests window appears.
-
Click Submit a New Request.
The Submit a New Request window appears.
-
Select the Single Request option and click OK.
The Submit Request window appears.
-
Select JTM Master Concurrent Program in the Name field.
The Parameters page appears.
-
Select the Lookup category and click OK.
-
Click Submit.
The JTM Master Concurrent Program is initiated. Wait until the program progresses to a Completed status.
-
Startup the Mobile Field Service Store and Forward - Laptop application. See Launching Oracle Mobile Field Service Store and Forward - Laptop.
-
Click the Synchronize link.
Ensure that the synchronization completes successfully.
-
When the synchronization completes successfully, open the new or modified view to verify the result.