Using Oracle Mobile Field Service - Wireless
This chapter documents how technicians can use the Oracle Mobile Field Service - Wireless application to access information, debrief tasks, create service requests and tasks, schedule tasks, and order parts.
This chapter covers the following topics:
- Introduction
- Getting Started
- Viewing, Managing, and Updating Your Tasks
- Viewing Today’s Tasks
- Performing a Task Search
- Updating an Existing Task
- Recording Counter Readings
- Adding Debrief Lines to a Task
- Creating a Service Request
- Creating a Service Request from the Main Menu
- Creating a Follow-Up Task
- Understanding Scheduling Tasks
- Starting Self-Assigned Tasks Immediately
- Self-Scheduling Tasks
- Using Window to Promise to Schedule Tasks
- Using the Intelligent Mode to Schedule Tasks
- Viewing Install Base Product Configuration
- Making Mobile Queries
- Performing a Parts Search
- Using Radius Search Capabilities
- Ordering Parts
- Creating an Internal Transfer
- Creating a Move Order
- Creating an Internal Order
- Receiving Parts
- Returning Parts
- Accessing the Knowledge Base
- Getting Driving Directions
- Viewing and Saving an Offline Schedule
- Managing Receipt of Shipments
- Changing Passwords
- Selecting Preferences
Introduction
Oracle Mobile Field Service - Wireless enables field service technicians access to information necessary to perform work at a customer’s site.
Not only can technicians view their daily schedule of tasks, they can also perform many other functions, such as ordering parts, creating and scheduling follow-up tasks, creating service requests, and accessing the Knowledge Base for potential solutions to common customer issues. The Oracle Mobile Field Service - Wireless application also enables technicians to access their daily schedule of tasks even when not in the network service area.
Optionally, technicians can use Mobile Field Service - Wireless to get directions to a job site.
User Interface
The Mobile Field Service - Wireless application provides a consistent user experience through a common look and feel (same color palette, same art direction), and through similar interaction behaviors.
Support for Blackberry™ Devices
The Mobile Field Service - Wireless application user interfaces are certified for use in Blackberry™ devices. As the device does not support the horizontal bar, input pages are changed to linear format from the tabular format.
-
Create new Service Request page
-
Create Follow up Task page
Pages containing tables are provided with width for the columns.
-
Task Search result page
-
Part Search result page
Choose between Images and Buttons
The Mobile Field Service - Wireless application provides you the ability to choose between images and buttons for the user interfaces. The value of the Profile Option CSFW: Use Icons for buttons determines whether icons or buttons appear:
-
If the Value of this profile is: Yes, then icons appear.
-
If the Value of this profile is: No, then buttons appear.
For more information about setting Profile Options, see the Oracle Mobile Field Service Implementation Guide.
Dependencies
Mobile Field Service - Wireless has these dependencies:
-
The steps and procedures documented in this chapter are based upon the use of a Medium Form Factor device, such as a PDA. For a comparative list of the functionality available for Medium Form Factor, Small Form Factor (WAP) and Voice-enabled devices, see Oracle Mobile Field Service Applications Compared.
-
To use the Order Part and Parts Search functionality, you must enable the Spares Management application of Oracle Field Service. For detailed information about the Spares Management functionality, see the Oracle Spares Management User Guide.
-
To use the Knowledge Base integration, you must install the Knowledge Management application. For detailed information on Knowledge Base functionality, see the Oracle Knowledge Management User Guide.
Multiple Responsibilities
Multiple responsibilities features can be applied to fulfill the following needs:
-
Assign a different transition task status to different responsibilities.
The Task Status and Transition Rule are assigned to a specific responsibility. The business requirement of applying different rules for different field service users, can be accomplished by creating new responsibilities and new rules, and then attaching them to each other.
-
Customized menus.
The business requirement of restricting some functions provided in the Field Service Wireless menu, can be accomplished by creating a custom responsibility with certain restricted functions excluded.
For example, if Get Direction or Knowledge Base functionality should not be provided to specific users, then a custom Field Service Wireless responsibility can be created with these functions excluded. Then this custom responsibility can be attached to specific users.
Getting Started
To use Mobile Field Service - Wireless, you must have a secure connection to the Oracle Application Server (AS) that your business uses to provide the connection between the application server network and your wireless device. After the technician has logged into the AS server, they must log into the application with the user name and password that was created for them during setup.
Note: It is possible to configure a single sign on (SSO) to use for the Oracle Mobile Field Service - Wireless application. In this case, authentication will be done only once. For information on creating a single sign on, see the Oracle Mobile Field Service Implementation Guide.
Once logged in, the technician will view the Home Page based on the CSFW: Home Page profile option, which includes a list of hypertext links that provide access to the available functionality. This list includes the following links:
-
Today’s Task
-
Task Search
-
Offline Schedule
-
Create Service Request
-
Knowledge Base
-
Parts Search
-
Receive Parts
-
Parts Return
-
Transaction History
-
Mobile Queries
-
Get Direction
Using this link, you can view the driving directions between any two tasks.
-
Preferences
-
Change Password
-
About
Using this link, you can view environment details such as, technician name, responsibility, database name, and browser information.
The Logout button at the bottom of the screen returns you to the Oracle Application Login page.
To navigate through the user interface (UI), the technician will use standard point-and-click functionality. The Mobile Field Service - Wireless application uses standard Oracle HTML functionality, whereby buttons and links are enabled, fields can be entered, and lookups can be used to select values for those fields that are list of value (LOV)-enabled.
When a technician logs into the Mobile Field Service - Wireless application, the home page main menu might also display the following notification message: "Your schedule has been updated. Please save offline schedule." This message occurs anytime there is a task assignment status change or time change to an assigned service request, or if a new task has been assigned to the technician. The message is a hypertext link and, by clicking it, the technician can view their updated daily schedule.
The next time the technician connects to the network through the wireless device, the notification will appear indicating a change. The technician can then view the change and save it as an updated offline schedule.
When you save a task list as an offline schedule, the task information is stored as a static HTML page and contains no active links or buttons. It is for view-only purposes.
Business Process
The field service technician is equipped with a wireless device, in most cases a Medium Form Factor PDA device.
Oracle Mobile Field Service Wireless is used together with the other wireless products and is not intended to replace these products. It will make the retrieval of task related information easier, because most field technicians carry phones with them. A connection with the wireless network is necessary for the application to operate.
Mobile Field Service Wireless supports the following business process flow.
-
The call center agent creates a request and an Oracle Field Service task.
-
The planner schedules a task and dispatches it to the most suitable field service technician.
From this moment the field service technician can use the Oracle Mobile Field Service Wireless application to retrieve and update task and task-related information, to order parts, create new service requests, create follow-up tasks, and schedule them.
-
The field service technician logs into the Oracle Mobile Field Service Wireless application.
-
The field service technician retrieves their agenda for the current working day.
If the current day is not applicable, the field service technician can choose another date. Navigation options are Next and Previous day. The technician can navigate days in both directions one at a time. After the field service technician selects one of these options, this date becomes the current day.
-
The field service technician can now do the following:
-
View customer information.
Field service technicians can inquire on the customer information concerning the selected task. They can also select customer telephone numbers and use them to call the customer.
-
View and update task information.
Field service technicians can inquire on the task information concerning the selected task. They can change the resolution and the status of the selected task.
-
Enter debrief information for the task.
When a field service technician works on a task, they have the ability create a debrief for that task after they have completed part or all of the task duties. A technician can add labor, material, and expense lines to the task, as well as capture counter readings and travel information.
-
Capture a customer signature.
Technicians can capture a customer signature during the Debrief process, provided that they are using one of the medium form devices that is supported by Oracle. After a signature is captured during debrief, it is sent to the Field Service Core Debrief application, where it can be viewed as an attachment.
-
View service request information.
Field service technicians can inquire on the request information concerning the selected task.
-
Submit the resolution of the task.
Field service technicians can change the resolution of the selected task and update the problem code. The resolution list is extracted from the back office application. The technicians will be asked to close the task. If they close the task, the status of the task will be set to Closed.
-
Submit the change of task assignment status.
Field service technicians can change the assignment status of a selected task. The task list is extracted from the back office application. When the assignment status of the task is set to Closed, the screen returns to the agenda.
-
Access the Knowledge Base.
The technician can access the company information repository for potential solutions to problems experienced in the field.
-
Order Parts.
The technician can order parts for a task.
-
Perform an Advanced Parts Search.
The technician can search for parts from their own sub-inventories, from coworker’s sub-inventories, or from a field warehouse.
-
Create service request and task.
When the technician is at the customer site and if the customer reports a new problem, then the technician can create a service request on behalf of the customer.
The technician can also create a task and assign the task to themselves by selecting: Work On It or Self Schedule options.
Alternatively, the technician can also provide the window of time to the customer and enable them to pick a schedule time that is suitable for them. In this scenario, the task may or may not be assigned to the technician.
-
Viewing, Managing, and Updating Your Tasks
The Mobile Field Service - Wireless application provides field service technicians a link to critical information needed to perform their duties at a customer site. Typically, field service technicians are assigned one or more tasks to perform. The Mobile Field Service - Wireless application enables technicians to quickly view those tasks they’re scheduled to perform today and also enables them to search for all tasks, or tasks that are assigned for a different day.
When viewing Today’s Task or any other list of tasks returned from a Task Search, the information that displays depends upon the settings entered in the CSFW: Task Display, CSFW: Task Display 2, and CSFW: Task Display 3 profile options.
For example, you may want to display the Scheduled Start Time and the Customer Address in the search results. The possible attributes you can display are the following: Customer address, scheduled start time, and task number.
For more information on setting up your home page or setting all Wireless profile options, see the Implementing Mobile Field Service - Wireless chapter in the Oracle Mobile Field Service Implementation Guide.
The following task-related procedures are available to a field service technician through the Mobile Field Service - Wireless application:
-
Viewing Today’s Tasks
-
Performing a Task Search
-
Updating an Existing Task
-
Creating a Service Request
-
Creating a Follow-Up Task
-
Viewing Install Base Product Configuration
Viewing Today’s Tasks
Use this procedure to view the current day’s task information.
Prerequisites
- A task must be assigned to the resource.
Steps
-
Field Service Wireless responsibility. From the main menu, click the Today’s Task hypertext link.
A screen labeled with the current date opens and displays a list of all the tasks scheduled to be addressed by the technician for that day. The tasks are displayed based upon the Task Display profile option and appear as hypertext links.
-
For task details, click the link of the task you want to view.
A screen appears displaying the task number and some of the task details such as, task assignment status, customer name, service request number, task name, priority, scheduled start, access hours, planned effort, and notes.
If there is a parts requirement associated with the task, this field will display as well. You can click the hypertext link to see the Parts Requirement details.
-
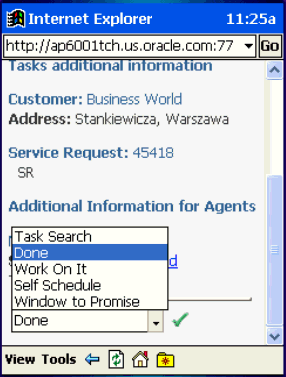
If you want to change the task assignment status, in the Status field, select the status you want to assign to the task (Working, Canceled, and so on) from the drop-down list and click Done to save the new assignment status.
-
To see additional customer information, click the hypertext Customer Name.
This action will display detailed customer information that was entered on the service request. If the customer contact has an email address, you can click the email address and create a message by entering a Subject and a Message. To send the message click Done.
-
To see additional information about the service request, click the hypertext service request number.
This action displays service request information such as customer name, summary of the service request, any notes that are attached, and also enables you to access any Knowledge Base solutions that might be attached to the service request. For more information on using the Knowledge Base, see Section 3.5, "Accessing the Knowledge Base".
-
If you want to add a note to the service request, click the Add notes hypertext link. You can also view existing notes, if any, by clicking the relevant hypertext link.
-
If you want to view service request attachments, click the Attachment icon.
The Attachment icon only appears if there are associated attachments.
The Attachment List screen appears displaying the attachment file name, size, and description. Attachments can be of any type such as, file type (.jpeg, .bmp, .doc, .pdf, .xls, .gif, and so on), web page, or short text. Click the attachment name to download and view the attachment.
-
If you want to add a note to the task, click the Add notes hypertext link. You can also view existing notes, if any, by clicking the relevant hypertext link.
Note: From the task details page of any task list in Today’s Task, you can perform a variety of updates, such as adding debrief information, ordering parts, creating follow up tasks, and so on, by using the drop-down menu that is displayed with the task details. For more information, see Update an Existing Task.
Performing a Task Search
Use this procedure to perform a task search.
Prerequisites
- A task must be assigned to the technician or a task is created by a technician.
To Perform a Simple Task Search
-
From the main menu, click the Task Search hypertext link.
The Task Search screen appears.
-
Select a Search For option.
Options are:
-
Open Tasks: Lists all the open tasks assigned to the technician.
-
Assigned Tasks: Lists all the tasks assigned to the technician either open or closed.
-
Created Tasks: Lists all the tasks created by the technician.
-
-
Select your task search criteria. You can filter your search for a task by using any of the following criteria that appear on the page:
-
Task Number
-
Service Request
-
Status
-
Date
-
Customer Name
-
-
Click OK to perform the search.
If you want to view all tasks, simply click OK and do not enter any search criteria.
Note: It is also possible to search for a task using Task Assignment Status and the Customer Name in the basic search screen.
The Search Results screen displays a list of all the tasks that match the search requirement. The results that display are dependent on the settings in the CSFW: Task Display 1, 2, and 3 profile options.
-
Click the hypertext link of the Task in which you want to view the details.
The Task Details page appears. From this page you can view and update various task details just as you can while viewing task details from the Today’s Task menu option.
To Perform an Advanced Task Search
-
From the main menu, click the Task Search hypertext link.
The Task Search screen appears.
-
Select a Search For option.
Options are:
-
Open Tasks
-
Assigned Tasks
-
Created Tasks
-
-
Select your task search criteria. You can filter your search for a task by using any of the following criteria that appear on the page:
-
Task Number
-
Service Request
-
Status
-
Date
-
Customer Name
-
-
Click the Advanced Task Search icon located at the bottom of the screen.
Advanced search criteria fields appear on the screen and the title of the screen is changed to Advanced Task Search.
-
Select additional search criteria to filter the tasks that you are searching for. Advanced search criteria are:
-
Priority
-
Start and End Date range
-
Account Number
-
Serial Number
-
Service Tag
-
Item Instance
-
-
Click OK to perform the search.
The Search Results screen displays a list of all the tasks that match the search requirement. The results that display are dependent on the settings in the CSFW: Task Display 1 and 2 profile options.
Updating an Existing Task
You can update key aspects of an existing task that has been assigned to you through Oracle Mobile Field Service - Wireless. You can access existing tasks through the Today’s Task entry point, or by using the Task Search functionality.
You can make several updates to an existing task. The updates you can make include: updating the task assignment status, adding notes to the task, adding an attachment, adding debrief lines, updating additional task information, and updating the scheduled start date and time.
Note: When adding notes to either a task or a service request, the note type options are determined during the setup process in CRM Foundation. Those note types related to a task are mapped to the Task Manager, which can only be viewed when adding a note to a task. Notes related to the service request are mapped to the service request, and can only be viewed when adding a note to a service request.
Once you have retrieved a task’s details, use the following procedure to update the task assignment status, to add notes, and to add attachments. For a flow diagram of voice commands to change the status of a task, see Changing Task Status.
Prerequisites
- A task must be assigned to the resource.
Steps
-
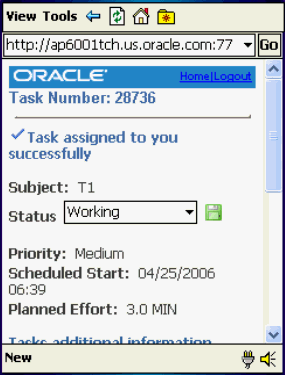
To update the task assignment status, from the Task Details screen, select the status you want to assign to the task from the drop-down list.
Main Menu > Task Search > Task Details
Main Menu > Today’s Task > Task Details
The available status values display such as, Completed, Accepted, Rejected, Working, Cancelled. The possible status values that appear are based on the Task Status Transition Rule definition for the current responsibility.
-
Click Save to save the new task assignment status.
Note: If a task is assigned to a service request that has products associated with it that include counter readings, upon changing the task assignment status to "Completed" a notification is generated asking the user if they want to "Capture Readings for the Following Counters?" and lists the products as a hypertext link. To capture the counter readings, click the hypertext link and enter the counter reading details. For more information, see Recording Counter Readings
-
To add a note, tap the Add hypertext link in the Notes field.
The Add Note screen appears.
-
Select the Type of note you are adding from the drop-down list.
For example, Callback, Conversation, Date Change, and so on.
-
Select a note Status from the drop-down list. Possible values include: Public, Private, and Publish.
-
Enter the text of the note in the Descriptions text box.
-
When you have finished with the note, tap OK.
After the note is added, the Task Details screen is opened again. In the Notes field, you can now look at the note you added by tapping the View hypertext link. Furthermore, all notes attached to a task can be viewed and multiple notes are designated by a numerical value next to the View link. For example, if there are two notes attached to a task, you will see "(2)View" in the Notes field.
-
To view an existing note, tap the View hypertext link.
The Notes screen appears and displays a list of the notes associated with the task. This hypertext link displays the date and time when the note was created, the name of the resource who created the note, and the first few words of the note description. You can also create a new note for the task by clicking the New Note button.
-
Click the hypertext link of the note you want to view.
The note details are displayed.
-
To add an attachment, scroll to the Attachments region and tap Add in the Service Request field.
The The Service Request: x screen appears.
-
From the LOV, select Attach File, Attach Text, or Attach URL.
For this subflow, assume that you picked Attach File. The Add Attachment: x screen appears.
-
In the Attachment Summary region, enter values for Title, Description, and Category. Browse and select the desired file. Tap OK.
The Add Attachment: x screen reappears.
-
Adjust the title and description if necessary, and tap OK.
The application uses its built-in Wireless server to upload the file to the E-Business Suite Enterprise server.
Recording Counter Readings
A technician can record counter readings during a service call if the task assignment they are working on is associated with a service request on a product requiring counter readings.
Use this procedure to record counter readings.
For a flow diagram of voice commands to capture counter readings, see Capturing Counter Readings.
Steps
-
From the Task Details screen, select Counters from the drop-down menu.
The Counter details screen appears displaying the product name and the Current Reading.
-
In the New Reading field, record the counter reading for the product.
-
Optionally, enter a Reset Reason.
-
Optionally, enter a Reset Reading.
-
Click Done when you have finished recording the counter readings.
Adding Debrief Lines to a Task
When a field service technician works on a task, they have the ability create a debrief for that task after they have completed part or all of the task duties. The Mobile Field Service - Wireless application leverages the Oracle Field Service’s Debrief module for this purpose. A technician can add labor, material, and expense lines to the task. Each of these debrief lines contains a list of fields that must be entered when adding that particular line to the task.
The following lists the required fields for each type of line:
-
Expense: Service Activity Code, Item, Amount, Currency, Quantity, and UOM.
-
Labor: Service Activity Code, Item (optional), Start Date, Start Time, End Date and End Time.
In the Mobile Field Service - Wireless application, you can set a profile option "CSF: Allow Overlapping Times" to determine whether or not you want to enable a technician to enter overlapping times for different task assignments for any given day. If this profile is set to No, then technicians will not be allowed to make such an entry and an error message will appear.
-
Material: Service Activity Code, Item, Sub Inventory, and Service Date.
The Material line is a two-step process in which the second step renders fields dynamically, depending up the selection you make in the first step. Other Material line fields include: Disposition, Quantity, UOM, Reason, Instance number, Parent Product, Recovered Product, and Part Status.
The Mobile Field Service - Wireless application also supports loaner transactions, whereby the field technician is installing a part at the customer site, which will serve as a temporary replacement part while the original is fixed. In this case, you will need to set up Service Activity Codes for material items of type Loaner.
Plus, the Mobile Field Service - Wireless application enables technicians to capture travel related information for their individual task assignments. Technicians have the ability to capture travel information such as, travel distance and travel time.
For a flow diagram of voice commands to create a debrief, see Creating a Labor Debrief.
For complete details on using Oracle Field Service Debrief, see the Oracle Field Service User Guide.
Capturing Customer Signature
The Mobile Field Service - Wireless application enables you to capture a customer signature during the Debrief process, provided that you are using one of the medium form devices that are supported by Oracle. Once a signature is captured during debrief, it is sent to the Field Service Debrief application, where it can be viewed as an attachment. A service manager can tell a signature has been captured because the attachment icon in core Debrief is enabled for that task.
The following table provides a list of the wireless devices that currently support Oracle’s capture customer signature functionality:
| PDA Device Name | Specifications |
|---|---|
| Palm Devices with Symbol Client (i.e. SPT-17xx, SPT-18xx) | Web client browser is required on the device to support signature capture. |
| Pocket PC 2002 or higher | Requires Pocket IE browser. |
For more information on customer signature capture, see My Oracle Support.
To Add Debrief Lines to a Task
-
Navigate to the task details page of the task you want to update. You can locate the task either through the Task Search function, or by using Today’s Task functionality.
-
Select Debrief from the drop-down list and click Go.
The Debrief summary screen appears. The screen will display the Customer Name and Debrief Number.
-
Optionally, if the Service Request has been resolved, select a Resolution Code from the drop-down menu and click Save.
Resolution codes are set up in Oracle TeleService and are user definable to meet your business needs.
-
If you want to add a summary of your work, enter some free form text in the Resolution Summary text box.
This information is reflected back on the Service Request window in Oracle TeleService and displays in the Resolution Summary section.
-
If you want to update the problem code, select a Problem Code from the drop-down menu and click Save.
Problem codes are set up in Oracle TeleService and are user definable to meet your business needs.
-
If you want to update the problem summary, enter some free form text in the Problem Summary text box.
This information is reflected back on the Service Request window in Oracle TeleService and displays in the Problem Summary section.
-
In the Debrief Details section, under the Edit Line Types section, there are hypertext links for Expense, Labor, and Material lines. To the right of each of these lines, there is an Add hypertext link. Click Add on the line you want to add to the debrief.
The Details screen appears. This screen will display the relevant fields associated with each of the Debrief lines.
-
Fill in the fields with your debrief information for the line you selected.
These fields will render dynamically, based upon the Debrief line selection that you make, in other words, Expense, Labor, or Material.
-
If you are entering Material line information, Step 7 is the first of two steps. When complete, click Next.
-
Enter the rest of the Material line details and click Submit.
Fields include Quantity, UOM Locator, and reason. If you entered a loaner item, you will need to enter a Return Date for the loaned out item as well.
-
Alternatively, if entering Expense or Labor lines, click Done when you have filled in the details of the debrief line in Step 7.
When you have added a debrief line, the hypertext name of the line (Expense, Labor, or Material) displays a numeric value next to it which indicates how many lines of that particular designation have been added.
For example, if you have added two expense lines, the hypertext link would read "Expense(2)." Clicking on that link opens the Expense Lines screen and displays some basic details of both the expense lines you added. You can click on either of the expense lines to open the Debrief Details screen and view or edit the line. You can also add another Expense line from the Expense Lines screen by clicking the Add Expense button. This process applies to Labor and Material lines as well.
Creating a Service Request
One of the advantages that the Oracle Mobile Field Service - Wireless application offers a field service operation is the ability to create follow-up work orders in those situations when a technician recognizes the need while out in the field. For example, a field service technician can initiate a new service request from a wireless device while on a customer call at a customer site.
This option is available from either:
-
The Create Service Request option in the drop-down menu of the Task Details screen, as documented in the following procedure, or
-
The main menu. See Creating a Service Request from the Main Menu.
When creating a service request for the same customer while servicing a particular task, the Mobile Field Service - Wireless application defaults key information such as, customer name, address and contact name, if any. The customer name and address cannot be edited.
The service request type, status, and severity appear by default from profile options set up in Oracle TeleService. These values can be overridden, if necessary.
After the service request has been created, the technician can add notes to the service request, and also has an option to create a task against the service request. Once the task is created, parts requirements can be added to the task. After a service request is created with an associated task, it is picked up by the Dispatch Center and can be scheduled, either manually or through the Oracle Advanced Scheduler.
The technician also has the following options to schedule and assign the tasks:
-
Done
-
Work On It
-
Self Schedule
-
Windows to Promise
-
Intelligent
For more information on creating service requests, see the Oracle TeleService User Guide.
Use the following procedure to create a service request from an existing task.
Steps
-
From the Task Details screen, select Create Service Request from the drop-down menu at the bottom of the screen.
Main Menu > Task Search > Task Details > Create Service Request option from drop-down menu > Create Service Request
The Create Service Request screen appears and the customer name and address from the existing service request that you were working on appear by default. The Type, Status and Severity fields also appear by default, but you can change the values, if necessary.
-
Enter a Summary of the problem for which you are creating the service request.
-
Select an Item, if necessary to associate with the service request.
-
If the item is serialized, select a Serial Number.
-
Select an Item Instance, if applicable.
-
Select a Service Tag, if applicable.
-
Click OK to create the service request.
At this point you will receive a service request number and a message that the service request was successfully created. The request number screen appears and, at this point, you can add Notes to the service request or you can add a Task.
-
To add Notes, click the Add hypertext link at the Notes field.
-
In the Notes screen, select the Type of note, the Status of the note, and enter a text Description for the note. When you are done, click OK to add the note and return to the request number screen.
-
To create a task for the service request, click the Add link at the New Task field.
The Create Task screen appears which is exactly the same as the screen used to create a follow-up task. See Creating a Follow-Up Task for details.
-
Click OK.
You can add a parts requirement to the task, which is associated with the new service request, just as you can when creating a follow-up task. You can also create a service request from the Mobile Field Service - Wireless application main menu. In this case, you must provide all the relevant customer information.
Creating a Service Request from the Main Menu
Technicians can also create service requests from the Main Menu. In this case, technicians have the opportunity to select from among all the customers that are on their Today’s Tasks list. When they navigate to the Create Service Request screen from the main menu, the Customer Name field contains all the customer names drawn from Today’s Tasks list in the drop-down list.
If you are creating a service request for a customer not contained in Today’s Tasks list, you must know the product Service Tag, Item Instance, or Serial Number. The Mobile Field Service - Wireless application can fill in the appropriate information if you know any of this information.
Creating a Follow-Up Task
Often times, a field service technician will recognize a need for follow-up work when completing a particular task at a customer site. For a variety of reasons such as, time constraints, parts availability, or lacking the technical expertise to address the task immediately, the technician might not be able to complete the work them self.
In these cases, a technician can create a follow-up task through the Mobile Field Service - Wireless application. When a technician creates a follow-up task:
-
the dispatcher manually assigns the task, or
-
the technician self-assigns the task, or
-
the technician can work on it right away, or
-
the technician can provide time window options to the customer to schedule the task according to their preference, or
-
the task is assigned automatically through Oracle Advanced Scheduler.
The task is automatically associated with the customer that the original task was assigned to. The Service Request number is defaulted from the original service request as well. If there is a Parts Requirement associated with the original task, and you want to create an identical parts requirement, you can copy the parts requirement from the original task when you create the follow-up task.
If there is a skills requirement associated with the original task, it will be automatically copied over to the follow-up task. For detailed information on skills requirements, see the Creating Service Requests and Field Service Tasks chapter of the Oracle Field Service User Guide.
The status of the task assignment appears by default from the CSF: Default "In Planning" task assignment status profile option, which you set during the implementation of Oracle Field Service.
Use the following procedure to create a follow-up task.
Prerequisites
- A task must be assigned to the resource.
Steps
-
Navigate to the task details page of the task you are working on. You can locate the task either through the Task Search function, or by using Today’s Task functionality.
Main Menu > Task Search > Task Details
Main Menu > Today’s Task > Task Details
-
From the drop-down list at the bottom of the details page, select Follow Up Task, and then click Go.
The Follow Up Task screen appears with the Customer name and Request Number appearing from the original task. The Status of the task appears by default as well.
-
In the Priority field, enter the task priority.
-
Select a Planned Start Date for the task. You can perform this step by clicking Pick.
-
Enter a Planned Start Time.
-
Select a Planned End Date.
-
Enter a Planned End Time.
-
Enter the Planned Effort for the task.
-
If you want to copy the parts requirement from the original task, select the Yes radio button at the Copy Requirements field.
-
If you have any notes to add, enter them in the Notes field.
-
Click OK to create the task.
You can also add a parts requirement after the follow-up task has been created. Click Add Requirement to navigate to the Add New Requirement Line screen and enter the appropriate information.
Understanding Scheduling Tasks
Technicians can schedule tasks and follow-up on tasks from wireless PDA devices. The access level for the technician in the wireless device for the scheduling and assignment of a task depends on the value of the profile option CSFW: Technician Schedulable Options. Possible values for this profile option are:
-
Work on it
-
Self Schedule
-
Window to Promise (Default)
-
Intelligent
Task scheduling and assignment from mobile devices supports the following business cases:
-
Work On It: Self-assign and begin work right away.
When technicians have the necessary skills, parts, and calendar availability to work on the task right away, they can select the Work On It option. Since scheduling is not needed, Advanced Scheduler is not required to be implemented for this option.
-
Self Schedule: Self-assign and start work at a later date.
Technicians can select the Self Schedule option if the technician cannot begin work on the created task or follow-up task right away, and wants to come back later to complete the task. When this option is selected, the technician is presented with a list of available schedule options. The technician can choose a schedule option to self-assign the task. This option requires Advanced Scheduler to be implemented.
-
Window-to-Promise: This option provides a list of available time slots, or "windows" for customer selection. This option requires Advanced Scheduler to be implemented.
Note: The Window to Promise option does not guarantee that the same technician will return to do the work.
-
Intelligent: Use the Intelligent option to assign a task to a resource based on selected criteria. This option requires Advanced Scheduler to be implemented.
Starting Self-Assigned Tasks Immediately
Use this procedure to start work on a self-assigned task right away:
Prerequisites
- A service request must exist. See Creating a Service Request or Creating a Service Request from the Main Menu.
- A task or follow-up task must exist. See Creating a Follow-Up Task.
Steps
-
Select a task from the Today’s Tasks list.
-
Select the Work On It option from the drop down menu, and then tap OK.
The task is assigned to the technician and the technician can begin to work on the task.
When the task is assigned, the task assignment status ID will appear by default from the profile option CSF: Default Working Task Status setting. See the Oracle Mobile Field Service Implementation Guide.
For example, the task status is set to "Working".
Self-Scheduling Tasks
In this option, the technician selects from the scheduling options provided by the system. The task is assigned to the technician.
Use this procedure to Self-Schedule a task:
Prerequisites
- Advanced Scheduler must be implemented.
- A service request must exist. See Creating a Service Request or Creating a Service Request from the Main Menu.
- A task or follow-up task must exist. See Creating a Follow-Up Task.
Steps
-
Select a task from the Today’s Tasks list.
-
Select the Self Schedule option from the drop down menu, and then tap OK.
Note: Alternatively, when a created task already exists in the device with the task status of “In Planning”, the technician can search for the task, select the task, and then select the Self Schedule option.
Selecting the self schedule option provides the technician with several schedule options. The plans appear in ascending order according to cost.
The plan options that display depend on the value set for the Profile Option CSFW: Task Max. See the Mobile Field Service Implementation Guide.
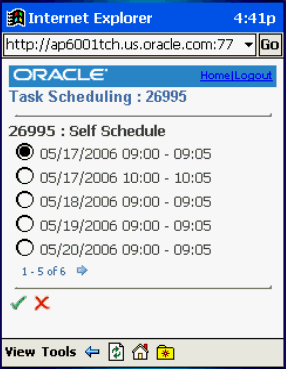
-
After the technician selects a schedule option, the task is assigned to the technician.
-
When the task is assigned to the technician the task assignment status changes, depending on the value of the profile option “CSF: Default Assigned task status”. See the Mobile Field Service Implementation Guide.
Using Window to Promise to Schedule Tasks
Using the window to promise option, the technician provides the customer with plan option time slots, or "windows", to choose from. When the customer selects a window plan option, based on the plan option selected, and availability of resources and parts for the plan option selected, the dispatcher assigns a technician for the task. The same technician may or may not be assigned for the task.
Use this procedure to use the windows to promise option to schedule tasks:
Prerequisites
- Advanced Scheduler must be implemented.
- A service request must exist. See Creating a Service Request or Creating a Service Request from the Main Menu.
- A task or follow-up task must exist. See Creating a Follow-Up Task.
Steps
-
Select a task from the Today’s Tasks list.
-
Select the Window to Promise option from the drop down menu, and then tap OK.
Note: Alternatively, when a created task already exists in the device with the task status of “In Planning”, the technician can search for the task, select the task, and then select the Self Schedule option.
Selecting the window to promise option provides the technician and customers with several windows of time. The plans appear in ascending order according to cost.
The plan options that display depend on the value you set for Profile Option CSFW: Task Max. See the Mobile Field Service Implementation Guide.
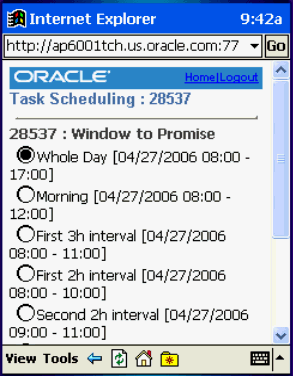
-
After the customer selects an option, the task is assigned to the technician available for the windows option selected.
-
When the task is assigned the task assignment status changes, depending on the value of the profile “CSF: Default Planned task status for Planned task”. See the Mobile Field Service Implementation Guide.
The access level for the technicians in the wireless device for the scheduling and assignment of a task depends on the value of the profile option: CSFW: Technicians Schedulable Options. Possible values are:
-
Work on it
-
Self Schedule
-
Window to Promise (Default)
If Level 3 is set (Window to Promise) all three options having same or lesser level are allowed.
-
Using the Intelligent Mode to Schedule Tasks
In this option, the technician selects from the scheduling options provided by the system.
Use this procedure to schedule a task with the intelligent mode:
Prerequisites
- Advanced Scheduler must be implemented.
- A service request must exist. See Creating a Service Request or Creating a Service Request from the Main Menu.
- A task or follow-up task must exist. See Creating a Follow-Up Task.
Steps
-
Select a task from the Today’s Tasks list.
-
Select the Intelligent option from the drop down menu, and then tap OK.
Note: Alternatively, when a created task already exists in the device with the task status of “In Planning”, the technician can search for the task, select the task, and then select the Self Schedule option.
Selecting the Intelligent option provides the you and customers with several windows of technician and time. The plans appear in ascending order according to cost.
The plan options that display depend on the value you set for Profile Option CSFW: Task Max. See the Mobile Field Service Implementation Guide.
-
After the customer selects an option, the task is assigned to the technician available for the windows option selected.
-
When the task is assigned the task assignment status changes, depending on the value of the profile “CSF: Default Planned task status for Planned task”. See the Mobile Field Service Implementation Guide.
The access level for the technicians in the wireless device for the scheduling and assignment of a task depends on the value of the profile option: CSFW: Technicians Schedulable Options. Possible values are:
-
Work on it
-
Self Schedule
-
Window to Promise (Default)
If Level 3 is set (Window to Promise) all three options having same or lesser level are allowed.
-
Viewing Install Base Product Configuration
The Oracle Mobile Field Service - Wireless application integrates with Oracle Installed Base to provide the installed base configuration for an instance, against which a service request was initially logged.
Oracle Installed Base is designed to track serialized and non-serialized item instances for products, providing for:
-
Instance maintenance.
-
Instance-to-Instance. relationships
-
History of all changes.
The Mobile Field Service - Wireless application enables a technician to view all the parent-child relationships related to a particular installed instance of an item. If, for example, a product (say a computer system) is installed at a customer site, and it is comprised of several other related components (monitor, hard drive, modem, and so on), then the install base view enables a technician to view the relationship between all of these components.
The wireless application provides support for internal assets. This functionality was developed to cater to the needs of the field service organizations that can provide service to internally owned assets as well as to customer products.
Typical examples of this case include:
-
Demo or training equipment.
-
Dispersed/Mobile assets, such as cell telephone towers.
-
Mobile MRI vans.
-
Leased copying machines.
Technicians can create tasks even when the service request incident address does not refer to a party site. This extends support for service of assets in locations that are not owned by or assigned to a specific party.
For more information, see the Oracle Installed Base User Guide.
Use this procedure to view the Installed Base configuration of an item associated with a service request:
Prerequisites
- A service request must have a product with an instance associated with it in the Installed Base.
Steps
-
Navigate to the Task Details page.
Main Menu > Task Search > Task Details
Main Menu > Today’s Task > Task Details
From the Task Details page, click the hypertext link Request number.
The Service Request screen appears.
-
In the Item field, if the item number is a hypertext link, then click it.
The IB Configuration screen for the selected item appears. This screen displays details about the item such as, Item Instance number, Item number, Item Description, Quantity, Status, and also a spread table with all the related child Item Instances. The table includes the Item Instance number, the Item number, status, and serial number, if any.
If there is an icon to the left of the Item Instance number, this indicates that there are children items related to this item instance.
-
Click the icon to see the item instances related to that particular child item instance.
-
When you are finished, click Done.
Making Mobile Queries
After administrators define queries and download them to local devices, you can select one of the predefined queries, enter variables, and submit it to the enterprise for execution. After enterprise processing, results appear in your screen.
Complete the following steps to prepare, submit, and view a query.
Prerequisites
- An administrator must have created and downloaded one or more predefined queries.
Steps
-
Tap the Mobile Query icon in the icon region.
The Mobile Queries screen appears.
-
Either tap a seeded query from the Query List LOV or tap an already saved query from the Query Name field.
-
Advance to the next screen, Submit Mobile Query.
A detailed description of the selected query appears in the Desc field. Then the cursor moves to the first query variable required.
-
Enter values for query variables until no more are required.
-
Tap the send icon to transmit your query.
When the enterprise has responded, a message appears in the Mobile Query Instances screen that says that a reply is available.
-
Tap the reply to display it in the mobile query results screen.
Performing a Parts Search
The ability to find parts quickly is a critical element of a successful field service operation. The Oracle Mobile Field Service - Wireless application enables a technician to search for parts throughout the organization, including those trunk stocks of other technicians, the central warehouse and, if he has multiple sub-inventories assigned to him, he can search his other sub-inventories as well.
After the appropriate parts are located, the Mobile Field Service - Wireless application enables the technician to make an internal transfer, create a move order transfer of parts, or to create an internal order.
The Mobile Field Service - Wireless application leverages Oracle Spares Management’s advanced parts search functionality, including the consideration of alternative or superseded parts in the search. Optionally, the Mobile Field Service - Wireless application also uses the Oracle Field Service’s geo-coding element to locate the nearest technician for parts availability, based on distance and time, providing that the technician has a verifiable "installed at" address.
The parts search functionality is a two-step process. First you locate the parts needed to fulfill the order, either through your own alternative sub-inventories, a coworker’s sub-inventory, or the warehouse. Once you have located the parts, the next step is to place an order.
Using Radius Search Capabilities
The Mobile Field Service - Wireless application leverages Oracle’s geo-coding capabilities, which gives technicians the ability to limit the search for items from coworkers’ trunk-stock to those coworkers who are within a specified radius. Radius search is an optional feature of the Mobile Field Service - Wireless application. The measurement unit is set with the profile option "CSFW: Default Distance Unit," which enables you to set the distance unit for measurement purposes. The available values are: Mile or Kilometer.
To use the radius search capabilities, one of the technicians task must be in an assignment status of "Working" and the customer site must have a valid geo-code address. This enables the geo-code to determine where to begin the radius search. For coworkers to be considered in this search, they must also have valid geo-code installed at addresses.
For more information on setting up the geo-code functionality, see the Oracle Field Service Implementation Guide.
Use the following procedures to perform a parts search.
Prerequisites
- You must have ATP functionality enabled in Advanced Supply Chain Planning.
- You must set the profile CSP: Part Search Method at the Application level by selecting for the Application level a value of ATP, Inventory, or Spares Supply Chain. You must also set the CSP: Order Type profile option, which is used to provide a default value for order type when creating internal orders.
- Oracle Spares Management must also be installed.
- If you want to use radius search capabilities, a task must have the status of "Working," and geo-code functionality must be implemented.
To Set Search Preferences
-
Navigate to the Technician Search preferences screen:
Main Menu > Technician Search Preferences
-
In the Distance field, enter the maximum distance from your location to perform the search. If you enter no value, the distance defaults to the value of the Max Distance profile.
-
Use the following table to indicate your preferences.
Label Action My Inventory If this box is selected, search results will include your own inventory. Other Technicians If this box is selected, search results will include the inventory of other technicians. Manned Warehouses If this box is selected, search results will include the inventory of manned warehouses that are open. Alternate Parts If this box is selected, search results will include the inventory of supersessions and substitute parts. Alternate parts will appear in the search results in blue font. Include Closed If this box is selected, search results will include the inventory of closed stocking sites for both warehouses and technicians. Closed stocking sites in the search results will appear in red font. Ship Set If this box is selected, search results will include only the stocking sites that have all parts required. -
Tap Go to save your preferences.
To Perform a Part Search
-
Navigate to the Part Search screen.
-
Main Menu > Part Search
-
Main Menu > Task Search > Task Details > Part Search
The Parts Search screen appears with your default search preferences applied. You can change them as required. If you came from the Task Details screen, then your task information is also carried forward here.
-
-
Select the Item number, of the item you want to find.
The item description appears by default.
-
Enter the Quantity of the item you need. The quantity of 1 appears by default.
-
Tap Add another item to add the item to the Items Entered list and to start the definition of another item.
-
Enter a value for Need Date/Time.
If you launched this screen from the Task Details screen, then enter the scheduled start date and time of the task or the current date and time, whichever is later. Otherwise enter the current date and time.
-
Enter locational or positional information.
Distance represents the radius for the search from the Ship to Address or, if selected, your current address. Your current address is defined by the current task or GPS.
Address Type can be a task address, a technician address, or a customer address.
-
Select the sources in which you want to search for the item by selecting the appropriate check boxes.
The options are the same as those that you had when you defined your search preferences, and those preferences appear here by default.
-
If this screen shows a task associated with this search and you want to create a parts requirement for the parts and quantities listed, then tap Part Requirement.
The part requirement number appears on this screen.
-
Click Search to begin the search.
The Search Results screen appears and displays which stocking sites have the items based on the search parameters, distance, and address selected.
To Perform an On Hand Quantity Part Search
-
Select the Item number of the item you want to search for.
Note: Item is the only field required when performing an on hand quantity search.
-
Enter an item Revision number, if applicable. The Revision number field will not appear if the item has no revisions.
-
Select the On Hand option.
Note: The other search criteria fields (Include Alternate Parts, Quantity, and Warehouse, My subinventories, and My co-workers check boxes) that appear on the screen do not pertain to the on hand quantity search.
-
Click Search to begin the search.
The Search Results screen displays all the on hand quantities for locations based on the information in the Planner's Desktop. The results screen displays the Location and for that location the On Hand Good quantity and On Hand Bad quantity.
For information on the Planner's Desktop, see the Oracle Spares Management User Guide.
Ordering Parts
Using the Mobile Field Service - Wireless application, you order parts to replenish a technicians trunk stock or to fill a specific need for a particular customer. Ordering parts using this application leverages the Oracle Spares Management application. The ordering process is closely integrated with the search process and automates the creation of the appropriate type of order.
An internal order to fill a parts requirement enables you to ship the necessary parts to a field technician at the specified "ship to" address. You can check for part availability within the supply chain and, if the part is not available, you can also check if there are any alternate parts. These include both substitute and superseded parts.
You can create an order from the search results and the order type will be automatically selected based on the Ship From and Ship To inventory organizations and with the source as a warehouse or another technician.
The search results are used to select the source and create either an order or a reservation. The following order type alternatives are used:
-
Move order
-
Internal order
-
Inter-org transfer
-
Sub-inventory transfer
The following variables determine the order type for the parts search and ordering:
-
Technician or warehouse
-
Manned or unmanned warehouse
-
Source organization same as or different than destination organization
-
In-transit required between source and destination
Use the following procedure to order parts through the Mobile Field Service - Wireless application:
Prerequisites
- You must also set the "CSP: Order Type" profile option, which is used to provide a default value for order type when creating internal orders.
To order a part
-
Search for the desired part and navigate to the Search Results screen. For details on doing this, see "To Perform a Search."
The Search Results screen displays which stocking sites have the items based on the search parameters, distance, and address selected.
Note: If a stocking source is closed, then it appears in red font. If a stocking source is a supersession or substitute, then it appears in parentheses.
-
Tap the hyperlink for a stocking site to see its details on the Stocking Site Details screen.
-
Tap Done to return to the Search Results screen.
-
Select the check box for the source and item that you want to use.
-
Tap Order.
The application determines the appropriate order type and generates it.
Note: Note: The Follow-Up Task button is optionally available on this screen by using security functionality. Tapping Follow-Up Task creates a follow-up task and parts requirement if a parts requirement was not previously created. See "Creating a Follow-Up Task" for more information.
Creating an Internal Transfer
In many field service operations, a technician may have multiple sub-inventories assigned to him within the same organization. The Mobile Field Service - Wireless application enables a technician to search all sub-inventories that reside in the same organization as the default sub-inventory for available parts. If a technician performs a parts search and finds that the necessary parts are in one of his other sub-inventories, he can create an internal transfer.
Creating a Move Order
In the event that a field service technician performs a parts search and the required parts can be found in the trunk stock of another field technician working in the same organization, they can create a move order to fill this request.
Note: To create a move order, the coworker’s sub-inventory most be in the same organization as the technician’s default sub-inventory.
When creating a move order that is associated to a particular task, the task assignment status should be "Working" during the search.
Follow this procedure to create a move order.
Prerequisites
- If you are using the geocode functionality to determine the distance of available coworkers, it must be properly installed.
- You must have a valid "installed at" address for the technicians included in the search.
Steps
-
After you have performed the search for a part, navigate to the search results screen.
This screen displays the item number, the name of the resource, the quantity available, the subinventory that contains the part, and the phone number.
-
Click on the hypertext linked name of the resource that you want to create the move order from.
The Move Order screen appears. This includes the resource name and phone number, the source sub-inventory and the quantity of parts.
-
In the Destination field, select the sub-inventory that you want to receive the move order parts shipment.
-
Add any comments you want to the move order.
-
Click Create.
You can view the move order by navigating to the Orders - In link from the main menu.
Creating an Internal Order
Technicians can create an internal order if their parts search includes warehouses that are located within the same organization as their default sub-inventory.
You can include substitute and superseded parts in the search by selecting the Alternate Parts check box.
Note: This internal order functionality works exactly the same as it does in the Field Service Spares Management module and returns the same results.
When performing an advanced parts search, the Mobile Field Service - Wireless application matches the "required" number of parts with the "available" number of parts in a warehouse. The application creates the parts requirement for the lesser of the two numbers.
Use the following procedure to create an internal order.
Steps
-
After you have performed the search for a part, navigate to the search results screen.
This screen displays the item number, the name of the warehouse, the arrival date and the shipping method.
-
Click on the hypertext linked name of the warehouse that you want to create the internal order from.
The Internal Order screen appears. This includes read only values for the source of the parts, the destination of the part, item number, UOM, and quantity.
-
In the Location field, select the location where you want the parts shipped. The default value is either the customer’s installed at address, or the technician’s default address. You can change this value.
-
Select a Need By Date for the parts.
-
Enter the Time by which you need the parts.
This is a 24-hour military clock and should be represented as hh:mm. So, if you need the parts at 8 a.m., enter 08:00.
-
Click Submit to create the internal order.
If you do not have ATP functionality enabled, the Mobile Field Service - Wireless application will still create a parts requirement, but it will not create the internal order. The internal order can be created by the dispatcher at a later time.
Receiving Parts
You initiate the receiving process in the Inbound Orders and Reservations screen. You can also use this screen to initiate a view of an order or reservation.
To Receive Parts
-
Navigate to Main Menu > Inbound Orders and Reservations
This screen shows a list of all your open orders and reservations. Reservations are used to receive sub-inventory transfers and inter organization transfers.
-
Select a single order or reservation to view or receive.
-
Tap View to view the order or reservation.
The Inbound Order screen appears.
-
Select the check box of the order lines whose balance due you want to cancel. A check box is disabled if a shipment is in transit.
-
Tap Apply to cancel the balance due on the selected order lines.
-
Tap Back to return to the Inbound Orders and Reservations screen.
-
Select the check box of any single order or reservation that you want to receive and tap Receive.
The Receive Parts screen appears. You use it to transact receipts from suppliers and other inventory locations. You can also use it to close orders short and cancel reservations.
This screen shows a list of all lines on the shipment, order, or reservation. Use this screen to enter actual quantities received when they are different from the shipment quantity or order quantity. Over shipments consistent with receiving rules for your organization are supported.
If an item is received that is not on the shipment and is not serialized, then report the situation to the dispatcher, logistics coordinator, analyst, or other designated user who will reconcile your inventory with the source inventory location. Ultimately both locations require stock adjustment transactions.
-
If you want a value for Sub-Inventory that is different from the default, then select it from the LOV.
-
Optionally, select a shipment to receive if there is more than one.
-
Enter a value for Receive Quantity if it is different from the default.
-
Select the Close Short check box to cancel the balance due on a line. A check box is disabled if a shipment in in transit.
-
Tap Receive.
If no serial controlled part has been received, then the application processes the receive transaction and displays a receiver number at the top of screen. If a serial controlled part has been received, then the Receive - Serial Numbers screen appears for further steps.
-
Enter or scan the serial numbers received.
Important: When a serial number is received that is not in the shipment, then the following message appears on the screen: “Serial number not in shipment." When you encounter this message, you cannot receive the invalid serial number until the serial number discrepancy is resolved. Return to the previous screen, change the quantity received, return to the Receive - Serial Numbers screen, and receive the valid serial number.
-
Tap Next.
The application transacts the receipt, returns to the Receive Parts screen, and displays the receiver number at the top of the screen.
Returning Parts
Excess parts are defined as those parts whose inventory balance is greater than the maximum level defined in the Authorized Stock List (ASL) in Spares Management. You can view the excess list information such as, item number, unit of measure, sub inventory, and condition type.
Spares Management return routing rules are used to display the destination for excess return in the Mobile Field Service -Wireless application. A parts return routing rule is defined by a source, a routing parameter, and a destination.
Refer to the Overview: Parts Return section in the Oracle Spares Management User Guide for more information.
Mobile Field Service - Wireless displays the excess parts list on a medium screen form. The technician will be able to invoke the excess parts list by clicking the Excess Returns link from the main menu.
The following information displays on the Excess Return screen:
-
Subinventory: This identifies the subinventory that contains the excess part.
-
Condition: This displays whether the subinventory is for usable parts or defective parts.
-
Return to: This displays the warehouse name and organization where the parts will be returned.
The return to organization and subinventories are populated from the Resource Addresses and Subinventories window in Oracle Spares Management or the shipping network setup in the Oracle Inventory.
-
Excess quantity: This is the quantity that is in excess of the maximum quantity as defined in the ASL after applying the excess rules.
The excess parts information is generated by the scheduled Create Excess List concurrent program that is executed in Spares Management.
For more information on Excess Parts Lists, see the Oracle Spares Management User Guide.
Use the following procedure to return parts:
Prerequisites
- You must have Oracle Spares Management fully implemented.
To Return Parts with a Consolidated Shipment
-
From the Main Menu, tap Parts Returns.
Main Menu > Parts Return
The Parts Return screen appears. This screen displays all the sub-inventories assigned to you and all the parts contained in each of these sub-inventories. The title area of the screen includes the date that the return list was created.
You use this page to initiate excess or defective returns by selecting a source sub-inventory. You can also select the consolidation option, which provides for multiple parts and quantities to be included in a single shipment. When the consolidation option is not selected, each piece will be a single shipment. This example flow uses the consolidation option.
-
Select a sub-inventory from the Source LOV.
-
Select the Consolidation check box.
Selecting this option means that multiple pieces will be included in the shipment.
The Part Details screen appears when there is only one destination, or the screen with a Destination Summary appears if there is more than one destination.
-
In the Return Quantity field, enter the actual quantity of an item to be returned if it is different from the recommended quantity.
-
Tap Next.
If an item is serialized, then the Parts Return - Serial Numbers screen appears. If the item is not serialized, then the Parts Return - Create Order screen appears.
-
If the Parts Return - Serial Numbers screen appears, then enter or scan the serial number for each item.
Note: If you enter a serial number that is not in the inventory balance, then the following message appears at the bottom of the screen: “Serial number not in inventory." When you encounter this message, the invalid serial number cannot be shipped until the discrepancy has been resolved. If there is a partial quantity on the part, then enter another serial number. If it is a total return, then go back to the previous page and reduce the return quantity by one and return to the serial numbers page. When your return to the serial numbers page, any valid serial numbers previously entered still show on the screen.
-
Tap Next.
The Parts Return - Create Order screen appears. You use this page to enter shipping details and create an order. In this example flow, this page is used to execute the shipment in consolidated mode where multiple parts and quantity are included in the shipment.
-
Revise the information on this screen as needed:
-
Destination Organization
Select a new organization if it is different from the one previously selected. Tap the Refresh button to update the ship-to address.
-
Destination Sub-Inventory
Select a new sub-organization if it is different from the one previously selected.
-
Carrier
Select a carrier.
-
Shipping Method
Select a shipping method.
-
Waybill
Enter a waybill.
-
Shipment number
Enter a shipment number or leave the field blank and the application will assign one.
-
-
Tap Create Order.
The application creates the order and displays the order type and number on the screen.
To Return Parts without a Consolidated Shipment
-
From the Main Menu, tap Parts Returns.
Main Menu > Parts Return
The Parts Return screen appears. This screen displays all the sub-inventories assigned to you and all the parts contained in each of these sub-inventories. The title area of the screen includes the date that the return list was created.
You use this page to initiate excess or defective returns by selecting a source sub-inventory. You can also select the consolidation option, which provides for multiple parts and quantities to be included in a single shipment. When the consolidation option is not selected, each piece will be a single shipment. This example flow does not use the consolidation option.
-
Select a sub-inventory from the Source LOV.
-
Clear the Consolidation check box.
Selecting this option means that each piece is a single shipment.
The Part Details screen appears when there is only one destination, or the screen with a Destination Summary appears if there is more than one destination.
-
In the Return Quantity field, enter the actual quantity of an item to be returned if it is different from the recommended quantity.
-
Tap Next.
The Parts Return - Create Order screen appears. You use this page to enter shipping details and create an order. In this example flow, this page is used to execute the shipment in non-consolidated mode, where each shipment is a single piece.
When the screen first appears, the value for Item is prepopulated with the first item on the list from the Part Details screen, but you can change this item if you want to do so. If the item is serial controlled, then the Serial No field is active.
-
If the item is is serial controlled, then enter or scan the serial number of the item being shipped.
Note: If you enter a serial number that is not in the inventory balance, then the following message appears at the bottom of the screen: “Serial number not in inventory." When you encounter this message, the invalid serial number cannot be shipped until the discrepancy has been resolved. You can enter or scan another serial number if one is available.
-
Revise the remaining information on this screen as needed:
-
Destination Organization
Select a new organization if it is different from the one previously selected. Tap the Refresh button to update the ship-to address.
-
Destination Sub-Inventory
Select a new sub-inventory if it is different from the one previously selected.
-
Carrier
Select a carrier.
-
Shipping Method
Select a shipping method.
-
Waybill
Enter a waybill.
-
Shipment number
Enter a shipment number or leave the field blank and the application will assign one.
-
-
Tap Create Order.
The application creates the order and displays the order type and number on the screen.
-
Repeat the steps for this process until you have shipped all items and return quantities.
Accessing the Knowledge Base
About the Knowledge Base
In a field service operation that services a variety of products or makes multiple customer calls involving similar issues, it can be advantageous to record and store solutions so that technicians can access them at a later date. The Oracle Knowledge Management application provides a mechanism for recording solutions for problems and it can be accessed by the Mobile Field Service - Wireless application.
Through the Mobile Field Service - Wireless application, you can perform a general knowledge base search or you can perform a search related to a specific service request. In the latter scenario, after you choose a Knowledge Base solution, you can manually attach it to the service request and it can be viewed at any time.
If you search the Knowledge Base from the main menu, you cannot attach any solutions to a specific service request. You can only view the solutions.
The Mobile Field Service - Wireless application supports two search methods: Keyword Search and Search by Category. If you are searching the knowledge base for a specific service request, the Service Request Summary serves as the keywords in the keyword search field. You can change the keyword value, if necessary.
Category search is available only through the main menu.
For complete details on using Knowledge Management and setting up Knowledge Management functionality, see the Oracle Knowledge Management User Guide.
Note: The Mobile Field Service - Wireless application supports only text-based messages. Any Knowledge Management solution that contains dynamic links or HTML pages will not appear in the search results.
Use the following procedure to perform a knowledge management search and attach it to a particular service request.
Prerequisite: You must have Oracle Knowledge Management installed and properly configured, including category setup.
Steps
-
Navigate to the task in which you want to perform a knowledge management search on.
Main Menu > Task Search > Task Details > Request Number > Knowledge Base
-
From the task details page, click the hypertext Request Number associated to the task.
The Request Number screen appears and displays basic information associated with the Service Request (Customer name, summary, notes, and Knowledge Management).
-
Click View in the Knowledge Base field.
The screen displays the Keyword field, that is populated with the SR Summary information, and also the Keyword Solution table with all the solutions that are associated with the keyword.
-
If you want to search for additional solutions, enter alternative words in the Keyword field and click Go.
Any related solutions are displayed in the solution table, which also displays the Score(%) of the relevance of the solution, the title and the type of solution.
-
To view a solution, click the hypertext Title of the solution you want to view.
The details of the knowledge base solution are displayed. This information includes the symptom a customer might be experiencing, the list of potential causes of the problem, and some solutions.
-
If you want to attach this solution to the service request, click Link.
-
Once you have linked the Knowledge Base solution, click Done to exit.
You can link multiple Knowledge Base solutions to the same service request. All linked solutions will appear with that particular service request in the future.
Getting Driving Directions
You can get driving directions to assist you in getting to customer sites or suppliers.
To get driving directions:
Steps
-
Tap the Get Direction icon from the toolbar.
The Driving Direction screen appears and contains a list of addresses from all the tasks that are scheduled for the system date.
-
Enter the starting address:
-
Tap a link in the list to select it.
-
Tap Work Address for help to select the work address.
-
Tap Other to type in the starting address.
-
-
Enter the destination address by following a parallel procedure to that in step 2.
-
Tap OK.
The Driving Direction screen displays written directions and an associated map.
Viewing and Saving an Offline Schedule
The Oracle Mobile Field Service - Wireless application operates in a connected (network) environment. It requires having network coverage at all times for accessing the enterprise information. However if the technician's wireless device is out of coverage, they can still access the information required to complete their job at the customer site.
Field service technicians have the ability to save the schedule of task assignments and their related information for a particular date on their wireless device. The field service technicians will be able to view these pages in offline mode when coverage is unavailable.
Each time their schedule is updated or changes, a notification is sent alerting them to update their daily schedule and re-save the offline schedule.
Use this procedure to view and save offline schedules.
Steps
-
Navigate to Today’s Tasks.
Main Menu > Today’s Task
-
When the screen appears, use the application’s "Save As" feature to save this page as a static html page.
Save the page with a name you will recognize and save it to a local directory on the PDA.
-
If you receive an "Update Schedule" notification, indicating that your schedule has been updated (this includes any status change, or time/date change to a task) you can re-save your schedule using the same file name you used in Step 2.
Managing Receipt of Shipments
The Oracle Mobile Field Service - Wireless application gives technicians the capability to view, confirm, and log as "completed" all their incoming part shipments. The main menu provides easy access to the list of shipments.
From the main menu, by navigating to the Receive Parts - Incoming Shipment screen, technicians can view a list of all shipments, which includes the shipment number, what organization the shipment came from, and the date shipped. By clicking a particular shipment link, the technician can view the details about that shipment.
After technicians view and confirm that shipments have been received, they can select those shipments and mark them as completed.
Use this procedure to view part shipments and log them as complete.
Steps
-
Navigate to the Receive Parts - Incoming Shipments screen.
Main Menu > Receive Shipments
A list of incoming shipments is displayed.
-
To view the details of a particular shipment, click on the shipment link.
The Shipment Details screen appears. This screen displays additional information about the shipment, including the vendor name, expected date of receipt, order number, item number, quantity, and so on.
-
If the shipment has been received, click Receive Complete.
-
Alternatively, from the main page, you can select the check box of all the shipments you have received and click Receive Complete.
Changing Passwords
Password Change Information Shared Between MFS Wireless and MFS PPC
Using the Change Password screen, you can change your password to access the Oracle Mobile Field Service - Wireless application.
To Change a Password
-
Navigate Main Menu > Change Password.
-
Enter the current password.
-
Enter the new password.
-
Enter the new password in the Verify Password field.
-
Tap Done to change the password.
The password has been changed. You can use the new password the next time you access the Oracle Mobile Field Service - Wireless application.
Setting Up Search Preferences:
-
From the main menu, click Preferences.
The Preferences page appears. The Oracle Mobile Field Service - Wireless application gives technicians the capability to set the search preferences for parts search.
-
Enter the search parameters and create saved parameters. You select the following search preferences:
-
Distance
-
My Inventory
-
Other Technicians
-
Manned Warehouses
-
Unmanned Warehouses
-
Include Alternate Parts
-
Include Closed
-
Use On-Hand
-
-
Click Done to save preferences.
Viewing Transaction History
-
From the main menu, click Transaction History.
The Transaction History page appears. This page enables you to enter search parameters such as; Subinventory, Transaction Type, Destination Organization, Destination Subinventory Transaction Date, Transaction Date Range, Transaction in Last Number of Days, and Item associated with the technicians sub-inventories.
-
Click the Search button. The Transaction History: Results page displays.
This page displays the transaction results based on your search parameters, with following information:
-
From: Subinventory
-
Transaction Type
-
Destination
-
Time
-
Item
-
Quantity
-
Selecting Preferences
You can define several preferences in the application as follows:
-
Modify formats, such as the date format, and views, such as the number of results to be shown
-
Modify your default primary address and inactivate one of your active addresses
-
Choose and change usable and defective default subinventories
To Select General Preferences
-
Navigate Main Menu > Preferences
The Preferences screen appears and displays items for which you can indicate a preference, usually by selection a value from a list of values or by tapping a radio button.
-
At the bottom of the screen, select from the LOV the preference type, which currently contains only the type Address & Subinventories.
Several items appear for which you can select a preferred value. The items include:
-
Date format mask – The default date format followed in Field Service Wireless is : DD-MON-RRRR (31-DEC-1999).
-
Default Distance Unit.
-
Home Page.
-
Task Display1 – Task search result display column 1.
-
Task display2 – Task search result display column 2.
-
Task Display3 – Task search result display column 3.
-
Task Max – Used for pagination in task search results and counter history results. Indicates the maximum number of records to be displayed at a time. Default: 7. This is displayed as a text box where you can enter your desired number.
-
Attachment Size Limit – Specifies the maximum attachment size limit. Default: 1024.
-
Use Icons for Buttons – Determines whether icons or buttons appear.
-
Default subinventory and address.
-
In addition to the common action buttons, the Resource Addresses and Subinventories preferences have an additional action button called Delete/Inactivate. Tap this button to inactivate the currently active address.
-
-
Tap Apply or Done to commit the changes.