Setting Up Advanced Supply Chain Planning
This chapter covers the following topics:
- Setup Overview
- Hardware Configuration
- Setup Flowchart
- Setup Steps for the Source
- Setup Steps for the Destination
Setup Overview
This section describes setup steps for Oracle Advanced Supply Chain Planning.
Set up for Oracle Demand Planning and Oracle Global Order Promising is briefly covered for the sake of completeness, but is described fully in their respective installation instructions.
The online help keys for Oracle Advanced Supply Chain Planning are:
-
Node Application: MSC
-
Node Key: GATPTOP_ASCP
-
Parent Application: SUPPLY
-
Parent Key: SUPPLY
Hardware Configuration
The first step in the setup process is to decide on the overall hardware configuration.
Oracle Advanced Planning Suite has a component architecture that separates the transaction data and associated processing (for example, inventory receipts and order entry) in a source instance from the planning calculations done in a destination instance. This allows planning calculations to be done on a different physical machine than the machine that performs transactions and results in better system response. It also allows planning calculations (demand planning, inventory planning, supply planning and order promising) to be applied simultaneously to information from across multiple source instances, which is useful when transaction information for a global supply chain is spread across multiple instances. Oracle Demand Planning also uses a third instance, an OLAP Analytic Workspace (AW) database, to hold data while multidimensional manipulation of demand data occurs.
The source can be any ERP system, but out-of-the-box integration to the Oracle Advanced Planning Suite destination instance (planning server) exists in some cases but not in all cases.
Both source and destination database instances must be on the same major release of the Oracle database; see Setup Flowchart.
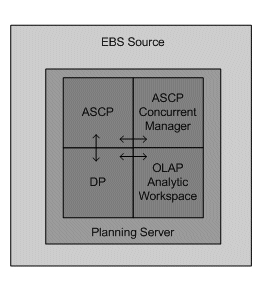
One-Machine Implementation
For small implementations, source, destination, and Express can reside on the same machine and be in the same instance. The following figure illustrates this configuration.
Note: ASCP means Advanced Supply Chain Planning and DP means Demand Planning.
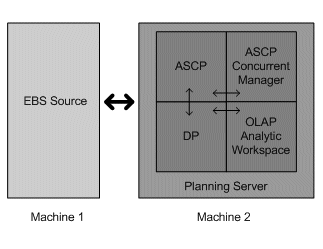
Two-Machine Implementation
For larger implementations where system throughput is more important, the various instances can be deployed on separate machines. A two-machine deployment configuration is appropriate when the size of the demand planning data is relatively small. The following figure illustrates this configuration.
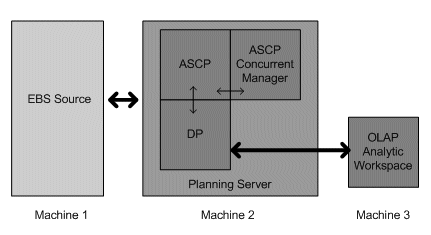
Three-Machine Implementation
A three-machine deployment allows for the manipulation of high-dimensionality, large-scale demand planning data to occur on a machine separate from the planning calculations done on the planning server. The following figure illustrates this configuration.
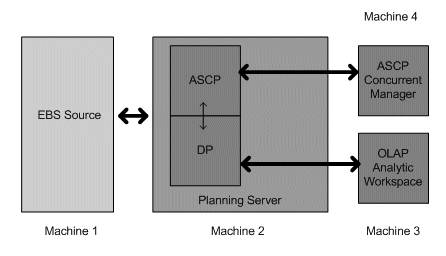
Four-Machine Implementation
The Advanced Supply Chain Planning concurrent manager may also be deployed on a separate machine. This creates even greater system performance. The following figure illustrates the four-machine implementation.
In all deployment configurations, a collection process brings data from the EBS Source tables to the APS Destination tables. A build process brings data form the APS Destination tables to the OLAP Analytic Workspace (AW) for Demand Planning. Finally, a publish process moves data from the AW to the APS Destination tables to be used for planning and can also publish data back to the EBS Source instance.
Global Order Promising and Inventory Optimization planning calculations are also performed on the planning server.
Setup Flowchart
Set up for Oracle Advanced Planning Suite consists of steps for the EBS Source instance, steps for the APS Destination instance, and steps for Express.
In Oracle Advanced Planning where you have a distributed installation with separate EBS Source and Planning Server (APS Destination), we support disparate database releases in all supported Oracle RDBMS releases. For instance, you could have an 11.5.10 EBS Source instance on 10gR2 and your 12.1 APS destination is on 11gR2.s
The following figure is a flowchart illustrating the source and destination setup steps.
Source and Destination Instance Setup
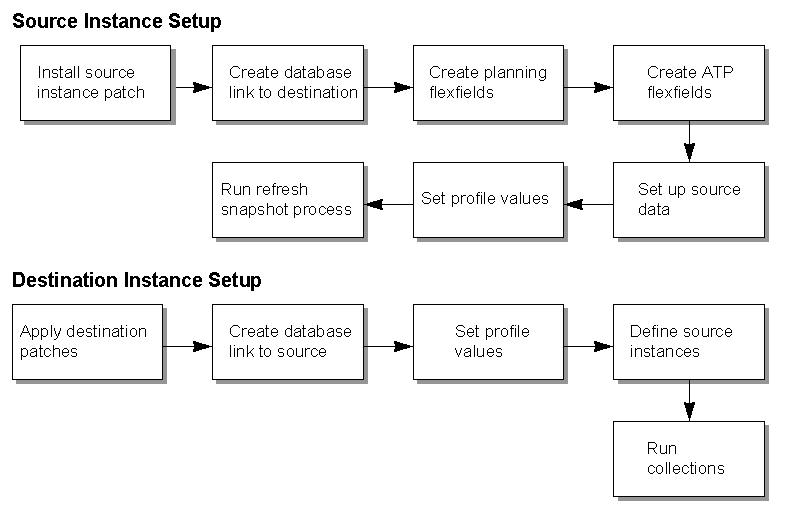
Setup Steps for the Source
The setup steps are as follows:
-
For a Distributed installation, you may have to apply patches on the EBS Source Instance.
Please reference My Oracle Support Note 746824.1, which describes:
-
Supported configurations and limitations.
-
Latest Patches to be applied for Centralized single instance.
-
Latest available patch to apply to both APS Destination on 12.1 with EBS Source also on 12.1
-
-
Create a database link pointing to the planning server.
A database link must be established on the EBS Source instance that points to the APS Destination (planning) instances, MRP: ATP Database Link. This database link will also be used, along with a database link established on the destination instance, in setting up the instances on the planning server.
-
Create Advanced Supply Chain Planner responsibilities in the source instance related to the collections process.
The data collection process is discussed in Running Collections.
Source Instance Prior to Release 12.1
You must assign this Advanced Supply Chain Planner Responsibility with the specifications listed below to the User who will launch Collections and Release from the workbench:
-
Responsibility Name: Advanced Supply Chain Planner
-
Application: Advanced Supply Chain Planning
-
Description: Used for running Refresh Collection Snapshots
-
Menu: MSC_TOP_4.0
-
Data Group Name: Standard
-
Application: Advanced Supply Chain Planning
-
Request Group: All MSC Reports
-
Application: Advanced Supply Chain Planning
-
Oracle Advanced Supply Chain Planning uses this responsibility to run the concurrent program Refresh Snapshot during all data collection runs.
Warning: If you create custom responsibilities for your users on the APS Destination to launch Data Collection or Release planned orders from the Planner Workbench, then you must also define those responsibilities on the EBS Source instance. When creating those responsibilities, the following fields must match exactly or the Release process will fail: Responsibility Name, Application, Responsibility Key, and Description.
For other fields, you should use the same fields used for Advanced Supply Chain Planner. The user will not use this responsibility for any data processing. It must exist only for processes launched on the APS destination which must have this information on the EBS Source to complete processing successfully.
Source Instance At Release 12.1 or Later
You must assign this Advanced Supply Chain Planner Responsibility, with the specifications listed below, to the User who will launch Collections and Release from the workbench:
-
First Responsibility Name: APS Collections
-
Application: Advanced Supply Chain Planning
-
Description: APS Collections Responsibility
-
Menu: MSC_COLL_REL_MENU
-
Data Group Name: Standard
-
Application: Advanced Supply Chain Planning
-
Request Group: All MSC Reports
-
Application: Advanced Supply Chain Planning
-
Assign the responsibility to user names in the source instance that are authorized to run the APS collection processes.
-
Second Responsibility Name: APS Release
-
Application: Advanced Supply Chain Planning
-
Description: APS Collections & Release
-
Menu: MSC_COLL_REL_MENU
-
Data Group Name: Standard
-
Application: Advanced Supply Chain Planning
-
Request Group: All MSC Reports
-
Application: Advanced Supply Chain Planning
-
Assign the responsibility to user names in the source instance that are authorized to run the APS release processes.
-
-
The Create Planning Flexfields concurrent program creates new segment definitions in existing descriptive flexfields to hold data that may be required for constrained and/or optimized planning. The program also populates profile values with the value corresponding to the descriptive flexfield attribute number for each attribute (planning parameter) created. The collections process uses the profile values for the flexfield attribute to collect any values for entities, for example, items and bills of material, when you populates them in the source instance.
The table below shows the descriptive flexfield attributes that are required, the name of the attributes that are created, the tables in which the data resides, and the profile options that correspond to each attribute.
Launch the Create Planning Flexfields report from the newly created Advanced Supply Chain Planner responsibility. The parameters that must be set for the report are the attributes that you wish to utilize for the new flexfield definitions. The list of values for each parameter lists only the available attributes in the subject descriptive flexfield.
Note: Keep track of the attribute number that you select for each flexfield segment. You will need to verify that each corresponding profile option was populated with the correct attribute number when the process completes.
After submitting the program, eleven additional processes should be spawned. These jobs are compiling the descriptive flexfield views.
Check that the profile values corresponding to each flexfield attribute were populated with the correct attribute number. Some profile values may retain the value of unassigned after the Create Planning Flexfield program completed. You must change any unassigned profiles to the attribute number corresponding to the flexfield attribute where the new segment was defined.
Set up source data with BOMs, resources, routings, supplier data, flexfields, purchasing information, item masters, Oracle BIS targets, and any other data required by your plans.
-
If Global Order Promising is going to be utilized, the following two additional profile options must be set.
The MRP: ATP Database Link profile option must be set with the database link. The profile value is the name of the database link that resides on the source and points to the destination. There is no validation on this profile value. If Global Order Promising is not utilized, this need not be set.
-
Execute the Refresh Snapshot concurrent program.
The Refresh Snapshot process must be run on the source. This concurrent program is available in the Advanced Supply Chain Planner responsibility created earlier. The process has no parameters to be set at run time. Verify that the process completes without error.
Setup Steps for the Destination
The setup steps are as follows:
-
Install the destination instance patches.
The patches can be found on My Oracle Support in Note 746824.1.
-
For a distributed installation, create a database link pointing to each source.
These links will be needed when defining instances later on in this setup procedure.
-
Define the source instances to be collected from.
The define instances setup establishes the means of communication between the source and destination instances. It also specifies the organizations in the source database for which data will be pulled.
In a distributed installation where EBS Source instance is release 12.1, you must have the responsibility APS COLLECTIONS on the source instance to run collections and APS RELEASE on the source instance to release planned orders. These responsibilities are seeded on the source instances. For all collection profiles on source instances at the responsibility level, set them to responsibility APS COLLECTIONS. For all release profiles on source instances at the responsibility level, set them to responsibility APS RELEASE.
-
In Advanced Planning Administrator, choose Setup > Instances. Do not access this form while the collections process is running; it locks a table that the collections process needs to complete successfully.
The Application Instances window appears.
-
Enter each of the Application instances for which you would like the Planning Server to plan.
-
Complete the fields and flags in the Application Instances window as shown in the table below.
Note: You are only required to set up Applications Instances before the first time you perform data collection.
Field/Flag Description Instance Code This is a user-defined three character short form for the instance to be planned. It appears in front organization names and other designators. For example, if two transaction instances TA1 and TA2 are to be planned, and both instances have an internal organization named M1, ASCP will display TA1's organization as TA1:M1 and TA2's organization and TA2:M1. Instance Type The valid values here are Discrete, Process, Discrete and Process. This controls whether discrete manufacturing data or process manufacturing data (or both) are collected from the transaction instance to the planner server for planning. Legacy is used when collecting from the applications other than E-Business Suite (EBS) application. Version The Oracle Application version of the transaction instance. Application Database Link Only used where in a Distributed Installation where EBS Source Instance on a separate server, then define a link to connect the EBS Source instance to the APS Destination instance. This link is determined by the database administrator. This database link is defined on the EBS Source transaction instance and points to the APD Destination planning server. This link is used to publish releases from the ASCP back to the transaction instance as purchase orders or work orders.
A link to connect the Applications database(s) to Oracle ASCP. This link is determined by the database administrator. This database link is defined on the transaction instance and points to the planning server. This link is used to publish releases from the ASCP back to the transaction instance as purchase orders or work orders.Planning Database Link Only used where in a Distributed Installation where EBS Source Instance on a separate server, then define a link to connect the APS Destination instance to the EBS Source instance. This link is determined by the database administrator. This database link is defined on the APS Destination server and points to the EBS Source transaction server. This link is used to find and collect the EBS Source transaction data to be collected for planning.
A link to connect Oracle ASCP to the Applications database(s). This link is determined by the database administrator. This link is defined on the planning server and points to the transaction instance. This link is used to positively locate the source of the transaction data to be planned.Enable Flag Select this option to enable the collection process. GMT Difference The difference between planning server time zone and GMT. Assignment Set Optionally, enter the default assignment set for this instance. The assignment is used to resolve sourcing for order promising inquiries. -
Enter the organizations on each of the instances from which to collect the Planning data and plan for on the Planning Server by clicking Organizations.
-
Select the organizations for a particular instance. Be sure to select the master organization.
-
Close the Organization window.
-
Save the Instance Definition setup.