Invoice and Payment Information
This chapter covers the following topics:
- Overview
- Submitting Invoices
- Viewing Invoice Information
- Viewing AP AR Netting Report
- Viewing Payment Information
Overview
You can access invoice and payment information as well as review invoice status online using Oracle iSupplier Portal. If the buying company uses Oracle Payables, you can also submit invoices online.
This section includes the following topics:
Submitting Invoices
If your buying company has implemented Oracle Payables, you may submit invoices online.
You can submit an invoice online to the buying company based on the purchase order lines you have fulfilled. You need to only identify those items shipped and enter a quantity. You can invoice against open, approved, standard, or blanket purchase orders that are not fully billed. You can enter a credit memo against a fully billed purchase order (use negative quantity amounts to enter a credit memo), as well as invoice against multiple purchase orders. However, the currency and organization of all items on an invoice must be the same. The organization is the entity within the buyer's company that you are invoicing.
You can also partially complete an invoice, save it, and submit it later.
After you submit an invoice, you cannot change the invoice. If you need to make adjustments to a submitted invoice, you can create a credit memo against the same purchase order items to net out the invoice charges. The purchase order will then be available for a new invoice.
In some cases, there will be no matching purchase order. If you have provided a service, to the buying company, for example, landscape services, the buying company may not have submitted a formal purchase order. You can submit invoices in these cases as well.
To submit an invoice with a matching purchase order:
-
Click the Finance tab, and then click Create Invoices in the task bar directly below the tabs.
-
On the Invoice Actions page, select either With a PO from the Create Invoice Menu and click Go.
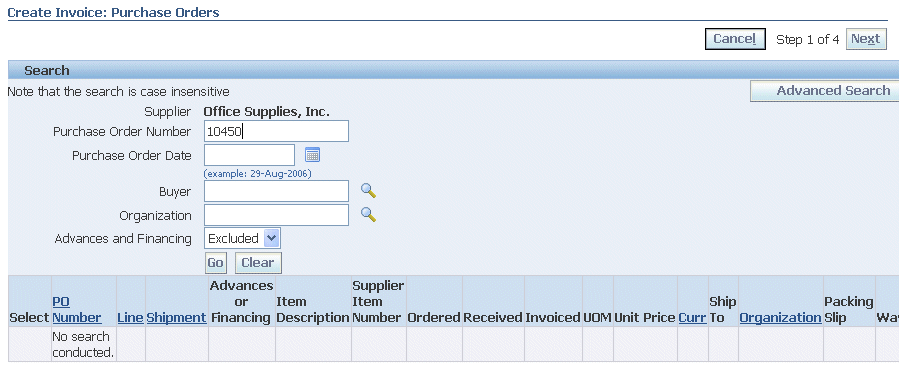
Create Invoices Select PO
-
On the Create Invoice: Purchase Orders page, enter search criteria to identify the purchase order, and click Go.
-
Select items of the PO to be invoiced and click Add to Invoice. Add as many items as you need (items on your invoice display at the bottom of the page). If you mistakenly add an item to the invoice, you can select it and click Remove from invoice.
-
When finished adding items, click Next.
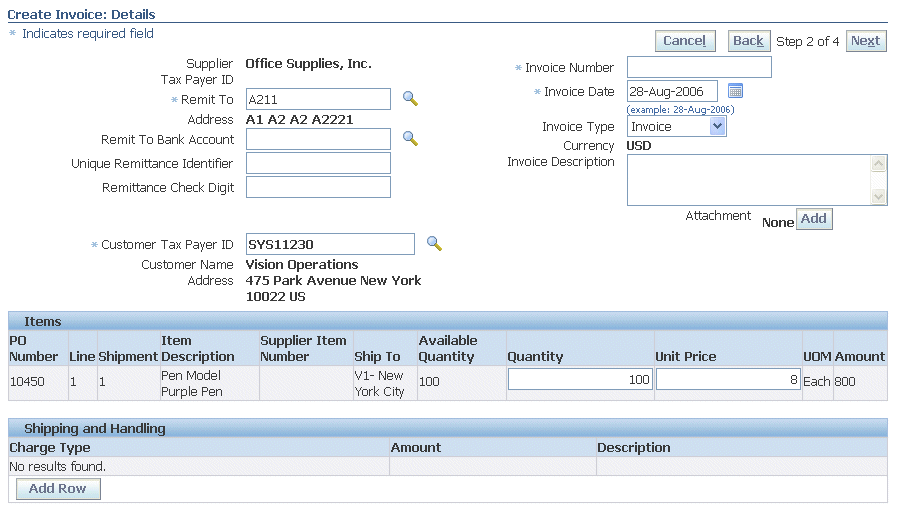
Create Invoice: Details Page
-
On the Create Invoice: Details page, enter an invoice number and remit to address. You can also update the quantity and/or price. Enter and any additional information, and then click Next.
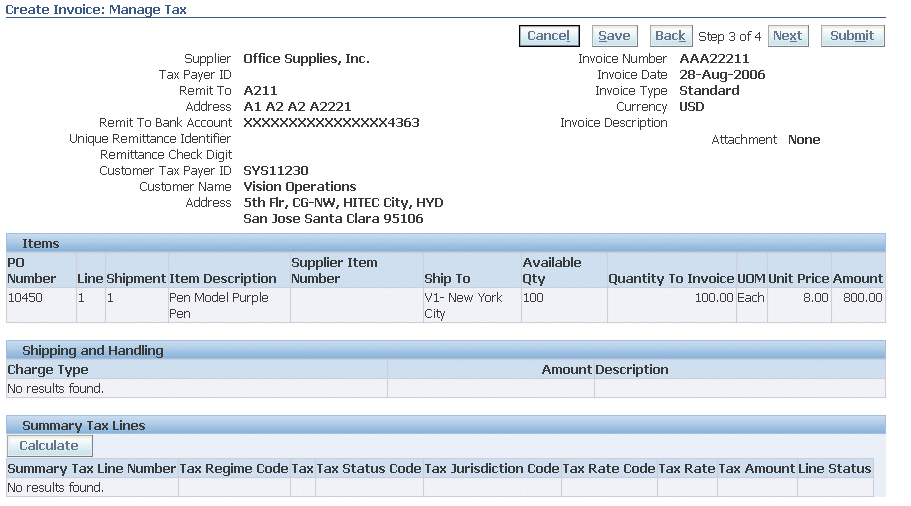
Create Invoice: Manage Tax Page
-
On the Create Invoice: Manage Tax page, you can view the tax information generated.
-
When finished, click Next.
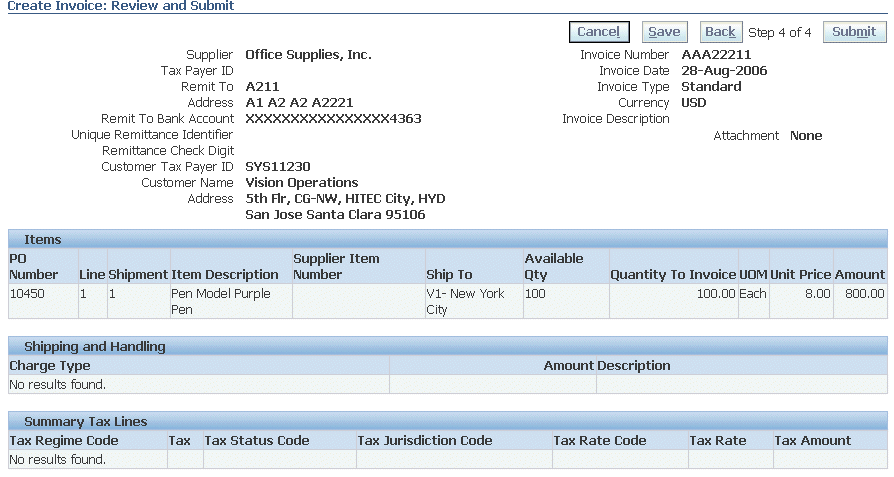
Review/Submit Invoice Page
-
On the Create Invoice: Review and Submit page, review your invoice and click Submit. You also have the option to return to this invoice later by clicking Save for Later.
-
A Confirmation page is generated informing you of successful invoice creation. .
Creating an Invoice Without a Purchase Order
The process of creating invoices that do not have matching purchase orders is similar, although some information is not required, and some must be entered.
The contact information for invoices with purchase orders is restricted to the sites for the users, but for invoices without purchase orders, the system will display all contacts for the supplier sites to which the user has access.
iSupplier users can enter an invoice without a PO, but if the approval workflow for their customer (Oracle Applications user) is not implemented, the status of that invoice request will remain IN PROCESS and will not change.
Note: You need work with the customers to ensure these type of invoices are accepted.
To create an invoice without a purchase order:
-
From the iSupplier Portal Home page, click the Finance tab.
-
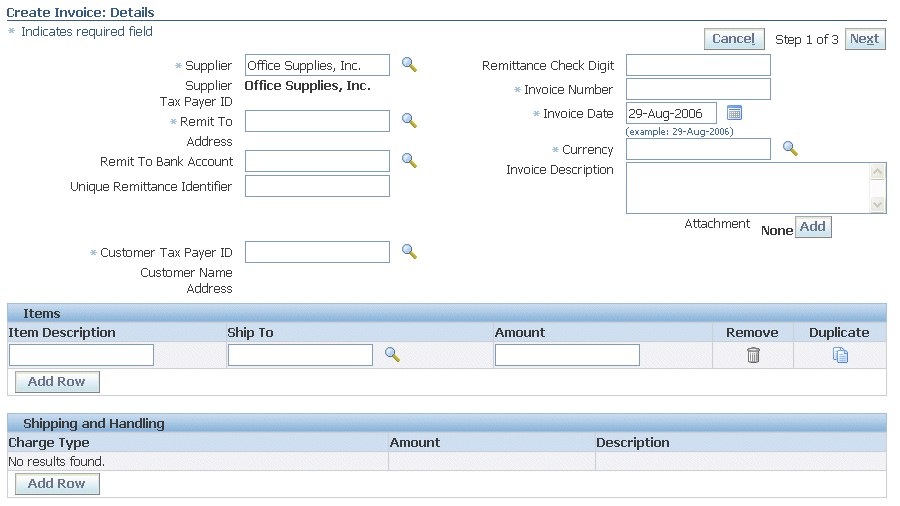
On the Create Invoices page, select Without PO from the Create Invoice menu, and click Go.
-
Enter information as needed. The following fields are required.
-
Invoice number
-
Remit to name
-
Currency
-
Customer tax payer ID
Enter any other appropriate information. Use the Items fields to identify and describe the item or service for which you are invoicing. When you are finished, click Next.
-
-
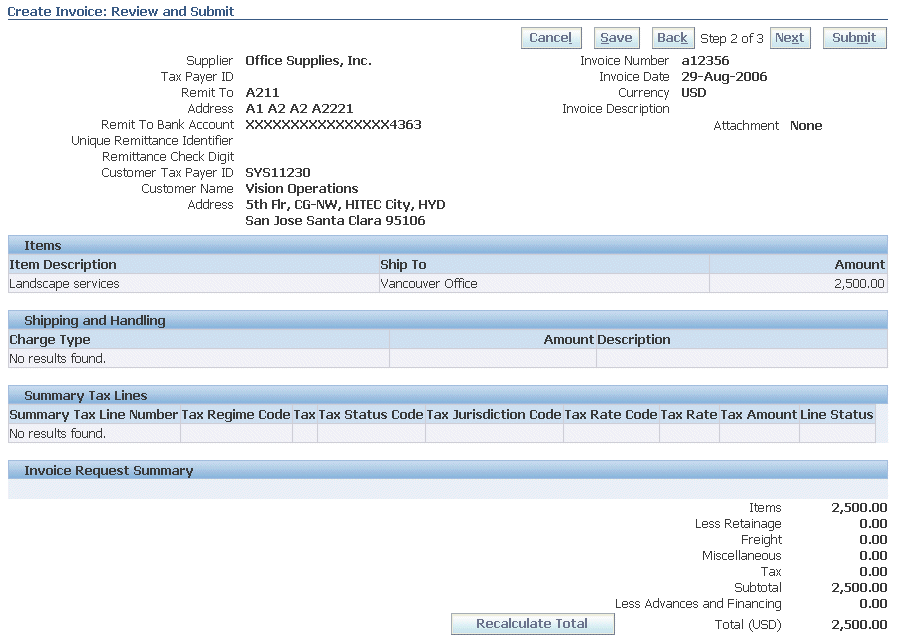
The Review and Submit page shows the tax information generated by the tax system. If the invoice information is correct, click Submit.
Viewing Invoice Information
The View Invoices page enables you to search for and view details of an invoice you have submitted. You can search using various any or all of the search criteria on the page such as:
-
Invoice Number
-
Invoice date
-
Due date
-
Payment status
-
Invoice Amount
To view invoice information:
-
On the iSupplier Portal Home page, click the Finance tab, then click the View Invoices subtab.
-
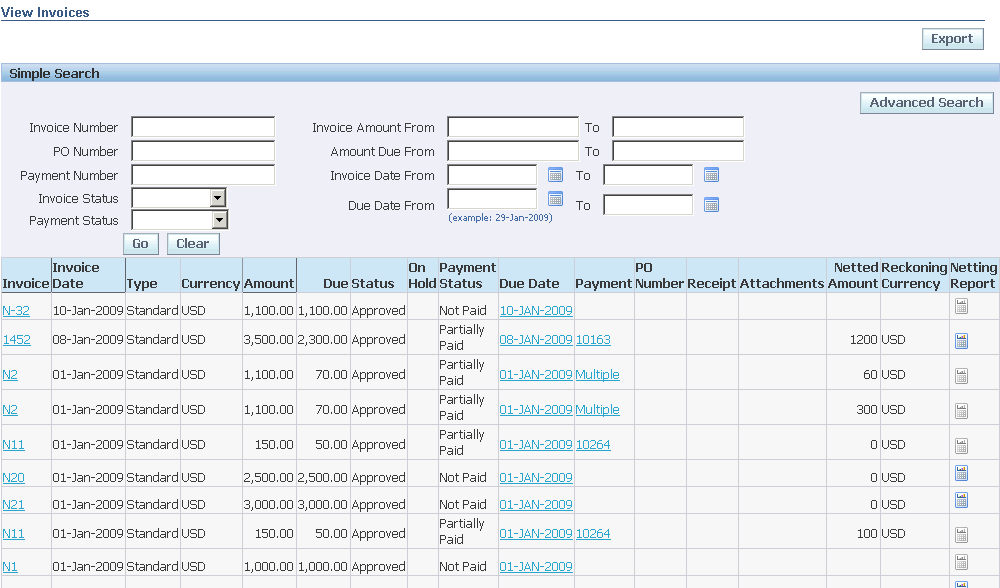
On the View Invoices page, enter search values into one or more of the search fields, and click Go. Or use the Advanced Search option.
Invoice Summary Results Page
-
When the search results display, click the Invoice Number link to view details of the invoice. (You can also view any associated purchase order(s), payments, scheduled payments, or netting report by clicking their respective links, or icons).
Invoice Details page
-
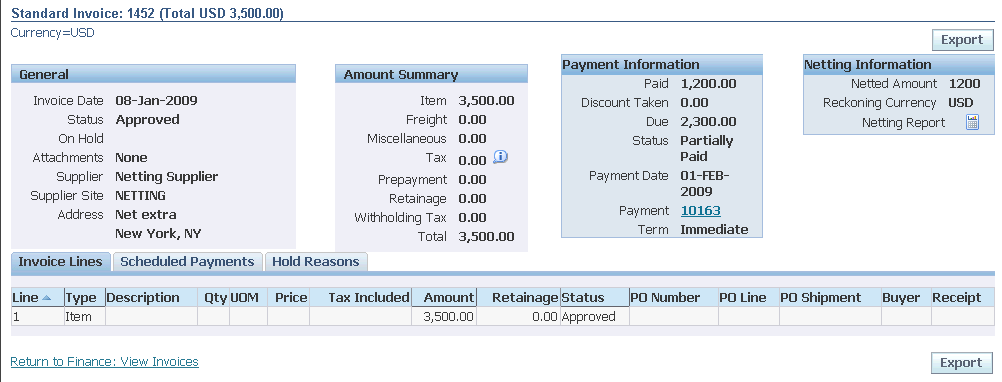
On the Invoice Details page, you can see the header level information.
-
To view invoice line information, click the Invoice Lines tab. You can also view any scheduled payments and any hold information.
Note: If you submitted your invoice online, there may be a delay before you can review it because the Accounts Payable department needs to process it first.
-
In the Payment Information region of Invoice Header, you can view the following dispute information for an Invoice:
-
Original Invoice Amount
-
Dispute Reason
Note: Oracle Transportation Management (OTM) will pass the disputed invoice to Oracle Payables with the original invoice amount of the invoice and disputed reasons. Refer the Oracle Payables Users Guide for more information on dispute resolution setup.
-
-
You can view the following Netting Information attributes at the header level under Netting Information:
-
Netting Amount
-
Reckoning Currency
-
Netting Report
Note: You can view the netting attributes only when the profile POS: AP AR Netting Information is set as Yes at the User level, or the Site level.
-
Viewing AP AR Netting Report
Netting functionality of Oracle Payables is integrated with the iSupplier Portal to enable you to view the netting information for an invoice. Please refer to the Payables and Receivables Netting section in the Oracle Payables User's Guide for more information on the AP AR Netting set up.
Oracle Payables enables you to offset supplier payables (AP invoice payments) against the customer receivables or claims with the netting functionality.
To view the AP AR Netting Report:
-
Navigate to the iSupplier Portal Full Access > Finance> View Invoices. The View Invoices page displays.
-
Enter the search criteria for an invoice number and Click Go.
-
Search result displays the invoices matching to your search criteria.
View Invoices

Note: The Netting Report icon is enabled when the invoice is netted off and netting batch is completed, otherwise it is disabled. Please refer to the Payables and Receivables Netting section in the Oracle Payables User's Guide to know how the invoice is netted off and netting batch is completed.
-
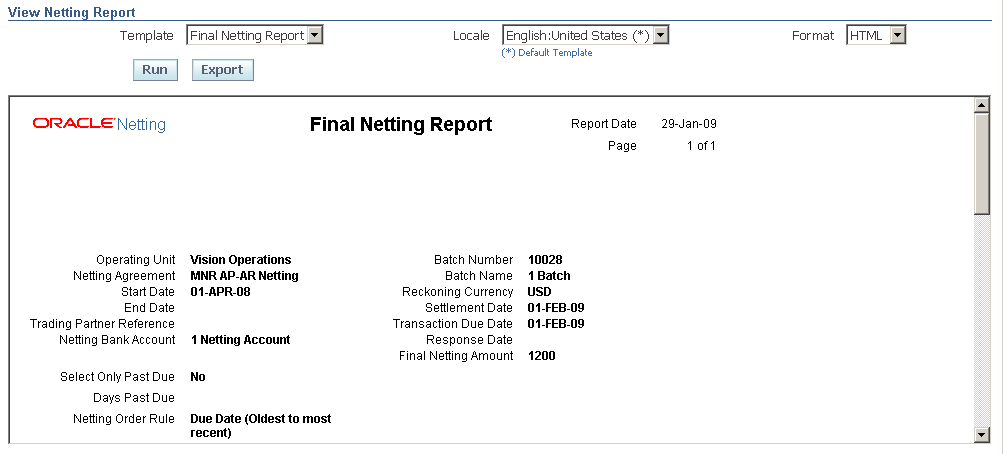
Click the Netting Report icon. The View Netting Report page displays.
View Netting Report

-
Select the Final Netting Report item from the Template list.
-
Select the Language from the Locale list. For Example: English: United States (*)
-
Select the Format from the list. You can select the format as Excel, HTML, PDF, and RTF from the list.
-
Click Run. The Oracle Netting Report page displays.
-
You can view the following netting information on this page along with invoice details:
-
Netting Agreement
-
Netting Bank Account
-
Reckoning Currency
-
Final Netting Amount
Note: You can view the netting information at the Invoice Header level, only when the POS: AP AR Netting Information profile is set as Yes at the User level, or the Site level.
-
-
Click Export to save the netting report.
Viewing Payment Information
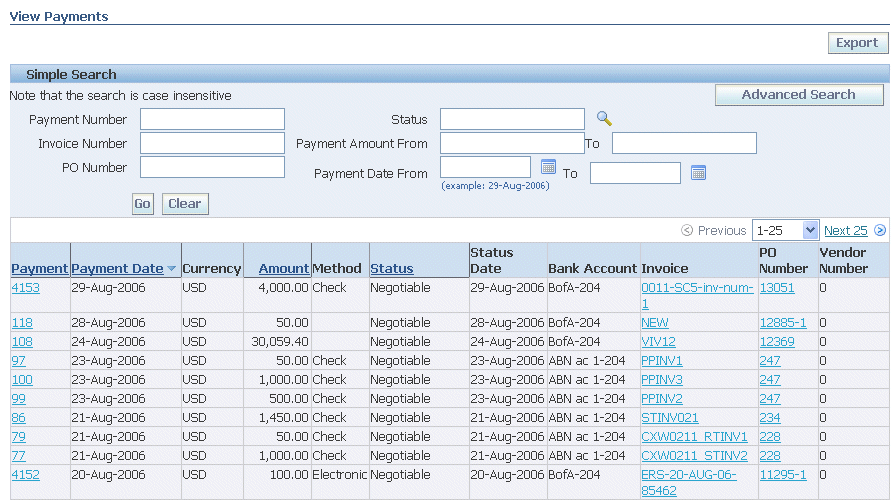
Payment inquiry enables you to view the history of all the payments to your invoices completed by the buying company. You can use the View Payments page to search using various search criteria, including:
-
Payment number
-
Invoice number
-
Payment date
-
Purchase order number
To view payment information:
-
On the iSupplier Portal Home page, click the Finance tab, then click the View Payments subtab.
-
On the View Payments page, enter search values into one or more of the search fields, and click Go. Or use the Advanced Search option.
Payment Summary Results Page
-
When the search results display, click the payment number link to view details of the payment. (You can also view any associated purchase order(s), or invoices by clicking their links).
Payment Details page

-
On the Payments details page, you can see the payment details including the invoices addressed by the payment.