Standing Charges Setup
Overview
Standing Charges is an extension to standard Receivables that lets you enter standing charge agreements and use them as a source to create and accurately control periodic invoices. You can then run the Receivables AutoInvoice program to import standing charge invoices and invoice lines.
Prerequisites
Before setting up Standing Charges, you must:
-
Enable the Standing Charges feature.
-
Set up the following in Receivables:
-
AutoAccounting (optional)
Note: Standing charges do not work with the Standard Lines table name.
-
Payment terms
-
Payment method (optional)
-
Transaction types
Note: Standing charges use invoice class transaction types.
-
Salesperson
-
Tax codes, if tax is required
Note: Tax codes defined for standing charges must allow ad hoc changes.
-
Customers
Note: Each customer must have an active bill-to site.
-
AutoInvoice grouping rule
-
Related Topics
Enabling Oracle Public Sector Financials (International) Features Procedure
Standing Charges Setup Steps
The following table lists setup steps for Standing Charges.
| Step Number | Step Description | Required or Optional |
|---|---|---|
| 1 | Enter Extended System Options | Required |
| 2 | Populate Standing Charge Data | Required |
| 3 | Generate Invoice Transaction Flexfield | Required |
| 4 | Generate Line Transaction Flexfield | Required |
| 5 | Define Transaction Sources | Required |
| 6 | Create Periodic Periods | Required |
Entering Extended System Options
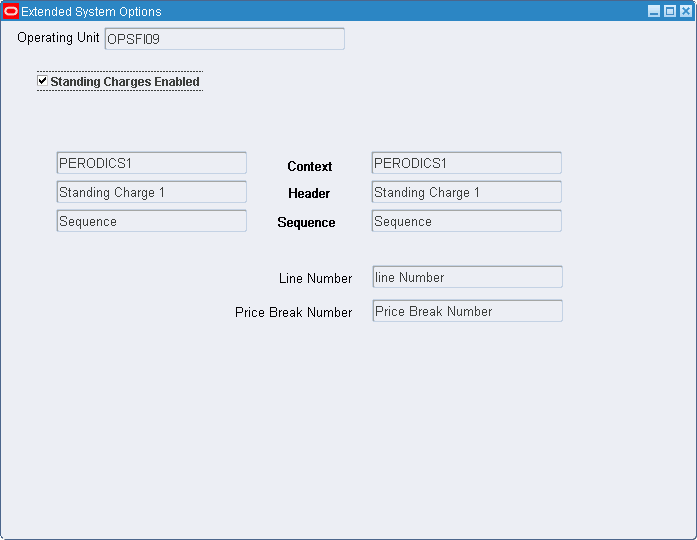
This information is needed by AutoInvoice to identify and import the standing charge invoice headers and lines and is also displayed in the descriptive flexfields of the transactions created.
You can set up Standing Charges feature for each operating unit and also set up the context and header, which you cannot change once assigned.
Entering Extended System Options

To populate the descriptive flexfields for AutoInvoice:
-
Navigate to the Extended System Options window.
-
Select the operating unit.
-
Ensure that Standing Charges Enabled is selected.
See: Enabling Oracle Public Sector Financials (International) Features Procedure to enable the Standing Charges feature.
-
Enter the context, header, and sequence, and then the line number and price break number.
The Charge Line Details region is populated with the data entered in the Standing Charges region.
Running the Receivables Global: Populate Data Process
The Receivables Global: Populate Data process creates the context field values for the invoice transaction descriptive flexfield and the line transaction descriptive flexfield using the information in the Extended System Options window.
Use the Standard Request Submission process to populate standing charge data. In the Name field, select Receivables Global: Populate Data and choose Standing Charges as the source type.
Related Topics
Using Standard Request Submission, Oracle Applications User Guide
Generating Invoice Transaction Flexfield
Use the Descriptive Flexfields Segments window in Receivables to generate an invoice transaction flexfield and compile the invoice transaction flexfield that is used in AutoInvoice.
Related Topics
Descriptive Flexfield Segments, Oracle Applications Systems Administrator's Guide
Generating Line Transaction Flexfield
Use the Descriptive Flexfields Segments window in Receivables to generate a line transaction flexfield and compile the line transaction flexfield that is used in AutoInvoice.
Related Topics
Descriptive Flexfield Segments, Oracle Applications Systems Administrator's Guide
Defining Transaction Sources
To use Standing Charges, define at least one imported invoice source for batches.
To define invoice batch sources:
-
In Receivables, navigate to the Transaction Sources window and enter the batch source name.
-
Enter the Batch Source Name and choose the type Imported.
-
On the Batch Source tab, ensure that automatic batch numbering and automatic transaction numbering are enabled and enter a standard transaction type.
Note: Standing charges only uses invoice class transaction types.
-
In the AutoInvoice Options tab, set all invalid lines to Reject, and enter a grouping rule.
-
In the Customer Information tab, set the values for the fields as follows:
Field Value Sold to Customer ID Bill to Customer ID Bill to Address ID Bill to Contact ID Ship to Customer ID, None Ship to Address ID, None Ship to Contact ID, None Payment Method Rule ID Customer Bank Account ID -
In the Accounting Information tab, set the values for the fields as follows:
Field Value Invoicing Rule ID, None Accounting Rule ID, None Accounting Flexfield ID Payment terms ID Revenue Account Allocation Percent -
In the Other Information tab, set all options to ID or None.
-
In the Sales Credit Validation tab, set the values for the fields as follows:
Field Value Salesperson ID Sales Credit Type ID Sales Credit Percent
Related Topics
Setting Up Transaction Sources in Receivables, Oracle Receivables User Guide
Create Periodic Periods
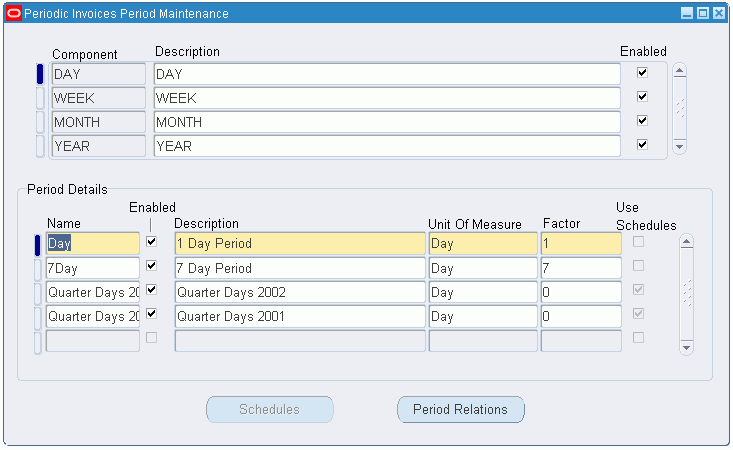
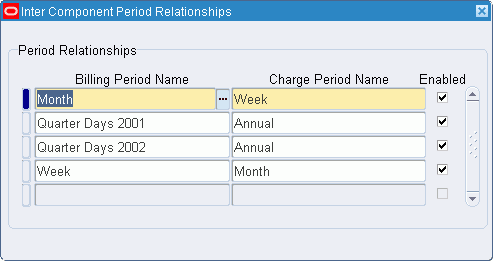
Use periodic periods to create different types of periods for billing periods or charge periods on entering standing charge agreements. If periods with different components are used as billing periods and charge periods on a given standing charge agreement, they must be set up as related periods on the Period Relation window.

To set up billing and charging periods:
-
Navigate to the Periodic Invoices Period Maintenance window.
-
Select the required component.
-
Enter a name and description for the period.
-
Select the unit of measure.
-
Enter the multiplication factor required.
-
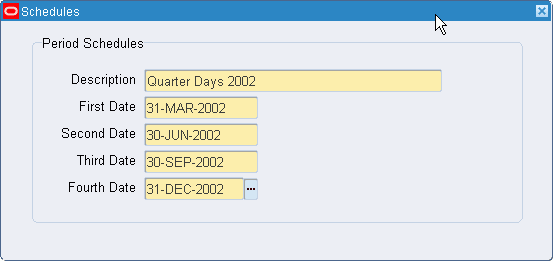
To define quarter days, click Schedules.
Note: The factor must be set to zero to access the Schedules window.

-
In the Schedules window, enter the quarter dates.
Note: All date fields must be entered and be in the same year.
-
Close the Schedules window and click Period Relations.
Note: Set up period relations if periods using different components are used together.

-
Enter the billing period name and charge period name.