Subledger Security Setup
Overview
Subledger Security is an extension of Oracle Applications enabling organizations to selectively partition data in a single install of Oracle Applications.
Subledger Security is primarily a technical implementation of a business security policy. Subledger Security is implemented by a systems administrator.
Note: Read the Subledger Security topical essay before completing any procedures.
Before using Subledger Security, you should consider:
-
Determine Overall Security Policy
A business analyst must determine the organization’s requirements and translate the business requirements into subledger security architecture.
-
Physical Definition of Security Policy
Systems administration must define the Subledger Security architecture using Subledger Security features.
-
Application of Security Policy
Systems administration must make Subledger Security architecture available to users of Oracle Financials modules.
-
Maintenance of Security Policy
Continuous maintenance of the Subledger Security system is required. The security policy may be altered according to the organizational changes.
Related Topics
Subledger Security Process, Oracle Public Sector Financials (International) User Guide
Security Group Consolidation Example, Oracle Public Sector Financials (International) User Guide
Prerequisites
Before setting up Subledger Security, you must enable subledger security.
Related Topics
Enabling Oracle Public Sector Financials (International) Features Procedure
Responsibilities Window, Oracle Applications System Administrator's Guide - Security
Subledger Security Setup Steps
This table lists setup steps for Subledger Security.
| Step Number | Step Description | Required or Optional |
| 1 | Set Up Application Level Profile Options. See Profile Options and Setting Application Level Profile Options | Required |
| 2 | Set Up Site Level Profile Options. See Profile Options. | Required |
| 3 | Define Security Groups. See Defining Security Groups and Maintaining Security Groups | Required |
| 4 | Define Responsibilities. See Responsibilities Window, Oracle Applications System Administrator's Guide | Required |
| 5 | Set Up Responsibility Level Profile Options. SeeSet Profile Options. | Required |
| 6 | Define Users | Optional |
| 7 | Define Secure Tables. See Defining Secure Tables and Maintaining Secure Tables | Required |
| 8 | Define Process Groups. See Defining a Process Group and Maintaining Process Groups | Optional |
| 9 | Allocate Secure Tables and Process Groups. See Table Allocation to Security Groups, Table Allocation to Process Groups, and Process Group Allocation to Security Groups | Required |
| 10 | Copy Allocations from Security Groups | Optional |
| 11 | View Tables | Optional |
| 12 | Apply Security | Required |
| 13 | Consolidate Security Groups | Optional |
| 14 | Secure Existing Data | Optional |
Setting Application Level Profile Options
To set the application level profile options:
-
Navigate to the System Profile Values window.
-
Select Application.
-
In the Application field, select the Oracle application that requires Subledger Security to be applied.
-
In the Profile field, select Initialization SQL Statement - Custom.
-
Click Find.
-
In the Application field, type the following command line:
begin igi_sls_context_pkg.set_sls_context; end;
For information on storing runtime database variables in memory, see Application Context, Oracle Public Sector Financials (International) User Guide.
Maintaining Security Groups
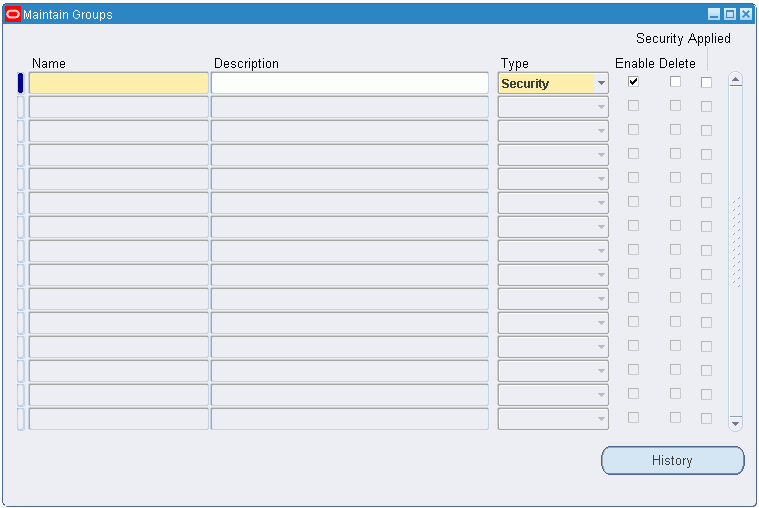
Defining Security Groups
-
Navigate to the Maintain Groups window.
-
Enter the name of a security group, for example, the cost center name.
-
In the Type field, select Security.
-
Run the Apply Security concurrent program.
Disabling Security Groups
-
Navigate to the Maintain Groups window.
-
To query, enter the security group name in the Name field.
-
Deselect the Enable check box.
-
Run the Apply Security concurrent program.
Note: The Apply Security concurrent program disables security on all database tables belonging to this security group only.
Re-enabling Security Groups
To re-enable a security group:
-
Enter query mode.
-
To query, enter the security group name in the Name field.
-
Select the Enable check box.
-
Run the Apply Security concurrent program.
Note: The Apply Security concurrent program re-enables security on all database tables belonging to this security group only.
Deleting Security Groups
-
Navigate to the Maintain Groups window.
-
To query, enter the security group name in the Name field.
-
Select the Delete check box.
-
Run the Apply Security concurrent program.
Warning: This step is irreversible. The Apply Security concurrent program removes all security information associated with this security group from all database tables belonging to this security group
Viewing Security Group History
To view security group history:
-
Navigate to the Maintain Groups window.
-
In the Name field, enter the name of the security group, for example, the cost center name.
-
Click History.
Related Topics
Defining Users
Defining users is optional as users may already be defined within the organization.
Note: The previously defined Subledger Security responsibilities must be assigned to application users.
Related Topics
Users Window, Oracle Applications System Administrator's Guide - Security
Application Users, Oracle Public Sector Financials (International) User Guide
Maintaining Secure Tables
Using subledger security, you can define, re-enable, and delete secure tables.
Defining Secure Tables
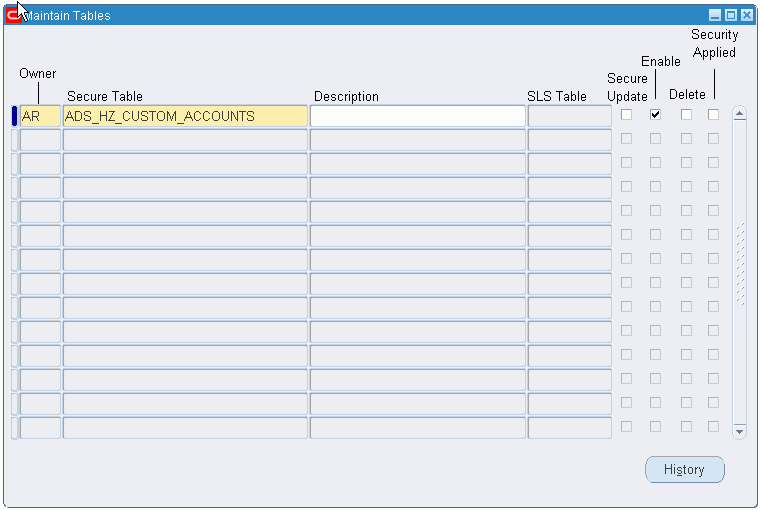
To define a secure table:
-
Navigate to the Maintain Tables window.
-
Select the owner.
-
In the Secure Table field, select the database table name.
-
Optionally, enter a description.
Note: This process provides the Subledger Security extended table name in the SLS Table field for the required secure database table and makes the database table available for allocation to a security group.
-
Run the Apply Security concurrent program.
Disabling Security on Tables
To disable security on tables:
-
Navigate to the Maintain Tables window.
-
Select the table owner.
-
Deselect the Enable check box.
-
Run the Apply Security concurrent program.
Warning: Running the Apply Security concurrent program disables security on the table across the subledger security system.
Re-enabling Security on Tables
To re-enable security on tables:
-
Navigate to the Maintain Tables window.
-
Enter query mode.
-
Select the table owner to be disabled in the Owner field.
-
Select the Enable check box.
Related Topics
Maintaining Process Groups
Using subledger security, you can define, disable, re-enable, delete, and view the process groups history.
Defining a Process Group
-
Navigate to the Maintain Groups window.
-
In the Name field, enter the process group name, for example, Requisitions.
-
Optionally, enter a description.
-
In the Type field, select Process.
-
Select the Enable check box to disable the group from security restrictions.
-
Save your work.
-
Close the window.
-
Run the Apply Security concurrent program.
Disabling Process Groups
-
Navigate to the Maintain Groups window.
-
Enter query mode.
-
In the Name field, enter the process group name.
-
Run the query.
-
Deselect the Enable check box.
-
Save your work.
-
Close the window.
-
Run the Apply Security concurrent program.
Note: The Apply Security concurrent program disables security on all database tables belonging to this process group only.
Re-enabling Process Groups
-
Navigate to the Maintain Groups window.
-
Query the process group name.
-
Select the Enable check box.
-
Save your work.
-
Close the window.
-
Run the Apply Security concurrent program.
Note: The Apply Security concurrent program re-enables security on all database tables that belong only to this process group.
Deleting Process Groups
-
Navigate to the Maintain Groups window.
-
Enter query mode.
-
In the Name field, enter the process group name.
-
Run the query.
-
Select the Delete check box.
-
Save your work.
-
Close the window.
-
Run the Apply Security concurrent program.
Warning: This step is irreversible. The Apply Security concurrent program removes all security information associated with the allocated secured database tables from the security group or groups to which the process group belongs. The Apply Security concurrent program can only remove security information if the secured database table does not already belong to the security group, either directly or through another process group.
Viewing Process Group History
To view process group history:
-
Navigate to the Maintain Groups window.
-
In the Name field, enter the process group name.
-
Click History.
The window shows when the process group was enabled or disabled and shows the date that security was applied.
Related Topics
Maintaining Allocations
In Subledger Security, you can allocate tables to security groups or process groups, and allocate process groups to security groups as described in these sections:
Table Allocation to Security Groups
Allocating Tables to Security Groups
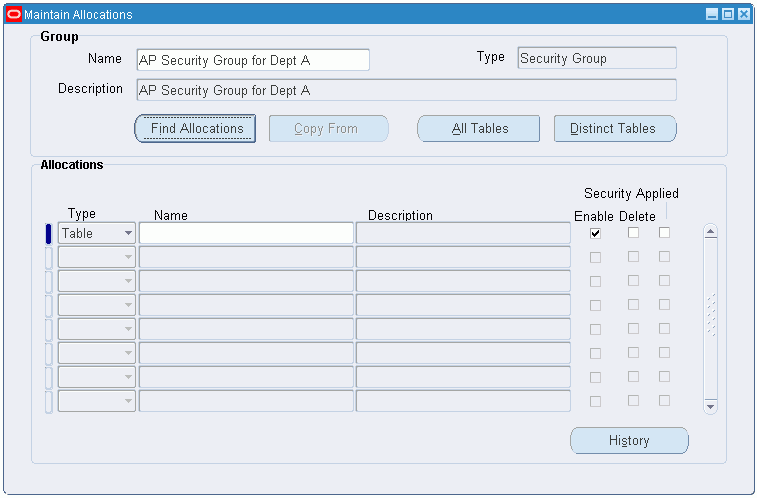
To allocate tables to security groups:
-
Navigate to the Maintain Allocations window.
-
In Group Name, select the security group name.
-
To display the allocated tables, click Find Allocations.
Tables allocated to the security group are displayed in the Allocations region.
Note: Performing this function enables the system administrator to view process groups allocated to the security group.
-
In the Allocations region, select the table name in the Name field to add a table to the security group.
-
Ensure Type is set to Table.
-
Save your work.
-
Close the window.
-
Run the Apply Security concurrent program.
Disabling Tables from Security Groups
To disable tables from security groups:
-
Navigate to the Maintain Allocations window.
-
In the Group Name field, select the security group name.
-
To display allocated tables, click Find Allocations.
Note: Performing this function enables the systems administrator to view process groups allocated to the security group.
-
Deselect the Enable check box.
-
Save your work.
-
Close the window.
-
Run the Apply Security concurrent program.
Re-enabling Tables to Security Groups
To re-enable a table to a security group:
-
Navigate to the Maintain Allocations window.
-
In the Group Name field, select the security group name.
-
Click Find Allocations.
Note: Performing this function enables the systems administrator to view process groups allocated to the security group.
-
Select the Enable check box.
-
Save your work.
-
Close the window.
-
Run the Apply Security concurrent program.
Deleting Tables from Security Groups
To delete tables from security groups:
-
Navigate to the Maintain Allocations window.
-
In the Group Name field, select the security group name.
-
To display allocated tables, click Find Allocations.
Note: Performing this function enables the systems administrator to view process groups allocated to the security group.
-
Select the Delete check box.
-
Save your work.
-
Close the window.
-
Run the Apply Security concurrent program.
Warning: This step is irreversible. Running the Apply Security concurrent program removes information relating to the table for this security group.
Related Topics
Table Allocation to Process Groups
In Subledger Security, you can allocate tables to or delete tables from the process groups as described in these sections:
Allocating Tables to Process Groups
To allocate tables to process groups:
-
Navigate to the Maintain Allocations window.
-
In the Group Name field, select the process group name.
-
Click Find Allocations.
-
Select the table name in the Name field to add tables to the process group.
-
Save your work.
-
Close the window.
-
Run the Apply Security concurrent program.
Deleting Tables from Process Groups
To delete tables from a process group:
-
Navigate to the Maintain Allocations window.
-
In the Group Name field, select the process group name.
-
Click Find Allocations.
-
Select the Delete check box.
-
Save your work.
-
Run the Apply Security concurrent program.
Note: Tables can be deselected before running the Apply Security concurrent program to prevent deletion.
Warning: This step is irreversible. The Apply Security concurrent program removes all security information, associated with the allocated secured database tables, from the security group or groups to which the process group belongs. This applies if the secured database table does not already belong to the security group, either directly or through another process group.
Related Topics
Process Group Allocation to Security Groups
In Subledger Security, you can allocate process groups to security groups, disable, re-enable, and delete process groups, as described in these sections:
Allocating Process Groups to Security Groups
To allocate process groups to security groups:
-
Navigate to the Maintain Allocations window.
-
In the Group Name field, select the security group name.
-
Click Find Allocations.
Note: Performing this function enables system administrators to view tables allocated to the security group.
-
To add process groups, select Process in the Type field.
-
In the Name field, enter the name of the process group.
-
Save your work.
-
Close the window.
-
Run the Apply Security concurrent program.
Disabling Process Groups from Security Groups
To disable a process group from a security group:
-
Navigate to the Maintain Allocations window.
-
In the Group Name field, select the security group name.
-
Click Find Allocations.
Note: Performing this function enables the systems administrator to view tables allocated to the security group.
-
Deselect the Enable check box.
-
Save your work.
-
Close the window.
-
Run the Apply Security concurrent program.
Re-enabling Process Groups to Security Groups
To re-enable a process group to a security group:
-
Navigate to the Maintain Allocations window.
-
In the Group Name field, select the security group name.
-
Click Find Allocations.
Note: Performing this function enables the systems administrator to view tables allocated to the security group.
-
Select the Enable check box.
-
Save your work.
-
Close the window.
-
Run the Apply Security concurrent program.
Deleting Process Groups from Security Groups
To delete a process group from a security group:
-
Navigate to the Maintain Allocations window.
-
In the Group Name field, select the security group name.
-
Click Find Allocations.
Note: Performing this function enables the systems administrator to view tables allocated to the security group.
-
Select the Delete check box.
Note: Deleting a process group deletes the tables associated with the process group from the security group. The record is permanently deleted when the Apply Security concurrent program is run.
-
Save your work.
-
Close the window.
-
Run the Apply Security concurrent program.
Related Topics
Maintain Allocations Window
| Field Name | Description |
|---|---|
| Name | security group name |
| Type | group type; valid values: Process Group or Security Group |
| Description | user-defined name description |
| Find Allocations | displays tables allocated to security group |
| Copy From | displays list of security groups; select security group to copy from |
| All Tables | displays All Tables window |
| Distinct Tables | displays Distinct Tables window |
| Type | allocation type; valid values are: Table or Process; Table selected by default |
| Name | table name |
| Description | user-defined name description |
| Enable | if selected, enabled; if deselected, disabled |
| Delete | if selected, indicates record marked for deletion |
| Security Applied | system generated showing if security is applied; selected by default; if selected, security applied |
| History | displays History window; displays date enabled, date disabled, and date security applied |
Copying Allocations from Security Groups
Allocations can be copied to a new security group or an existing group with no allocations.
To copy allocations from an existing security group:
-
Navigate to the Maintain Allocations window.
-
In the Name field, select a security group name.
-
Click Copy From.
-
Select a security group name.
-
Click OK.
Note: All copied allocations are enabled by default.
Viewing Tables
In Subledger Security, you can view all allocated tables or distinct allocated tables. You can view tables allocated to more than one process group. Viewing distinct tables displays tables once though the table is allocated to more than one process group. A table should not be allocated to more than one process group to facilitate maintenance
To view tables:
-
Navigate to the Maintain Allocations window.
-
In the Name field, select a security group name.
-
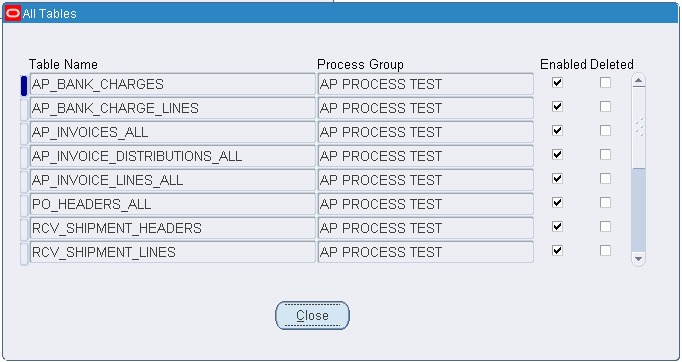
To view all tables, click All Tables.
-
To view all distinct tables, click Distinct Tables.
All Tables Window
| Field Name | Description |
|---|---|
| Table Name | table name |
| Process Group | process group name |
| Enabled | if selected, enabled; if deselected, disabled |
| Deleted | if selected, deleted; if deselected, not deleted |
| Close | closes All Tables window |
Distinct Tables Window
| Field Name | Description |
|---|---|
| Table Name | table name |
| Secured | if selected, tables secured; if deselected, tables unsecured |
| Close | closes Distinct Tables window |
Applying Security
Use the Standard Request Submission process to run the apply security program.
-
Navigate to the Submit Request window.
-
Place the cursor in the Name field.
The Subledger Security - Apply Security concurrent program name is automatically displayed.
-
In the Mode field, select Create or Refresh.
-
To recompile triggers or policy functions that are invalid or disabled, select Refresh.
-
To change subledger security architecture, select Create.
Note: Refresh is used only to recompile invalid triggers or policy functions. Create is used at all other times.
-
-
To apply the parameters, click OK.
-
To run the Apply Security concurrent program, click Submit.
Related Topics
Using Standard Request Submission, Oracle Applications User Guide
Consolidating Security Groups
Subledger Security enables you to map changes to the organization by consolidating security groups.
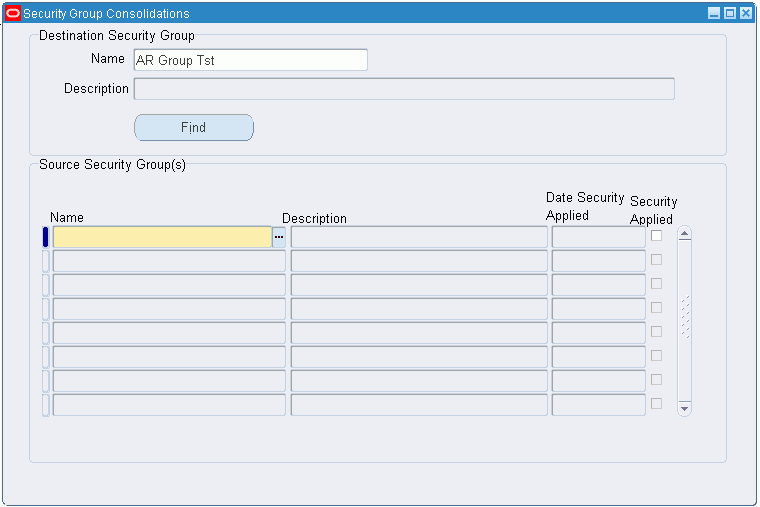
To consolidate security groups:
-
Navigate to the Security Group Consolidations window.
-
Select the name in the Destination Security Group Name field.
The destination security group is where the source security groups are consolidated.
-
Click Find.
-
Select the Source Security Group(s) Name to be consolidated into the destination security group.
-
Save your work.
-
Run the Apply Security concurrent program.
Warning: This step is irreversible after the Apply Security concurrent program has run successfully.
Related Topics
Security Group Consolidations Window
| Field Name | Description |
|---|---|
| Name | destination security group name |
| Description | destination security group description |
| Find | displays source security groups in Source Security Group(s) region |
| Name | source security group name |
| Description | source security group description |
| Date Security Applied | date security applied |
| Security Applied | indicates if security applied; if selected, security applied; if deselected, security not applied |
Subledger Security - Securing Existing Data Process
Use the Standard Request Submission process to secure existing data.
To secure existing data:
-
Navigate to the Submit Request window.
The Submit a New Request window appears.
-
Place the cursor in the Name field.
-
Select the Subledger Security - Secure Existing Data concurrent program.
-
In the SLS Group Name field, select the security group to secure the existing data.
-
To apply the parameters, click OK.
-
To run the Apply Security concurrent program, click Submit.
Related Topics
Using Standard Request Submission, Oracle Applications User Guide
