Entering Service Lines
This chapter covers the following topics:
- Overview of Entering Service Lines
- About Service Lines
- Entering a Service Line (General Procedure)
- Changing the Billing and Shipping Accounts and Locations
- Entering Billing and Shipping Contacts for a Contract Line
- Creating or Modifying a Contract Line Contact
- Specifying How a Contract Line Is to Be Renewed
- Renewing Service Purchased for Seasonal or Peak Periods
- Specifying What a Service Covers
- Levels of Coverage and Their Uses
- Covering Customer Products (Instances in Oracle Installed Base)
- Covering Customer Products
- Browsing Oracle Installed Base to Identify Item Instances for Coverage
- Entering a Customer Product into Oracle Installed Base
- Covering Parties
- Covering Customer Accounts
- Covering Party Sites
- Browsing Through Party Sites
- Covering Systems
- Browsing Through Oracle Installed Base Systems
- Covering Inventory Items
- Viewing Details About a Covered Product
- Maintaining Pricing Attributes for Covered Products
- Specifying How the Service Prints on an Invoice
- Omitting a Line or Subline from the Invoice
- Specifying the Invoice Text
- Specifying a Billing Schedule
- Pricing What a Service Covers
- Adjusting the Price of a Service for a Covered Product or an Item
- Repricing a Service by Changing the Price List
- Manually Adjusting the Price
- Changing the Basis for Pricing a Service
- Pricing Service for a Party, Customer Account, Site, or System
- Specifying a Payment Method for a Contract Line
- Specifying Payment by Credit Card or Commitment Number
- Requiring a Purchase Order
- Specifying a Purchase Order Number
- Modifying Coverage Provided by a Service
- Scheduling Preventive Maintenance Activities
- Scheduling Multiple Activities at the Same Time
- Scheduling Individual Activities
- Scheduling Activities at Regular Intervals Using Schedule Streams
- Viewing Maintenance Program and Activity Details
- Updating Scheduled Service Dates for a Maintenance Program
- Ending Service Lines on a Day Specified by the Customer
- About Cotermination
- Applying the Cotermination Date to a Service
- Specifying Tax Status
- Applying Changes from a Service Line to the Covered Sublines
- Assigning Sales Credits for a Contract Line
- Updating Service
- Applying Default Values to Existing Contract Lines
Overview of Entering Service Lines
This group of topics explains how to enter service lines into your contract.
About Service Lines
A service can cover broad-category business processes such as field service, depot repair, call center, technical support, safety inspections, and any other user-defined business activities.
Each service is set up by the application administrator as an item in Oracle Inventory and is associated with a coverage template. The coverage template specifies the business processes that are covered, the times that the customer is entitled to the coverage, amounts that are covered and applicable discounts, as well as any resources that are to be used and their pricing.
If preventive maintenance is required as part of the service, the service is also associated with a program of maintenance activities. These activities are scheduled automatically when you enter the service line.
The administrator can also restrict which customers or products are permitted to use this service.
You must be familiar with the details of the services that are created for your organization before using them in a contract because you select a service in a service line by its Oracle Inventory name.
A service can cover different types of entities. A safety inspection service can cover individual customer sites or the entire enterprise. A depot repair service can cover individual products, a group of products, all products at a specific location, or all products that are grouped into a system.
For example, a service may cover field service for all of the computer equipment at site A, or it may instead cover laptops L451, L359, and L863.
A service line can cover multiple entities, each of which you enter as a subline.
When you cover individual customer products (Oracle Installed Base item instances or Items in Oracle Inventory), you can have the application price the service automatically and take advantage of Oracle Advanced Pricing features including discounts. Your organization can price the same service differently by setting up multiple price lists, and it can offer different prices for the service based on service length. This means that your organization can offer discounts if a customer purchases service for a longer period of time.
Entering a Service Line (General Procedure)
Create the contract with the appropriate category:
-
To cover products in a customer's installed base, you can use any of the available contract categories: Warranty and Extended Warranty, Service Agreement, and Subscription Agreement.
-
If your contract includes usage lines, or the service covers other levels including parties, sites, accounts, and inventory items, then you must select Service Agreement or Subscription Agreement.
-
To include subscription lines in the same contract, you must select Subscription Agreement.
-
Enter the required fields on the header of the contract.
To enter a service line:
-
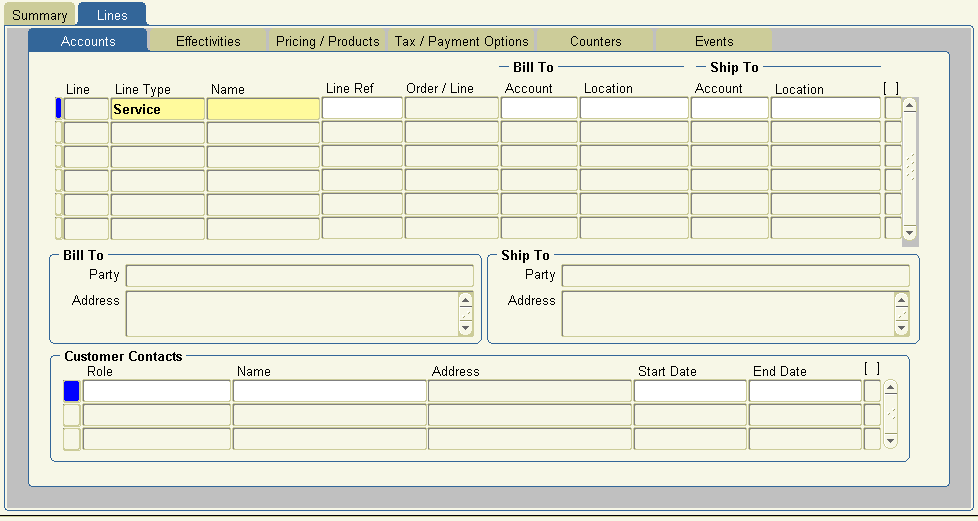
From the Service Contracts Authoring window, select Lines tab and Accounts subtab.
-
Select one of the following from the Line Type list of values (LOV) depending on the contract category:
-
For a service contract of category Service Agreement or Subscription Agreement, select Service.
-
For a service contract of category Warranty and Extended Warranty, select Extended Warranty.
Note: Both choices permit you to select from the same list of service offerings.
-
-
Select the service from the Name LOV, which comprises all services that your organization offers. You must select a service that is applicable to what you are covering. Because you select the service first and what it covers later, the application informs you of a wrong choice only after you enter the items that you are covering.
Note: If the application displays a note that your entry is not a valid service, then the application administrator excludes the customer from ordering this service. See the Oracle Service Contracts Implementation Guide for more information about defining service availability rules.
-
Enter billing and shipping contacts that are specific to this contract line by following the procedure described in Entering Billing and Shipping Contacts for a Contract . If a contact does not exist in the database, then you can add one following the procedure described in Creating or Modifying a Contract Line Contact.
The contacts that you enter here are different from the ones that you entered in the contract header.
-
Select the Effectivities subtab.
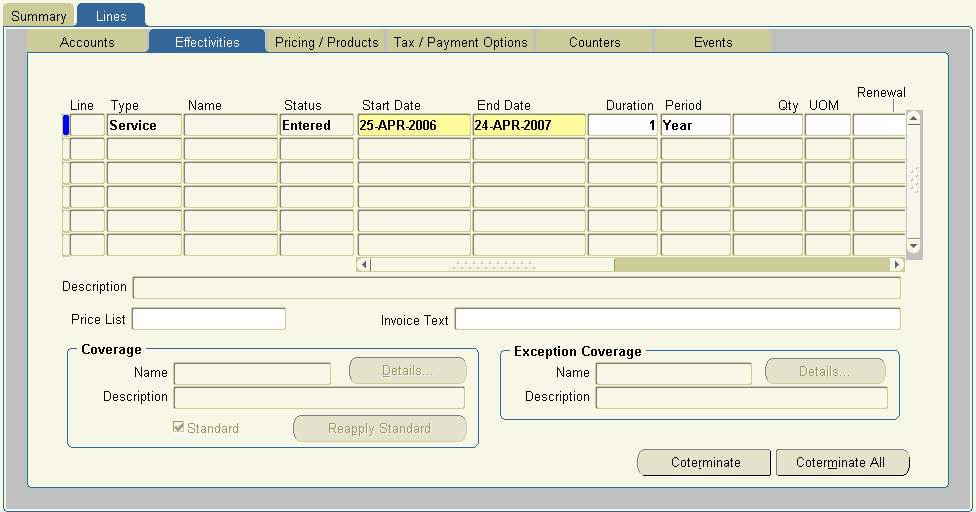
-
You can review the status of the line. Lines on entered status contracts can be individually canceled if you elect not to purchase the service during contract negotiation. Leaving a line on the contract and canceling it rather than removing it from the contract provides more visibility to lost opportunity for new and renewal contracts. When a line is canceled, the application records the cancellation date and reason.
-
Specify the duration of the service.
By default, the start and end dates of the service and duration are copied from the contract header.
You can specify a different duration by:
-
Clicking Coterminate to end the service line on a day that is preferred by the customer.
This button is enabled only in contracts with a status of Entered for customers to simplify renewals by terminating all contracts on the same day each year, for example at the end of the calendar or fiscal years. This date is called the cotermination date. See Ending Service Lines on a Day Specified by the Customer for more details.
-
Entering either of the following:
-
Start and end dates
-
Duration and period
The application calculates the missing information. If you supply a duration and period, then the start date is the start date of the contract.
Note: If your organization prices contracts differently based on different periods, for example offering different prices for a service that is purchased by month, quarter, and year, then the value in the Period field determines which price applies in the absence of a specified price UOM for the line.
You can change the price basis when you price the service. You may need to do so whenever you sell a service for an unusual service length, for example. By default, a customer purchasing a contract for one year and five days is charged based on a daily and not the yearly price because the line length is not divisible by a year.
For more information, see About Changing the Basis for Pricing a Service.
If the duration of the service starts earlier than the start date or ends later than the end date of the contract, then you must extend the start and end dates of the contract at the header level before you can make the contract active.
-
-
-
If the contract can be renewed (you have not selected Do Not Renew on the Summary tab and Renewals subtab), then specify how the line is to be renewed using the Renewal Type LOV. For details, see Specifying How a Contract Line is to Be Renewed.
-
Select the Pricing/Products subtab and Effectivity secondary tab.
-
Specify what the service line covers. For each subline, specify one of the covered levels and then enter what is being covered.
A service can cover:
-
A specific product that the customer owns (an Oracle Installed Base item instance)
-
A party
-
A customer account (party account)
-
A party site
-
An Oracle Installed Base system
-
An Oracle Inventory item
For covered products, you can either enter each subline individually or click the LOV indicator to open a browsing window where you can select multiple sublines at once.
See Specifying What a Service Covers for an explanation of the covered levels and how to enter them.
-
-
If you are covering an inventory item or a product (instance) that the customer owns, then the application prices the service for you. You must, however, price the other covered levels manually. See Pricing What a Service Covers.
-
Much of the remaining information for a service line comes from the defaults that you enter in the Summary tab or by the application itself from the coverage template that is associated with the service. You can make modifications by following these procedures:
-
Save.
Changing the Billing and Shipping Accounts and Locations
The application uses the billing and shipping accounts and locations from the entries that you made in the contract header. You can change the values to any account and location that are related to the parties that are entered in the contract header.
The Bill To account and location that you select for the line is the account that receives the invoice for this line. Your entries also restrict the contacts that you can enter for this line.
Note: You must select the location by the application-generated location codes. The corresponding addresses appear at the bottom of the tab.
Prerequisite
Enter the contract line.
To change the billing and shipping accounts and locations:
-
From the Service Contracts Authoring window, select the Lines tab and Accounts subtab.
-
Select the contract line to modify.
-
Use the LOVs to select a Bill To and Ship To account and location.
Entering Billing and Shipping Contacts for a Contract Line
The contacts that you enter here are separate from those that you entered for the party on the Summary line.
Note: The list of contacts that you can select is limited to those at that particular account location. While you can create new contacts according to the procedure that is described in Creating or Modifying a Contract Line Contact, make sure that you do not create any unnecessary duplicates.
Prerequisite
Select the shipping and billing accounts.
To enter billing and shipping contacts for a contract line:
-
From the Service Contracts Authoring window, select the Lines tab and Accounts subtab.
-
Select the service line at the top of the subtab.
-
Place your cursor in an empty record in the Role field in the Customer Contacts region.
-
To enter a contact for the billing account, select Billing Contact from the Role LOV. This entry limits the available names to contacts for the billing account.
-
To enter a contact for the shipping account, select Shipping Contact from the Role LOV. This entry limits the available names to contacts for the shipping account.
Note: Entering any other available role, such as Technical Contact, makes contact at both accounts available for selection.
-
Enter the contact using the Name LOV.
-
You can specify a start date and end date for a contact using the date fields.
-
To view the phone and other contact information for a contact, select the contact and select Maintain Contact from the Tools menu.
Creating or Modifying a Contract Line Contact
The contact that you create becomes a contact for the bill to account, the ship to account, or both, depending on your selection.
Prerequisite
Enter a service contract line
To create or modify a contract line contact:
-
From the Service Contracts Authoring window, select the Lines tab and Accounts subtab.
-
Select the contract line to which you want to associate to a contact.
-
In the Customer Contacts region, place the cursor in the Role field.
-
Select Maintain Contact from the Actions menu.
The Contact window appears.
-
If you are creating a new contact, then:
-
Select a role for this contract using the Contact Role LOV. Usually this is either Billing Contact or Shipping Contact.
-
Select the Bill To or the Ship To radio button depending on whether you want to create a contact for the billing or shipping account in the contract line.
The role that you selected in the previous step restricts your choices: if you selected the Billing Contact role, then you cannot select the Ship To radio button and vice versa.
-
Enter the contact last and first name.
-
Use the following guidelines for entering other information:
-
Select the titles and job descriptions from the Titles and Job LOVs. These are preset by your application administrator.
-
Phone, fax, and mobile numbers are composed of three fields: a country code (LOV), an area code, and the number itself. Do not use any delimiters when entering your number.
-
For the contact address, you can select only one of the existing customer locations that is associated with the account. You can add a mail stop or a mail box, however, by pressing the Tab key after entering the address.
-
-
-
If you are modifying an existing contact, then you can:
-
Change the title and job description by selecting a different one from the Title and Job LOVs.
-
Change the phone, fax, and mobile numbers.
-
Change the e-mail address.
Note: When modifying existing contact information, be aware that you are modifying the contact record for all Oracle E-Business Suite applications.
You cannot modify the address or mail stop number after you have saved them. To select another address or enter a different mail stop, you must:
-
Navigate back to the Service Contracts Authoring window.
-
Delete the contact by selecting it and clicking Delete in the toolbar.
-
Create a replacement contact with the correct address information.
Note: Deleting the contact from the contact does not delete it from the database. Creating a replacement record creates a duplicate.
-
-
-
If you are modifying an existing contact and want to revert to the existing record, click Reset.
-
Click OK to return to the Service Contracts Authoring window.
-
Save.
Specifying How a Contract Line Is to Be Renewed
This procedure applies to lines of all types (Service, Usage, and Subscription).
Prerequisites
-
Enter a contract line.
-
You cannot renew a line if you have indicated that the contract is not to be renewed at the header level. See Specifying How a Contract Will Be Renewed.
To specify how a line is to be renewed:
-
From the Service Contracts Authoring window, select the Lines tab and Effectivities subtab.
-
Select the line to set up.
-
Select one of the renewal options from the Line Renewal Type list. The choices are:
-
Do Not Renew: The line will not be renewed when the contract is renewed.
-
Full Duration: The line will be renewed for the whole duration of the new contract. For example, if a customer ordered six months worth of a yearly service in the current contract, but the renewed contract is for a period of one year, then the service line is extended to the full year as well.
-
Keep Duration: The duration of this line will remain the same in a renewed contract. Use this setting for intermittent or seasonal service lines. For example, a mountain resort may order special service for peak periods in winter and summer. Using this setting, you ensure that the renewed contract retains the same structure. See Renewing Service Purchased for Seasonal or Peak Periods.
-
Renewing Service Purchased for Seasonal or Peak Periods
This topic explains how to set the renewal types for service lines in a contract that includes intermittent or seasonal service.
Customer Problem
A mountain resort has installed power generators and wants to purchase two kinds of service:
-
Regular service for the whole calendar year that entitles them to repair during regular business hours.
-
Premium 24/7 service for peak winter and summer periods.
Oracle Service Contracts Solution
The following guidelines explain how to structure a contract based on the customer requirements.
Service Line Entry
Create a contract with three service lines:
-
Line 1: Regular service for the whole year.
-
Line 2: Premium for the winter
-
Line 3: Premium for the summer
Renewal Information
To keep the same contract structure when the contract is renewed in the future specify the following renewal information for each line:
| Line | Renewal Type | Explanation |
|---|---|---|
| 1. Regular Service | Full Duration | Renewed for the full duration of the new contract. |
| 2. Premium Winter | Keep Duration | Keeps the same duration in the renewed contract. |
| 3. Premium Summer | Keep Duration | Keeps the same duration in the renewed contract. |
Specifying What a Service Covers
A service can cover everything from individual products that a customer owns to telephone support for a whole corporation.
Note: Contracts of category Warranty and Extended Warranty restrict you to covering products that the customer owns (Oracle Installed Base item instances). The other covered levels are available for service lines that you enter in the Service Agreement and Subscription Agreement contract categories.
This group of topics explains the different levels of coverage that are available and provides procedures for entering them.
Levels of Coverage and Their Uses
Service can cover products on multiple levels. For example, you can have a service cover the repair of an individual product that the customer owns, or you can use it to provide telephone support for a whole enterprise.
Covered Levels
The following table lists the different levels of coverage, specifies the contract categories for which they are available, and provides a brief explanation of each.
| Level LOV Name | What It Covers | Available in Contract Category | Explanation |
|---|---|---|---|
| Party | A party in the database | Service Agreement only | Covers:
|
| Customer | A customer account (an account belonging to a party in the database) | Service Agreement only | Covers:
|
| Site | A party site | Service Agreement only | Covers:
|
| System | An Oracle Installed Base system | Service Agreement only | Covers:
|
| Product | An item instance in Oracle Installed Base | Warranty and Extended Warranty Service Agreement |
Covers:
|
| Item | An Oracle Inventory item | Service Agreement only | Covers:
|
How to Use Coverage Levels
Which level you use depends on the type of service you are selling and on the different needs of your enterprise.
The following table provides suggested guidelines. It lists some of the main business uses and lists the recommended covered levels for each.
| Business Use | Recommended Levels | Example |
|---|---|---|
| Servicing a customer product |
|
|
| Servicing high-volume and low-cost items |
|
The fire safety equipment vendor services fire sprinklers by customer site because they are too numerous to track in a contract individually. |
| Providing services not tied to any specific product such as telephone support or safety inspections. |
|
Sometimes a service covers a business process rather than any specific product that a customer owns. For example:
|
| Providing support for products that the customer plans to purchase in the future |
|
Use the Item level to cover products that are not yet in the installed base. For example, a customer plans to purchase additional generators in the near future, so they want to include them in the same service agreement to receive a discount. |
Covering Customer Products (Instances in Oracle Installed Base)
This group of procedures explains how to cover one or more customer products by a service:
-
Covering Customer Products provides the general procedure for entering a product.
-
Browsing the Oracle Installed Base to Identify Item Instances for Coverage explains how to use a built-in browsing window to identify the Oracle Installed Base item instances that you want to cover if you do not know their serial numbers or item instance numbers. Here you also learn how the browser speeds up your entries of multiple sublines at the same time.
-
Entering a Customer Product into the Installed Base explains how to create a record in Oracle Installed Base so that you can cover products that a customer has purchased from third parties.
Covering Customer Products
You can enter one or more products to be covered by the service.
You are not restricted to covering products that are owned by the parties in the contract. You can cover any product belonging to any party that is an item instance in Oracle Installed Base. However, Oracle recommends covering products that belong to the customer party or third party on the contract, or any party that is related to the contract customer party.
For contracts in renewal streams, service can be canceled for individual covered levels.
Prerequisites
-
Enter a service line.
-
If a product that you want to cover is not entered in Oracle Installed Base (for example, if you are selling service for a product that the customer purchased from a third party), then you must create an item instance as described in Entering a Customer Product into the Installed Base.
To cover customer products:
-
From the Service Contracts Authoring window, select the Lines tab and Pricing/Products subtab.
-
Select the service line that will cover the product.
Note: If customer products are associated with the contract line, you can select Show All Products, which opens the Product Details window. This window shows the details of the products covered by the service in a spread table.
-
Select the Effectivity secondary tab.
-
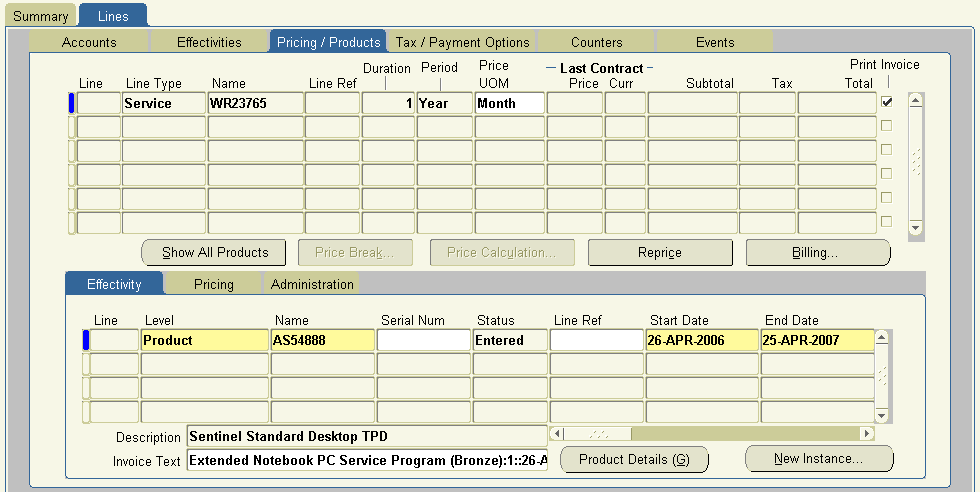
Enter the product or products to cover by one of the following two methods:
-
If you have a small number of products to cover and you know their serial numbers or item instance numbers, you can enter each subline individually making entries directly into the fields on each line:
-
On a new line on the Effectivity secondary tab, select Product from the Level LOV.
-
For Covered Level Product, the Name LOV displays customer and related customer items.
-
To view all item instances navigate to the Item Selection window by clicking on the LOV icon.
-
-
In the Name field, enter the Oracle Inventory name or a partial name with the percent sign to indicate any missing characters. If the product inventory name is AS45888, for example, then you can enter AS45888 or AS45%.
-
Press the Tab key.
The LOV search window appears:
-
You can search by complete serial number or the Oracle Installed Base item instance number. Enter it after the % sign in the Find field. For example: AS54888%99855.
-
Click Find.
If the search identifies a unique customer instance, the application returns you to the authoring window. Otherwise, you have to narrow your search criteria or select an item on the list and click OK.
-
-
To select multiple products for coverage at the same time, or if you do not know the serial number or the item instance number of an individual product to cover, you can make your selection from a graphical display of the contents of the customer's installed base by clicking the LOV indicator in the Name field. For details see Browsing the Oracle Installed Base to Identify Item Instances for Coverage.
A product that you enter is displayed in the Name field by its inventory item name. You can see the customer product's serial number, item instance number, or both in the Description field.
Note: Your administrator can set the profile OKS: Item Display Preference to display an item by name or by description. If the profile set to Name, then you can select and view products by the item name, such as AS54888, and the description text following the sublines table shows the item description, such as Sentinel Standard Desktop. If the profile is set to Description, then you can select and view products by description and view the name in the Description field following the sublines table.
-
-
Save.
The application automatically updates the price of the service line.
Note: The application calculates prices based on the quantity that is attached to the item instance and the price list that you have selected for the service line. Most item instances are specified for individual items, but non-serialized items, including consumables such as ink cartridges, can come in any quantity. If the updated price is more than you expected, then check the quantity that is attached to the item instance by clicking Product Details.
-
You can review the status for the covered level. If an existing covered level has a canceled status you, can scroll to find the cancellation date and reason.
-
To create an item instance in the installed base, select New Instance. The Create Item Instance window appears.
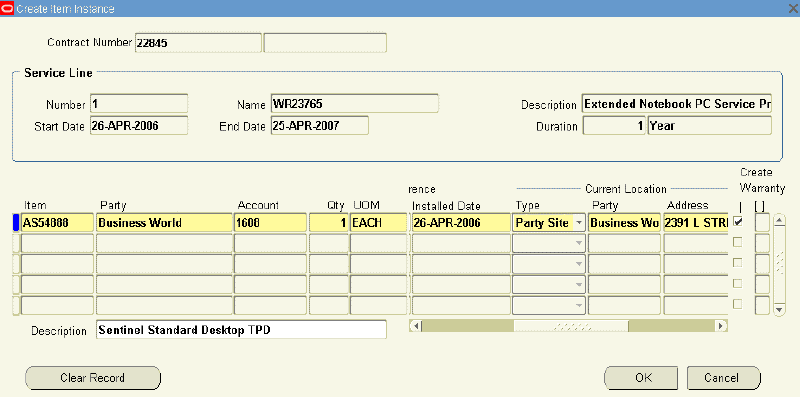
-
Select the product to add from the Item LOV.
-
Enter a quantity.
-
Select a unit of measure (UOM) from the LOV.
-
Select a location type from the Current Location Type list, such as Party Site.
-
Select a party from the Current Location Party LOV.
-
Select an address from the Current Location Address LOV.
-
Click OK.
Note: You can create multiple item instances at one time and then select OK. The application adds the newly created item instances as covered products to the selected service line.
The Service Contracts Authoring window appears, and the new item instance appears within the Effectivity secondary tab.
-
Save.
-
Browsing Oracle Installed Base to Identify Item Instances for Coverage
You can browse the customer's Oracle Installed Base records and select one or more products for coverage. Each product that you select appears as a separate line in the authoring window.
Prerequisite
Enter a service line.
To browse Oracle Installed Base to identify item instances for coverage:
-
From the Service Contracts Authoring window, select the Lines tab and Pricing/Products subtab.
-
Select the service line that will cover the product.
-
Select the Effectivity secondary tab.
-
Select Product from the Level LOV.
-
Click the LOV indicator in the Name field.
The Product window appears.
-
Because the size of your installed base can be too large for browsing, you can restrict the view in a number of ways. You can:
-
Select different views.
By making a selection from the Level list, you can view the item instances by:
-
Item: Selecting this level displays all of the instances for a particular inventory item.
-
Model: If you have configured items in your installed base, you can view them by model.
-
System: If your Oracle Installed Based item instances are grouped in systems, you can display the instances by system.
-
Site: Use this level to display all the item instances at a particular address.
-
Customer: Use this level to view item instances by a customer account.
-
Party: Use this level to organize the display by customers in your database. This view is most useful if you are selling to consumers.
-
-
Specify which customer records display.
By selecting a customer context, you specify what customer records appear:
-
Customer: Limit the display to the party that is entered as the customer on the Summary tab of the contract.
-
Related Customer: Display parties with a relationship to the customer in the Oracle Trading Community Architecture (TCA) party model. You can define customer account and party relationships in Oracle Receivables at account level.
You can display item instances for:
-
Both: Both the customer and related parties.
-
All: All parties in the database.
-
-
Restrict the list that is displayed in the window.
Enter a search term in the Name field to restrict what is displayed in the list. You can use partial entries and the percent sign % to represent omitted characters.
For example, to view the installed base by inventory item but not view all items, you can restrict the display to just the item that you want by entering it in the Name field.
-
-
After you have entered the display criteria, click Find.
The window displays the installed base in the form of a tree.
-
View the details of any node on the tree by clicking it.
-
Select any item instance that you want to add, holding down the CTRL and Shift keys for multiple selections.
-
Click OK to return to the Service Contracts Authoring window.
Each selection creates an individual line in the Effectivity secondary tab.
Entering a Customer Product into Oracle Installed Base
You can cover a product that does not have an item instance in Oracle Installed Base. You may have to create an instance if you provide service for products that a customer purchased from a third party such as a vendor or a dealer, for example.
Prerequisites
-
Set up product as an item in Oracle Inventory.
-
Enter a service line.
To enter a customer product into Oracle Installed Base:
-
From the Service Contracts Authoring window, select the Lines tab and Pricing/Products subtab.
-
Select the service for the product that you are about to create.
-
Select the Effectivity secondary tab.
-
Select New Instance. The Create Item Instance window appears.
-
Select the product to add from the Item LOV.
-
Enter a quantity.
-
Select a UOM from the LOV.
-
Select a location type from the Current Location Type list, such as Party Site.
-
Select a party from the Current Location Party LOV.
-
Select an address from the Current Location Address LOV.
-
Click OK.
The Service Contracts Authoring screen appears, and the new item instance appears within the Effectivity secondary tab.
-
Save.
-
Covering Parties
You can cover one or more parties with a service. A party is a customer in your database. This can be an individual consumer or an organization.
Prerequisite
Create a contract of category Service Agreement.
To cover parties:
-
From the Service Contracts Authoring window, select the Lines tab and Pricing/Products subtab.
-
Select the service.
-
Select the Effectivity secondary tab.
-
If you are covering a small number of parties and you know the party names or a partial party names, then make your entries on separate sublines. For each party:
-
In a new line, select Party as the Level.
-
Enter the name or partial name in the Name field. (Use the % sign to indicate omitted characters.)
-
Press the Tab key.
If the application does not find a unique match, it opens a search window where you can refine your search.
-
-
To enter multiple parties at the same time or if you do not know the name of the party, then you can make a selection from a list of the parties in your database displayed in a logical tree:
-
Click on the LOV indicator in the Name field.
The Party window appears.
-
Select Related Customer from the Customer Context list.
-
Click Find.
The window displays a list of parties that are related to the customer on the contract.
-
Select one or more parties (use the Shift and Ctrl keys for multiple selections).
-
Click OK.
-
-
Save.
Covering Customer Accounts
You can select one or more customer accounts (party accounts) to cover with a service. You can cover the accounts belonging to the parties in the contract or to any parties with a relationship to them.
Prerequisite
Create a contract of category Service Agreement.
To cover customer accounts:
-
From the Service Contracts Authoring window, select the Lines tab and Pricing/Products subtab.
-
Select the service.
-
Select the Effectivity secondary tab.
-
If you know the party that owns the account, you can enter each account individually as a subline. For each subline:
-
Select Customer for your Level.
-
In the Name field, enter the name or partial name of the party.
-
Press the Tab key.
The application displays a list of accounts for the party that you specified in a search window.
-
Select the account to cover or refine your search by adding the % sign and the account number to the search term.
-
Click OK.
The Name field displays the name of the party. The Description field displays the account number.
-
-
To enter multiple parties at the same time or if you do not know the party name or account, then you can browse through a list of related parties and accounts:
-
In a new line, select Customer for your Level.
-
Click on the LOV indicator in the Name field.
The Party window appears.
-
Select Related Customer from the Customer Context list.
-
Click Find.
The window displays a list of parties that are related to the customer on the contract.
You can view the accounts for the parties listed, by clicking the party node.
-
Select one or more accounts (use the Shift and Ctrl keys for multiple selections).
-
Click OK.
-
-
Save.
Covering Party Sites
You can cover one or more party sites with a service.
Prerequisite
Create a contract of category Service Agreement.
To cover party sites:
-
From the Service Contracts Authoring window, select the Lines tab and Pricing/Products subtab.
-
Select the service.
-
Select the Effectivity secondary tab.
-
To enter individual sites for which you know the site numbers, enter each site on a separate subline:
-
On a new line, select Site as the Level.
-
Enter the site number in the Name field. The site number is the unique identifying number that is generated by the application for each party address.
-
-
To cover multiple sites at the same time or if you do not know the site number, then you can find the site to cover by browsing through a list of customers and their sites. See Browsing Through Party Sites.
Browsing Through Party Sites
You can select sites to cover by browsing through a list of sites organized by party.
Note: When coverage is provided for a product, the Installed At location in Oracle Installed Base is the site that is pertinent when coverage is provided for that product. When you create a service request the contract will not appear as an Open Contract unless the product is Installed At the designated site. If Party Type Is HZ Location, then the entitlement check does not return that contract line. Coverage is not provided if the Party Type for the Installed At location is not Party Site. Changing the Installed At address in the Service Request does not mean that the product will be covered under the designated contract.
Prerequisite
Enter a service line.
To browse through party sites:
-
From the Service Contracts Authoring window, select the Lines tab and Pricing/Products subtab.
-
Select the service line.
-
Select the Effectivity secondary tab.
-
On a new line, select Site from the Level LOV.
-
Click the LOV indicator in the Name field.
The Site window appears.
-
Restrict which parties to display by choosing a Customer Context:
-
To view only the sites for the contract customer, select Customer.
-
Related Customer: Displays the parties with a relationship to the customer in the Oracle TCA party model.
-
Both: Displays both the customer and related parties.
-
All: Displays all parties in the database.
-
-
-
To restrict the list that is displayed to a particular party name, enter a name or partial name.
-
Click Find.
The window displays a list of parties that meet your criteria.
-
View the sites for any party, by clicking the party node.
-
Select the sites to cover (hold down the Shift and Ctrl keys for multiple selections).
-
Click OK to return to the Service Contracts Authoring window.
Covering Systems
You can cover one or more systems with a service. A system is a grouping of item instances that are created in Oracle Installed Base.
Prerequisite
Create a contract of category Service Agreement.
To cover systems:
-
From the Service Contracts Authoring window, select the Lines tab and Pricing/Products subtab.
-
Select the service.
-
Select the Effectivity secondary tab.
-
To enter systems individually when you know the system names, for each system:
-
On a new line, select System from the Level LOV.
-
Enter the name or partial name in the Name field. Use the % sign to represent missing characters.
-
Press the Tab key.
-
-
To enter multiple systems at the same time or if you do not know the system names, you can browse through a list of systems by party, party account, or party site. See Browsing Through Oracle Installed Base Systems.
Browsing Through Oracle Installed Base Systems
You can identify and select systems for coverage by browsing through a list of systems organized by party, party account, or party site.
Prerequisite
Enter the service line.
To browse through Oracle Installed Base systems:
-
From the Service Contracts Authoring window, select the Lines tab and Pricing/Products subtab.
-
Select the service line.
-
Select the Effectivity secondary tab.
-
Select System from the Level LOV.
-
Click the LOV indicator in the Name field.
The System window appears.
-
To limit the number of customer systems to browse through at any one time, you can:
-
Select different views
By making a selection from the Level list, you can view systems by:
-
Customer account, by choosing Customer.
-
Party, by choosing Party.
-
Party site (identified by its number), by choosing Site.
-
-
Specify which parties to display by choosing a Customer Context. You specify what customer records display. The choices are:
-
Customer: Limit the display to the party entered as the customer in the contract.
-
Related Customer: Show parties with a relationship to the customer in the Oracle TCA party model.
-
Both: Show both the customer and related parties.
-
All: Show all parties in the database.
-
-
Restrict the list that is displayed in the window
Enter a search term in the Name field to restrict what is displayed in the list.
For example, if you have selected Party as the level, you can limit the display to a specific party by entering its name in this field.
-
-
After you have entered the desired display criteria, click Find.
The window displays the systems in the desired view of the installed base systems in the form of a logical tree.
-
View the systems in any node on the tree by clicking it.
-
Select the systems that you want to cover (use the Shift and Ctrl keys for multiple selections).
-
Click OK to return to the Service Contracts Authoring window.
Covering Inventory Items
You can cover one or more Oracle Inventory items with a service. You can cover multiple quantities of the item on each subline.
Prerequisites
-
Create a contract of category Service Agreement.
-
Identify the Oracle Inventory item name of the item to cover.
To cover inventory items:
-
From the Service Contracts Authoring window, select the Lines tab and Pricing/Products subtab.
-
Select the service.
-
Select the Effectivity secondary tab.
-
Select Item for your Level.
-
Use the Name LOV to enter the item name.
-
Save.
-
Navigate to the Pricing tab.
-
Enter the quantity of item that is being covered in the Qty field.
-
Select the unit of measure using the UOM LOV.
-
Save.
Viewing Details About a Covered Product
The products that are covered by a service line are identified in the Service Contracts Authoring Window by their Oracle Inventory names. You can view the complete details about a covered product (an instance in Oracle Installed Base), including the installation address, installation date, and pricing information.
Prerequisites
-
Set up the product as an item in Oracle Inventory.
-
Enter a service line.
To view details about a covered product:
-
From the Service Contracts Authoring window, select the Lines tab and Pricing/Products subtab.
-
Select the service covering the product.
-
Select the Effectivity secondary tab.
-
Select the covered line to display. The Level must be of type Product.
-
Click Product Details.
The Product Details window appears with the information.
Note: For service contracts of category Warranty and Extended Warranty, you can view details for all of the covered products at the same time, by clicking the Show All Products button.
Maintaining Pricing Attributes for Covered Products
The pricing attributes can be maintained for any of the covered products.
To maintain pricing attributes for Covered Products:
-
From the Service Contracts Authoring window, select the Lines tab and the Pricing/Products subtab, and then select the service line to update.
-
Select the Effectivity secondary tab and highlight a covered product.
-
From the Actions menu select Pricing Attributes.
-
Select the Pricing Context from the LOV. For each Pricing Context, you can enter the pricing attributes in the corresponding descriptive flexfield.
-
Click Apply to save the pricing attributes
Specifying How the Service Prints on an Invoice
By default, Oracle Receivables prints both the line and subline on the customer invoice.
You can specify:
Omitting a Line or Subline from the Invoice
You can control the printing of contract line and subline details with the Invoice Print Flag check box. By default, the application activates this check box and prints the line and subline. You can prevent a selected line or subline from being printed on the invoice, by clearing the check box. Omitting the line or subline from the printed invoice does not remove the price from the invoice subtotals.
Prerequisite
Enter a service line.
To omit a line or subline from the invoice:
-
From the Service Contracts Authoring window, select the Lines tab and Pricing/Products subtab.
-
To omit a line from the invoice, clear the Print Flag check box on the right.
-
To omit a subline from the invoice:
-
Select the line.
-
Select the Administration secondary tab.
-
Clear the Print Flag check box.
-
-
Save.
Specifying the Invoice Text
You can specify what text appears on the invoice for the service line and sublines.
The application automatically creates a description of the line and sublines for you. For contract lines, this is the service description and the effective dates separated by colons.
For example, if the service name is Gold Service and the effective dates are 01-JAN-2005 to 31-DEC-2005, then the text invoice reads:
Gold Service:01-JAN-2005:31-DEC-2005.
For covered sublines, the description also includes the name of the item that is covered.
If you have sold Gold Service, 01-JAN-2005 to 31-DEC-2005, for washing machine SuperWash, then the generated description reads:
Gold Service:01-JAN-2005:31-DEC-2005.
Prerequisite
Enter a service line.
To specify the invoice text:
-
From the Service Contracts Authoring window, select the Lines tab and Effectivities subtab.
-
Select the service covering the product.
-
Modify the line descriptions in the Invoice Text field.
-
If you are billing for individual covered items, then:
-
Select the Pricing/Product subtab.
-
Select the Effectivity secondary tab and modify the text in the Invoice Text field.
-
-
Save.
-
You can copy the description you have entered to the sublines by using the Cascade Attributes option from the Actions menu. See Applying Changes from a Service Line to the Covered Sublines.
Specifying a Billing Schedule
You can specify how the application bills the customer for a service and when the application sends the billing records to Oracle Receivables.
You can bill a customer for a service either at the contract line level or separately for each of the sublines that are covered by the service. If you are billing separately for each subline, then you can create a different billing schedule for each.
If you entered a billing schedule at the contract header level, then this schedule passes to the line level.
Prerequisite
Enter a service line.
To specify a billing schedule:
-
From the Service Contracts Authoring window, select the Lines tab and Pricing/Products subtab.
-
Select the service line to set up.
-
Click Billing.
The Billing window appears.
-
Select a billing level from the Level LOV:
-
Equal Amount: to bill for equal amounts over the billing period and have control over the amount as well as the billing periods.
-
Top Level: to bill customers for the service as a whole.
-
Covered Level: to bill customers at the level of each subline.
-
-
Specify the billing schedule by entering one or more billing streams. This is the same procedure as is used for creating schedules at the header level. See Entering a Billing Stream for details.
-
If you chose Covered Level you can modify the billing schedule for any of the sublines:
-
Select the service line on the Lines tab and Pricing/Products subtab.
-
Select the Pricing secondary tab.
-
Select the subline that you want to modify.
-
Click Billing.
The Billing window appears for this subline.
-
Create a billing schedule for this subline using one or more billing streams.
-
Click OK.
-
Pricing What a Service Covers
The application automatically prices a service on an Oracle Inventory item or a product that the customer owns (an item instance in Oracle Installed Base) based on the price list.
Following is a summary of how pricing works for covered products, whether you are adding an existing item instance to a contract as a covered product or creating new item instances and adding them to the contract:
-
Obtaining an Asking UOM:
If Price UOM for a covered product is NULL, Oracle Service Contracts passes the service duration UOM on the covered product subline as the Asking UOM for the pricing call.
Note: The UOM for service duration is always converted to the highest possible UOM. For example, if you enter 365 days as the service duration for the subline, at time of save the service duration is updated to 1 year. If Price UOM is present on a covered product subline, the Price UOM takes precedence over the service duration UOM and the application passes it as the Asking UOM for the pricing call.
-
Pricing the Service:
If you define a service price in the same UOM as the Asking UOM, then the price is returned at a rate/uom for the same UOM that is passed as the asking price.
Example
-
Asking UOM is Month
-
Price List has price defined as Month is $100 and Year is $900
-
Service duration is 4 months
-
Price is $400 (Quantity 4 at a monthly price of $100)
-
Unit Price = $100
-
If you do not define a service price in the same UOM as the Asking UOM, then the price returns as follows:
-
If your Price List has a price defined for a UOM for which the Primary check box is selected, then the price list price/UOM is converted into a price/asking UOM to derive the service price.
Example
-
Asking UOM is Month
-
Price List has following prices:
-
Month is $100; Precedence is 20
-
Year is $900; Primary UOM; Precedence is 20
-
-
Service duration is 4 months
-
Price returned is $300 (Quantity 4 multiplied by ($900/12))
-
Unit Price is $900
Note: Unit Price is based on the price list UOM the application uses to calculate the price.
-
-
If your Price List has more than one price defined for a UOM for which the Primary check box is selected, then the price list UOM with the highest precedence is used.
Example
-
Asking UOM is Month
-
Price List has the following prices:
-
Month is $100; Precedence is 20
-
Year is $900; Primary UOM; Precedence is 20
-
-
Quarter is $270; Primary UOM; Precedence is 10
-
Service duration is 4 months
-
Price is $360 (Quantity 4 multiplied by (270/3))
-
Unit Price is $270
Note: Unit Price is based on the Price List UOM that the application uses to calculate the price.
-
-
If Price List does not have a Price List UOM that is the same as the Asking UOM and the price list does not have a price defined in another UOM selected as a Primary UOM, then the application does not return a price for the Asking UOM.
The preceding logic applies for both Covered Product pricing and Covered Item pricing.
You must price the other covered levels manually. For this reason, you must use different procedures for entering and adjusting prices:
Adjusting the Price of a Service for a Covered Product or an Item, Pricing Service for a Party.
Additional ways of adjusting prices for your customer are covered in Adjusting Prices.
Adjusting the Price of a Service for a Covered Product or an Item
The application automatically prices a service for an inventory item or a covered product (an item instance in Oracle Installed Base) using the price list that you entered on the Effectivities subtab.
To reprice, you can:
-
Apply preset discounts and surcharges by using the pricing Adjustments window (a selection from the Tools menu). See Entering Price Adjustments.
-
Adjust the price manually directly in the Authoring window when you enter the subline. See Manually Adjusting the Price.
-
Change the price list on the Effectivities subtab. See Repricing a Service by Changing the Price List for details.
Repricing a Service by Changing the Price List
You can reprice the service line or an individual subline by changing the price list.
Prerequisite
Enter a service line.
To reprice a service by changing the price list:
-
From the Service Contracts Authoring window, select the Lines tab and Effectivities subtab.
-
Select a different price list from the Price List LOV.
-
Save.
-
Select the Pricing/Products subtab.
-
Select the line that you want to reprice.
-
To reprice an individual subline:
-
Select the Pricing secondary tab.
-
Select the subline that you want to reprice using the new price list.
-
Click Reprice to update the price.
-
-
To reprice the whole line, click Reprice on the subtab itself.
-
Save.
Manually Adjusting the Price
You can manually adjust the price of a service covering an inventory item or a covered product (Install Base item instance) in one of two ways:
-
By applying discounts or surcharges that are preset by the administrator using the Adjustment window. See Entering Price Adjustments.
-
By modifying the price directly in the authoring window as described in this procedure.
Note: Your application administrator must set up this item or product with a manual modifier in Oracle Advanced Pricing for you to be able to adjust the price using this method.
Prerequisite
Enter a service line.
To manually adjust the price:
-
From the Service Contracts Authoring window, select the Lines tab and Pricing/Products subtab.
-
Select the service line to adjust.
-
Select the Pricing secondary tab.
-
Select the subline to reprice.
-
Adjust the price using one of the following methods:
-
Enter a different price in the Subtotal field and click Save. For example, if the service costs $100, then you can give the customer a 10% discount by entering 90.
Note: The application applies the discount that you enter here provided that the application administrator has set the system profile OKS: Use Advanced Pricing for Manual Adjustment to Yes. You can verify whether the item has been discounted by clicking the Price Calculation button. See Viewing Adjustments for the Whole Contract.
-
If your organization prices a service based on different time increments, for example charging a different price if the service is purchased by the year, by the quarter, or by the month, then you can use the Price UOM to specify which increment to use to calculate the price. If you do not sell by different increments, then leave this field blank.
To reprice:
-
Select a length from the Price UOM LOV.
-
Save.
See About Changing the Basis for Pricing a Service for details on when and how to use this repricing method.
-
-
-
If you are not satisfied with the changes you have made, you can restore the original price by clicking Reprice.
Changing the Basis for Pricing a Service
If your organization prices the same service based on different time increments, for example offering different prices for a year contract and a monthly contract, you can specify which increment price will be the basis for charging the customer by making an entry in the Price UOM field.
This enables you to:
-
Offer a customer any of the available prices for the service.
For example, you can offer a customer who wants to purchase a service for nine months either the monthly, the quarterly, or the yearly price.
-
Ensure that a customer purchasing a contract for an irregular time period is charged the correct price.
If you do not make any entries in the Price UOM field, then the application charges the customer based on the value of the Period field on the Lines tab, Effectivities subtab. The period, which is passed by the application, may not always be the one that you want to use as the basis for charging the customer.
Suppose your organization offers a service in yearly, quarterly, and daily increments, and a customer wants to start the service on January 1, 2005 and end it on January 4, 2006. Because this period of one year and five days is not divisible by one year or a quarter, the application uses a day as the period.
This means that, unless you enter a different basis in the Price UOM field, the customer will pay 370 times the price of a daily contract rather than the price of a yearly contract plus a prorated price for the extra five days.
Note: If you specify a UOM that is not priced on the price list, the application charges the customer based on the price of the UOM that the administrator has specified as primary. If the UOM is not priced and no UOM is designated as primary, then the application returns a price of 0.
Pricing Service for a Party, Customer Account, Site, or System
You can price a service for covered levels that are not priced automatically: party, customer (party) account, site, and system. You must price each subline individually.
Prerequisite
Enter a service line.
To price a service for parties, customer accounts, sites, and systems:
-
From the Service Contracts Authoring window, select the Lines tab and Pricing/Products subtab.
-
Select the service line to set up.
-
Select the Pricing secondary tab.
-
Select the subline to price.
-
Enter the price using one of the two following methods:
-
Calculate the extended price for the service based on a quantity and unit price:
-
Enter the quantity in the Qty field.
-
Select the unit of measure from the UOM LOV.
-
Enter the unit price in the Unit Price field.
-
Press the Tab key.
The application calculates the extended amount.
-
You can modify the subtotal.
Note: The entries that you make here are optional. They are designed to aid you in making the calculation only.
-
-
Enter the price directly into the Subtotal field.
-
-
Save.
Specifying a Payment Method for a Contract Line
This group of procedures explains how to specify a payment method for a specific contract line.
To specify the same payment method for all the lines in your contract, instead create a default payment method on the Summary tab according to the procedure that is described in Specifying a Payment Method.
If you have already set up the default payment method, then payment information automatically appears.
Specifying Payment by Credit Card or Commitment Number
Commitments represent a customer's prepayment for goods or services (prepayments) or contractual agreements (guarantees). Commitments are set up in Oracle Receivables.
Prerequisite
Confirm the setup of commitments in Oracle Receivables. See the Oracle Receivables User Guide.
To specify payment by credit card or commitment number:
-
From the Service Contracts Authoring window, select the Lines tab and Exemption/Payment Options subtab.
-
To specify payment by credit card:
-
Select Credit Card from the Payment Type list.
-
Enter the credit card number using the LOV.
Note: You can enter an expiry date only for new credit cards.
-
-
To specify payment by commitment:
-
Select Commitment Number from the Payment Type list.
-
Enter the commitment number using the LOV.
-
-
Save.
Requiring a Purchase Order
You can require the entry of a purchase order number for the contract line. The contract then cannot pass the QA check and become active unless a purchase order is entered for every line.
To require a purchase order:
-
From the Service Contracts Authoring window, select the Lines tab and Exemption/Payment Options subtab.
-
In the Payment Method region, select the Purchase Order Required check box.
-
Save.
Specifying a Purchase Order Number
You can enter a purchase order number in a contract line. This number is sent to Oracle Receivables and appears on customer invoices.
To specify a purchase order number:
-
From the Service Contracts Authoring window, select the Lines tab and Exemption/Payment Options subtab.
-
In the Payment Method region, enter the purchase order number in the PO Number field.
-
Save.
Modifying Coverage Provided by a Service
Each service that you select as a contract line item comes with a predefined list of what that service covers (terms of coverage). This includes:
-
Covered business processes (service fulfillment channels)
-
Pricing and discounts
-
Time zones covered, and the days and times that coverage is available
-
Required reaction and resolution times
-
Preferred resources to carry out the work
Your administrator defines the coverage terms that are included in a service offering, using a coverage template at the time the service item is defined in Oracle Inventory.
You can modify any of the coverage provided for an individual service line in the contract. For example, you can change the response time, or extend a service providing weekday telephone support to cover weekends as well. However, the contract price is not affected by any of the modifications that you make in an individual contract, so your organization may prefer to make any coverage changes in the coverage template itself.
Prerequisite
Enter a service line.
To modify coverage provided by a service:
-
From the Service Contracts Authoring window, select the Lines tab and Effectivities subtab.
-
Select the service line to modify.
-
Click Details.
The Service Contracts Coverage window appears.
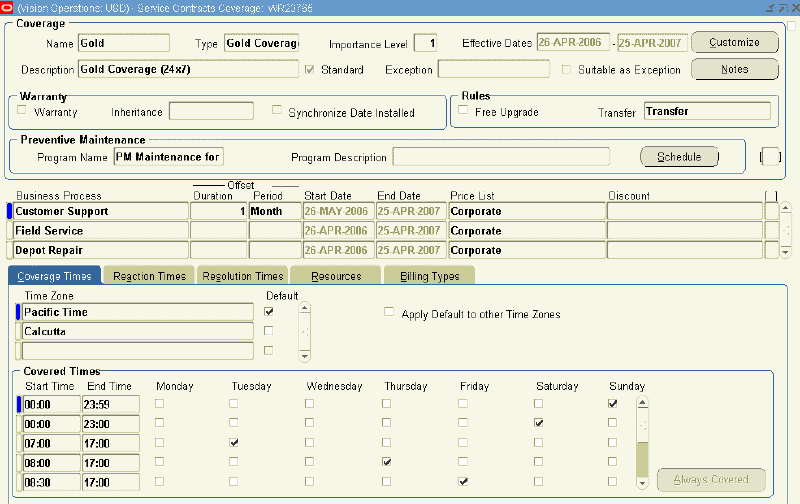
-
Click Customize to create contract-specific coverage terms.
-
Modify the coverage as described in Defining Standard Coverage.
-
Click Reapply Standard to reapply the standard coverage terms to the service line.
Note: You can customize the coverage terms for an approved and activated contract; however, you cannot reapply the standard coverage template to a service line once it appears on an approved and activated contract.
Scheduling Preventive Maintenance Activities
This procedure is for scheduling periodic activities only. For scheduling activities based on usage, for example, maintaining a printer based on the number of copies made, you must use Oracle Complex Maintenance, Repair, and Overhaul.
If preventive maintenance activities are required as part of the service that you have entered in a contract line, then the application includes these along with the other coverage details that are attached to the item.
The application administrator can set up the application to automatically schedule these maintenance activities for you when you enter the contract line. The scheduled dates are the planned start dates of any service requests the application generates to carry out the work.
You can:
-
Specify new dates when each of the activities is to start.
The dates that you enter become the planned start dates in any service requests that the application generates for these activities.
-
Specify a range of dates that the maintenance activities are to start.
The start date of each activity is the planned start date in the corresponding service request.
Note: The application can automatically generate a schedule based on start dates only. To specify a date range, you must enter the start and end dates into the contract manually.
Prerequisites
-
Enter a service line.
-
Confirm the setup of the preventive maintenance program and associated activities in Oracle Complex Maintenance, Repair, and Overhaul.
To schedule preventive maintenance activities:
-
From the Service Contracts Authoring window, select the Lines tab and Effectivities subtab.
-
Select the service line to modify.
-
Click Edit Coverage.
The Service Contracts Coverage window appears.
The preventive maintenance program that is associated with the service line by your application administrator appears in the Program name field in the Preventive Maintenance region of the window.
The preventive maintenance program encompasses the required maintenance activities for the product. Both the program (also called a maintenance requirement) and its activities are set up in Oracle Complex Maintenance, Repair, and Overhaul.
-
Click Schedule.
The Preventive Maintenance Schedule window appears showing the Program Schedule tab. If the application administrator has set up a schedule for this program, then the Schedule region is already populated with dates.
The maintenance activities that you must schedule are listed on the Activity Schedule tab.
-
You can schedule the preventive maintenance activities in one of two ways. You can:
-
Create a template schedule on the Program Schedule tab and use that schedule to schedule multiple activities. See Scheduling Multiple Activities.
-
Create a separate schedule for each activity. See Scheduling Individual Activities.
-
-
Click OK.
Scheduling Multiple Activities at the Same Time
You can later modify the default schedule to create a unique schedule for each activity.
Prerequisites
-
Enter a service line.
-
Confirm the setup of the preventive maintenance program and associated activities in Oracle Complex Maintenance, Repair, and Overhaul.
-
Associate a preventive maintenance program with a coverage template.
To schedule multiple activities at the same time:
-
From the Service Contracts Authoring window, select the Lines tab and Effectivities subtab.
-
Select the service line to modify.
-
Click Edit Coverage.
The Service Contracts Coverage window appears.
-
Click Schedule in the Preventive Maintenance region.
The Preventive Maintenance Schedule window appears.
-
Select the Program Schedule tab.
-
If the customer must approve scheduled tasks in the service request before they are performed, then select the Confirmation Required check box.
-
Create a default schedule for the activities in the Stream Levels region. See Scheduling Activities at Regular Intervals Using Schedule Streams.
-
To default this schedule to multiple activities:
-
Select the Activity Schedule tab.
-
Make sure that only the Select check boxes for the activities you want to set up are selected.
-
Click OK.
The application asks you whether you want to copy the schedule to the activities.
-
Click Yes.
-
-
To pass this schedule to a single activity:
-
Save.
-
Select the Activity Schedule tab.
-
Select the activity by placing your cursor in any field on the line.
-
Click Populate from Program.
The application copies the default dates or date ranges to the selected activity.
-
Scheduling Individual Activities
-
Enter a service line.
-
Confirm the setup of the preventive maintenance program and associated activities in Oracle Complex Maintenance, Repair, and Overhaul.
-
Associate a preventive maintenance program with coverage template.
To schedule an individual activity:
-
From the Service Contracts Authoring window, select the Lines tab and Effectivities subtab.
-
Select the service line to modify.
-
Click Edit Coverage.
The Service Contracts Coverage window appears.
-
Click Schedule in the Preventive Maintenance region.
The Preventive Maintenance Schedule window appears.
-
Select the Activity Schedule tab.
-
Make sure that only the activities you want to set up are selected using the Select check box to the right of the Activity region.
-
If you have created a default schedule that you want to use to schedule this activity, then click Populate from Program.
The application passes the schedule that you have created on the Program Schedule tab.
-
To create a separate schedule for this activity, create the schedule in the Stream Levels region. See Scheduling Activities at Regular Intervals Using Schedule Streams.
-
If the customer must approve the tasks in the service request before work starts, then select the Confirmation Required check box that is located to the right of the activity.
-
Save.
Scheduling Activities at Regular Intervals Using Schedule Streams
You can schedule an inspection every month for a piece of equipment that requires 12 inspections during the year.
Each set of regular dates is called a schedule stream. You can set up any number of such schedule streams using this procedure to handle complex requirements. For example, if a piece of equipment requires two inspections in the first year and six for every year thereafter, you can schedule the semiannual inspections for the first year using one stream and use the second stream to create the schedules for the six inspections in the second year.
You can use this procedure on both the Program Schedule and the Activity Schedule tabs, depending on whether you are creating a default schedule for all the activities in a program or scheduling individual activities. See Scheduling Multiple Activities at the Same Time and Scheduling Individual Activities.
To schedule an activity at regular intervals using a scheduling stream:
-
From the Preventive Maintenance Schedule window, navigate to the Stream Levels region:
-
If this is the first stream, then:
-
Enter 1 in the Seq Num field.
The application passes the start date from the start date of the contract line.
-
Enter the number of times that you want the activity to be performed in the Periods field
-
Enter the length of each period in the UOM/Period and UOM fields. For example, to schedule an inspection once a month, enter 1 in the UOM/Period field and select Month from the UOM LOV.
The application supplies the end date.
-
-
If this is an additional stream, then:
-
In the Seq Num field, enter a number corresponding to the order in which the periods are created.
The sequence numbers for scheduling streams must be in order of the dates in the schedule. To schedule an activity earlier than an existing activity, reorder the entire sequence.
The application passes the start date from the end date of the previous stream.
-
Enter the length of each period in the UOM/Period and UOM fields. For example, to schedule an inspection once a month, enter 1 in the UOM/Period field and select Month from the UOM LOV.
The application supplies the end date.
-
-
To postpone the scheduled start of the first activity in the stream, enter an offset period by either of these two methods:
-
Enter a different date in the First Date field.
-
Enter the number of periods in Offset Period and the length of the offset period in Offset UOM.
-
-
To create a schedule based on individual suggested dates, select the Auto Schedule check box.
-
To create a schedule based on a date range, clear the Auto Schedule check box.
-
Click Schedule to generate the schedule.
The application displays the generated schedule in the schedule region.
-
If you left the Auto Schedule check box cleared, the application permits you to enter a date or a date range to replace the automatically generated date.
Enter the date range for any of the scheduled dates in the From and To fields.
-
Save.
Viewing Maintenance Program and Activity Details
Both the program and activities are set up and maintained in Oracle Complex Maintenance, Repair, and Overhaul. See Oracle Complex Maintenance, Repair, and Overhaul User's Guide for details.
Prerequisite
Enter a service line.
To view maintenance program and activity details:
-
From the Service Contracts Authoring window, select the Lines tab and Effectivities subtab.
-
Select the service line to modify.
-
Click Edit Coverage.
The Service Contracts Coverage window appears.
-
To view details about the program, click View Program on either the Program Schedule or the Activity Schedule tabs.
The application opens a new browser window displaying the details of the maintenance requirements.
-
To view details about individual activities:
-
On the Activity Schedule tab, select the activity in the Activity region.
-
Click View Activity.
The application opens a new browser window displaying the details of the activity. See Oracle Complex Maintenance, Repair, and Overhaul User's Guide for details.
-
-
To view the maintenance history of the product that the customer owns:
-
On the Program Schedule tab, click History.
The application displays the Search Unit Maintenance Plan page in a separate browser window. Search for the maintenance history for the product according to procedures described in Oracle Complex Maintenance, Repair, and Overhaul User's Guide.
-
-
Updating Scheduled Service Dates for a Maintenance Program
Companies that perform preventive maintenance sometimes need to update schedule maintenance dates on active contracts to accommodate customer requests to reschedule planned service. For example, the scheduled maintenance may fall on a holiday, the equipment may not be available for service on the date scheduled, or the equipment may not need servicing due to a low level of usage. Program schedule dates and activity schedule dates can be updated if Auto schedule is cleared and a service request has not been generated for the scheduled maintenance.
Prerequisites:
-
Enter a service line.
-
Associate a preventive maintenance program with the coverage template.
-
Activate the contract.
-
Confirm Open for Update allowed for Active status contracts.
To update activity schedule dates:
-
From the Service Contracts Authoring window, select the Lines tab and Effectivities subtab.
-
Select the service line to modify.
-
Click Edit Coverage.
The Service Contracts Coverage window appears.
-
Click Schedule in the Preventive Maintenance region.
The Preventive Maintenance Schedule window appears.
-
Select the Activity Schedule tab.
-
Select an Activity on which to update scheduled maintenance dates.
Dates in activity schedules can be updated only if:
-
Auto Schedule is cleared.
-
A Service Request has not already been created for the scheduled maintenance.
-
To update program schedule dates:
-
From the Service Contracts Authoring window, select the Lines tab and Effectivities subtab.
-
Select the service line to modify.
-
Click Edit Coverage.
The Service Contracts Coverage window appears.
-
Click Schedule in the Preventive Maintenance region.
The Preventive Maintenance Schedule window appears.
-
Select dates to update in the program schedule.
Dates in the program schedule can be updated only if:
-
Auto Schedule is cleared.
-
The new scheduled service date is greater than the latest scheduled service date for any activity under the program for which a service request has already been created.
-
Ending Service Lines on a Day Specified by the Customer
You can define a cotermination date, which is a date that has been chosen by the customer as the end date for all service lines:
About Cotermination
To simplify renewals and accounting, customers sometimes request all contracts to terminate on the same date, such as the end of the calendar or fiscal year. This date is called the cotermination date.
Your application administrator can set up a cotermination date for a customer account. The customer account for the service line is the bill to account that you enter on the Lines tab, Accounts subtab.
You can tell that a cotermination date exists for the service line, when the Coterminate and Coterminate All buttons are enabled.
Note: You cannot apply the cotermination date for contracts with a status of Active.
If the cotermination date falls too close to the start of the service in your contract, the application automatically extends the service until the same cotermination date the following year. For example, if a customer purchases six months of service in December 1 and the cotermination date on December 31 then the application extends the service until December 31 of the following year instead of selling just one month-worth of service. Just what minimum service length triggers the extension is determined by the values in system profiles OKS: Minimum Duration and OKS: Minimum Period.
Applying the Cotermination Date to a Service
-
Enter a service line.
-
Confirm that the contract is in Entered status.
To apply the cotermination date to a service:
-
From the Service Contracts Authoring window, select the Lines tab and Effectivities subtab.
-
Select the service line to end on the cotermination date.
-
Click Coterminate.
The new end date that you have entered does not automatically apply to the items that are already covered by the service. If you have already specified what the service covers, then you must copy the new end date using the Cascade Attributes window.
Specifying Tax Status
You can enter tax exemption information
If you have already set up a default tax status for all lines, then the tax status fields are already populated for you.
Prerequisite
Enter a service line.
To specify tax status:
-
From the Service Contracts Authoring window, select the Lines tab and Exemption/Payment Options subtab.
-
In the Tax Exemption region, select the customer's tax status from the Control LOV.
-
If you entered Exempt, then select the tax exemption number from the Number LOV.
This populates the Reason field.
-
Select the code that is used to determine the tax rate from the Tax Classification Code LOV.
Note: If you entered Exempt, you can still select Tax classification code.
-
Save.
Applying Changes from a Service Line to the Covered Sublines
If you change the length of a service, for example by applying a cotermination date, you must apply them to any existing sublines. You can also use this procedure to copy the following line attributes to the sublines:
-
Invoice text
-
Renewal type
-
Printing preferences (the setting of the Invoice Print Flag)
Prerequisite
Identify a contract with sublines (what the service covers) and modify the dates for the service later.
To apply changes from a service line to the covered sublines:
-
From the Service Contracts Authoring window, select Cascade Attributes from the Actions menu.
The Cascade Attributes window appears.
-
Select Lines to Sublines from the Cascade list.
-
Select the check boxes for the line attributes that you want to apply.
-
Select the sublines that you want to copy to on the right side of the window. You can use the check boxes to the right to select individual sublines, or the Select All button.
-
Click Submit.
Assigning Sales Credits for a Contract Line
You can assign both revenue and non-revenue credits.
To assign sales credits for a contract line:
-
From the Service Contracts Authoring window, select the Lines tab and select the service to enter sales credits for on any of the subtabs.
-
Select Sales Credits from the Actions menu.
The Sales Credits window appears.
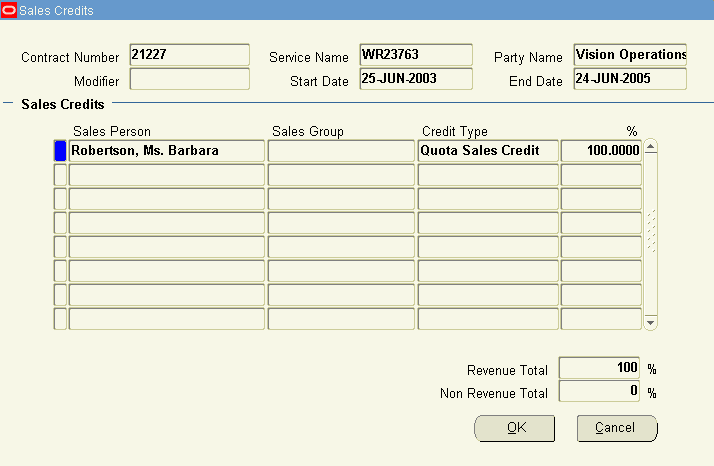
-
Enter the sales agents and the revenue and non revenue credit that they are to receive. Sales group entry is optional. Revenue credit must always add up to 100 percent.
-
Click OK.
Updating Service
You can use the Update Service window to review existing service information and select one or more new replacement services for the covered products on the contract line. You can assign a percentage of the price of the former service to the new service lines.
The Update Service window is intended for use on entered status contracts, generally during the renewal process. For example, a customer has a contract with a line that covers 500 laptops for Bronze service, which covers Monday through Friday from 8 a.m. to 5 p.m. After the customer restructures their service offerings, Bronze service is no longer offered. Level II support is the comparable offering. To make contracts reflect the new offering, rather than adding a new line and adding all the covered products to that line, select the old service line and click Update Service, select the new service, and indicate what percentage of the existing service's price should be applied to the new service. This amount does not need to equal 100%. It can be more or less depending on the appropriate value for the new service. Contract value and billing schedule amount are adjusted accordingly. Coverages and invoice text are not changed. The renewal relationship to the prior contract is not lost when Update Service is performed on a service line. The Update Service function is not available for Usage and Subscription lines.
To update service:
-
From the Service Contracts Authoring window, select the Lines tab and Pricing/Products tab.
-
Select the service line to update.
-
From the Tools menu select Update Service.
-
Review the Contract Line region to make sure this line should be updated.
-
From Update Service region, select the new service item from the Name LOV. This is the item replacing the item that is shown at the top of the form.
-
In the Prorate column, indicate the percentage of the price from the existing service item that should apply to the new service item. For example, if the existing item is $150 and the new item should cost $75, enter 50 to see a final price on the new line that is equal to 50% of the old line.
-
Enter additional service lines as necessary. The prorate column does not need to total 100%. You will receive a message indicating that the total is more or less. Select OK to proceed or cancel to return to the form.
-
When all of the new lines have been entered, click Apply. The existing service item disappears and the new service items appear. The new price is reflected for the line item. The billing schedule reflects the new pricing as well.
Applying Default Values to Existing Contract Lines
You can apply values that you have entered in the Summary tab of the contract down to existing lines.
Note: For information about applying changes from a service line to a subline, see Applying Changes from a Service Line to the Covered Sublines.
To apply default values to existing contract lines:
-
From the Service Contracts Authoring window, select Cascade Attributes from the Action menu.
The Cascade Attributes window appears. The window automatically disables contract attributes that have not yet been entered. For example, if you have not entered any sales credits in your contract, the Sales Credits check box is disabled and you cannot cascade sales credits.
-
Select Header to Lines from the Cascade list.
-
Select the check boxes next to the attributes that you want to apply to the contract lines. You can cascade the following values from the header to existing contract lines:
-
Effective dates: The dates entered in the Start Date and End Date fields.
Note: If you are changing the effective dates of an existing warranty line, this method changes the contract dates only. It cannot be used to change the installed date in Oracle Installed Base. To change both the contract date and the installed date, then use the procedure describe in Modifying the Dates a Warranty Is Effective.
Extending a contract using cascading does not reprice sublines. Extending a contract using a mass change will reprice sublines.
-
Accounting Rule: Accounting rule entered on the Summary tab and Pricing/Billing subtab.
-
Bill To Account: Bill To account entered on the Summary tab and Parties subtab.
-
Bill To Address: Bill to address entered on the Summary tab and Parties subtab.
-
Bill To Contact: Bill to contact entered on the Summary tab and Parties subtab.
-
Ship To Account: Ship To account entered on the Summary tab and Parties subtab.
-
Ship To Address: Ship To location entered on the Summary tab and Parties subtab.
-
Invoicing Rule: Invoicing rule entered on the Summary tab and Pricing/Billing subtab.
-
Exemption Control: Tax status entered on the Summary tab and Pricing/Billing subtab.
Note: Exemption will be cascaded from header to line only if the header and line have same party account.
-
Exemption Number: Exemption number entered on the Summary tab and Pricing/Billing subtab.
-
Tax Classification Code: This LOV uses the tax classification lookup codes that are created for Oracle E-Business Tax. By selecting a value from this LOV, you can cascade the tax classification code to the Lines tab and Tax/Payment Options subtab.
-
Billing Profile: Billing profile entered on the Summary tab and Pricing/Billing subtab.
-
Recalculate Tax: After applying an exemption to the contract or to a service line, recalculate tax using Cascade Attributes. You must also use cascade attributes to recalculate tax if you enter a tax classification code on a service line.
-
Payment Method: Payment method and details entered in the Payment Details region of the Summary tab and Pricing/Billing subtab, such as a credit card.
-
Sales Credits: Sales credits entered at the contract header level.
-
Price List: Price list that you selected on the Summary tab and Pricing/Billing subtab. (If you changed the header price list and, at the time you made the change did not cascade the change to the lines, you can use the cascade attributes form to select specific lines to which to cascade the new price list).
Note: When attributes cascaded from header to line, repricing is done for all eligible sublines that:
-
Are not terminated.
-
Are not 100% billed.
-
Do not contain manually priced sublines.
-
-
Price UOM: Price UOM populated on the Summary tab and Pricing/Billing subtab from the Global Contracts Defaults form. Price UOM can be cascaded from header to all service lines. Although other lines will appear in the Lines block, you cannot choose the select option for usage and subscription lines. When Price UOM is cascaded from header to line, lines are not repriced. (If you change the header Price UOM, you can use the cascade attributes form to cascade the new Price UOM to selected service lines and covered levels)
Important: The Price UOM value is used in the partial period calculation for pricing, billing, and termination. For more information, see Entering Contract Defaults.
-
-
In the Lines region, specify which lines to change by selecting the check boxes to the right of those lines. You can use the Deselect All and Select All buttons.
Note: By default, all of the check boxes are selected so all lines in the contract will be changed.
-
Click Submit.
-
The Transaction Log displays the status of the changes that you are about to make.
-
Click Apply.
Note: By default when you select a header attribute to cascade on a contract with multiple lines all lines are selected.
To control which lines inherit specific attributes, select the attribute that you want to cascade, and then deselect the lines that should not inherit the attribute value. You can then select the next attribute and deselect the lines that should not inherit the attribute.
For example, suppose you have a contract with two lines, Service Line 1 and Usage Line 2, and you want to cascade the Accounting Rules and Bill To Address attributes to Service Line 1 but not to Usage Line 2. You would select the Accounting Rules attribute and deselect Usage Line 2, and then select the Bill To Address attribute and deselect Usage Line 2.