Electronic Approvals and Records
This chapter explains how you can set up service requests and cases to require electronic approvals and to generate electronic audit records. All Oracle TeleService modules use the same setups.
This chapter covers the following topics:
- Service Request Electronic Approvals and Records Overview
- Special Service Request Setup Concepts
- Setting Up the Capture of Approvals and E-Records
- Example of Status and Related Setups
- Setting Up a Triggering Service Request Status
- Downloading and Registering the E-Record Template
- Registering the E-Record Template in Oracle E-Records
- Setting the E-Record Template and Other Oracle E-Record Variables
- Viewing the Status of Approval Requests of All Service Requests
- About the E-Record Template
Service Request Electronic Approvals and Records Overview
In Oracle TeleService, the capture of electronic audit records (e-records) and electronic signatures (e-signatures) is triggered by the service request status (case status) field. Whenever an agent sets a service request (case) to a special status, the application captures the e-record and sends out any approval requests via the Oracle Workflow notification process. Approvers access these requests from their notification inboxes.
Typical Uses
Here are two typical ways the integration can be used:
-
Use Case 1: Approval Before Work Can Begin
A medical equipment manufacturer requires sign-offs before technicians can change the configuration of a particular piece of equipment such as an X-ray machine.
-
Use Case 2: Approval Before Closure
A manufacturing company requires special sign-off before service requests for safety violations can be closed.
Both of these use cases will be used to illustrate the setups in this chapter.
Integration Setup Overview
To implement this integration, you must set up:
-
Any approval rules using Oracle Approvals Management.
-
The templates for the e-record in Oracle E-Records.
-
Service request status and related setups as described in this chapter.
You must have both the Oracle Approvals Management and Oracle E-Records applications implemented before you begin. See Oracle Approvals Management Implementation Guide and Oracle E-Records Implementation Guide for details.
Note: The integration supports deferred-only approvals. It does not support online e-signature capture or e-signature capture via e-mail.
About E-Records
The e-record generated by the application serves both as a historical record of the service request and as the report the approvers review before making their decision. The application generates the e-record when the service request is set to the triggering status and updated. The content is based on a service-specific Oracle E-Record template which has been seeded for this purpose.
The template (CSERecordTemplate.rtf) is an RTF document with embedded XML codes that pull in service request information. The template is set up to provide either a summary or a detailed report. For a listing of the attributes listed in each report and the differences between them see About the E-Record Template.
By default, the application generates the summary report to conserve system resources. You can modify the electronic record template to remove or add attributes or change its appearance. If you do, you must upload and register the new file using either Oracle XML Publisher or Oracle E-Records. For details, see Downloading and Registering the E-Record Template.
Service Event
Your application provides the following single seeded event for use with Oracle Approvals Management:
-
Event name: Service Request Approval
-
Event Key: oracle.apps.cs.sr.ServiceRequestApproval
-
Online or Deferred: Deferred
Special Service Request Setup Concepts
This topic describes the special service application setups for the integration. These are:
The actual setup steps are outlined in Setting Up the Capture of Approvals and E-Records.
Note: You must be familiar with the terminology and function of various service request objects such as statuses, service request types, and related setups. See About Statuses, Status Groups, and Service Request Types.
Intermediate Statuses
An intermediate status is the status of the service request while it is waiting for the approval process to complete, for example, “Waiting for Approval”.
To create an intermediate status, you must select the Pending Approval check box while setting up the status in the Service Request Statuses window. The image below highlights the check box.

Triggering Statuses
The application starts the approvals and e-record capture process you have implemented when an agent sets the service request to a triggering status.
If the Oracle Approvals Management rules you have set up determine approval is required, then the application automatically sets the service request to the intermediate status (such as “Waiting for Approval”) while it waits for the approval process to complete.
If no approval is required, then the application resets the service request to the triggering status.
A status you are setting up becomes a triggering status when you enter an intermediate status in the Intermediate Status field as highlighted in the following image.

If your process generates an electronic record only (no approvals required), then you must still enter an intermediate status. However, as the e-record gets generated immediately when the service request is updated, the application never sets the service request to that intermediate status.
Note: A triggering status cannot be created as an initial status. This is because the application does not support approvals for service requests on creation.
Approval Action and Rejection Action Statuses
Optionally, you can have the application set the service request to special statuses when the service request is approved or rejected. This is accomplished by making entries in the Rejection Action and Approval Action fields of the triggering status. You can make entries in one or both fields.
You want to specify an approval or rejection status if some action such as an escalation needs to happen as a result of the approval process outcome or if agents need to know if the particular service request was approved or not.
Approval Action Status
If you do not enter an approval status, the application sets the service request to the triggering status. For example, if the triggering status is “Closed” then the status becomes “Closed” after approval.
If the approval rules you design trigger the approval process only in certain cases (for certain products, for example), then without an approval status agents won't know if a service request was closed because it was approved or simply closed because no approval was necessary.
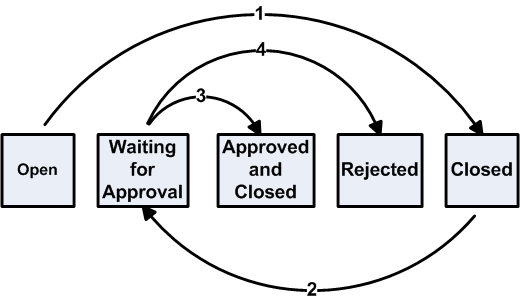
The following examples illustrate the different behavior with and without the approval status for a company that requires approval before service request closure (Use Case 2).
Approval Before Closure With Approval Action Status
Suppose you create the statuses listed in the following table for the approval process:
| Status | Description |
|---|---|
| Open | Initial |
| Closed | Triggering and Final |
| Waiting for Approval | Intermediate |
| Approved and Closed | Approval Action and Final |
| Rejected | Rejection Action |
The application behaves as follows (numbers in brackets refer to the diagram below):
-
An agent wants to close the service request and so sets the service request status to Closed (1).
-
If no approval process is triggered by the rules you set up, the service request remains Closed.
-
If approval is required, then the application sets the status to Waiting for Approval. (2)
-
If the service request is approved, then the application resets the service request status to Approved and Closed(3)
-
If it is rejected, then the status becomes Rejected.(4)
Note that the service request can end up in one of two final statuses: the triggering status “Closed” if no approval is required, or “Approved and Closed” if approval is required and obtained.
Approval Before Closure Without an Approval Action Status
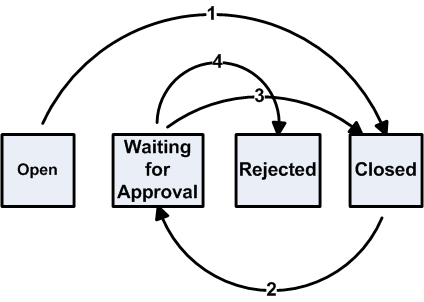
To set service requests to the same “Closed” status regardless of any approval process, you can set up your statuses without the rejection action status:
| Status | Description |
|---|---|
| Open | Initial |
| Closed | Triggering and Final |
| Waiting for Approval | Intermediate |
| Rejected | Rejection Action |
Then the application behaves as follows:
-
The agent sets the service request status to Closed (1).
-
If your rules determine that service request requires no approval, the status remains Closed.
-
If approval is required, then the application sets the service request to Waiting for Approval (2).
-
If the service request is approved, the application resets the service request status back to Closed (3)
-
If it is rejected, the status gets set to Rejected.(4)
Rejection Action Status
If you do not enter a rejection status, then the application reverts the service request to its previous status. If the agent had changed the service request from “Open” to the triggering status “Closed”, a rejection resets the status to “Open”. If you do not use a rejection status, then agents cannot tell that the service request was rejected without looking at the history log.
Status Group Transition Rules
If your triggering status is not the final status and you want to ensure that all service requests are evaluated by your rules, you can set up status group transition rules to ensure that agents cannot bypass the triggering status.
Status groups determine which statuses are available for a particular service request type. Their transition rules specify which status can be changed to which.
You do not need to set up transition rules if:
-
Your triggering status is the service request's final status.
This is because all service requests must be closed and the triggering status enforces its own rules.
-
Agents decide on their own if the rules must be invoked.
A maker of medical devices that requires approvals for changes in equipment configuration may leave it up to agents to set the service request to the triggering status of “Repair” only if a unit needs servicing by a technician.
If you do set up transition rules, then you must ensure that these rules permit the transitions required by your triggering status setup. See About Statuses, Status Groups, and Service Request Types.
Setting Up the Capture of Approvals and E-Records
Use this general procedure as a guide for setting up the Oracle E-Records and Oracle Approvals Management integration. Where applicable, each step provides a reference you can follow to obtain more details.
Prerequisites:
-
Implement Oracle E-Records as described in the Oracle E-Records Implementation Guide.
-
Implement Oracle Approvals Management as described in the Oracle Approvals Management Implementation Guide.
To set up the capture of approvals and e-records for a service request type
-
Plan out which statuses you need to set up.
Note: A simple example at the end of this topic illustrates the status and related setups for approvals before agents can close service requests (Use Case 2). See Example of Status and Related Setups.
-
Create the intermediate status. The procedure is almost the same as that described in Setting Up Service Request Statuses. There is one additional step: for intermediate statuses you must select the Pending Approval check box. When you do, the application automatically selects the following check boxes:
-
Disallow Request Update
Prevents the service request from being updated while the service request is in the intermediate status.
-
On Hold
Placing a service request on hold prevents the application from distributing the service request to agents when they click the Get Next Work button while the service request is awaiting approval.
You can override the settings of both of these check boxes.
Note: Please note the following:
-
You cannot reuse the same intermediate status for multiple triggering statuses.
-
Agents cannot set service requests to the intermediate statuses themselves. The application does this automatically.
-
An intermediate status cannot be an initial status in the status group.
-
-
-
Optionally, create the rejection action and approval action statuses. This setup is the same as for general statuses.
-
Set up the trigger status. See Setting Up a Triggering Service Request Status.
-
Group the statuses into a status group using the procedure outlined in Setting Up Status Groups.
-
Optionally, set up the status transition rules for the status group. These are required only if you do not use a final status as a triggering status and you want prevent agents from closing the request without first setting it to the triggering status. For details, see Status Groups and Status Transition Rules .
You must permit all the transitions required by your triggering status setup.
-
To have the application generate the detailed e-record report for your service request type rather than the default summary report, navigate to Setup, Definitions, Service Request Type, and select the Detail ERES Record check box in the Service Request Types window (highlighted in the image below).
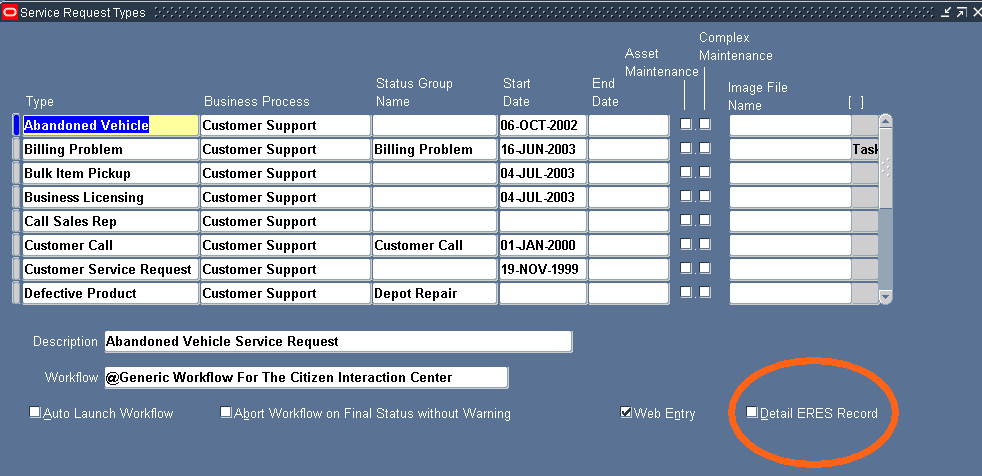
Leaving this check box deselected generates the default summary report.
For more information on setting up service request types, see Setting Up Service Request Types.
-
Map the status group to the service request type.
See About Mapping Status Groups to Service Request Types and Responsibilities.
-
Optionally, modify the seeded electronic record (e-record) template and register the new version according to the procedures outlined in Downloading and Registering the E-Record Template.
You can add or remove information or modify the template's appearance. Oracle does not recommend extensive modifications. See About the E-Record Template for guidelines and a list of service request attributes used by the template.
-
Specify the template you want to use for creating e-records and set other variables according to the procedure described in Setting the E-Record Template and Other Oracle E-Record Variables.
To capture e-records only, set the variable ESIG_REQUIRED to N.
-
If you require approvals:
-
Make sure you have set the variable ESIG_REQUIRED to Y.
-
Switch responsibility to Approvals Management Business Analyst.
-
Choose Service Request Approval as the Transaction Type to do your setup.
-
Set up the approval flow in Oracle Approvals Management according to the procedures described in the Oracle Approvals Management Implementation Guide. You can set up different approval rules based on parameters passed by the service request.
The following table lists the seeded service request parameters and the corresponding names used by the Oracle Approvals Management (OAM) user interface:
Service Request Parameter OAM Name Item REQUEST_ITEM Item Category REQUEST_CATEGORY Problem Code REQUEST_PROBLEM_CODE Service Request Severity REQUEST SEVERITY Service Request Status REQUEST_STATUS Service Request Type REQUEST_TYPE Service Request Urgency REQUEST_URGENCY You can add any additional parameters from the detailed e-record template.
-
-
To have the application automatically capture approval information (including approver names, outcomes, and comments) as a note in the service request, you must set the system profile Service: Note Type for ERES Comment to any note type. By default, this system profile is null. This means the application does not capture the information in the service request. Users must instead go to the e-record itself to view it.
-
If you are capturing Oracle Quality data for the service request, then you must set up separate e-record capture and e-signature approval rules according to the procedures in Oracle E-Records Implementation Guide and the E-Records and E-Signatures for Oracle Quality section of the Oracle Quality User's Guide. The e-record capture and approval processes for service requests and Oracle Quality are independent. However, approvers and other users viewing the service request e-record can view the Oracle Quality e-record by following the link in the Related E-Records section.
Example of Status and Related Setups
This section uses an example to illustrate the status and related setups.
Suppose, for example, that your company requires approvals from safety managers before agents can close service requests involving safety violations.
If the safety managers do not approve the solution, the service request must be escalated.
If the safety managers approve, the service request is closed automatically.
Here are the setup steps for this example:
-
Set up the statuses.
The triggering status is the final status: “Closed”.
Because you want to escalate service requests when they are rejected, you need a rejection action status.
You do not need to set up an approval action status as you want the application to set the service request in the Closed status if approval is obtained or no approval is required.
The statuses you need are the same as those described in Approval Before Closure Without an Approval Action Status. Additional details about entries you must make in the status setup window are shown in the table below:
Status Initial Check Box Final Check Box On Hold Check Box Intermediate Status Field Rejection Action Field Approval Action Field Pending Approval Check box Disallow Request Update Check Box Open Selected Null Null Null Null Null Null Null Closed Null Selected Selected Waiting for Approval Rejected Approved Null Null Waiting for Approval Null Null Selected Null Null Null Selected Selected Rejected Null Null Selected Null Null Null Null Selected Please note that:
-
Open is the initial status
-
Closed is the triggering status.
-
Waiting for Approval is the intermediate status.
-
Selecting the On Hold check box prevents the application from reassigning the service request
-
Selecting the Disallow Request Update check box prevents agents form updating the service request.
-
-
Group the statuses by creating a service request status group called “Safety Complaint Group,” for example. The following table shows the setup:
SR Status Group Statuses Safety Complaint Group Open, Closed, Waiting for Approval, Rejected -
You do not need to set up status transitions to require agents to submit the service request for evaluation by your approval rules because the triggering status is the last status.
-
Because you have only one status group for all users in this example, you can associate the status group with the service request type on the Service Request Type setup window as shown in the table below:
Service Request Type Status Group Safety Compliant Safety Complaint Group
Setting Up a Triggering Service Request Status
Use this procedure to set up service request statuses that trigger the Oracle E-Record processes you have set up.
Prerequisites:
You must set up the intermediate, rejection action, and approval action statuses first.
To set up a triggering service request status
-
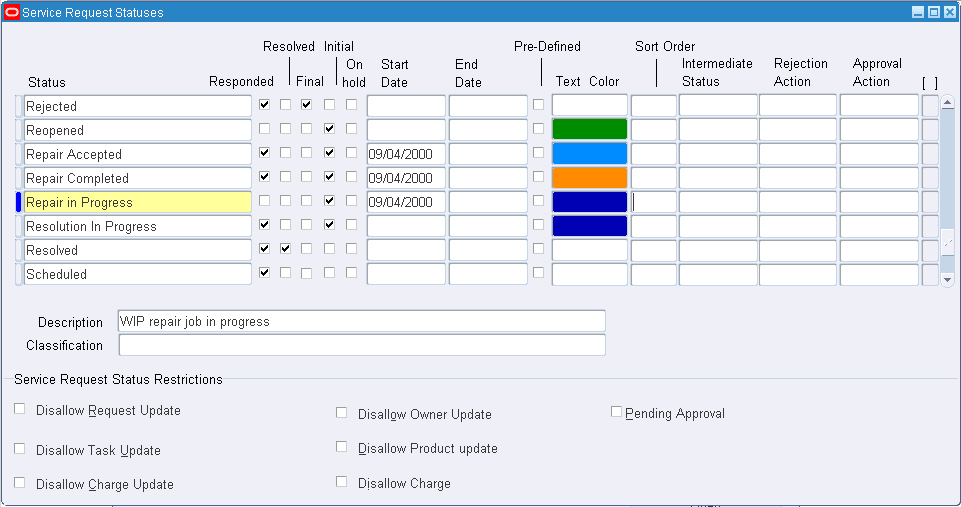
Under the Service responsibility, navigate to Setup, Definitions, Service Request Statuses.
The Service Request Statuses window appears.
-
Enter a name in the Status field. This is what the agent sees when the application sets the service request to this status.
-
Enter an intermediate status using the Intermediate status list of values. If the Oracle E-Record process you have set up requires approvals (e-signatures), then the service request will be set to this status until all the approvals are obtained. If no approvals are required, then the service request remains in the triggering status.
-
If approvals are required, then select the Approval Action status and the Rejection Action status.
-
To assign a color to the text the support agent sees in the Status field of the Service Request window use the Text Color field.
Downloading and Registering the E-Record Template
You can use Oracle XML Publisher to download the seeded template for modification. After modification you must rename and upload the new template file and specify it as the default.
For details on using Oracle XML Publisher, see the Oracle XML Publisher Report Designer's Guide.
Use these guidelines for downloading the seeded template for modification and uploading the new version.
Note: Alternately, you can use Oracle E-Records to register your template as describe in Registering the E-Record Template in Oracle E-Records. However, registration using Oracle XML Publisher is simpler.
To download or register the template using Oracle XML Publisher
-
Under the XML Publisher Administrator responsibility navigate to Home, Templates.
The XML Publisher Templates page appears.
-
To display the seeded template, search for “Service” in the Application field and “RTF” as the Type.
-
Click on the “Service Request E-Record” link in the Name field.
Note: Your application includes two other templates which are used for service request reports.
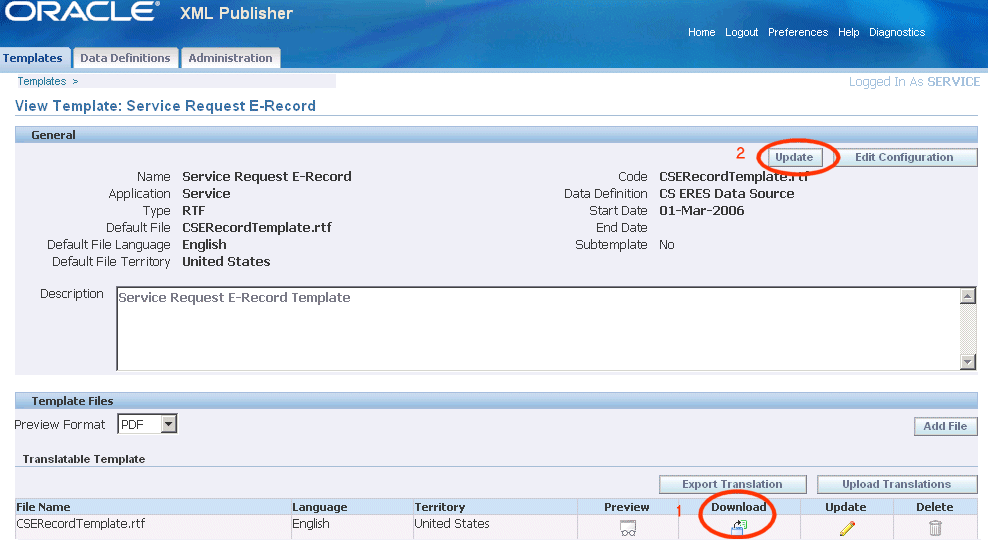
The View Template: Service Request E-Record page appears.
-
To download the template for modification, click Download.
-
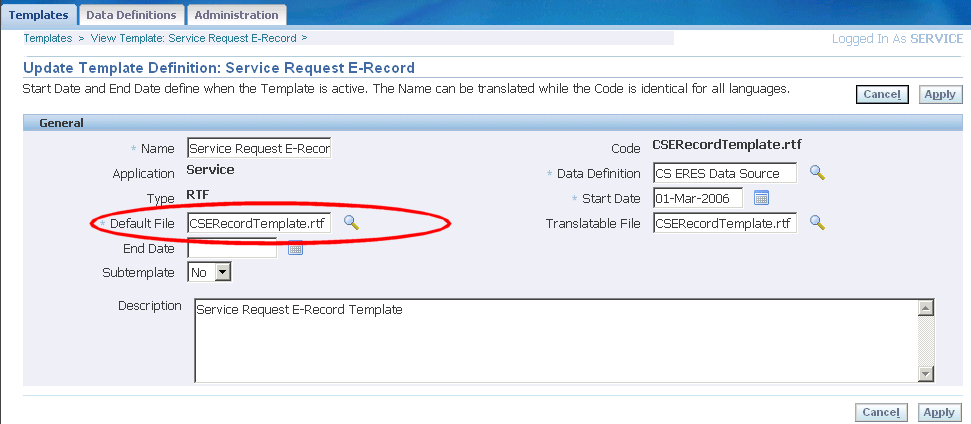
If you modify the seeded template, you must upload it under a different name and then make it the default.
This is accomplished by clicking Update and entering the file name (Code) in the Default File field in the Update Template Definition page.
Registering the E-Record Template in Oracle E-Records
Use this procedure to register a modified template in Oracle E-Records. This provides an alternative to registration via Oracle XML Publisher. For more details on how to use the Oracle E-Records application, please see the Oracle E-Records Implementation Guide.
To register the e-record template in Oracle E-Records
-
Log in under the iSignatures Administrator responsibility.
The Files Approval page appears.
-
Choose EDR E-record Templates from the Category drop-down box.
The page refreshes displaying additional fields.
-
Enter “CS” in the Product Field.
-
Enter “RTF” as the Template Type
-
Enter en in the Language field and US in the Territory field. These fields indicate the language of your template.
-
Click Browse and select the template. If you are using the seeded template CSERecordTemplate.rtf without modifications you can find it in the APPL_TOP directory (patch115/publisher/templates).
-
Enter an number for the version you are uploading in the Version field. For example, entering 1 appends v_1 to the file name. The uploaded file will have the name “CSERecordTemplate_v_1.rtf”.
-
Click Apply.
You are returned to the Files Approval page.
-
If you do not see the file you have uploaded listed, enter search criteria and click Go.
-
Select the file and click Send for Approval. You must do this even if the file does not have an associated approval process.
-
Navigate to the Files Approval window and upload the template into the evidence store as described in Uploading Documents chapter of the Oracle E-Records Implementation Guide.
Setting the E-Record Template and Other Oracle E-Record Variables
Use this procedure to set the service variables. These specify the e-record template and any approvals.
Prerequisites:
You must first upload and register the template you want to use for capturing the e-record.
To set Oracle E-Record Variables
-
Under the ERES Administrator responsibility, navigate to Administration Tasks, Setup.
The Configuration Variables page opens in a browser window.
-
Using the Search field search for Service Request Approval.
-
Modify the values of the service request variables as shown in the table below:
Variable Name Name Description EREC_REQUIRED E-Record Required You must set this variable to Y to capture e-records and e-signatures. A setting of N disables both e-records and e-signatures. EREC_STYLE_SHEET E-Record Style Sheet Set this variable to the name of the e-record template you want to use. By default, the value is set to the seeded template CSERecordTemplate_en_US.rtf. ESIG_REQUIRED E-Signature Required Set to Y (the default) if approvals are required. Set to N to capture the e-record only.
Viewing the Status of Approval Requests of All Service Requests
Agents can view the status of pending approvals for individual service requests by clicking the E-Records Detail link from their service request. However, you can use this procedure to view the status of approval processes for all service requests.
To view the status of approval requests
-
Log in under the ERES Administrator responsibility.
-
Navigate to Evidence Store.
The E-record Details page appears.
-
The event name to use for your search is: oracle.apps.cs.sr.ServiceRequestApproval.
About the E-Record Template
This section provides guidelines for modifying the seeded e-record template and lists all the service request-related information in both the summary and detailed report.
Because the template includes logic to generate both the summary and detailed report and because it is tied to the service request type setup, Oracle suggests you keep modifications to a minimum.
You can:
-
Delete fields from the template
-
Change template name provided you register the new file with Oracle XML Publisher or Oracle E-Records. See Downloading and Registering the E-Record Template.
-
Alter layout or graphics
-
Move or add fields
You can add or move fields provided they are from the same report. For example, you can move Incident Address which displays only in the detailed report to another place in the detailed report, but you cannot add it to the summary report.
What you must not do:
-
Move or add fields from the summary report to the detailed report or vice versa.
-
Delete logic in the template
The sections below list the service request attributes displayed in the summary and the detailed reports and any additional attributes you can add. The sections correspond to the sections in the report itself.
Each table lists the service request attribute and its XML data element.
Detailed Report
This section lists the service request attributes and their XML data elements used for the detailed report.
Customer Information
The following table lists the service request customer attributes used by the detailed report. There are no additional customer attributes available for inclusion in the report.
| Attribute | XML Data Element |
|---|---|
| Account | ACCOUNT_NUMBER |
| Name | CUSTOMER_NAME |
| Number | CUSTOMER_NUMBER |
| Type | CUSTOMER_TYPE |
Contact Information
The following table lists the service request primary contact information displayed in the detailed report.
| Attribute | XML Data Element |
|---|---|
| CONTACT_EMAIL | |
| Name (Concatenation of title, first, and last name) |
CONTACT_NAME |
| Phone Number | CONTACT_PHONE_NUMBER |
| Phone Type | CONTACT_TELEPHONE_TYPE |
| Type | CONTACT_TYPE |
Subject Information
The following table lists the service request problem information displayed in the detailed report. This appears under the Subject heading.
| Attribute | XML Data Element |
|---|---|
| Category | ITEM_CATEGORY |
| Incident Address | INCIDENT_ADDRESS |
| Item Description | PRODUCT_DESCRIPTION |
| Item Instance | INSTANCE_NUMBER |
| Item Number | PRODUCT |
| Problem Code | PROBLEM_CODE |
| Problem Summary | PROBLEM_SUMMARY |
| Resolution Code | RESOLUTION_CODE |
| Resolution Summary | RESOLUTION_SUMMARY |
| Serial Number | SERIAL_NUMBER |
Service Request Information
The following table lists the service request information displayed in the detailed report under the Request heading.
| Attribute | XML Data Element |
|---|---|
| Escalation Level | ESCALATION_LEVEL |
| Group | SR_GROUP |
| Incident Date | INCIDENT_DATE |
| Owner | SR_OWNER |
| Owner Type | RESOURCE_TYPE |
| Reported Date | REPORTED_DATE |
| Resolve By Date | RESOLVE_BY_DATE |
| Resolved On Date | INCIDENT_RESOLVED_DATE |
| Respond By Date | RESPOND_BY_DATE |
| Responded On Date | INC_RESPONDED_BY_DATE |
| Severity | INCIDENT_SEVERITY |
| Status | INCIDENT_STATUS |
| Type | INCIDENT_TYPE |
| Urgency | INCIDENT_URGENCY |
Contract Information
The following table lists the service contract information displayed in the detailed report under the Contract heading.
| Attribute | XML Data Element |
|---|---|
| Coverage (Name of coverage for the service line in the contract) |
CONTRACT_COVERAGE |
| Number (Service Contract Number) |
CONTRACT_NUMBER |
| Service (Name of service in contract line) |
CONTRACT_SERVICE |
Service Request Task Information
The following table lists the service request task information displayed in the detailed report under the Task heading.
| Attribute | XML Data Element |
|---|---|
| Actual Effort | TASK_ACTUAL_EFFORT |
| Actual End Date | TASK_ACTUAL_END_DATE |
| Actual Start Date | TASK_ACTUAL_START_DATE |
| Creation Date | TASK_CREATION_DATE |
| Description | TASK_DESCRIPTION |
| Duration | TASK_DURATION |
| Number | TASK_NUMBER |
| Owner | TASK_OWNER |
| Owner Type | TASK_OWNER_TYPE |
| Parent | TASK_PARENT_TASK_NUMBER |
| Planned Effort | TASK_PLANNED_EFFORT |
| Planned End Date | TASK_PLANNED_END_DATE |
| Planned Start Date | TASK_PLANNED_START_DATE |
| Priority | TASK_PRIORITY |
| Scheduled End Date | TASK_SCHEDULED_END_DATE |
| Scheduled Start Date | TASK_SCHEDULED_START_DATE |
| Status | TASK_STATUS |
| Subject | TASK_NAME |
| Type | TASK_TYPE |
| Unit of Measure for Actual Effort | TASK_ACTUAL_EFFORT_UOM |
| Unit of Measure for Duration | TASK_DURATION_UOM |
| Unit of Measure for Planned Effort | TASK_PLANNED_UOM |
Notes Information
The following table lists the notes information displayed in the detailed report under the Notes heading.
| Attribute | XML Data Element |
|---|---|
| Created By | NOTE_CREATED_BY |
| Date Entered | NOTE_CREATION_DATE |
| Description | NOTE_DESCRIPTION |
| Detail | NOTE_DETAIL |
| Type | NOTE_TYPE |
| Visibility | NOTE_VISIBILITY |
Related Service Requests Information
The following table lists information about related service requests displayed in the detailed report under the Related Service Requests heading.
| Attribute | XML Data Element |
|---|---|
| Number | RELATEDSR_NUMBER |
| Owner | RELATEDSR_OWNER |
| Relationship | RELATEDSR_NAME |
| Severity | RELATEDSR_SEVERITY |
| Status | RELATEDSR_STATUS |
| Summary | RELATEDSR_SUMMARY |
Related Objects
The following table lists the related objects information displayed in the detailed report.
| Attribute | XML Data Element |
|---|---|
| Description | RELATEDOB_DESCRIPTION |
| Number | RELATEDOB_NUMBER |
| Object | RELATEDOB_NAME |
Internal Descriptive Flexfield
The Service Request Additional Information section of the XML reports lists the information you enter in the descriptive flexfield located on the Workbench tab of the Service Request window.
If you have implemented the capture of additional service request information using this flexfield, you must modify the prompts in the report to correspond to the prompts in the flexfield. The prompts and the corresponding XML data elements are listed in the table below:
| Prompt | Corresponding XML Data Element |
|---|---|
| Attribute 1 Prompt | ATTRIBUTE1 |
| Attribute 2 Prompt | ATTRIBUTE2 |
| Attribute 3 Prompt | ATTRIBUTE3 |
| Attribute 4 Prompt | ATTRIBUTE4 |
| Attribute 5 Prompt | ATTRIBUTE5 |
| Attribute 6 Prompt | ATTRIBUTE6 |
| Attribute 7 Prompt | ATTRIBUTE7 |
| Attribute 8 Prompt | ATTRIBUTE8 |
| Attribute 9 Prompt | ATTRIBUTE9 |
| Attribute 10 Prompt | ATTRIBUTE10 |
| Attribute 11 Prompt | ATTRIBUTE11 |
| Attribute 12 Prompt | ATTRIBUTE12 |
| Attribute 13 Prompt | ATTRIBUTE13 |
| Attribute 14 Prompt | ATTRIBUTE14 |
| Attribute 15 Prompt | ATTRIBUTE15 |
| Context Prompt | INCIDENT_CONTEXT |
External Descriptive Flexfield
The Service Request External Additional Information section of the report lists the information captured by the flexfield in the header of the Service Request window.
If you have implemented this flexfield, you must modify the attribute prompt in the report to correspond to the prompts in your flexfield. The table below lists the seeded prompts.
| Prompt | Corresponding XML Data Element |
|---|---|
| Ext Attribute 1 Prompt | EXT_ATTRIBUTE1 |
| Ext Attribute 2 Prompt | EXT_ATTRIBUTE2 |
| Ext Attribute 3 Prompt | EXT_ATTRIBUTE3 |
| Ext Attribute 4 Prompt | EXT_ATTRIBUTE4 |
| Ext Attribute 5 Prompt | EXT_ATTRIBUTE5 |
| Ext Attribute 6 Prompt | EXT_ATTRIBUTE6 |
| Ext Attribute 7 Prompt | EXT_ATTRIBUTE7 |
| Ext Attribute 8 Prompt | EXT_ATTRIBUTE8 |
| Ext Attribute 9 Prompt | EXT_ATTRIBUTE9 |
| Ext Attribute 10 Prompt | EXT_ATTRIBUTE10 |
| Ext Attribute 11 Prompt | EXT_ATTRIBUTE11 |
| Ext Attribute 12 Prompt | EXT_ATTRIBUTE12 |
| Ext Attribute 13 Prompt | EXT_ATTRIBUTE13 |
| Ext Attribute 14 Prompt | EXT_ATTRIBUTE14 |
| Ext Attribute 15 Prompt | EXT_ATTRIBUTE15 |
| Ext Context Prompt | EXT_CONTEXT |
Service Request Extensible Attributes
The information in the following table is listed under the Service Request Extensible Attributes heading:
| Attribute | XML Data Element |
|---|---|
| Attribute Group Name | ATTR_GROUP_DISP_NAME |
| Attribute Value | ATTR_VALUE_DISPLAY |
| Attribute Group (Internal Name) |
GROUP |
| Attribute Unit of Measure | ATTR_UNIT_OF_MEASURE |
Additional Information Available for Use
You can add additional XML data elements listed in the table below to the detailed report:
| XML Data Element | Attribute Description |
|---|---|
| ACCOUNT_ID | Application-Generated ID Number |
| ACTUAL_RESOLUTION_DATE | Resolved On Date |
| CLOSE_DATE | Date Request Was Closed |
| COMPONENT | Oracle Installed Base or Inventory Component Number |
| COMPONENT_REVISION | Oracle Installed Base or Inventory Component Revision Number |
| CONTACT_PARTY_ID | Application-Generated ID Number |
| CREATED_BY | Created by |
| CREATED_BY_ID | Application-Generated ID Number |
| CUSTOMER_EMAIL | Customer's Primary E-Mail Address |
| CUSTOMER_ID | Application-Generated ID Number |
| CUSTOMER_PHONE | Customer's Primary Phone Number |
| CUSTOMER_PRODUCT_ID | Application-Generated ID Number |
| INCIDENT_ID | Application-Generated ID Number |
| INCIDENT_SERVERITY_ID | Application-Generated ID Number |
| INCIDENT_STATUS_ID | Application-Generated ID Number |
| INCIDENT_TYPE_ID | Application-Generated ID Number |
| INCIDENT_URGENCY_ID | Application-Generated ID Number |
| INVENTORY_ORG_ID | Application-Generated ID Number |
| INVERTORY_ITEM_ID | Application-Generated ID Number |
| ITEM_REVISION | Oracle Installed Base or Inventory Item Revision Number |
| LAST_UPDATE_DATE | Date of Last Service Request Update |
| ORGANIZATION_ID | Application-Generated ID Number |
| ORGANIZATION_ID | Application-Generated ID Number |
| PROBLEM_CODE_ID | Application-Generated ID Number |
| PUBLISH_FLAG | Publish Flag for the Service Request (This flag, which can have a value of Y or N, determines if customers can view the service request on their Oracle iSupport Web portal.) |
| RESOLUTION_CODE_ID | Application-Generated ID Number |
| SEV_IMPORTANCE_LEVEL | Severity Importance Level |
| SR_CREATION_CHANNEL | Service Request Creation Channel |
| SR_GROUP_ID | Application-Generated ID Number |
| SR_OWNER_ID | Application-Generated ID Number |
| STATUS_FLAG_CODE | Application-Generated ID Number |
| STATUS_SORT_ORDER | Application-Generated ID Number |
| SUB_COMPONENT | Oracle Installed Base or Inventory Subcomponent Number |
| SUB_COMPONENT_REVISION | Oracle Installed Base or Inventory Subcomponent Revision Number |
| SYSTEM_NUMBER | Oracle Installed Base System Number |
| TAG_NUMBER | Oracle Installed Base Tag Number |
| TIMEZONE_ID | Application-Generated ID Number |
| TIMEZONE_NAME | Contact's Time Zone (Contact time zone name from the CS schema.) |
Summary Report
The tables in this section list the attributes captured by the summary e-record and their corresponding XML data elements.
Subject Information
The following table lists the service request problem information displayed in the summary report. This appears under the Subject heading.
| Attribute | XML Data Element |
|---|---|
| Problem Summary | PROBLEM_SUMMARY |
| Resolution Summary | RESOLUTION_SUMMARY |
Service Request Information
The following table lists the service request information displayed in the summary report under the Request heading.
| Attribute | XML Data Element |
|---|---|
| Severity | INCIDENT_SEVERITY |
| Status | INCIDENT_STATUS |
| Type | INCIDENT_TYPE |
Additional Information Available for Use
You can add additional XML data elements listed in the table below to the summary report:
| Attribute | XML Data Element |
|---|---|
| Problem Code | PROBLEM_CODE |
| Resolution Code | RESOLUTION_CODE |
| Severity Importance Level | SEV_IMPORTANCE_LEVEL |
Date and Time Displayed in Electronic Records
For all date fields in an electronic record, the application uses either the server time zone or the time zone selected by the application user (client time zone) depending on the setting of system profile Enable Timezone Conversions.
If Enable Timezone Conversions profile is set to Y, the application uses the user preferred time zone. If set to N, it uses the system time zone.
The following fields are affected:
-
Reported Date
-
Incident Date
-
Respond By Date
-
Resolve By Date
-
Responded On Date
-
Resolved On Date
-
Task Creation Date
-
Task Planned Start Date
-
Task Planned End Date
-
Task Scheduled Start Date
-
Task Scheduled End Date
-
Task Actual Start Date
-
Task Actual End Date
-
Note Creation Date
The application stamps the top of each electronic record with the time zone, the date, and the time the record was generated.